Bring on the Spring Smiles: Your New Favorite Party Trick is Here!
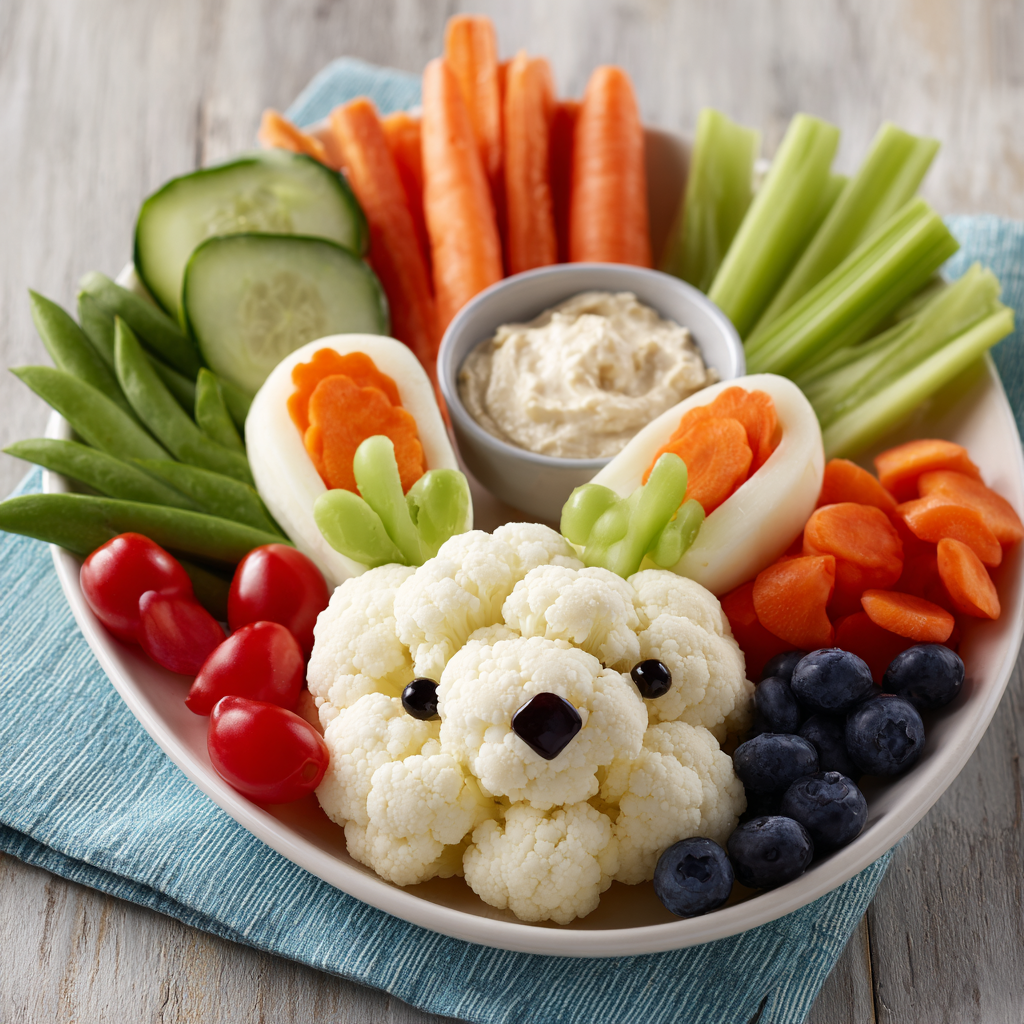
Hey there, friend! Can you feel it? That little shift in the air, the extra hour of sunshine, the first brave daffodils poking through the earth? Spring is whispering, and with it comes a craving for all things fresh, bright, and brimming with life. And let’s be real—it also brings a calendar dotted with gatherings where we want to bring something that says, “I care, and I also have a fun streak a mile wide.” Enter the star of today’s kitchen adventure: the Bunny-Shaped Fruit & Veggie Platter.
This isn’t just another snack plate. This is a centerpiece, a conversation starter, a magic trick that turns “please eat your veggies” into “can I have the bunny’s nose?” I live for recipes like this—the kind that merge effortless beauty with wholesome goodness and a giant dose of joy. You don’t need a culinary degree or fancy tools, just a big platter, a handful of colorful produce, and about 20 minutes of playful arranging. It’s the perfect project to do with little helpers in the kitchen, and the result is a guaranteed smile-maker for Easter brunch, school parties, baby showers, or just a sunny Tuesday that needs a lift. So, tie on your (probably already flour-dusted) apron, and let’s create something unforgettable together!
Why This Bunny Hops Straight to My Heart
This silly, veggie-filled bunny takes me right back to my grandma’s linoleum kitchen floor, sitting cross-legged with my cousin, giggling uncontrollably. Every spring, she’d task us with “building the salad” for Sunday supper. To us, it wasn’t a salad; it was an edible landscape. Cucumber sticks became logs, radish roses were… well, roses, and a lone, perfectly round tomato was always the setting sun. We’d arrange and rearrange, narrating a grand story until the adults called us to the table.
When I set out the ingredients for this platter, that same feeling of playful creativity washes over me. I’m not just prepping food; I’m crafting a moment. I imagine the wide-eyed wonder of a kid seeing a cauliflower bunny for the first time, or the delighted chuckle from a friend who wasn’t expecting a work of art next to the deviled eggs. Food has this incredible power to connect—to stories, to people, to simple happiness. This bunny platter is my edible hug, my way of passing on that kitchen-floor joy. It’s proof that feeding the people you love can be nourishing for the soul, too, and a whole lot of fun in the process.
Gathering Your Garden: What You’ll Need
Here’s the beautiful part: this “recipe” is incredibly forgiving. Think of this list as your inspiration palette—swap colors and textures based on what’s seasonal, what’s on sale, or what your crew loves most. The goal is a vibrant mix of colors, crunch, and sweetness.
- 1 large head of cauliflower: This is our bunny’s fluffy face! Look for one that’s tight, heavy for its size, and creamy white with bright green leaves clinging to the stem. The leaves add a perfect rustic touch. Chef’s Insight: Don’t toss the core! Slice it thinly—it’s crunchy, mild, and perfect for the platter border.
- 2 baby cucumbers or 2 long celery sticks: Our iconic bunny ears. Baby cucumbers are firm and seedless, giving a smooth green look. Celery has fantastic crunch and those classic pale green ribs. Substitution Tip: Trimmed, blanched asparagus spears or even long, thin slices of jicama work beautifully too.
- 1 small bowl of ranch OR hummus: The bunny’s cozy center. Ranch is a classic kid-pleaser, but a creamy roasted red pepper hummus adds amazing color and protein. Chef’s Insight: Place the bowl on the platter first to anchor your design. A little ramekin or even a small teacup works great.
- Cherry or grape tomatoes: Our bunny’s rosy cheeks! I love using a mix of red and yellow for extra sunshine. Pro Tip: Pat them dry with a paper towel so they don’t make the platter watery.
- Baby carrots: These multi-taskers are perfect for the nose, for outlining the bunny, or just filling in as a classic snack. Chef’s Insight: For a more refined look, use “rainbow” baby carrots or peel and slice full-sized carrots into sticks.
- Sugar snap peas or green beans: A burst of the most gorgeous spring green! They’re fantastic for creating a grassy border or outlining the bunny’s shape. Substitution Tip: Broccoli florets or trimmed radishes add a similar pop of color and crunch.
- Strawberries or red grapes: Our accent fruit for sweetness and brilliant color. Sliced strawberries look like little hearts. Chef’s Insight: If using grapes, keep them in small clusters for easy grabbing and a lush, full look.
- 2 black olives or blueberries: The all-important eyes! Pitted whole black olives are easy to place. Blueberries give a sweeter, fruit-focused alternative. Fun Twist: Use two small dollops of cream cheese or a dot of hummus with a single black sesame seed in the center for each eye.
- 1 thin slice of baby carrot: That adorable little pink nose! Just a tiny round is all you need. Use a vegetable peeler to get a perfect, thin slice.
Let’s Build a Bunny: A Step-by-Step Story
Ready to play with your food? Let’s do this! Clear a big space on your counter, grab your largest platter or a clean cutting board, and let’s bring this bunny to life. Remember, there’s no wrong way—just your way.
- Set Your Stage. Place your small bowl of dip slightly below the center of your platter. This isn’t just a dip; it’s the anchor point for our bunny’s head and body. Visualize the bunny’s face floating above it.
- Create the Fluffy Face. Break your cauliflower into medium-sized florets. Start placing them snugly together above the dip bowl to form a roundish, fluffy bunny head. Let some florets overlap and tumble a bit for texture. This is the base of our character! Chef’s Hack: If a floret is too big, use your hands to gently break it into the perfect size. No knife needed!
- Give It Ears. Take your cucumbers or celery and place them angled outward from the top of the cauliflower head. They should look like they’re perked up and listening! For cucumber, you can slice one in half lengthwise for two perfect ears.
- Add the Sweetest Face. Now for the personality! Use your olives or blueberries for eyes, placing them close together near the center-top of the cauliflower face. Right below them, add that tiny carrot round for a nose. Then, flank the dip bowl (or just below the cauliflower) with two cherry tomatoes for cheerful, blushing cheeks.
- Frame and Fill with Color. This is where the party happens. Start arranging your carrots, snap peas, strawberries, and any other veggies in clusters and lines around the bunny. Create a “lawn” at the bottom with sugar snap peas. Use carrot sticks to frame one side. Tuck clusters of grapes or berries into any gaps. There’s no rule—just keep going until the platter looks bountiful and bursting with color. Pro Tip: Work from the outside in, creating a vibrant border that leads the eye to the star of the show: the bunny.
- The Final Flourish. Take a step back. What’s missing? Maybe a few extra pea pods by the ears for greenery? A final strawberry placed just so? Add those last little touches. Then, for a professional, polished look, give any empty spots on the platter a light sprinkle of fresh herbs—chopped dill or parsley adds a whisper of green and makes everything look intentional.
Presenting Your Masterpiece
Carry this platter to the table with pride! Place it right in the center where everyone can see. I love pairing it with other spring favorites—think fluffy quiche, lemonade in mason jars, or a basket of warm rolls. The beauty of this platter is its interactive, communal nature. There’s no careful slicing or serving required; guests can just dig in, creating their own perfect bite of crunch and dip. Watch as the first person spots the bunny and points it out—that’s your moment, chef. You’ve just created more than a snack; you’ve created a happy memory.
Make It Your Own: Endless Bunny Possibilities
- The Fruit Bunny: Swap the cauliflower for a mound of green grapes or broccoli florets. Use pineapple chunks for ears (held with toothpicks) and berries for all the facial features. Perfect for a sweeter tooth!
- Rainbow Swaps: Embrace color! Use purple cauliflower, yellow cherry tomatoes, orange peppers sliced into sticks, and purple grapes. A rainbow bunny is a showstopper.
- Allergy-Friendly/Dairy-Free: The dip is the key. Use a vegan ranch, a black bean dip, guacamole, or a simple olive oil and balsamic drizzle in the center bowl.
- “Fancy” Grown-Up Bunny: Elevate the flavors. Use endive leaves and radishes for crunch, marinated mozzarella balls (ciliegine) for cheeks, and a bowl of sophisticated lemon-herb white bean dip or tzatziki.
- Breakfast Bunny: For an Easter brunch, make a pancake bunny face on a big plate, and use this fruit and veggie platter as the “garden” surrounding it.
Olivia’s Kitchen Notes & Stories
This bunny has evolved more than any recipe in my box! The first time I made it, I was so worried about it being “perfect” that I spent an hour meticulously placing each pea. My husband walked in, grabbed a carrot, and said, “Cute rabbit!” before I’d even finished the eyes. It was a wonderful reminder: the joy is in the gesture, not the precision. Now, I embrace the slightly wonky ear, the cheek tomato that’s a different size. It has character!
My biggest tip? Have a “test snack” while you build. Quality control is essential, right? This platter is meant to be relaxed, fun, and a reflection of the season’s best. If your cauliflower is on the smaller side, make a whole family of baby bunnies on a board! There are no rules, only delicious, colorful results.
Your Questions, Answered!
Q: Can I make this ahead of time?
A: Absolutely! Prep is your best friend. Wash and dry all your produce, cut what needs cutting, and store components separately in airtight containers in the fridge. The cauliflower head can even be broken into florets a day ahead. Assemble the platter no more than 1-2 hours before serving to keep everything crisp and fresh. Add delicate berries last.
Q: The cauliflower florets keep falling everywhere! How do I get them to stay put?
A: Great question! Start with a stable base. Place your dip bowl first, then build the cauliflower around and above it, kind of like you’re building a wall. Nestle the florets tightly together; they’ll hold each other up. If you’re really struggling, you can lightly spread a thin layer of cream cheese or hummus on the platter where the face will go to act as “glue,” but it’s usually not necessary.
Q: My kids are picky. Will they actually eat this?
A: The magic of a platter like this is that it often works better than a plate served just to them. It’s interactive, colorful, and fun. They can choose what they want to try without pressure. Involving them in the building process is the ultimate win—they’re far more likely to eat the carrot nose they placed themselves! I’ve seen the most veggie-skeptical kid go straight for the snap peas because they were part of the “bunny’s garden.”
Q: What’s the best platter to use?
A: A large, round or oval wooden board, a white ceramic platter (makes the colors *pop*!), or even a simple rimmed baking sheet lined with parchment or kale leaves for a natural look. Use what you have—the food is the star.

Bunny-Shaped Fruit & Veggie Platters : Fun, Fresh & Kid-Approved
Description
Spring parties are brighter when the food is playful, colorful, and easy to enjoy. This Bunny-Shaped Fruit & Veggie Platter is a fun, no-cook recipe that turns fresh produce into a cheerful centerpiece. It’s perfect for Easter, school gatherings, or family brunch, and it helps everyone snack on something wholesome while smiling. No special tools needed — just a big plate and a little creativity.
Ingredients
Spring parties are brighter when the food is playful, colorful, and easy to enjoy. This Bunny-Shaped Fruit & Veggie Platter is a fun, no-cook recipe that turns fresh produce into a cheerful centerpiece. It’s perfect for Easter, school gatherings, or family brunch, and it helps everyone snack on something wholesome while smiling. No special tools needed — just a big plate and a little creativity.
Instructions
-
Prepare the Dip
Mix all yogurt dip ingredients in a small bowl if making your own. Place the bowl slightly below the center of a large platter — this helps anchor the bunny design. -
Build the Bunny Face
Arrange cauliflower florets above the dip bowl in a tight circle or oval to form the bunny’s fluffy head. -
Add the Ears
Place cucumber halves or celery sticks at the top of the head, angled outward like bunny ears. -
Create the Face
Add blueberries or olives for eyes. Place a thin carrot slice for the nose and cherry tomatoes for cheeks. -
Make the Garden Border
Arrange the remaining fruits and vegetables around the bunny in colorful clusters. Fill empty spaces so the platter looks full and bright. -
Chill Until Serving
Cover loosely and refrigerate if not serving right away. Best served within 1–2 hours of assembly.
Notes
-
Dry produce well so the platter doesn’t get watery.
-
Cluster, don’t scatter — grouped foods look more abundant.
-
Let kids help place the face pieces — they’ll be more excited to eat it.
-
Use color contrast (red, green, orange, white) to make the bunny pop.
-
Prep ahead: Cut veggies and make dip a day early; assemble later.
A Note on Nourishment
While I’m not a dietitian, I can tell you this platter is a celebration of whole, real foods. It’s packed with fiber from all the veggies and fruits, vitamins like C from the bell peppers and strawberries, and antioxidants from the colorful produce. It’s a fantastic way to add a spectrum of nutrients to any gathering in the most delightful way possible. Remember, healthy eating should be joyful, and this platter is exactly that.
Final Thoughts
Bring on the Spring Smiles: Your New Favorite Party Trick is Here!
Hey there, friend! Can you feel it? That little shift in the air, the extra hour of sunshine, the first brave daffodils poking through the earth? Spring is whispering, and with it comes a craving for all things fresh, bright, and brimming with life. And let’s be real—it also brings a calendar dotted with gatherings where we want to bring something that says, “I care, and I also have a fun streak a mile wide.” Enter the star of today’s kitchen adventure: the Bunny-Shaped Fruit & Veggie Platter.
This isn’t just another snack plate. This is a centerpiece, a conversation starter, a magic trick that turns “please eat your veggies” into “can I have the bunny’s nose?” I live for recipes like this—the kind that merge effortless beauty with wholesome goodness and a giant dose of joy. You don’t need a culinary degree or fancy tools, just a big platter, a handful of colorful produce, and about 20 minutes of playful arranging. It’s the perfect project to do with little helpers in the kitchen, and the result is a guaranteed smile-maker for Easter brunch, school parties, baby showers, or just a sunny Tuesday that needs a lift. So, tie on your (probably already flour-dusted) apron, and let’s create something unforgettable together!