

The Pizza That Changed the Game: Spicy, Cheesy, and Seriously Good For You
Hey there, friend! Come on in and grab a seat at the kitchen island. Can I offer you a virtual apron? Because today, we’re not just making dinner; we’re creating a little bit of magic. Let’s be real for a second: haven’t we all had those nights where our soul is screaming for a hot, drippy, deliciously messy pizza, but our body (and maybe our fitness goals) is whispering something about protein and vegetables? It’s the eternal tug-of-war between cozy comfort and feeling good. For the longest time, I thought I had to choose a side.
But what if I told you that you can have it all? What if you could have that fiery buffalo kick, that glorious cheese pull, and the satisfying crunch of a perfect crust, all in a meal that fuels you and comes together in about 15 minutes? No, I haven’t discovered pizza fairy dust (though I’m looking!). I’ve discovered something even better: the power of a simple, 2-ingredient dough and your trusty air fryer.
This Buffalo Chicken Protein Pizza is my love letter to busy weeknights, post-workout cravings, and anyone who believes healthy food has to be boring. It’s proof that “better-for-you” can be bold, spicy, and incredibly satisfying. We’re taking shredded chicken, tossing it in that iconic tangy buffalo sauce, piling it onto a shockingly easy crust that’s high in protein, and letting the air fryer work its crispy, quick-cooking magic. The result? A personal-sized pizza that’s packed with flavor and will keep you full and happy. So, let’s ditch the delivery menu and make something incredible together. Your kitchen is about to smell amazing.
More Than a Snack: A Game Day Tradition
This recipe isn’t just about macros and convenience for me; it’s rooted in one of my favorite memories. Picture this: It’s a crisp autumn Sunday. My tiny college apartment is packed with friends, all wearing jerseys (supporting wildly different teams, of course). The energy is electric, the TV is loud, and the table is covered in… well, let’s be honest, mostly bowls of questionable nacho cheese and greasy wings.
I was always the friend who hovered by the spread, wishing for something that tasted indulgent but wouldn’t make me feel like I needed a nap by halftime. One year, I decided to take over a corner of the table. I whipped up a batch of this simple dough, topped it with leftover rotisserie chicken I’d doused in buffalo sauce and a lighter cheese, and popped a few mini pizzas in the oven. They were gone in minutes. My friends, who were absolutely not there for “health food,” were obsessed. They couldn’t believe it was “good for you.” That day, this pizza went from a kitchen experiment to a game day staple. It proved that the food that brings us together can also make us feel great. Now, every time I make it, I think of laughter, friendly rivalry, and the joy of feeding my people something I’m genuinely proud of.
Gathering Your Flavor Team
Here’s the beautiful part: the ingredient list is short, sweet, and mighty. Each one plays a crucial role in creating our protein-packed masterpiece. Let’s break it down.
- ½ cup Self-Rising Flour: This is the superstar of our 2-ingredient dough. It already contains baking powder and salt, which gives our crust its lift and flavor. Chef’s Insight: No self-rising flour? No problem! For every 1 cup of all-purpose flour, whisk in 1 ½ teaspoons of baking powder and ¼ teaspoon of salt. You’ll need just under half of that mix for this recipe.
- ⅓ cup Plain Greek Yogurt (plus more as needed): This is the other half of our magic dough and the secret protein boost! The tanginess mimics the flavor of a traditional yeast dough, and its thickness creates the perfect texture. Use full-fat for extra richness, or non-fat to keep it leaner. Substitution Tip: In a pinch, regular plain yogurt can work, but your dough will be sticker. You may need a bit more flour.
- ⅓ – ½ cup Shredded Low-Fat Mozzarella: We want that iconic, stretchy cheese pull! Low-fat mozzarella melts beautifully and keeps the protein high. Chef’s Insight: For the absolute best melt, shred it yourself from a block. Pre-shredded cheese is coated to prevent clumping, which can sometimes hinder that gooey factor.
- ½ cup Cooked Buffalo Chicken: The star of the show! I use shredded rotisserie chicken for ultimate ease. Simply toss it in your favorite buffalo sauce (like Frank’s RedHot) until well coated. Substitution Tip: Leftover grilled chicken, canned chicken (drained well), or even chickpeas for a vegetarian twist work perfectly here.
- Optional Dip & Veggies: 2 tbsp Greek yogurt mixed with a sprinkle of ranch seasoning, served with fresh cucumber and carrot sticks. This cool, creamy dip is the perfect counterpoint to the spicy pizza and adds a refreshing crunch.
Let’s Build Your Pizza! A Step-by-Step Guide
Ready? Aprons on, music up, let’s get cooking! This process is so fast, you’ll be amazed.
Step 1: Create the Dough. In a medium bowl, add your self-rising flour and Greek yogurt. Using a fork or your hands, mix until it starts to come together into a shaggy ball. This is where you get to feel it! If the mixture seems dry and isn’t fully combining, add yogurt one teaspoon at a time. If it’s *too* sticky, a light dusting of flour will help. Once combined, turn it out onto a lightly floured surface. Chef’s Hack: I like to sprinkle a tiny bit of garlic powder or dried herbs into the flour mix for an extra flavor boost in the crust!
Step 2: Shape Your Canvas. Knead the dough just 10-15 times until it becomes relatively smooth. Then, using a rolling pin (or a sturdy wine bottle in a pinch!), roll it out into a circle, about ¼ inch thick. Don’t stress about perfect shapes—rustic is charming! Important Tip: Place your shaped crust on a small piece of parchment paper. This is your “handle” for easily moving it in and out of the air fryer basket and prevents any sticking.
Step 3: First Air Fryer Sizzle. Preheat your air fryer to 400°F (200°C). Carefully lift the parchment paper with the crust and place it directly into the basket. You don’t need to grease it! Air fry for 5-7 minutes. You’re looking for the crust to puff up slightly and get some beautiful golden-brown spots. This pre-cook is key for a crust that can hold toppings without getting soggy.
Step 4: Top It Up! Pull the basket out (careful, it’s hot!). The crust will be firm. Now, the fun part: assembly! Sprinkle about half of your cheese directly onto the hot crust. This creates a delicious “glue” for your toppings. Pile on your saucy buffalo chicken, then cover it with the remaining cheese. More cheese on top means maximum melt and coverage.
Step 5: The Final Melt. Return the pizza (still on its parchment paper) to the air fryer. Cook for another 3-4 minutes at 400°F. Watch it closely! You want the cheese to be completely melted, bubbly, and possibly even a little browned in spots. The smell will be absolutely irresistible.
Step 6: The Grand Finale. Use the parchment to slide the pizza onto a cutting board. Let it rest for just a minute (this helps the cheese set so it doesn’t all slide off!). Slice it up, whisk together your quick yogurt-ranch dip, and arrange those fresh veggies. You did it!
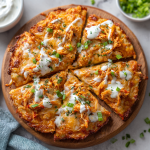
Plating Your Masterpiece
Presentation is part of the joy! I love sliding the whole pizza right onto a wooden board for that rustic, shareable feel (even if it’s just for you—no judgment!). Arrange the bright carrot and cucumber sticks right alongside it, with the creamy white ranch dip in a little bowl. The contrast of the spicy, cheesy pizza with the cool, crisp veggies is not just delicious, it’s visually stunning. It says, “I totally have my life together,” even if you just whipped it up in a chaotic 15-minute window.
Make It Your Own: Endless Possibilities
The beauty of this base recipe is its flexibility. Here are a few of my favorite twists:
- BBQ Chicken: Swap buffalo sauce for your favorite BBQ sauce. Top with red onion slices and a sprinkle of cilantro after cooking.
- Greek-Style: Use a garlic-herb yogurt sauce instead of buffalo. Top with chopped spinach, diced tomatoes, kalamata olives, and crumbled feta cheese.
- Everything Bagel: Mix everything bagel seasoning into the dough. Top with cream cheese “sauce” (thinned Greek yogurt works), smoked salmon, red onion, and capers after baking.
- Veggie Lover’s: Skip the chicken and load up with sliced mushrooms, bell peppers, and red onion. Brush the crust with a little olive oil and garlic before the first cook.
- Breakfast Pizza: After the first cook, top with scrambled eggs, turkey sausage crumbles, and a little cheddar cheese.
From My Kitchen to Yours: A Few Parting Thoughts
This recipe has been on quite a journey with me. The first time I tried the 2-ingredient dough, I was skeptical. It felt too simple to be good. I’ll never forget the time I got overzealous with the yogurt and created a dough so sticky it became a permanent part of my kitchen towel—we called it “The Dough That Wouldn’t Quit.” Lesson learned: add moisture gradually! Over time, I’ve learned that letting the dough rest for 5 minutes after kneading makes it even easier to roll out. I’ve also discovered that a light brush of buffalo sauce on the crust *before* adding the cheese adds an extra flavor punch. Don’t be afraid to play with it. This is your kitchen, your pizza, your rules. The goal is to have fun and end up with something delicious in your belly.
Your Questions, Answered!
Q: My dough is too sticky/wet to handle! What do I do?
A: Don’t panic! This is the most common hiccup. Simply sprinkle a little more self-rising flour onto the dough and your hands. Knead it in gently until the dough becomes smooth and only slightly tacky. It’s better to start with a slightly drier mix, as you can always add more yogurt, but it’s harder to take it away.
Q: Can I make this in a regular oven?
A: Absolutely! Preheat your oven to 425°F (220°C). Place your shaped crust on a parchment-lined baking sheet or pizza stone. Pre-bake for 7-8 minutes, then add toppings and bake for another 5-7 minutes, until cheese is melted and golden.
Q: How do I store leftovers?
A: This pizza is best enjoyed fresh, but you can store slices in an airtight container in the fridge for up to 2 days. Reheat in the air fryer at 350°F for 2-3 minutes to re-crisp the crust. The microwave will make it soggy.
Q: Can I make the dough ahead of time?
A: Yes! You can prepare the dough ball, wrap it tightly in plastic wrap, and store it in the fridge for up to 3 days. Let it come to room temperature for 20-30 minutes before rolling it out for best results.
Nutritional Information*
*This is an approximate estimate for the entire pizza with low-fat mozzarella and non-fat Greek yogurt, using the provided recipe.
- Calories: 450-500
- Protein: 35-40g
- Carbohydrates: 30g
- Fat: 18g
- Fiber: 2g
Prep Time: 5 minutes | Cook Time: 10 minutes | Meal Type: Lunch / Dinner / Post-Workout
Final Thoughts
This Buffalo Chicken Protein Pizza is more than a recipe—it’s a revelation. It’s the satisfying crunch of biting into something indulgent, paired with the quiet confidence of knowing you’ve nourished your body well. It’s the triumphant answer to the question, “Can it really be both?” Yes. It can.
In a world of complicated meal plans and restrictive diets, this pizza is a breath of fresh air. It reminds us that healthy eating isn’t about subtraction—taking away the joy, the flavor, the comfort. It’s about smart, delicious addition. Adding more protein, adding clever techniques, and most importantly, adding fun back into the kitchen.
From its humble, 2-ingredient dough to its fiery, cheesy crown, this dish celebrates simplicity and satisfaction in equal measure. It proves that you don’t need hours or exotic ingredients to create something extraordinary. All you need is a little inspiration, a trusty air fryer (or oven!), and the desire to treat yourself well.
So the next time that craving hits—for something spicy, something cheesy, something that feels like a treat—remember this pizza. Roll out that dough, pile on that buffalo chicken, and let the magic happen. You’re not just making dinner. You’re reclaiming the idea that feeling good and eating well can—and should—be one and the same.
Here’s to crispy crusts, stretchy cheese, and the empowering joy of a meal that loves you back.
Enjoy every slice,
Olivia
Buffalo Chicken Protein Pizza : Air Fryer, High-Protein & Easy
Description
This personal-sized pizza is the ultimate weeknight win: tangy buffalo chicken, melty cheese, and a crispy, protein-packed 2-ingredient dough that comes together in about 15 minutes. Healthy, bold, and absolutely satisfying!
Ingredients
-
½ cup self-rising flour (or ½ cup all-purpose + ¾ tsp baking powder + pinch of salt)
-
⅓ cup plain Greek yogurt (full-fat or non-fat, add more as needed)
-
⅓–½ cup shredded low-fat mozzarella
-
½ cup cooked buffalo chicken (shredded rotisserie chicken tossed in buffalo sauce)
-
Optional sides: Greek yogurt + ranch seasoning dip, carrot & cucumber sticks
Flavor Twists:
-
BBQ Chicken: Swap buffalo sauce for BBQ, top with red onion & cilantro.
-
Greek-Style: Garlic-herb yogurt sauce, spinach, diced tomato, olives, feta.
-
Everything Bagel: Mix everything bagel seasoning into the dough, top with smoked salmon & cream cheese.
-
Veggie Lover: Mushrooms, bell peppers, red onion; brush crust with olive oil & garlic.
-
Breakfast Pizza: Scrambled eggs, turkey sausage, cheddar.
Instructions
-
Make the Dough:
-
In a medium bowl, combine flour and Greek yogurt. Mix until a shaggy dough forms. Adjust with extra yogurt or flour as needed.
-
Knead 10–15 times until smooth.
-
-
Shape the Crust:
-
Roll out dough on a floured surface to ~¼ inch thick. Transfer to parchment paper for easy handling.
-
-
Pre-Cook the Crust:
-
Preheat air fryer to 400°F (200°C).
-
Place dough with parchment in the basket. Air fry 5–7 min until lightly golden.
-
-
Top Your Pizza:
-
Sprinkle half the cheese on the crust. Add buffalo chicken, then remaining cheese.
-
-
Final Cook:
-
Return to air fryer for 3–4 min until cheese melts, bubbly, and slightly golden.
-
-
Serve:
-
Slide pizza onto a board, let rest 1 min. Slice and serve with optional veggie sticks and yogurt dip.
-
Notes
-
Sticky Dough? Sprinkle extra flour and knead gently.
-
Oven Option: 425°F, pre-bake 7–8 min, then bake with toppings 5–7 min.
-
Make Ahead: Dough can be stored in fridge 3 days, bring to room temp before rolling.
-
Leftovers: Store in fridge 2 days, reheat in air fryer 2–3 min.


