Your New Favorite Comfort Food is Here: Baked Stuffed Manicotti
Hey there, friend! Come on in, pull up a stool, and let’s get something wonderfully cheesy bubbling in the oven. There’s a special kind of magic that happens when you combine tender pasta, a savory, hearty filling, and a blanket of melty, golden cheese. It’s the kind of meal that doesn’t just fill your belly; it warms your soul. And today, we’re making the absolute queen of cozy Italian dinners: my Baked Stuffed Manicotti with Beef & Ricotta.
If you’ve ever walked past the pasta aisle and wondered what to do with those intriguing tube-shaped shells, wonder no more! We’re going to transform them into edible vessels of joy, packed with a creamy, cheesy, beefy filling that’s downright irresistible. This isn’t a fussy, complicated restaurant recipe. This is real, from-the-heart, “everyone asks for seconds” kind of food. It’s perfect for a festive Sunday supper, a potluck you want to win, or just a Tuesday night that needs a little extra love.
I promise, you can totally do this. We’ll navigate the “how do I stuff this pasta?!” question together (spoiler: it’s easier than you think), and I’ll share all my little chef hacks along the way. So, tie on your favorite apron—the messy one with all the character—and let’s create some kitchen magic that will have your whole family lighting up.
The Story Behind the Shells: A Tale of Sunday Suppers
This manicotti recipe always takes me right back to my Nona’s kitchen, a place that always smelled like simmering tomatoes and fresh basil. She wasn’t my actual grandmother, but our wonderful neighbor who adopted me as her honorary granddaughter whenever I’d follow the delicious smells to her back door.
I’ll never forget the first time I saw her make manicotti. She didn’t use a spoon or a piping bag. With hands that moved with a lifetime of practice, she’d gently cradle a cooked shell in one palm and use her fingers to lovingly press the filling inside. To my wide-eyed, seven-year-old self, it was pure wizardry. She’d let me “help” by sprinkling the mountain of mozzarella on top, a job I took very seriously. That first bite in her sun-drenched kitchen—the rich meat, the tangy sauce, the creamy ricotta—was a flavor explosion that felt like a hug from the inside. This is my version of her recipe, a tribute to those slow, delicious Sundays and the powerful connection that happens when we share a meal made with love.
Gathering Your Cast of Characters
Great food starts with great ingredients, but I’m a firm believer in working with what you’ve got! Here’s what you’ll need, along with my best tips and swaps to make this recipe your own.
- 12 Manicotti Shells: These are our edible containers! Look for a box in the dried pasta aisle. Chef’s Insight: We’ll boil them just until al dente (meaning “to the tooth”) so they’re still firm enough to handle and stuff without falling apart.
- 1 lb Ground Beef: I like an 80/20 blend for the best flavor, but lean beef works great, too. Substitution Tip: Ground Italian sausage, turkey, chicken, or a plant-based ground “meat” are all fantastic alternatives!
- 2 cups Ricotta Cheese: The creamy, dreamy base of our filling. For the best texture, look for whole-milk ricotta. Chef’s Insight: Give the ricotta a quick stir in its container before measuring to smooth it out.
- 1 cup Shredded Mozzarella (plus more for topping): Hello, gooey, melty goodness! I like to shred a block of low-moisture mozzarella myself, as it melts better than the pre-shredded kind (which has anti-caking agents).
- ½ cup Grated Parmesan Cheese: This adds a salty, nutty punch of flavor. Please, for the love of all things cheesy, use the real deal Parmigiano-Reggiano if you can!
- 1 Egg: Our binding agent! It helps hold the ricotta and beef filling together so it doesn’t ooze out during baking.
- 2 Cloves Garlic, Minced: Flavor foundation! Fresh is best here.
- 2 teaspoons Italian Seasoning: A convenient blend of dried herbs like oregano, basil, and thyme. Substitution Tip: No blend? Use 1 tsp dried oregano and 1 tsp dried basil.
- 1 Jar (24 oz) Marinara Sauce: Our shortcut to a flavorful, saucy base. Use your favorite store-bought brand or your own homemade sauce! Chef’s Insight: I often jazz up a simple jarred sauce by sautéing a little extra garlic and stirring in a handful of fresh basil.
- Salt & Pepper, to taste: The essential flavor enhancers. Don’t be shy!
- Fresh Parsley or Basil, for garnish: A pop of green color and fresh flavor at the end makes all the difference.
Let’s Get Cooking: Building Your Manicotti Masterpiece
Ready? Let’s turn these simple ingredients into a show-stopping dinner. Follow these steps, and you’ll be a manicotti-stuffing pro in no time.
- Preheat and Prep: First things first, preheat your oven to 375°F (190°C). This gives it plenty of time to get perfectly hot and ready for our pasta. Now, bring a large pot of well-salted water to a rolling boil. Chef’s Hack: Salt your pasta water like the sea! It’s your one chance to season the pasta from within.
- Cook the Pasta: Gently add your manicotti shells to the boiling water. Cook them for about 2 minutes less than the package directions for al dente. They will continue to cook in the oven, and this prevents them from becoming mushy. Once done, drain them carefully and let them cool on a lightly oiled baking sheet so they don’t stick together. Little Tip: Laying them in a single layer is key here!
- Brown the Beef: While the pasta cooks, let’s make the filling. In a large skillet over medium-high heat, cook the ground beef, breaking it up with a spoon, until it’s no longer pink. Add the minced garlic, Italian seasoning, and a good pinch of salt and pepper. Cook for one more minute until fragrant. Drain off any excess grease and let it cool for a few minutes. Why we cool it? So it doesn’t cook the egg when we mix it into the cheese!
- Create the Filling: In a large mixing bowl, combine the ricotta, 1 cup of mozzarella, Parmesan, and the egg. Give it a good mix until it’s well-combined. Now, add the slightly cooled beef and garlic mixture. Stir everything together until it’s a uniform, delicious-looking filling. Taste it! This is your chance to adjust the seasoning. Does it need more salt? A crack of black pepper? Now’s the time.
- The Fun Part: Stuffing the Shells! Here’s the step that intimidates people, but fear not! I have two foolproof methods. Method 1 (The Piping Bag): Spoon the filling into a large zip-top bag, snip off one corner (about a 1-inch cut), and pipe the filling directly into the shells. It’s clean and easy. Method 2 (The Spoon): No bag? No problem! Use a small spoon to carefully fill each shell. Gently press the filling in from both ends. They don’t need to be bursting, just nicely filled.
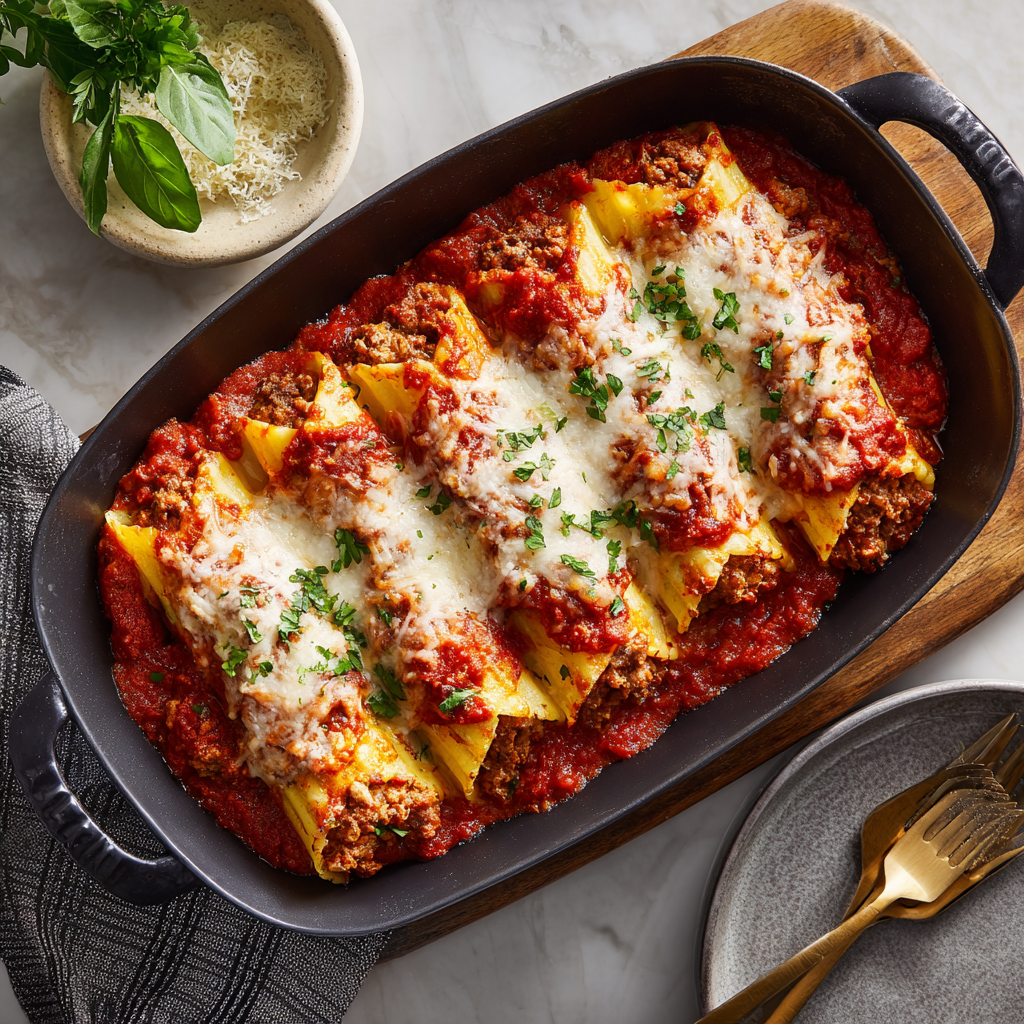
- Assemble the Bake: Spread about ¾ cup of your marinara sauce evenly over the bottom of a 9×13 inch baking dish. This creates a saucy bed that prevents the pasta from sticking. Arrange your beautifully stuffed manicotti shells in a single layer over the sauce. Pour the remaining sauce over the top, making sure each shell gets a little love. Generously top with the remaining shredded mozzarella.
- Bake to Perfection: Cover the baking dish tightly with aluminum foil. This traps the steam and cooks the pasta through without drying it out. Bake for 25 minutes. Then, remove the foil, turn the oven up to 400°F (200°C) if you want a more golden top, and bake for another 10-15 minutes, or until the cheese is melted, bubbly, and delightfully spotted with golden brown.
- The Final Touch: Remove the manicotti from the oven and let it rest for 5-10 minutes. This is a crucial step—it allows the filling to set, making it much easier to serve. Right before bringing it to the table, sprinkle with freshly chopped parsley or basil for that beautiful, fresh finish.
How to Serve Your Saucy Masterpiece
Presentation is part of the fun! I love using a wide, shallow bowl for serving. Carefully lift out one or two manicotti shells with a spatula, making sure to get some of that saucy goodness from the bottom. Spoon a little extra sauce from the dish over the top. The final flourish? A light dusting of extra Parmesan and a few more fresh basil leaves. This is a rich dish, so I love serving it with a simple, crisp green salad with a sharp vinaigrette to cut through the richness, and a slice of warm, crusty garlic bread for soaking up every last bit of sauce.
Make It Your Own: Delicious Recipe Twists
This recipe is a fantastic canvas for your creativity! Here are a few of my favorite ways to mix it up:
- Classic Vegetarian: Simply omit the beef. Sauté 2 cups of finely chopped mushrooms and spinach with the garlic for a deeply flavorful, earthy filling.
- Three-Cheese Spinach: Add one 10-oz package of thawed and thoroughly squeezed frozen chopped spinach to the ricotta mixture, and use a blend of mozzarella, ricotta, and fontina cheese.
- Spicy Arrabbiata Twist: Use a spicy arrabbiata sauce instead of marinara, and add a pinch of red pepper flakes to the beef as it cooks.
- White Sauce Wonder: Swap the red sauce for a creamy béchamel or Alfredo sauce. It creates a decadent, rich, and different flavor profile that’s absolutely divine.
Olivia’s Chef’s Notes & Kitchen Confessions
This recipe has truly evolved in my kitchen over the years. My first attempt at manicotti, back in my tiny first apartment, was… a learning experience. I overcooked the pasta, under-seasoned the filling, and tried to stuff the shells while they were still piping hot. Let’s just say it was a messy, somewhat bland affair! But that’s how we learn, right? Every time I made it, I picked up a new trick—like cooling the shells on an oiled tray and always, ALWAYS tasting the filling before it goes in.
My favorite part of this dish now is its generosity. It’s impossible to make just a little. It’s designed to be shared, to fill a table with happy people. And the leftovers? Honestly, sometimes they’re even better the next day, after the flavors have had a chance to really get to know each other in the fridge. Don’t tell anyone, but I’ve been known to sneak a cold shell straight from the container for a midnight snack.
Your Manicotti Questions, Answered!
I’ve gotten a lot of questions about this recipe over the years! Here are the most common ones to help you troubleshoot like a pro.
Q: My manicotti shells keep splitting when I boil/cool them. What am I doing wrong?
A: This is usually a sign of overcooking! Remember, we’re going for al dente. Also, make sure you have a rapid, rolling boil before adding the pasta, and give them plenty of room in the pot—don’t crowd them. After draining, handle them gently and lay them in a single layer to cool; stacking them hot will make them stick and tear.
Q: Can I assemble this ahead of time and bake it later?
A: Absolutely! This is a fantastic make-ahead meal. Assemble the entire dish, cover it tightly with plastic wrap and then foil, and refrigerate for up to 24 hours. When you’re ready, bake it straight from the fridge, but add an extra 10-15 minutes to the covered baking time since it will be starting from cold.
Q: My filling came out a bit watery. How can I prevent that?
A> A watery filling usually traces back to the ricotta. Some brands are simply wetter than others. To be safe, you can place your ricotta in a fine-mesh strainer for 15-30 minutes before using to drain off excess liquid. Also, make sure your cooked beef is properly drained of grease and that you’ve thoroughly squeezed any add-ins like spinach.
Q: Do I have to use manicotti shells? I can’t find them!
A> No worries! You can use cannelloni shells, which are very similar. In a real pinch, you can use no-boil lasagna sheets. Par-boil them for just a minute to make them pliable, lay them flat, place a line of filling along one edge, and roll them up! They work beautifully.

Baked Stuffed Manicotti with Beef & Ricotta : Cheesy, Saucy Italian Comfort
Description
Baked Stuffed Manicotti with Beef & Ricotta
Creamy, cheesy, cozy Italian comfort food at its best.
Ingredients
Manicotti & Filling
-
12 manicotti shells
-
1 lb ground beef
-
2 cloves garlic, minced
-
2 cups whole-milk ricotta
-
1 cup shredded mozzarella (plus extra for topping)
-
½ cup grated Parmesan
-
1 large egg
-
2 tsp Italian seasoning
-
Salt & black pepper to taste
Sauce
-
1 jar (24 oz) marinara sauce
-
Fresh parsley or basil for garnish
Instructions
1. Prep
-
Preheat oven to 375°F (190°C).
-
Bring a large pot of salted water to a boil.
2. Cook the Manicotti
-
Boil shells until al dente — about 2 minutes less than package directions.
-
Drain gently and place in a single layer on a lightly oiled tray to cool.
3. Cook the Beef
-
In a skillet over medium-high heat, cook beef until no longer pink.
-
Add garlic, Italian seasoning, salt & pepper; cook 1 more minute.
-
Drain excess grease and let cool slightly.
4. Make the Filling
In a large bowl, mix together:
-
Ricotta
-
1 cup mozzarella
-
Parmesan
-
Egg
-
Salt & pepper
Add in the slightly cooled beef mixture and stir until fully combined.
5. Stuff the Shells
Use either:
-
A piping bag (or zip-top bag with corner cut) to pipe filling into each shell, OR
-
A small spoon to gently fill from both ends.
6. Assemble
-
Spread ¾ cup marinara sauce across the bottom of a 9×13 baking dish.
-
Arrange stuffed manicotti in a single layer.
-
Pour remaining sauce over the top.
-
Finish with a generous layer of mozzarella.
7. Bake
-
Cover tightly with foil and bake 25 minutes.
-
Remove foil and bake 10–15 minutes more (or until bubbly and golden).
8. Rest & Serve
-
Let rest 5–10 minutes before serving.
-
Garnish with parsley or basil.
Notes
Vegetarian
Swap beef for sautéed mushrooms + spinach.
Spicy
Use arrabbiata sauce + a pinch of red pepper flakes.
White Sauce Version
Swap marinara for Alfredo or béchamel.
Can’t find manicotti?
Use cannelloni—or par-boil lasagna sheets and roll them.
Nutritional Information*
*Please note: This is an estimate provided for informational purposes only. Actual values will vary based on specific ingredients used.
Per Serving (based on 6 servings):
Calories: 480 | Protein: 31g | Carbohydrates: 28g | Sugar: 6g | Fat: 27g | Saturated Fat: 13g | Fiber: 3g | Sodium: 720mg
Prep Time: 25 minutes | Cook Time: 35 minutes | Total Time: 1 hour | Servings: 6
Final Thoughts: A Warm, Cheesy Hug on a Plate
And there you have it—a bubbling, golden-brown testament to the fact that the most comforting meals are often the simplest in spirit, if not in effort. As you pull this manicotti masterpiece from the oven and see that cheese shimmering, take a deep breath of that incredible aroma: savory beef, sweet tomato, and toasty, melted cheese. You’ve just created more than a meal; you’ve built a centerpiece for connection.
This dish is a beautiful reminder that cooking is a loving act. It’s the patience to stuff each shell with care, the anticipation as it bakes, and the shared joy of that first, perfect bite. Whether it becomes your new Sunday tradition or your go-to “wow” dish for company, it holds that magical power to turn an ordinary evening into something memorable.
So, gather your people, slice the garlic bread, and dig in. May your shells be tender, your filling rich, and your table full of laughter. You didn’t just make dinner—you crafted an experience. And trust me, they’ll be asking you to make it again.
Until next time, may your kitchen be warm and your heart full.
With love and a sprinkle of parmesan,
Olivia
Your Fellow Comfort Food Enthusiast