

Bacon Jalapeño Mac & Cheese: The Ultimate Comfort Food with a Kick
Hey there, friend! Come on in, pull up a stool, and let’s get something incredible bubbling on the stove. Is there anything in the world that smells more like home than mac and cheese? That rich, cheesy, oh-so-comforting aroma has a way of pulling everyone into the kitchen, noses first, with hopeful smiles. It’s the edible equivalent of a warm hug.
But what if we took that classic hug and gave it a little joyful nudge? What if we added a crispy, smoky crunch and a spicy, fresh zing that makes every single bite a tiny adventure? That’s exactly what we’re doing today with my all-time favorite twist: Bacon Jalapeño Mac & Cheese.
This isn’t just a side dish; it’s the main event. It’s the star of potlucks, the hero of game day spreads, and the secret weapon for those “I need something gloriously indulgent” weeknights. We’re talking tender pasta swirled in the creamiest, cheesiest sauce you’ve ever made, punctuated with crispy bacon bits and slices of jalapeño that offer just the right amount of heat. It’s bold, it’s comforting, and I promise, it’s going to become a regular in your recipe rotation. Let’s make a memory (and a fantastic mess) together!
The Game Day That Started It All
This recipe was born out of a happy accident, as the best ones often are. It was a chilly Sunday years ago, and my friends were coming over to watch the game. I had planned to make my standard, beloved mac and cheese—a recipe passed down from my grandma. But as I was prepping, I saw it: a leftover package of bacon from breakfast and a few bright green jalapeños winking at me from the veggie drawer.
On a whim, I decided to chop them up and throw them in. Why not, right? The result was nothing short of magical. The second that pan hit the table, the usual polite serving spoons were abandoned. It was a full-on fork fight for the last bite! The combination of the smoky, salty bacon with the fresh, spicy kick of the peppers against the creamy cheese base was a revelation. It was no longer just my grandma’s mac and cheese; it was our mac and cheese. Now, I can’t imagine making it any other way. It’s a dish that’s seen more victory dances than I can count, and it’s always a winner, no matter what the scoreboard says.
Gathering Your Flavor Dream Team
Here’s everything you’ll need to create this masterpiece. The beauty of this recipe is in its simplicity and the power of each ingredient. I’ve included my favorite tips and swaps so you can make it your own!
- 2 cups elbow macaroni, cooked and drained: The classic choice! Its small shape and hollow center are perfect for trapping all that cheesy goodness. Feel free to use cavatappi, shells, or any short pasta you love. Pro tip: Cook it just to al dente—it will soften a bit more when we bake it, and we don’t want mushy pasta!
- 6 slices bacon, chopped: This is our smoky, salty, crispy superstar. I use a good, thick-cut bacon for the best texture. For a twist, try smoked applewood bacon or even a peppered bacon. If you don’t eat pork, turkey bacon works, but for a vegetarian option, a teaspoon of smoked paprika added to the sauce will give you that smoky vibe.
- 2–3 fresh jalapeños, sliced (seeds removed for less heat): Don’t be scared! Removing the seeds and white membranes tames the heat significantly, leaving you with amazing flavor. For more fire, leave some seeds in. Always, always wash your hands thoroughly after handling them!
- 2 cups sharp cheddar cheese, shredded: Please, I beg you, shred your own cheese! Pre-shredded bags contain anti-caking agents that can make your sauce grainy and less smooth. Sharp cheddar gives us that classic, tangy base flavor we all crave.
- 1 cup pepper jack cheese, shredded: This is our secret weapon for a little built-in spice and incredible meltability. Its monterey jack base is so creamy. If you’re sensitive to spice, swap it for more cheddar or a creamy gouda.
- 2 tablespoons butter & 2 tablespoons all-purpose flour: This dynamic duo is our roux—the simple paste that will thicken our sauce into lush, velvety perfection. It’s the foundation of any great cheese sauce.
- 2 cups whole milk: Whole milk makes the sauce richest and creamiest. You can use 2% in a pinch, but I wouldn’t go lower. For extra decadence, substitute one cup of the milk with heavy cream!
- Salt and pepper, to taste: Season as you go! The bacon and cheese are already salty, so taste before you add more salt at the end.
Let’s Build the Creamy, Cheesy Magic
Ready to create something unforgettable? Follow these steps, and you’ll have a perfect pan of mac and cheese in no time. I’m right here with you, sharing all my little kitchen hacks!
- Prep Your Pasta & Preheat: First, get a large pot of well-salted water boiling and cook your elbow macaroni according to the package directions until it’s al dente. Drain it and set it aside. This is also a great time to preheat your broiler if you plan on giving the top a gorgeous, crispy finish later!
- Crispy Bacon & Jalapeño Tango: While the pasta cooks, let’s work on our flavor boosters. Grab a large skillet and cook your chopped bacon over medium heat until it’s beautifully crispy. Use a slotted spoon to remove the bacon and let it drain on a paper towel. Now, here’s a chef’s hack: leave about a tablespoon of that glorious bacon grease in the skillet. Toss your sliced jalapeños into the hot grease and sauté them for just 1-2 minutes until they’re slightly softened and fragrant. This quick cook tames their raw bite and infuses them with smoky bacon flavor. Transfer them to the plate with the bacon.
- Master the Roux: In a medium-sized saucepan, melt your 2 tablespoons of butter over medium heat. Once it’s melted and foamy, sprinkle in the 2 tablespoons of flour. Immediately start whisking! Cook this roux for a full 1-2 minutes. You’ll know it’s ready when it smells a bit nutty and takes on a very pale golden color. This step cooks out the raw flour taste and is key for a flawless sauce.
- Create the Velvety Base: Now, slowly pour in the milk, whisking constantly. I mean it—don’t stop whisking! This prevents any lumps from forming. Keep whisking as the mixture comes to a gentle simmer. It will slowly start to thicken. You’re looking for a consistency that nicely coats the back of a spoon. This is your béchamel sauce! Chef high-five! 👋
- The Big Cheese Melt: Reduce the heat to low. Now, gradually add your shredded cheeses, one handful at a time, whisking until each addition is fully melted and incorporated before adding the next. This patience rewards you with a smooth, emulsified sauce instead of a greasy, broken one. Once all the cheese is melted in, season with a pinch of black pepper. Hold off on the salt until the end because of the bacon.
- The Grand Finale: Take the sauce off the heat. Add your drained pasta, crispy bacon, and sautéed jalapeños to the cheesy sauce. Gently fold everything together until every single piece of pasta is gleaming with cheesy love. Taste it now and add salt only if you think it needs it.
- Optional (But Highly Recommended) Crispy Top: Pour the entire mixture into a buttered baking dish. Sprinkle a little extra cheese on top if you’re feeling fancy. Pop it under the broiler for just 2-3 minutes—watch it like a hawk!—until the top is bubbly and speckled with golden-brown spots. This adds an incredible textural contrast.
How to Serve This Masterpiece
This Bacon Jalapeño Mac & Cheese is a hearty star all on its own, but I love to serve it straight from the skillet or baking dish for that rustic, family-style feel. Let everyone dig in and serve themselves! To cut through the richness, a simple, crisp side salad with a tangy vinaigrette is absolute perfection. For a true comfort food feast, pair it with some juicy grilled chicken or piled-high pulled pork sandwiches. And don’t forget a cold beer, a chilled glass of white wine, or even a fizzy limeade—something to cool down that spicy kick!
Make It Your Own: Delicious Twists & Swaps
The fun doesn’t stop here! This recipe is a fantastic canvas for your creativity.
- Buffalo Chicken Style: Stir in 1-2 cups of shredded rotisserie chicken and ¼ cup of buffalo sauce along with the bacon and jalapeños. Top with crumbled blue cheese before broiling. Game day heaven!
- BBQ Bliss: Swap the jalapeños for ½ cup of chopped roasted poblano peppers. Fold in the bacon and peppers as usual, but also swirl in ⅓ cup of your favorite BBQ sauce for a sweet and smoky twist.
- Lobster Luxe: Feeling fancy? Replace the bacon with 1 cup of cooked, chopped lobster meat. Use a blend of white cheddar and gruyere cheese. The jalapeño adds a surprising and delicious contrast to the sweet lobster.
- Green Chile Swap: Not a jalapeño fan? Use a 4-ounce can of mild diced green chiles instead. You’ll get all the flavor with zero heat.
- Gluten-Free & Lighter: Use your favorite gluten-free pasta and swap the all-purpose flour for a 1:1 gluten-free flour blend. For a lighter version, use turkey bacon, low-fat milk, and reduce the cheese by about ¼ cup (it will still be delicious!).
Olivia’s Chef Notes & Kitchen Stories
This recipe has evolved so much from that first game day experiment. I’ve learned that shredding your own cheese is non-negotiable for the creamiest sauce. I’ve also learned the hard way to NEVER walk away from the broiler—R.I.P. to the slightly charred batch of 2018. We don’t talk about that one.
One of my favorite things about this dish is how it brings people together. It’s sparked more conversations and recipe swaps at my dinner table than almost any other meal. It’s a dish that says “let’s relax and enjoy each other’s company.” So have fun with it! Don’t stress about perfection. The little bits of bacon stuck to the pan? The cheese sauce that might seem too thick? It’s all part of the process. Cooking is about love and joy, not perfection. Now, go forth and create your own kitchen story with this recipe!
Your Questions, Answered!
Q: My cheese sauce turned out grainy/oily. What happened?
A: This usually happens if the heat is too high when melting the cheese or if you use pre-shredded cheese. Cheese melts best over low, gentle heat. Adding it all at once can also shock the sauce and cause it to break. Always add cheese off the heat or on the lowest possible setting, one handful at a time. Pre-shredded cheese contains starches that can seize up and make the sauce grainy.
Q: How can I make this ahead of time?
A: You can assemble the entire dish (through step 6) up to a day in advance. Cover it tightly and store it in the fridge. When you’re ready to bake, let it sit on the counter for 20-30 minutes to take the chill off, then bake at 350°F (175°C) for 20-25 minutes, until heated through, before finishing with the broiler.
Q: Can I freeze Bacon Jalapeño Mac & Cheese?
A: You can, but be warned that dairy-based sauces can sometimes separate a bit upon thawing and reheating. It will still taste good, but the texture might be slightly less creamy. Thaw overnight in the fridge and reheat in the oven, covered, at 350°F until hot.
Q: It’s too spicy for my family! How can I tone down the heat?
A> No problem! The heat primarily comes from the jalapeño seeds and membranes. Be sure to remove all of them before slicing. You can also swap the jalapeños for a small bell pepper for color with zero heat, or use the canned green chiles as mentioned in the variations.
Bacon Jalapeño Mac & Cheese
Description
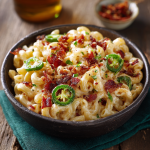
Mac and cheese is already a hug in a bowl—but this version? It’s got personality. Smoky bacon, spicy jalapeños, and the creamiest cheese sauce come together to make every bite bold, comforting, and unforgettable. Perfect for game day, potlucks, or just a night when you need a little joy baked into your dinner.
Ingredients
-
2 cups elbow macaroni, cooked al dente
-
6 slices thick-cut bacon, chopped
-
2–3 fresh jalapeños, sliced (seeds removed for less heat)
-
2 cups sharp cheddar, shredded
-
1 cup pepper jack cheese, shredded
-
2 tbsp butter
-
2 tbsp all-purpose flour
-
2 cups whole milk (or 1 cup milk + 1 cup heavy cream for richness)
-
Salt & black pepper, to taste
Instructions
-
Cook pasta: Boil macaroni in salted water until al dente. Drain and set aside.
-
Crisp bacon: Fry bacon until crispy. Remove and set aside, keeping 1 tbsp of bacon fat in the skillet.
-
Sauté jalapeños: Add sliced jalapeños to bacon fat and sauté 1–2 minutes until fragrant. Remove and set aside.
-
Make roux: Melt butter in a saucepan, whisk in flour, and cook 1–2 minutes until golden.
-
Build sauce: Slowly whisk in milk. Simmer until thickened. Reduce heat and add cheeses one handful at a time, stirring until smooth. Season with pepper (salt if needed).
-
Combine: Fold in pasta, bacon, and jalapeños until evenly coated.
-
Optional bake: Transfer to a buttered dish, sprinkle with extra cheese, and broil 2–3 minutes until bubbly and golden.
Notes
-
Remove jalapeño seeds for mild heat—or swap for bell peppers.
-
Add shredded chicken + buffalo sauce for game-day flair.
-
Use poblano peppers + BBQ sauce for a smoky-sweet twist.
-
Make it vegetarian: skip bacon and add smoked paprika for flavor.
Nutrition
- Calories: 480 cal Per Serving
- Fat: 32g
- Carbohydrates: 30g
- Fiber: 1g
- Protein: 20g
Nutritional Information*
Per Serving (based on 6 servings):
Calories: ~480 | Protein: 20g | Carbohydrates: 30g | Fat: 32g | Fiber: 1g
*Please note: This is an approximate estimate based on the specific ingredients used. Values can vary significantly based on brands and portion sizes.
Prep Time: 15 minutes | Cook Time: 20 minutes | Servings: 4-6
Final Thoughts
So there you have it—the story, the secrets, and the step-by-step guide to creating a dish that’s so much more than the sum of its parts. This Bacon Jalapeño Mac & Cheese is a testament to the magic that happens when we take a beloved classic and fearlessly make it our own.
It’s a recipe built for sharing, for celebrating the small victories, and for turning an ordinary weeknight into something special. I hope it finds its way to your table and becomes a part of your own story, creating memories as warm and comforting as that first, perfect cheesy bite.
Now, I’d love to hear from you! Did your family do a happy dance? Did you add your own special twist? Share your kitchen adventures with me in the comments below. Happy cooking!


