
Carrot Patch Brownie Cups : Adorable Easter Dirt Cup Dessert for Kids
Welcome to My Easter Kitchen: Let’s Grow a Dessert Garden!
Hey there, friend! Olivia here. Can you feel it? That little buzz of spring in the air? The days are getting longer, the trees are starting to blush green, and my kitchen is officially infected with a serious case of Easter fever. For me, Easter has always been less about the fancy china and more about the pure, unadulterated joy of making something that puts a gigantic smile on someone’s face—especially the little (and not-so-little) kids in our lives.
That’s why I’m practically bouncing as I type this, because today, we’re ditching the complicated layer cakes and intricate pastries. Instead, we’re getting playfully messy and making an adorable dessert that’s as fun to create as it is to eat. We’re building a Carrot Patch Brownie Cup garden! Imagine this: rich, fudgy brownie bites, a cloud of chocolate mousse “soil,” and a bright, hand-dipped strawberry “carrot” poking right out of the top. Served in clear cups, they’re these tiny, edible worlds of deliciousness.
This isn’t just a dessert; it’s an experience. It’s perfect for classroom parties (hello, room mom hero!), the star of your Easter buffet, or the sweetest little DIY favor for guests to take home. No fancy skills required—just a willingness to play with your food a little. So, tie on your favorite (probably messy) apron, put on some happy music, and let’s turn simple ingredients into an unforgettable, crowd-pleasing spring celebration. Ready to dig in?
The Messy Magic of Easter Memories
This recipe takes me right back to my grandma’s linoleum kitchen floor, speckled with glitter and spilled jelly bean dye. Every year, she’d orchestrate the Great Easter Dessert Construction, and my cousins and I were her chief engineers. We’d make the classic “dirt cups” with pudding and gummy worms, our hands covered in chocolate cookie crumbs, giggling as we “planted” our wormy garden.
But one year, I decided I wanted to grow carrots. We didn’t have fancy candy melts, so we tried dipping strawberries in thinned orange frosting. It was a glorious, drippy, pink-and-orange-striped mess! The “carrots” looked more like psychedelic space rocks, but we were so proud. That memory—the creativity, the laughter, the shared pride in our wobbly culinary creation—is the heart of this recipe. I’ve just given our childhood dream a delicious, chocolatey upgrade. It’s that same spirit of playful, messy, heartfelt making that I hope you bring to your kitchen today.
Gathering Your Garden Supplies
Here’s everything you’ll need to build your delicious little carrot patches. I’ve added my little chef notes next to each one because knowing the “why” makes you a more confident cook!
- 1 box brownie mix (plus ingredients listed on box): This is our garden foundation! I’m a fan of a fudgy-style mix for maximum rich, dense bites. No shame in the box-mix game—it saves time and guarantees a perfect base. Feel free to use your favorite homemade recipe if you have one!
Chef’s Insight: Bake the brownies in a parchment-lined pan for super easy removal and cutting later. - For the Chocolate “Soil” Mousse:
- 1 cup heavy whipping cream: This is the secret to our light, fluffy “soil.” Make sure it’s very cold—I even pop my bowl and beaters in the freezer for 10 minutes before starting. For a dairy-free version, a full-fat coconut cream (chilled) can work wonders.
- ½ cup powdered sugar: It sweetens and stabilizes our mousse without any grit.
- ¼ cup cocoa powder: Use a good-quality unsweetened cocoa powder for the deepest, richest chocolate flavor. This is our “dirt” color!
- ½ tsp vanilla extract: The flavor enhancer. It rounds out the chocolate beautifully.
- ½ cup crushed chocolate cookies (optional): Think Oreo® middles removed, or chocolate graham crackers. This adds a fantastic crunchy “dirt” texture on top! It’s optional but highly recommended for the full garden effect.
- For the Strawberry “Carrots”:
- 12 fresh strawberries, hulled: Look for berries that are firm, bright red, and slightly conical in shape—they’ll look more like natural carrots! Dry them VERY well after rinsing; water is the enemy of melted candy coating.
- 1 cup orange candy melts: These are the easiest route for a smooth, vibrant orange shell. You can find them in the baking aisle. For a more natural approach, you can use white chocolate chips with a drop of orange oil-based food coloring.
- Green decorating icing (for carrot tops): The little tube with a fine tip is perfect for this. No fuss! You could also use melted green candy melts or even a small sprig of fresh mint for a totally different look.
Let’s Build Our Easter Garden! (Step-by-Step)
Okay, let’s do this! We’ll tackle it in three phases: Bake, Make, and Assemble. Put on some tunes and let’s have fun.
Phase 1: The Brownie Base
- Bake & Cool: Preheat your oven and prepare your brownie mix according to the package directions. Pour the batter into your prepared pan and bake until a toothpick inserted comes out with a few moist crumbs (not wet batter!). This is key—we want fudgy, not dry, brownies. Let them cool completely in the pan on a wire rack. I know it’s tempting to rush, but warm brownies will turn our mousse into soup!
Chef’s Hack: Speed up cooling by popping the pan in the fridge for 20-30 minutes once it’s no longer hot to the touch. - Chop into Bites: Once completely cool, lift the brownie slab out using the parchment paper. Use a sharp knife to cut it into small, rustic cubes—about ½ inch in size. They don’t have to be perfect! These are the delicious rocks and rubble at the bottom of our garden.
Phase 2: Crafting the Chocolate “Soil” & Strawberry “Carrots”
- Whip the Magic Mousse: In your chilled bowl, beat the heavy cream on medium-high speed until soft peaks form. You’ll know it’s ready when you lift the beaters and the cream forms a peak that gently flops over. Now, sift in the powdered sugar and cocoa powder (sifting prevents lumps!). Add the vanilla. Beat on medium until stiff peaks form—this means the mousse holds its shape firmly when you lift the beaters. Be careful not to overbeat into butter! Cover and pop it in the fridge.
Chef’s Tip: If you have the time, chilling the finished mousse for 20 minutes before assembling makes it even easier to pipe or spoon. - Create the Candy “Carrots”: Melt the orange candy melts according to package directions, usually in 30-second bursts in the microwave, stirring well between each. This is the fun part! Hold a very dry strawberry by the leaves (or use a fork), dip it about ¾ of the way into the orange candy, let the excess drip off, and place it on a parchment-lined tray. Repeat with all berries. Let them set completely.
Chef’s Hack: If your coating is too thick, add a tiny teaspoon of coconut oil to thin it for easier dipping. - Add the Greens: Once the orange coating is hard, use your green decorating icing to pipe little squiggly lines and leaves coming out of the top of each strawberry. Voilà—instant carrots!
Phase 3: The Grand Assembly
- Layer Your Garden: Grab your clear cups (plastic party cups or small glasses work great). Start with a layer of brownie cubes in the bottom of each cup. Don’t pack them down; let them stay loose.
- Add the “Soil”: Spoon or pipe a generous layer of the chocolate mousse over the brownies. I love using a piping bag with a star tip for a fluffy, “piled dirt” look, but a spoon is perfectly wonderful!
- Sprinkle & Plant: If using, sprinkle a pinch of the crushed chocolate cookies over the mousse for that authentic, crumbly topsoil. Just before serving, gently press a strawberry “carrot” into the center of each cup.
- The Final Chill: Cover loosely and refrigerate the assembled cups for at least 30-60 minutes before serving. This lets all the flavors mingle and gives the mousse the perfect, cool, creamy texture.
How to Serve Your Sweet Harvest
Presentation is half the fun! Line these cuties up on a platter or a bed of green Easter grass. For an extra special touch, place each cup on a small saucer with a few real pecan or walnut halves scattered around to look like “rocks.” You can even add a clean, new plastic shovel or garden trowel as a serving utensil. The goal is whimsy! Let everyone admire their individual edible garden before they dive in and destroy it with a spoon.
Grow Your Garden Your Way: Fun Variations
Want to mix it up? Your garden, your rules!
- “Bunny Burrow” Version: Add a surprise! Before adding the mousse, hide a mini peanut butter cup or a ball of cream cheese frosting in the brownie layer as a “burrowed treasure.”
- Dairy-Free/Gluten-Free Garden: Use a GF brownie mix, ensure your cookies are GF, and whip chilled full-fat coconut cream with cocoa and powdered sugar for the mousse.
- Lemon-Thyme Carrots: For a sophisticated twist, dip strawberries in white chocolate colored yellow and orange, and add a tiny fresh thyme sprig for the green top. Pair with a lemon zest-infused mousse.
- Cookies & Cream Dirt: Use crumbled Oreos® (filling and all) for both the mousse mix-in and the topping. The classic kid-pleaser!
- Individual Trifle: Layer everything in a large, clear trifle bowl for one stunning centerpiece dessert. Just increase the layers!
Olivia’s Kitchen Notes
This recipe has seen some… experimental phases. There was the “Great Gelatin Soil Incident of 2018” (we don’t talk about it) and the time I tried to make carrot-shaped cake pops (a structural disaster). This version, with the brownie base and stable mousse, is the happy, reliable, and adorable result of all that tasty trial and error.
The best part? Kids LOVE to help. Let them be in charge of sprinkling the cookie “dirt” or piping the green tops (even if it gets messy). The laughter and pride are the real secret ingredients. I always make a few extra strawberry carrots because, let’s be honest, they tend to “disappear” during construction. And that’s perfectly okay.
Your Questions, Answered!
Q: Can I make these ahead of time?
A: Absolutely! You can bake the brownies 1-2 days ahead and store them covered at room temp. Make the mousse and dip the strawberries up to a day ahead, storing them separately in the fridge (strawberries on a tray, mousse in a bowl). Assemble the cups up to 4-6 hours before your event and keep them chilled. Add the strawberry “carrot” just before serving so it stays perky.
Q: My chocolate mousse is runny! What happened?
A: Two likely culprits: 1) Your cream wasn’t cold enough, or 2) It was under-whipped. Always start with cold cream and beat to stiff peaks. If it’s already runny, you can try re-whipping it, but sometimes it’s easier to gently fold in a little more sifted cocoa powder to thicken it up.
Q: The candy coating is too thick/chunky for dipping.
A: Candy melts can seize if overheated or if a tiny drop of water gets in. Melt slowly and stir often. If it’s just too thick, stir in a tiny amount of solid vegetable shortening or coconut oil (start with ½ tsp) to thin it to a dippable consistency.
Q: What can I use instead of candy melts for the strawberries?
A: You can use white chocolate chips mixed with a drop or two of orange oil-based food coloring. Be aware that real chocolate is more temperamental to melt and sets with a less glossy finish, but the flavor is fantastic!
Nutritional Information (Per Serving, Approximate)
Please note: This is an estimate for 1 cup, calculated using standard ingredients and will vary based on specific brands and substitutions.
Calories: 340 | Total Fat: 18g | Saturated Fat: 10g | Carbohydrates: 42g | Fiber: 2g | Sugar: 30g | Protein: 4g
Prep Time: 25 minutes | Bake Time: 25 minutes | Chill Time: 45 minutes | Total Time: 1 hour 35 minutes | Yield: 12 cups | Difficulty: Easy | Storage: Refrigerate, covered, for up to 2 days.
Final Thoughts: The Sweetest Harvest
And there you have it—your very own edible Easter garden, ready to sprout smiles! As you stand back and admire your row of charming little cups, with their chocolate soil and bright strawberry carrots, I hope you feel that same spark of joy my cousins and I felt on my grandma’s kitchen floor all those years ago. It’s the magic of creating something with your own two hands that’s meant to be shared.
Whether these make their way to a classroom party, a sunny Easter brunch table, or just an afternoon of fun with your own little ones, remember that the real ingredient isn’t listed in the recipe card. It’s the laughter as you pipe the “dirt,” the tiny “oohs” and “ahhs” when the carrots are planted, and the happy silence that follows when everyone digs in.
Pin Title: Carrot Patch Brownie Cups: The Cutest Easter Dessert!
Pin Description (400+ characters): Grow an adorable edible garden with these Carrot Patch Brownie Cups! This easy, no-bake Easter dessert is perfect for kids and parties. Layers of rich fudgy brownie bites and fluffy chocolate mousse “soil” are topped with hand-dipped strawberry “carrots.” A fun, creative, and crowd-pleasing treat that’s ideal for Easter brunch, classroom parties, DIY favors, and spring celebrations. Learn how to make this simple yet impressive dirt cup upgrade with step-by-step instructions, chef tips, and recipe variations for dietary needs. The ultimate cute Easter dessert idea that everyone will love! #easterdessert #kidfriendly #partydessert #easterrecipe #springdessert #dirtcup #funfood #carrotpatch
SEO Meta Description: Make adorable Carrot Patch Brownie Cups for Easter! Layers of brownie,
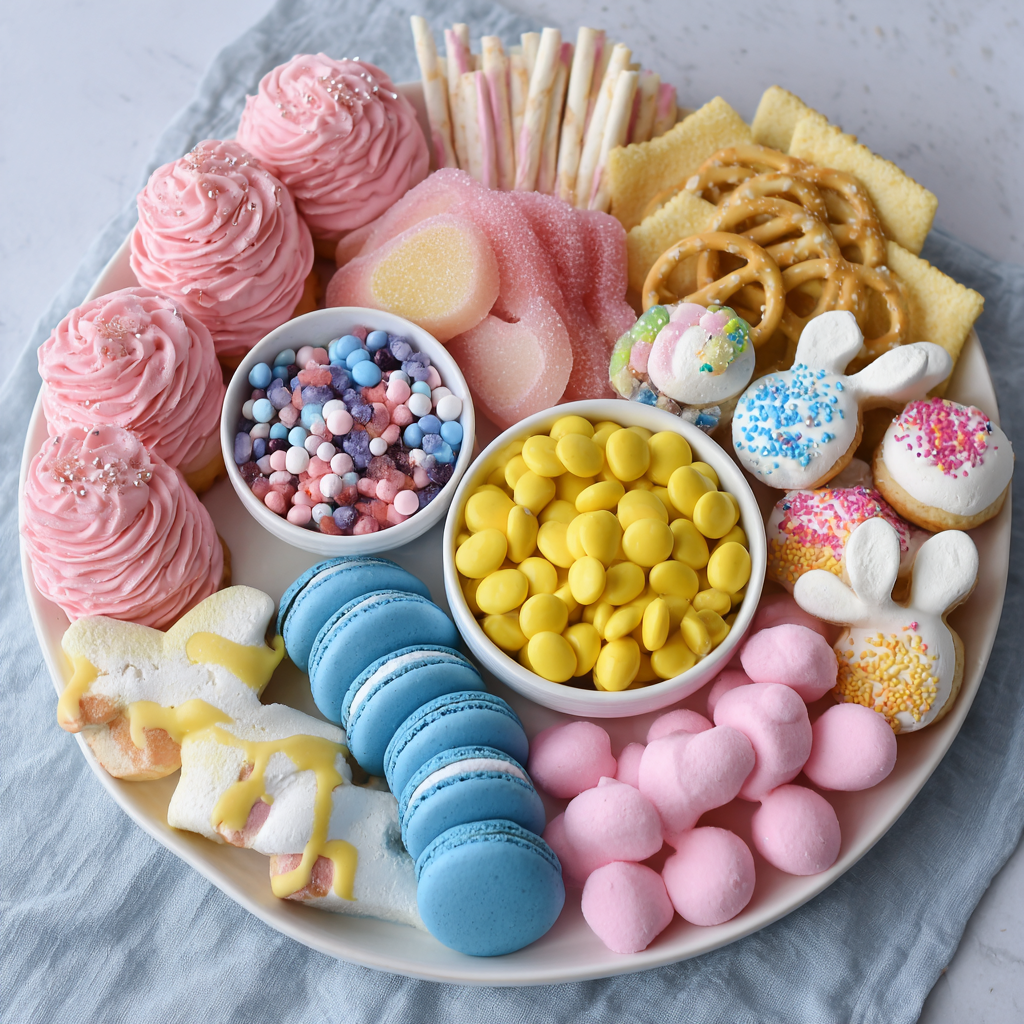
Easter Charcuterie Dessert Board : Pastel-Only Sweet Party Platter
Easter Charcuterie Dessert Board: Your Pastel-Only Sweet Masterpiece
Hey there, friend! Olivia here, apron a little dusty with powdered sugar and my heart absolutely full. Can you feel it? That buzz in the air? Spring is whispering, flowers are peeking out, and Easter is just around the corner. For me, this season has always been about more than just one big meal—it’s about the gathering, the laughter, and those perfect, shareable bites that make everyone’s eyes light up.
If you’ve spent any time on Pinterest or Instagram lately (and let’s be real, who hasn’t?), you’ve seen the charcuterie board revolution. We’ve moved way beyond cheese and crackers, my friends. We’re in an era of edible art, where the board itself becomes the centerpiece of the party. But today, we’re throwing a sweet twist into the mix. We’re ditching the savory and going full-on sugar-dream.
I’m so excited to introduce you to the ultimate Easter showstopper: The Pastel-Only Charcuterie Dessert Board. This isn’t just a plate of cookies. This is a moment. A pastel-hued, texture-filled, joy-sparking masterpiece that follows one gloriously simple rule: everything must be in the softest shades of pink, yellow, and blue. Imagine a watercolor painting you can eat! It’s playful, it’s stunningly pretty, and the best part? It’s incredibly easy to put together. You don’t need to be a pastry chef—you just need a sense of fun and a sweet tooth.
This board is for the host who wants to hear “WOW!” as they bring it to the table. It’s for the parent making magical memories with wide-eyed kids. It’s for anyone who believes that food should be as beautiful as it is delicious. So, grab your favorite large board or platter, and let’s turn your table into a Pinterest-worthy, pastel paradise that tastes as good as it looks.
The Sweet Spark: Where This Idea Came From
This whole pastel obsession? It definitely comes from my childhood Easters. My grandma was a force of nature in the kitchen, but her true artistry came out the night before the holiday. While the rest of the house slept, she’d transform our old, weathered wooden table into a pastel wonderland. It wasn’t a formal, sit-down dessert. It was a sprawling, glorious buffet of happiness.
She’d have little dishes of pastel Jordan almonds, pastel-frosted petit fours from the local bakery, and these incredible, pastel-tinted coconut haystacks she’d make herself. The rule was unspoken but understood: color was key. It was like she was painting with food. My sister and I would sneak downstairs in our pajamas, just to stare at it, our faces bathed in the soft light of the fridge. It felt less like a meal setup and more like she’d laid out a feast for the Easter Bunny himself.
That memory—the anticipation, the pure visual joy—stuck with me. It taught me that presentation is a form of love. When I started seeing the modern charcuterie trend, I instantly thought of Grandma’s pastel table. This board is my homage to that magic. It’s that feeling of festive wonder, designed for sharing, chatting, and grazing with the people you love most. It’s proof that sometimes, the most memorable recipes aren’t cooked at all—they’re carefully, lovingly curated.
Gathering Your Pastel Palette: Ingredients & Tips
Here’s the fun part: shopping (or baking)! This list is your roadmap to pastel perfection. Think of it as choosing paints for a canvas. You can absolutely use store-bought items for a 30-minute miracle, or you can sprinkle in a few homemade touches. I’ve included notes and swaps for everything, because your kitchen, your rules!
Board Essentials: A large wooden board, slate slab, or even a very large, clean serving tray. Round or rectangular works!
- Pink Zone Ingredients:
- Pink Frosted Sugar Cookies: The anchors of your pink section. Store-bought is perfect, or use your favorite cut-out cookie recipe with a pastel pink buttercream. Chef’s Tip: If frosting store-bought, a tiny drop of red gel food coloring in vanilla frosting works miracles.
- Strawberry Macarons: They bring elegance and that classic pastel pink hue. Find them at a bakery, a gourmet market, or frozen section. Swap: Pink frosted donut holes or mini strawberry cupcakes.
- Pink Chocolate-Covered Pretzels: Sweet, salty, crunchy perfection. You can make these by dipping pretzel rods in melted white chocolate tinted pink. Insight: The salt cuts the sweetness and adds fantastic texture.
- Pink Marshmallows: Look for pastel pink ones or large white marshmallows. Fun Twist: Roll them in pink sanding sugar for extra sparkle!
- Pastel Pink M&M’s: Use the Easter mix or buy a bag of just the pink ones online. They’re ideal for filling tiny gaps.
- Yellow Zone Ingredients:
- Lemon Cookies: Bright, cheerful, and tangy. Soft-baked lemon cookies or delicate lemon shortbread rounds are fantastic. Chef’s Insight: The citrus flavor is a refreshing palate cleanser among all the sugar.
- Yellow Candy-Coated Chocolates: Think yellow Sixlets, Reese’s Pieces, or even yellow peanut M&M’s. They add pops of sunny color.
- White Chocolate Pretzels with Yellow Drizzle: Buy them or make your own by drizzling melted yellow candy melts over white chocolate-dipped pretzels.
- Yellow Marshmallow Chicks (Peeps): A non-negotiable dose of nostalgia! They’re pure Easter joy.
- Lemon Fudge Cubes: Rich, creamy, and decadent. Look for them in the candy aisle or make a simple microwave lemon fudge. Swap: Yellow frosted brownie bites or pieces of pineapple upside-down cake.
- Blue Zone Ingredients:
- Blue Macarons: Royal blue, baby blue, or aqua—any shade works! Vanilla or almond flavor is perfect. Tip: Macarons are fragile, place them just before serving.
- Vanilla Cupcakes with Blue Frosting: Mini cupcakes are ideal! They’re adorable and easy to pick up. Use a simple vanilla box mix and color your frosting with blue gel food coloring.
- Blue Candy Melts Bark: So easy! Melt blue candy wafers, spread on parchment, sprinkle with pastel sprinkles and mini eggs, break once set. It’s a gorgeous, textured filler.
- Blue Jelly Beans: Scatter these like little gems in the blue section. They’re a classic.
- Yogurt-Covered Raisins (Light Blue Coating): A slightly healthier(ish) option with a lovely pastel blue hue and a chewy center. A great texture contrast.
- Optional Fillers & “Confetti”:
- White Chocolate Popcorn: A light, airy, and crunchy element that acts as a delicious “filler” between color blocks.
- Pastel Sprinkles: Jimmies, nonpareils, sugar pearls—scatter them like edible glitter over the whole board for a finished look.
- Mini Candy Eggs: The quintessential Easter candy. Use them to bridge color zones or create a border.
Building Your Edible Art: A Step-by-Step Guide
Okay, artiste, it’s time to create! Don’t overthink this. We’re going for abundant, joyful, and organized chaos. Follow these steps, and you simply cannot fail. I’ve sprinkled my best tips throughout.
- Lay the Foundation. Grab your chosen board and place it on a stable surface. I like to work right on the table where it will be served. Give yourself plenty of space! Chef Hack: If your board is very porous (like untreated wood), you can lay down sheets of parchment or wax paper first for easy cleanup. Just tuck the edges under neatly.
- Map Your Zones. Don’t put anything down yet! Just visually divide your board into three main sections: Pink, Yellow, and Blue. You can think of them as wedges of a pie on a round board, or three columns on a rectangular one. It doesn’t have to be perfect—we’re creating an impression.
- Place Your “Anchor” Items. This is the most important step for structure. In each colored zone, start by placing your largest items. In the Pink zone, arrange your frosted cookies and macarons. In the Yellow zone, position your lemon cookies and maybe a cluster of marshmallow chicks. In the Blue zone, place your cupcakes and macarons. Space them out within their zone, but keep them clearly grouped by color. These are the landmarks of your board.
- Add Your Medium-Sized Players. Now, build around those anchors. Tuck in your pink chocolate pretzels near the pink cookies. Place the lemon fudge cubes and drizzled pretzels in the yellow section. Add your blue candy bark and little piles of yogurt raisins to the blue area. You’re starting to fill in the canvas and create height and variety. Pro Tip: Turn some items on their side or stack a few to create visual interest and dimension. Flat boards are boring!
- Fill Every Gap with Small Candies. Here’s where the magic happens and the board goes from “nice” to “WOW!” Take your small candies—the M&M’s, jelly beans, coated chocolates—and pour them into the gaps. Let them cascade around the larger items, filling the empty space and creating lush, abundant color blocks. Don’t be shy! The goal is to have very little board showing. This creates that lavish, generous feeling.
- The Final Flourish. Take a step back and look. Where does it need a little something? This is when you add your “confetti.” Take pinches of pastel sprinkles and lightly dust them over the entire board. Scatter a few mini candy eggs between zones as a unifying element. If you have white chocolate popcorn, you can use it as a neutral buffer between two strong color zones. My Secret: I always add one last tiny sprinkle of flaky sea salt over the chocolate-dipped items. It elevates everything!
Presenting Your Pastel Masterpiece
Place your finished board right in the center of the action—the coffee table, the dessert buffet, the kitchen island. The beauty of this is its interactivity! Provide small plates, napkins, and a few tiny tongs or spoons for easy grabbing (though I promise, fingers will be diving in). For an extra touch, tie pastel ribbon around the napkins or place a small vase of spring flowers (like hyacinths or tulips) next to the board. Then, just watch the smiles appear as your guests explore each colorful section, creating their own perfect sweet bite.
Make It Your Own: Creative Twists & Swaps
The pastel rule is fun, but feel free to play within it! Here are some ideas to tailor this board to your crowd:
- Spring Floral Theme: Incorporate flower-shaped cookies, candied violets, and fruit-flavored gummies in pastel shades. Add edible flowers as garnish!
- “Bunny Bait” Board: Focus on snack mixes! Make pastel popcorn mix, pastel-painted Chex Mix, and include bunny-shaped graham crackers.
- Allergy-Friendly: Create zones with gluten-free cookies, dairy-free chocolates (check coatings), and nut-free candies. Use fruit like pastel-hued grapes (champagne grapes are perfect), raspberries, and pineapple.
- Pastel & White: For a more elegant look, stick to only two colors: white and one pastel (like blush pink). Use white chocolate-dipped everything, meringue kisses, and white macarons.
- Adult-Only Upgrade: Spike it! Include pastel-hued cocktails in shot glasses on the board, or incorporate boozy desserts like limoncello-dipped cake pops or raspberry champagne gummies.

Easter Charcuterie Dessert Board : Pastel-Only Sweet Party Platter
Description
If you want a fun, eye-catching Easter dessert without complicated baking, a pastel dessert board is the perfect solution. It’s colorful, playful, and completely customizable. Think of it like edible art — soft pinks, yellows, and blues arranged into a sweet grazing board that guests can snack from all afternoon. No oven required, just simple treats and a little creativity.
Ingredients
Pink Treats
-
Pink frosted sugar cookies
-
Strawberry or vanilla macarons
-
Pink chocolate-covered pretzels
-
Pink marshmallows
-
Pink candy-coated chocolates
Yellow Treats
-
Lemon cookies or lemon bars
-
Yellow frosted mini cupcakes
-
Yellow candy-coated chocolates
-
Marshmallow chicks
-
Lemon fudge or blondie bites
Blue Treats
-
Blue frosted mini cupcakes
-
Blue macarons
-
Blue candy bark pieces
-
Blue jelly beans
-
Yogurt-covered raisins (light blue coating)
Fillers & Extras
-
White chocolate popcorn
-
Mini candy eggs
-
Pastel sprinkles
-
White chocolate dipped cookies or pretzels
Instructions
-
Choose your board
Use a large platter, wooden board, or tray. Make sure it’s clean and dry. -
Plan color zones
Visually divide the board into three areas: pink, yellow, and blue. -
Place anchor items first
Add the biggest items (cupcakes, large cookies, bark pieces) in each color zone. -
Add medium treats
Arrange pretzels, macarons, and cookie stacks around the larger items to build height and variety. -
Fill the gaps
Pour small candies and jelly beans into open spaces so very little board shows. -
Finish with texture
Tuck popcorn and mini eggs between sections and lightly scatter pastel sprinkles over the top. -
Serve immediately
Add small plates and napkins and let guests mix and match.
Notes
-
Use different textures: soft (marshmallows), crunchy (pretzels), creamy (frosted items).
-
Keep colors grouped — it makes the board look organized and striking.
-
Add height by stacking cookies or leaning bark pieces upright.
-
Put fragile items (macarons, cupcakes) on last.
-
Assemble within 2–3 hours of serving for best freshness.
-
If it’s warm, keep frosted items refrigerated until the last minute.
Olivia’s Kitchen Notes & Stories
I’ve made some version of this board for three Easters running now, and it’s evolved every time. The first year, I was so strict about the colors that I almost had a meltdown because the “blue” jelly beans looked teal. My husband just laughed, ate one, and said, “Tastes like Easter to me.” He was right. It’s supposed to be fun, not perfect!
One of my favorite memories is the year my niece, who was four at the time, “helped” me. Her job was to place the marshmallow chicks. She created an entire narrative for them, marching them in a line from the yellow zone to “visit” the blue macarons. We left her little procession right where it was. It was the most charming part of the whole board.
The biggest lesson? Things will get messy. Sprinkles will end up on the floor. A cookie might break. Just pop it in your mouth (the chef’s treat!) and keep going. The mess is part of the memory. This board is less about rigid recipe rules and more about embracing creativity, color, and the sweet, simple joy of sharing.
Your Questions, Answered!
Q: How far in advance can I assemble this board?
A: For the best texture, I recommend assembling it no more than 2-3 hours before serving. Anything with frosting (cookies, cupcakes) can get soft, and candies might bleed color if they get warm. You can, however, do all your shopping, baking
Final Thoughts
As I put the finishing touches on this board, dusting it with one last sprinkle of pastel nonpareils, I can’t help but smile. It’s more than just sugar and pretty colors, isn’t it? It’s about gathering around something beautiful. It’s about watching my niece’s face light up as she claims the biggest macaron. It’s about my husband sneaking a jelly bean when he thinks I’m not looking. It’s the laughter, the “oohs” and “ahhs,” and the quiet moments of connection that happen when you’re sharing something sweet.
This board is my love letter to those moments, inspired by my grandma’s kitchen and written in buttercream and candy. It’s a reminder that the best recipes aren’t always about complicated techniques, but about creating a feeling. A feeling of welcome, of celebration, of simple, unadulterated joy.
So this Easter, don’t stress over the perfect ham or the most elaborate side dish. Take an hour, gather your pastels, and build this edible piece of art. Let it be the centerpiece that sparks conversation and fills bellies with sweetness. Let it be the thing that makes your people feel loved. Because, friend, that’s what this is all about.
From my kitchen to yours, have a beautifully sweet and joy-filled Easter.
Happy Grazing,
Olivia
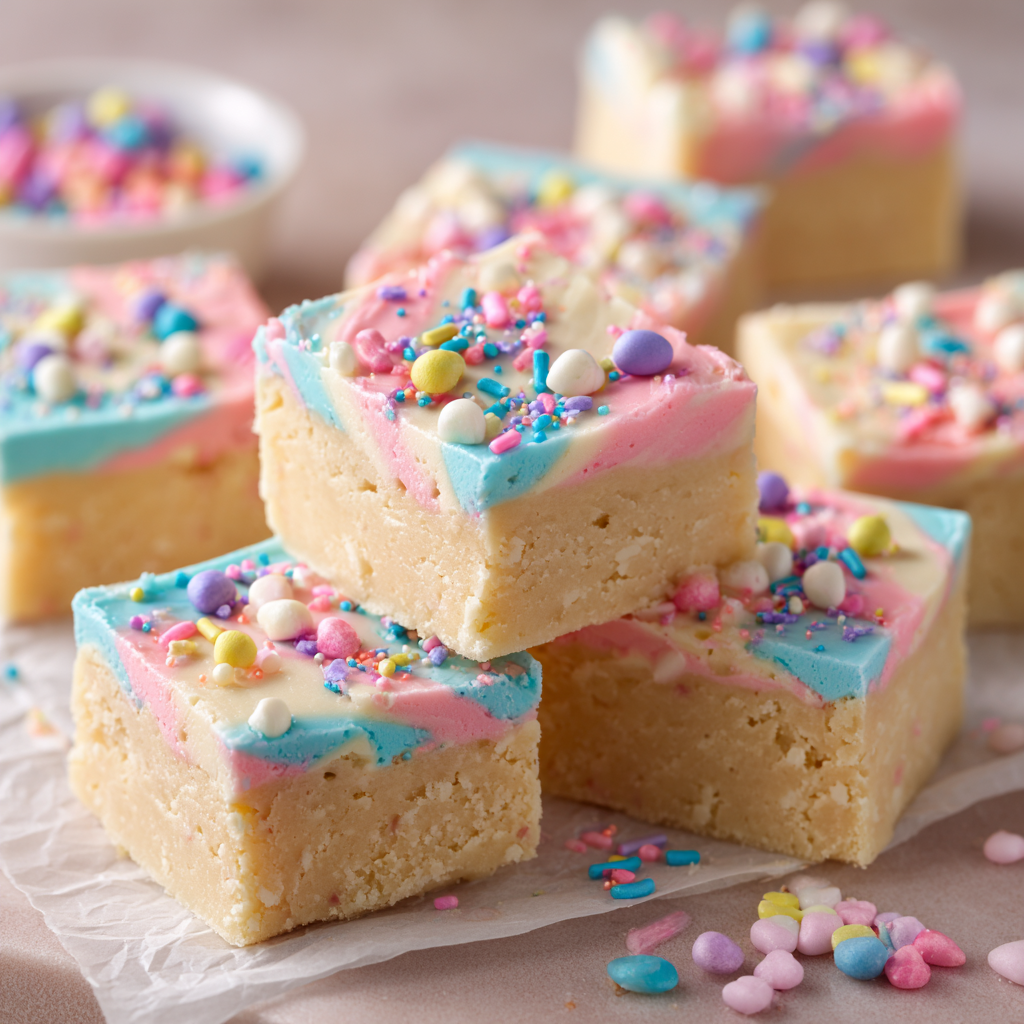
Pastel Frosted Sugar Cookie Fudge : Creamy Easter Dessert Squares
Pastel Frosted Sugar Cookie Fudge: Your New Favorite Easter Treat
Hey there, friend! Come on in, pull up a stool, and let’s chat about the best part of any spring gathering: the dessert table. I don’t know about you, but I live for that moment when eyes light up at the sight of something sweet, colorful, and downright irresistible. If you’re nodding along, then you and I are about to become best kitchen friends, because I have the ultimate no-bake Easter treat to share with you today.
Introducing my Pastel Frosted Sugar Cookie Fudge. Just saying the name makes me smile! Imagine the soft, buttery flavor of your favorite childhood sugar cookie, transformed into a rich, creamy square of fudge, and then topped with a cloud of sweet pastel frosting and a happy shower of sprinkles. It’s nostalgia and indulgence, all in one gorgeous, bite-sized package.
The absolute best part? You don’t need to turn on your oven. This is a foolproof, one-pan wonder that comes together in about 15 minutes of hands-on time. The rest is just letting the fridge work its magic. Whether you’re hosting a big Easter brunch, putting together a treat box for neighbors, or just need a little something sweet to celebrate the season, this fudge is your secret weapon. It looks like you spent hours in a fancy bakery, but we’ll keep our little kitchen secret between us. Ready to make something magical? Let’s grab our aprons!
The Sugar Cookie Connection: A Sweet Slice of Nostalgia
This recipe didn’t just pop into my head out of nowhere. It’s a direct line to my happiest springtime memories, specifically to my Great Aunt Clara’s kitchen. Every Easter, without fail, Aunt Clara would bake what seemed like hundreds of soft, pillowy sugar cookies. She’d recruit all the cousins for decorating duty, and her counter would become a rainbow of pastel frosting and every sprinkle shape imaginable (the little silver balls were the ultimate prize).
The process was joyous chaos. There was flour on the floor, frosting on our noses, and the sound of her laugh ringing through the house. But for all the fun of decorating, my favorite moment was always stealing a still-warm, unfrosted cookie from the cooling rack. That pure, buttery, vanilla-kissed flavor was absolute perfection.
This fudge is my love letter to that simple, un-frosted cookie moment. It captures that essential, comforting flavor in a decadent new form. It’s for anyone who believes the best part of the cookie is the cookie itself. Making it now feels like sharing a hug with my past, and I hope it becomes a part of your own sweet traditions, too.
Gathering Your Ingredients: A Chef’s Notes
One of the joys of this recipe is its simplicity! Here’s everything you’ll need, along with my little tips to ensure your fudge is a stunning success.
For the Sugar Cookie Fudge Base:
- 3 cups white chocolate chips: This is the foundation! I highly recommend using a quality brand of chips for the smoothest melt. You can use white chocolate bars chopped up, but chips often have stabilizers that help them melt more reliably for fudge.
- 1 can (14 oz) sweetened condensed milk: The magic ingredient that creates that luscious, fudgy texture. Do not substitute with evaporated milk—they are very different!
- 2 tbsp unsalted butter: Adds an extra layer of richness and helps create a silky mouthfeel. Using unsalted lets you control the salt level.
- 1 tsp pure vanilla extract: The star of the sugar cookie flavor show. Use the good stuff here!
- ½ tsp almond extract (optional, but highly recommended): This is the secret weapon! That subtle “what is that amazing flavor?” note that makes sugar cookies taste like *sugar cookies*. If you have a nut allergy, you can simply leave it out.
- ¼ cup pastel sprinkles (jimmies): These get folded right into the fudge. Pro tip: Use the longer “jimmy” style sprinkles rather than nonpareils (tiny round balls), as the color from nonpareils can bleed more easily into your white fudge.
For the Pastel Frosting Layer:
- ½ cup (1 stick) unsalted butter, softened: “Softened” is key! Leave it on the counter for 30-60 minutes until it yields gently to pressure. This ensures a creamy, lump-free frosting.
- 1 ½ cups powdered sugar: Sift it if it’s lumpy! This gives you the smoothest, dreamiest frosting texture.
- 1–2 tbsp milk or heavy cream: Start with one tablespoon and add the second only if needed to reach a spreadable consistency.
- ½ tsp vanilla extract: A little more vanilla love for the frosting.
- Pink or pastel food coloring: Gel food coloring is my go-to because it provides vibrant color without thinning the frosting. A tiny drop goes a long way!
- Extra sprinkles for topping: Go wild! This is where you can use any fun spring or Easter-themed sprinkles you love.
Step-by-Step: Making the Magic Happen
Okay, let’s get cooking! Or rather, let’s get *not*-cooking. This is so easy and fun.
Step 1: Prep Your Pan. Line an 8×8-inch baking pan with parchment paper, leaving some overhang on two sides. This is your “fudge sling” and will make lifting the whole block out for slicing incredibly easy. Give the paper a light spritz with cooking spray for extra non-stick insurance. Set the pan aside.
Step 2: Melt the Fudge Base. In a medium saucepan, combine the white chocolate chips, sweetened condensed milk, and 2 tablespoons of butter. Place this over LOW heat. I’m emphasizing low because white chocolate is delicate and can scorch or seize (become grainy) if heated too aggressively. Stir constantly and patiently until everything is melted, smooth, and beautifully combined. This should take about 5-7 minutes. Once it’s a cohesive, glossy mixture, immediately remove it from the heat.
Step 3: Flavor & Fold. Stir in the vanilla and almond extracts—that incredible sugar cookie aroma will hit you right away! Now, let the mixture cool for just 2-3 minutes. Why? If you add the sprinkles when the fudge is too hot, their colors might run. After a brief cool-down, gently fold in your ¼ cup of pastel sprinkles until they’re evenly distributed.
Step 4: Set the Base. Quickly pour and spread the fudge mixture into your prepared pan. Use a small offset spatula or the back of a spoon to smooth it into an even layer. Now, the hard part: patience. Pop the pan into the refrigerator, uncovered, and let it chill for at least 2-3 hours, until it’s completely firm to the touch. You can speed this up by using the freezer for about 1 hour if you’re in a pinch.
Step 5: Create the Frosting Cloud. While the fudge sets, make your frosting. In a medium bowl, beat the softened butter with a hand mixer (or stand mixer) on medium speed for 1-2 minutes, until it’s pale and creamy. Gradually add the sifted powdered sugar, starting on low speed so you don’t get a sugar cloud in your kitchen! Add the ½ tsp vanilla and 1 tablespoon of milk. Beat on medium-high until light and fluffy, about 2 minutes. If it seems too thick, add the second tablespoon of milk, a little at a time. Now, add a tiny drop of gel food coloring and beat until you achieve a soft, pretty pastel hue.
Step 6: Frost & Decorate. Once the fudge base is fully firm, spread the frosting over the top in a lovely, even layer. Immediately add your topping of extra sprinkles—they’ll stick perfectly to the fresh frosting. Gently press them down just a tad.
Step 7: Final Set & Slice. Return the pan to the fridge for another 30 minutes to let the frosting layer set. When you’re ready, use the parchment paper sling to lift the entire block of fudge onto a cutting board. Using a large, sharp knife, wipe the blade clean with a warm, damp cloth between cuts for super clean slices. Cut into 16 squares for a perfect two-bite treat, or 25 smaller squares for a dessert platter.
How to Serve These Pretty Pastel Squares
Presentation is half the fun with this dessert! Arrange the squares on a pastel-colored platter or a clean white cake stand for maximum visual pop. For a party, you can place them in pretty pastel paper liners to make them easy to grab. They pair beautifully with a pot of herbal tea, a glass of cold milk, or a crisp glass of Prosecco for a festive brunch. They also make the most heartfelt homemade gift—stack a few in a clear cellophane bag tied with a ribbon, or place them in a small gift box lined with parchment.
Get Creative: Fun Flavor Twists
Love the base recipe? Try one of these easy swaps to make it your own!
- Lemon Bliss: Omit the almond extract. Add 1 tbsp of lemon zest to the fudge base and use lemon juice instead of milk in the frosting. Top with yellow sprinkles!
- Funfetti Party: Use rainbow jimmies inside the fudge and on top. Add ¼ tsp of butter extract to the base for an extra “cake batter” flavor.
- Chocolate Dipped: Skip the frosting layer. Once the fudge is set, melt ½ cup of dark or milk chocolate chips and drizzle it extravagantly over the top before slicing.
- Gluten-Free/Dairy-Free: Use certified gluten-free sprinkles. For dairy-free, use dairy-free white chocolate chips, plant-based butter, and full-fat coconut milk instead of condensed milk (note: texture may vary slightly).
- Peppermint Holiday: For winter, omit almond extract, use red food coloring in the frosting, and top with crushed candy canes.
From My Kitchen to Yours: Chef’s Notes
This recipe has become my go-to for every spring event, and it’s evolved a bit from my first test batch. The first time I made it, I was so excited I added the sprinkles straight into the scalding hot fudge… and ended up with lovely swirls of pastel tie-dye fudge! It tasted great but wasn’t the look I was going for. Hence, the “cool slightly” tip I gave you—learn from my colorful mistake!
I’ve also learned that the quality of white chocolate really matters. One time I used a bargain-brand chip, and my fudge was a bit grainy. It’s worth the upgrade for that melt-in-your-mouth texture. Finally, don’t skip the chilling times. I know it’s tempting to slice into it early, but letting it get completely firm is what gives you those clean, beautiful squares that hold their shape. Trust the process!
Your Questions, Answered: FAQs & Troubleshooting
Q: My white chocolate mixture got grainy or lumpy. What happened?
A: This is usually from overheating. White chocolate seizes easily. Always use low heat and stir constantly. If it happens, you can try to rescue it by immediately removing it from heat and vigorously stirring in an extra tablespoon of condensed milk or a teaspoon of vegetable oil until it smooths back out.
Q: Can I make this ahead of time? How do I store it?
A: Absolutely! This is a fantastic make-ahead dessert. Store the finished fudge squares in a single layer in an airtight container in the refrigerator for up to 1 week. You can also freeze them (without stacking) on a parchment-lined tray until solid, then transfer to a freezer bag for up to 2 months. Thaw in the fridge overnight.
Q: My frosting is too runny/too thick. Help!
A: For runny frosting: Your butter may have been too soft, or you added too much liquid. Pop the whole bowl in the fridge for 10-15 minutes to firm up the butter, then re-whip. For too-thick frosting: Simply add more milk, just a teaspoon at a time, beating well after each addition until it’s spreadable.
Q: I don’t have an 8×8 pan. Can I use a different size?
A: You can! A 9×9 pan will give you slightly thinner squares and a shorter chill time. Just reduce the frosting by about 25% so the layer isn’t too thick relative to the base. Avoid a much larger pan, or your fudge layer will be too thin.

Pastel Frosted Sugar Cookie Fudge : Creamy Easter Dessert Squares
Description
If you love soft sugar cookies and creamy fudge, this no-bake treat brings the best of both into one colorful Easter dessert. It’s rich, sweet, and packed with vanilla-buttery flavor, topped with pastel frosting and sprinkles for a festive finish. Best of all, it comes together quickly with simple ingredients and no oven time — perfect for spring gatherings or quick holiday sweets.
Ingredients
Fudge Base
-
3 cups white chocolate chips
-
1 can (14 oz / 400 g) sweetened condensed milk
-
2 tbsp unsalted butter
-
1 tsp vanilla extract
-
½ tsp almond extract (optional)
-
¼ cup pastel jimmies sprinkles
Pastel Frosting
-
½ cup (1 stick) unsalted butter, softened
-
1½ cups powdered sugar
-
1–2 tbsp milk or cream
-
½ tsp vanilla extract
-
Pastel gel food coloring
-
Extra sprinkles for topping
Instructions
-
Prepare pan
Line an 8×8-inch pan with parchment paper, leaving overhang for lifting. -
Make fudge layer
In a saucepan over low heat, combine white chocolate chips, condensed milk, and butter. Stir constantly until fully melted and smooth. Remove from heat. -
Flavor
Stir in vanilla and almond extract. Let cool 2–3 minutes, then gently fold in sprinkles. -
Set
Spread mixture evenly in the pan. Chill 2–3 hours (or about 1 hour in the freezer) until firm. -
Make frosting
Beat softened butter until creamy. Add powdered sugar gradually. Mix in vanilla and 1 tbsp milk. Beat until fluffy, adding more milk if needed. Tint with pastel food coloring. -
Frost & decorate
Spread frosting over chilled fudge. Add sprinkles. -
Final chill & slice
Chill 30 minutes more, then lift out and cut into squares with a clean, sharp knife.
Notes
-
Keep heat low when melting white chocolate to prevent grainy texture.
-
Let fudge cool slightly before adding sprinkles so colors don’t bleed.
-
Use gel coloring for frosting — it gives bright color without thinning it.
-
Clean the knife between cuts for neat squares.
-
Store chilled — this fudge slices and holds best when cold.
Nutritional Information (Approximate)
Yield: 16 squares. Per square: Calories: ~260 | Total Fat: 14g | Saturated Fat: 8g | Cholesterol: 25mg | Sodium: 45mg | Total Carbohydrates: 32g | Sugars: 31g | Protein: 2g
***
There you have it! My beloved Pastel Frosted Sugar Cookie Fudge. I hope this recipe brings as much joy to your kitchen as it does to mine. Remember, cooking (and not-cooking!) is about the love you stir into it. So have fun, make a little mess, and enjoy every sweet, buttery bite. Happy Easter and happy baking!
xo, Olivia
Final Thoughts: More Than Just a Fudge Square
As I sit here, looking at a plate of these pastel-frosted beauties on my kitchen counter, I’m reminded why I love this time of year so much. It’s not just the warmer weather or the blooming flowers; it’s the invitation to create—to fill our homes with color, sweetness, and the people we love.
This Pastel Frosted Sugar Cookie Fudge has become so much more than a recipe to me. It’s a bridge between the cherished memories of my Aunt Clara’s bustling, flour-dusted kitchen and the new traditions I’m building in my own home. It’s proof that the simplest flavors—butter, vanilla, a hint of almond—can be the most profound. And it’s a reminder that you don’t need complicated techniques or hours of free time to create something that feels truly special.
Whether you’re making this for a bustling Easter brunch, packaging it up as a heartfelt gift for a neighbor, or just treating yourself on a quiet spring afternoon, I hope you feel the love baked (or, in this case, stirred) into every single square. I hope it brings a smile to your face and a little moment of joy to your day.
So, go ahead, pull up that stool in your own kitchen. Gather your ingredients, maybe put on some music, and make a little magic. And when you do, I’d love nothing more than to hear about it. Tag me in your photos, leave a comment below, and let’s keep this sweet conversation going.
From my kitchen to yours, thank you for spending this time with me. Now, go grab a piece (you deserve it!), and I’ll see you here again very soon.
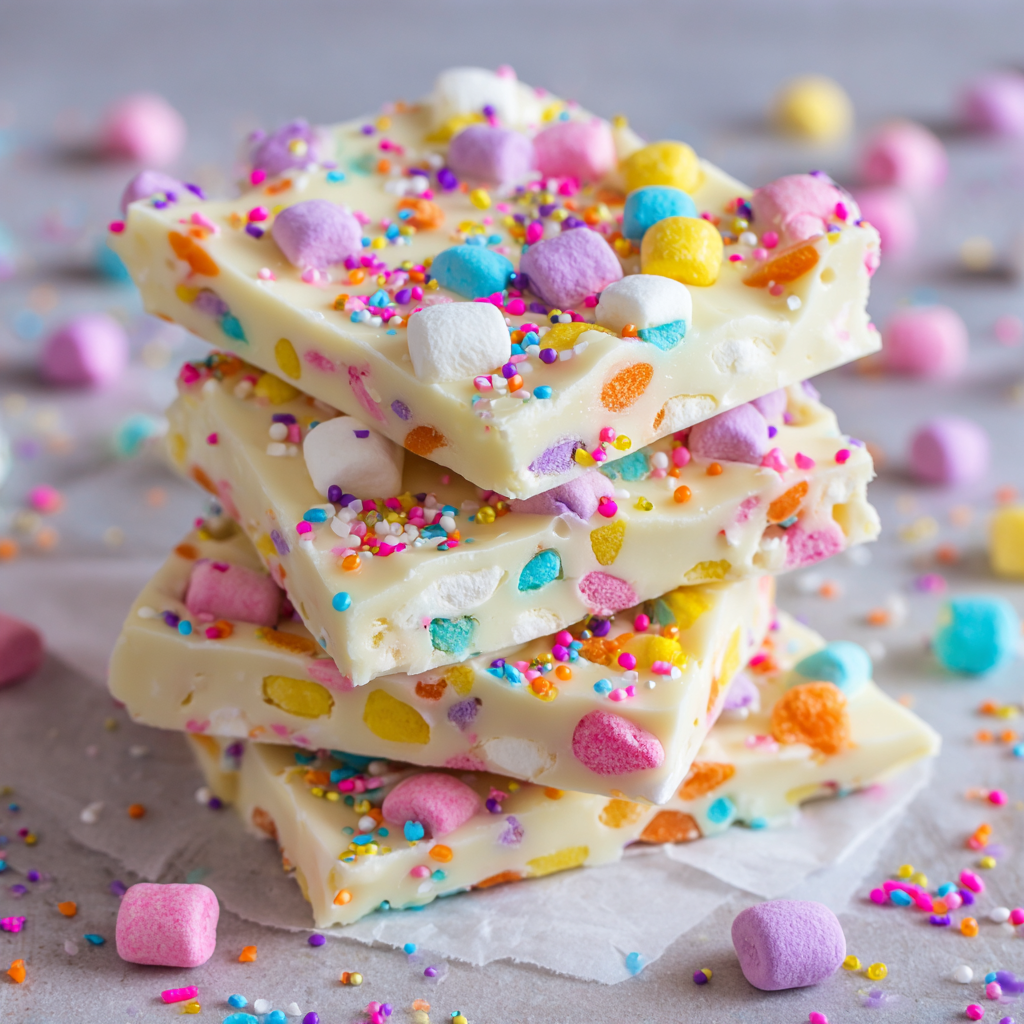
Super Easy Easter Marshmallow Bark : 4 Ingredient No-Bake Spring Treat
Super Easy Easter Marshmallow Bark: Your New Favorite 4-Ingredient Spring Tradition
Hey friends! Olivia here, apron probably a little dusty with powdered sugar, coming at you from my sunlit kitchen counter. Can you feel it? That little buzz in the air? Spring is whispering, flowers are peeking out, and Easter is just around the corner, bringing with it all those wonderful, chaotic, beautiful gatherings.
And with gatherings comes the age-old question: what on earth am I going to make? I’m talking about that treat that needs to be easy enough to whip up during naptime or after work, impressive enough to make everyone’s eyes light up, and delicious enough to have people sneaking seconds (and thirds). It needs to be a crowd-pleaser, a conversation starter, and maybe even a little bit magical.
Well, my food-loving friend, I have the absolute perfect answer. Let me introduce you to your new kitchen superhero: Super Easy Easter Marshmallow Bark. This isn’t just a recipe; it’s a revelation. We’re talking about creamy, dreamy white chocolate, clouds of pastel mini marshmallows, and a joyful confetti of sprinkles, all coming together in a bark that’s simultaneously soft, crunchy, and melt-in-your-mouth wonderful. The best part? It requires just four simple ingredients, zero baking, and about 30 minutes from start to delicious finish.
Whether you’re prepping for an Easter egg hunt, needing a sweet contribution to Sunday brunch, or just wanting to make a weeknight feel special, this bark has your back. It’s the kind of homemade happiness that looks like you spent hours, but secretly took you less time than a single episode of your favorite show. So, grab your favorite mixing bowl, and let’s make some messy, wonderful, sweet memories together!
The Apron-String Memory That Inspired This Bark
This recipe always takes me right back to my grandma’s linoleum-floored kitchen. Easter at her house wasn’t a quiet affair. It was a symphony of cousins laughing, the hum of the oven, and the unmistakable *thwack* of eggs being dyed (sometimes a little too enthusiastically).
One year, when I was maybe seven or eight, I was deemed “old enough” to help with the real cooking. My job? The “sprinkle overseer.” My grandma was making a version of this bark, a recipe clipped from a magazine, and my sole responsibility was to shower the top with every color of sprinkle and sugar crystal we owned. I remember the intense concentration, my tongue poking out, carefully placing nonpareils like they were precious gems. When she broke it into pieces later, I pointed proudly to “my section.” That first taste—the cool, smooth chocolate giving way to the soft, sweet marshmallow—was a trophy. It wasn’t just a treat; it was a badge of honor, a sign I was part of the kitchen crew.
Now, every time I make this bark, I think of her. I don’t always measure the sprinkles perfectly anymore (sometimes more is more!), but that feeling of creating simple, shared joy? That’s the real recipe. This Easter, I hope this bark becomes a little part of your story, too.
Gathering Your Rainbow: Ingredients & Why They Work
See? I told you it was simple! Here’s your grocery list for pure joy. Don’t just toss them in the cart—let’s chat about why each one matters and how you can make it your own.
- 1 bag (12 oz) white chocolate chips: This is our superstar, the creamy canvas for our spring masterpiece. **Chef’s Insight:** I like using good-quality chips for the smoothest melt. White chocolate is a bit diva-ish—it seizes (gets clumpy) easily if overheated. We’ll handle it with care! Substitution Tip: You can use a white chocolate baking bar chopped up, or for a different flavor, try semi-sweet or milk chocolate chips!
- 3 cups mini rainbow marshmallows: These are the fluffy, chewy, colorful heart of the bark. The mini size is key—they distribute perfectly and are just adorable. **Chef’s Insight:** Look for the pastel-colored “Easter” minis if you can find them; they make it extra festive. If you only have regular marshmallows, just give them a quick chop!
- 1 tbsp shortening (optional, but highly recommended): This is my secret weapon for a flawlessly smooth, glossy chocolate. **Chef’s Insight:** Shortening helps thin the chocolate just enough for easy spreading and prevents it from getting chalky as it sets. Substitution Tip: If you don’t have shortening, you can use 1/2 tbsp of coconut oil. Avoid butter, as the water content can cause the chocolate to seize.
- Easter sprinkles (for topping): This is where you get to shout “Happy Spring!” with color. **Chef’s Insight:** Go wild! Use pastel jimmies, confetti quins, sugar pearls, or even crushed-up cereal like pastel Easter Egg Oreos. This is your chance to personalize. Pro-tip: Have your sprinkles ready in a small bowl before you melt the chocolate. Timing is everything!
Let’s Make Some Magic: Step-by-Step Instructions
Ready? Aprons on, music up, let’s do this! It’s so simple, but these little tips will guarantee bakery-level results every single time.
- Prep Your Pan: Line an 8×11-inch baking dish (or a similar-sized rimmed baking sheet) with parchment paper, letting a little overhang on two sides. Why? This creates a “sling” so you can lift the entire slab of bark out for easy cutting later. No struggling with a spatula! A light spritz of cooking spray on the pan under the paper helps it stick in place.
- Melt the Chocolate Like a Pro: In a clean, dry, microwave-safe bowl, combine your white chocolate chips and that tablespoon of shortening. **Chef’s Hack:** Microwave on high for 1 minute, then stop. Take it out (the bowl will be hot!). Stir vigorously with a rubber spatula. It will look mostly unmelted—that’s normal! Microwave again in 30-second intervals, stirring with determination after each blast. White chocolate holds its shape but can be secretly melted. Stop when just a few small lumps remain; the residual heat will melt them as you stir. Over-microwaving is the enemy of smooth chocolate!
- The Big Fold-In: Working quickly now, dump your 3 cups of mini marshmallows into the melted chocolate. Gently fold them in with your spatula until they’re all evenly coated. **Chef’s Secret:** Be swift and gentle. We want to coat the marshmallows, not melt them. If they start to get gooey, you’re stirring too hard or the chocolate was too hot. A few streaks of chocolate are fine—it looks homemade and wonderful!
- Spread & Sprinkle: Immediately pour the mixture onto your prepared pan. Use the spatula to spread it into an even layer, about 1/2 to 3/4-inch thick. Don’t stress about perfection—rustic is charming! Now, grab your pre-measured sprinkles and shower them over the top, pressing down gently so they adhere. This is the fun part—let any kids nearby take over!
- The Chill: Carefully transfer the pan to your freezer. Let it set for about 20 minutes. The freezer sets it faster and gives a great snap. **Chef’s Note:** You can use the fridge, but it will take closer to 45-60 minutes to set completely.
- The Grand Finale – Cutting: Once rock solid, lift the bark out using the parchment paper sling and place it on a cutting board. Let it sit at room temperature for 2-3 minutes—this prevents it from shattering. Use a sharp knife to cut into squares or rectangles. For extra Easter fun, lightly grease metal Easter egg-shaped cookie cutters and press them into the bark to create adorable shapes! The scraps are the cook’s treat—I won’t tell.
Serving Your Sweet Masterpiece
Presentation is half the fun! Pile your bark pieces high on a pastel platter or in a rustic wooden bowl. For a really special touch, layer pieces in a clear cellophane bag, tie it with a pretty ribbon, and give it as the sweetest homemade Easter gift. It’s perfect with a mid-afternoon coffee, as a sweet ending to a big meal, or tucked into lunchboxes for a surprise. Watch it disappear—it always does!
Make It Your Own: Delicious Recipe Variations
Got the basic recipe down? Let’s play! Here are a few of my favorite twists:
- Bunny Trail Mix Bark: Swap out 1 cup of the marshmallows for a mix of pretzel sticks (broken), roasted peanuts, and pastel M&M’s for a sweet-and-salty crunch.
- Spring Berry Blast: After folding in marshmallows, gently mix in 1/2 cup of freeze-dried strawberry or raspberry pieces. The tartness cuts the sweetness beautifully!
- “Cadbury Egg” Bark: Use milk chocolate instead of white. After spreading, dot the top with halved or mini Cadbury Creme Eggs before it sets.
- Gluten-Free & Nut-Free: This recipe is naturally both! Just double-check your chocolate chip and sprinkle labels to ensure they’re certified GF if needed.
- Peeps-tacular! Right after spreading the bark, press whole or halved Easter Peeps (chicks or bunnies) into the top for an iconic, fluffy finish.
Olivia’s Chef Notes: A Few More Crumbs of Wisdom
This recipe has evolved from my grandma’s clipped magazine version to my ultimate no-stress staple. I’ve learned a few things along the way! First, the shortening truly is a game-changer—it makes the chocolate so much more cooperative. Second, I used to be so careful not to break the marshmallows, but one day my toddler “helped” by vigorously stirring, and you know what? The slightly melted, swirly result was delicious! So don’t fear a little imperfection.
I also keep a stash of this in the freezer year-round, just changing up the sprinkles. Red and green for Christmas? Done. Orange and black for Halloween? Absolutely. It’s my edible mood ring. The biggest lesson, though, is that the messier the counter gets with sprinkles, the bigger the smiles are when you serve it. That’s a kitchen rule I live by.
Your Questions, Answered: FAQs & Troubleshooting
Let’s tackle the common hiccups before they happen. You’ve got this!
- Q: My white chocolate got thick, clumpy, and grainy. What happened?
A: Ah, you’ve met the “seizing” monster. This happens when water or steam gets into the chocolate (from a wet bowl or spoon) or if it’s overheated. Unfortunately, once seized, it’s hard to fully recover. Prevention is key: Use a perfectly dry bowl and spatula, and microwave in short bursts, stirring well. If it’s just slightly thick, try stirring in a teaspoon more of shortening until smooth. - Q: Can I use the stovetop instead of a microwave to melt the chocolate?
A: Absolutely! Use a double boiler (or a heatproof bowl set over a pot of simmering water, ensuring the bowl doesn’t touch the water). Stir constantly until melted. This method gives you more control and is less likely to overheat the chocolate. - Q: My marshmallows started melting into the chocolate! Is it ruined?
A: Not ruined at all—just a different, wonderfully gooey texture! It happens if the chocolate is too hot when you add them. Next time, let the chocolate cool for a minute or two after melting before folding. This batch will still taste amazing, I promise. - Q: How do I store this, and how long does it last?
A: Store it in an airtight container at room temperature for up to 5 days, or in the fridge for up to 2 weeks. For the best texture (that perfect snap!), I love storing mine in the freezer for up to a month. It’s a chilled, delightful treat straight from the freezer!
Super Easy Easter Marshmallow Bark : 4 Ingredient No-Bake Spring Treat
Description
Spring treats don’t get much easier than this. If you need something festive, colorful, and crowd-pleasing without turning on the oven, this Easter Marshmallow Bark is your new go-to. It’s creamy, sweet, and chewy with pops of crunch from sprinkles — and it comes together in minutes. Perfect for parties, school events, or a fun weekend kitchen project.
Ingredients
-
12 oz (340 g) white chocolate chips or chopped white chocolate
-
3 cups mini pastel marshmallows
-
1 tablespoon shortening or coconut oil (optional, for smoother melting)
-
2–3 tablespoons Easter sprinkles
Instructions
-
Prep the pan
Line an 8×11-inch pan or small baking sheet with parchment paper, leaving overhang for easy lifting. -
Melt the chocolate
Place white chocolate and shortening (if using) in a microwave-safe bowl.
Microwave 60 seconds, stir well, then continue in 30-second bursts, stirring each time, until smooth. Do not overheat. -
Mix in marshmallows
Let chocolate cool for about 1 minute, then gently fold in marshmallows until coated. -
Spread
Pour mixture into the lined pan and spread evenly with a spatula. -
Decorate
Sprinkle toppings over the surface and press lightly so they stick. -
Chill
Refrigerate 30–45 minutes or freeze 15–20 minutes until firm. -
Break or cut
Lift out and cut into squares or break into bark pieces.
Notes
-
Let the chocolate cool slightly before adding marshmallows so they don’t melt too much.
-
Stir chocolate even if it looks unmelted — white chocolate keeps its shape while melting.
-
Use dry bowls and spoons — even a little water can make chocolate clumpy.
-
Want less sweetness? Mix in crushed pretzels or plain cereal for balance.
-
Store in an airtight container in the fridge for a firmer snap.
Final Thoughts
Super Easy Easter Marshmallow Bark: Your New Favorite 4-Ingredient Spring Tradition
As I’m standing here in my kitchen, wiping the last traces of powdered sugar from the counter and sneaking one more piece of bark (purely for quality control, of course), I can’t help but smile. This little recipe—this humble combination of chocolate, marshmallows, and sprinkles—has become so much more than just a dessert in my home.
It’s the quiet Sunday afternoon activity when the kids are bouncing off the walls with spring fever. It’s the “I need something to bring to the potluck in an hour” miracle solution. It’s the gift we tie with ribbon for neighbors, teachers, and friends who deserve a little sweetness. And honestly? It’s the treat I make just for me sometimes, because everyone deserves a little edible joy.
What I love most about this Easter Marshmallow Bark is that it captures the very best part of springtime: the feeling that something colorful and beautiful can come together with minimal effort. The flowers don’t try hard to bloom—they just do. And this bark is exactly the same. Four ingredients, fifteen minutes of hands-on time, and suddenly you’ve created something that looks like it came from a fancy bakery.
So here’s my hope for you, sweet friend: Make this bark with abandon. Let the sprinkles fly everywhere. Let little hands help (and make a glorious mess). Package it up in cute bags for the mail carrier, the piano teacher, the coworker who always makes you laugh. Set a big pile of it on the Easter dessert table and watch how quickly it disappears—not because people are hungry, but because it makes them happy.
And when you bite into that perfect piece—the one with the ideal ratio of creamy chocolate to fluffy marshmallow to rainbow sprinkles—I hope you feel what I feel. A little bit of nostalgia. A whole lot of simple pleasure. And the quiet satisfaction of knowing that you made something lovely, with your own two hands, for the people you love.
That’s the real recipe, friends. That’s the magic.
Now go make some memories—and save a piece for yourself. You’ve earned it.
Happy Easter, and happy creating!
XOXO,
Olivia
P.S. I’d absolutely love to see your creations! Tag me when you make this—there’s nothing that makes my day quite like seeing your kitchen triumphs and sprinkle-covered smiles. And if you have a funny story about a marshmallow mishap or a toddler who “helped” a little too enthusiastically? Those are my favorite messages of all.
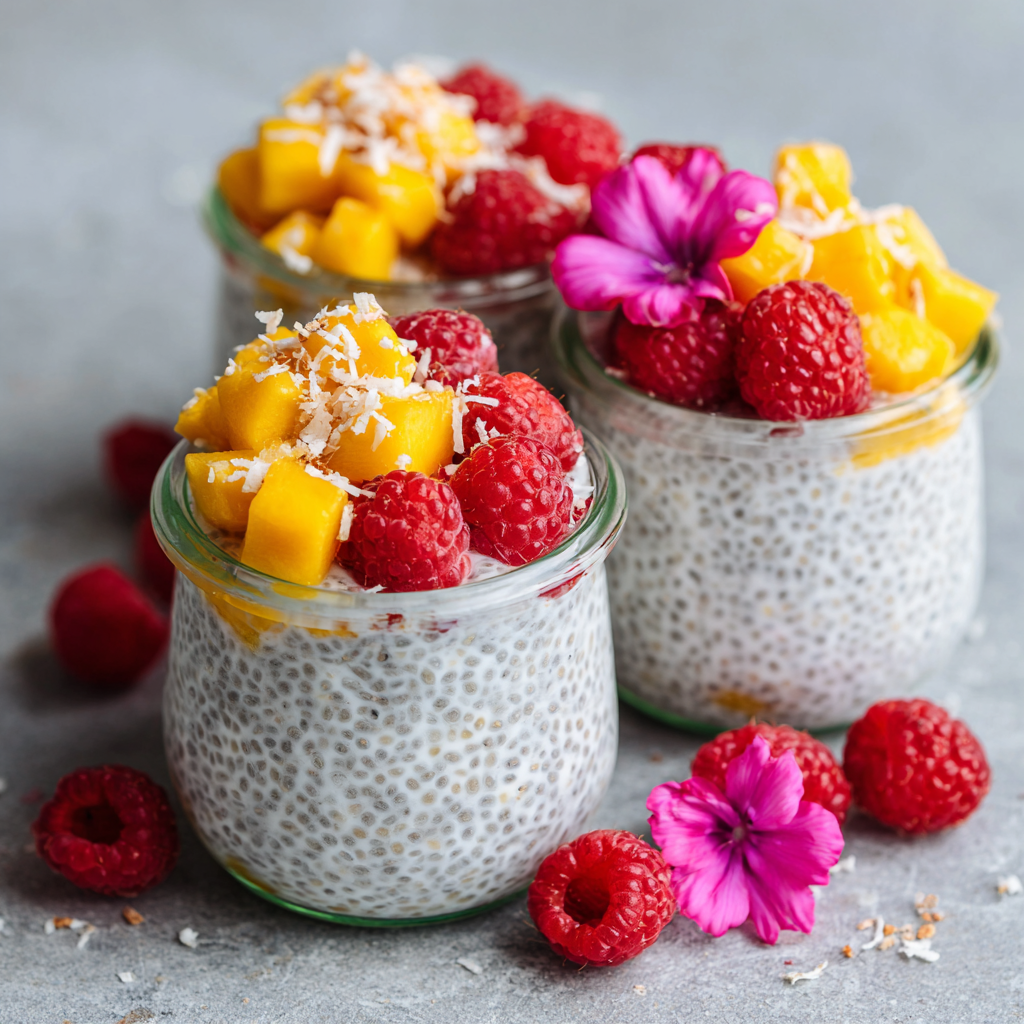
Coconut Chia Pudding Cups with Mango or Raspberries (Spring-Ready)
Sunshine in a Jar: My Favorite Spring-Ready Coconut Chia Pudding
Hello, hello, my friend! Welcome back to the kitchen. Can we just take a moment to appreciate that first real, warm day of spring? The one where you throw the windows open, the birds are suddenly a full choir, and you crave food that tastes as bright and hopeful as the sunshine feels. That’s exactly the mood that inspired today’s recipe. We’re leaving the heavy stews and rich bakes behind (for now, no worries, they’ll be back!) and embracing something light, vibrant, and effortlessly elegant.
I’m talking about my Coconut Chia Pudding Cups, crowned with jewel-like mango or bursting raspberries. This isn’t just a recipe; it’s a feel-good ritual. It’s for those mornings when you want a breakfast that feels like a treat, for brunches where you want to impress without stress, and for those evenings when a light, satisfying dessert is the perfect period at the end of your day. The best part? It’s almost magically simple. A few wholesome ingredients, a good whisk, and a little patience while it chills transforms into a creamy, dreamy, fiber-rich pudding that will have you doing a little happy dance.
So, tie on your favorite apron (the one with the questionable stain that tells a story, I won’t judge), grab a bowl, and let’s make something that tastes like springtime and simplicity had a delicious love child. Trust me, once you see how easy and versatile this is, it’s going to become a staple in your rotation.
A Taste of Sunshine & A Lesson in Patience
This recipe always takes me back to a tiny, sun-drenched cafe in California I visited years ago. I was jet-lagged, a little lost, and desperately craving something that didn’t feel like airport food. I stumbled into this little spot and ordered something called “Coconut Chia Bliss” from a blackboard menu. What arrived was this stunning glass layered with creamy white pudding and brilliant yellow mango. One spoonful and I was hooked—it was cool, subtly sweet, and bursting with fresh flavor. I immediately needed to know how to make it at home.
My first attempt? A complete lumpy, seedy disaster. I rushed it. I mixed, didn’t whisk again, and expected instant pudding magic. Chia seeds, I learned, teach you a beautiful lesson in patience. They need time to work their gelatinous, thickening magic. That initial failure was the best thing that could have happened. It sent me back to my kitchen, determined to crack the code for the perfect, clump-free, luxuriously creamy texture. After many joyful experiments (and a few more less-successful ones), I landed on this foolproof method. Now, every time I take that first bite of my homemade version, I’m transported back to that sunny patio, reminded that good things—in life and in the kitchen—are worth the wait.
Gathering Your Sunshine: Ingredients & Insights
Here’s what you’ll need to create this little jar of joy. I’ve included my favorite chef’s notes and swaps so you can make this recipe your own!
- 1 can (13.5 oz) full-fat coconut milk – This is the secret to that lush, creamy, indulgent texture. The fat content is what makes it feel like a dessert. Chef’s Insight: Shake the can like crazy before opening! Separation is natural, but we want it all combined. For a lighter version, light coconut milk works, but the pudding will be a bit less rich and creamy.
- ¼ cup chia seeds – Our mighty little thickener! They’re packed with fiber, omega-3s, and protein. Chef’s Insight: Don’t skimp on quality if you can help it. Fresh, high-quality chia seeds have a neutral taste and swell beautifully.
- 1–2 tbsp pure maple syrup or honey – Sweetness to taste! I love the earthy depth of maple with coconut. Substitution Tip: Agave nectar, date syrup, or even a pinch of your favorite sugar-free sweetener all work. Start with 1 tbsp, you can always add more after chilling.
- ½ tsp pure vanilla extract – The warmth of vanilla is the cozy hug that ties all the flavors together. A tiny splash of almond extract is also a dream here.
- A tiny pinch of salt – Never forget the salt! Even in sweet dishes. It’s not about tasting salty; it’s about amplifying every other flavor and balancing the sweetness perfectly.
- Toppings: Fresh Mango & Raspberries – The springtime crown! I love the tropical vibe of mango, but the tart pop of raspberries is equally stunning. Chef’s Insight: Use what’s freshest and brightest at your market.
- Optional: Toasted Coconut Flakes & Lime Zest – These are my “pro-chef” finishes that take 10 seconds but add a huge wow factor. The toasty crunch and the bright citrus zest make each bite an event.
Let’s Make Some Magic: Step-by-Step
Ready? This is where the fun happens. Let’s walk through it together, step by cozy step.
- The Foundation Whisk: Grab a medium-sized bowl with a flat bottom (it makes whisking easier!). Pour in your well-shaken coconut milk. Add the chia seeds, 1 tbsp of your sweetener, the vanilla, and that all-important pinch of salt. Now, take your whisk and go to town! You want to whisk vigorously for a good 30-45 seconds. Our goal is to evenly distribute every single chia seed so none are clumped together at the bottom. Chef’s Hack: If you’re using a jar, seal the lid tightly and give it a vigorous shake instead! It’s oddly therapeutic.
- The Patience Practice: Set a timer for 5 minutes. Let the mixture just sit on the counter. This brief rest allows the chia seeds to start absorbing the liquid. You’ll see a slight thickening begin around the edges.
- The Second Chance Whisk: This is the most crucial step for a smooth pudding! After 5 minutes, grab your whisk again and give it another really good stir, breaking up any clumps that dared to form. This ensures every seed is suspended and will thicken evenly, giving you that flawless, silky texture we’re after.
- The Transformative Chill: Cover the bowl tightly with plastic wrap or a lid. Pop it into the fridge. Let it work its magic for at least 2 hours, but honestly, overnight is gold. As you sleep or go about your day, the chia seeds are plumping up, creating that beautiful, spoonable pudding texture. No heat, no fuss, just time.
- The Grand Finale: When you’re ready to serve, give the pudding one last gentle stir. Spoon it into your favorite glasses, bowls, or mason jars. Now, artfully pile high with your diced mango or raspberries. For the finishing touches, sprinkle with toasted coconut flakes (toast them in a dry pan for 2 minutes until golden—trust me, it’s worth it) and a little grated lime zest. The aroma alone is heavenly!
Serving Up the Sunshine
Presentation is half the fun! I love serving these in clear glasses or mason jars so you can see the beautiful layers. For a brunch spread, I’ll line up a whole row of them on the table—it looks stunning with minimal effort. They’re perfect as a make-ahead breakfast you can grab and go, a light dessert after a big meal, or a healthy snack that feels decadent. Pair it with a hot cup of coffee or a cool glass of iced herbal tea for the ultimate spring moment.
Make It Your Own: Delicious Twists & Swaps
- Tropical Dream: Use pineapple instead of mango, and add a tablespoon of crushed macadamia nuts on top.
- Berry Medley: Swap the single berry for a mix of strawberries, blueberries, and raspberries. A drizzle of berry compote takes it over the top.
- Chocolate-Covered Strawberry: Whisk 1 tbsp of unsweetened cocoa powder into the coconut milk base. Top with fresh sliced strawberries and a dark chocolate shaving.
- Vegan & Refined Sugar-Free: Stick with maple syrup and ensure your coconut milk brand is vegan-friendly (most are!).
- Protein Power-Up: Stir a scoop of your favorite vanilla or unflavored collagen peptides or plant-based protein powder into the milk before adding the chia seeds. You may need a splash more liquid.
From My Kitchen to Yours: A Few Extra Thoughts
This recipe has evolved from that first lumpy batch into my go-to “I need something wonderful, fast” dish. I’ve made it for bridal showers, new mom friends, and countless sleepy Sunday mornings. One of my favorite kitchen stories is the time I accidentally used coconut *cream* instead of milk (similar can, very different look!). It was so thick I could stand a spoon in it! I thinned it out with a bit of almond milk, and it was still delicious—proof that you can often rescue a kitchen “oops” with a little creativity. Don’t be afraid to play with it. Add a spoonful of passionfruit pulp, mix in some lemon curd, or layer it with granola for crunch. This pudding is your canvas!
Your Questions, Answered!
Q: My pudding is still runny after 2 hours. What happened?
A: Don’t worry! This usually means the chia seed-to-liquid ratio is off (brands of coconut milk can vary slightly in volume) or the seeds just need more time. Give it a good stir and pop it back in the fridge for a few more hours or overnight. It will thicken up!
Q: I have chia seed clumps! Can I fix it?
A> You can absolutely salvage it! Just take a small whisk or a fork and break up the clumps vigorously. If they’re really stubborn, you can even give the whole mixture a quick blitz with an immersion blender or in a regular blender for a few seconds to smooth it out. Next time, remember that crucial second whisk at the 5-minute mark.
Q: How long does this keep in the fridge?
A> It keeps beautifully! Store the base pudding (without fresh fruit toppings) in a sealed container for up to 5 days. Add your fresh fruit just before serving to keep it from getting soggy.
Q: Can I make it less sweet?
A> Absolutely. Start with just 1/2 tablespoon of sweetener, or even none at all. You can always drizzle a little honey or syrup on top when serving. The fruit also adds natural sweetness!
Coconut Chia Pudding Cups with Mango or Raspberries (Spring-Ready)
Description
Bright, creamy, and packed with fresh fruit, this Coconut Chia Pudding is spring in a jar! Perfect for breakfast, brunch, or a light dessert, it’s naturally fiber-rich, made with wholesome ingredients, and beautifully customizable.
Ingredients
For the Coconut Chia Pudding:
-
1 can (13.5 oz) full-fat coconut milk (shake well before opening)
-
¼ cup chia seeds
-
1–2 tbsp pure maple syrup or honey, to taste
-
½ tsp pure vanilla extract
-
A tiny pinch of salt
Toppings (Optional but Recommended):
-
Fresh mango, diced
-
Fresh raspberries
-
Toasted coconut flakes
-
Grated lime zest
Instructions
-
Mix the Base: In a medium bowl, combine coconut milk, chia seeds, 1 tbsp maple syrup, vanilla, and a pinch of salt. Whisk vigorously for 30–45 seconds to evenly distribute the seeds. (Or shake in a tightly sealed jar.)
-
Rest: Let sit 5 minutes to allow chia seeds to start thickening.
-
Second Whisk: Stir again thoroughly to break up any clumps. This ensures a smooth, creamy pudding.
-
Chill: Cover and refrigerate at least 2 hours, ideally overnight, until thick and spoonable.
-
Serve: Stir gently before serving. Spoon into jars or bowls and top with fresh mango, raspberries, toasted coconut, and lime zest.
Notes
-
Tropical Dream: Replace mango with pineapple and sprinkle crushed macadamia nuts.
-
Berry Medley: Mix strawberries, blueberries, and raspberries; drizzle with berry compote.
-
Chocolate-Covered Strawberry: Add 1 tbsp unsweetened cocoa powder to the base; top with strawberries and chocolate shavings.
-
Vegan & Sugar-Free: Stick with maple syrup and ensure coconut milk is vegan-friendly.
-
Protein Boost: Stir in a scoop of vanilla or unflavored protein powder before adding chia seeds.
Nutritional Info (A General Guide)
Per serving (approx. ¾ cup pudding base, without toppings): Calories: ~220 | Protein: 5g | Carbohydrates: 14g | Dietary Fiber: 8g | Fat: 16g. This is a fantastic source of fiber and healthy fats to keep you satisfied!
Final Thoughts: A Little Jar of Joy
And there you have it—your own little jar of sunshine, ready to brighten any morning, afternoon, or evening. This Coconut Chia Pudding is proof that the most beautiful things in life are often the simplest. It’s a recipe that asks very little of you (just a bit of whisking and a whole lot of patience) but gives so much in return: a creamy, nourishing, and stunningly pretty dish that genuinely makes you feel good from the inside out.
I love that this recipe isn’t just about following steps; it’s about creating a moment. Whether you’re assembling a batch on a lazy Sunday afternoon to set yourself up for a stress-free week, or layering them into fancy glasses for a brunch with friends, you’re doing more than just making food. You’re practicing a little self-care, and you’re sharing that feeling of brightness with others. That’s the kind of cooking I live for.
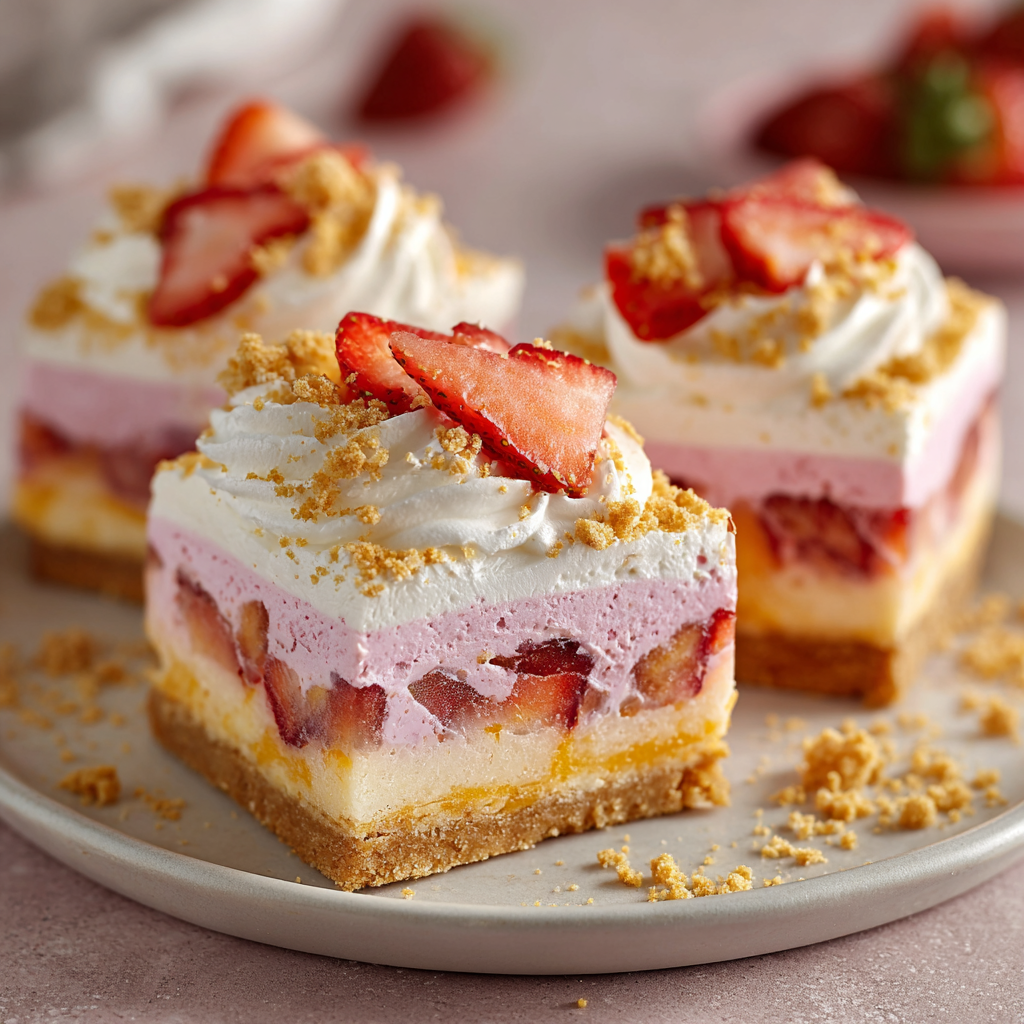
Strawberry Shortcake Easter Bars : Creamy Layered Spring Dessert
Strawberry Shortcake Easter Bars: Your New Spring Tradition
Hey there, friend! Come on in, grab an apron, and let’s get something wonderful baking. If your heart does a little happy dance at the first sight of ruby-red strawberries at the market, or if the idea of a dessert that’s equal parts stunning and simple makes you giddy, you are absolutely in the right kitchen today.
I’m so excited to share with you these Strawberry Shortcake Easter Bars. Imagine this: a buttery, melt-in-your-mouth shortbread crust. A cloud-like, vanilla-kissed cream layer that’s impossibly lush. And on top, a glittering blanket of fresh strawberries, macerated until they’re practically singing with spring flavor. It’s a dessert that looks like a pastel dream but tastes like pure, unadulterated joy.
This isn’t about fussy techniques or hard-to-find ingredients. This is about creating a showstopper that lets you spend less time stressing and more time savoring the moments with your people. These bars are meant to be shared, to be the centerpiece of your Easter table, your spring brunch, or just a Tuesday that needs a little brightening. They slice like a dream, travel well (hello, potluck superstar!), and have this magical way of making everyone feel like they’re getting a giant hug. So, are you ready to make something unforgettable? Let’s do this!
A Strawberry-Stained Memory
This recipe always takes me right back to my grandma’s sun-drenched kitchen in April. She wasn’t a fancy baker, but she was a generous one. Every Easter, alongside the glazed ham, she’d make a towering, slightly lopsided strawberry shortcake. The whipped cream would always start to weep, and the biscuit would soak up the berry juices, creating a glorious, messy masterpiece on our plates.
My job, as the “official strawberry washer,” was to de-stem the berries. I’d sneak a few, of course, and she’d pretend not to notice, her eyes crinkling at the corners. That dessert wasn’t just about the taste; it was the smell of sugar and berries mingling in the air, the sound of family laughter bouncing off the walls, and the feeling of being part of a sweet, sticky tradition. These bars are my love letter to that memory—capturing all that nostalgic flavor in a neat, sliceable package that’s perfect for making new traditions of your own.
Gathering Your Sunshine Ingredients
Here’s everything you’ll need to bring these springtime bars to life. I’ve added my little chef’s notes for each—think of me as your friendly guide, whispering tips over your shoulder!
For the Buttery Shortbread Crust:
- 1 cup (2 sticks) unsalted butter, melted – Using unsalted butter lets you control the salt level. Melted butter is the secret to that irresistibly tender, crumbly texture that holds together perfectly. No mixer needed!
- ½ cup granulated sugar – This sweetens the crust just enough to balance the tangy cream and bright berries.
- 2 cups all-purpose flour – The trusty backbone. For a slightly nuttier flavor, you could swap ½ cup for oat flour.
- ¼ tsp salt – Never skip this! Salt is the flavor booster that makes the butter and sugar sing.
For the Luscious Cream Layer:
- 8 oz cream cheese, softened – Pro-tip: Take this out of the fridge at least an hour ahead. Truly softened cream cheese is non-negotiable for a silky-smooth, lump-free layer. Low-fat works in a pinch, but full-fat delivers that decadent mouthfeel we’re after.
- ½ cup powdered sugar – It dissolves instantly, giving us a smooth filling. Sift it if it’s lumpy!
- 1 tsp pure vanilla extract – The soul of the cream layer. The good stuff makes a difference here.
- 1 cup whipped topping (like Cool Whip), thawed – This gives the layer incredible lightness and stability. For a from-scratch vibe, you can fold in 1 cup of freshly whipped heavy cream sweetened with a tablespoon of the powdered sugar.
For the Glittering Strawberry Topping:
- 2 cups fresh strawberries, diced small – About one pint. Their fresh, vibrant flavor is the star! Frozen won’t work well here as they release too much liquid.
- 2 tbsp granulated sugar – This draws out the berries’ natural juices, creating a gorgeous, glossy syrup.
- 1 tsp lemon juice – A bright pop of acid that wakes up all the flavors and keeps the berries looking vibrant.
- Crushed golden cookies (optional, for topping) – Think shortbread cookies or vanilla wafers. They add a delightful “shortcake” crunch and make it extra pretty!
Let’s Build Some Magic, Step-by-Step
Follow these steps, and you really can’t go wrong. I’m breaking it all down with my favorite kitchen hacks to ensure your bars are perfect.
Step 1: Prep & Preheat. First, let’s get organized! Preheat your oven to 350°F (175°C). Line a 9×9-inch baking pan with parchment paper, leaving some overhang on two sides. This is your lifesaver hack for lifting the entire slab of bars out of the pan later for flawless slicing. Give the paper a quick spritz with cooking spray so the crust doesn’t stick.
Step 2: Make the Shortbread Crust. In a medium bowl, stir together the melted butter, sugar, flour, and salt. You’ll use a fork, then your hands, and it will come together into a soft, crumbly dough. Don’t overmix! Just until no dry flour remains. Dump the mixture into your prepared pan and press it down firmly and evenly into one glorious layer. I use the bottom of a measuring cup to really pack it in—this prevents a crumbly disaster later. Bake for 18-22 minutes, until the edges are just beginning to turn a light golden brown. Let this cool completely on a wire rack. Patience here is key for a solid base!
Step 3: Whip Up the Cream Dream. While the crust cools, make the cream layer. In a large bowl, beat the softened cream cheese with an electric mixer (or a lot of arm power!) until it’s completely smooth and creamy. Add the powdered sugar and vanilla, and beat again until combined. Now, grab a spatula. Gently fold in the thawed whipped topping until you have a uniform, fluffy, cloud-like mixture. “Folding” means you’re turning the mixture over gently to keep all that air in it—no vigorous stirring!
Step 4: Macerate the Strawberries. In another bowl, toss the diced strawberries with the 2 tablespoons of sugar and lemon juice. Let it sit for at least 10 minutes. You’ll see a beautiful syrup start to pool at the bottom. This is liquid gold! We’ll spoon the berries and this syrup over the cream layer.
Step 5: The Grand Assembly. Spread the cream cheese mixture evenly over the completely cooled crust. Use an offset spatula or the back of a spoon to make it nice and level. Next, spoon the strawberry mixture over the cream layer, making sure to distribute that delicious syrup. If you’re using them, sprinkle your crushed cookies over the top for that perfect finishing texture.
Step 6: The Final Chill. Cover the pan loosely with plastic wrap and refrigerate for at least 2 hours, but ideally 4 or even overnight. This chilling time is what transforms the layers from soft to sliceably perfect. It allows the flavors to marry and the cream layer to set firmly.
How to Serve These Springtime Jewels
When it’s time to serve, use the parchment paper “handles” to lift the entire slab onto a cutting board. Run a sharp knife under hot water, wipe it dry, and slice into 12 beautiful bars. For an extra touch, plate them on a pastel platter and garnish with a whole fresh strawberry and a sprig of mint. They’re stunning on their own, but a tiny dollop of extra whipped cream never hurt anybody! Serve them straight from the fridge for the best texture.
Make It Your Own: Delicious Twists
- Lemon Berry Bliss: Add the zest of one lemon to the cream cheese mixture and use a mix of strawberries, blueberries, and raspberries for a patriotic or summery twist.
- Chocolate-Dipped Dream: Drizzle melted white or dark chocolate over the chilled bars before serving.
- “Cheesecake” Style: Add a tablespoon of fresh lemon juice and an extra ¼ cup of sugar to the strawberry layer for a more pronounced tang.
- Gluten-Free Friendly: Use a 1:1 gluten-free all-purpose flour blend for the crust and ensure your cookies (if using) are GF.
- Coconut Cream Delight: Fold ½ cup of toasted coconut into the cream layer and sprinkle more on top for a tropical feel.
Olivia’s Kitchen Notes
This recipe has become my springtime staple, and it’s evolved in the funniest ways. The first time I made it, I was so impatient that I spread the cream layer on a warm crust. Let’s just say I ended up with “Strawberry Shortcake Soup” instead of bars! Lesson learned: let that crust cool. I’ve also been known to swap the strawberry topping for a mix of peaches and blueberries in late summer, and it’s just as heavenly. The beauty of this recipe is in its layers and its flexibility. Don’t be afraid to play with it and make it yours. After all, the best recipes are the ones that gather a few splatters and stories on the page.
Your Questions, Answered!
Q: Can I use frozen strawberries?
A: I don’t recommend it for the topping. Frozen berries release a tremendous amount of water as they thaw, which will make your cream layer soggy and the bars difficult to slice. Fresh is truly best here for texture and flavor.
Q: My cream cheese layer is lumpy! What did I do wrong?
A> This almost always means your cream cheese wasn’t soft enough. It should be at room temperature for a good hour. If you have small lumps, you can try pressing the mixture through a fine-mesh sieve, but prevention (softening ahead of time) is the best cure!
Q: How far in advance can I make these?
A> They are the perfect make-ahead dessert! You can assemble them completely 1-2 days before serving. Just keep them covered tightly in the refrigerator. The crust might soften slightly, but it will still be delicious.
Q: Can I double this recipe?
A> Absolutely! Double all ingredients and press the crust into a 9×13-inch pan. You may need to add a few minutes to the crust baking time—just watch for that light golden color.
Strawberry Shortcake Easter Bars : Creamy Layered Spring Dessert
Description
These Strawberry Shortcake Easter Bars are spring on a plate! A buttery shortbread crust, cloud-like cream layer, and juicy, macerated strawberries make a dessert that’s as stunning as it is simple. Perfect for Easter brunch, potlucks, or any time you want a sweet slice of spring.
Ingredients
For the Shortbread Crust:
-
1 cup (2 sticks) unsalted butter, melted
-
½ cup granulated sugar
-
2 cups all-purpose flour (or 1½ cups flour + ½ cup oat flour for nuttier flavor)
-
¼ tsp salt
For the Cream Layer:
-
8 oz cream cheese, softened
-
½ cup powdered sugar
-
1 tsp pure vanilla extract
-
1 cup whipped topping, thawed (or freshly whipped cream sweetened with 1 tbsp sugar)
For the Strawberry Topping:
-
2 cups fresh strawberries, diced
-
2 tbsp granulated sugar
-
1 tsp lemon juice
-
Crushed golden cookies (optional, for extra crunch)
Instructions
-
Prep & Preheat: Preheat oven to 350°F (175°C). Line a 9×9-inch baking pan with parchment, leaving overhang for easy lifting. Lightly spray with cooking spray.
-
Make the Crust: In a medium bowl, stir melted butter, sugar, flour, and salt until combined. Press evenly into the pan using the bottom of a measuring cup. Bake 18–22 minutes until edges turn light golden. Cool completely.
-
Whip the Cream Layer: Beat cream cheese until smooth. Add powdered sugar and vanilla; beat until combined. Gently fold in whipped topping until fluffy and uniform.
-
Macerate Strawberries: Toss diced strawberries with sugar and lemon juice. Let sit at least 10 minutes to create syrup.
-
Assemble Bars: Spread cream layer over cooled crust. Spoon strawberry mixture evenly on top. Sprinkle crushed cookies if desired.
-
Chill: Cover loosely and refrigerate 2–4 hours (or overnight) until set.
-
Serve: Lift bars using parchment overhang. Slice into 12 squares using a hot, dry knife for clean cuts. Garnish with extra strawberries or mint if desired.
Notes
-
Chocolate-Dipped: Drizzle melted white or dark chocolate over chilled bars.
-
Cheesecake Style: Add 1 tbsp lemon juice + ¼ cup sugar to strawberry layer for extra tang.
-
Gluten-Free: Use a 1:1 gluten-free flour blend for crust and GF cookies.
-
Coconut Cream Delight: Fold ½ cup toasted coconut into cream layer and sprinkle on top.
Nutritional Information (Per Bar, Approximate)
Calories: 310 | Fat: 19g | Saturated Fat: 12g | Carbohydrates: 32g | Fiber: 1g | Sugar: 18g | Protein: 4g
Prep Time: 20 mins | Cook Time: 20 mins | Chill Time: 2 hours | Total Time: 2 hours 40 mins | Yield: 12 bars | Difficulty: Easy
Final Thoughts: A Slice of Springtime Joy
And there you have it, friend—a pristine pan of Strawberry Shortcake Easter Bars, ready to steal the show. Take one last look at those jewel-toned berries glistening on their creamy, golden pedestal. Isn’t it amazing how a few simple ingredients, layered with a little love, can transform into something so beautiful?
As you carry that pan to the table, I hope you feel a swell of pride. You’ve created more than just a dessert. You’ve created a centerpiece for connection. In a world that often feels too busy, these bars are an invitation to pause—to gather around, to let the conversation flow, and to savor something sweet together. Watch as that first slice is lifted out, revealing the perfect layers inside. Listen for the happy murmurs of “oh, this is good” that will inevitably ripple around the room.
These bars carry the warmth of my grandma’s kitchen and the joy of a spring day, all wrapped up in one neat, sliceable package. They’re proof that the most memorable recipes aren’t about perfection or complexity. They’re about translating a feeling—the anticipation of Easter, the brightness of the season, the comfort of tradition—into something you can share.
So, as you hand out that first plate, know that you’ve given a gift. You’ve given a moment of sweetness, a taste of sunshine, and a new tradition just waiting to be written into your family’s story.
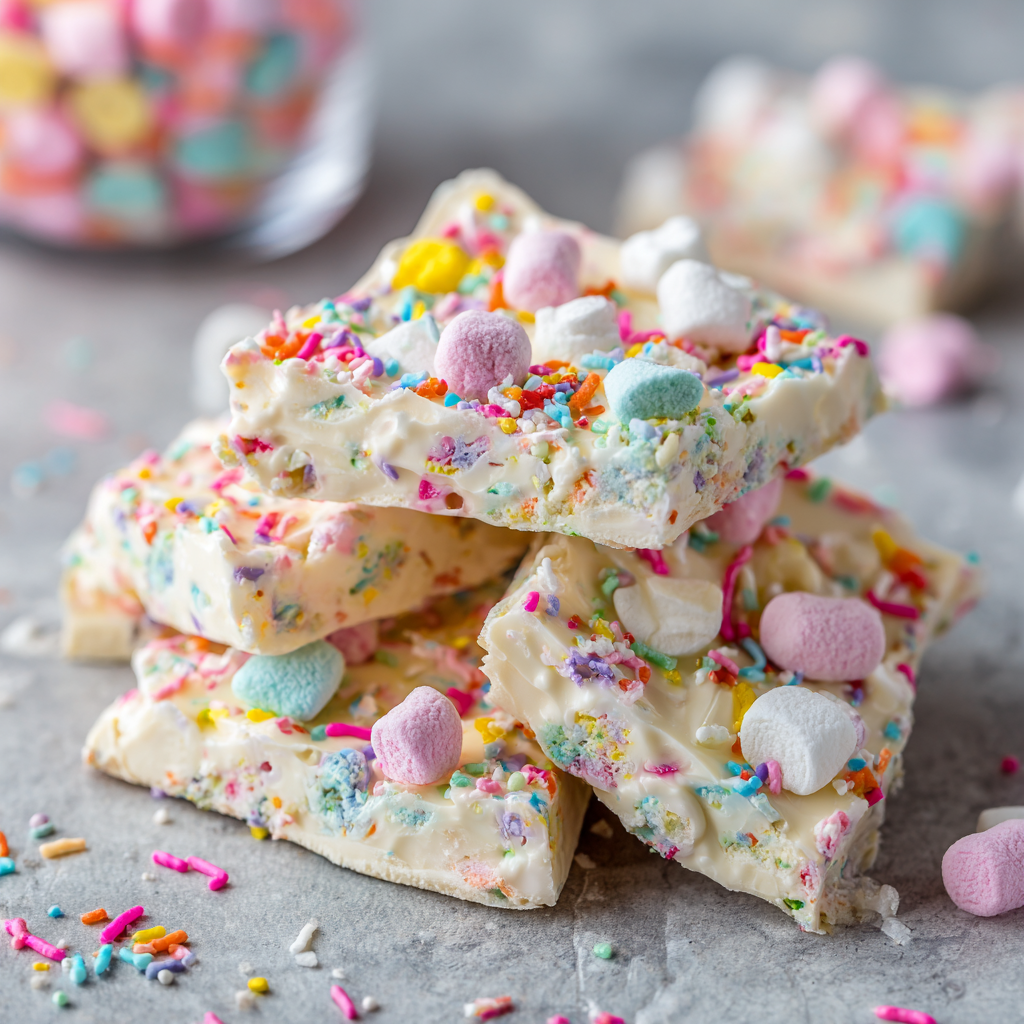
Super Easy Easter Marshmallow Bark : 4 Ingredient No-Bake Spring Treat
Super Easy Easter Marshmallow Bark: A 4-Ingredient No-Bake Spring Treat
The Joy of Simple, Sweet Magic
Hey there, friend! Come on in – I’ve got a bowl of something melty and wonderful on the counter, and I can’t wait to show you. Is there anything better than a dessert that brings instant smiles, requires zero oven time, and looks like a spring party exploded in the best way possible? I don’t think so. That’s exactly why I’m so obsessed with this Super Easy Easter Marshmallow Bark.
If your Easter to-do list is longer than a bunny’s ears and the thought of one more complicated recipe makes you want to hide like an egg, this treat is your kitchen savior. We’re talking about creamy, dreamy white chocolate, clouds of pastel mini marshmallows, and a happy shower of sprinkles, all coming together in about 30 minutes flat. It’s the perfect project to do with little hands (or when you just want a sweet, solo kitchen win). This bark is sweet, a little soft, with a satisfying crunch, and it’s guaranteed to be the star of your dessert table. So, tie on that apron – the messy ones are the most loved – and let’s make some no-bake magic together.
A Sweet Slice of Nostalgia
This recipe always takes me right back to my grandma’s linoleum-floored kitchen, the air thick with the smell of lamb roasting and yeast rolls rising. Us kids were always underfoot, begging for a job. Her solution? A no-fuss, no-bake treat we could “help” with that wouldn’t derail her symphony of Easter dinner. It was a simpler version of this bark – just chocolate and pastel marshmallows from the Easter aisle. I remember the intense focus of stirring the glossy chocolate, the serious negotiation over sprinkle distribution, and the agonizing wait for it to set. When she finally cracked it into jagged pieces, it felt like we’d created edible treasure. That’s the spirit I want to bottle with this recipe: the joy of creating something festive, together, without any stress. It’s less about perfection and all about the sweet, shared moment.
Gathering Your Happy Ingredients
See? I told you it was simple! Just four main players come together to create this pastel perfection. Here’s what you’ll need and my little chef insights on each one:
- 1 bag (12 oz) of high-quality white chocolate chips: This is your flavor and structure base. I like to use a name-brand chip (like Ghirardelli or Guittard) because they melt more consistently. Chef’s Tip: White chocolate is finicky! It’s not really chocolate in the traditional sense (it’s cocoa butter, sugar, and milk solids), so it seizes up (gets grainy) if it gets too hot or a drop of water sneaks in. We’ll be gentle with it!
- 3 cups of mini rainbow marshmallows: The fluffy heart of the bark! The mini size is key—they distribute evenly and are easy to bite. The pastel colors scream spring. Substitution Tip: If you can only find regular white mini marshmallows, use them! Just toss in an extra handful of pastel sprinkles to make up for the color.
- 1 tablespoon of vegetable shortening (optional but recommended): This little bit of fat is your secret weapon for a super smooth, dip-able chocolate. It helps thin the melted chips just enough for easy coating. Substitution Tip: You can use 1/2 tablespoon of refined coconut oil instead for a similar effect.
- Easter sprinkles, nonpareils, or festive decorations: This is where your personality shines! Use pastel jimmies, bunny-shaped sprinkles, or even crushed pastel candy shells. Chef’s Insight: For a prettier finish, I like to hold back a small handful of the best sprinkles to press on top after spreading the bark, so they don’t all get lost in the mix.
Let’s Make Some Bark! (Step-by-Step)
Ready? This is the fastest, most satisfying process. I’ll walk you through every step with my best tips to ensure success.
- Prep Your Pan: Line an 8×11-inch baking dish (or a similar-sized rimmed baking sheet) with parchment paper. Let the paper overhang the sides a bit—this creates “handles” that will make lifting the set bark out a breeze! No parchment? Aluminum foil lightly greased with butter or non-stick spray works in a pinch.
- Melt the White Chocolate: Place the white chocolate chips and the shortening (or coconut oil) into a clean, dry, microwave-safe bowl. Microwave on high for 1 minute. Stop! Take it out. It will look mostly unmelted, but that’s okay. Grab a spatula and stir, stir, stir. The residual heat will start melting the chips. Now, microwave in 30-second intervals, stirring vigorously after each one, until the mixture is completely smooth and fluid. This usually takes 1-2 more intervals. My Big Hack: It’s better to under-heat and stir to melt than to over-heat and scorch! If you have a few tiny lumps, keep stirring off the heat—they’ll often melt in.
- Fold in the Marshmallows: Immediately pour all 3 cups of mini marshmallows into the melted chocolate. Using your spatula, gently fold and stir until every marshmallow is lovingly coated in that glossy white chocolate. Work quickly but gently. Pro Tip: “Fold” means to cut through the center, scoop under, and turn over. We’re not beating it! Overmixing can cause the marshmallows to start melting or the chocolate to get stiff.
- Spread & Sprinkle: Dump the mixture onto your prepared pan. Use your spatula to spread it into an even layer, about 1/2 to 3/4-inch thick. Don’t worry about it being perfectly smooth—rustic is charming! Now, take your reserved sprinkles and generously shower them over the top, gently pressing them in so they stick.
- The Quick Chill: This is the only “hard” part—waiting! Pop the entire pan into the freezer for about 20 minutes. The freezer sets it faster and gives a satisfying snap when you break it. The fridge will work too; it’ll just take 45 minutes to an hour.
- Slice & Serve: Once it’s completely firm, lift the bark out using the parchment paper handles. Place it on a cutting board. You can break it into rustic chunks with your hands, cut it into neat squares with a sharp knife, or for extra Easter fun, use a metal cookie cutter (lightly greased with non-stick spray) to cut out egg or bunny shapes!
How to Serve This Pastel Perfection
Presentation is half the fun! Pile the bark pieces high on a white platter or in a rustic wooden bowl to let the colors pop. For a party, arrange the pieces in a single layer on a tray lined with parchment or a pastel napkin. It’s the perfect sweet bite to set out with coffee after Easter brunch, package in cellophane bags as a homemade gift for neighbors, or tuck into kids’ lunchboxes as a festive surprise the week before the holiday. It’s delicious straight from the fridge for a cooler, firmer treat, or at room temperature for a softer chew.
Make It Your Own! Fun Variations
The beauty of bark is its versatility. Once you master the base, the sky’s the limit! Here are a few of my favorite twists:
- Cookies & Cream: Replace 1 cup of the marshmallows with roughly crushed chocolate sandwich cookies (like Oreos) for a delicious contrast.
- Spring Fling: Add 1/2 cup of dried cranberries or chopped dried apricots and 1/4 cup of toasted coconut flakes with the marshmallows for a fruity, chewy twist.
- Peanut Butter Paradise: Swirl 1/4 cup of melted peanut butter into the white chocolate marshmallow mixture before spreading for a sweet and salty combo.
- “Bunny Bait” Style: Mix in 1 cup of pastel-colored candy-coated chocolates (like M&Ms) and 1 cup of lightly salted pretzel pieces for that addictive sweet-salty-crunchy mix.
- Dairy-Free Swap: Use a high-quality dairy-free white chocolate and ensure your marshmallows are vegan (many standard ones contain gelatin). Everything else stays the same!
Olivia’s Chef Notes & Kitchen Stories
This recipe has seen many iterations in my kitchen! One year, in a pre-Easter frenzy, I grabbed a bag of strawberry-flavored white chips by mistake. We dubbed it “Pink Bunny Bark,” and it was a huge hit! Another time, my nephew was in charge of sprinkles and used an entire container of green nonpareils. We called it the “Easter Grass Patch,” and it was hilariously monochromatic. The point is, it’s incredibly forgiving. Over the years, I’ve learned that the single most important thing is taking the time to stir the white chocolate thoroughly after every microwave blast. Rushing that step is the only way I’ve ever messed it up. Now, I put on a 2-minute song and make the stirring my kitchen dance party. Work with joy, and it always tastes better!
Your Questions, Answered!
Q: My white chocolate got chunky and grainy instead of smooth! What happened?
A: Ah, you’ve experienced “seizing.” This usually happens if a tiny bit of water/steam got into the bowl, or if the chocolate was heated too aggressively. To try and save it, immediately stir in an extra 1/2 teaspoon of shortening or a few drops of vegetable oil. Sometimes you can bring it back! Prevention is best: use a perfectly dry bowl and heat in short bursts.
Q: Can I use almond bark or candy melts instead?
A: Absolutely! Almond bark or vanilla candy melts are actually more forgiving and melt very smoothly. They have a slightly different flavor (less creamy, a bit sweeter), but they work perfectly for this recipe. Follow the same melting instructions on their package.
Q: How far in advance can I make this? How do I store it?
A: You can make it up to 3-4 days ahead. Store it in an airtight container at room temperature in a cool, dry place (not the fridge, as it can cause condensation and make the bark “sweat”). If your kitchen is very warm, layer it between parchment paper and store it in the fridge. It also freezes beautifully for up to a month!
Q: My marshmallows started melting when I stirred them in. Why?
A: This means your white chocolate was still a bit too hot. Next time, let it cool for just a minute or two after melting before adding the marshmallows. They just need to be coated, not cooked!
Super Easy Easter Marshmallow Bark : 4 Ingredient No-Bake Spring Treat
Description
This Easter Marshmallow Bark is pastel perfection! Creamy white chocolate, soft mini marshmallows, and a shower of festive sprinkles come together in about 30 minutes—no oven required. It’s fun, forgiving, and perfect for gifting, snacking, or adding a colorful centerpiece to your spring dessert table.
Ingredients
-
12 oz white chocolate chips (high-quality)
-
3 cups mini pastel marshmallows
-
1 tbsp vegetable shortening or coconut oil (optional, for smooth melting)
-
Easter sprinkles, nonpareils, or festive decorations
Instructions
-
Prep Pan: Line an 8×11-inch baking dish or rimmed sheet with parchment paper, leaving overhang for easy removal.
-
Melt White Chocolate: Place chocolate chips and shortening in a dry microwave-safe bowl. Microwave 1 minute, stir, then microwave in 30-second intervals, stirring until smooth. Under-heat and stir to avoid scorching.
-
Fold in Marshmallows: Quickly fold in marshmallows until coated in chocolate. Don’t overmix; you want them to stay fluffy.
-
Spread & Decorate: Spread mixture evenly, about ½–¾ inch thick. Sprinkle generously with Easter decorations, gently pressing them in.
-
Chill: Freeze 20 minutes (or refrigerate 45–60 minutes) until firm.
-
Slice & Serve: Lift bark using parchment handles. Break into chunks, cut into squares, or use cookie cutters for fun shapes. Serve at room temperature or chilled.
Notes
-
Cookies & Cream: Fold in 1 cup crushed chocolate sandwich cookies.
-
Spring Fling: Add ½ cup dried cranberries or apricots + ¼ cup toasted coconut.
-
Peanut Butter Paradise: Swirl in ¼ cup melted peanut butter before spreading.
-
Bunny Bait: Mix 1 cup pastel candy-coated chocolates + 1 cup pretzel pieces.
-
Dairy-Free: Use vegan white chocolate and marshmallows.
Chef Tips: Let melted chocolate cool slightly before folding in marshmallows to prevent melting. Shortening or coconut oil helps achieve a smooth, glossy finish.
Quick Nutrition & Details
- Prep Time: 10 minutes
- Chill Time: 20 minutes
- Total Time: 30 minutes
- Yield: About 12-16 pieces
- Approx. Calories per piece: 180-220 (for 16 pieces)
Save This Recipe For Later!
Final Thoughts
The Joy of Simple, Sweet Magic
Hey there, friend! Come on in – I’ve got a bowl of something melty and wonderful on the counter, and I can’t wait to show you. Is there anything better than a dessert that brings instant smiles, requires zero oven time, and looks like a spring party exploded in the best way possible? I don’t think so. That’s exactly why I’m so obsessed with this Super Easy Easter Marshmallow Bark.
If your Easter to-do list is longer than a bunny’s ears and the thought of one more complicated recipe makes you want to hide like an egg, this treat is your kitchen savior. We’re talking about creamy, dreamy white chocolate, clouds of pastel mini marshmallows, and a happy shower of sprinkles, all coming together in about 30 minutes flat. It’s the perfect project to do with little hands (or when you just want a sweet, solo kitchen win). This bark is sweet, a little soft, with a satisfying crunch, and it’s guaranteed to be the star of your dessert table. So, tie on that apron – the messy ones are the most loved – and let’s make some no-bake magic together.
Easter Bunny Sprinkle Bars : Soft & Chewy Festive Sugar Cookie Bars
Easter Bunny Sprinkle Bars: Your New Favorite Spring Treat
Hey there, friend! Come on in, grab an apron, and let’s make something that tastes like a sunbeam and a hug had a delicious baby. I’m talking about my absolutely irresistible Easter Bunny Sprinkle Bars. If the mere thought of soft, buttery sugar cookie dough packed with joyous pastel sprinkles, topped with a cloud of vanilla frosting and even more colorful sparkle makes your heart do a little happy dance, then you are in exactly the right kitchen.
This is the recipe I turn to when I want to create pure, unadulterated joy on a plate. It’s for those moments when you need a show-stopping dessert for your Easter brunch table, a guaranteed hit for the spring bake sale, or just a sweet project to make a regular Tuesday feel like a celebration. The best part? There’s zero rolling, chilling, or fussy cookie cutting involved. We’re making glorious, fuss-free bars. You simply press the dough into a pan, bake it to golden perfection, slather on the frosting, and watch them disappear. It’s the kind of baking that feels creative, not stressful, and the results are always, always met with smiles. So, preheat that oven, and let’s bake up a batch of springtime magic together!
The Sprinkle Jar of Memories
This recipe always takes me right back to my grandma’s linoleum-floored kitchen, the air thick with the scent of melting butter and sugar. She wasn’t a fancy baker, but she was a joyful one. Her signature move was the “sprinkle jar,” a giant glass container filled with every color and shape imaginable. Letting me pick out the sprinkles for whatever we were making was her way of saying, “This is your creation.”
For Easter, it was always the pastel ones—tiny eggs, little bunnies, and soft-colored quins. We’d fold them into cake batter or press them into frosting on cut-out cookies, our fingers stained with food coloring and laughter. These bars capture that exact feeling: the simple, messy, heart-swelling happiness of making something beautiful and sweet with someone you love. Every time I pour a cup of these cheerful sprinkles into the dough, I’m not just adding color; I’m stirring in a big spoonful of that happy memory. It’s my hope that baking these bars becomes a little tradition in your home, too, creating your own sprinkle-jar-worthy moments.
Gathering Your Rainbow: Ingredients & Insights
Here’s what you’ll need to create these soft, chewy masterpieces. I’ve included my little chef notes for each ingredient because knowing the “why” makes you a more confident baker!
For the Sugar Cookie Bars:
- 1 cup (2 sticks) unsalted butter, softened – This is the soul of our bar, giving it that rich, melt-in-your-mouth quality. “Softened” is key! Leave it on the counter for about an hour. It should be cool to the touch but leave a slight indent when you press it. This creams perfectly with the sugar for that essential light, fluffy texture.
- 1 cup granulated sugar – Sweetness and structure. Creaming it with the butter creates tiny air pockets that help our bars rise and become tender, not dense.
- 2 large eggs – They bind everything together and add moisture. Make sure they’re at room temperature to blend smoothly into the creamed butter and sugar without seizing it up.
- 1 tsp pure vanilla extract – The flavor enhancer! It adds a warm, cozy depth that makes the bars taste like they came from a professional bakery.
- 2 ½ cups all-purpose flour – The backbone. I always recommend fluffing your flour in the canister, then spooning it lightly into the measuring cup and leveling it off. No packing! This prevents dry, tough bars.
- 1 tsp baking powder – Our leavening agent. This is what gives the bars their slight lift and soft, cake-like chew. Check the date on yours to make sure it’s active!
- ½ tsp salt – The secret weapon. Salt balances the sweetness and makes all the other flavors pop. Don’t skip it!
- ½ cup pastel sprinkles – The stars of the show! Use “jimmies” or “quins” for best results. Avoid nonpareils (the tiny round balls) in the dough, as they tend to bleed color. Save those for the top! This is your chance to go wild with spring colors.
For the Vanilla Frosting:
- ½ cup (1 stick) unsalted butter, softened – Just like for the bars, soft butter is non-negotiable for a silky-smooth, spreadable frosting.
- 2 cups powdered sugar – Also called confectioners’ sugar. It dissolves beautifully into the butter for a lump-free frosting. I usually sift mine if it seems clumpy.
- 1-2 tbsp milk – Whole milk or even a splash of heavy cream works wonders. Start with one tablespoon and add the second only if needed to reach your perfect spreading consistency.
- ½ tsp vanilla extract – Because vanilla frosting should actually taste like vanilla.
- Pink food coloring (optional) – A drop or two of gel food coloring gives that pretty Easter blush. Gel is better than liquid as it won’t thin out your frosting.
- Extra sprinkles for topping – This is where you go for the gold (or the pastel)! Use any and all sprinkles you love here. The more, the merrier.
Let’s Bake! Step-by-Step Instructions
Follow these simple steps, and you’ll have perfect bars in no time. I’m chatting right alongside you with all my favorite tips!
- Prep Your Stage. Preheat your oven to 350°F (175°C). This ensures it’s perfectly hot and ready when your dough is. Line a 9×13-inch baking pan with parchment paper, leaving a little overhang on the two long sides. This is my #1 kitchen hack for easy removal and clean slicing! Lightly grease any exposed parts of the pan.
- Cream the Butter & Sugar. In a large bowl, use a hand mixer or stand mixer fitted with the paddle attachment to beat the softened butter and granulated sugar together on medium-high speed. We’re not just mixing; we’re creaming. Do this for a good 2-3 minutes, until the mixture is pale yellow, fluffy, and almost looks like frosting. This step incorporates air, which is crucial for texture.
- Add the Wet Team. Beat in the eggs, one at a time, making sure each is fully incorporated before adding the next. Then beat in the vanilla extract. Scrape down the sides of the bowl with a rubber spatula to make sure everything is homogenous.
- Welcome the Dry Ingredients. In a separate bowl, whisk together the flour, baking powder, and salt. With your mixer on low speed, gradually add the dry ingredients to the wet. Mix just until the flour disappears and a soft dough forms. Over-mixing at this stage can lead to toughness, so once you don’t see any dry flour, stop!
- Fold in the Joy. Now, for the fun part! Add your ½ cup of pastel sprinkles to the dough. Use your spatula to gently fold them in until they’re evenly distributed. Try not to over-stir, as the colors might start to streak.
- Press & Prep for Baking. Transfer the dough to your prepared pan. It will be thick! Use lightly floured or buttered fingertips to press it into a smooth, even layer from corner to corner. This ensures even baking.
- Bake to Golden Perfection. Pop the pan into your preheated oven and bake for 20-25 minutes. You’re looking for the edges to be a light golden brown and the top to look set. The center might still seem a tiny bit soft—that’s perfect! It will set up as it cools. Over-baking is the enemy of chewiness.
- The All-Important Cool Down. This is the hardest step: patience! Place the pan on a wire rack and let the bars cool completely in the pan. If you frost them while they’re warm, the frosting will melt into a sad, glazy puddle. I sometimes pop the whole pan in the fridge to speed this up if I’m impatient.
- Whip Up the Frosting. While the bars cool, make your frosting. In a clean bowl, beat the softened butter until it’s creamy and smooth. Gradually add the powdered sugar, a half cup at a time, beating on low at first to avoid a sugar cloud, then increasing speed. Add the vanilla and 1 tablespoon of milk. Beat on medium-high for 2-3 minutes until it’s wonderfully light and fluffy. Add the second tablespoon of milk only if it seems too thick. Tint with food coloring if using.
- Frost & Decorate! Once the bars are completely cool, use an offset spatula or butter knife to spread the frosting evenly over the top. Immediately shower it with your reserved extra sprinkles so they stick beautifully.
- Slice & Savor. Using the parchment paper overhang, lift the entire slab of bars out of the pan and onto a cutting board. Use a sharp knife to slice into squares. For super clean cuts, wipe the knife clean between slices. Then, pour yourself a glass of milk, grab a bar, and take that first glorious bite!
How to Serve These Sprinkled Beauties
Presentation is part of the fun! I love arranging these bars on a simple white platter or a vintage cake stand to let their colors really sing. Stack them up in a little pyramid or line them in rows. For a special Easter treat, place a few pastel-wrapped chocolate eggs in the center of the platter. They’re perfect with a cup of coffee for a spring morning treat, as the sweet finale to a big holiday meal, or packed into little cellophane bags tied with ribbon as the most delightful edible gift. Honestly, they taste best shared with people you love, right in the kitchen where you made them!
Get Creative: Recipe Variations
Love the base recipe? Here are a few fun twists to make it your own:
- Lemon Zest Burst: Add the zest of one large lemon to the cookie dough and a tablespoon of fresh lemon juice to the frosting for a bright, sunny citrus twist.
- Almond Joy: Swap the vanilla extract in both the dough and frosting for pure almond extract. Fold in ½ cup of toasted coconut with the sprinkles for a magic cookie bar vibe.
- Funfetti Cake Batter: Add ½ teaspoon of butter or cake batter extract to the dough and use rainbow sprinkles instead of just pastel. It’s a birthday party in a bar!
- Chocolate Drizzle: Keep the vanilla frosting, but melt ¼ cup of white or semi-sweet chocolate chips and drizzle it artfully over the frosted bars before adding sprinkles.
- Gluten-Free Swap: Use a 1:1 gluten-free all-purpose flour blend (like Bob’s Red Mill) and ensure your sprinkles are certified gluten-free.
Chef’s Notes: From My Kitchen to Yours
This recipe has been my trusty sidekick for years, and it’s evolved in the best ways. I originally made it as a roll-out cookie, but one rushed Easter, I simply pressed the dough into a pan on a whim. The discovery that it was not only easier but also yielded a softer, chewier texture was a total game-changer! Now it’s the only way I make them. A funny kitchen story? The first time I made these, I was so excited I dumped in the entire bottle of sprinkles (probably a cup and a half!). The bars were a riot of color but spread like crazy in the oven because the dough structure was compromised. We still ate them, of course—they were deliciously crunchy on the edges—but I learned that ½ cup is the perfect sprinkle-to-dough ratio for the ideal bake. Remember, baking is part science, part love, and always an adventure. Don’t be afraid to make it your own!
FAQs & Troubleshooting
Q: My bars came out really dry and crumbly. What happened?
A: This usually points to over-measuring the flour or over-baking. Remember to spoon and level your flour, don’t scoop! Also, ovens can vary, so check a minute or two before the minimum bake time. The bars will continue to set as they cool in the pan.
Q: Can I make these ahead of time?
A: Absolutely! You can bake and cool the bar base, wrap the whole pan tightly in plastic wrap, and store it at room temperature for a day. Frost it the day you plan to serve. Frosted bars keep well in an airtight container at room temp for 2-3 days.
Q: My sprinkles bled a lot of color into the dough and frosting. How do I prevent that?
A> This is common with certain types of sprinkles, especially nonpareils (the tiny balls). For the dough, stick to jimmies (the rod-shaped sprinkles) or quins (flat discs), as they hold color better. For the top, you can add sprinkles just before serving if you’re concerned.
Q: Can I freeze these bars?
A> Yes, brilliantly! Freeze the unfrosted baked and cooled bar slab tightly wrapped for up to 2 months. Thaw at room temperature, then frost. You can also freeze frosted bars; place them in a single layer on a baking sheet until solid, then transfer to a container. They might “sweat” a little when thawing, but will still taste amazing.
Easter Bunny Sprinkle Bars : Soft & Chewy Festive Sugar Cookie Bars
Description
If spring had a flavor, it would taste like these Easter Bunny Sprinkle Bars: buttery, soft sugar cookie bars loaded with pastel sprinkles, topped with a cloud of vanilla frosting, and finished with even more cheerful sprinkles. They’re fuss-free, fun to make, and guaranteed to bring a smile to anyone who bites in. Perfect for Easter brunch, spring celebrations, or just brightening an ordinary day.
Ingredients
For the Sugar Cookie Bars:
-
1 cup (2 sticks) unsalted butter, softened
-
1 cup granulated sugar
-
2 large eggs, room temperature
-
1 tsp pure vanilla extract
-
2½ cups all-purpose flour
-
1 tsp baking powder
-
½ tsp salt
-
½ cup pastel sprinkles (jimmies or quins; avoid nonpareils)
For the Vanilla Frosting:
-
½ cup (1 stick) unsalted butter, softened
-
2 cups powdered sugar, sifted if needed
-
1–2 tbsp milk or heavy cream
-
½ tsp vanilla extract
-
Pink food coloring (optional)
-
Extra sprinkles for topping
Instructions
-
Prep Oven & Pan: Preheat to 350°F (175°C). Line a 9×13-inch pan with parchment paper, leaving a little overhang for easy removal. Lightly grease exposed pan edges.
-
Cream Butter & Sugar: In a large bowl, beat softened butter and sugar for 2–3 minutes until pale and fluffy.
-
Add Eggs & Vanilla: Beat in eggs one at a time, then add vanilla. Scrape the bowl to ensure even mixing.
-
Incorporate Dry Ingredients: In a separate bowl, whisk together flour, baking powder, and salt. Gradually mix into wet ingredients on low speed until just combined.
-
Fold in Sprinkles: Gently fold in ½ cup pastel sprinkles until evenly distributed.
-
Press into Pan: Using lightly floured or buttered fingertips, press dough evenly into the prepared pan.
-
Bake: Bake 20–25 minutes until edges are lightly golden and top looks set. Center may still seem slightly soft. Cool completely on a wire rack.
-
Make Frosting: Beat softened butter until smooth. Gradually add powdered sugar, then vanilla and 1 tbsp milk. Beat 2–3 minutes until fluffy. Add a second tbsp of milk if needed and tint with food coloring if desired.
-
Frost & Decorate: Spread frosting over cooled bars. Immediately top with extra sprinkles.
-
Slice & Serve: Lift bars from pan using parchment overhang. Slice into squares with a sharp knife, wiping between cuts for clean edges.
Notes
-
Use jimmies or quins in the dough to prevent color bleeding.
-
Avoid over-baking for soft, chewy bars.
-
Frost after cooling to keep frosting from melting.
-
Make-ahead: Bake bars in advance, store at room temp, and frost on serving day.
-
Freezing: Freeze unfrosted bars up to 2 months. Frost after thawing.
Nutritional Information (Approximate)
Per bar (based on 18 bars): Calories: ~240 | Fat: 12g | Saturated Fat: 7g | Cholesterol: 50mg | Sodium: 85mg | Carbohydrates: 32g | Sugar: 22g | Protein: 2g
Final Thoughts
And there you have it, sweet friend—a pan full of pure, sprinkle-dusted joy that’s guaranteed to make any spring day feel like a celebration. These Easter Bunny Sprinkle Bars are everything I hope a dessert can be: incredibly easy to make, impossibly pretty to look at, and so delicious that they disappear before you’ve even had a chance to sneak a second one (though I fully support going back for thirds).
What I adore most about this recipe is how it captures the very essence of springtime—that feeling of sunshine warming your skin after a long winter, of flowers bursting into color, of gathering with the people you love most. Every time I slice into these bars, with their soft, buttery centers and that cloud of pastel-frosted perfection, I’m reminded that the simplest pleasures are often the sweetest. There’s no complicated technique here, no fancy equipment required. Just good old-fashioned baking made with love and a generous helping of sprinkles.
Spicy Keto Chicken-and-Cheese Casserole : Bold Flavor, No Carbs
Spicy Keto Chicken-and-Cheese Casserole: Your New Favorite Low-Carb Comfort Food
Hey there, friend! Come on in and pull up a stool. Can you smell that? It’s the unmistakable, mouthwatering aroma of something cheesy, spicy, and deeply comforting baking in the oven. If your week has been a whirlwind and you’re craving a dinner that feels like a warm hug but fits your healthy goals, you have absolutely landed in the right spot. Today, we’re diving fork-first into my Spicy Keto Chicken-and-Cheese Casserole – a dish that’s become a rockstar in my weekly rotation and a total crowd-pleaser for everyone at my table.
Let’s be real for a second. “Keto” and “casserole” sometimes sound like they belong in a sentence that ends with “…but it’s kinda dry and sad.” I’m here to blow that notion right out of the kitchen. This casserole is anything but! It’s the glorious, low-carb love child of creamy enchiladas and the most satisfying chicken bake you’ve ever had. We’re talking tender, seasoned chicken smothered in a luscious, tangy, and spicy sauce, all buried under a blanket of perfectly melted cheese. It’s bold, it’s unapologetically flavorful, and it proves that eating low-carb doesn’t mean sacrificing an ounce of joy.
Whether you’re a keto veteran, just dipping your toes into a lower-carb lifestyle, or simply someone who loves a good, easy, one-dish wonder, this recipe is for you. It comes together with minimal fuss, uses simple ingredients you can feel good about, and creates the kind of leftovers you’ll actually look forward to. So, tie on that apron (embrace the mess!), and let’s make a dinner that’s guaranteed to spark some happy sighs around the table.
The Night This Casserole Saved Dinner (And My Sanity)
This recipe has a permanent place in my heart because of one particularly chaotic Tuesday. My sister and her family surprised us with a last-minute visit, my little one was mid-toddler-meltdown, and my grand plan for a fancy dinner was crumbling faster than a poorly made pie crust. I stood in front of the fridge, doing that classic “what-on-earth-can-I-make-with-this” scan. I saw leftover cooked chicken, a jar of salsa, and a block of cheese staring back at me.
In a moment of “let’s just throw it all together and pray,” I chopped, mixed, and baked. The transformation was magical. As that cheesy, spicy scent filled the house, the toddler’s tears stopped, replaced by curious sniffing. My sister wandered in, asking, “What is that amazing smell? It smells like my favorite Mexican restaurant!” We gathered around the table, not with a perfectly plated masterpiece, but with a big, comforting dish of this impromptu casserole. The conversation flowed, seconds were served, and the stress of the day just melted away. It was a powerful reminder that the best meals aren’t about perfection—they’re about bringing people together with warmth and flavor, straight from a humble baking dish.
Gathering Your Flavor Power Team
Here’s everything you’ll need to create this flavor fiesta. I’ve included some of my favorite insights and swaps to make this recipe your own!
- 1 teaspoon butter or avocado oil cooking spray: This is just to prevent sticking. I love using avocado oil spray for its high smoke point and neutral flavor, but good old butter adds a lovely richness. Chef’s Tip: If your baking dish is well-seasoned ceramic or enameled cast iron, you might get away with skipping this, but I usually give it a quick glug or spray for peace of mind.
- 4 boneless, skinless chicken breasts (about 1.5 lbs), cut into 1-inch chunks: The star of the show! Using uniform chunks ensures even cooking. Substitution: Thighs are fantastic here for more juicy, forgiving meat. You can also use 4 cups of shredded rotisserie chicken to cut the cook time in half—just skip the sauté step!
- 1 teaspoon taco seasoning: A flavor shortcut I fully endorse. Check the label for hidden sugars or carbs. Chef’s Insight: For an extra flavor boost, make your own blend with chili powder, cumin, garlic powder, onion powder, and a pinch of smoked paprika.
- 1 (8 oz) jar of your favorite salsa: This is the base of our sauce and where you can personalize the heat level. I like a classic red salsa for depth. Substitution: Green salsa (salsa verde) creates a wonderfully tangy, zingy version. For a smoother sauce, you can use a cup of plain sugar-free marinara in a pinch.
- ½ cup full-fat sour cream: The secret to that dreamy, creamy texture that makes the sauce so luxurious. Substitution: Full-fat Greek yogurt works beautifully and adds a bit more protein. For a dairy-free option, try unsweetened coconut cream.
- 4 oz diced jalapeños (about ½ a standard jar, drained): Our fiery friend! I use the pre-diced kind from a jar for convenience and consistent heat. Chef’s Tip: For milder flavor, use pickled jalapeños. For serious heat, add 1-2 finely chopped fresh jalapeños (seeds and all!).
- 4 oz shredded sharp Cheddar cheese: The golden, melty crown. I always recommend shredding your own from a block—pre-shredded cheese contains anti-caking agents that can make the melt less smooth. Substitution: A Mexican cheese blend, Pepper Jack (for more heat!), or Monterey Jack are all delicious.
- 4 green onions, sliced: The fresh, crisp finish! The green parts add a pop of color and a light oniony bite that cuts through the richness perfectly.
Let’s Build Some Deliciousness: Step-by-Step
Ready to cook? Follow these steps for a foolproof, flavor-packed casserole. I’ve packed each one with my favorite kitchen hacks!
- Prep and Preheat: Start by preheating your oven to 350°F (175°C). This is our target temperature for cozy, even baking. While it heats, grab your favorite 9×13 inch (or similar 3-quart) baking dish. Give it a light coating of butter or cooking spray. My Little Hack: I sometimes rub a cut clove of garlic around the greased dish for a subtle, aromatic background note.
- Sauté the Chicken: Heat a large skillet over medium-high heat. No need to add extra oil if your pan is non-stick. Add the chicken chunks in a single layer (work in batches if needed to avoid steaming). Let them get a nice sear without moving them for a few minutes, then stir and cook until they’re no longer pink in the center, about 6-8 minutes total. Chef’s Commentary: This step isn’t just about cooking the chicken; it’s about building flavor through browning (the Maillard reaction, for my science-loving friends!). Once cooked, drain any excess liquid from the pan—this keeps our casserole from getting watery. Immediately toss the hot chicken with the taco seasoning. The residual heat will toast the spices and make them incredibly fragrant.
- Assemble the Base: Transfer that beautifully seasoned chicken directly into your prepared baking dish. Spread it into a nice, even layer. Now, grab a medium mixing bowl. To it, add the entire jar of salsa, the ½ cup of sour cream, and the diced jalapeños. Stir it until you have a gorgeous, creamy, speckled sauce. Pro Tip: Taste this sauce! This is your moment to adjust. Want more heat? Add a dash of cayenne. Need more tang? A squeeze of lime juice works wonders.
- The First Bake: Pour the creamy jalapeño salsa sauce all over the chicken, making sure to cover most of it. You want every bite saucy! Pop the dish, uncovered, into your preheated oven. Bake for 25 minutes. You’re looking for the sauce to be bubbling actively around the edges—that’s how you know the center is piping hot.
- The Cheesy Finale: Carefully pull the casserole out of the oven (it’ll be hot!). Evenly sprinkle all of that gorgeous shredded cheese over the top. Slide it back into the oven for just 5 more minutes, or until the cheese is fully melted, gooey, and maybe even starting to get a few golden spots. Watchful Eye: Don’t wander off here! Melting cheese goes from perfect to browned faster than you think.
- Rest and Garnish: This might be the hardest step: let it rest! Take the casserole out and place it on a cooling rack or your stove top. Let it sit for 5-10 minutes. This allows the sauce to thicken slightly and lets everything settle, so you get perfect slices instead of a saucy avalanche. Right before serving, scatter the sliced green onions over the top for that fresh, colorful finish.
How to Serve This Spicy Masterpiece
This casserole is a complete meal in a dish, but I love building a plate around it. For a true low-carb feast, serve generous scoops alongside a crisp, simple salad of romaine and avocado with a lime vinaigrette. It’s also fantastic with a side of cauliflower rice to soak up any extra sauce. For a non-keto crowd, a side of black beans or warm, soft tortillas for scooping is always a hit. I like to serve it right from the baking dish at the table—it’s inviting, communal, and means fewer dishes for me to wash!
Make It Your Own: 5 Flavorful Twists
The beauty of this recipe is its adaptability. Here are a few ways to play with it:
- “Buffalo Chicken” Style: Swap the salsa for ¾ cup of Frank’s RedHot sauce (or your favorite sugar-free hot sauce) mixed with ¼ cup of melted butter or ranch dressing. Use blue cheese or ranch dressing as a garnish instead of green onions.
- “Taco Salad” Bake: After adding the cheese, top with a layer of shredded iceberg lettuce, diced tomatoes, sliced black olives, and a few crushed pork rinds for crunch after baking.
- Dairy-Free Delight: Use coconut cream instead of sour cream and a dairy-free cheese alternative that melts well (violife or Miyoko’s are great). Top with fresh cilantro.
- Add More Veggies: Sauté a diced bell pepper and half an onion with the chicken. Or, stir in a cup of fresh spinach or chopped kale into the sauce before baking.
- Breakfast-for-Dinner Version: Use cooked, crumbled breakfast sausage instead of chicken, and add a layer of whisked eggs (about 6) poured over the meat before adding the sauce. Bake until the eggs are set, then add cheese.
Olivia’s Kitchen Notes & Stories
This recipe has truly evolved in my kitchen. The first time I made it, I was so worried it would be too dry that I doubled the sauce (a delicious mistake, by the way—feel free to add an extra ¼ cup of sour cream if you love it extra creamy). My husband now judges my success by the level of “cheese pull” he can achieve on his first serving—it’s a high-stakes game! I’ve also learned that this casserole freezes like a dream. I’ll often make a double batch, bake one, and freeze the other (unbaked) in a foil pan. It’s my ultimate “gift for my future self” on a busy night. Just thaw in the fridge overnight and bake as directed, adding a few extra minutes if needed. The flavors seem to get even better as they mingle.
Your Questions, Answered
Q: My casserole came out a bit watery. What happened?
A: This is usually due to excess liquid from the chicken or the salsa. Make sure to drain the cooked chicken well after sautéing. Also, if your salsa is very liquidy, you can drain a tablespoon or two of the excess liquid from the jar before mixing. Letting the casserole rest for a full 10 minutes after baking also allows the sauce to thicken up beautifully.
Q: Can I make this ahead of time?
A: Absolutely! You can assemble the entire casserole (through step 3, before the first bake) up to 24 hours in advance. Cover tightly and refrigerate. When ready to bake, you may need to add 5-10 minutes to the initial baking time since you’re starting with a cold dish. Then add the cheese and finish as usual.
Q: Is this really keto? The salsa and jalapeños have carbs.
A> Great question! Yes, it fits a standard keto framework. The carbs from the salsa and jalapeños are minimal and are factored into the total net carb count (around 8g per serving, but always check your specific brands). The key is using a salsa with no added sugar. Always read labels to be sure.
Q: My cheese browned/burned before the middle was hot. Help!
A> Ovens can have hot spots! Next time, try baking the casserole (without cheese) on a center rack. If your cheese is browning too fast during the final 5 minutes, simply place a loose piece of foil over the top. Also, ensure your cheese is evenly shredded—thicker clumps take longer to melt and can brown on the outside before melting fully.

Spicy Keto Chicken-and-Cheese Casserole : Bold Flavor, No Carbs
Description
If you’re craving something warm, cheesy, and bold but still low-carb, this spicy keto chicken-and-cheese casserole is a perfect pick. It’s creamy, satisfying, and packed with flavor — the kind of easy oven meal that works on busy nights and tastes even better the next day. Simple ingredients, one dish, big comfort.
Ingredients
-
1½ lb (700 g) boneless skinless chicken breast, cut in chunks
-
1 tsp butter or avocado oil (for greasing dish)
-
1 tsp taco seasoning (no added sugar)
-
1 cup (240 g) low-sugar salsa
-
½ cup (120 g) full-fat sour cream (or full-fat Greek yogurt)
-
4 oz (115 g) diced jalapeños, drained (jarred or fresh)
-
1½ cups (170 g) shredded sharp cheddar cheese
-
4 green onions, sliced
-
Salt and pepper to taste
Instructions
-
Preheat Oven
Heat oven to 350°F (175°C). Lightly grease a medium baking dish. -
Cook the Chicken
Heat a skillet over medium-high heat. Add chicken pieces and cook 6–8 minutes until no longer pink and lightly browned. Drain excess liquid. Toss with taco seasoning, salt, and pepper. -
Make the Creamy Sauce
In a bowl, mix salsa, sour cream, and jalapeños until smooth. -
Assemble
Spread chicken evenly in the baking dish. Pour sauce over the top and spread to cover. -
Bake
Bake uncovered for 25 minutes, until hot and bubbling at the edges. -
Add Cheese
Sprinkle shredded cheese evenly on top. Return to oven for 5 minutes until melted and gooey. -
Rest & Finish
Let rest 5–10 minutes to thicken. Top with sliced green onions and serve.
Notes
-
Preheat Oven
Heat oven to 350°F (175°C). Lightly grease a medium baking dish. -
Cook the Chicken
Heat a skillet over medium-high heat. Add chicken pieces and cook 6–8 minutes until no longer pink and lightly browned. Drain excess liquid. Toss with taco seasoning, salt, and pepper. -
Make the Creamy Sauce
In a bowl, mix salsa, sour cream, and jalapeños until smooth. -
Assemble
Spread chicken evenly in the baking dish. Pour sauce over the top and spread to cover. -
Bake
Bake uncovered for 25 minutes, until hot and bubbling at the edges. -
Add Cheese
Sprinkle shredded cheese evenly on top. Return to oven for 5 minutes until melted and gooey. -
Rest & Finish
Let rest 5–10 minutes to thicken. Top with sliced green onions and serve.
Nutritional Information (Per Serving)
Please note: This is an estimate based on the specific ingredients listed. Values may vary depending on the brands you use.
Calories: ~335 | Total Fat: 19g | Saturated Fat: 9g | Protein: 32g | Total Carbohydrates: 8g | Dietary Fiber: 2g | Net Carbs: 6g | Sugar: 3g
Final Thoughts
Spicy Keto Chicken-and-Cheese Casserole: Your New Favorite Low-Carb Comfort Food
Hey there, friend! Come on in and pull up a stool. Can you smell that? It’s the unmistakable, mouthwatering aroma of something cheesy, spicy, and deeply comforting baking in the oven. If your week has been a whirlwind and you’re craving a dinner that feels like a warm hug but fits your healthy goals, you have absolutely landed in the right spot. Today, we’re diving fork-first into my Spicy Keto Chicken-and-Cheese Casserole – a dish that’s become a rockstar in my weekly rotation and a total crowd-pleaser for everyone at my table.
Let’s be real for a second. “Keto” and “casserole” sometimes sound like they belong in a sentence that ends with “…but it’s kinda dry and sad.” I’m here to blow that notion right out of the kitchen. This casserole is anything but! It’s the glorious, low-carb love child of creamy enchiladas and the most satisfying chicken bake you’ve ever had. We’re talking tender, seasoned chicken smothered in a luscious, tangy, and spicy sauce, all buried under a blanket of perfectly melted cheese. It’s bold, it’s unapologetically flavorful, and it proves that eating low-carb doesn’t mean sacrificing an ounce of joy.
Whether you’re a keto veteran, just dipping your toes into a lower-carb lifestyle, or simply someone who loves a good, easy, one-dish wonder, this recipe is for you. It comes together with minimal fuss, uses simple ingredients you can feel good about, and creates the kind of leftovers you’ll actually look forward to. So, tie on that apron (embrace the mess!), and let’s make a dinner that’s guaranteed to spark some happy sighs around the table.
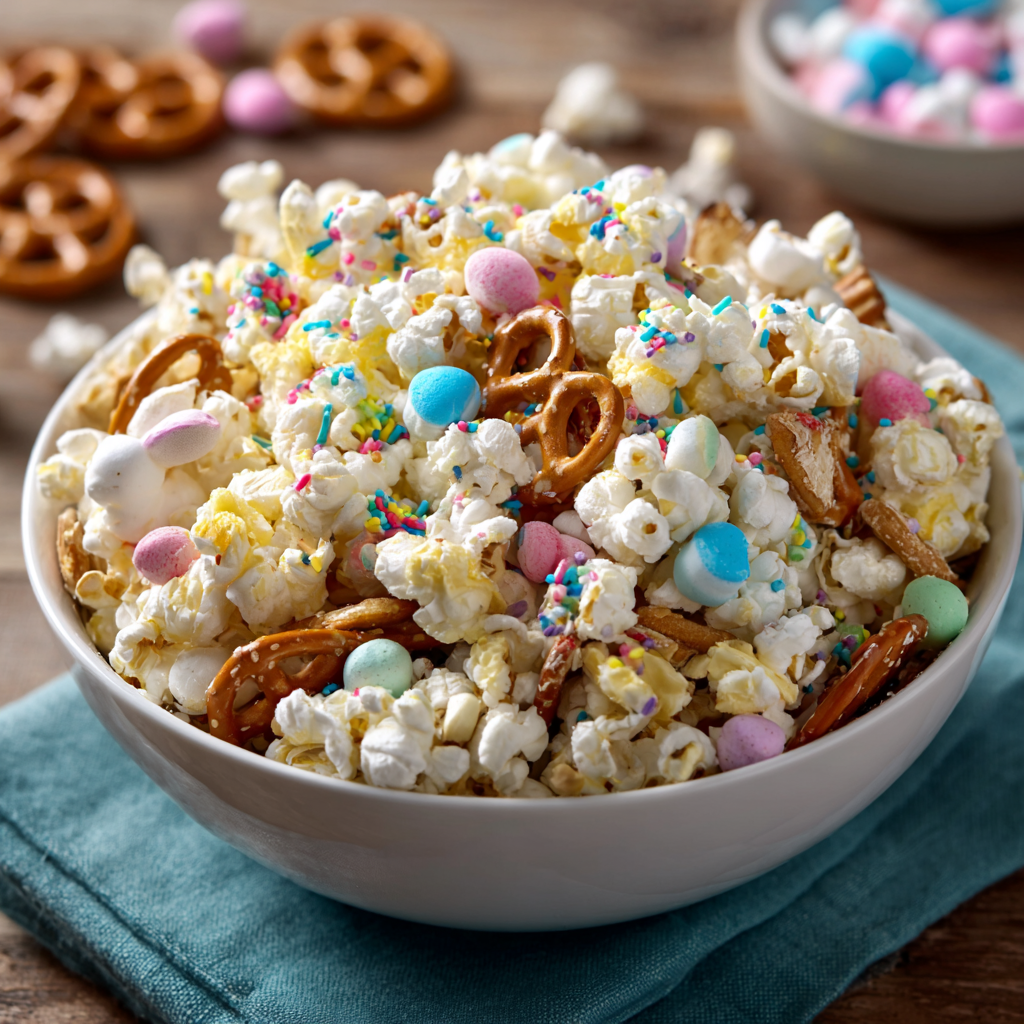
Bunny Bait Easter Mix Recipe : Easy No-Bake Sweet & Salty Snack
Bunny Bait Easter Mix: The Irresistible No-Bake Snack That Steals the Spotlight
Hey there, friend! Come on in, grab an apron (a clean one, or a messy one—I won’t judge!), and let’s chat about the magical moment when a recipe becomes more than just food. It becomes a tradition, a centerpiece for laughter, and the thing everyone huddles around the table for. Today, we’re making exactly that: my legendary Bunny Bait Easter Mix.
If you’ve ever needed a treat that’s guaranteed to bring pure, unadulterated joy—look no further. This is it. We’re talking about a glorious, confetti-like jumble of crunchy popcorn, salty pretzels, crispy cereal, pastel candies, and mini marshmallows, all hugged by a coat of silky white chocolate. It’s sweet, it’s salty, it’s crunchy, and it has that fantastic “break-it-into-clusters” texture that makes it impossible to eat just one handful.
The best part? You don’t even have to turn on your oven. This is a true no-bake wonder, coming together in about 15 minutes of active kitchen time. It’s the hero you need for Easter brunch, the star of the school bake sale (nut-free option included!), the perfect gift for neighbors, or just a fun project for a cozy spring afternoon with the kids. It’s adaptable, forgiving, and bursting with personality—just like the best home cooking should be.
So, if you’re ready to make a treat that disappears faster than you can say “hoppy Easter,” let’s dive in. I’ll share my secrets, my favorite silly substitutions, and the story of how this mix became a non-negotiable part of our spring celebrations. Let’s make some magic!
The Year the Bunny Bait Saved Easter (And My Sanity)
Let me paint you a picture. It’s Easter weekend a few years back. I’ve ambitiously promised a homemade brunch for 15, complete from-scratch hot cross buns (they were… dense), a glazed ham, the works. My kitchen looks like a flour bomb went off, and I’ve realized I have exactly zero festive snacks for the kids (and let’s be real, the adults) to munch on while the main event finishes cooking. Panic was starting to simmer.
Then, I remember the concept of “puppy chow” or “muddy buddies”—that iconic cereal-chocolate-powdered sugar snack. A lightbulb goes off! I rummage through the pantry: a bag of popcorn from movie night, leftover pretzels, some cereal, and a treasure trove of pastel Easter candy I’d “hidden” from myself. I melted the last of some white chocolate, tossed everything together in a colossal bowl, and drizzled it with abandon.
I poured this chaotic, beautiful mix into a big platter and set it on the counter with a sign that said “Bunny Bait – Take Some!”. Friends, it was a revelation. It was the first thing gone. Kids were making little bags of it to take home. My uncle asked for the recipe three times. It wasn’t the perfect ham or the (sad) hot cross buns they talked about for weeks—it was this thrown-together, no-bake, joyfully messy snack mix. It taught me a beautiful lesson: sometimes, the most memorable food isn’t the most complicated. It’s the one made with a dash of creativity and a whole lot of love, served with a side of fun. Now, making Bunny Bait is my favorite pre-Easter ritual, a happy chaos I look forward to every year.
Gathering Your Bunny Bait Brigade: Ingredients & Insights
Here’s the beautiful part: this recipe is a fantastic template. Think of this list as your playground. I’ll give you the classic blueprint and all my favorite chef-y notes and swaps to make it your own.
For the Base Mix (The Crunch Crew):
- 8 cups popped popcorn (plain or lightly salted): This is our foundational crunch! I use plain air-popped or a lightly salted microwave bag. Chef’s Insight: Avoid heavy butter-flavored popcorn—it can make the mix greasy. And please, do a quick check for unpopped kernels! They’re a tooth’s worst enemy.
- 2 cups mini pretzels (twists or sticks): The salty superstar that balances all the sweetness. Mini twists are classic, but pretzel sticks are fun too and easy for little hands. Substitution Tip: Got gluten-free friends? Swap in your favorite GF pretzels! They work perfectly.
- 2 cups Rice Chex or Corn Chex cereal: This adds a light, crispy texture that’s different from the popcorn and pretzels. Chef’s Insight: Rice Chex gets a bit more delicate, Corn Chex has a nice corn flavor. Both are winners!
For the Sweet Add-Ins (The Party Starters):
- 1½ cups pastel chocolate candies (M&M’s-style): The Easter color pop! Use the classic mini eggs or pastel M&M’s. Chef’s Insight: If it’s not Easter, rainbow chocolate candies work for any occasion. This is where the festive vibes come from!
- 1 cup mini marshmallows: They add little chewy, sweet pockets. Substitution Tip: For a different look, use pastel marshmallows if you can find them!
- ¼–½ cup pastel sprinkles (jimmies or nonpareils): This is pure edible confetti. It makes the mix look professionally festive. Don’t skip the sprinkles!
For the Coating (The Glue That Binds):
- 16 oz white chocolate chips or vanilla candy melts: This is what creates those delicious clusters. Chef’s Deep Dive: White chocolate chips can be trickier to melt smoothly (they contain cocoa butter). Candy melts (like Wilton brand) are designed for melting and coating—they’re more forgiving and set firmly. I often use candy melts for guaranteed smoothness!
- 1–2 tsp neutral oil (like vegetable or coconut): Optional but highly recommended. If your melted chocolate seems thick or is seizing up, a tiny bit of oil brings it back to a silky, drizzle-able consistency.
Optional Extra Crew (Mix & Match!):
- ½ cup crushed vanilla sandwich cookies (like Golden Oreos): Adds a “cookie dirt” vibe that’s delicious.
- ½ cup roasted salted nuts (peanuts, almonds): For extra crunch and protein. Omit for nut-free.
- ½ cup shredded coconut: Toasted or plain, for a tropical twist.
Let’s Make Some Magic: Step-by-Step Instructions
Ready? This is the fun, hands-in part. Put on some happy music, and let’s go!
- Prep Your Station. Line two large baking sheets with parchment paper or silicone baking mats. This is non-negotiable for easy cleanup! Pop your popcorn and spread it out evenly on the sheets. Now, channel your inner detective and pick out any unpopped kernels. Chef’s Hack: I like to give the popcorn a gentle shake on the tray—the heavy kernels usually fall to the bottom for easy spotting.
- Build the Crunch Foundation. Scatter your mini pretzels and Chex cereal evenly over the popcorn landscape. Use your hands or a couple of spoons to gently toss and distribute everything. You want every future scoop to get a bit of everything. Chef’s Commentary: Listen to that sound! That’s the sound of potential deliciousness.
- Melt the Chocolate Like a Pro. Add your white chocolate chips or candy melts to a microwave-safe bowl. Microwave at 50% power in 30-second intervals. After each interval, stop and stir well. This low-and-slow method prevents the chocolate from scorching. It’s done when it’s completely smooth and fluid. If it seems a little thick or chunky, stir in that 1-2 tsp of neutral oil. It works miracles! Chef’s Hack: You can also use a double boiler on the stovetop if you’re nervous about the microwave. Just keep the heat low and steady.
- The Great Toss & Drizzle. Here’s the key to perfect clustering: don’t dump all the chocolate at once! Pour about half of your melted chocolate over the popcorn mixture. Now, gently fold and toss everything together. I use two large spoons or silicone spatulas in a lifting motion. Then, drizzle the remaining chocolate over the top and give it a few more gentle turns. You want most things coated, but not drenched into one giant brick. Leaving a little chocolate in the bowl for a final drizzle is a good move.
- Decorate with Abandon! While the chocolate is still wet and sticky, immediately shower your mix with the pastel candies, mini marshmallows, sprinkles, and any of your optional extras. Don’t be shy! Then, gently press down on the toppings with your clean hands or the back of a spoon. This helps them adhere as the chocolate sets.
- The Patience Game (The Hardest Step!). Let the trays sit at room temperature for 20-30 minutes, until the chocolate is completely firm. If your kitchen is very warm, you can pop them in the fridge for 10-15 minutes to speed things up. Chef’s Tip: This is the perfect time to wash that one bowl and spoon, so you come back to a clean kitchen and a ready-to-devour snack.
- Break & Celebrate! Once set, use your hands to break the mix into delightful, uneven clusters. Some big, some small—it’s all good. Transfer your gorgeous Bunny Bait to a big serving bowl, cute treat bags, mason jars for gifting, or just eat it straight off the tray (I’ve done it).
How to Serve Your Masterpiece
Presentation is half the fun with this mix! For a party, I love piling it high in a big colorful bowl or on a rustic wooden board. For individual treats, scoop it into clear cellophane bags tied with a ribbon and a cute “Bunny Bait” tag. For school, use small paper cups. You can even layer it in a clear glass jar as a sweet gift for a friend or neighbor. The vibrant colors make it a centerpiece all on its own!
Make It Your Own: Fun Recipe Variations
- Chocolate Lover’s Dream: Use semi-sweet or milk chocolate chips instead of white chocolate. Swap the pastel candies for regular M&M’s and add some chocolate chips to the mix.
- Spring Fling: Use pastel-colored candy melts (pink, yellow, light blue), and coordinate your sprinkles and candies to match. Add some freeze-dried strawberries for a tangy crunch!
- Trail Mix Twist: Make it more substantial by adding ½ cup each of raisins or dried cranberries, sunflower seeds, and coconut flakes. Use a mix of white and dark chocolate drizzle.
- Ultimate Cookie Crunch: Add 1 cup of broken pieces of your favorite cookies—Oreos, Biscoff, or even graham crackers. It’s next-level!
- Birthday Party Bait: Use rainbow sprinkles and multi-colored candies. Substitute the popcorn with Golden Grahams cereal for a s’mores-like vibe!
Olivia’s Chef Notes & Kitchen Confessions
This recipe has evolved from my pantry-scavenging panic into a beloved staple. One year, I accidentally used cheddar popcorn (don’t ask how I mixed up the bags). It was… interesting. Not recommended, but we laughed a lot! Over time, I’ve learned that the oil in the chocolate is your best friend, and letting the mix set fully before breaking it is worth the wait for perfect clusters.
My biggest piece of advice? Have fun with it. Cooking should spark joy, not stress. If you’re missing an ingredient, swap it. If you want more sprinkles, add more sprinkles. This Bunny Bait is a feeling—a celebration of spring, simplicity, and sharing. Every time I make it now, I remember that first chaotic Easter and smile. I hope it becomes a little pocket of joy in your traditions, too.
Your Questions, Answered: FAQs & Troubleshooting
Q: My white chocolate got clumpy and seized! What do I do?
A: Don’t panic! This usually means a tiny bit of moisture got in (from a not-perfectly-dry spoon or bowl). Try adding that teaspoon of neutral oil and stirring vigorously. If it’s really stubborn, you can add a tiny bit (½ tsp) of shortening and gently re-warm it at very low power. If all else fails, melt a new batch slowly—we’ve all been there!
Q: Can I make this ahead of time?
A: Absolutely! Once completely set, store it in an airtight container at room temperature for up to 5 days. For longer storage (up to 2 weeks), you can keep it in the fridge. The texture stays great!
Q: How do I make sure I get good clusters?
A: The two-drizzle method is key! Coating in stages, rather than drowning it all at once, allows the chocolate to act as “glue” between pieces without making one solid block. Also, don’t over-stir after the final drizzle.
Q: Is there a nut-free option?
A> Yes! This recipe is naturally nut-free if you skip the optional nuts. Just double-check that your chocolate chips and candies are made in a nut-free facility if you have a severe allergy.
Bunny Bait Easter Mix Recipe : Easy No-Bake Sweet & Salty Snack
Description
Need a fast, fun treat that looks festive and disappears fast? This Bunny Bait Easter Mix is your go-to. It’s a colorful no-bake snack packed with crunchy popcorn, pretzels, cereal, marshmallows, and candy, all coated in creamy white chocolate. Perfect for Easter parties, school events, or gifting — and easy enough for kids to help make.
Ingredients
Crunch Base
-
8 cups popped popcorn (plain or lightly salted)
-
2 cups mini pretzels
-
2 cups rice or corn square cereal
Mix-Ins
-
1½ cups pastel chocolate candies
-
1 cup mini marshmallows
-
¼–½ cup pastel sprinkles
Coating
-
16 oz white chocolate chips or candy melts
-
1–2 tsp neutral oil (optional, for smoother melting)
Optional Extras
-
Crushed vanilla cookies
-
Shredded coconut
-
Sunflower seeds (if nut-free is required, avoid mixed seed packs)
Instructions
-
Prep Trays
Line two large baking sheets with parchment paper. Spread popcorn out and remove any hard kernels. -
Add Crunch Items
Scatter pretzels and cereal over the popcorn. Gently toss to combine. -
Melt White Chocolate
Place chocolate in a microwave-safe bowl. Heat at 50% power in 30-second bursts, stirring each time, until smooth. Stir in oil if needed for a thinner drizzle. -
Coat the Mix
Drizzle half the melted chocolate over the mixture and gently toss. Drizzle the rest and toss again lightly — don’t overmix. -
Add Toppings
Immediately sprinkle candies, marshmallows, and sprinkles over the top. Press lightly so they stick. -
Set
Let sit at room temperature 20–30 minutes (or chill 10–15 minutes) until firm. -
Break & Serve
Break into clusters and transfer to a bowl or treat bags.
Notes
-
Use plain popcorn — heavy butter flavor can make the mix greasy.
-
Melt chocolate slowly to avoid clumping.
-
Two-step drizzle = better clusters instead of one big pour.
-
Add toppings while chocolate is wet so they stick.
-
For school-safe batches: check labels and skip nuts/seeds if needed.
Nutritional Information*
*Please note: This is an approximate estimate calculated using online software and standard ingredients. Values will vary based on specific brands and optional add-ins used.
Per Serving (1/12th of recipe): Calories: ~320 | Total Fat: 15g | Saturated Fat: 8g | Cholesterol: 5mg | Sodium: 180mg | Total Carbohydrates: 44g | Dietary Fiber: 1g | Total Sugars: 28g | Protein: 4g
Prep Time: 15 minutes | Set Time: 20-30 minutes | Total Time: 35-45 minutes | Yield: 12-16 servings
Final Thoughts
Bunny Bait Easter Mix: The Irresistible No-Bake Snack That Steals the Spotlight
Hey there, friend! Come on in, grab an apron (a clean one, or a messy one—I won’t judge!), and let’s chat about the magical moment when a recipe becomes more than just food. It becomes a tradition, a centerpiece for laughter, and the thing everyone huddles around the table for. Today, we’re making exactly that: my legendary Bunny Bait Easter Mix.
If you’ve ever needed a treat that’s guaranteed to bring pure, unadulterated joy—look no further. This is it. We’re talking about a glorious, confetti-like jumble of crunchy popcorn, salty pretzels, crispy cereal, pastel candies, and mini marshmallows, all hugged by a coat of silky white chocolate. It’s sweet, it’s salty, it’s crunchy, and it has that fantastic “break-it-into-clusters” texture that makes it impossible to eat just one handful.




