
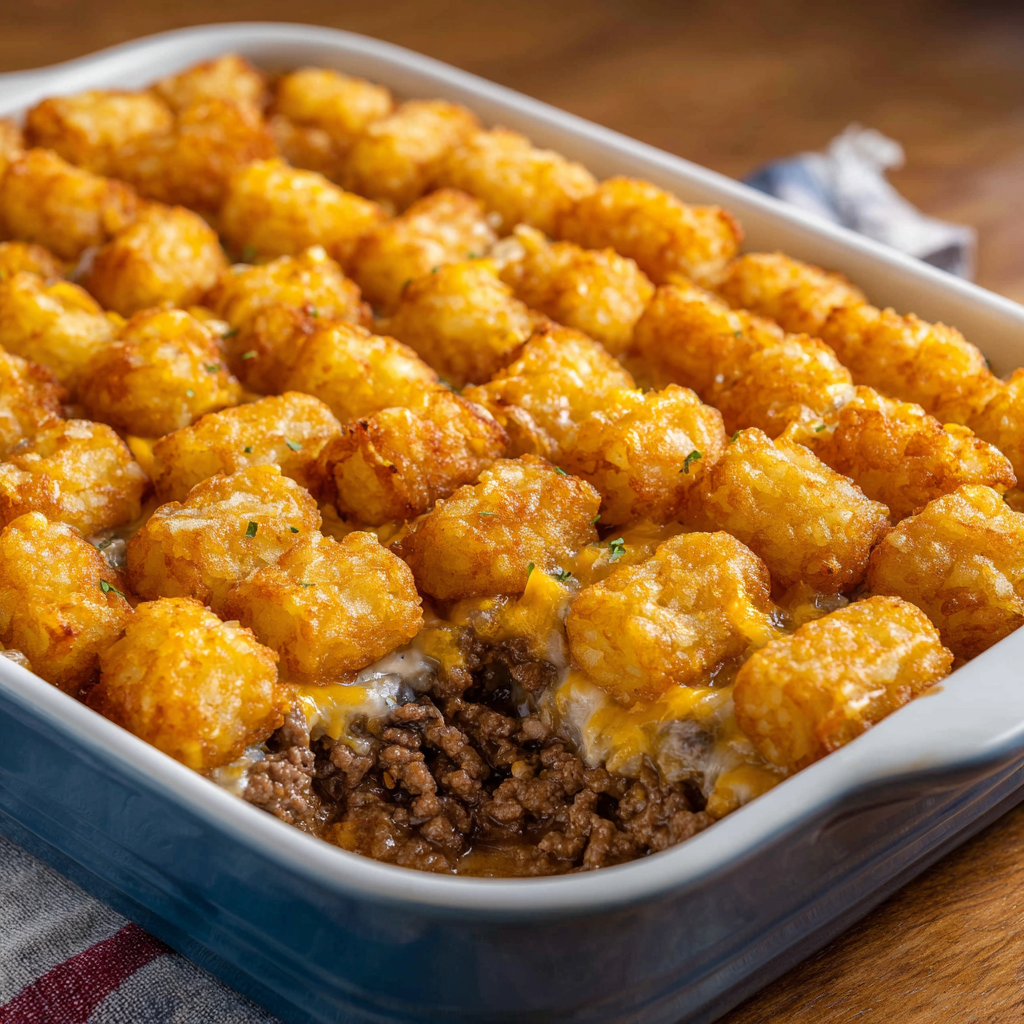
Quick and Easy Tater Tot Casserole
Hey There, Comfort Food Lover! Let’s Make Magic with Tater Tots
Okay, hands up if the smell of something crispy, cheesy, and downright cozy baking in the oven makes your heart do a happy dance! 🙋♀️ Welcome back to my kitchen, friends – it’s Olivia, your apron-clad cheerleader for all things delicious and doable. Today? We’re diving fork-first into pure nostalgia with my Quick & Easy Tater Tot Casserole. This isn’t just dinner; it’s a warm hug on a plate, the culinary equivalent of your favorite worn-in sweater. Imagine this: golden-brown tater tots forming a crispy crown over a bubbling, creamy, savory beef filling that smells like childhood joy. It’s the kind of meal where seconds disappear faster than you can say “pass the ketchup,” and leftovers? Ha! Good luck with that. Whether you’re wrangling hungry kids after soccer practice, craving a no-fuss comfort feast, or hosting a casual game night, this casserole is your weeknight superhero. No fancy techniques, no obscure ingredients – just simple, satisfying goodness that brings everyone to the table grinning. Ready to make some magic? Grab your favorite baking dish and let’s get cozy!
My Tater Tot Time Machine: A Story of Seconds & Smiles
This recipe instantly zaps me back to my Aunt Marge’s bustling kitchen circa 1998. Picture it: me, a gangly 10-year-old “sous chef” (read: official taste-tester), perched on a wobbly stool, “helping” her assemble what she called her “Emergency Crowd-Pleaser.” One frantic Wednesday, my entire Little League team descended on her house unexpectedly after a rainout. Aunt Marge, unfazed, whipped out ground beef, a couple of cans, and a giant bag of tater tots. As the casserole baked, filling her tiny kitchen with that unmistakable savory perfume, the chaos of muddy cleats and loud pre-teens magically transformed into eager anticipation. The moment it hit the table? Silence. Then, the glorious symphony of forks scraping plates. I swear, my friend Timmy tried to lick his dish clean! Seeing that mountain of tots disappear faster than a pop fly, and the pure, uncomplicated joy on everyone’s faces? That’s when I truly understood the power of simple, hearty food made with love. Every time I make this now, I channel Aunt Marge’s calm-in-the-storm energy and that memory of shared, unpretentious happiness.
Your Tater Tot Treasure Chest: What You’ll Need
Gathering these simple staples is half the battle won! Here’s the lowdown on each player in our cozy casserole symphony:
- 1 lb ground beef (80/20 blend is perfect!): Our hearty base! The little bit of fat adds flavor and keeps things moist. Chef Tip: Ground turkey or chicken works great for a lighter twist! For a plant-based win, swap in lentils or a meatless crumble.
- Salt and pepper to taste: The essential flavor builders! Season your beef well while cooking – it makes all the difference.
- Pinch of garlic powder (used twice!): Our flavor booster! We add one pinch to the browning beef for depth, and another pinch into the creamy mixture for that extra savory hum. Chef Insight: If you’re feeling fancy, a clove of minced fresh garlic sautéed with the beef is *chef’s kiss*.
- 1 (32 oz) package tater tots, thawed: The iconic crispy crown! Thawing is KEY for even cooking and maximum crispiness. Substitution Tip: Can’t find tots? Frozen hash brown patties, roughly chopped, work in a pinch!
- 1 (10.75 oz) can condensed cream of mushroom soup: Creamy, earthy goodness! This forms the luscious base of our filling. Allergy Alert? Cream of chicken or celery soup are easy swaps, or try a homemade “cream of” substitute using mushrooms, broth, and a roux.
- 1 (10.75 oz) can condensed cream of celery soup: Adds brightness and herbaceous notes alongside the mushroom. Flavor Twist: Love cheese? Swap one can for condensed cheddar cheese soup!
- 1 (10.75 oz) can milk (use the soup can to measure!): The magic liquid that transforms the condensed soups into a perfect, creamy sauce. Whole milk makes it richest, but 2% works beautifully. Dairy-Free? Unsweetened almond or oat milk blends right in.
Building Your Tater Tot Masterpiece: Step-by-Step
Let’s transform these simple ingredients into pure comfort! Follow these easy steps for casserole perfection:
- Fire Up the Oven & Prep: Preheat your oven to 350°F (175°C). Lightly grease a trusty 9×13 inch baking dish with cooking spray or butter. Chef Hack: Doing this now means less scrambling later!
- Brown that Beautiful Beef: Grab a large skillet over medium-high heat. Crumble in the ground beef. Sprinkle with salt, pepper, and that first pinch of garlic powder. Cook, breaking it up with a spoon, until it’s nicely browned and no pink remains (about 5-7 minutes). Pro Tip: Don’t overcrowd the pan – brown it in batches if needed for the best sear! Drain off any excess fat. Why drain? Too much grease = a soggy casserole bottom. Nobody wants that!
- Mix Up the Creamy Dream: In a large mixing bowl, combine the condensed cream of mushroom soup, condensed cream of celery soup, the measured can of milk, and the second pinch of garlic powder. Whisk it together until smooth. Now, add the drained, cooked beef and stir it all up until every bit is coated in that creamy, dreamy sauce. Chef Secret: Taste it now (carefully, it’s hot!) and adjust the salt and pepper if needed. This is your flavor foundation!
- Spread the Love: Pour the creamy beef mixture into your prepared baking dish. Use a spatula to spread it out evenly into a smooth, glorious layer. Think of it as tucking the beefy goodness into bed!
- Top with the Tot Crown: Now, the fun part! Arrange the thawed tater tots in a single, even layer over the creamy beef mixture. Presentation Hack: Place them neatly in rows, slightly overlapping, or just scatter them evenly – both work! The key is coverage so every bite has crispy tot goodness. Why thawed? Frozen tots straight from the freezer can make the baking time wonky and lead to a soggier topping or undercooked centers. Thawing ensures golden, crispy perfection!
- Bake to Golden Bliss: Slide that dish of potential into your preheated oven. Bake for 45-50 minutes, or until the filling is bubbling enthusiastically around the edges and those glorious tots are a deep, irresistible golden brown and crispy. Don’t Peek Too Early! Give it at least 35 minutes before checking to let the magic happen.
- The Grand Finale – Rest!: Once out of the oven, resist the urge to dive in immediately! Let the casserole rest for 5-10 minutes. Why Rest? This lets the filling thicken up beautifully, making it easier to serve those perfect, saucy scoops without it running everywhere. Plus, it saves your tongue from a molten lava surprise!
Plating Up Pure Comfort: How to Serve
This casserole is a star all on its own, but a little love on the plate never hurts! Spoon out generous portions – that crispy tot layer, creamy center, and savory beef is the main attraction. For a classic diner vibe, serve it right from the baking dish at the table. Want to fancy it up (just a smidge)? Plate individual servings and add a bright, fresh contrast: a simple side salad with tangy vinaigrette cuts the richness perfectly, or some steamed green beans or roasted broccoli. Don’t forget the condiments! Offer ketchup (a must for the tots!), hot sauce for heat lovers, or even a dollop of sour cream for extra creaminess. It’s the ultimate crowd-feeding, soul-satisfying centerpiece!
Shake It Up! Tater Tot Casserole Twists
Love the base? Let’s get creative! This recipe is a fantastic canvas:
- Cheeseburger Paradise: Stir 1 cup shredded cheddar cheese into the beef mixture before topping with tots. Sprinkle another 1/2 cup cheese over the tots during the last 10 minutes of baking! Add diced pickles on top after baking for the full burger effect.
- Veggie-Loaded Delight: Sauté 1 cup diced onions, 1/2 cup diced bell peppers, and 1 cup sliced mushrooms with the ground beef. Use all cream of mushroom soup. Perfect for sneaking in goodness!
- Southwestern Fiesta: Swap the cream of celery soup for cream of chicken. Add 1 can (drained) black beans, 1 cup corn (frozen or canned), and 1 tbsp taco seasoning to the beef mix. Top the baked casserole with diced tomatoes, avocado, and cilantro.
- Breakfast-for-Dinner: Omit the soups and beef. Whisk together 8 eggs, 1/2 cup milk, salt, pepper. Layer cooked, crumbled sausage or bacon in the dish, pour egg mix over, top with tots. Bake 45-50 mins until set. Serve with salsa!
- Gluten-Free Comfort: Use certified GF tater tots and GF condensed soups (or make your own GF “cream of” soup substitute). Double-check all labels!
Olivia’s Kitchen Confessions & Tips
This recipe? It’s evolved from Aunt Marge’s “dump and bake” classic into my slightly tweaked hug-in-a-dish. My big “aha!” moment was adding that second pinch of garlic powder to the soup mix – it just lifts everything! And thawing the tots? Learned that the hard way after one too many “crispy on top, frosty in the middle” incidents. Oops! Over the years, I’ve tried EVERY variation – adding peas (kid-approved!), mixing in Worcestershire sauce (umami bomb!), even attempting a “fancy” version with gruyere and caramelized onions (delicious, but defeats the quick & easy vibe!). The beauty is its flexibility. One snowy night, I literally only had cream of chicken soup and frozen mixed veggies – it became “Clean Out the Pantry Tater Tot Surprise” and was devoured. Remember, cooking’s an adventure! Don’t stress perfection; embrace the cozy chaos. If your tots aren’t perfectly aligned, but everyone’s smiling? That’s a win in my book.
Tater Tot Casserole Q&A: Your Questions, Answered!
Let’s tackle those common kitchen quandaries:
- “Can I assemble this ahead of time?” Absolutely! You rockstar meal prepper, you. Brown the beef and mix it with the soups/milk. Let it cool completely. Store the mixture covered in the fridge (up to 24 hours) and keep the thawed tots separate. When ready, spread the cold mixture in the dish, top with tots, and bake. You might need to add 5-10 extra minutes since it’s starting cold.
- “Help! My filling is too runny/thick!” Don’t panic! If it’s runny after baking, it likely needed more rest time (let it sit 15 mins). If still soupy, bake uncovered 5-10 mins longer. For next time, slightly reduce the milk (try 3/4 can). If it’s too thick before baking, stir in a splash more milk or broth. If it thickens too much after baking, a little extra milk stirred in when reheating leftovers fixes it.
- “Can I freeze Tater Tot Casserole?” Yes, but with caveats! Assemble completely (with thawed tots), but do not bake. Wrap the unbaked casserole tightly in plastic wrap AND foil. Freeze for up to 2 months. Thaw completely in the fridge overnight before baking as directed (might need a few extra mins). Freezing after baking can make the tots lose their crispiness and the sauce grainy.
- “My tater tots aren’t crispy enough! What gives?” We crave that crunch! Ensure tots are thawed (frozen ones steam instead of crisp). Bake on the middle rack – too close to the top or bottom can cause uneven cooking. If needed, switch the oven to broil for the last 1-2 minutes (WATCH CLOSELY to avoid burning!). Make sure your oven is fully preheated! Soggy bottom? Ensure you drained the beef well.

Quick and Easy Tater Tot Casserole
- Total Time: 55 minutes
Description
Get ready to dive into a bubbling dish of creamy beef goodness topped with a crown of golden, crispy tater tots. This easy casserole is more than just dinner—it’s childhood, cheer, and coziness baked into one pan. Whether it’s a rainy Wednesday or a game night with friends, this soul-warming recipe brings smiles fast. Grab a dish and make dinner feel like a hug from the oven.
Ingredients
-
1 lb ground beef (80/20)
-
Salt & pepper, to taste
-
2 pinches garlic powder (divided)
-
1 (32 oz) bag tater tots, thawed
-
1 (10.75 oz) can cream of mushroom soup
-
1 (10.75 oz) can cream of celery soup
-
1 soup can of milk (whole or 2%)
Optional Twists:
-
Swap beef for turkey, chicken, or plant-based crumble
-
Use cheddar soup for extra cheesy flavor
-
Add 1 cup mixed veggies or black beans for a boost
Instructions
-
Preheat oven to 350°F (175°C). Lightly grease a 9×13″ baking dish.
-
Brown the beef in a skillet over medium-high with salt, pepper & 1 pinch garlic powder (5–7 min). Drain excess fat.
-
Mix soups, milk & second garlic powder pinch in a bowl. Stir in cooked beef.
-
Layer the creamy beef into your dish. Smooth evenly.
-
Top with thawed tater tots in a single layer.
-
Bake uncovered 45–50 min, until bubbling and tots are golden brown.
-
Rest 5–10 min before serving for best texture and flavor.
Notes
-
Thaw those tots! Cold tots = soggy top.
-
Want crispier finish? Broil 1–2 mins at the end, watching closely.
-
Make ahead: Prep filling up to 24 hrs ahead & top with tots just before baking.
-
Freezer friendly: Assemble (don’t bake), wrap well, freeze up to 2 months.
- Prep Time: 10 mins
- Cook Time: 45 mins
Nutrition
- Calories: 420 cal Per Serving
- Sodium: 780mg
- Fat: 28g
- Carbohydrates: 25g
- Protein: 17g
Nutritional Info (Approximate Per Serving)
Servings: 6 | Prep Time: 10 mins | Cook Time: 45 mins
Calories: ~420 | Fat: 28g | Carbs: 25g | Protein: 17g | Sodium: ~780mg
Note: Nutritional values are estimates and can vary based on specific ingredients used (e.g., leaner beef, low-sodium soups, milk fat content). Using low-sodium soups and lean ground beef can significantly reduce sodium and fat.
Final Thoughts: More Than Just a Casserole
Tater tot casserole isn’t just a meal—it’s a feeling. It’s the sound of laughter around the dinner table, the smell that brings you back to simpler times, and the taste that says, “Everything’s going to be okay.” Whether you’re making it for a crowd, meal-prepping for the week, or just treating yourself after a long day, this dish is a reminder that joy can be found in the simplest things.

Pumpkin Baked Oatmeal
Welcome to the Coziest Breakfast of Your Fall Dreams!
Hey there, kitchen friend! Olivia here, wiping flour off my apron and grinning ear to ear because we’re about to make magic happen. You know that feeling when crisp autumn air hits your face and you instantly crave something warm, spiced, and soul-hugging? That’s exactly why we’re diving into this Pumpkin Baked Oatmeal today. Imagine the best parts of pumpkin pie and your favorite oatmeal cuddling under a blanket – that’s what’s coming out of your oven in about an hour. This isn’t just breakfast; it’s edible sunshine for gloomy mornings, a make-ahead lifesaver for chaotic weeks, and your secret weapon for feeding hungry houseguests without breaking a sweat. I designed this double batch intentionally because trust me – once your crew tastes this cinnamon-kissed, maple-drenched wonder, they’ll be begging for seconds (and thirds!). No fancy techniques needed – just a bowl, a whisk, and that gorgeous oven of yours. Ready to fill your kitchen with smells that’ll make your neighbors jealous? Let’s bake some joy!
The Pumpkin Spice Epiphany That Started It All
Picture this: It’s 2017, and I’m hosting my first-ever Friendsgiving. I’d ambitiously planned six dishes… and completely forgot about breakfast for 10 groggy guests. Panic mode! With only pantry staples and a lonely can of pumpkin puree staring back at me, I frantically threw together oats, spices, and hope. What emerged was a golden, puffy miracle – scarfed down so fast, my friend Mark literally licked his plate. But the real magic happened later that week. My then-boyfriend (now husband!) texted: “Leftover pumpkin oats + coffee = happiness. Marry me?” (He proposed properly later, don’t worry!). That humble dish became our autumn love language. Every October, we bake it on Sunday nights, dancing to jazz in our mismatched socks while it fills the house with that iconic spicy-sweet perfume. It’s proof that sometimes the best memories start with a happy kitchen accident and a can opener.
Your Pumpkin Spice Toolkit
Double batch goodness! Why make one when you can share? (Or hoard leftovers guilt-free!)
- Olive oil or avocado oil – Our non-stick superhero! Avocado oil handles high heat beautifully, but olive oil adds a lovely fruity whisper. Chef’s hack: Brush some on the dish corners – no stuck bits!
- 4 cups rolled oats – Hearty old-fashioned oats give perfect texture. Insider tip: Avoid quick oats – they turn mushy! Gluten-free? Ensure certification if needed.
- 4 tsp pumpkin spice – Autumn in a jar! DIY option: Mix 3 tsp cinnamon + ½ tsp each ginger, nutmeg, allspice, cloves.
- 2 tsp baking powder – Our lift agent for fluffy layers. Check expiration dates – flat oatmeal is sad oatmeal!
- ½ tsp salt – Balances sweetness. Use flaky sea salt if you’re fancy!
- 2 cups pumpkin puree – NOT pie filling! Pro move: Squeeze excess liquid in a cheesecloth for extra firmness.
- 2½ cups milk of choice – Almond milk keeps it light, whole dairy makes it richer. Oat milk? Creamy perfection!
- 4 large eggs – Binds everything. Vegan swap: Flax eggs (4 tbsp ground flax + 10 tbsp water, sit 5 mins).
- 4 tsp vanilla extract – Use the good stuff! Imitation vanilla can taste medicinal.
- ⅔ cup maple syrup or honey – Pure maple syrup = earthy depth. Honey = floral notes. Both divine!
- Optional toppings – Chocolate chips (melt into gooey pockets!), toasted pecans (crunch!), or plump raisins (old-school charm).
Let’s Bake Some Comfort!
Preheat your oven to 350°F (175°C). Now, let’s make that baking dish non-stick! Rub olive or avocado oil generously everywhere – sides, corners, every nook. Trust me, crispy edges that release cleanly are worth the 30-second massage!
In a large bowl, whisk together your dry team: 4 cups rolled oats, 4 tsp pumpkin spice, 2 tsp baking powder, and ½ tsp salt. See how the spices create little rusty swirls in the oats? That’s flavor confetti!
Grab a second bowl for the wet ingredients. Plop in the 2 cups pumpkin puree. Add 2½ cups milk – pour slowly to avoid splashes! Crack in 4 large eggs (or add prepared flax eggs). Now drizzle that liquid gold: ⅔ cup maple syrup or honey and 4 tsp vanilla extract. Whisk like you’re cheering on your favorite team – get it silky smooth!
Here comes the fun part: Pour the wet mixture over the dry ingredients. Use a spatula (not a whisk!) to gently fold. Stop when just combined – overmixing makes oatmeal tough. Stir in any optional add-ins now (I vote chocolate chips + pecans!).
Transfer this glorious orange batter into your oiled 9×13-inch dish. Spread evenly – tap the dish firmly on the counter to eliminate air pockets. Secret weapon: Sprinkle extra toppings on top for visual wow-factor!
Slide it into the oven’s center rack. Bake 35-40 minutes. At 30 minutes, do the jiggle test: If the center wobbles like jello, it needs more time. Perfection looks golden-brown with crispy edges and a set middle. Your kitchen should smell like a Vermont farmhouse at sunrise!
CRUCIAL STEP: Let it cool 15 minutes before slicing. I know it’s tempting – but this lets the custardy center firm up. Use a sharp knife dipped in hot water for clean squares.
Plating Your Pumpkin Masterpiece
This is where personality shines! Serve warm squares in shallow bowls. Drizzle with extra maple syrup or a dollop of Greek yogurt swirled with honey. For “company fancy,” top with candied pecans and a dusting of cinnamon. Kids adore it with a side of warm apple cider. Brunch pro-tip: Pair with crispy bacon – sweet/salty heaven! Leftovers? Layer cold squares with yogurt and granola for next-day parfaits.
Shake Up Your Oatmeal Adventure!
- Apple Crumble Twist: Swap 1 cup pumpkin for unsweetened applesauce. Top with streusel (½ cup oats + ¼ cup flour + 3 tbsp butter + 2 tbsp brown sugar).
- Protein Power-Up: Add ½ cup vanilla protein powder to dry ingredients + extra ¾ cup milk. Top with almond butter.
- Tropical Escape: Use coconut milk + add ½ cup shredded coconut to batter. Top with mango chunks + macadamia nuts.
- Chocolate Lover’s Dream: Mix ⅓ cup cocoa powder into dry ingredients + ½ cup chocolate chips. Serve with raspberries.
- Savory-Sweet: Reduce sweetener to ⅓ cup + add ½ cup crumbled feta + 2 tbsp chopped rosemary. Top with black pepper.
Olivia’s Extra Pinch of Love
This recipe evolved from my infamous “pumpkin glop” phase – version 1.0 was so wet, we called it oatmeal soup! After 27 tests (yes, twenty-seven!), I learned the moisture-wicking power of blotting pumpkin puree. My husband still jokes he’s part pumpkin now. Pro tip: Bake it Sunday night for stress-free breakfasts all week! Store slices in airtight containers; they reheat beautifully in the microwave (45 secs) or toaster oven (crispy revival!). Freezes like a dream too – just thaw overnight. Funny story: My cat, Whiskers, once stole a square off the counter… now he meows at the oven every October. Even pets fall for this stuff!
Leftover Wizardry: 5 Unexpected Ways to Reinvent Your Oatmeal
Don’t let leftovers go stale! These transformations will have you craving day-old oatmeal.
1. Oatmeal Pancakes
Mash 2 cups leftover oatmeal with 1 egg, ¼ cup flour, and 1 tsp baking powder. Cook like silver dollar pancakes – the pumpkin makes them naturally sweet! Top with cranberry compote.
2. Savory Bread Pudding
Cube stale oatmeal into a greased dish. Whisk 3 eggs + 1 cup milk with ½ tsp garlic powder. Pour over cubes, top with cheddar, and bake at 375°F for 25 mins. Brunch game-changer!
3. Pumpkin Oat Smoothie
Blend 1 cup oatmeal with ½ banana, 1 cup milk, 1 tbsp almond butter, and ice. The oats add thickness rivaling protein powder – perfect post-workout fuel.
4. Crispy Oatmeal Bars
Press leftovers into a parchment-lined pan. Bake at 300°F for 45 mins until firm. Slice into bars. Dip half in melted chocolate for grown-up “oatmeal cream pies.”
5. Stuffing Upgrade
Use cubed baked oatmeal instead of bread in your Thanksgiving stuffing! Its spices pair perfectly with sage and sausage. Moisture tip: Reduce added broth by ¼ cup.
Storage Pro Tips
-
Fridge: Up to 5 days in airtight containers. Layer with parchment to prevent sticking.
-
Freezer: Wrap individual portions in foil. Reheat frozen (350°F for 20 mins).
-
Room Temp: Safe for 2 hours post-baking. Ideal for potlucks!
Fun Fact: The oatmeal’s flavor deepens by day 2 as spices meld. Cold slices make amazing “cookie dough” energy bites when rolled with peanut butter!
Your Questions, Solved!
Q: Why is my oatmeal soggy in the middle?
A: Three culprits! 1) Underbaking – wait for zero jiggle. 2) Wet pumpkin – always blot puree. 3) Cutting too soon – patience is key! Let it rest 15 mins.
Q: Can I use steel-cut oats?
A: Not here, friend. Steel-cut oats won’t soften enough. Rolled oats give the ideal tender-yet-chewy texture. Save steel-cut for stovetop porridge!
Q: Help! I’m out of eggs. What’s the best binder?
A: Flax eggs work great (see Ingredients)! Alternatively, mix ¼ cup applesauce per egg. The texture will be denser but still delish.
Q: Can I halve this recipe?
A: Absolutely! Use an 8×8 dish. Bake time drops to 30-35 mins. But fair warning – you’ll wish you’d made the full batch!
Pumpkin Baked Oatmeal
Description
Pumpkin Baked Oatmeal
Your Cozy Autumn Breakfast Miracle
Ingredients
-
4 cups rolled oats (not quick oats)
-
4 tsp pumpkin pie spice
-
2 tsp baking powder
-
½ tsp salt
-
2 cups pumpkin puree (not pie filling)
-
2½ cups milk (any kind)
-
4 large eggs (or flax eggs for vegan)
-
⅔ cup maple syrup or honey
-
4 tsp vanilla extract
-
Olive/avocado oil for greasing
Topping Ideas:
-
Toasted pecans
-
Chocolate chips
-
Greek yogurt drizzle
Instructions
1. Prep & Mix
-
Preheat oven to 350°F (175°C). Grease a 9×13″ baking dish.
-
In a large bowl, whisk dry ingredients: oats, pumpkin spice, baking powder, salt.
-
In another bowl, mix wet ingredients: pumpkin, milk, eggs, maple syrup, vanilla.
2. Combine & Bake
-
Gently fold wet into dry ingredients. Don’t overmix!
-
Pour into prepared dish. Top with extras if desired.
-
Bake 35-40 mins until golden and set (no jiggle!).
3. Serve & Store
-
Cool 15 mins before slicing.
-
Store leftovers refrigerated (5 days) or frozen (3 months).
Notes
-
Microwave: 45-60 secs (sprinkle water to prevent drying)
-
Oven: 10 mins at 350°F for crispy edges
Nutrition
- Calories: 220 cal Per Serving
- Fat: 7g
- Carbohydrates: 32g
- Fiber: 4g
- Protein: 6g
Nourishment Notes (Per Serving)
Calories: ~220 | Fat: 7g | Carbs: 32g | Protein: 6g
Note: Toppings/add-ons change values. Using almond milk and maple syrup keeps it dairy-free!
Final Thoughts: More Than Just Breakfast
This Pumpkin Baked Oatmeal is a edible hug – the kind that starts with crisp autumn mornings but quickly becomes year-round solace. It’s the dish you’ll make when:
-
Your teen has early soccer practice (fuel for the win!)
-
A friend needs postpartum meals (nourishment that comforts)
-
You’re craving dessert without guilt (hello, chocolate chip version!)
What began as a Friendsgiving save has become Olivia’s signature for a reason: it’s flexible enough for dietary needs, impressive enough for guests, and simple enough for sleep-deprived zombies. But beyond practicality, it’s a reminder that the best foods aren’t about perfection – they’re about connection. Whether it’s your husband’s proposal story, Whiskers the pumpkin-thieving cat, or your own future memories waiting to be made, this recipe is really just a delicious excuse to gather, share, and savor.
So preheat that oven, blot that pumpkin (seriously, don’t skip this!), and let the smell of cinnamon and maple weave its magic. Because sometimes, the coziest mornings start the night before – with a spoon, a smile, and a baking dish full of promise.

Freezer Breakfast Sandwiches
Ditch the Drive-Thru: Homemade Magic in Minutes
Hey there, kitchen friend! Olivia here, apron slightly dusted with flour and heart full of excitement because today? We’re tackling the *ultimate* breakfast lifesaver: Freezer Breakfast Sandwiches. Picture this: It’s 7 AM, your alarm didn’t go off, the kids are hunting mismatched socks, and you’re already dreaming of coffee. Instead of stress-eating a granola bar or shelling out $8 for a sad fast-food biscuit, you glide to your freezer, grab a foil-wrapped bundle of joy, and nuke it. Two minutes later: warm, melty, protein-packed heaven cradled in a toasty English muffin. *That’s* the power we’re unleashing today!
I live for recipes that turn chaos into cozy, and these sandwiches? They’re my MVP. They’re customizable, freezer-friendly for up to 3 months, and taste infinitely better than anything store-bought. Whether you’re sprinting to the office or herding tiny humans toward the school bus, these handheld heroes give you back precious morning minutes—with zero compromise on flavor or nourishment. Let’s make mornings feel like a warm hug, shall we?
My “Aha!” Moment: Pancakes, Meltdowns & a Brilliant Pivot
Rewind to two years ago: My nephew’s sleepover. I’d *promised* blueberry pancakes. But the blender died, my cat knocked over the batter bowl, and 3 hangry kids stared at me like I’d betrayed humanity. In desperation, I grabbed leftover bacon, scrambled eggs, and English muffins from the pantry. We assembled slapdash sandwiches, wrapped extras in foil, and tossed them in the freezer. The next week? My sister called raving about how they saved her during back-to-school chaos. Lightbulb moment! That happy accident birthed this recipe. Now, I batch-make these monthly—they’ve fueled family road trips, postpartum nights, and yes, many pancake fails. Food magic often hides in the mess!
🛒 Your Breakfast Dream Team: Simple, Smart & Swappable
Gather these staples (and don’t sweat substitutions!):
- 12 eggs – Farm-fresh if possible! They’re richer and fluffier. Vegan? Swap for 2 cups chickpea flour whisked with 1.5 cups water and 1 tbsp turmeric for color.
- ¼ cup milk (dairy or non-dairy) – Adds creaminess to eggs. Almond milk works, but oat milk’s thickness mimics dairy best.
- 1 package bacon (about 12 slices) – Chef hack: Bake it! Lay slices on a rack over a sheet pan at 400°F (200°C) for 15 mins—no flipping, extra crispiness.
- 6 sausage patties (cut in half to make 12 portions) – Pre-cooked patties save time. Or crumble bulk sausage and cook until browned.
- 12 slices cheddar cheese – Aged cheddar melts beautifully, but pepper jack or Swiss add fun twists. For dairy-free, try Violife or Chao slices.
- 12 English muffins – Toasting them *before* freezing prevents sogginess. Gluten-free? Use sweet potato toast or GF bagels.
Pro Insight: Eggs are your glue! Whisk them thoroughly—trapped air = lighter texture.
👩🍳 Let’s Build Breakfast Gold: Effortless Assembly Line
Don your favorite apron and crank up a playlist—this is therapeutic kitchen time!
- Cook Proteins Like a Boss: Bake bacon as directed above (trust me, it’s life-changing). For sausage, pan-fry patties over medium heat until browned (about 4 mins per side). Drain both on paper towels. Halve sausage patties—they fit muffins better! Chef Hack: Save bacon grease! Strain it into a jar; it’s liquid gold for roasting veggies.
- Scramble Smarter, Not Harder: Whisk eggs + milk with ½ tsp salt and ¼ tsp pepper. Pour into a greased 9×13 pan. Bake at 350°F (175°C) for 15–18 mins—no stirring! Eggs puff up evenly. Cool slightly, then slice into 12 squares. Why bake? No standing over a stove, and you get perfect rectangles for stacking!
- Toast for Triumph: Split muffins and lightly toast (toaster or oven). Critical step! Untoasted muffins turn mushy when reheated. Let them cool completely.
- Assembly Line Joy: Line up muffin bottoms. Top each with: 1 egg square → 1 cheese slice → 1 bacon slice OR 2 sausage halves. Cap with muffin tops. Tip: Put cheese *between* egg and meat—it melts into both layers!
- Wrap & Conquer the Freezer: Wrap each sandwich tightly in foil or parchment paper. Slide into a labeled freezer bag, squeezing out air. Freeze flat for easy stacking. Storage Tip: Write reheating instructions on the bag!
Reheating Magic: Microwave (wrapped in a damp paper towel) 1-2 mins from frozen. For crunch, unwrap and bake at 350°F (175°C) for 20 mins. The oven method revives that “fresh-made” crispiness!
🌟 Serving Up Cozy & Quick
Unwrap your reheated sandwich and let it rest 1 minute—this lets heat distribute evenly. Serve solo for a true grab-and-go moment, or plate it with fresh fruit or avocado slices for a leisurely weekend vibe. Packed lunch? Tuck one into an insulated container—it’ll stay warm for hours. Pair with hot coffee or a zingy smoothie, and savor that “I’ve got this” feeling!
✨ Mix It Up! 5 Flavor Adventures
Keep things exciting with these twists:
- Veggie Lover’s: Sauté spinach, mushrooms, or bell peppers; layer under cheese.
- Southwest Fiesta: Add salsa to eggs, use pepper jack cheese, and swap bacon for chorizo.
- Lower-Carb: Skip the muffin—wrap fillings in a lettuce cup or between two egg “buns” (bake eggs in 4-inch rounds).
- Mediterranean: Use feta, spinach, and a smear of sun-dried tomato pesto.
- Sweet & Savory: Add a thin slice of apple or pear beneath the sausage—trust me!
💖 Olivia’s Extra Sprinkle of Love
This recipe evolved from my “kitchen sink” philosophy: use what you’ve got! Once, I subbed leftover holiday ham for bacon and added a dash of maple syrup to the eggs—my husband still requests that “franken-sandwich.” Over time, I learned freezing components separately (like baked egg squares) speeds up assembly. And confession: I’ve eaten these straight from the freezer (no reheating!) during newborn haze—still delicious. They’re forgiving, flexible, and fueled my best-selling cookbook draft! Make them your own; that’s where the magic lives.
❓ You Asked, I’m Answering!
Q: Why are my sandwiches soggy after reheating?
A: Did you skip toasting the muffins? That’s usually the culprit! Also, ensure fillings are cooled completely before assembling. If using veggies, pat them bone-dry.
Q: Can I freeze these without cheese? It gets weird when microwaved…
A> Smart question! Cheese acts as a moisture barrier. If avoiding dairy, add a slice of tomato or avocado *after* reheating, or use vegan cheese that melts well (Chao is my top pick).
Q: How long do they REALLY last in the freezer?
A> 3 months for peak quality—but they’ve vanished from my freezer by week 2! Store in airtight freezer bags to prevent freezer burn.
Q: Can I use silicone wraps instead of foil?
A> Absolutely! Reusable silicone bags or wraps work beautifully. Just ensure they’re freezer-safe and sealed tight.

Freezer Breakfast Sandwiches
Description
Homemade Freezer Breakfast Sandwiches
*Your 2-Minute Morning Miracle*
Ingredients
-
12 English muffins (toasted)
-
12 large eggs
-
¼ cup milk (any kind)
-
12 slices cheese (cheddar, Swiss, etc.)
-
12 slices bacon OR 6 sausage patties (halved)
-
½ tsp each salt & pepper
Optional Add-Ins:
-
Sautéed veggies (spinach, peppers)
-
Avocado slices (add after reheating)
-
Hot sauce or pesto
Instructions
1. Cook Components
-
Bacon: Bake at 400°F (200°C) for 15 mins on a rack until crisp.
-
Sausage: Pan-fry patties 4 mins per side. Halve when cool.
-
Eggs: Whisk eggs + milk + S&P. Bake in greased 9×13″ pan at 350°F (175°C) for 15-18 mins. Cut into 12 squares.
2. Toast & Assemble
-
Lightly toast muffin halves (key for texture!).
-
Layer: Muffin bottom → Egg → Cheese → Meat → Muffin top.
3. Freeze Like a Pro
-
Wrap each tightly in foil or parchment.
-
Store in freezer bag (remove air!).
-
Label with date & reheating instructions.
Nutrition
- Calories: 390 cal Per Sandwich
- Fat: 14g
- Carbohydrates: 25g
- Protein: 18g
Nutrition Per Sandwich (Approximate)
Calories: 390 | Fat: 24g | Carbs: 25g | Protein: 18g
Note: Values vary with substitutions. Add veggies to boost fiber!
–
Final Thought: Mornings, Solved.
No more frantic drive-thru runs or sad desk breakfasts. With a little prep, you can have restaurant-quality sandwiches at home, anytime. Make a batch this weekend—future-you will be so grateful.

Walnut Maple Roasted Sweet Potatoes
Welcome to the Coziest Corner of My Kitchen!
Hey there, friend! Olivia here, apron dusted with cinnamon and a wooden spoon in hand. Can you smell that? It’s the warm hug of maple syrup kissing sweet potatoes in the oven, and I swear, if autumn had a signature scent, this would be it. If you’ve ever wanted to turn humble ingredients into a showstopper that makes everyone at your table go “WOW,” you’re in exactly the right place. This Walnut Maple Roasted Sweet Potatoes recipe isn’t just a side dish—it’s a conversation starter, a holiday heirloom in the making, and proof that magic happens when sweet meets savory.
I’m doubling the batch today because, let’s be real: leftovers of this gloriousness are a gift to your future self. Whether you’re hosting Friendsgiving, prepping for Christmas dinner, or just craving some Sunday comfort, these caramelized beauties are your ticket to feeling like a rockstar host. No fancy skills needed—just a baking sheet, a handful of real ingredients, and that gorgeous oven of yours. Ready to make your kitchen smell like a Vermont farmhouse meets a Parisian patisserie? Let’s roast!
That Time My Grandma’s Apron Saved Thanksgiving
Picture this: It’s my first Thanksgiving hosting duty. I’m 24, nervously basting a turkey twice my confidence level, when I realize I forgot a sweet potato dish. Cue panic! Then I spot my grandma’s handwritten note tucked in her old apron pocket: “Sweet taters + maple + love = smiles.” No measurements, just vibes. I cubed sweet potatoes frantically, drowned them in maple syrup (the real stuff, because Grandma didn’t play), and tossed in walnuts from her cookie jar. Thirty minutes later? Golden, sticky perfection. My uncle—a man of few words—took one bite and said, “Tastes like joy.”
That messy, unplanned experiment became our family’s most requested holiday staple. Now, every time I make these, I wear that flour-dusted apron. It’s my reminder that cooking isn’t about perfection; it’s about the stories we stir into every bite. And honestly? Burning the rolls that year was totally worth it.
Your Grocery List: Simple Stars, Big Flavor
Here’s what you’ll need for this double batch (because trust me, you’ll want leftovers!). Pro tip: Measure everything before you start—we call this “mise en place” in chef lingo, but really, it just saves you from maple-syrup fingerprints on your spice jars!
- 6 medium sweet potatoes – Peeled and cubed! Look for firm, deep-orange ones—they’re sweeter. No sweat if they’re huge; just adjust roasting time.
- ⅔ cup melted unsalted butter – Unsalted lets you control the salt. Vegan? Swap equal parts coconut oil or olive oil.
- 3 tsp cinnamon – Our warmth wizard! For extra depth, add a pinch of nutmeg or cardamom.
- 1 tsp salt – Flakey sea salt or kosher, please! It balances the sweetness.
- 1 tsp black pepper – Freshly cracked adds a subtle kick. Yes, pepper in sweets—it’s a game-changer!
- ⅔ cup + 4 tbsp maple syrup – Grade A amber for that rich flavor. Reserve the 4 tbsp for drizzling—it’s the grand finale!
- ⅔ cup chopped walnuts – Toast ’em first if you’re extra (I am). Pecans work too!
- 2 tsp fresh thyme – Or 1 tsp dried. Rosemary or sage? Also divine.
Chef insight: Sweet potatoes vary in moisture. If yours seem watery after cubing, pat them dry. Crispy edges await!
Let’s Roast! Your Foolproof Blueprint
Preheat that oven to 400°F (200°C). Line a large baking sheet with parchment paper—no scrubbing sticky maple off pans tonight! Now, channel your inner kitchen DJ and let’s mix:
- Toss it like you mean it: In a big bowl, combine cubed sweet potatoes, melted butter, cinnamon, salt, pepper, and ⅔ cup maple syrup. Use your hands (wash ’em first!) to massage every nook. Why? Butter coats, syrup caramelizes, spices cling. No sad, naked spuds allowed!
- Spread the love: Dump those glazed beauties onto your lined sheet. Arrange in a single layer—overcrowding = steamed potatoes (sad trombone). Pro hack: Use two sheets if needed. We want caramelization, not condensation!
- Roast and rotate: Slide into the oven. Set a timer for 15 minutes. When it dings, pull the sheet out and give everything a flip/stir with a spatula. This ensures even browning and no charred casualties. Back in it goes for another 15-20 minutes. They’re ready when fork-tender with crispy, caramelized edges!
- Nutty finale: In the last 10 minutes of roasting, sprinkle walnuts and thyme over the potatoes. Timing matters! Nuts burn fast, and thyme turns bitter if overbaked. This way, walnuts toast lightly, and thyme infuses its herbaceous magic.
- The grand drizzle: Pull the sheet from the oven. Immediately cascade reserved 4 tbsp maple syrup over everything. Hear that sizzle? That’s the sound of flavor fireworks. Let it rest 5 minutes—syrup will glaze the potatoes like edible stained glass.
Chef secret: For next-level crisp, broil 1-2 minutes at the end. Watch closely—it goes from golden to “oops” in seconds!
Plate Like a Pro (Zero Fuss Required!)
Scoop these beauties into a warm serving bowl—ceramic or rustic wood looks gorgeous. Garnish with extra thyme sprigs and a handful of reserved toasted walnuts. Serve immediately while that maple glaze is still shimmering! They’re heavenly alongside:
- Honey-glazed ham or herb-roasted turkey
- A cozy fall salad with apples and goat cheese
- Your favorite vegetarian loaf (lentil-walnut, anyone?)
Leftovers? Lucky you! They reheat beautifully. Spread in a skillet over medium heat for 5 minutes to revive the crispiness.
Shake It Up: 5 Delicious Twists
Once you’ve mastered the base, play with these riffs:
- Spicy Maple: Add ¼ tsp cayenne pepper to the toss. Sweet heat = addictive!
- Vegan Dream: Swap butter for coconut oil, and use maple syrup. Top with toasted pepitas.
- Apple Harvest: Toss in 1 diced apple (Honeycrisp!) with the sweet potatoes. Roast together.
- Savory Herb: Reduce maple to ⅓ cup, add 2 minced garlic cloves and 1 tbsp chopped rosemary.
- Brunch Upgrade: Serve topped with crumbled feta, a fried egg, and hot sauce. Yes, for breakfast!
Olivia’s Extra Nuggets of Wisdom
This recipe has evolved from my “maple emergency” years ago! Originally, I drizzled ALL the syrup upfront, which made the walnuts soggy. Lesson learned: Reserve that final drizzle! Also—confession time—I once subbed pancake syrup in a pinch. Don’t. The artificial flavor haunts me. Real maple or bust, pals.
Funny story: My dog, Butters, once stole a sweet potato cube mid-photo shoot. I now guard the baking sheet like a dragon with treasure. Worth it? Absolutely. These potatoes have seen three engagement parties, one gender reveal (it’s a girl!), and countless “just because” Tuesdays. They’re my edible hug.
Storage tip: Keep leftovers airtight in the fridge 3-4 days. Freeze for up to 2 months! Reheat in a 350°F oven to maintain texture.
The Science Behind Perfectly Caramelized Sweet Potatoes
What transforms humble sweet potatoes into those irresistible caramelized cubes? It’s all about the Maillard reaction—the magical chemical process where sugars and amino acids create hundreds of new flavor compounds when heated. Here’s why this recipe works so well:
Sugar Content Matters
Sweet potatoes naturally contain maltose, which caramelizes at 356°F (180°C)—our 400°F oven ensures perfect browning. The added maple syrup (66% sucrose) boosts this reaction, creating that glossy, crackly exterior while keeping interiors creamy.
Fat’s Crucial Role
Butter isn’t just for flavor—its milk solids brown beautifully, adding nutty depth. The fat also:
-
Conducts heat evenly
-
Prevents drying out
-
Helps spices adhere
Why Cubes > Wedges
1-inch cubes maximize surface area for:
-
More caramelized edges (the best part!)
-
Even cooking (no hard centers)
-
Perfect bite-sized portions
Oven Dynamics
The initial high heat:
-
Quickly evaporates surface moisture
-
Creates a crust that seals in juices
Rotating halfway prevents hot spots—essential for that uniform golden glow!
Pro Tip: For extra caramelization, toss potatoes with 1 tsp baking soda (alkaline = faster browning). Just don’t overdo it—they’ll get too dark!
Maple Syrup – From Tree to Table
That bottle of amber goodness isn’t just sweetener—it’s liquid heritage. Understanding maple syrup elevates this dish from good to extraordinary.
Grades & Flavor Profiles
-
Golden (Grade A Delicate): Mild, best for drizzling
-
Amber (Grade A Rich): Our recipe’s MVP—balanced caramel notes
-
Dark (Grade A Robust): Intense, great for baking
-
Very Dark (Processing Grade): Too strong for this use
Why Real Maple Matters
Imitation syrups (corn syrup + flavoring):
-
Burn easier (higher fructose content)
-
Lack maple’s 100+ bioactive compounds (like quebecol, a unique antioxidant)
-
Leave a metallic aftertaste
Sustainable Harvesting
It takes 40 gallons of sap (collected over 4-6 weeks in early spring) to make 1 gallon of syrup. Our ⅔ cup represents:
-
2.5 hours of tree tapping
-
Careful evaporation over wood fires
-
A sugar maker’s watchful eye
Fun Fact: Maple syrup contains minerals like manganese (good for bones) and zinc (immunity booster)—making it the “healthiest” part of this indulgent dish!
The Psychology of Comfort Food – Why This Dish Feels Like a Hug
That warm, contented feeling you get eating these potatoes isn’t accidental—it’s neuroscience meets nostalgia.
Sensory Triggers
-
Aroma: Cinnamon activates the brain’s limbic system (memory center)
-
Texture: Crispy-creamy contrast releases dopamine
-
Taste: Umami from roasted walnuts + sweet-salty balance = bliss
The Nostalgia Factor
Sweet potatoes subconsciously remind us of:
-
Childhood marshmallow-topped casseroles
-
Holiday gatherings
-
Grandma’s kitchen (even if she never made them!)
Studies show foods eaten during positive emotional events (like your first successful Thanksgiving) create lasting comfort associations.
Modern Wellness Twist
Despite being indulgent, sweet potatoes offer:
-
Fiber (keeps you satisfied)
-
Vitamin A (1 cup = 769% DV!)
-
Anti-inflammatory compounds
This makes the dish feel “wholesome” even when drenched in maple butter—a psychological permission slip to enjoy guilt-free.
Your Questions, Answered!
Q: Can I prep this ahead?
A: Totally! Cube sweet potatoes 1 day early; store in water (prevents browning) in the fridge. Drain and pat dry before using. Roast fully, but add walnuts/thyme/final maple AFTER reheating.
Q: Why aren’t my potatoes caramelizing?
A: Three culprits: 1) Overcrowded pan (spread them out!), 2) Oven temp too low (get an oven thermometer!), or 3) Wet potatoes (pat them dry pre-toss).
Q: Can I use honey or brown sugar instead of maple?
A> Honey works 1:1, but burns faster—reduce oven to 375°F. Brown sugar? Mix ½ cup with 2 tbsp water for similar consistency. But maple’s depth is unmatched!
Q: My walnuts burned! Help?
A> Been there! Toast walnuts separately on a small pan for 5-7 minutes at 350°F. Add AFTER roasting, with the final maple drizzle.
Walnut Maple Roasted Sweet Potatoes
- Total Time: 50 mins
Description
Walnut Maple Roasted Sweet Potatoes
A sweet-savory symphony of caramelized edges, toasty nuts, and maple-kissed warmth
Ingredients
Main Players:
-
6 medium sweet potatoes (peeled, 1″ cubes)
-
⅔ cup unsalted butter, melted (or coconut oil for vegan)
-
⅔ cup + 4 tbsp pure maple syrup (Grade A)
-
⅔ cup chopped walnuts (toasted!)
-
2 tsp fresh thyme (or 1 tsp dried)
Spice Mix:
-
3 tsp cinnamon
-
1 tsp salt
-
1 tsp black pepper (freshly cracked)
Instructions
1. Prep & Preheat
-
Preheat oven to 400°F (200°C). Line a baking sheet with parchment.
-
Peel and cube sweet potatoes (1″ pieces for even cooking).
2. Coat the Potatoes
-
In a large bowl, toss sweet potatoes with melted butter, ⅔ cup maple syrup, cinnamon, salt, and pepper until fully coated.
3. Roast to Perfection
-
Spread in a single layer on the baking sheet.
-
Roast 15 minutes, then flip/stir.
-
Roast another 15-20 minutes until fork-tender and caramelized.
4. Add Walnuts & Thyme
-
In the last 10 minutes, sprinkle walnuts and thyme over the potatoes.
5. The Grand Finish
-
Drizzle with remaining 4 tbsp maple syrup right out of the oven. Let rest 5 minutes.
- Prep Time: 15 mins
- Cook Time: 30-35 mins
Nutrition
- Calories: 320 cal Per Serving
- Sugar: 20g
- Fat: 18g
- Saturated Fat: 8g
- Carbohydrates: 38g
- Fiber: 4g
- Protein: 3g
Nutritional Per Serving (Approx):
Calories: 210 | Fat: 10g | Carbs: 30g | Protein: 2g
Note: Using coconut oil reduces saturated fat. Walnuts add heart-healthy omega-3s!
Final Thoughts: More Than a Side Dish
These Walnut Maple Roasted Sweet Potatoes are:
✅ A science experiment (caramelization in action!)
✅ A history lesson (maple syrup’s Indigenous roots)
✅ A therapy session (comfort food at its finest)
They prove that the best recipes:
-
Respect ingredients’ stories
-
Balance tradition with innovation
-
Create moments worth remembering
So preheat that oven, and let’s make some edible memories. After all, life’s too short for bland sweet potatoes!
P.S. Want to take it further? Try:
-
Smoking the walnuts for 10 minutes (game-changer!)
-
Infusing the butter with vanilla bean
-
Serving with maple-whipped goat cheese

Cider Pumpkin Waffles with Salted Maple Butter
Fall’s Coziest Brunch: Crispy Cider Pumpkin Waffles & Dreamy Maple Butter
Hey there, kitchen friends! Olivia here, wrapped in my favorite chunky-knit sweater and sipping a steaming mug of spiced cider. If your heart does a happy dance when autumn leaves crunch underfoot and your kitchen smells like cinnamon and nostalgia, you’ve landed in the right place. Today, we’re making my ultimate fall brunch showstopper: Cider Pumpkin Waffles with Salted Maple Butter. Imagine crispy-edged waffles infused with real pumpkin and reduced apple cider, slathered with a luscious butter that tastes like a hug from a maple tree. These aren’t just waffles—they’re edible autumn magic. And because I believe in brunch for crowds (or future-you breakfasts!), we’re doubling the batch. Trust me, you’ll want leftovers. Ready to make your kitchen smell like a pumpkin-spiced dream? Aprons on!
Why These Waffles Taste Like Home
Picture this: It’s my first fall in this old farmhouse, rain tapping the windows, and my dad—a man who thinks “cooking” means microwaving leftovers—surprises me with a waffle iron he found at a flea market. “Make us something memorable, Liv,” he says. I threw together pumpkin puree from my porch pumpkins and reduced apple cider from the orchard down the road, laughing as batter splattered everywhere. When we bit into those golden waffles, drenched in maple butter? Silence. Then Dad mumbled through a full mouth: “You’ve outdone yourself, kid.” Now, every time I make these, I’m back at that wobbly kitchen table, rain drumming overhead, reminded that the best memories start with a little mess and a lot of butter. That’s the power of food, friends—it’s a time machine.
Your Grocery List (Plus Chef Secrets!)
- Salted butter (12 tbsp, melted) – Why salted? It balances the sweetness. Unsalted works too—just add an extra pinch of salt to the batter.
- Pumpkin puree (2 cups) – Not pumpkin pie filling! Canned puree is perfect. Squeeze excess moisture in a towel if it looks watery.
- Spiced apple cider (3 cups) – Chef’s hack: Simmer it down to 1.5 cups first! Concentrates the flavor. No cider? Use apple juice + ½ tsp cinnamon.
- Eggs (4 large) – Room temp = fluffier waffles. Forgot to thaw? Submerge in warm water for 5 mins.
- Pure maple syrup (4 tbsp) – Grade A for flavor. Honey works in a pinch, but maple’s caramel notes shine here.
- All-purpose flour (4 cups) – For lighter waffles, swap 1 cup with whole wheat pastry flour.
- Baking powder (2 tbsp) + baking soda (1 tsp) – Our rise heroes! Check expiration dates—old ones = flat waffles.
- Spices (cinnamon, ginger, nutmeg) – Freshly ground nutmeg? *Chef’s kiss.* Add a pinch of cardamom for intrigue!
Salted Maple Butter:
- Salted butter (12 tbsp, softened) – European-style (higher fat) makes it silkier.
- Maple syrup (1 cup) – Grade B’s robust flavor wins here.
- Flaky sea salt (2 pinches) – Maldon is my crush. It doesn’t dissolve, giving salty little bursts.
Waffle Alchemy: Let’s Get Cooking!
- Reduce that cider! Simmer 3 cups cider in a saucepan over medium heat until it thickens and reduces to 1.5 cups (≈15 mins). Why? This intensifies the apple-spice flavor. Cool it slightly—no one wants scrambled egg waffles!
- Whisk wet ingredients. In a large bowl, combine pumpkin puree, reduced cider, eggs, maple syrup, vanilla, and melted butter. Pro tip: Whisk eggs first before adding to avoid clumps!
- Fold in dry ingredients. In another bowl, whisk flour, baking powder, baking soda, spices, and salt. Gently pour into wet mix and stir until just combined. Lumpy batter = tender waffles! Overmixing = hockey pucks.
- Preheat & grease your waffle iron. Crank it to medium-high. Brushing with oil > spray for crispness. Listen for the sizzle when batter hits the iron!
- Cook to golden perfection. Ladle batter (⅔ cup per waffle). Close lid and resist peeking! Steam escape = less crisp. Cook 4-5 mins until deeply golden. Hack: Keep finished waffles on a wire rack in a 200°F oven—they’ll stay crisp!
- Whip the maple butter. Beat softened butter and maple syrup until fluffy (2 mins). Fold in flaky salt. Taste and swoon.
Plating Like a Pro (It’s Easy, Promise!)
Stack waffles high on a rustic board or pretty plates. Swipe a generous dollop of salted maple butter over the top—watch it melt into golden pools. Drizzle with extra maple syrup, add a sprinkle of toasted pecans for crunch, and finish with a dusting of cinnamon. Serve immediately with crispy bacon or caramelized apples on the side. Coffee or hot cider? Mandatory.
Mix It Up! 5 Delicious Twists
- Gluten-Free: Swap AP flour for 1:1 GF blend + 1 tsp xanthan gum.
- Vegan: Use plant-based butter, flax eggs (4 tbsp ground flax + 10 tbsp water), and almond milk cider reduction.
- Extra Decadent: Fold dark chocolate chips or candied ginger into the batter.
- Savory-Sweet: Top with crumbled goat cheese and rosemary-roasted pears.
- Spice Lover: Add ¼ tsp black pepper or a dash of cayenne to the batter!
Olivia’s Extra Sprinkle of Love
This recipe was born from a “kitchen sink” moment when I had half a can of pumpkin and leftover cider. Version 1.0? Gummy disaster. But after tweaking (less pumpkin, reduced cider, higher heat), we landed here. The double batch? Genius for freezing! Cool waffles completely, layer between parchment, and freeze in a zip-top bag. Reheat in a toaster for instant cozy mornings. True story: My dog, Biscuit, once stole a waffle mid-photo shoot. I snapped a pic of his guilty maple-butter beard—it’s still my most-liked Instagram post!
The Science of Crispy, Fluffy Waffles (And How to Nail It Every Time)
Waffles walk a culinary tightrope—too dense, and they’re leaden; too light, and they crumble. Here’s why this recipe strikes the perfect balance:
The Role of Reduced Cider
Simmering apple cider isn’t just for flavor—it’s chemistry! Reducing it concentrates:
-
Sugars: Caramelization adds depth and helps the waffles brown evenly.
-
Acids: Softens gluten for a tender bite (like buttermilk’s effect in pancakes).
-
Pectin: Naturally thickens the batter for better structure.
Pro Tip: Reduce extra cider to drizzle over finished waffles—it’s like liquid apple pie.
Pumpkin’s Hidden Superpower
Pumpkin puree isn’t just for flavor; its starches absorb moisture, preventing sogginess. But too much makes waffles gummy. Our 2:1 flour-to-pumpkin ratio ensures:
-
Crisp Exterior: Moisture evaporates quickly at high heat, creating a crust.
-
Pillowy Interior: Trapped steam from the cider keeps it fluffy.
Chef’s Hack: Squeeze excess water from canned pumpkin in a cheesecloth for even crispier results.
Baking Powder vs. Baking Soda
-
Baking Powder (2 tbsp): Double-acting = first rise when wet, second in the iron.
-
Baking Soda (1 tsp): Reacts with cider’s acids for immediate lift.
Test Freshness: Mix 1 tsp baking powder with 1/3 cup hot water. Bubbles = good. No fizz? Toss it.
The Maillard Effect
That golden crust? A reaction between amino acids (in eggs, flour) and sugars (cider, maple) at 300°F+. For maximum crisp:
-
Grease with Butter: Milk solids brown beautifully.
-
Don’t Open Early: Breaking the seal releases steam = limp waffles.
Waffle Iron Mastery: Troubleshooting & Pro Techniques
Even the best batter can flop with the wrong iron tactics. Let’s fix common pitfalls:
Choosing Your Weapon
-
Belgian vs. Classic: Belgian’s deeper pockets hold more butter (yes, please!), but any iron works.
-
Temperature: Medium-high (375°F) is ideal. Too low = pale; too high = burnt outside/raw inside.
The Perfect Pour
-
Amount: ⅔ cup batter for a standard round iron. Underfill = thin waffles; overfill = spillage.
-
Spread Gently: Use a spoon to nudge batter toward edges—no bare spots!
Crispness Hacks
-
Rest the Batter: 10 minutes lets flour hydrate for even cooking.
-
Wire Rack Trick: Place finished waffles in a single layer to prevent steaming.
-
Reheat Right: Revive leftovers in a 350°F oven for 5 mins or a toaster (no microwave!).
Sticking Nightmares Solved
-
Grease Generously: Brush melted butter between every batch.
-
Nonstick Savior: If waffles stick, let the iron cool slightly, then gently pry with a silicone spatula.
-
Clean Smart: Never submerge the iron! Wipe with a damp cloth while warm.
Pro Move: For extra crunch, dust the iron with cornstarch after greasing.
Beyond Brunch: Creative Uses for Leftover Waffles
These waffles are too good to waste! Here’s how to repurpose them:
Savory Transformations
-
Waffle Benedict: Top with poached eggs, hollandaise, and crispy prosciutto.
-
Stuffing: Cube stale waffles, mix with sausage, celery, and broth, then bake.
-
Grilled Cheese: Use waffles as bread with cheddar and apple slices.
Sweet Innovations
-
Ice Cream Sandwich: Layer maple butter and vanilla ice cream between waffles, freeze.
-
Bread Pudding: Whisk 3 eggs + 2 cups milk, pour over cubed waffles, bake at 375°F for 45 mins.
-
Croutons: Toast cubes with cinnamon sugar for yogurt or oatmeal topping.
Meal Prep Magic
-
Freezer Packs: Individually wrap waffles with parchment. Reheat in a toaster for 90 seconds.
-
Waffle “Cupcakes”: Press warm waffles into muffin tins, fill with yogurt and berries.
Pro Tip: Make a double batch of maple butter—it keeps for 2 weeks in the fridge and elevates toast, roasted carrots, or even popcorn!
Your Questions, Answered!
Q: Why are my waffles soggy?
A: Three culprits! 1) Overfilled iron (steam can’t escape). 2) Undercooked (wait for the steam to stop). 3) Stacking hot waffles (they steam each other). Use a wire rack!
Q: Can I make the batter ahead?
A: Yes! Cover and refrigerate overnight. The baking powder needs 5 mins to reactivate—let batter sit on the counter before cooking.
Q: Can I use fresh pumpkin?
A: Absolutely! Roast sugar pumpkin, puree, and strain overnight in cheesecloth. Canned is quicker, though—no shame!
Q: My maple butter split! Help!
A: Butter too cold? Gently warm the bowl over simmering water while whisking. Too warm? Chill 10 mins, then re-whip.

Cider Pumpkin Waffles with Salted Maple Butter
- Total Time: 45 mins
Description
There’s nothing like the smell of warm spices and maple syrup on a crisp autumn morning. These Cider Pumpkin Waffles are crispy on the outside, fluffy on the inside, and packed with cozy fall flavors. Topped with a velvety Salted Maple Butter, they’re the ultimate brunch treat. Plus, they’re freezer-friendly—because busy mornings deserve a little indulgence too!
Ingredients
For the Waffles:
-
2 cups all-purpose flour
-
2 tbsp baking powder
-
1 tsp baking soda
-
1 tsp cinnamon
-
½ tsp ground ginger
-
¼ tsp nutmeg
-
½ tsp salt
-
2 cups pumpkin puree (not pie filling)
-
1½ cups reduced spiced apple cider (simmer 3 cups down to 1½)
-
4 large eggs, room temperature
-
4 tbsp pure maple syrup
-
1 tsp vanilla extract
-
12 tbsp (1½ sticks) salted butter, melted
For the Salted Maple Butter:
-
12 tbsp (1½ sticks) salted butter, softened
-
1 cup pure maple syrup
-
2 pinches flaky sea salt (like Maldon)
Optional Toppings:
-
Extra maple syrup
-
Toasted pecans
-
Whipped cream
-
Caramelized apples
Instructions
1. Reduce the Apple Cider
-
In a saucepan, simmer 3 cups of spiced apple cider over medium heat until reduced to 1½ cups (about 15 mins). Let cool slightly.
2. Make the Waffle Batter
-
In a large bowl, whisk together flour, baking powder, baking soda, cinnamon, ginger, nutmeg, and salt.
-
In another bowl, mix pumpkin puree, reduced cider, eggs, maple syrup, vanilla, and melted butter.
-
Gently fold the wet ingredients into the dry until just combined (a few lumps are fine—overmixing makes tough waffles!).
3. Cook the Waffles
-
Preheat your waffle iron to medium-high and lightly grease it.
-
Pour ⅔ cup batter per waffle and cook for 4-5 minutes until deep golden and crisp.
-
Keep cooked waffles warm in a 200°F (95°C) oven on a wire rack (prevents sogginess!).
4. Whip the Maple Butter
-
Beat softened butter and maple syrup until fluffy (2 mins). Fold in flaky salt.
- Prep Time: 20 mins
- Cook Time: 25 mins
Nutrition
- Calories: 320cal Per Serving
- Sugar: 15g
- Fat: 18g
- Carbohydrates: 35g
- Fiber: 2g
- Protein: 5g
Nutrition Per Waffle (with butter)
~330 calories | 14g fat | 45g carbs | 6g protein
(Note: Estimates vary based on ingredient brands and waffle iron size.)
Final Thoughts: A Recipe for Connection
These waffles are more than a meal—they’re an invitation. An invitation to slow down, to gather around a syrup-drizzled stack, and to savor the fleeting magic of autumn. Whether you’re serving them to sleepy-eyed kids on a Saturday morning or gifting a batch to a neighbor (with a jar of that maple butter, because generosity tastes sweet), this recipe is a reminder that joy often hides in simple things: the sound of batter hitting a hot iron, the smell of cinnamon mingling with coffee, the shared silence of a truly great bite.
So here’s to crisp edges, to melted butter, and to the messy, delicious moments that turn into memories. Now, go forth and brunch like you mean it.
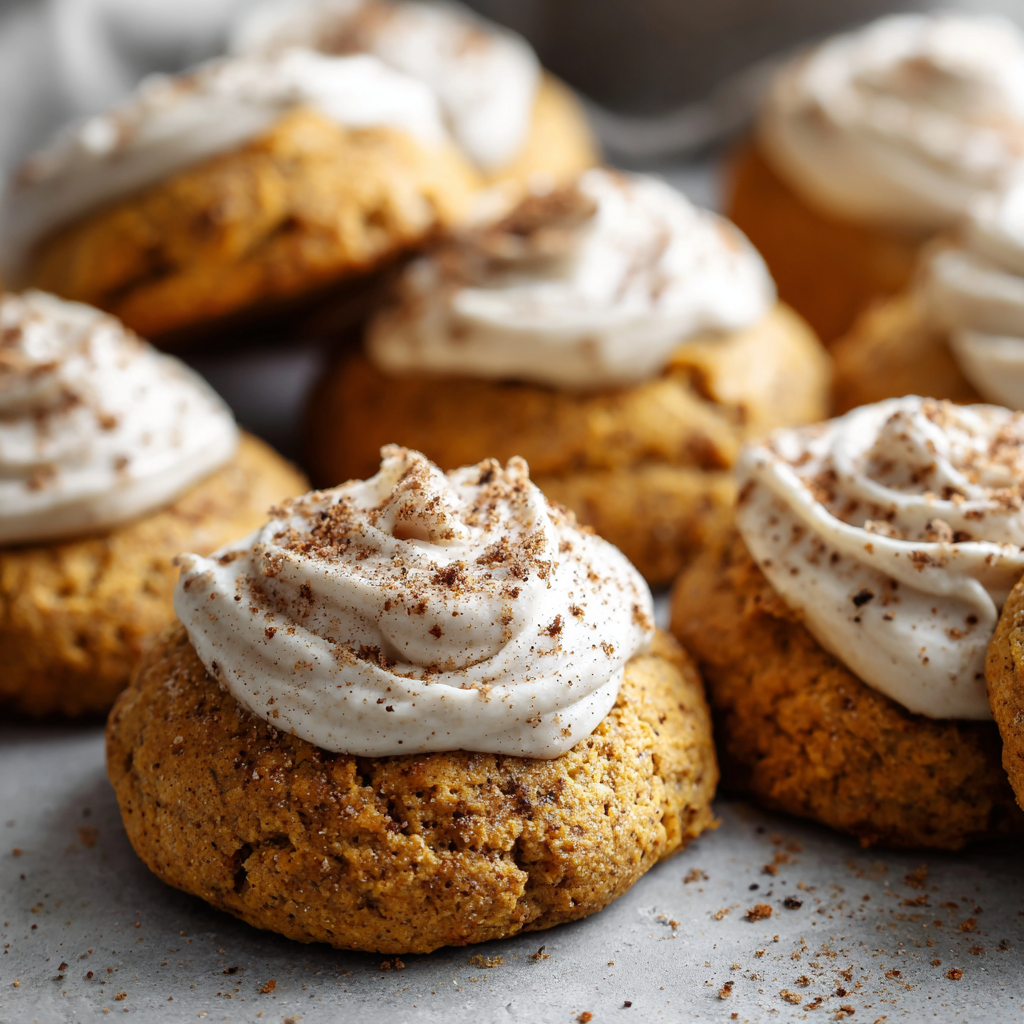
Soft Pumpkin Cookies with Brown Sugar Frosting
Welcome to Cozy Cookie Magic: Soft Pumpkin Cookies That Feel Like a Hug!
Hey there, kitchen friend! Olivia here, apron dusted with flour and heart full of excitement because today? We’re baking pure autumn joy. Imagine sinking your teeth into a cookie so soft it practically melts, infused with warm pumpkin spice, and then… BAM! It’s crowned with a luscious, caramel-kissed brown sugar frosting. These Soft Pumpkin Cookies with Brown Sugar Frosting aren’t just treats; they’re edible nostalgia wrapped in a half batch (perfect for smaller gatherings or when you need a *reasonable* dose of sweetness). Whether you’re hosting a pumpkin-carving party, surprising a neighbor, or simply treating yourself mid-zoom call, these cookies are your cozy secret weapon. They’re forgiving for new bakers, quick enough for a weeknight whim (just 45 minutes!), and guaranteed to make your kitchen smell like a cinnamon-scented dream. Grab your favorite mug—let’s turn simple ingredients into something unforgettable together!
The Cookie That Started With a Happy Accident
Picture this: It’s a rainy October Sunday years ago. I’m testing pie recipes, but my can opener rebels mid-pumpkin-puree scoop, leaving me with exactly… ¾ cup of lonely pumpkin. Disaster? Nope! It was cookie destiny. I started tossing things into a bowl—butter, sugar, spices—channeling my grandma’s “bake by feel” spirit. The first tray emerged puffy and golden, smelling like heaven. But they needed *something*. In a stroke of sleepy inspiration (and dwindling powdered sugar), I whisked brown sugar into melted butter, creating a glossy, toffee-like frosting. One taste and I did a literal happy dance—my toddler thought it was hilarious! That happy accident became our family’s official “first leaf pile” celebration cookie. Now, every time I make them, I remember that messy, joyful afternoon. Proof that the best recipes often begin with a little chaos and a lot of heart.
Your Pumpkin Cookie Toolkit: Simple Stars, Big Flavor
Don’t you love when pantry staples shine? This half-batch recipe makes 30 perfect cookies without overwhelming your cupboard. Here’s the lineup with my favorite tips:
- Butter (1 cup, softened): The fluffy foundation! Unsalted is best for control, but if you only have salted, reduce added salt by half. MUST be softened (leave it out 1-2 hours). Cold butter = dense cookies. Chef hack: Cube it for faster softening!
- Granulated Sugar (1 cup): Sweetens and helps create that dreamy texture. For deeper flavor, swap half with brown sugar in the cookie dough.
- Leaveners (1 tsp baking powder + 1 tsp baking soda): Our lift-off team! Baking soda reacts with pumpkin’s acidity for spread, baking powder adds rise. Check expiry dates—old ones equal flat cookies.
- Salt (½ tsp): Flavor superhero! Balances sweetness and makes spices pop. Use fine sea salt.
- Spices (½ tsp cinnamon + ½ tsp nutmeg): Warmth in a pinch! Freshly grated nutmeg is *chef’s kiss*. Out of nutmeg? Sub allspice or extra cinnamon.
- Egg (1 large): Binder and moisture. Room temp blends smoother. Vegan swap: ¼ cup unsweetened applesauce.
- Vanilla Extract (1 tsp cookies + ½ tsp frosting): Use the real stuff! Imitation tastes artificial here.
- Canned Pumpkin (¾ cup): NOT pie filling! Pure pumpkin puree is key. Half a 15oz can leaves you extra for smoothies! Squeeze excess liquid with paper towels if it looks watery.
- All-Purpose Flour (2 cups): Structure queen! Gluten-free? Swap 1:1 with a quality GF blend (like Bob’s Red Mill). Spoon & level into measuring cups—don’t pack!
- Brown Sugar (¼ cup, packed) & Milk (2 tbsp) for frosting: Pack that brown sugar tight! Any milk works (dairy or plant-based).
- Powdered Sugar (1½-2 cups): Sift it! Lumps ruin silky frosting. Start with 1½ cups, add more to thicken.
Let’s Bake! Your Foolproof Cookie Journey
Ready for cookie magic? Follow these steps (and my sneaky chef hacks) for guaranteed success:
- Preheat & Prep (350°F/175°C): Line baking sheets with parchment paper. No parchment? Lightly grease. HACK: Place a mug of water in the oven while preheating—steam keeps cookies soft!
- Cream Butter & Sugar (3-4 mins): In a large bowl, beat softened butter and granulated sugar until light, fluffy, and almost white. This is CRUCIAL! It incorporates air for lift. Use medium-high on your mixer.
- Wet Team Unite: Beat in the egg, vanilla, and pumpkin until JUST combined (don’t overmix!). Mixture might look slightly curdled—totally fine! Chef insight: Scrape the bowl sides halfway.
- Whisk Dry Ingredients: In a separate bowl, whisk flour, baking powder, baking soda, salt, cinnamon, and nutmeg. HACK: Whisking = no spice clumps & even distribution.
- Marry Wet & Dry: Gradually add dry ingredients to wet, mixing on low until *just* incorporated. Overmixing = tough cookies! Dough will be soft and slightly sticky.
- Scoop & Space: Drop tablespoon-sized mounds (I use a #40 cookie scoop!) onto sheets, 2 inches apart. HACK: Lightly dampen fingers to smooth dough tops—prevents jagged edges.
- Bake (10-12 mins): Until tops look set and edges are faintly golden. They’ll feel soft—that’s perfect! Don’t overbake or they lose moisture. Rotate pans halfway for even baking.
- Cool COMPLETELY: Transfer cookies to a wire rack. Frosting warm cookies = melty mess. Patience, grasshopper!
- Frosting Finesse: Melt butter in a small saucepan over medium heat. Stir in brown sugar and milk. Bring to a gentle boil (bubbles at edges), stirring constantly for 1 minute. Remove from heat. Stir in vanilla. HACK: Let this cool 5 mins so powdered sugar doesn’t melt! Whisk in sifted powdered sugar until smooth. Too thick? Add milk ½ tsp at a time. Too thin? Add more sugar.
- Frost & Flourish: Spread frosting on cooled cookies. Sprinkle with cinnamon if feeling fancy! Pro tip: Frosting sets as it cools—spread quickly.
Sharing the Pumpkin Love: Serving Up Smiles
These cookies are stars solo with coffee or tea, but let’s make it an event! Stack them high on a vintage cake stand for a rustic fall tablescape. Pack them in cute boxes tied with twine for a heartfelt “thinking of you” gift. For parties, set up a DIY frosting bar: offer the brown sugar frosting alongside bowls of toasted pecans, mini chocolate chips, or dried cranberries for dunking. They’re heavenly slightly warmed (5 secs in the microwave!) with a scoop of vanilla ice cream—instant cookie sundae. However you serve them, watch those smiles appear. That’s the real magic!
Mix It Up! Your Cookie, Your Rules
Love the base recipe? Try these fun twists:
- Chocolate Chip Pumpkin Bliss: Fold ½ cup semi-sweet chocolate chips into the dough before scooping. Frosting optional (but recommended!).
- Oatmeal Spice Upgrade: Replace ½ cup flour with rolled oats for chew. Add ¼ tsp ginger to the spice mix.
- Cream Cheese Swirl: Skip the frosting! Swirl 4 oz softened cream cheese mixed with 2 tbsp maple syrup into the dough before baking.
- Gluten-Free & Vegan Friendly: Use GF flour, applesauce for the egg, and plant-based butter/milk. Frosting is naturally vegan!
- Maple Brown Sugar Frosting: Replace vanilla in frosting with ½ tsp maple extract. Divine!
Olivia’s Extra Pinch of Insight
These little guys have evolved! Early versions used whole canned pumpkin, making the dough too wet—hence the precise ¾ cup. I also learned the hard way that over-creaming after adding flour leads to hockey pucks! Now, I embrace the soft, slightly sticky dough—it guarantees that melt-in-mouth texture. One hilarious fail? I once used baking SODA instead of POWDER (oops!). The cookies spread into one giant, crispy pumpkin blob… my dog thought it was amazing. Lesson learned: label your jars! Storing tip: Layer unfrosted cookies between parchment in an airtight container for 3 days. Frosted? Store single layer at room temp 1-2 days. Freeze unfrosted dough balls for instant cookie cravings! Just bake frozen, adding 1-2 mins. Happy baking, friends—make memories (and maybe a little mess)!
Cookie Conundrums? Solved!
Let’s tackle common hiccups so your cookies are flawless:
- Q: My cookies spread too much/flattened! Help!
A: Likely culprits: Butter too warm/melted, over-creamed after adding flour, expired leaveners, or dough too warm. Chill dough 20 mins before scooping next time! Also, double-check baking soda/powder dates. - Q: Frosting turned grainy or separated. What happened?
A: The butter/sugar/milk mix was probably too hot when you added powdered sugar, or sugar wasn’t fully dissolved. Ensure mixture just reaches a gentle boil (not rolling!), cool 5 mins, and SIFT powdered sugar. If grainy, whisk in ½ tsp hot milk. - Q: Can I use fresh pumpkin puree?
A: Absolutely! Ensure it’s cooked, pureed smooth, and drained VERY well (wrap in cheesecloth and squeeze). Canned is more consistent for moisture, but homemade adds lovely depth. - Q: Cookies are cakey, not soft. Why?
A: Overmixing the dough develops gluten. Mix wet and dry ingredients ONLY until combined—it’s okay if you see a few flour streaks. Also, measure flour correctly (spoon & level!).

Soft Pumpkin Cookies with Brown Sugar Frosting
- Total Time: 27 minutes
Description
Hey cookie lover—Olivia here! These Soft Pumpkin Cookies are the ultimate cozy treat: fluffy, warmly spiced, and topped with a brown sugar frosting so good, you’ll want to lick the spoon. Made with simple ingredients and baked in under an hour, this half-batch is perfect for small gatherings or a just-right personal stash. One bite, and you’ll see why they’ve become a cherished fall tradition in my kitchen.
Ingredients
For the Cookies:
-
1 cup unsalted butter, softened
-
1 cup granulated sugar
-
1 large egg (or ¼ cup applesauce)
-
1 tsp vanilla extract
-
¾ cup canned pumpkin purée (not pie filling)
-
2 cups all-purpose flour
-
1 tsp baking soda
-
1 tsp baking powder
-
½ tsp salt
-
½ tsp cinnamon
-
½ tsp nutmeg
For the Frosting:
-
¼ cup brown sugar (packed)
-
2 tbsp butter
-
2 tbsp milk (any kind)
-
½ tsp vanilla extract
-
1½–2 cups powdered sugar, sifted
Instructions
-
Preheat oven to 350°F (175°C). Line baking sheets with parchment paper.
-
Cream butter & sugar for 3–4 mins until fluffy. Beat in egg, vanilla, and pumpkin.
-
In a separate bowl, whisk flour, baking soda, baking powder, salt, and spices.
-
Add dry ingredients to wet; stir gently until just combined. Dough will be soft!
-
Scoop tablespoon-sized mounds onto baking sheets.
-
Bake 10–12 mins, until set and lightly golden. Cool completely on racks.
Make the Frosting:
-
In a small saucepan, melt butter with brown sugar and milk. Bring to a gentle boil; cook 1 min.
-
Remove from heat, stir in vanilla, then whisk in powdered sugar until smooth.
-
Spread onto cooled cookies quickly—frosting sets fast!
Notes
-
Add ½ cup chocolate chips or walnuts to dough
-
Sub oats for ½ cup flour for chewy texture
-
Use maple extract for a frosting twist
-
Vegan? Use dairy-free butter/milk and applesauce
- Prep Time: 15 mins
- Cook Time: 12 mins
Nutrition
- Calories: 150 cal Per cookie
- Sugar: 14g
- Fat: 7g
- Carbohydrates: 20g
- Protein: 1g
Nutritional Nibbles (Per Cookie, Approx.)
Calories: 150 | Fat: 7g | Carbs: 20g | Sugar: 14g | Protein: 1g
Remember: Joy is also an essential nutrient! Enjoy mindfully.
Final Thoughts: More Than Just a Cookie
What began as a pumpkin puree salvage project has become something greater – a recipe that carries memories in every spiced bite. These cookies represent the beauty of kitchen improvisation, the warmth of shared treats, and the magic that happens when we embrace happy accidents. They’re not just desserts; they’re edible invitations to slow down, savor, and connect.
As you pull your golden batches from the oven, remember that perfection isn’t the goal – joy is. Whether your cookies are slightly lopsided or your frosting isn’t Instagram-smooth, what matters is the love stirred into the dough and the smiles they’ll create. That’s the real secret ingredient no recipe can quantify.
Now go forth and bake – may your kitchen be filled with the scent of cinnamon and contentment! And when you share these (because you must!), don’t forget to tell the story of how a can opener failure led to something wonderful. After all, the best recipes come with stories baked right in. Happy baking, friends! 🍂🎃

Flourless Pumpkin Muffins
Welcome to Pumpkin Paradise!
Hey there, kitchen friend! Olivia here, apron dusted with cinnamon and heart full of autumn vibes. 🍂 Can you smell it? That cozy, spicy-sweet aroma wafting through the air? That’s the magic of pumpkin season, and today we’re whipping up something extra special: Flourless Pumpkin Muffins. Imagine tender, spice-kissed muffins that hug your taste buds like a warm blanket—no flour, no dairy, no fuss. Just wholesome ingredients dancing together in one bowl (because who wants a sink full of dishes?). These little guys are gluten-free, naturally sweetened, and so moist, they’ll make you do a happy dance. Perfect for busy mornings, lunchboxes, or that 3 p.m. slump when you need a hug in edible form. Ready to bake joy?
My Pumpkin Epiphany
Picture this: It’s 2018, and I’m hosting my first Friendsgiving. I’d spent hours on a from-scratch pumpkin pie… only to watch my gluten-free bestie, Maya, eye it wistfully. “It’s okay,” she said, “I’ll just have extra wine!” 😂 My heart sank. Later that night, I raided my pantry—canned pumpkin, almond butter, eggs—and baked a batch of experimental muffins. When Maya bit into one, her eyes welled up. “Tastes like childhood,” she whispered. That’s when I knew: food isn’t just fuel; it’s love made visible. These muffins became our annual tradition—imperfect, inclusive, and deeply delicious.
What You’ll Need
Grab these simple staples (and yes, substitutions are totally cool!):
- Canned pumpkin purée (1 cup): Not pie filling! Pure pumpkin gives moisture and earthy sweetness. Chef hack: Freeze leftovers in ice cube trays for smoothies!
- Eggs (2 large): Binders extraordinaire. For vegan swaps, try flax eggs (2 tbsp ground flax + 5 tbsp water, sit 10 mins).
- Maple syrup or honey (¼ cup): Nature’s candy! Use dark maple syrup for depth, or agave to keep it vegan.
- Almond butter or peanut butter (½ cup): Creamy, drippy nut butter adds richness and protein. SunButter works for nut-free!
- Vanilla extract (1 tsp): The secret whisper of warmth. Splurge on pure vanilla—it’s worth it.
- Pumpkin pie spice (1½ tsp): Autumn in a jar! Make your own: 1 tsp cinnamon + ¼ tsp each ginger, nutmeg, cloves.
- Baking soda (½ tsp): Our lift agent. Ensure it’s fresh (test with vinegar—if it fizzes, you’re golden!).
- Salt (pinch): Balances sweetness. I use flaky sea salt.
- Dark chocolate chips or nuts (¼ cup, optional): Because joy comes in chocolate form. Pepitas add crunch!
Let’s Get Baking!
No mixer needed—just a bowl, a whisk, and your favorite spatula. Here’s how we make magic:
- Preheat & Prep: Fire up your oven to 350°F (175°C). Line a muffin tin with parchment cups (or grease well!). Why parchment? These muffins are sticky—parchment prevents heartbreak. ♥️
- Wet Team Assemble!: In a large bowl, whisk pumpkin, eggs, maple syrup, nut butter, and vanilla. Pro tip: Warm nut butter for 10 seconds if it’s stubborn—it blends smoother!
- Dry Team Unite!: Sprinkle in pumpkin spice, baking soda, and salt. Whisk until JUST combined (overmixing = dense muffins!). Batter will be thick—like cozy fall sweatpants. 👌
- Fold in Fun: Gently stir in chocolate chips or nuts. Reserve a few to sprinkle on top—pretty muffins = happy muffins!
- Fill ‘er Up: Spoon batter into cups until ¾ full. Baking hack: Use an ice cream scoop for zero mess and even portions!
- Bake to Bliss: Pop in the oven for 18–22 minutes. They’re done when tops spring back when tapped. No toothpick? Slide a knife in—clean = ready!
- Cool & Celebrate: Let muffins chill in the pan for 5 minutes (they’re delicate!). Transfer to a rack—if you can wait 10 minutes before devouring. 😉
How to Serve These Babes
These muffins shine brightest warm! Split one open, let steam escape, and add a smear of coconut yogurt or almond butter. For brunch drama, stack ’em high with fresh berries and a dusting of cinnamon. Pack in lunchboxes with apple slices, or crumble over oatmeal. And hey—microwave one for 8 seconds and top with vanilla ice cream. You’re welcome. 🍨
Mix It Up!
Play with these fun twists:
- Cranberry-Orange: Swap chocolate for ¼ cup dried cranberries + 1 tbsp orange zest.
- Protein Power: Add 2 scoops collagen peptides or 3 tbsp oat flour for extra staying power.
- Paleo Pumpkin: Use cashew butter + coconut nectar. Add chopped pecans!
- Spice Explorer: Add a pinch of cardamom or black pepper for intrigue.
- Mini Muffins: Bake in mini tins for 12–14 minutes—perfect for tiny hands!
Olivia’s Extra Crumbles
These muffins have evolved more than my taste in sweatpants! Originally, I used bananas instead of pumpkin (disaster—tasted like spiced socks 🧦). Lesson learned: pumpkin rules. Now, I double the batch and freeze extras—they thaw in minutes! Funny story: My dog, Biscuit, once stole one off the counter. He hid it in his bed like a prized truffle. Even pups know good stuff. 🐶 Lastly, don’t stress perfection. My first batch looked like lumpy pumpkins… but tasted like heaven. Embrace the mess!
Flourless Pumpkin Muffins: A Love Letter to Fall
There’s something magical about pumpkin season—the way the air turns crisp, the leaves blaze with color, and our kitchens fill with the scent of warm spices. These Flourless Pumpkin Muffins are my edible love letter to autumn. They’re tender, moist, and packed with cozy flavor—no flour, no dairy, just pure pumpkin bliss. Whether you’re gluten-free, health-conscious, or simply craving a wholesome treat, these muffins deliver joy in every bite.
Why These Muffins Are a Game-Changer
-
Naturally gluten-free & dairy-free—no fancy flours or substitutes needed!
-
Sweetened with maple syrup (or honey) for a gentle, caramel-like sweetness.
-
Packed with protein & fiber thanks to almond butter and pumpkin.
-
One-bowl wonder—minimal cleanup, maximum flavor.
-
Perfect for meal prep—freeze well and reheat like a dream.
So grab your mixing bowl and let’s bake some happiness!
The Science Behind Flourless Baking: Why It Works
Ever wondered how muffins can be fluffy without flour? It’s all about ingredient chemistry! Here’s why this recipe is foolproof:
1. Pumpkin Purée: The Moisture Master
-
Acts as a binder (replacing flour’s structure).
-
Adds natural sweetness and a velvety texture.
-
Pro Tip: Always use 100% pure pumpkin purée, not pie filling (which has added sugar and spices).
2. Nut Butter: The Flour Replacement
-
Almond butter (or peanut butter) provides fat, protein, and structure.
-
Its natural oils keep muffins tender without drying out.
-
Fun Fact: Nut butters work similarly to flour in trapping air, giving a light crumb.
3. Eggs: The Glue That Holds It All Together
-
Provide lift and stability.
-
For vegan muffins, flax eggs (2 tbsp ground flax + 5 tbsp water) work beautifully.
4. Baking Soda: The Rise Agent
-
Reacts with the pumpkin’s acidity for a perfect puff.
-
Test for freshness: Mix ½ tsp with vinegar—if it bubbles, it’s active!
The Result?
A muffin that’s soft, moist, and satisfying—without any gluten or grains!
Serving & Storing: Make These Muffins Shine
Best Ways to Enjoy
-
Warm & Fresh: Split open and slather with almond butter or coconut yogurt.
-
Brunch-Worthy: Stack high with fresh berries and a drizzle of honey.
-
Dessert Mode: Microwave for 8 seconds and top with vanilla ice cream.
-
On-the-Go: Pack in lunchboxes with apple slices—kid-approved!
Storage Tips
-
Room Temp: 3 days in an airtight container.
-
Fridge: 1 week (reheat for 10 seconds to revive).
-
Freezer: 3 months (thaw at room temp or toast for crispy edges).
Pro Tip: Double the batch and freeze half—future you will be grateful!
Your Questions, Answered!
Q: Why are my muffins wet inside?
A: Oven temps vary! If centers seem underdone, bake 2–3 minutes longer. If tops brown too fast, tent with foil. Also, ensure pumpkin purée isn’t watery—strain it if needed!
Q: Can I use fresh pumpkin?
A: Absolutely! Roast sugar pumpkin, purée until smooth, and strain overnight in cheesecloth. Use 1 cup packed. Pro tip: Canned is easier and consistent!
Q: Muffins stuck to the liner! Help!
A: Two tricks: 1) Let muffins cool COMPLETELY before peeling. 2) Spritz liners with coconut oil spray. Or skip liners and grease tin well!
Q: How long do they keep?
A: 3 days airtight at room temp, 1 week in the fridge, or 3 months frozen. Reheat frozen ones in a toaster oven—crispy edges revive the magic!
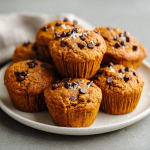
Flourless Pumpkin Muffins
- Total Time: 30 minutes
Description
Hey pumpkin lover—Olivia here! These Flourless Pumpkin Muffins are the hug-your-soul kind of treat you’ll want on repeat. Super moist, naturally sweetened, and whisked together in one bowl, they’re perfect for busy mornings, snacky afternoons, or that friend who always says, “I’m avoiding gluten.” Packed with pumpkin, nut butter, and warm spices, they’re fall comfort made easy.
Ingredients
-
1 cup canned pumpkin purée (not pie filling)
-
2 large eggs (or flax eggs for vegan)
-
¼ cup maple syrup or honey
-
½ cup almond or peanut butter (or SunButter for nut-free)
-
1 tsp vanilla extract
-
1½ tsp pumpkin pie spice
-
½ tsp baking soda
-
Pinch of salt
-
¼ cup dark chocolate chips or nuts (optional)
Instructions
-
Preheat oven to 350°F (175°C). Line a muffin tin with parchment cups or grease well.
-
In a large bowl, whisk pumpkin, eggs, maple syrup, nut butter, and vanilla until smooth.
-
Add pumpkin spice, baking soda, and salt. Stir just until combined—don’t overmix!
-
Fold in chocolate chips or nuts, reserving a few for topping.
-
Fill muffin cups ¾ full. Bake 18–22 minutes, until tops spring back when gently pressed.
-
Cool 5 mins in pan, then transfer to rack. Enjoy warm or let cool completely.
Notes
-
Add dried cranberries + orange zest for a bright twist
-
Boost protein with 2 tbsp oat flour or collagen
-
For mini muffins: Bake 12–14 mins
-
Freeze leftovers and reheat for snack-time joy
- Prep Time: 10 mins
- Cook Time: 20 mins
Nutrition
- Calories: 140 cal Per muffin
- Fat: 8g
- Carbohydrates: 12g
- Fiber: 2g
- Protein: 4g
Nutritional Per Serving (1 muffin)
- Calories: 140
- Fat: 8g
- Carbs: 12g
- Sugar: 7g (all natural!)
- Protein: 4g
- Fiber: 2g
⏱ Total Time: 30 minutes | 🔥 Makes: 9–10 muffins
Final Thoughts: More Than Just a Muffin
These Flourless Pumpkin Muffins aren’t just a recipe—they’re a reminder that food should be joyful, nourishing, and inclusive. Whether you’re gluten-free, vegan, or just looking for a healthier treat, these muffins prove that delicious doesn’t have to mean complicated.
Why I Keep Baking Them
-
They make my kitchen smell like a fall candle.
-
My friends and family light up when they take that first bite.
-
They’re forgiving—no stress over perfect measurements.
So here’s to cozy mornings, happy tummies, and the magic of pumpkin season. Now go bake some love!
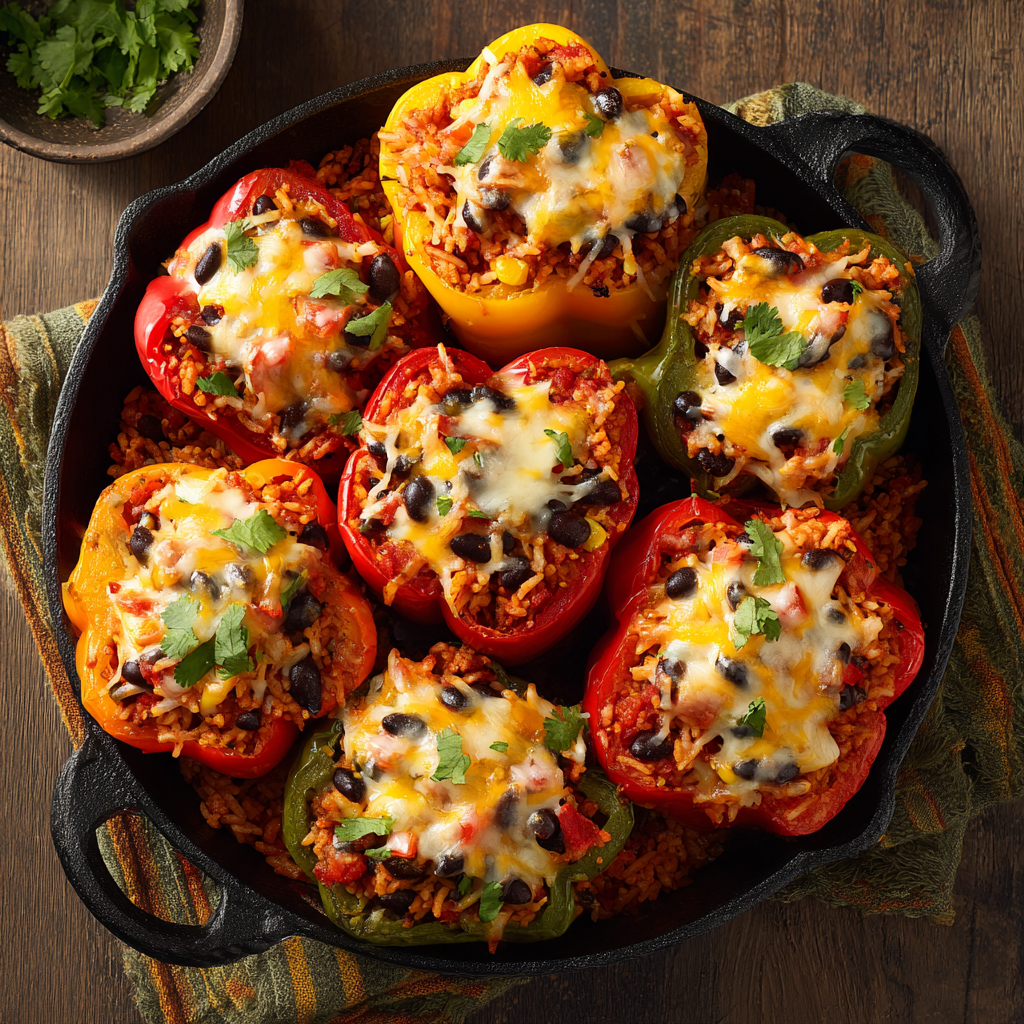
Meatless Mexican Stuffed Peppers
Welcome to Flavor Town: Let’s Make Magic in Pepper Form!
Hey there, kitchen rockstar! Olivia here, apron dusted with paprika and heart full of excitement. There’s something downright magical about turning humble veggies into a showstopper, isn’t there? Today, we’re diving into my crowd-pleasing Meatless Mexican Stuffed Peppers—a dish that’ll make herbivores and carnivores alike do a happy dance. Picture this: plump red bell peppers cradling a fiesta of seasoned rice, black beans, sweet corn, and melty cheese, all baked until tender and golden. It’s vibrant, hearty, and proof that plant-based eating can be an absolute flavor explosion. Perfect for Sunday suppers, potlucks, or meal prep heroics, this doubled recipe serves 12 with zero meat required. Grab your favorite mixing bowl—let’s create edible sunshine!
Why These Peppers Feel Like a Hug
Rewind to my first big dinner party after moving cross-country. I was nervous—new friends, tiny apartment, and my kitchen felt like an alien spaceship. I needed a dish that screamed “welcome” without screaming “stress.” Enter these stuffed peppers! As the smell of toasty cumin and roasting peppers filled my cramped kitchen, something shifted. Laughter bubbled up as friends squeezed around my wobbly table, scraping every last cheesy bit from their plates. One buddy, a sworn meat-lover, whispered, “Wait, there’s no steak in this?!” with genuine shock. That night, these peppers taught me a golden rule: good food isn’t about perfection. It’s about the messy, cheese-dripping, soul-warming moments that turn strangers into family. Now, they’re my go-to “let’s gather” dish—my edible welcome mat.
Your Flavor Toolkit: What We’re Using & Why
- 5 cups vegetable broth – The flavor backbone! Use low-sodium if watching salt, or swap with mushroom broth for umami depth.
- 3 cups uncooked white rice – Basmati or jasmine work great. For grain swaps, try quinoa (cook time may vary).
- 2 (14 oz) cans diced tomatoes + liquid – Adds juicy tang. Fire-roasted tomatoes? Yes, please—extra smokiness!
- 2 (4 oz) cans diced green chilies – Mild kick without heat overwhelm. No cans? Roast & dice 2 fresh poblanos.
- 2 medium onions + 2 diced bell peppers – The “sofrito” starters! Red peppers add sweetness; green bring earthiness.
- 6 tbsp taco seasoning – Homemade blend (see my blog!) or store-bought. Chef hack: Toast spices in a dry pan first for depth!
- 2/3 cup chopped cilantro – Fresh is non-negotiable here. Hat? Swap with flat-leaf parsley.
- 2 cups corn – Frozen = easy & sweet. Charred fresh corn in summer? *Chef’s kiss*
- 2 (14 oz) cans black beans – Drained & rinsed well. Pinto or kidney beans work too!
- 6 large red bell peppers – Halved lengthwise. Pick firm, heavy ones—they hold filling like champs.
- 2 cups shredded pepper jack – Melty bliss! Vegan? Use almond-based “cheese” or nutritional yeast + cashew cream.
- Cilantro & avocado – The confetti finish! Adds creaminess and freshness.
Let’s Build Flavor Bombs: Your Foolproof Roadmap
Step 1: In your largest pot (seriously, go big—this mix puffs up!), bring broth to a lively boil. Stir in rice, tomatoes, chilies, onion, diced bell pepper, and taco seasoning. Chef tip: Don’t stir after this—trapping steam = fluffy rice! Cover, reduce heat to low, and simmer 18-20 minutes until rice is tender. Peek once midway—if dry, splash in ¼ cup water.
Step 2: Remove from heat. Fluff rice gently with a fork—this keeps grains intact! Fold in cilantro, corn, and black beans. Taste! Need more zing? Add lime zest or chipotle powder. Kitchen story: My dog once stole a cilantro bunch mid-stir. We renamed him “Salsa.”
Step 3: Preheat oven to 375°F (190°C). Arrange pepper halves in baking dishes—snug is fine; they’ll soften. Scoop filling generously into each, mounding it high. Pro move: Rub pepper insides with olive oil + salt for extra flavor!
Step 4: Sprinkle cheese over filling—don’t hold back! Loosely tent with foil (prevents steaming cheese into rubber). Bake 25-30 mins until peppers are fork-tender. Uncover, bake 5 more minutes for that golden, bubbly crown. Hack: Broil 1-2 mins if you’re extra.
Step 5: Let peppers rest 5 mins—this lets flavors mingle. Garnish with avocado slices and cilantro. Serve with lime wedges for squeezing!
How to Serve & Shine
Slide these beauties onto a platter—color is your friend! Pair with a crisp jicama slaw or lime-spiked sour cream dollops. For gatherings, let guests customize toppings: pickled red onions, hot sauce, or crushed tortilla chips for crunch. Serving buffet-style? Keep peppers in baking dishes—their vibrant red makes a stunning centerpiece. Pro tip: A drizzle of cilantro-lime crema (blend yogurt, lime, cilantro, garlic) takes it next-level!
Shake It Up: 5 Delicious Twists
- Southwest Fiesta: Swap black beans for pinto, add 1 cup cooked sweet potato cubes.
- Protein Power: Stir in 1.5 cups cooked lentils or crumbled tofu with taco seasoning.
- Green Goddess: Use poblano peppers instead of bell, stuff with spinach + pepitas.
- Cheesy Jalapeño Popper: Mix cream cheese into filling, top with cheddar + bacon bits (optional).
- Mediterranean Mood: Replace taco seasoning with oregano/garlic, use chickpeas + feta.
Olivia’s Extra Sprinkles of Wisdom
This recipe evolved from my mom’s 1980s version—back then, it involved canned soup and sad ground beef! Over years, I’ve tweaked it for maximum flavor and ease. Funny fail: Once, I used “extra-hot” chilies by mistake. We served it with milk shots—lesson learned! Now, I keep spice levels crowd-friendly. The filling also makes killer burrito bowls or taco salad topping—double it for meal prep! Pro tip: Leftovers? Freeze unbaked stuffed peppers; thaw and bake as needed. They’re freezer superheroes.
The Filling Philosophy – Texture & Flavor Layers
A great stuffed pepper is all about contrast. Let’s break down how to build a filling that sings:
The Holy Trinity of Texture
-
Creamy: Black beans (partially mashed) + melted cheese
-
Crunchy: Fresh corn + toasted pepitas (sprinkle on top last minute)
-
Chewy: Sun-dried tomatoes or sautéed mushrooms (optional add-ins)
Flavor Amplifiers
-
Acidity: A splash of apple cider vinegar or lime juice brightens heavy spices.
-
Umami: A tablespoon of tomato paste or soy sauce in the rice mix adds depth.
-
Heat: Add a minced chipotle in adobo for smoky spice (or serve hot sauce on the side).
The Rice Rule
-
Undercook slightly: Rice keeps absorbing liquid in the oven. Aim for al dente when pre-cooking.
-
Fluff with a fork: Never stir vigorously—you want separate grains, not mush.
-
Toast it first: For nuttier flavor, sauté dry rice in oil with spices before adding broth.
Pro Tip: Let filling cool 15 minutes before stuffing—warm fillings can make peppers soggy.
The Psychology of Plant-Based Comfort Food
Why do these meatless peppers satisfy even die-hard carnivores? Science (and strategy!) at work:
1. The “Fullness Factor”
Black beans + rice = complete protein. Fiber from veggies and beans triggers satiety hormones, tricking the brain into feeling “meat-level” satisfied.
2. Flavor Layering
Studies show we perceive dishes with 5+ flavors as more indulgent. These peppers hit:
-
Sweet (corn, peppers)
-
Savory (cheese, broth)
-
Spicy (chilies)
-
Tangy (tomatoes)
-
Herbal (cilantro)
3. Color Psychology
Red peppers stimulate appetite (hence their use in fast-food logos!). A vibrant dish literally makes mouths water.
4. The Comfort of Customization
Toppings = control. Letting guests personalize their pepper activates the brain’s reward system.
Pro Tip: Serve on warm plates—the heat amplifies aromas, making flavors “pop” more!
Your Questions, Answered!
Q: Can I use brown rice?
A: Absolutely! Increase broth by 1 cup and simmer 35-40 mins. Grain-free? Cauliflower rice works—sauté it first to remove moisture.
Q: My peppers are still firm after baking!
A: Two tricks: 1) Blanch pepper halves in boiling water 3 mins before stuffing. 2) Add ¼ cup water to the baking dish before covering with foil—steam softens them faster.
Q: Can I make these ahead?
A: Yes! Assemble peppers (unbaked) 1 day ahead. Cover and refrigerate. Add 5-10 mins to bake time if chilled.
Q: Help—my filling is soggy!
A: Did you drain your beans? Rinsing is key! Also, if using frozen corn, thaw and pat dry. For extra-fluffy rice, let filling cool 10 mins before stuffing peppers.

Meatless Mexican Stuffed Peppers
- Total Time: 1 hour
Description
Hey there, flavor-loving friend! Olivia here, and I’ve got the ultimate plant-based crowd-pleaser: Meatless Mexican Stuffed Peppers. Juicy red bells stuffed with zesty rice, black beans, corn, green chilies, and melty pepper jack. They’re cozy, colorful, and make enough to feed 12 hungry souls (or stock your freezer like a pro). No meat, no problem—just serious flavor magic!
Ingredients
-
5 cups vegetable broth
-
3 cups uncooked white rice
-
2 (14 oz) cans diced tomatoes (with liquid)
-
2 (4 oz) cans diced green chilies
-
2 medium onions, diced
-
2 bell peppers, diced
-
6 tbsp taco seasoning
-
2 cups frozen corn
-
2 (14 oz) cans black beans, rinsed and drained
-
⅔ cup chopped fresh cilantro
-
6 large red bell peppers, halved lengthwise and cored
-
2 cups shredded pepper jack cheese (or vegan cheese)
-
Optional: avocado slices, extra cilantro, lime wedges
Instructions
-
In a large pot, bring broth to a boil. Add rice, tomatoes, chilies, onions, diced bell pepper, and taco seasoning. Stir once, cover, and simmer on low 18–20 mins.
-
Fluff rice. Fold in corn, black beans, and cilantro. Taste and adjust seasoning.
-
Preheat oven to 375°F (190°C). Rub pepper halves with olive oil and arrange in baking dishes. Fill generously with rice mixture.
-
Top with cheese. Cover loosely with foil. Bake 25–30 mins until tender. Uncover and bake 5 mins more (broil 1–2 mins if desired).
-
Let rest 5 mins. Garnish with avocado, lime, and cilantro.
Notes
-
Add lentils or tofu for extra protein
-
Use brown rice (add 1 cup broth and 15–20 mins simmer time)
-
Try poblano peppers for a smoky twist
-
Leftover filling? Use in burritos or bowls
-
Freeze unbaked stuffed peppers for future dinners
- Prep Time: 25 mins
- Cook Time: 35 mins
Nutrition
- Calories: 320 cal Per Serving
- Fat: 10g
- Carbohydrates: 46g
- Fiber: 7g
- Protein: 10g
Nutrition Per Serving (approx.):
Calories: 320 | Protein: 10g | Carbs: 46g | Fat: 10g | Fiber: 7g | Sodium: 540mg
Note: Values vary with swaps. Vegan? Use plant-based cheese!
Final Thoughts: More Than a Meal
These peppers aren’t just dinner—they’re edible confetti, a celebration of color, community, and the joy of cooking without rules. They taught me that the best recipes aren’t about precision; they’re about the cheese dripping down your wrist, the friend who asks for thirds, the quiet “mmm” sounds around the table. So here’s to messy hands, bright flavors, and the magic that happens when we gather around good food. Now, go stuff some peppers—and some memories!
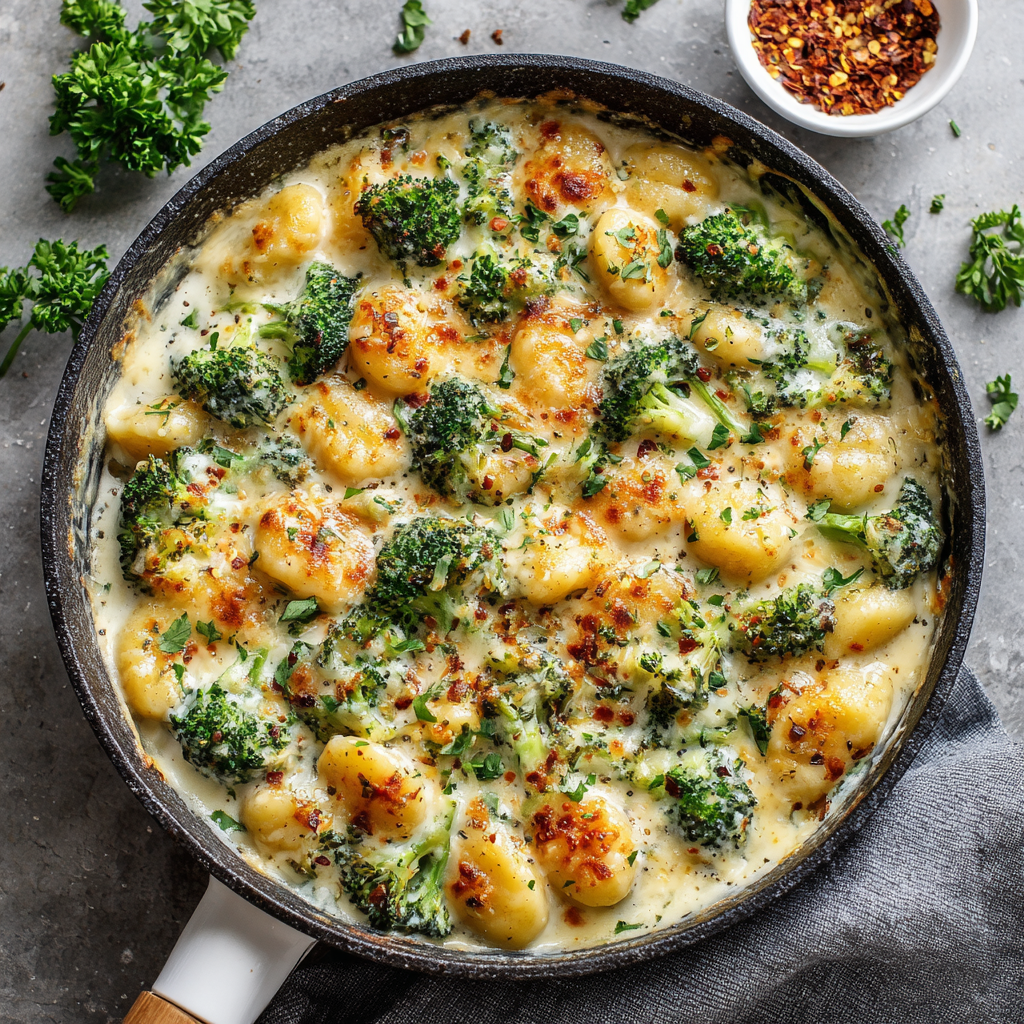
Cheesy Broccoli Gnocchi Skillet
Double the Comfort: Your New Family Favorite Is Here!
Hey there, kitchen friend! Olivia Bennett here, apron dusted with flour and heart full of excitement because today? We’re making pure magic in a skillet. Picture this: pillowy gnocchi bobbing in a creamy, cheesy sea, dotted with vibrant green broccoli that’s tender-crisp, all bubbling away in one glorious pan. This Cheesy Broccoli Gnocchi Skillet isn’t just dinner; it’s a warm hug disguised as comfort food. I specifically doubled the servings because let’s be real—whether you’re feeding a lively crew, prepping genius leftovers, or just want extra for that inevitable midnight snack attack, more of this goodness is always better!
This recipe sings my personal love language: maximum flavor, minimal fuss. No boiling gnocchi separately, no pre-steaming broccoli—everything cooks together in that trusty skillet while you maybe sip wine or wrangle homework. It’s weeknight easy but special enough for Sunday supper. That creamy sauce? It’s dreamily rich thanks to a double-cheese punch, with a subtle kick from red pepper flakes that makes you go “Hmm, what *is* that deliciousness?” Best part? You’re about 25 minutes away from watching your people’s eyes light up. Ready to make some cheesy, bubbly magic? Grab your skillet—let’s dive in!
Why This Skillet Holds a Special Place in My Heart (and Stomach!)
This recipe? It’s got roots. Picture a chaotic, rainy Tuesday last fall. My niece and nephew were over, my fridge was looking bleak, and hangry clouds were gathering. I spotted a bag of gnocchi, a lonely head of broccoli, and some cheese. Desperation birthed invention! I threw everything into my big cast-iron skillet with broth and spices, whispering a prayer. Ten minutes later… pure alchemy. The kids went silent (a miracle!), scraping their bowls clean. My nephew, usually suspicious of green things, mumbled through a full mouth: “Aunt Liv, can broccoli always taste like this?”
That’s the moment this skillet became legend in our house. It wasn’t fancy, but it was *real*. It filled bellies, turned broccoli skeptics into believers, and created that warm, fuzzy feeling of everyone gathered around, sharing something simple but soul-deeply satisfying. Now, it’s my go-to “I need a win” meal—the culinary equivalent of your favorite cozy sweater. Every time that cheese bubbles, I remember that rainy day and smile. Food memories? They’re the best kind.
Gathering Your Flavor Arsenal: Ingredients & Pro Insights
Here’s your shopping list for cozy perfection! Don’t sweat substitutions—I’ve got your back with flexible options. Pro Tip: Prep everything before heating the skillet! Mise en place makes this lightning-fast.
- 2 lbs Gnocchi: The fluffy potato pillows! Use shelf-stable, refrigerated, or frozen (no thaw needed!). Gluten-free? Absolutely! Just ensure the brand holds shape well. Mini gnocchi are adorable and cook even faster.
- 7 cups Chopped Broccoli (about 2 large heads): Florets and tender stems! Fresh is best here for bright color and texture. Frozen? Thaw and drain VERY well first, or your sauce gets watery.
- 2 cups Chicken Broth: Flavor booster and cooking liquid. Vegetarian? Swap in rich vegetable broth. Low-sodium is smart since we add salt.
- The Flavor Dream Team:
- 2 tsp Garlic Powder: Instant depth! Fresh minced garlic (4 cloves) works too—add with the broth.
- 2 tsp Parsley Flakes: Herbal freshness. Use 1 tbsp fresh parsley later as garnish.
- 1 tsp Paprika: Smoky sweetness (use smoked paprika for extra oomph!).
- 1 tsp Onion Powder: Savory backbone.
- 1 tsp Red Pepper Flakes: Gentle warmth! Adjust to your spice love. Omit for kiddos.
- 1 tsp Salt + ½ tsp Black Pepper: Season to taste! Start here, add more at the end if needed.
- 8 oz Cream Cheese, Cubed: The secret to luxe, creamy sauce! Lighter? Neufchâtel works. Dairy-free? Use a block-style plant-based cream cheese.
- 4 cups Shredded Mozzarella, Divided: Melty magic! Part-skim works fine. Chef Insight: Reserve half for topping—it creates that irresistible golden layer!
- Optional: Fresh Parsley: For a pop of color and fresh finish right before serving.
Let’s Get Cooking: Your Foolproof Roadmap to Cheesy Bliss
Ready? Fire up that stove! This comes together incredibly fast, so stay close. I’ll guide you through every step with my favorite hacks.
- Combine & Simmer:Grab your largest, deepest skillet or Dutch oven (at least 12 inches!). Place it over medium heat. Dump in the gnocchi, chopped broccoli, chicken broth, garlic powder, parsley flakes, paprika, onion powder, red pepper flakes, salt, and black pepper. Give it ONE gentle stir just to distribute the spices – don’t go crazy, or the gnocchi might break. Chef Hack: Pour the broth around the edges to wash spices into the mix! Bring it to a lively simmer (you’ll see steady bubbles around the edges). Immediately cover with a lid. Set your timer for 6 minutes.
- Check & Cook:After 6 minutes, carefully lift the lid (steam alert!). Stir gently. Your gnocchi should be floating and plump, and the broccoli should be bright green and tender-crisp (a fork should pierce the stem easily). If the gnocchi still feels dense or the broccoli is too firm, re-cover and cook for 1-2 more minutes MAX. Key Tip: Overcooking now = mushy gnocchi later! We want al dente pillows.
- Creamy Cheese Heaven:Reduce the heat to low. Add the cubed cream cheese and 2 cups of the shredded mozzarella. Now, stir slowly and constantly! Watch the magic happen as the cheese melts into the broth, creating a luscious, creamy sauce that coats everything. Chef Secret: Cubing the cream cheese helps it melt evenly and quickly—no lumps! This takes about 2-3 minutes. Sauce too thick? Add a splash of broth or milk. Too thin? Let it simmer uncovered for 1 min.
- The Golden Blanket:Turn off the heat! Sprinkle the remaining 2 cups of mozzarella evenly over the entire surface. Don’t stir! Just cover the skillet again with the lid. Let it sit for 1-2 minutes. The residual heat will melt the cheese into that perfect, gooey, slightly golden blanket we all crave. Pro Move: For extra browning, pop the uncovered skillet under a hot broiler for 60-90 seconds (watch closely!).
- Finish & Feast:Grab your garnish! Sprinkle generously with fresh chopped parsley if using. Serve IMMEDIATELY straight from the skillet for maximum cozy vibes and minimum cleanup. Dig in while it’s gloriously hot and bubbly!
Plating Up the Cozy: How to Serve This Beauty
This dish is a showstopper right in the pan! Set that sizzling skillet in the middle of the table on a trivet—let everyone admire the golden cheese and vibrant broccoli before diving in. Scoop generous portions into shallow bowls. Pair it with something simple to mop up that dreamy sauce: crusty garlic bread is perfection, or warm focaccia. For a lighter touch, a bright lemony arugula salad cuts through the richness beautifully. Got a crowd? Add a platter of roasted chicken sausage on the side. Pour some chilled white wine (a Pinot Grigio loves this!) or sparkling cider. It’s all about that warm, shared, comforting experience!
Make It Your Own: Delicious Twists & Swaps!
This skillet is your culinary canvas! Here’s how to riff on it:
- Protein Power-Up: Stir in 2 cups shredded rotisserie chicken, diced cooked ham, browned Italian sausage, or crispy bacon bits with the cream cheese.
- Veggie Delight: Swap half the broccoli for cauliflower florets, sliced mushrooms (add with the broth!), or sun-dried tomatoes (drained & chopped, add with the cheese).
- Cheese Swap Meet: Substitute 1 cup of the mozzarella with sharp cheddar, fontina (super melty!), gouda, or pepper jack for extra kick.
- Lighter Love: Use reduced-fat cream cheese & part-skim mozzarella. Swap 1 cup broth for unsweetened almond milk. Boost fiber with whole wheat gnocchi.
- Gluten-Free & Vegan: Use certified GF gnocchi. Swap chicken broth for veggie broth. Use high-quality dairy-free cream cheese & mozzarella shreds (Violife or Miyoko’s melt well!).
Olivia’s Extra Scoop: Stories & Tips from My Kitchen
Confession time: The very first test batch of this? I forgot to reduce the heat when adding the cream cheese. Let’s just say I learned that cream cheese can seize slightly if the pan is too hot! Low and slow is the key to silky sauce. This recipe evolved from that frantic rainy-day throw-together into our family’s most-requested “cheat day” meal. My husband swears it’s even better reheated for lunch (he’s right!). I love how forgiving it is—once I accidentally used frozen broccoli without thawing (oops!), so I just added an extra 2 minutes simmering time and drained a tiny bit of liquid before adding the cheese. It still rocked! For leftovers (if you have any!), store in an airtight container in the fridge for up to 3 days. Reheat gently in the microwave with a splash of milk or broth, stirring often. The gnocchi softens more, but the flavor deepens beautifully! It’s comfort that keeps on giving.
Your Gnocchi Questions, Answered!
Let’s tackle those common kitchen hiccups before they happen!
- Q: Help! My sauce is too thin/watery. What now?A: Don’t panic! First, ensure you used the full amount of cream cheese and mozzarella (melting is key!). If it’s still loose, remove the lid after adding the cheese and let it simmer gently on low for 1-2 extra minutes, stirring constantly. If using frozen broccoli, always thaw and drain VERY well first! As a last resort, make a quick slurry: mix 1 tsp cornstarch with 1 tbsp cold water or broth, stir it in, and simmer for 1 min until thickened.
- Print

Cheesy Broccoli Gnocchi Skillet
- Total Time: 25 minutes
Description
Hey, kitchen friend! Olivia here, sharing my go-to skillet sensation that turns gnocchi, broccoli, and cheese into pure dinnertime joy. This Cheesy Broccoli Gnocchi Skillet is fast, filling, and totally flexible. No boiling, no fuss—just everything cooked in one glorious pan. It’s cozy, creamy, and ready in 25 minutes, making it perfect for weeknights, lazy Sundays, or feeding a houseful of hungry humans. Let’s make magic!
Ingredients
Scale-
2 lbs shelf-stable or refrigerated gnocchi (GF if needed)
-
7 cups chopped fresh broccoli florets (about 2 heads)
-
2 cups chicken or vegetable broth
-
2 tsp garlic powder
-
2 tsp dried parsley (or 1 tbsp fresh)
-
1 tsp paprika
-
1 tsp onion powder
-
1 tsp red pepper flakes (optional)
-
1 tsp salt + ½ tsp black pepper
-
8 oz cream cheese, cubed
-
4 cups shredded mozzarella, divided
-
Optional: fresh parsley for garnish
Instructions
-
In a large deep skillet or Dutch oven, combine gnocchi, broccoli, broth, and all seasonings. Stir gently.
-
Bring to a simmer over medium heat. Cover and cook 6–8 mins, until broccoli is tender and gnocchi is soft.
-
Reduce heat to low. Stir in cream cheese and 2 cups mozzarella until smooth and creamy.
-
Sprinkle remaining cheese over top. Cover and let melt 2 mins—or broil uncovered for golden perfection!
-
Garnish with parsley and serve warm, straight from the skillet.
Notes
-
Frozen broccoli? Thaw & drain well before using.
-
Add protein: rotisserie chicken, sausage, or bacon.
-
Cheese swap: try cheddar, gouda, or pepper jack.
-
Make it vegan: use dairy-free cheese & broth.
-
Reheat with a splash of milk or broth—flavor only gets better!
- Prep Time: 10 mins
- Cook Time: 15 mins
Nutrition
- Calories: 420 cal Per Serving
- Fat: 22g
- Carbohydrates: 38g
- Protein: 15g
-
Final Thoughts
This Cheesy Broccoli Gnocchi Skillet isn’t just a meal—it’s a celebration of simplicity, science, and shared joy. Whether you’re a busy parent, a cooking newbie, or a flavor adventurer, this dish meets you where you are. It teaches us that great food doesn’t require complexity, just heart (and a little melted cheese). So grab that skillet, trust the process, and savor every bite. After all, the best memories are often made around the table, one forkful at a time.
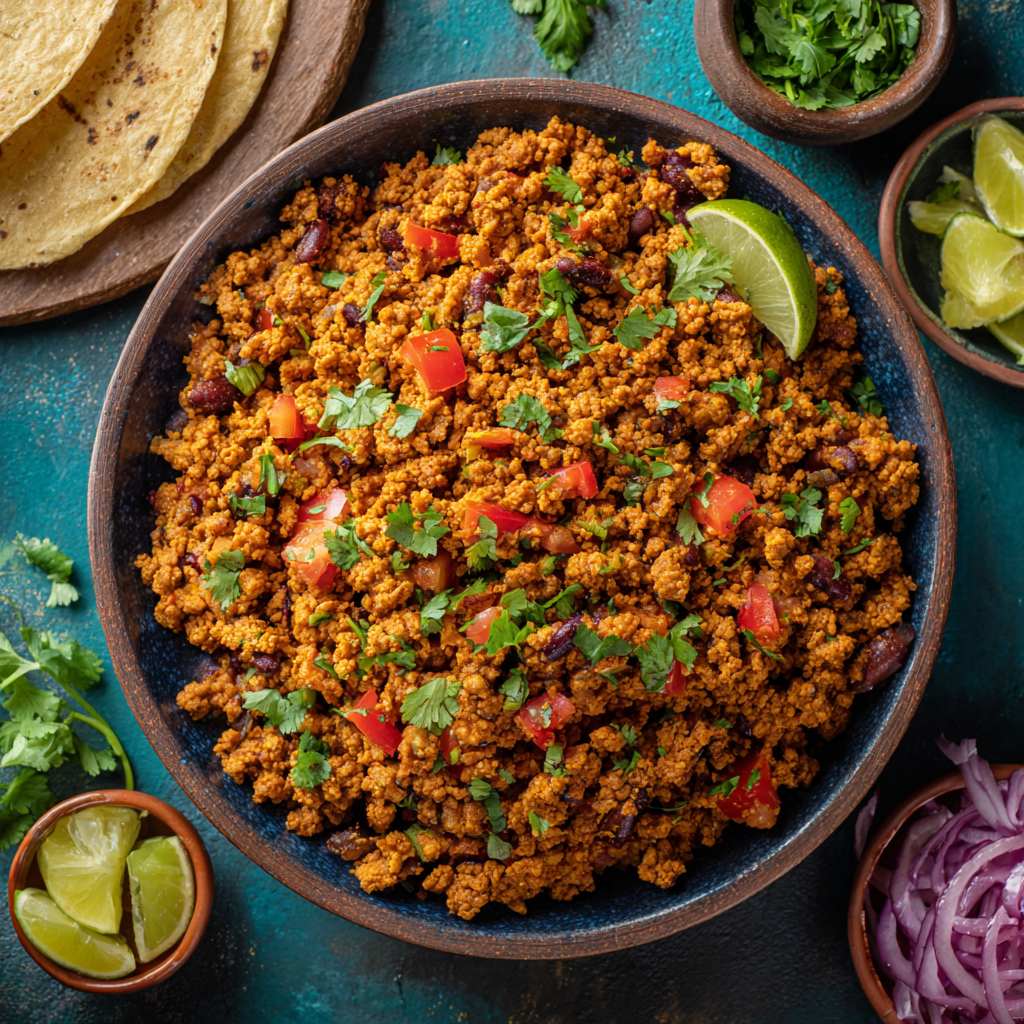
Vegan Ground Beef Crumbles
Hey, Let’s Make Magic in a Bowl: Vegan Ground Beef Crumbles!
Picture this: It’s 5 p.m., your kitchen smells like a cozy hug, and you’ve got hungry souls to feed—maybe even a mixed crowd of vegans, vegetarians, and “I’ll-try-anything-once” friends. The pressure’s on, but you? You’re about to blow their minds with a freezer hero that’s bold, protein-packed, and wildly versatile. Meet your new kitchen BFF: Vegan Ground Beef Crumbles. This isn’t just “meatless”—it’s a flavor explosion ready to star in your tacos, pastas, casseroles, and beyond. And guess what? You don’t need fancy skills or all day. Just grab two baking sheets and that well-loved mixing bowl—we’re making a double batch because leftovers (or freezer stashes) are self-care, darling.
Why do I swear by this recipe? Because it’s the ultimate crowd-pleaser that even my meat-loving uncle requests at BBQs. It’s chewy, savory, and crisps up like a dream. Plus, it’s cheaper and healthier than store-bought alternatives. Whether you’re meal-prepping for chaos-filled weeks or hosting a last-minute taco night, these crumbles are your golden ticket. Ready to flex those plant-based muscles? Aprons on—let’s get messy and make magic!
Why This Recipe Tastes Like Home to Me
Flashback to my niece’s 10th birthday party: 20 kids hyped on sugar, two gluten-free cousins, one skeptical brother-in-law (“Plants can’t taste like beef, Liv!”), and me—determined to please everyone without losing my mind. I whipped up these crumbles, tucked them into crispy taco shells with all the fixings, and held my breath. The result? Kids fist-bumped me, my brother-in-law took seconds, and my freezer stash vanished faster than cupcakes. But the real win? Seeing my vegan niece beam, “Aunt Liv, you made this for ME.”
That’s the heart of this recipe: it’s not just food. It’s connection. It’s the “aha!” moment when someone realizes plant-based can be hearty, satisfying, and downright delicious. Every time I bake these crumbles, I remember her smile—and how a simple bowl of spiced gluten can turn doubters into believers. Food memories? Yeah, we’re making them right here.
Your Flavor-Packed Lineup (Plus Genius Swaps!)
- 480g (4 cups) vital wheat gluten: The MVP! This high-protein flour gives that meaty chew. Chef’s tip: Pack it lightly in your measuring cup—don’t compress!
- 30g (½ cup) nutritional yeast: Umami magic! Adds a savory, cheesy depth. Swap: If you hate “nooch,” use 2 tbsp mushroom powder.
- 2 tbsp onion powder + 2 tbsp garlic powder: The dynamic duo for savory depth. Insight: Powder > fresh here—it distributes evenly without sogginess.
- 2 tsp ground cumin + 2 tsp paprika: Earthy warmth and color. Fun twist: Smoked paprika for campfire vibes!
- ½ tsp black pepper + ¼ tsp cayenne: Gentle heat. Swap: Omit cayenne for kid-friendly bites.
- ¼ tsp allspice: Secret weapon! Echoes the complexity of beef. Don’t skip—trust me.
- 1½ cups water: Binds everything. Tip: Use broth for extra flavor!
- ½ cup liquid aminos: Salty, savory punch. Swap: Tamari or soy sauce work too.
- ½ cup coconut aminos: Sweet balance. No coconut aminos? Use ¼ cup liquid aminos + ¼ cup maple syrup.
- 2 tbsp apple cider vinegar: Bright tang to cut richness. Swap: Lemon juice in a pinch.
Let’s Cook! Your Foolproof Roadmap
Step 1: Preheat oven to 350°F (175°C). Why? A hot oven = crispy edges! If it’s not fully preheated, crumbles steam instead of sear.
Step 2: Whisk all dry ingredients in a big bowl. Chef hack: Want no spice lumps? Sift ’em! This ensures every crumble sings with flavor.
Step 3: In another bowl, whisk wet ingredients. Pro insight: Whisk vigorously—this “marries” the flavors. See those bubbles? Good job!
Step 4: Pour wet into dry. Stir with a fork JUST until combined. Critical tip: Don’t overmix! Overworked gluten = tough crumbles. Lumps are okay—they’ll become texture.
Step 5: Knead dough 1-2 minutes on the counter. Fun fact: This activates the gluten for chew. Set a timer—90 seconds is sweet spot!
Step 6: Crumble with gusto! Pinch marble-sized pieces. Game-changer: Smaller pieces = more crispy edges (aka flavor bombs!).
Step 7: Spread on two parchment-lined sheets. Why two? Crowding = steamed crumbles. We want golden perfection!
Step 8: Bake 25-30 mins, stirring halfway. Watch closely: Ovens vary! At 20 mins, you’ll smell magic. Done when edges are golden and centers chewy.
Step 9: Cool completely. Patience, grasshopper: They crisp as they cool! Portion into jars or freezer bags.
Serve It Like a Boss
These crumbles shine anywhere meat would! For taco night, sizzle in a skillet with extra cumin and chili powder. Pile into warmed shells with avocado crema. Craving comfort? Stir into marinara sauce for a 10-minute “bolognese” over rigatoni. Weeknight warrior move: Toss with roasted veggies and quinoa for power bowls. Or go classic—layer into lasagna with cashew ricotta. My fave? Sprinkle cold crumbles straight from the fridge onto a pizza before baking. Crispy, salty, *chef’s kiss*.
5 Fun Twists to Make It Your Own
1. Italian Stallion: Swap cumin/paprika for 1 tbsp dried oregano + 1 tsp fennel seeds. Perfect for meatballs!
2. Smoky BBQ: Replace coconut aminos with ¼ cup BBQ sauce + ¼ cup water. Add 1 tsp liquid smoke to wet mix.
3. Gluten-Free Hack: Can’t do wheat? Use 4 cups cooked brown lentils (drained VERY well). Bake 15 mins less—still delish!
4. “Sausage” Style: Add 1 tbsp maple syrup + ½ tsp sage + ¼ tsp red pepper flakes to wet ingredients.
5. Low-Sodium Love: Use low-sodium tamari + skip liquid aminos. Boost flavor with 2 tbsp tomato paste.
Olivia’s Kitchen Confessions
This recipe was born from a “kitchen disaster” win! Years ago, I botched a seitan roast—it crumbled like sad gravel. But when I tossed those bits into chili? Mind blown. After 27 tests (yes, 27!), we landed on this formula. Now, I double-batch monthly. Pro tip: Freeze crumbles flat in bags—they thaw in minutes! Funny story: My dog, Butters, once stole a cooling sheet. I found him hiding behind the sofa, looking VERY guilty (he’s fine, but now I use oven locks!). Moral? Guard your crumbles. They’re that good.
The Science Behind the Perfect Vegan Beef Crumbles
Ever wonder what makes these vegan beef crumbles so convincingly meaty? It all comes down to vital wheat gluten, the powerhouse ingredient that gives this recipe its signature chew. When mixed with water and kneaded, gluten forms a stretchy, elastic network—similar to the protein structure in animal meat. This is why seitan (the food made from gluten) has been a staple in Asian cuisine for centuries, often used as a meat substitute in Buddhist temples.
But texture alone isn’t enough—flavor layering is key. The combination of nutritional yeast, umami-packed aminos, and spices mimics the deep, savory notes of beef. Nutritional yeast contributes a slightly cheesy, nutty taste, while liquid aminos (or soy sauce) provide the salty, fermented depth found in aged meats. The spices—cumin, paprika, and allspice—add warmth and complexity, tricking the brain into registering familiar meaty flavors.
Why baking > boiling? Many traditional seitan recipes boil the dough, but baking creates a superior texture. Boiling can lead to a spongy, uniform consistency, while baking dehydrates the exterior, creating crispy edges and a tender interior—just like pan-fried ground beef. The dry heat also intensifies the Maillard reaction, the chemical process responsible for browning and deepening flavors.
Pro Tip: For an even meatier texture, try adding 1 tbsp of beet powder to the dry mix. Not only does it enhance the color, but its slight earthiness reinforces the “beefy” illusion. And if you’re gluten-free? While vital wheat gluten is irreplaceable for chew, a blend of mashed lentils, chopped mushrooms, and oat flour can approximate the texture (though it won’t be identical).
Meal Prep Magic—How to Use Vegan Crumbles All Week
These crumbles are the ultimate meal-prep multitasker. Here’s how to turn one double batch into a week of effortless, flavor-packed meals:
1. Taco Tuesday (But Make It Wednesday… and Thursday):
Sauté crumbles with extra cumin, chili powder, and a splash of lime juice for instant taco filling. Serve with:
-
Classic fixings: Avocado, pickled onions, cilantro.
-
Breakfast twist: Scramble with tofu for a vegan “chorizo” burrito.
2. Pasta Night Savior:
Simmer crumbles in marinara sauce for a 10-minute bolognese. Or go creamy: Stir into cashew Alfredo with roasted garlic and spinach.
3. Soup & Stew Boost:
Add frozen crumbles directly to lentil soup, chili, or minestrone. They’ll thaw while cooking, absorbing broth flavors.
4. Salad Topper:
Pan-fry cooled crumbles until extra crispy, then sprinkle over kale Caesar or grain bowls for a protein crunch.
5. Freezer Hacks:
-
Portion into muffin tins (freeze, then pop out for single servings).
-
Make “meat”balls: Mix crumbles with breadcrumbs, flax egg, and Italian herbs, then freeze raw.
Pro Tip: For fast-food vibes, mix crumbles with vegan mayo, ketchup, and diced pickles for a sloppy Joe sandwich—kid-approved!
The Global Flavor Remix—5 Cultural Twists
Why stop at Tex-Mex? These crumbles are a blank canvas for global flavors:
1. Korean BBQ:
Toss baked crumbles with 1 tbsp gochujang, 1 tsp sesame oil, and 1 minced garlic clove. Serve over rice with quick-pickled cucumbers.
2. Indian Keema:
Sauté with 1 tbsp garam masala, ½ cup peas, and diced tomatoes. Stuff into toasted pita or serve with coconut yogurt.
3. Italian “Sausage”:
Add 1 tsp fennel seeds + ½ tsp red pepper flakes to the dry mix. Use in vegan lasagna or stuff into bell peppers.
4. Jamaican Jerk:
Marinate crumbles in 2 tbsp jerk seasoning + 1 tbsp maple syrup before baking. Pair with mango salsa and coconut rice.
5. Greek Gyro:
Season with 2 tsp dried oregano + 1 tsp lemon zest. Stuff into pitas with tzatziki (use vegan yogurt + grated cucumber).
Pro Tip: For umami overload, mix crumbles with 1 tbsp miso paste + 1 tbsp tahini before baking. Instant depth!
Your Questions—Answered!
Q: Why are my crumbles rubbery?
A: Over-kneading is the culprit! Gluten gets too tight. Mix just until combined—90 seconds max. If it happens, chop crumbles smaller next bake.
Q: Can I air-fry these?
A: Yes! Spread crumbles in a single layer (work in batches). Air-fry at 375°F for 10-12 mins, shaking halfway. They’ll be extra crispy!
Q: How long do they keep?
A: Fridge: 5 days in airtight containers. Freezer: 3 months! Thaw overnight in fridge or add frozen to soups/sauces.
Q: Too salty for me. Help?
A: Reduce liquid aminos to ¼ cup and use low-sodium veg broth instead of water. Taste dough before baking—add more spices if needed!

Vegan Ground Beef Crumbles
- Total Time: 45 minutes
Description
Hey kitchen friend! Olivia here, bringing you the ultimate flavor flex: Vegan Ground Beef Crumbles. With a bold, savory kick and a dreamy, meaty chew, these beauties are perfect for tacos, lasagna, pizza, or just sneaking from the tray. One bowl, two pans, and zero stress—let’s turn pantry staples into weeknight magic!
Ingredients
-
4 cups vital wheat gluten
-
½ cup nutritional yeast
-
2 tbsp onion powder
-
2 tbsp garlic powder
-
2 tsp ground cumin
-
2 tsp paprika (or smoked)
-
½ tsp black pepper
-
¼ tsp cayenne
-
¼ tsp allspice
-
1½ cups water or broth
-
½ cup liquid aminos (or tamari/soy sauce)
-
½ cup coconut aminos (or ¼ cup liquid aminos + ¼ cup maple syrup)
-
2 tbsp apple cider vinegar
Instructions
-
Preheat oven to 350°F (175°C).
-
Whisk dry ingredients in a large bowl.
-
Whisk wet ingredients in another bowl until foamy.
-
Pour wet into dry, mix gently just until combined.
-
Knead 1–2 mins, then pinch into marble-sized crumbles.
-
Spread on two parchment-lined baking sheets.
-
Bake 25–30 mins, stirring halfway, until browned and crisp.
-
Cool completely, then store in fridge or freezer.
Notes
-
Use smoked paprika or mushroom powder for depth
-
No coconut aminos? Mix soy sauce + maple syrup
-
Gluten-free? Try crumbled lentils or tofu instead
-
Want spice? Add chili flakes to the mix
-
Freeze flat in bags for quick reheating
- Prep Time: 15 mins
- Cook Time: 30 mins
Nutrition
- Fat: 1g
- Carbohydrates: 5g
- Fiber: 2g
- Protein: 21g
Nutritional Per Serving (approx. ½ cup)
Calories: 130 | Protein: 21g | Carbs: 5g | Fat: 1g | Fiber: 2g | Sodium: 300mg
Note: Sodium varies based on aminos used. Gluten-free version will differ.
Final Thoughts: Why This Recipe Wins Every Time
This isn’t just a recipe—it’s a kitchen revolution. Whether you’re vegan, flexitarian, or just hungry, these crumbles deliver on flavor, texture, and versatility. They’re cheaper than store-bought alternatives, freeze like a dream, and—most importantly—make plant-based eating joyful, not sacrificial.
So next time someone says, “I could never go vegan,” hand them a taco stuffed with these crumbles. Watch their eyebrows rise. Then smile and say, “Told you we’d make magic.”
Recent Posts
- Thai Shrimp Lettuce Wraps : Fresh, Flavorful & Ready in 20 Minutes

- Easy Hawaiian Pineapple Cake with Cream Cheese Frosting

- Strawberry Rhubarb Pie : A Sweet & Tangy Classic with a Flaky Crust

- Crispy Seafood Egg Rolls : Golden, Crunchy & Loaded with Flavor

- Chocolate Dump Cake : Rich, Gooey, and Amazingly Easy
