
Roasted Garlic Spaghetti Squash Lasagna Boats
When Comfort Food Gets a Cozy (and Clever!) Makeover
Hey there, kitchen friend! Olivia here, apron slightly dusted with Parmesan and probably humming an old Italian tune. Ever have one of those days where only a big, bubbly lasagna will do… but your energy (or your waistband) whispers, “Maybe not today”? That’s exactly where these Roasted Garlic Spaghetti Squash Lasagna Boats sailed into my life – and I’m utterly obsessed with sharing them with you. Imagine: golden-roasted spaghetti squash halves, transformed into edible bowls cradling layers of savory meat sauce, creamy ricotta bursting with sweet roasted garlic, and that glorious blanket of melted mozzarella. It’s all the soul-warming, crowd-pleasing magic of Sunday lasagna, but lighter, brighter, and ready in just over an hour. No fancy skills needed, just a love for big flavors and cozy vibes. Whether you’re feeding your crew, meal-prepping like a boss, or just craving Italian night without the carb coma, these little boats are your delicious secret weapon. Ready to set sail? Grab your fork – let’s get cooking!
A Squash, a Spark, and a Happy Accident
This recipe actually started with a happy little kitchen mishap! Picture it: a few winters ago, deep in the cozy chaos of my tiny apartment kitchen, I was testing a stuffed spaghetti squash recipe. My goal was simple veggie goodness. But then… disaster (or destiny?) struck. I accidentally roasted the squash *too* long. Instead of firm strands, I had this gloriously soft, almost nest-like base. My mind instantly flashed to lazy lasagna layers. I had some leftover Sunday meat sauce in the fridge, a tub of ricotta, and a head of garlic begging to be roasted. On pure instinct, I scraped, layered, cheezed, and baked it all right back into the squash shells. The result? Pure, bubbling, cheesy euphoria! My husband took one bite, eyes wide, and declared, “This tastes like lasagna hugged a vegetable!” That messy, accidental creation became an instant family legend – proof that sometimes the best recipes are born from a little imperfection and a lot of hungry inspiration.
Your Flavor Crew: What You’ll Need
Gathering your ingredients is like inviting your favorite flavor friends to a party! Here’s the lineup, with my chef-y notes to guide you:
- 2 medium spaghetti squash, halved and seeds removed: Look for firm, yellow squash that feel heavy for their size. They’re your edible bowls! *Pro Tip:* Microwave each half for 2-3 minutes before cutting if wrestling with a knife feels daunting.
- 1 head garlic: Roasting transforms it into sweet, mellow gold. Essential for that deep flavor base!
- 2 tbsp olive oil: Good quality EVOO makes everything better. Divided use: some for the squash, some for the garlic.
- Salt and pepper, to taste: Season every layer! Kosher salt and freshly cracked black pepper are my ride-or-dies.
- Ricotta Layer: The creamy dream team!
- 1 cup ricotta cheese: Whole milk ricotta gives the richest texture. *Sub Alert:* Cottage cheese (blended smooth) works in a pinch, or try goat cheese for tang!
- ¼ cup grated Parmesan: Adds salty, nutty depth. Use the real stuff, not the shaker can!
- 1 egg: The binder! Helps the ricotta layer set beautifully. *Insight:* Bring it to room temp for easier mixing.
- 1 tsp Italian seasoning: Your flavor shortcut! Or mix your own with dried oregano, basil, thyme, and rosemary.
- Meat Sauce: Hearty and robust!
- 1 lb ground beef or Italian sausage: Sausage adds fantastic spice! *Lean Swap:* Ground turkey or chicken work great too. *Veggie Power:* Use 2 cups cooked lentils or crumbled tofu.
- 1 small onion, diced: Sweet foundation. Yellow or white onion is perfect.
- 2 cups marinara sauce: Your favorite jarred sauce is FINE! Or use homemade. *Flavor Boost:* Stir in 1 tbsp tomato paste for extra richness.
- 1 tsp dried basil: Complements the Italian seasoning. Fresh basil works too (use 1 tbsp).
- Topping: The melty crown!
- 1½ cups shredded mozzarella: Low-moisture shreds melt best. *Cheesy Swap:* Provolone, fontina, or a blend are delish.
- Fresh basil, for garnish: That pop of color and fresh aroma! Non-negotiable for me.
Let’s Build Those Flavor Boats! Step-by-Step
Okay, crew! Let’s transform these humble ingredients into golden, cheesy masterpieces. Follow along – I’ve packed each step with my favorite kitchen hacks:
- Roast the Squash & Garlic (The Flavor Foundation!): Preheat your oven to 400°F (200°C). Place your squash halves cut-side-up on a baking sheet. Drizzle the cut surfaces with about 1 tbsp of the olive oil and rub it in. Season generously with salt and pepper. Take the whole head of garlic, slice off the very top (about 1/4 inch) to expose the cloves, drizzle the exposed cloves with the remaining 1 tbsp olive oil, and wrap it tightly in a little foil packet. Pop the squash and the garlic packet onto the baking sheet. Roast for 35-40 minutes. *HACK ALERT:* Place the squash cut-side DOWN for the first 25 minutes, then flip them cut-side UP for the last 10-15. This steams them initially for easier scraping, then crisps the edges! The squash is done when a fork easily pierces the flesh, and the garlic should feel super soft.
- Simmer the Hearty Meat Sauce: While the squash roasts, let’s make the sauce! Heat a large skillet over medium-high heat. Add the ground beef or sausage and the diced onion. Cook, breaking up the meat with a spoon, until the meat is browned and the onion is soft (about 5-7 minutes). Drain any excess grease if needed. Stir in the marinara sauce and dried basil. Bring to a gentle simmer, then reduce the heat to low and let it bubble away for about 10 minutes. This lets the flavors marry beautifully! *CHEF TIP:* Taste and adjust seasoning now – does it need a pinch more salt? A crack of pepper? Make it yours!
- Whip Up the Dreamy Ricotta Layer: In a medium bowl, combine the ricotta, grated Parmesan, egg, and Italian seasoning. Use a fork to mix it until just combined – don’t overmix! *INSIGHT:* Letting this sit for 5-10 minutes while you prep the squash helps the flavors meld.
- Unlock the Squash & Embrace the Garlic Gold: Carefully remove the baking sheet from the oven. Let the squash cool for a few minutes until you can handle them. Use a fork to scrape the flesh – you’ll see those gorgeous spaghetti-like strands appear! Scrape them gently, loosening them but leaving them *in* the squash shell – you’re creating a nest, not removing it. Fluff the strands slightly. Now, unwrap your garlic! It should be golden brown and incredibly soft. Squeeze the base of the head to push the sweet, caramelized roasted garlic paste directly into the ricotta mixture. Stir it in thoroughly – this is FLAVOR MAGIC!
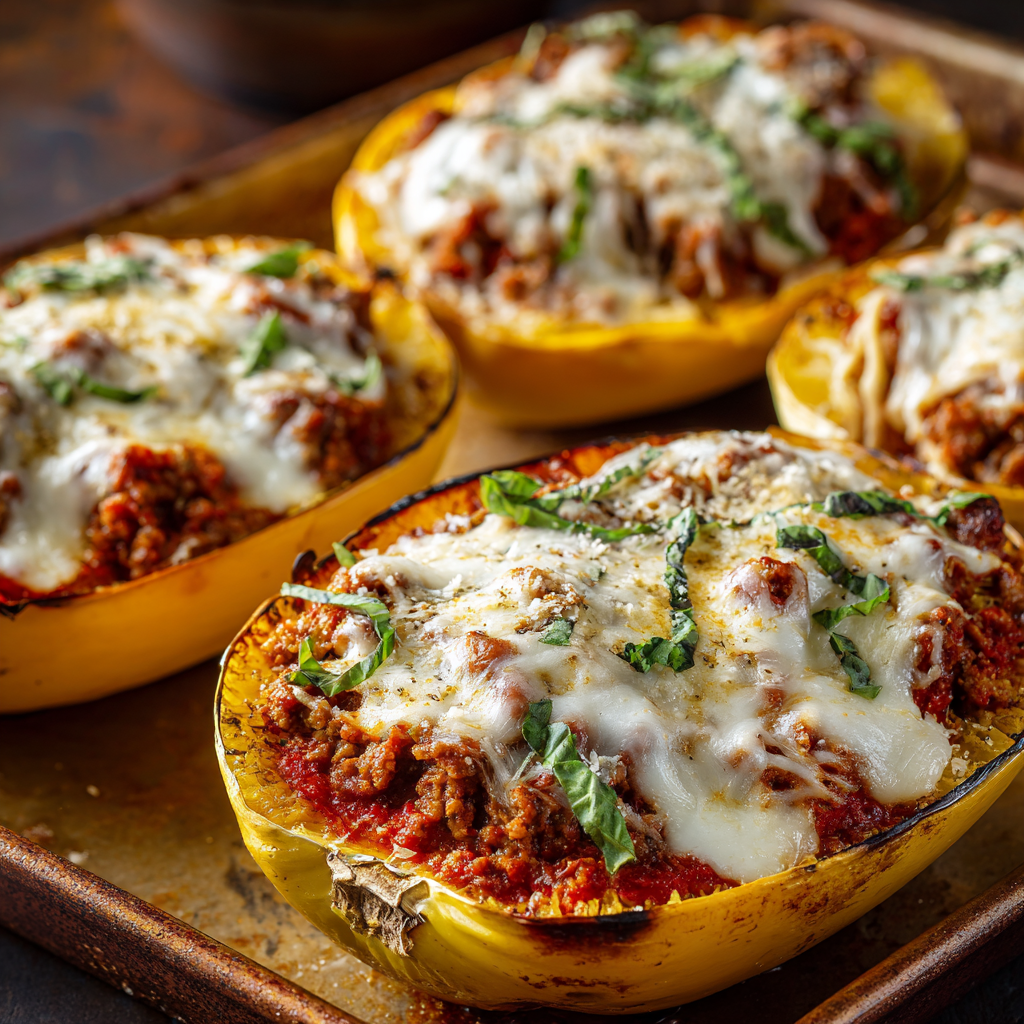
- Layer Up Your Lasagna Boats: Time for assembly! Divide the creamy roasted garlic ricotta mixture evenly among the four squash halves, spreading it over the bottom of the “nests.” Next, spoon the hearty meat sauce evenly over the ricotta layer. Finally, crown each boat generously with the shredded mozzarella. *PRO PRESENTATION TIP:* Press the cheese down lightly to help it melt evenly and stay put.
- Melt & Bubble to Perfection: Return the loaded squash boats to the oven (still at 400°F). Bake for 10-15 minutes, or until the cheese is gloriously melted, bubbly, and maybe even starting to get those irresistible golden-brown spots. *WATCH CLOSELY:* Ovens vary, and cheesy goodness can go from perfect to overdone quickly!
- Garnish & Serve the Comfort: Carefully remove the boats from the oven (they’ll be hot!). Let them rest for just 2-3 minutes – this helps the layers set slightly. Tear or chiffonade some fresh basil and sprinkle it generously over the top. *SERVE PROMPTLY:* These beauties are best enjoyed hot, right out of the oven, when the cheese is at its most stretchy and tempting!
Setting Sail: How to Serve Your Masterpiece
Presentation is half the fun! Slide each squash boat onto a dinner plate – their natural bowls make serving effortless. They’re a complete meal superstar all on their own! For a little extra flair, add a simple side salad tossed in a bright lemon vinaigrette to cut through the richness. A slice of crusty garlic bread is *never* a bad idea for mopping up any stray sauce. If you’re feeling fancy, sprinkle a little extra grated Parmesan or a drizzle of good olive oil right at the table. Remember, these boats are meant to be dug into with gusto – provide big spoons and forks, and watch those happy faces light up!
Mix It Up! Delicious Twists on the Classic
Love the base recipe? Try these fun spins next time!
- Vegetarian Fiesta: Skip the meat! Sauté mushrooms, zucchini, and bell peppers with the onion, then mix into the marinara. Add a handful of spinach to the ricotta layer.
- Chicken Alfredo Dream: Swap the meat sauce for cooked shredded chicken tossed in a creamy Alfredo sauce. Add a pinch of nutmeg to the ricotta for depth.
- Pesto Powerhouse: Stir 2 tbsp of basil pesto into the ricotta mixture instead of the Italian seasoning. Use a lighter tomato sauce or skip it for a vibrant green twist.
- Tex-Mex Fiesta Boat: Season ground beef with taco seasoning. Use salsa instead of marinara. Mix black beans and corn into the “meat” sauce. Top with pepper jack cheese and avocado after baking.
- Cheesier & Lighter: Swap half the ricotta for low-fat cottage cheese (blended smooth). Add a layer of part-skim shredded Italian cheese blend under the mozzarella.
Olivia’s Kitchen Confessions & Pro Musings
Okay, full disclosure: the first time I made these, I got *so* excited about the roasted garlic that I squeezed the entire head in… only to realize it was a HUGE head! The ricotta turned almost fluorescent yellow and was *intensely* garlicky (like, vampire-repelling level!). My husband still teases me about “Garlic Bomb Boats.” Lesson learned: taste as you go! Over the years, this recipe has become my go-to for potlucks – it travels surprisingly well pre-assembled (just bake at your destination!). I also love doubling the roasted garlic step – an extra head wrapped in foil alongside the first. That sweet, caramelized paste is gold stirred into soups, mashed potatoes, or just smeared on crusty bread. The biggest evolution? Embracing the “rustic” look. These boats aren’t meant to be perfect cylinders – embrace the slightly messy, cheesy, vegetable-forward glory! It’s homemade comfort, not a food magazine shoot.
Your Questions, Answered!
Let’s tackle those common kitchen hiccups before they happen:
- Q: My squash is still really hard after 40 minutes! Help!A: Squash sizes vary wildly! If it’s not fork-tender, just pop it back in for 5-10 minute intervals. The flip hack (cut-side down first) really helps ensure even cooking. If your oven runs cool, bump the temp to 425°F next time.
- Q: Can I make these ahead of time?A: Absolutely! Roast the squash and garlic, make the meat sauce, and mix the ricotta base (hold off on adding the roasted garlic until assembly). Store components separately in the fridge for up to 2 days. Assemble the boats cold, then bake – you might need an extra 5-10 minutes since they start cold.
- Q: Why add an egg to the ricotta? Can I skip it?A: The egg helps bind the ricotta mixture, preventing it from becoming watery and giving it a slightly firmer, more cohesive texture as it bakes. You *can* skip it, especially if using very thick ricotta. Your layer might just be a bit looser.
- Print

Roasted Garlic Spaghetti Squash Lasagna Boats
- Total Time: 1 hr 10 min
Description
This is what happens when comfort food gets clever. Think tender spaghetti squash turned into edible lasagna bowls, layered with roasted garlic ricotta, rich meat sauce, and bubbling mozzarella. It’s rustic, cozy, and shockingly simple—with all the flavor, none of the pasta nap needed.
Ingredients
Scale-
2 medium spaghetti squash, halved & seeded
-
1 head garlic
-
2 tbsp olive oil (divided)
-
Salt & pepper
Ricotta Layer
-
1 cup whole-milk ricotta
-
¼ cup grated Parmesan
-
1 egg
-
1 tsp Italian seasoning
Meat Sauce
-
1 lb ground beef or Italian sausage
-
1 small onion, diced
-
2 cups marinara sauce
-
1 tsp dried basil
Topping
-
1½ cups shredded mozzarella
-
Fresh basil, for garnish
Instructions
-
Roast Squash & Garlic: Preheat oven to 400°F. Drizzle squash halves with olive oil, season with salt & pepper. Roast cut-side down for 25 mins, then flip and roast 10–15 more. Roast garlic (wrapped in foil with olive oil) alongside until soft.
-
Make Sauce: Brown meat with onion (5–7 mins). Stir in marinara and basil. Simmer 10 mins.
-
Ricotta Mix: Combine ricotta, Parmesan, egg, seasoning, and roasted garlic squeezed from the bulb.
-
Scrape Squash: Fluff cooked squash with a fork but leave in shell.
-
Assemble Boats: Spread ricotta in each squash half, then meat sauce. Top with mozzarella.
-
Bake Again: Return to oven 10–15 mins until cheese is bubbly and golden.
-
Finish: Rest 3 mins. Garnish with basil. Serve hot!
Notes
-
Too garlicky? Start with half the head, taste, and adjust.
-
Make ahead: Assemble, chill, and bake just before serving.
-
Swap it up: Use ground turkey, plant-based meat, or pesto ricotta!
-
Leftovers? Reheat uncovered to keep the cheese crispy.
- Prep Time: 20 min
- Cook Time: 50 mins
Nutrition
- Calories: 520 cal Per Serving
- Fat: 33g
- Carbohydrates: 22g
- Fiber: 5g
- Protein: 35g
-
Final Thoughts: Comfort Food, Reimagined
These Spaghetti Squash Lasagna Boats are more than a recipe – they’re a mindset shift. They prove that:
-
Healthy-ish can still be decadent (thank you, molten mozzarella).
-
Mistakes spark genius (over-roasted squash = happy accident).
-
Weeknight dinners deserve celebration (especially when they look this impressive).
So whether you’re craving classic Italian flavors or eager to experiment, remember: the best meals aren’t about perfection. They’re about that moment when you scoop into a golden, cheesy boat and think, “I made this?!” Now go forth and roast with abandon!
-
Instant Pot Pesto Zuppa Toscana
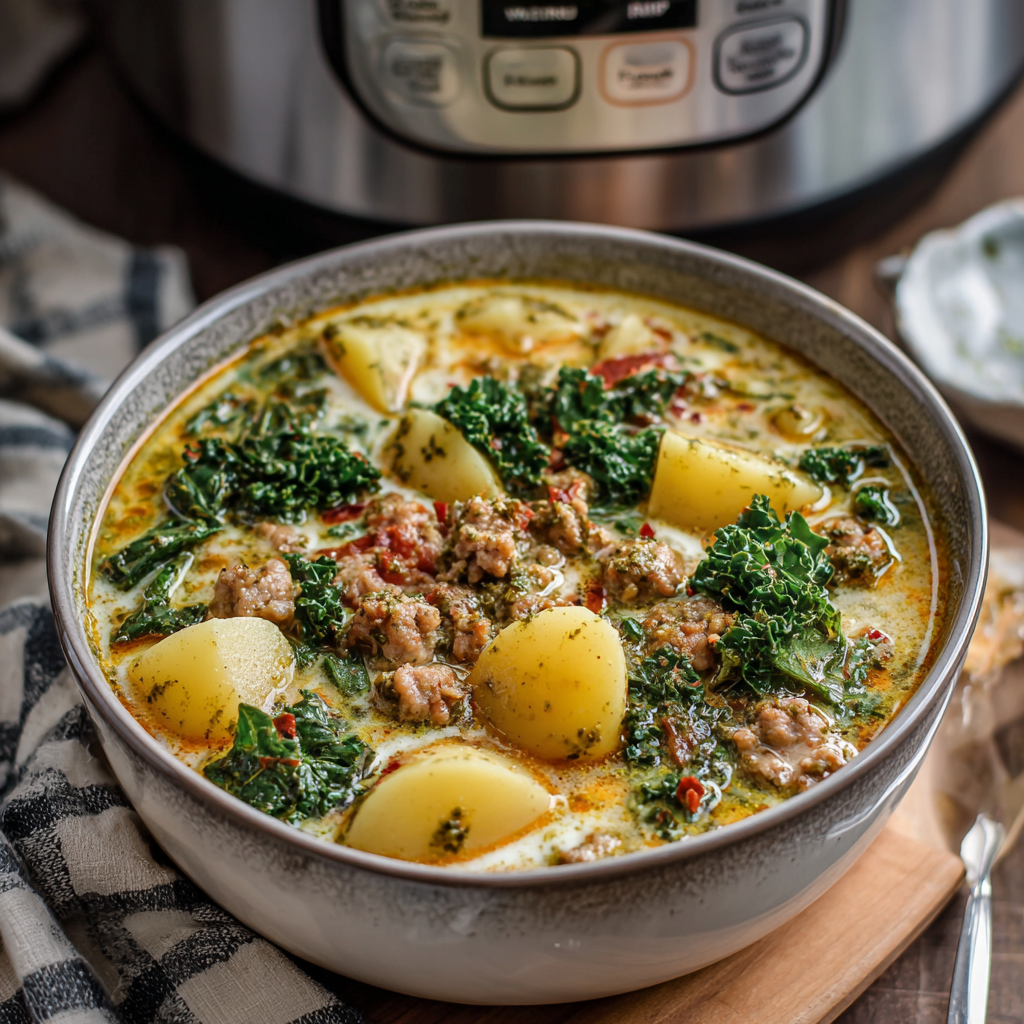
Instant Pot Pesto Zuppa Toscana: Cozy Comfort in 30 Minutes Flat!
Hey there, kitchen friends! Olivia here, apron slightly dusted with flour (as usual), ready to share one of my all-time favorite weeknight miracles. Picture this: It’s 5:30 PM, your stomach’s rumbling, and you’re craving something that tastes like it simmered all day—but you’ve got maybe 30 minutes tops. Enter this Instant Pot Pesto Zuppa Toscana! This isn’t just any soup; it’s a hug in a bowl with a genius Italian flair. We’re talking spicy sausage, buttery Yukon golds, vibrant kale, all swimming in a creamy broth that gets a flavor bombshell from basil pesto. The magic? Your Instant Pot does the heavy lifting while you kick back. No fancy skills needed—just big, soul-warming flavors that’ll make everyone at your table ask for seconds. Let’s turn pantry staples into something extraordinary together!
Why do I adore this recipe? Because it’s proof that busy schedules and homemade joy can absolutely coexist. That pesto swirl? It transforms classic Zuppa Toscana from comforting to “WOW” with zero extra effort. Whether you’re feeding a crowd after soccer practice or just need a cozy solo dinner, this soup’s your ticket to flavor town. So grab your Instant Pot—and maybe a crusty loaf for dipping—we’re making magic happen!
My Tuscan “Aha!” Moment
Let me take you back to a tiny trattoria in Florence, where I first fell head-over-heels for Zuppa Toscana. It was raining, I was jet-lagged, and one spoonful of that rustic sausage-and-kale soup made everything right. Fast-forward to last winter: I was recreating it at home when my basil plant practically begged to be used. On a whim, I swirled pesto into the pot. Game. Changer. That bright, herby kick cut through the richness like sunshine! Now, it’s a staple in our house—my kids call it “Confetti Soup” because the pesto makes it look so happy. Every time that garlicky aroma fills the kitchen, I’m back in that cozy Tuscan alley, but now I get to share that magic with you.
Your Flavor Toolkit: Ingredients & Smart Swaps
- 1 lb Italian sausage (mild or spicy) – The flavor anchor! Spicy adds a kick, but mild lets the pesto shine. Chef’s tip: Remove casings for perfect crumbles! Swap: Turkey sausage or plant-based crumbles.
- 1 small onion, diced – Sweetness base. Yellow or white works! Swap: 1 tsp onion powder in a pinch.
- 3 garlic cloves, minced – Non-negotiable for depth! Chef’s hack: Use a microplane for super-fine mincing.
- 4–5 cups chicken broth – Low-sodium recommended so you control the salt. Swap: Veggie broth for vegetarian versions.
- 1½ lbs Yukon gold potatoes – Their buttery texture holds up beautifully. Insight: Chop evenly (1-inch cubes) for consistent cooking! Swap: Red potatoes.
- 1 tsp salt + ½ tsp black pepper – Season in layers! Adjust at the end.
- 1½ cups chopped kale – Sturdy greens that won’t wilt to mush. Tip: Remove woody stems! Swap: Spinach (add at the very end).
- ¾ cup heavy cream or half-and-half – For luscious body. Half-and-half lightens it up slightly. Swap: Coconut milk for dairy-free (adds subtle sweetness).
- ⅓ cup basil pesto + extra for serving – The star twist! Use store-bought or my homemade pesto. Chef’s secret: Stir in last to preserve that fresh herb pop!
- Grated Parmesan & red pepper flakes (optional) – For serving. Because cheese is life.
Why this combo rocks: Sausage = savory depth, pesto = herbal brightness, cream = velvety balance. It’s the trifecta!
Let’s Cook! Effortless Instant Pot Magic
- Sizzle that sausage! Set your Instant Pot to “Sauté” (Normal mode). Add sausage, breaking it into small crumbles with a wooden spoon. Cook 5-6 minutes until browned. Chef’s hack: No oil needed—sausage has enough fat! Drain excess grease if it looks more than 1 tbsp.
- Build the base: Add onion and garlic. Sauté 2-3 minutes until fragrant and soft—don’t let garlic burn! Tip: Deglaze the pot with a splash of broth, scraping any browned bits (that’s flavor gold!).
- Potato power: Stir in potatoes, salt, pepper, and broth. Ensure potatoes are mostly submerged (4 cups broth for thicker soup; 5 for brothier). Insight: The potatoes will absorb salt, so we’ll adjust later!
- Pressure cook: Seal lid, set valve to “Sealing.” Pressure Cook on HIGH for 10 minutes. Chef’s note: It takes 10-15 mins to pressurize—that’s normal!
- Quick release: Carefully turn valve to “Venting” once timer beeps. Safety first: Use a towel to shield your hand from steam!
- Creamy finish: Stir in kale and cream. Hit “Cancel,” then select “Keep Warm.” Let sit uncovered 5-10 minutes—kale wilts perfectly without overcooking! Hack: This prevents curdling and keeps cream silky.
- Pesto party: Swirl in pesto just before serving. Big flavor tip: DON’T boil after adding—heat dulls pesto’s vibrancy!
Timing pro-tip: Prep potatoes/onions while sausage browns for lightning speed!
Making It Pretty (Because We Eat With Our Eyes!)
Ladle this emerald-green beauty into deep bowls. Top with extra pesto swirls, a snowfall of Parmesan, and a pinch of red pepper flakes for heat lovers. My must-have sides: crusty garlic bread for dunking (hello, broth heaven!) and a simple arugula salad with lemon vinaigrette to cut the richness. For gatherings, serve with pesto and Parmesan on the side so everyone can customize. Bonus coziness: Pre-warm bowls in the microwave for 30 seconds—hot soup stays hot longer!
Make It Your Own: 5 Delicious Twists
- Vegetarian Wonder: Swap sausage for 1.5 cups white beans (cannellini or Great Northern) + 1 tsp fennel seeds. Use veggie broth!
- Lightened Up: Turkey sausage + half-and-half instead of cream. Still creamy, less guilt!
- Pesto Remix: Try sun-dried tomato pesto or kale-walnut pesto. Each adds a unique personality!
- Extra Veggie Boost: Add 1 cup diced carrots or celery with the onions. More nutrients, same great vibe.
- Spicy Lover’s Dream: Use hot sausage + add ¼ tsp cayenne with broth. Top with extra red pepper flakes!
Olivia’s Kitchen Confessions
True story: The first time I tested this, I accidentally used cilantro pesto (don’t ask how!). Verdict? Surprisingly delicious, but my Italian nonna would’ve side-eyed me hard. Over time, I’ve learned: Underseason at first—broth reductions vary! Always taste after pressure cooking and add salt if needed. Also, if your pesto is very thick, thin it with 1 tsp broth before swirling for prettier ribbons. This recipe’s a chameleon—it’s survived my experiments with sweet potatoes (too soft, FYI) and even a desperate kale-substitution-with-spinach moment. It always delivers comfort!
The Science Behind the Magic: Why This Recipe Works
Ever wonder why this soup tastes like it simmered for hours when it only took 30 minutes? Let’s geek out on the culinary science:
1. Pressure Cooking = Flavor Compression
The Instant Pot’s high-pressure environment forces liquid into ingredients faster than traditional cooking. Potatoes absorb broth while cooking, becoming infused with savory depth in record time. That’s why 10 minutes under pressure equals 45 minutes of stovetop simmering!
2. Pesto’s Late Entry = Brightness Preserved
Basil’s delicate flavor compounds (like linalool) break down under heat. By stirring in pesto at the end, we preserve its vibrant, garden-fresh aroma. The fat in the pesto (oil, nuts, cheese) also binds with the soup’s cream for a luxuriously smooth texture.
3. Kale’s Structural Advantage
Unlike delicate spinach, kale contains sturdy cellulose fibers that hold up to heat. Adding it post-pressure cooking lets it wilt just enough to be tender without turning to sludge. Bonus: Kale’s slight bitterness balances the richness.
4. Sausage Fat = Built-In Flavor Base
Browning sausage first renders its fat, which then carries the garlic and onion flavors. This creates a fond (those browned bits at the bottom) that dissolves into the broth, adding complex umami. No extra oil needed!
Pro Tip: For even deeper flavor, deglaze with 1/4 cup white wine before adding broth—the acidity brightens the dish.
Meal Prep & Storage Hacks
Make-Ahead Magic:
-
Full Prep: Cook the soup (minus cream/pesto) up to 3 days ahead. Store broth and solids together—the potatoes will soak up more flavor! Reheat gently, then add dairy and pesto.
-
Freezer Friendly: Portion cooled soup (sans dairy/pesto) in freezer bags. Lay flat to save space. Thaw overnight, then add fresh cream and pesto when reheating.
Ingredient Prep Shortcuts:
-
Pre-Chopped Veggies: Grab pre-diced onions and minced garlic from the salad bar to save 5 minutes.
-
Sausage Savvy: Form bulk sausage into a log, freeze, then slice into coins for faster browning.
-
Kale Trick: Massage chopped kale with 1 tsp olive oil before storing—it stays fresher longer.
Reviving Leftovers:
-
Too Thick? Add broth or cream when reheating.
-
Lost Vibrancy? Freshen with a new swirl of pesto.
-
Cream Separation? Blend briefly with an immersion blender.
Single-Serve Idea: Pour individual portions into mason jars (leave 1-inch headspace). Refrigerate for easy grab-and-go lunches—just shake and microwave!
Troubleshooting & Customizations
Common Issues Fixed:
-
Broth Too Thin? Mash a few potatoes against the pot’s side to thicken naturally.
-
Too Spicy? Stir in 1 tsp honey or maple syrup to tame the heat.
-
Pesto Too Strong? Mix it with 1 tbsp cream before adding to mellow the flavor.
Dietary Twists:
-
Keto: Swap potatoes for diced radishes or turnips (pressure cook 8 mins). Use full-fat coconut milk.
-
Paleo: Omit dairy—use coconut milk + 1 tbsp nutritional yeast for creaminess.
-
Gluten-Free: Ensure sausage and broth are GF-certified (some contain fillers).
Global Flavor Adventures:
-
Greek Style: Use lamb sausage + mint pesto + feta garnish.
-
Thai-Inspired: Swap Italian sausage for ground pork + red curry paste. Use cilantro-cashew pesto.
-
Mexican Twist: Chorizo sausage + pepita pesto + avocado garnish.
Kid-Friendly Version:
-
Skip red pepper flakes
-
Use mild sausage
-
Blend the soup smooth with extra cream (they’ll never spot the kale!)
Your Soup Questions, Answered!
Q: Can I make this dairy-free?
A: Absolutely! Swap cream for full-fat coconut milk (the canned kind). Skip Parmesan or use nutritional yeast. Pro tip: Chill the can first—use the thick cream part only for best texture.
Q: Why did my cream curdle?
A: Likely added while the soup was too hot! After pressure cooking, let the pot sit 2 minutes before stirring in cream. The “Keep Warm” function gently incorporates it. If it curdles slightly, blend 1 cup of soup until smooth and stir back in—it’ll rescue the texture!
Q: Can I freeze leftovers?
A: Cream-based soups can get grainy when frozen. For best results, freeze before adding cream and pesto. Thaw, reheat, then stir them in fresh.
Q: My potatoes are undercooked! Help?
A: Potatoes vary in starch content. If they’re still firm after pressure cooking, seal the pot again and cook 2-3 extra minutes. Quick release immediately after.

Instant Pot Pesto Zuppa Toscana
- Total Time: 30 min
Description
This is your 30-minute answer to a long day: savory sausage, creamy potatoes, vibrant kale, and a swirl of fresh pesto that turns cozy into gourmet. It’s got Tuscan heart, Instant Pot speed, and just enough magic to make your kitchen smell like an Italian hug.
Ingredients
-
1 lb Italian sausage (mild or spicy)
-
1 small onion, diced
-
3 garlic cloves, minced
-
1½ lbs Yukon gold potatoes, cubed
-
4–5 cups low-sodium chicken broth
-
1 tsp salt + ½ tsp black pepper
-
1½ cups chopped kale (stems removed)
-
¾ cup heavy cream or half-and-half
-
⅓ cup basil pesto + extra for serving
-
Grated Parmesan & red pepper flakes (optional)
Instructions
-
Sauté Sausage: Set Instant Pot to Sauté. Cook sausage until browned (5–6 mins). Drain excess grease.
-
Add Veggies: Stir in onion and garlic. Sauté 2–3 mins until soft. Deglaze with a splash of broth, scraping browned bits.
-
Pressure Cook: Add potatoes, salt, pepper, and broth. Seal lid. Cook on HIGH for 10 mins. Quick release pressure.
-
Finish: Stir in cream and kale. Let sit on “Keep Warm” for 5–10 mins to wilt kale. Swirl in pesto just before serving.
-
Serve: Top with extra pesto, Parmesan, and red pepper flakes. Serve with crusty bread.
Notes
-
Dairy-free? Use coconut milk and skip cheese.
-
Extra rich? Add more pesto and finish with a butter swirl.
-
Freezing? Hold pesto and cream until reheating.
-
Spice it up! Use hot sausage or add cayenne.
- Prep Time: 10 min
- Cook Time: 20 min
Nutrition
- Calories: 430 cal Per Serving
- Fat: 30g
- Carbohydrates: 24g
- Fiber: 3g
- Protein: 18g
Nutritional Info (Per Serving)
Calories: ~430 | Carbs: 24g | Fat: 30g | Protein: 18g | Fiber: 3g
Note: Using turkey sausage and half-and-half reduces calories to ~350 and fat to 22g.
Final Thoughts: More Than Just Soup
This Pesto Zuppa Toscana is my edible security blanket—the recipe I make when I need comfort, when friends drop by unexpectedly, or when the weather turns gloomy. It’s proof that “quick” doesn’t have to mean “compromise,” and that one clever twist (looking at you, pesto!) can elevate a classic into something extraordinary.
The real magic? Watching my kids gobble up kale without complaint, seeing my husband swipe his bread around the bowl to catch every last drop, and that moment when first-time tasters pause mid-spoonful to say, “Wait—what’s IN this?!”
So whether you’re an Instant Pot newbie or a pressure-cooking pro, I hope this soup becomes your secret weapon too. Because everyone deserves a recipe that feels like a warm hug after a long day—no passport to Tuscany required.

Creamy Wild Rice Chicken Soup with Roasted Mushrooms
There’s Magic in That Bowl: Creamy Wild Rice Chicken Soup with Roasted Mushrooms
Hey there, friend! Olivia here, waving from my perpetually flour-dusted kitchen counter. Can you smell that? It’s the intoxicating blend of earthy roasted mushrooms, nutty wild rice, and creamy broth simmering away—the kind of aroma that wraps around you like your favorite chunky knit sweater. If your soul craves a hug in a bowl, especially when the wind howls or the rain taps insistently on the windowpane, you’ve landed in exactly the right spot. This Creamy Wild Rice Chicken Soup with Roasted Mushrooms isn’t just dinner; it’s an experience. It’s the culinary equivalent of curling up by the fire with a great book. We’re talking tender shreds of chicken, hearty grains with that delightful *pop*, mushrooms roasted until they’re little umami bombs, and a velvety broth that whispers comfort with every spoonful. Forget complicated techniques or fancy gadgets—this is pure, unfussy, soul-warming goodness. Whether you’re thawing out after sledding, soothing a sniffle, or simply needing a nourishing reset, this soup delivers. Grab your coziest apron (messy is totally encouraged here!), and let’s make something unforgettable together. Trust me, your kitchen’s about to smell incredible, and your people are going to be *very* happy.
A Bowl Full of Minnesota Memories
This soup? Oh, it takes me straight back to my grandma’s tiny, steam-fogged kitchen up in Minnesota. Every fall, when the air turned crisp enough to bite, she’d declare it “Wild Rice Season.” We’d pile into her old station wagon, drive to the Ojibwe harvesters selling rice by the roadside, and she’d buy a big brown paper bag full. Back home, she’d simmer it for hours with whatever chicken was left from Sunday supper. I remember standing on a wobbly stool, “helping” her stir, feeling like the most important chef in the world. The magic moment came when she’d pull roasted mushrooms from the oven – she swore creminis tasted like the forest floor after rain. One particularly blustery November day, after I’d face-planted spectacularly building a snow fort, she ladled out a steaming bowl. As I dunked buttered bread into that creamy, earthy goodness, scraped knees forgotten, I understood. This wasn’t just soup; it was her love language, a warm fortress against the cold. Making it now, I still feel her hand guiding mine, and I hope sharing it becomes your cozy tradition too.
Your Flavor Arsenal: What You’ll Need
Gather these goodies! Don’t stress about perfection – cooking’s an adventure, not a pop quiz.
- Olive oil or butter (2 tbsp): Our flavor-starter! Butter adds richness, olive oil brings a lovely fruitiness. Use what you love!
- Onion (1, diced): The sweet, aromatic base of so much goodness. Yellow or white works great.
- Carrots (2, chopped): Sweetness and color! No need to peel if they’re scrubbed clean.
- Celery stalks (2, chopped): That essential savory crunch. Use the leaves too – extra flavor!
- Garlic cloves (3, minced): Flavor bomb alert! Smash them first with your knife for easier mincing.
- Wild rice blend (1 cup, rinsed): Rinsing removes excess starch. *Chef Insight:* A blend (with brown/black rice) cooks more evenly than pure wild rice alone and gives fantastic texture!
- Low-sodium chicken broth (6 cups): Low-sodium is key – you control the salt! Veggie broth works for a swap.
- Shredded cooked chicken (2 cups): Rotisserie chicken is your weeknight hero here! Leftover roast chicken or poached breasts/thighs work beautifully.
- Dried thyme (1 tsp) & Bay leaf (1): Earthy, herby backbone. Tie them in cheesecloth for easy removal later!
- Salt and pepper (to taste): Season in layers – start light, adjust at the end.
- Heavy cream or half-and-half (1 cup): Cream = ultimate luxury, half-and-half = slightly lighter but still dreamy. *Sub Tip:* Full-fat coconut milk for dairy-free richness.
- Lemon juice (1 tbsp): The secret weapon! Brightens everything up – don’t skip it.
For the Roasted Mushroom Glory:
- Mushrooms (12 oz cremini or mixed, sliced): Cremini are my fave (meatier than white button), but mix in shiitake or oyster for fun! Slice evenly for consistent roasting.
- Olive oil (1 tbsp): Helps them crisp up beautifully.
- Soy sauce (1 tsp): *Chef Hack:* This isn’t for saltiness, it’s for deep, savory umami magic! Tamari for gluten-free.
- Fresh thyme (1 tsp) or dried (½ tsp), Salt & Pepper: Simple perfection. Fresh thyme leaves are lovely if you have them.
Let’s Get Simmering! Your Foolproof Steps
Ready? Deep breath, put on some tunes, and let’s cook!
- Roast Those ‘Shrooms! Preheat your oven to 400°F (200°C). On a rimmed baking sheet, toss the sliced mushrooms with 1 tbsp olive oil, 1 tsp soy sauce, thyme, and a pinch of salt and pepper. Spread them out in a single layer – crowding = steaming, not roasting! Roast for 20-25 minutes, stirring halfway, until deeply golden brown and crisp at the edges. *Chef Tip:* That soy sauce caramelizes into something incredible. Set these beauties aside – they’re the crowning glory!
- Sweat the Veggie Trio (The “Holy Trinity” Plus Garlic!): Heat 2 tbsp olive oil or butter in your largest, heaviest pot or Dutch oven over medium heat. Add the diced onion, chopped carrots, and chopped celery. Sauté, stirring occasionally, for 8-10 minutes until the onion is soft and translucent and the carrots are just starting to soften. *Chef Hack:* Add a tiny pinch of salt here – it helps draw out moisture and build flavor. Stir in the minced garlic and cook for just 1 minute more until fragrant – don’t let it burn!
- Rice & Broth Time – The Simmering Heart: Stir in the rinsed wild rice blend. Let it toast for about 1 minute, stirring constantly – you’ll smell its nuttiness! Pour in the 6 cups of low-sodium chicken broth. Add the dried thyme (if using fresh, reserve for garnish), bay leaf, and a good pinch of salt and pepper (remember, low-sodium broth!). Bring this glorious mixture to a lively boil.
- Low and Slow for Tender Grains: Once boiling, immediately reduce the heat to low. Cover the pot tightly. Let it simmer gently for 45-50 minutes. *Chef Insight:* Resist the urge to peek too often! We need steady heat and steam to cook that wild rice blend perfectly. Check around the 45-minute mark – the rice should be tender with a slight pop, but not mushy. If it’s still too firm, give it another 5-10 minutes and a splash of broth if needed.
- Bringing it All Together: Creamy Bliss: Fish out and discard the bay leaf. Stir in the shredded cooked chicken, the heavy cream (or half-and-half), and the 1 tablespoon of lemon juice. *Chef Tip:* Adding the lemon juice after the cream prevents any potential curdling and brightens the whole pot magically. Let the soup simmer gently, uncovered, for another 5-10 minutes just to heat the chicken through and let the flavors meld beautifully. Taste it! This is crucial. Adjust the seasoning – does it need more salt? Pepper? A tiny extra squeeze of lemon? Make it sing to *you*.
Plating Up Your Cozy Masterpiece
Presentation is part of the joy! Ladle that lusciously creamy soup into deep, wide bowls – the kind you can cradle in your hands. Generously pile those gorgeous roasted mushrooms right on top. Their deep color and crispy edges look stunning against the creamy soup. A final flourish? A sprinkle of fresh thyme leaves or chopped fresh parsley adds a vibrant pop of green and freshness. Serve immediately with crusty bread for dunking (sourdough or a rustic baguette is perfect) or maybe some flaky biscuits. This soup is hearty enough to be a full meal, but a simple green salad on the side never hurts. Gather everyone around the table, watch the steam rise, and dive into pure comfort.
Make It Your Own: Delicious Twists
Love experimenting? Try these fun spins!
- Forest Forager: Swap the cremini for a mix of wild mushrooms like chanterelles, morels (if you’re splurging!), or maitake. Roast as directed for an ultra-earthy vibe.
- Lighten Up: Use half-and-half instead of heavy cream. Swap half the chicken broth for water and add a Parmesan rind while simmering for extra savory depth without the fat.
- Dairy-Free Dream: Use full-fat coconut milk instead of cream. Swap butter for olive oil. The coconut adds a subtle sweetness that pairs surprisingly well with the mushrooms!
- Veggie Powerhouse: Omit the chicken, use veggie broth, and add 1 cup of cooked white beans (like cannellini) or lentils when you’d add the chicken. Roasted sweet potato cubes are fantastic too!
- Herb Garden Delight: Stir in 2 cups of fresh baby spinach or chopped kale with the cream for a vibrant green boost. Finish with a swirl of pesto instead of extra herbs.
Olivia’s Kitchen Confidential
This soup has been on quite a journey with me! The very first time I tried to recreate Grandma’s magic, I used *only* pure wild rice… and learned the hard way it can take over an hour to cook! Hence the switch to a blend – same incredible flavor, way more practical for a weeknight. The roasted mushroom topping? That was a happy accident born from laziness. I didn’t want to dirty another pan sautéing them, so I tossed them in the oven. Best. Decision. Ever. The concentrated flavor and texture are game-changers. One funny fail? I once forgot the lemon juice. The soup tasted flat, like something crucial was missing. My husband politely asked, “Did you forget your sunshine?” Lesson learned! Now, I keep lemons front and center. This recipe is forgiving, though. Broth too thick after adding the rice? Add a splash more water or broth. Too thin after simmering? Let it bubble uncovered for a few extra minutes. Make it yours, laugh at the mishaps, and savor every cozy spoonful.
Your Soup Questions, Answered!
Let’s tackle those common kitchen head-scratchers:
- Q: My wild rice is still crunchy after 50 minutes! Help!
A: Don’t panic! Wild rice blends vary. Ensure your soup is at a true *gentle* simmer (small bubbles breaking the surface occasionally), not a rapid boil, and that the pot is covered tightly. If it’s still too firm, add about 1/2 cup more broth or hot water, cover, and simmer in 5-10 minute increments until tender. Patience is key! - Q: Can I make this soup ahead of time?
A: Absolutely, and it often tastes even better the next day! Prepare the soup completely, *but* hold off on adding the cream and lemon juice. Let it cool, then store covered in the fridge for up to 3 days. When ready to serve, gently reheat the soup base. Stir in the cream and lemon juice *just* before serving and heat through gently (don’t boil!). Roast the mushrooms fresh for topping – they lose their crispness if stored on the soup. - Q: My soup looks a bit “curdled” after adding the cream. What happened?
A: This usually happens if the soup is boiling too vigorously when the cream is added, or if very cold cream hits very hot soup too quickly. To prevent: Take the soup off the heat for a minute before adding the cream. Temper the cream by whisking a small ladleful of hot soup into the cream first, then stir this mixture back into the pot. Return to *low* heat just to warm through. The lemon juice also helps stabilize it! - Q: I don’t have cooked chicken. What’s the best way to cook it for this?
A: Poaching is perfect! Place 1 lb boneless, skinless chicken breasts or thighs in a saucepan. Cover with broth or water by an inch. Add a slice of onion, a garlic clove, a bay leaf, and a pinch of salt. Bring to a simmer, cover, reduce heat to low, and cook for 10-15 minutes (breasts) or 20-25 minutes (thighs) until cooked through. Shred! Or, use a store-bought rotisserie chicken – total time-saver.

Creamy Wild Rice Chicken Soup with Roasted Mushrooms
- Total Time: 1 hr 10 min
Description
Imagine the deep umami of roasted mushrooms, the nutty pop of wild rice, and tender bites of chicken all floating in a velvety, herb-laced broth. This isn’t just a soup—it’s a full-body sigh on a stormy day. Whether you’re craving comfort or just a seriously satisfying one-pot meal, this recipe brings warmth to the table (and your soul).
Ingredients
-
2 tbsp olive oil or butter
-
1 onion, diced
-
2 carrots, chopped
-
2 celery stalks, chopped (with leaves if available)
-
3 garlic cloves, minced
-
1 cup wild rice blend, rinsed
-
6 cups low-sodium chicken broth
-
2 cups cooked shredded chicken
-
1 tsp dried thyme
-
1 bay leaf
-
Salt & pepper, to taste
-
1 cup heavy cream or half-and-half
-
1 tbsp lemon juice
Roasted Mushroom Topping
-
12 oz cremini mushrooms, sliced
-
1 tbsp olive oil
-
1 tsp soy sauce
-
1 tsp fresh thyme (or ½ tsp dried)
-
Salt & pepper
Instructions
-
Roast Mushrooms: Toss mushrooms with olive oil, soy sauce, thyme, salt, and pepper. Roast at 400°F (200°C) for 20–25 mins until golden and crisp.
-
Sauté Base: In a large pot, heat oil/butter. Add onion, carrot, celery. Cook 8–10 mins until soft. Add garlic, cook 1 min more.
-
Simmer Soup: Stir in wild rice. Toast briefly, then add broth, thyme, bay leaf, salt, and pepper. Bring to boil, reduce to low, cover, and simmer 45–50 mins until rice is tender.
-
Finish: Discard bay leaf. Stir in chicken, cream, and lemon juice. Simmer 5–10 mins to heat through. Adjust seasoning.
-
Serve: Ladle into bowls, top with roasted mushrooms and fresh herbs. Serve hot with crusty bread.
Notes
-
Use a wild rice blend for texture + faster cook time.
-
Don’t skip the lemon—it brings brightness!
-
No chicken? Try white beans or roasted sweet potato.
-
Leftovers? Soup thickens overnight—add broth when reheating.
- Prep Time: 15 min
- Cook Time: 55 min
Nutrition
- Calories: 390 cal Per Serving
- Fat: 21g
- Carbohydrates: 28g
- Protein: 22g
Nourishment in Every Spoonful (Approximate per serving)
Calories: ~390 | Carbohydrates: 28g | Fat: 21g | Protein: 22g | Fiber: 4g | Sodium: ~450mg (will vary based on broth/salt used)
This hearty soup provides a good balance of protein for satisfaction, complex carbs from the wild rice for energy, and healthy fats. The mushrooms add valuable nutrients like selenium and B vitamins. Using low-sodium broth helps manage salt levels. Enjoy it as a fulfilling, nourishing meal!
Final Thoughts: More Than Just Soup
This Creamy Wild Rice Chicken Soup with Roasted Mushrooms is more than a recipe—it’s a memory maker. It’s the kind of dish that turns a dreary day into something warm and special, the kind that invites people to linger at the table just a little longer. Whether you’re cooking for a crowd, meal-prepping for the week, or simply treating yourself, this soup delivers comfort, nourishment, and a touch of elegance.
So grab your pot, embrace the process (yes, even the mushroom roasting!), and let the aroma fill your kitchen. Because the best meals aren’t just about taste—they’re about the love stirred into every step. Happy cooking, friend. May your bowls always be full, and your heart even fuller
Ricotta and Sausage Pappardelle
Welcome to My Cozy Kitchen: Let’s Make Magic with Pappardelle!
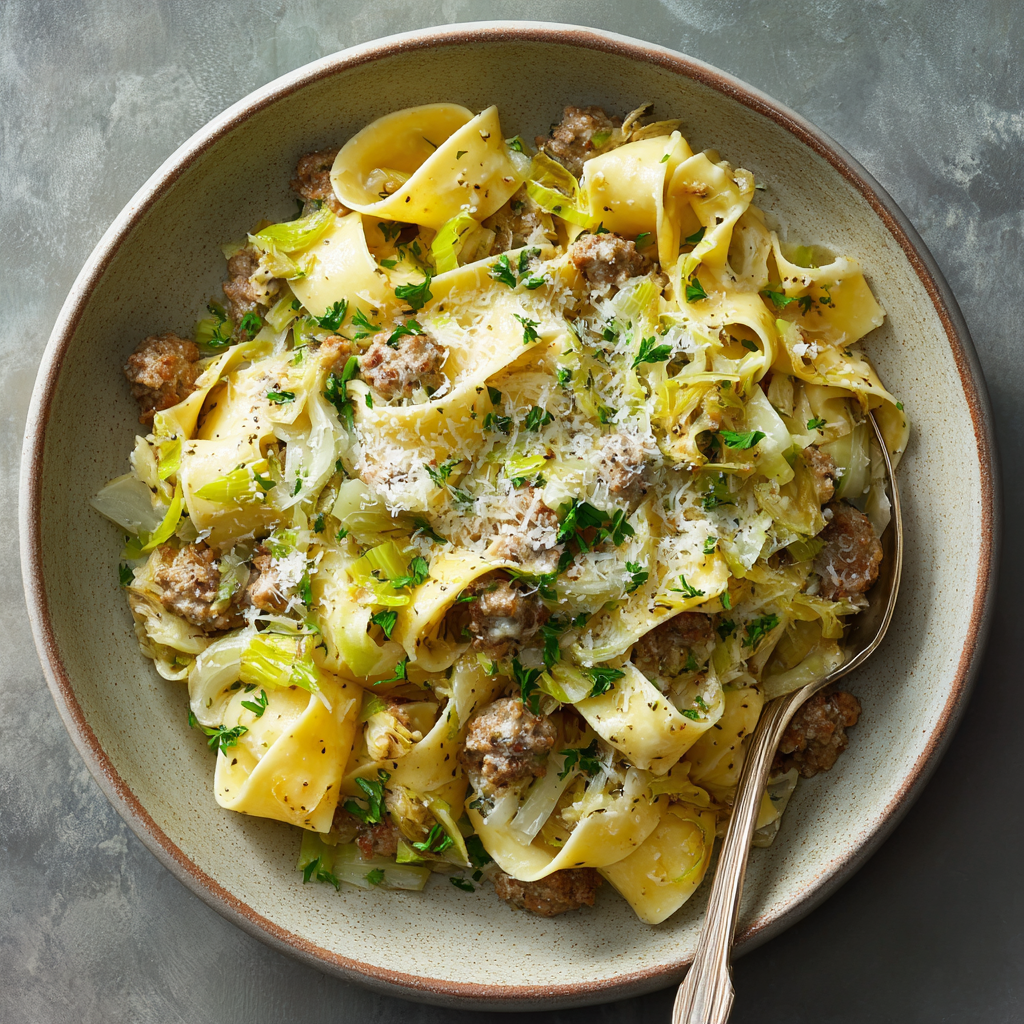
Hey there, friend! Olivia here, waving from my flour-dusted countertop where the scent of sizzling sausage and caramelizing fennel is already making my stomach growl. Is there anything more soul-warming than a big bowl of pasta that hugs you from the inside out? Today, we’re diving fork-first into my Ricotta and Sausage Pappardelle – the kind of dish that turns ordinary weeknights into tiny celebrations and makes dinner guests swoon without requiring chef-level skills. Imagine this: tender, wide ribbons of pappardelle tangled up with rich, fennel-kissed sausage, swimming in a silky sauce that gets its luscious texture from swirls of fresh ricotta and a generous knob of butter. It’s rustic elegance on a plate – fancy enough for date night but comforting enough for pajama-clad Tuesday dinners. Whether you’re a pasta newbie or a seasoned sauce whisperer, this recipe is your golden ticket to that glorious moment when everyone at the table goes quiet… except for the happy hum of full mouths. So tie on your favorite apron (messy is mandatory in my kitchen!), grab a wooden spoon, and let’s create some edible joy together. Trust me – your future self, savoring that first bite, will thank you!
The Little Trattoria That Stole My Heart (and Inspired This Dish!)
Picture this: It’s my honeymoon in Tuscany, and we’ve stumbled into this tiny, family-run trattoria tucked away on a cobblestone alley. Nonna is rolling pasta by the window, her grandson is refilling wine glasses, and the air smells like heaven – garlic, woodsmoke, and something meaty and magical. We order “pasta della casa,” and out comes this unassuming bowl of wide noodles with crumbled sausage and dollops of fresh cheese. One bite and I’m transported! It wasn’t fussy or dainty; it was robust, generous, and deeply satisfying – like a culinary bear hug. The chef, Marco, saw my wide-eyed reaction and winked, “La semplicità che nutre l’anima” (“Simplicity that feeds the soul”). Back home, I became obsessed with recreating that feeling. My early attempts were… let’s say “rustic” (read: gluey pasta, rubbery sausage!). But through happy accidents (like swapping leeks for onions and adding thyme from my garden), I landed on this version. Now, every time I make it, I’m back in that sun-drenched trattoria, feeling that newlywed joy. It’s my edible postcard from Tuscany, and sharing it with you feels like passing along a little piece of that warmth.
Your Flavor Toolkit: Ingredients & Why They Shine
Gather these goodies! Pro tip: Mise en place (prepping everything before cooking) is your best friend here. It makes the process feel like a joyful dance, not a frantic scramble.
- 2 lbs pappardelle pasta: Those wide, luxurious ribbons cradle sauce like a dream! Chef’s hack: Can’t find pappardelle? Fettuccine or tagliatelle work beautifully.
- 12 tbsp olive oil: We’re using it generously to build flavor layers. Insight: A good extra-virgin adds fruity depth – save your fancy bottle for finishing!
- 2 lbs Italian fennel sausage (casings removed): The STAR! Fennel seeds add sweet licorice notes. Substitution: Mild or spicy pork sausage works, but add 1 tsp crushed fennel seeds if yours lacks it.
- 2 fennel bulbs, cored & sliced: They caramelize into sweet, tender perfection. Don’t skip the fronds! Save some for garnish – they look pretty and taste like delicate anise.
- 4 leeks (white parts only), halved & sliced: Sweeter and silkier than onions! Cleaning tip: Soak sliced leeks in water to remove gritty dirt hiding between layers.
- 1 cup dry white wine: Adds bright acidity. Substitution: Extra chicken stock + 1 tbsp lemon juice works in a pinch.
- 2 shallots & 8 garlic cloves, minced: Our aromatic base. Chef’s secret: Mince garlic finely so it melts into the sauce without burning.
- 4 tsp fresh thyme: Earthy magic! Insight: Rub leaves between fingers before adding to release oils.
- 2 cups chicken stock: Use low-sodium to control salt. Flavor boost: Homemade stock elevates it, but store-bought is totally fine!
- 8 tbsp (1 stick) unsalted butter: Creates that irresistible silkiness. Pro tip: Cold butter added at the end emulsifies the sauce – no splitting!
- 2 cups fresh ricotta: Look for whole-milk ricotta in the deli section – it’s creamier than tub versions. Chef’s touch: Let it sit at room temp while you cook – cold ricotta chills the pasta.
- ½ cup torn parsley & ½ cup grated Parmesan: The vibrant, salty finish! Substitution: Pecorino Romano adds sharper bite if preferred.
Let’s Get Cooking: Your Foolproof Roadmap to Deliciousness
Ready? Fire up the stove, pour yourself a glass of that white wine (cook’s treat!), and let’s build some flavor!
- Pasta Perfect: Cook pappardelle in heavily salted water (like the sea!) until just al dente. Why? It keeps cooking slightly in the sauce later. RESERVE 1 CUP PASTA WATER – this starchy liquid is liquid gold for saucing! Drain pasta (don’t rinse!) and drizzle with a little olive oil to prevent sticking.
- Sausage Shenanigans: Heat 4 tbsp olive oil in a large, heavy skillet or Dutch oven (we need space!) over medium heat. Add sausage, breaking it into small, rustic crumbles with your spoon. Cook until deeply browned – about 6-8 minutes. Chef’s hack: Don’t stir constantly! Let it get a nice sear for maximum flavor. Transfer sausage to a plate, leaving those glorious browned bits (fond) in the pan.
- Veggie Victory Lap: Add remaining 8 tbsp olive oil to the pan. Toss in sliced fennel, leeks, and shallots. Sprinkle with a pinch of salt. Sauté, stirring occasionally, for 6-8 minutes until they soften and start to caramelize – leeks turn buttery, fennel sweetens. Add garlic and thyme, cook just 1 minute until fragrant (garlic burns fast!).
- Wine & Shine: Pour in the white wine! It’ll sizzle and steam – use your spoon to scrape up all that delicious fond stuck to the pan. Let it bubble and reduce for 2 minutes, cooking off the alcohol raw edge.
- Bring It All Together: Add chicken stock and return the browned sausage (and any juices!) to the pan. Bring to a gentle simmer for 5 minutes, letting flavors meld. Taste now! Adjust salt or pepper if needed.
- The Magic Finish: Reduce heat to low. Stir in the cold butter, one tablespoon at a time, swirling the pan until each piece melts. This creates a luscious, emulsified sauce. Add the drained pasta and toss vigorously to coat every ribbon. Add splashes of reserved pasta water as needed – it helps the sauce cling beautifully! Goal: A glossy, cohesive dish, not soupy.
- Ricotta Reverie: TAKE THE PAN OFF THE HEAT! Dollop spoonfuls of room-temp ricotta over the pasta. Gently fold/swirl it in – don’t overmix! We want beautiful creamy streaks, not a homogenous pink sauce.
- Grand Finale: Sprinkle generously with torn parsley and grated Parmesan. Give one last gentle toss. Chef’s flourish: Top with reserved fennel fronds for elegance!
Plating Your Masterpiece: Simple & Stunning
This dish shines brightest served family-style! Pile that gorgeous, saucy pasta into a large, shallow bowl or warm platter. The wide pappardelle ribbons look stunning cascading over each other. Grab some tongs for easy serving. Sprinkle extra parsley, Parmesan, and a few delicate fennel fronds on top for a pop of color and freshness. Pair it with a simple green salad dressed with lemon vinaigrette (cuts the richness!) and crusty, warmed bread – essential for mopping up every last bit of that incredible sauce. Pour the rest of that white wine, light some candles, and watch the happy faces around your table!
Mix It Up! Delicious Twists on the Classic
Love this base recipe? Make it your own!
- Spicy Arrabbiata Twist: Add 1 tsp crushed red pepper flakes with the garlic. Stir in 1/2 cup tomato paste after deglazing with wine for a rich, spicy tomato sauce vibe.
- Lighter & Brighter: Swap sausage for ground turkey or chicken. Use half the butter and swap full-fat ricotta for part-skim. Finish with a big squeeze of lemon juice and extra parsley.
- Mushroom Lover’s Dream: Replace sausage with 2 lbs sliced wild mushrooms (cremini, shiitake, oyster). Sauté until deeply browned. Add 1 tsp soy sauce with the stock for umami punch!
- Creamy Kale Boost: Stir in 4 cups chopped lacinato kale (stems removed) with the stock. It wilts beautifully and adds color/nutrients.
- Gluten-Free/Pescatarian: Use GF pappardelle. Swap sausage for 1.5 lbs large peeled shrimp added in the last 2 minutes of simmering with the stock.
Olivia’s Kitchen Confessions & Tips
This recipe is my well-loved, sauce-splattered friend! Over the years, I’ve learned: Ricotta temperature is KEY. Cold ricotta straight from the fridge seized up my sauce once – lesson learned! Now I always let it lounge on the counter. I also used to brown the sausage too finely, like ground beef. Letting it form slightly larger, craggy crumbles gives amazing texture. One hilarious disaster involved forgetting the pasta water reserve – my sauce turned into glue! I had to frantically microwave some plain water (not the same, folks!). My husband now teases me, “Pasta water check?” before I drain. The beauty of this dish? It’s incredibly forgiving. Sauce too thick? More pasta water! Too thin? Simmer it down for a minute. Made too much? Leftovers reheat beautifully with a splash of water or stock. It’s evolved from my Tuscan inspiration into my ultimate comfort food love letter. Make it yours!
Your Questions, Answered!
Let’s tackle those common kitchen hiccups before they happen:
- Q: My sauce looks greasy/oily. Help!
A: Don’t panic! This usually happens if the heat was too high when adding the butter or if you stirred the ricotta too vigorously on heat. Next time: Ensure pan is off heat before adding ricotta and fold gently. For now, try stirring in 1-2 tbsp hot pasta water or a squeeze of lemon juice – it can help emulsify it back together. - Q: Can I make this ahead of time?
A: You can prep components! Brown the sausage, chop all veggies, and make the sauce base (through step 5) up to 2 days ahead. Store separately in the fridge. When ready, reheat sauce gently, cook pasta fresh, and proceed from step 6. The dish is best served immediately after combining for optimal texture. - Q: My pasta seems sticky/gummy after adding to the sauce. What went wrong?
A: Two likely culprits: 1) You overcooked the pasta initially. Always go al dente! 2) You didn’t use enough reserved pasta water or sauce was too thick before adding pasta. The water helps lubricate and finish cooking the pasta in the sauce. Add more splashes next time! - Q: Can I use dried thyme instead of fresh?
A: Yes, but use 1/3 the amount (about 1 1/3 tsp dried thyme). Dried herbs are more potent. Add them with the garlic. Fresh thyme’s bright flavor is ideal, but dried works in a pinch!

Ricotta and Sausage Pappardelle
- Total Time: 45 mins
Description
Inspired by a sun-drenched trattoria in Tuscany and perfected in a cozy home kitchen, this dish brings bold comfort with zero stress. Caramelized fennel, buttery sauce, and swoops of ricotta make every bite a memory. Whether it’s date night or pajama dinner, this recipe is pure pasta poetry.
Ingredients
-
2 lbs pappardelle (or fettuccine/tagliatelle)
-
12 tbsp olive oil
-
2 lbs Italian fennel sausage, casings removed
-
2 fennel bulbs, cored & sliced (save fronds!)
-
4 leeks (white only), halved & sliced
-
2 shallots, minced
-
8 garlic cloves, minced
-
4 tsp fresh thyme (or 1 ⅓ tsp dried)
-
1 cup dry white wine
-
2 cups chicken stock
-
8 tbsp unsalted butter
-
2 cups fresh ricotta (room temp)
-
½ cup parsley, torn
-
½ cup grated Parmesan
-
Kosher salt & black pepper
Instructions
-
Cook Pasta: Boil in salted water until al dente. Reserve 1 cup pasta water before draining.
-
Brown Sausage: In a large skillet, heat 4 tbsp olive oil. Brown sausage in crumbles (6–8 mins). Set aside.
-
Sauté Veggies: Add 8 tbsp olive oil. Cook fennel, leeks, and shallots with salt until golden (6–8 mins). Stir in garlic, thyme (1 min).
-
Deglaze: Pour in wine. Scrape pan. Simmer 2 mins. Add stock + sausage. Simmer 5 mins.
-
Finish Sauce: Lower heat. Stir in cold butter, 1 tbsp at a time, to emulsify. Add pasta and toss. Use reserved water for ideal texture.
-
Add Ricotta: Off heat, gently fold in ricotta. Leave creamy ribbons.
-
Serve: Sprinkle with parsley, Parmesan, and fennel fronds.
Notes
-
Pasta water = sauce MVP. Don’t skip it!
-
Don’t overmix ricotta—swirls are prettier (and tastier).
-
Leftovers? Reheat gently with a splash of stock.
-
Fresh herbs + lemon = lift! Add for brightness.
- Prep Time: 15 min
- Cook Time: 30 min
Nutrition
- Calories: 580 cal Per Serving
- Fat: 34g
- Carbohydrates: 45g
- Fiber: 4g
- Protein: 25g
Nutritional Information (Per Serving)
Approximate values: Calories: 580 kcal | Carbohydrates: 45g | Dietary Fiber: 4g | Total Fat: 34g (Saturated Fat: 14g) | Protein: 25g | Sodium: 780mg (varies based on sausage/stock saltiness).
Note: This is an estimate based on specific ingredients. Values can change with substitutions.
Final Thoughts: More Than Just a Pasta Recipe
This Ricotta and Sausage Pappardelle isn’t just about feeding hungry bellies—it’s about creating moments. The sizzle of sausage, the swirl of wine deglazing the pan, the laughter around the table as everyone twirls their forks… these are the memories that stick.
I hope this recipe becomes your culinary hug, the dish you turn to after long days or when friends drop by unexpectedly. Cooking, like life, is better when shared—so pass the Parmesan, pour the wine, and savor every bite. As Marco from that Tuscan trattoria would say, “Mangia con gioia!” (Eat with joy!).
Chicken Parmesan Gnocchi Bake
Chicken Parmesan Gnocchi Bake: Your New Favorite Comfort Food Hug
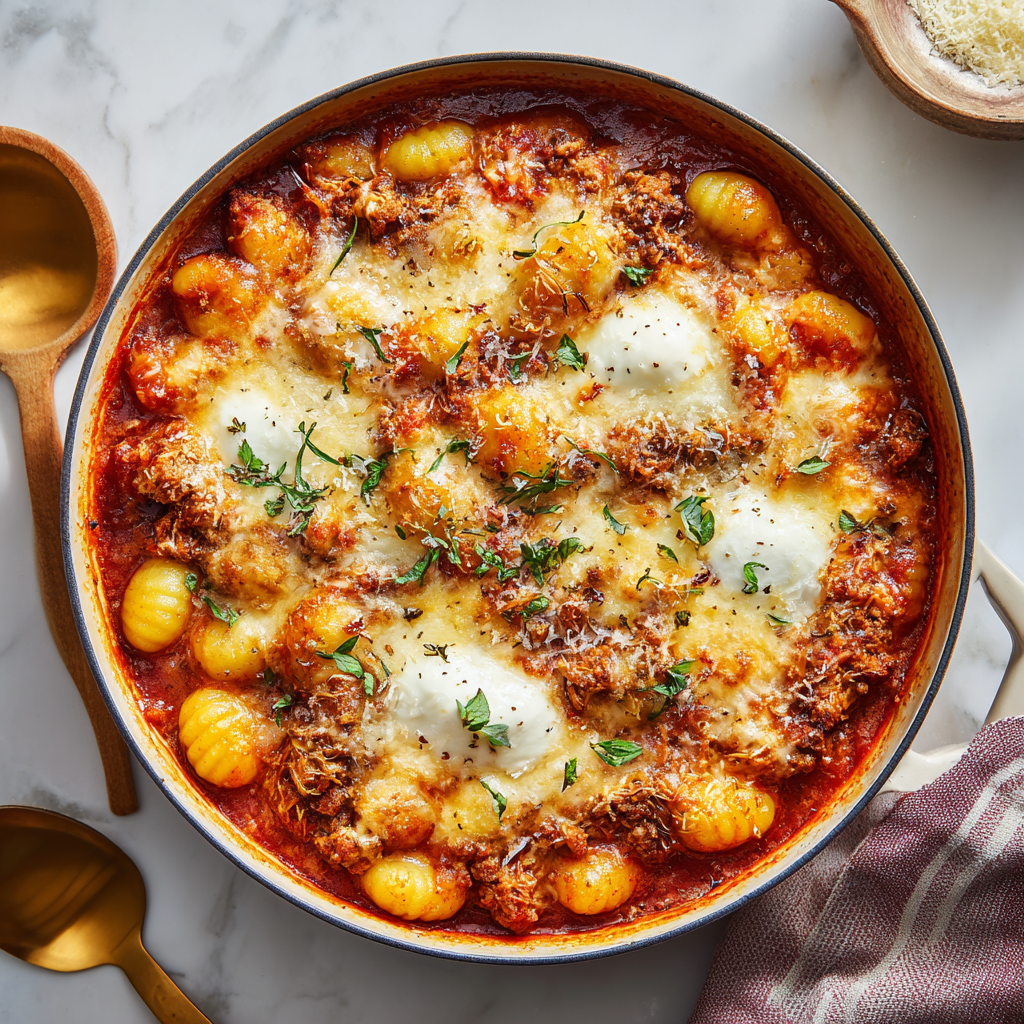
Hey there, kitchen friend! Olivia here, waving from my flour-dusted countertop. Is there anything cozier than that moment when savory aromas start dancing through your kitchen? When cheese bubbles like a happy lava pool and tomato sauce whispers sweet nothings to your soul? That’s exactly the magic we’re making today with this Chicken Parmesan Gnocchi Bake.
Imagine all the crispy-cheesy-jovial vibes of classic chicken parm… but hugging fluffy potato gnocchi in a one-pan wonder. We’re talking juicy ground chicken (so much faster than pounding cutlets!), tangy marinara, and not one, not two, but THREE cheeses melting into glorious harmony. This dish is my love letter to busy foodies who crave big flavor without the fuss. It’s weeknight superhero meets Sunday comfort queen, ready in 45 minutes flat. So tie on that apron (embrace the mess, I promise!), grab your favorite skillet, and let’s turn simple ingredients into a standing ovation dinner. Your people will hug you. Maybe twice.
Why This Bake Feels Like My Kitchen Roots
This recipe? It’s basically my culinary comfort blanket. Picture it: My Nonna’s tiny Brooklyn kitchen circa 2008. I’m “helping” (read: taste-testing marinara), and she’s teaching me her chicken parm secrets. Fast-forward to my first solo apartment, hosting friends for “fancy” pasta night… only to realize I forgot breadcrumbs and accidentally boiled gnocchi into sad little pillows. Disaster! But hungry friends inspire genius. I tossed everything into a baking dish with extra cheese, praying for mercy. The result? Silence. Then forks clattering. Then recipe requests. That happy accident became this bake – marrying Nonna’s soulful flavors with my lazy-girl hack for pillowy gnocchi perfection. Now, every time that golden crust emerges, I smell ambition, resilience, and melted burrata. Pure love.
Your Flavor Dream Team (Plus Clever Swaps!)
- 24 oz plain gnocchi: These potato pillows soak up sauce like flavor sponges! Chef insight: Don’t pre-boil – they’ll cook perfectly in the bake. Swap with cauliflower gnocchi for low-carb.
- 3 tbsp extra-virgin olive oil: Our aromatic launchpad. Tip: Use the good stuff! It adds fruity depth.
- 2 yellow onions, diced: Sweetness foundation. Swap with 1 large leek for milder flavor.
- 8 garlic cloves, roughly chopped: Bold, rustic punches. Chef confession: I often add 10. No regrets.
- Kosher salt & black pepper: Season in layers! Taste after browning chicken.
- 2 lbs ground chicken: Lighter than beef but rich. Swap: Ground turkey or plant-based crumbles work great.
- 4 cups store-bought marinara: Choose a brand you love! Time-saver: Jarred is fine – we doctor it up.
- ½ tsp crushed red pepper flakes: Gentle warmth. Omit for kiddos.
- 3 cups shredded mozzarella: The gooey glue! Pro move: Shred it yourself for better melt.
- 1 cup shredded Parmesan: Salty umami kick. Grana Padano works too.
- 2 balls fresh burrata: The creamy grand finale. No burrata? Dollop ricotta instead.
- Fresh basil or oregano: The confetti finish! Adds brightness.
Let’s Build Flavor Heaven (Step-by-Step!)
Step 1: Fire up your oven to 375°F (190°C). Grab your biggest oven-safe skillet or a 9×13 baking dish. Chef hack: Preheat the skillet while chopping for faster sautés!
Step 2: Heat olive oil over medium heat. Toss in onions and garlic with a pinch of salt. Sauté 5-6 minutes until they’re soft and singing – golden, not brown! Why? This builds a flavor base called “sofrito.” Your future self will thank you.
Step 3: Add ground chicken, breaking it up with your spoon. Season generously with salt and pepper. Cook until no pink remains (5-7 mins). Tip: Drain excess fat if needed, but leave a bit for richness.
Step 4: Pour in marinara and red pepper flakes. Stir like you mean it! Simmer 5 minutes. Taste test time! Adjust salt/pepper. Want more depth? Add 1 tsp Italian herbs.
Step 5: Gently fold in gnocchi and HALF the mozzarella. Critical gnocchi tip: Don’t stir vigorously – they’re delicate! Transfer to baking dish if not skillet-to-oven ready.
Step 6: Sprinkle remaining mozzarella and Parmesan over the top. Tear burrata balls into chunks and nestle them in. Visual tip: Place burrata where you want creamy pockets!
Step 7: Bake 20-25 mins until cheese is molten gold and edges bubble fiercely. Watch closely: Ovens vary! If top browns too fast, tent with foil.
Step 8: Rest 5 minutes (torture, I know!). Garnish with fresh herbs. Final flourish: Drizzle with olive oil for sheen.
Serving This Beauty Like a Pro
Bring the sizzling skillet straight to the table – drama is delicious! Scoop generous portions into shallow bowls. Pair with garlic bread for sauce-dunking and a crisp green salad (arugula with lemon vinaigrette cuts the richness perfectly). For family style? Let everyone dig in with big spoons straight from the dish. Laughter and seconds guaranteed.
The Science Behind the Perfect Gnocchi Bake – Why This Recipe Works
Gnocchi, those tender little potato dumplings, are the unsung heroes of Italian comfort food. But why do they work so well in this Chicken Parmesan Gnocchi Bake? Let’s break it down.
1. Gnocchi’s Magic Texture
Unlike pasta, gnocchi are made from potatoes, flour, and sometimes egg, giving them a soft, pillowy texture. When baked in sauce, they absorb flavors while maintaining their structure—if treated right. The key? No pre-boiling! Skipping this step prevents them from turning mushy. Instead, they cook gently in the marinara, soaking up the sauce while staying tender.
2. The Maillard Reaction & Cheese Melt
The golden, bubbly cheese crust isn’t just pretty—it’s science! When mozzarella and Parmesan bake, the proteins and sugars undergo the Maillard reaction, creating that irresistible browned, nutty flavor. The burrata, added in chunks, stays creamy because its high moisture content prevents over-browning, giving you pockets of molten richness.
3. Layered Seasoning = Big Flavor
This recipe builds flavor in stages:
-
Sofrito base (onions + garlic): Cooking them slowly in olive oil unlocks sweetness and depth.
-
Browning the chicken: Creates fond (those tasty browned bits) for umami richness.
-
Marinara simmering: Reduces and concentrates flavors.
-
Cheese layering: Melting cheese into the sauce (not just on top) ensures every bite is gooey.
4. The Resting Rule
Letting the bake rest for 5 minutes post-oven allows the gnocchi to set slightly, preventing a saucy landslide when serving. It also lets the cheese tighten up just enough for perfect scooping.
Pro Tip: If your gnocchi ever turns gummy, you likely overworked the dough or stirred too aggressively during mixing. Handle with care!
The Art of Comfort Food – Why This Dish Feels Like a Hug
Comfort food isn’t just about taste—it’s about memory, texture, and ritual. Here’s why this gnocchi bake hits all the right notes:
1. Nostalgia in Every Bite
Chicken Parmesan is a classic for a reason: crispy, cheesy, saucy perfection. But pounding cutlets? Time-consuming. This version swaps in ground chicken for ease without sacrificing flavor. The gnocchi adds a playful twist, evoking both Italian grandmothers and modern weeknight wins.
2. Texture Symphony
Great comfort food plays with contrasts:
-
Crispy cheese top
-
Creamy burrata pockets
-
Pillowy gnocchi
-
Meaty chicken crumbles
Each bite is a mini adventure.
3. The Lazy-Girl Genius
This recipe is forgiving. Forgetful? Use frozen gnocchi. No burrata? Ricotta works. Short on time? Jarred marinara is fine (doctored with garlic and red pepper flakes). It’s designed for real life, not just Instagram.
4. The Sharing Factor
There’s something magical about a bubbling, family-style dish. It invites gathering, scooping seconds, and passing bread to mop up sauce. Unlike finicky plated meals, this bake thrives on casual, communal eating.
Fun Fact: Studies show that sharing comfort food literally boosts oxytocin (the “love hormone”). So yes, this dish scientifically makes people happier.
Beyond the Recipe – Creative Variations & Global Twists
Once you’ve mastered the basics, try these spins to keep it exciting:
1. Global Flavor Mashups
-
Greek Style: Swap marinara for tomato-feta sauce, add Kalamata olives, and top with crumbled feta.
-
Tex-Mex: Use taco-seasoned ground beef, enchilada sauce, and Monterey Jack cheese. Garnish with cilantro and avocado.
-
Indian-Inspired: Brown chicken with garam masala, stir in tikka masala sauce, and top with paneer cubes.
2. Seasonal Swaps
-
Spring: Add peas, asparagus, and lemon zest for brightness.
-
Fall: Mix in roasted butternut squash and sage-infused brown butter.
-
Winter: Stir in kale and top with crispy pancetta.
3. Dietary Tweaks
-
Keto: Use cauliflower gnocchi and extra cheese; skip the breadcrumb topping.
-
Vegan: Plant-based ground “meat,” cashew ricotta, and vegan mozzarella shreds.
-
Dairy-Free: Nutritional yeast + coconut milk-based mozzarella alternative.
4. Breakfast-for-Dinner Twist
Yes, really! Swap chicken for crumbled sausage, marinara for marinara-spiked gravy, and top with a fried egg.
Pro Move: Keep a batch in the freezer for emergency comfort cravings. Assemble unbaked, freeze, and bake straight from frozen (add 15-20 mins).
Make It Your Own (5 Tasty Twists!)
- Veggie Power: Swap chicken for sautéed mushrooms + spinach. Add roasted eggplant for “Parmigiana” vibes.
- Spicy Arrabbiata: Use spicy marinara and add sliced jalapeños under the cheese.
- Caprese Style: Top baked dish with fresh cherry tomatoes and balsamic glaze.
- Gluten-Free: Use GF gnocchi and ensure marinara/crumbs are GF.
- Extra Crunch: Mix ½ cup panko with 2 tbsp melted butter + ¼ cup Parmesan. Sprinkle on before baking.
Olivia’s Extra Kitchen Whispers
This recipe evolved from my “Oops, no pasta!” panic into a weekly staple. The burrata? That was a happy accident when mozzarella ran out! Now I can’t skip it – that cool cream against hot sauce is EVERYTHING. Pro tip: Leftovers taste even better (if they exist!). Reheat in the oven to keep gnocchi springy. Funny story: Once subbed cinnamon for red pepper flakes… let’s just say dessert vibes don’t work here! Lesson learned: Label spice jars, friends.
Your Questions, Answered!
Q: Can I use frozen gnocchi?
A: Absolutely! Add them straight from frozen – no thawing needed. Just extend bake time by 5 mins.
Q: Why is my gnocchi gummy?
A: Over-stirring is the culprit! Gently fold them in Step 5. Also, ensure sauce covers them completely so they steam, not dry out.
Q: Can I prep this ahead?
A: Yes! Assemble (without baking) up to 24 hours ahead. Cover and refrigerate. Add 10-15 mins to bake time if cold from fridge.
Q: Help! Sauce too thick/thin?
A: If thick: Stir in ¼ cup broth or water before baking. If thin: Simmer meat sauce 5 mins longer uncovered pre-bake. Gnocchi absorbs liquid!

Chicken Parmesan Gnocchi Bake
- Total Time: 45 mins
Description
This isn’t just dinner—it’s a giant cheesy hug baked to golden perfection. Fluffy gnocchi meet juicy ground chicken and a lake of marinara, all blanketed in mozzarella, Parmesan, and burrata. It’s got all the soul of Nonna’s chicken parm, minus the breading marathon. Whether you’re feeding a crowd or freezing leftovers for your future self, this 45-minute wonder brings the flavor and the drama—straight from skillet to table.
Ingredients
-
24 oz plain gnocchi (no pre-boiling!)
-
3 tbsp extra-virgin olive oil
-
2 yellow onions, diced
-
8 garlic cloves, chopped
-
2 lbs ground chicken
-
Salt & black pepper to taste
-
4 cups marinara sauce
-
½ tsp red pepper flakes (optional)
-
3 cups shredded mozzarella
-
1 cup shredded Parmesan
-
2 balls fresh burrata (or dollops of ricotta)
-
Fresh basil or oregano for garnish
Instructions
-
Prep Oven: Preheat to 375°F (190°C).
-
Sauté Base: In an oven-safe skillet, sauté onions and garlic in olive oil with a pinch of salt (5–6 mins).
-
Brown Chicken: Add chicken, season, and cook until fully browned (7 mins).
-
Simmer Sauce: Stir in marinara and red pepper flakes. Simmer 5 mins.
-
Fold in Gnocchi: Gently stir in gnocchi and half the mozzarella.
-
Top & Bake: Sprinkle remaining mozzarella, Parmesan, and torn burrata over the top.
-
Bake: Bake uncovered 20–25 mins until bubbly and golden.
-
Rest & Serve: Rest 5 mins. Garnish with herbs and drizzle with olive oil.
Notes
-
No burrata? Use ricotta or skip for a lighter bake.
-
Frozen gnocchi? Add straight in—just bake 5 mins longer.
-
Crunchy top? Add a quick panko-Parmesan topping pre-bake.
-
Make-ahead magic: Assemble and chill up to 24 hrs before baking.
- Prep Time: 15 min
- Cook Time: 30 mins
Nutrition
- Calories: 490 cal Per Serving
- Fat: 28g
- Carbohydrates: 35g
- Fiber: 3g
- Protein: 28g
Nutritional Notes (Per Serving)
Approx. 490 kcal | Carbs: 35g | Fat: 28g | Protein: 28g | Fiber: 3g
Note: Values are estimates. For precise counts, use your specific ingredient brands.
Final Thoughts: Why This Dish Will Stay in Your Rotation
This Chicken Parmesan Gnocchi Bake isn’t just a recipe—it’s a flexible, feel-good template for endless deliciousness. It’s weeknight easy but special enough for guests. It’s nostalgic but open to adventure. Most importantly, it celebrates imperfection: burnt cheese edges, saucy spills, and all.
So here’s to messy kitchens, happy accidents, and the kind of food that makes people linger at the table. May your gnocchi always be pillowy, your cheese eternally bubbly, and your dinners full of laughter. Now go forth and bake!

Creamy Butternut Squash Pasta
When Autumn Craves a Cozy Hug (in Pasta Form!)
Hey there, kitchen friend! Olivia here, waving from my flour-dusted countertop. Can we just take a moment to appreciate butternut squash? That gorgeous, sunset-hued veggie that transforms from humble gourd into pure velvet magic? When October’s chill starts nipping at the windows, my soul craves bowls of comfort that feel like a warm embrace – and THIS creamy butternut squash pasta is my ultimate love letter to fall. Imagine: sweet roasted squash and garlic whirled into a luscious sauce, kissed with cream and nutmeg, then tangled with al dente spaghetti. It’s elegant enough for date night but cozy enough for sweatpants-and-socks Sundays. The best part? We’re roasting the squash to caramelized perfection (no tedious peeling and chopping while raw – hallelujah!), and the sauce comes together faster than you can say “second helping.” So grab your favorite apron – bonus points if it’s as splattered as mine – and let’s make your kitchen smell like autumn’s dreamiest bistro!
That One Rainy Tuesday & the Birth of a Obsession
Picture this: Upstate New York, 2017. Rain lashed against the windows, my fridge held a lone butternut squash, and my then-boyfriend (now husband!) was coming over for dinner looking hangry. Desperation + creativity = roasting that squash with garlic and shallots because, well, roasting makes everything better. When I blended it into a sauce? HOLY MOLY. The way it clung to the pasta in creamy, sunset-colored ribbons? The nutty pecorino against that subtle sweetness? We inhaled it by candlelight, and I knew this wasn’t just dinner – it was a memory in the making. Now, it’s our annual “first leaf-peeping weekend” tradition. Every bite takes me back to that stormy night, proving the best recipes aren’t just fed by ingredients, but by life’s messy, beautiful moments.
Your Golden Ticket to Cozy Bowl Bliss: The Ingredients
Gather these simple stars – each plays a delicious role! Pro tip: Pre-cubed squash saves serious time if you’re in a rush.
- 2 medium butternut squash, peeled & cubed (8 cups): The heart of the dish! Look for heavy, firm squash with matte skin. Chef’s Swap: Sweet potatoes or pumpkin work too!
- 4 shallots, halved: Their delicate sweetness beats onions here. Pantry Rescue: Use 1 small yellow onion in a pinch.
- 8 garlic cloves, peeled: Roasting mellows them into sweet, nutty gold. Don’t skimp!
- 4 tbsp olive oil: Coats our veggies for caramelization magic. Extra virgin adds fruitiness.
- 3 cups chicken stock: Deepens flavor. Vegetarian? Veggie broth rocks too!
- 2 lbs spaghetti: Classic for sauce-hugging. Fun Twist: Rigatoni or fettuccine catch sauce beautifully.
- 1 cup heavy cream: Adds luxurious silkiness. Lighter Option: Half-and-half works, but sauce will be thinner.
- Pinch of ground nutmeg: The secret whisper! It brightens the squash’s sweetness. Freshly grated is *chef’s kiss*.
- Kosher salt & cracked black pepper: Season every layer!
- To Serve: Grated Pecorino Romano (salty kick!) & fresh herbs like thyme, basil, or chives (color + freshness pop!).
Let’s Make Magic Happen: Step-by-Step!
Put on some tunes – this is the fun part! Detailed steps below ensure saucy perfection.
- Roast Those Veggies to Golden Glory: Preheat oven to 425°F (220°C). On a large rimmed baking sheet, toss squash, shallots, and garlic cloves with olive oil, 1 tsp salt, and ½ tsp pepper. Chef’s Hack: Line your sheet with parchment for ZERO stuck-on scrubbing later! Spread everything in a single layer – crowding steams, we want caramelization! Roast 25-30 mins until fork-tender and kissed with brown spots. Your kitchen will smell AMAZING.
- Pasta Power & Liquid Gold: While veggies roast, cook spaghetti in heavily salted water (taste it – it should be like the sea!) until JUST al dente. Critical Tip: RESERVE 1 CUP of that starchy pasta water before draining! This is our sauce-thinning magic potion later. Drain pasta but don’t rinse – we want that starch to grab the sauce!
- Blend It Like You Mean It: Carefully scrape roasted veggies and all their oily juices into a blender or food processor. Add chicken stock. Safety First: Let hot veggies cool 5 mins if using a plastic blender, or vent the lid and cover with a towel. Blend until velvety smooth – about 1-2 minutes. Taste! Add more salt/pepper if needed.
- Sauce Simmer & Creamy Dreams: Pour blended sauce into a large skillet over medium heat. Stir in heavy cream and that pinch of nutmeg. Let it bubble gently for 5 minutes, stirring occasionally. Sauce thickens slightly here – hello, lush texture!
- The Grand Tangle: Add drained pasta directly to the skillet. Toss fiercely with tongs until every strand is coated in orange silk. Texture Rescue: Sauce too thick? Add reserved pasta water, ¼ cup at a time, tossing until it flows perfectly. Too thin? Simmer 1-2 mins more.
- Serve Immediately & Generously: Pasta waits for no one! Dish it up hot.
Plating Your Masterpiece: Simple & Stunning
This beauty speaks for itself! Twirl high piles into wide, shallow bowls (pasta looks gorgeous against white!). Drizzle any extra sauce clinging to the skillet over the top. Now, the bling: shower with grated Pecorino Romano – its salty bite cuts the richness perfectly. Scatter with vibrant fresh herbs – thyme leaves for earthy perfume, basil for sweetness, or chives for oniony zing. Want crunch? Toasted pine nuts or walnuts are fabulous. Serve with crusty bread for sauce-mopping and a simple arugula salad with lemon vinaigrette to balance the creaminess. Pure cozy elegance!
Make It Your Own: Delicious Twists!
Love this base? Try these riffs next time!
- Protein Power-Up: Toss in 2 cups shredded rotisserie chicken, crispy pancetta bits, or Italian sausage crumbles with the pasta.
- Vegan Velvet: Swap chicken stock for veggie broth, cream for full-fat coconut milk, and skip the cheese. Garnish with nutritional yeast for cheesy vibes.
- Green Goddess: Stir in 3 big handfuls of baby spinach or kale right after adding the sauce to the pasta – heat wilts it perfectly.
- Spice It Up: Add ½ tsp red pepper flakes to the veggies before roasting or a swirl of chili oil at the end.
- Bacon & Sage Bliss: Crisp 6 slices chopped bacon. Use bacon fat instead of some olive oil for roasting. Garnish with crispy bacon and fried sage leaves.
Olivia’s Notebook Scribbles
This recipe is my kitchen’s happy place! It evolved from that rainy night when I learned: roasting squash is WAY easier (and tastier!) than wrestling with raw cubes. Over the years, I’ve tweaked – more garlic (always!), shallots instead of onion, nutmeg for depth. One hilarious fail? I forgot to reserve pasta water once, added plain water to thin the sauce… and cried over the bland result. Lesson learned: STARCH IS GOLD. Now, I keep a mug by the pot as a visual reminder! It’s also my go-to for potlucks – doubled, it feeds a crowd and travels well in a slow cooker on ‘warm’. Seeing friends go back for thirds? That’s the real chef’s kiss.
Your Questions, Answered!
Let’s tackle common kitchen hiccups so yours turns out perfect!
- Q: Can I make the sauce ahead? A: Absolutely! Roast and blend the sauce (without cream) up to 3 days ahead. Store in the fridge. When ready, reheat gently, stir in the cream, simmer 5 mins, then toss with freshly cooked pasta. Add extra stock if it thickens in the fridge.
- Q: My sauce is too thin/too thick! Help! A: Don’t panic! Too thin? Simmer it 5-10 mins longer before adding pasta. Too thick? That reserved pasta water is your hero! Add it splash by splash while tossing the pasta until it’s gloriously silky. No pasta water? Warm broth or cream works, but lacks the magic starch.
- Q: Can I freeze this? A: The sauce freezes beautifully (without cream) for up to 3 months! Thaw overnight in the fridge. Reheat, add cream, simmer, then toss with FRESH pasta. Freezing cooked pasta makes it mushy, so I don’t recommend freezing the fully assembled dish.
- Q: Help! My squash isn’t caramelizing, it’s steaming. A: Overcrowding is the culprit! Use two baking sheets if needed. Ensure pieces are in a single layer with space between them. High heat (425°F) is key for browning, not stewing!

Creamy Butternut Squash Pasta
- Total Time: 45 mins
Description
When the crisp breeze hits and leaves start tumbling, this pasta becomes your edible sweater. Creamy butternut squash sauce, roasted to caramelized perfection, wraps around spaghetti like a cozy blanket. It’s soul food in the chicest, simplest form—perfect for slow Sundays, candlelit date nights, or feeding the whole crew with fall flavors in every bite.
Ingredients
-
2 medium butternut squash, peeled & cubed (8 cups)
-
4 shallots, halved
-
8 garlic cloves, peeled
-
4 tbsp olive oil
-
3 cups chicken or veggie broth
-
2 lbs spaghetti (or rigatoni/fettuccine)
-
1 cup heavy cream
-
Pinch ground nutmeg
-
Kosher salt & black pepper
-
Grated Pecorino Romano (to serve)
-
Fresh herbs (thyme, basil, chives)
Instructions
-
Roast: Toss squash, garlic, and shallots with olive oil, salt, and pepper. Roast at 425°F for 25–30 mins until golden and soft.
-
Cook Pasta: Boil in salted water until al dente. Reserve 1 cup pasta water before draining.
-
Blend Sauce: Blend roasted veggies with broth until smooth.
-
Simmer: Pour into a skillet. Stir in cream and nutmeg. Simmer 5 mins to thicken.
-
Combine: Toss pasta with sauce. Add pasta water as needed to reach a creamy consistency.
-
Serve: Top with Pecorino, herbs, and optional toasted nuts. Eat hot!
Notes
-
No squash hassle: Buy pre-cut squash for speed.
-
Sauce too thick? Use reserved pasta water!
-
Vegan swap: Coconut milk + veggie broth + nutritional yeast = dreamy plant-based option.
-
Make ahead: Sauce (no cream) keeps 3 days or freezes 3 months.
- Prep Time: 15 min
- Cook Time: 30 min
Nutrition
- Calories: 420 cal Per Serving
- Fat: 16g
- Carbohydrates: 55g
- Fiber: 6g
- Protein: 12g
Nutritional Information (Per Serving)
Approx. 420 kcal | Carbs: 55g | Fat: 16g | Protein: 12g | Fiber: 6g
Prep Time: 15 mins | Cook Time: 30 mins | Total Time: 45 mins | Servings: 8
Final Thoughts: More Than Just a Recipe
This butternut squash pasta isn’t just about feeding your body—it’s about nourishing your soul. It’s the kind of dish that turns a random Tuesday into a small celebration, a reminder that joy can be as simple as a bowl of carbs and a well-roasted vegetable.
Over the years, I’ve made this for birthdays, breakups, and “just because” nights. It’s been slurped by toddlers (who declared it “orange spaghetti magic”) and savored by grandparents (who asked for thirds). The recipe bends without breaking—vegan, gluten-free, or loaded with bacon—because good food should adapt to your life.
So here’s my wish for you: May your squash caramelize deeply, your pasta water be sufficiently salty, and your kitchen fill with the kind of aroma that makes neighbors peek in to ask, “What’s cooking?” And when you twirl that first forkful, may it taste like the coziest hug autumn ever gave you.
Now go forth, roast boldly, and always save that pasta water.

Vegetable Lasagna with Béchamel
Hello, My Cozy Kitchen Friends!
Is there anything more soul-warming than the scent of garlic, herbs, and bubbling cheese wafting through your home? If your heart does a happy little dance at that thought (mine sure does!), you’re about to fall head-over-apron for today’s star: my Vegetable Lasagna with Béchamel & Basil Vinaigrette. Picture this: layers of tender no-boil noodles hugging roasted seasonal veggies, smothered in a velvety Parmesan béchamel and tangy marinara, all crowned with molten mozzarella. But here’s the magic twist—right before serving, we zigzag a bright, herbaceous basil vinaigrette over the top. It cuts through the richness like sunshine through clouds!
This isn’t just “another lasagna.” It’s a vibrant, veggie-packed hug that’s equally perfect for Sunday family dinners, potlucks where you want to wow, or cozy weeknights when only carbs and cheese will do. And guess what? You absolutely don’t need to be a pro to nail it. I’ll walk you through every step, sharing all my messy-apron secrets. Whether you’re feeding a crowd or stashing slices for future-you (genius move, by the way), this recipe is your ticket to comfort food bliss. Ready to make magic? Let’s grab our spoons and dive in!
The Lasagna That Started a Tradition
This recipe? Oh, it’s got roots! Years ago, my best friend hosted a “Bring-Whatever-You-Have” potluck after a sudden snowstorm. I raided my fridge: sad-looking eggplant, a lone zucchini, half a jar of marinara, and some wilting basil. Desperate times! I layered it all up with a quick béchamel, crossed my fingers, and threw it in the oven. When I pulled it out, golden and bubbling, my friend’s skeptical dad (a die-hard meat-lover) took one bite. His eyes widened. “Olivia… this is it,” he mumbled through a full mouth. He went back for thirds! Now, every first snowfall, he texts me: “Is it lasagna time?” That chaotic kitchen experiment became our snowy-day tradition—proof that the best dishes are born from a little chaos and a lot of heart (and maybe a snowstorm!).
Your Flavor-Packed Toolkit
Gather these goodies! Don’t stress about exact veggie combos—use what’s fresh or hiding in your crisper.
For the Béchamel (Our Creamy Dream):
- 1 cup butter – Unsalted is my go-to for control. Vegan butter works too!
- 1 cup flour – All-purpose builds the perfect roux. For gluten-free, swap in a 1:1 GF blend.
- 8 cups milk – Whole milk = richest sauce. Skim works, but add 2 extra tbsp butter for lushness.
- 2 cups grated Parmesan – Freshly grated melts smoother than pre-shredded (which has anti-caking agents).
- Pinch of grated nutmeg – Trust me! It’s the secret whisper that makes béchamel sing.
- Kosher salt & freshly cracked black pepper – Season in layers—you’ll adjust later!
For the Vegetable Filling (The Colorful Heart):
- 8 tbsp olive oil – Extra-virgin for flavor. Don’t skimp—we’re caramelizing!
- 2 yellow onions, diced – Sweetness base. Red onions add punch if you prefer.
- 4 large carrots, diced – Tiny cubes ensure they soften perfectly.
- 8 cups mixed chopped vegetables – Chef’s hack: Zucchini, squash, and eggplant release water—sauté them first until golden! Bell peppers and mushrooms add umami depth. Frozen veggies? Thaw and pat dry!
- 48 oz marinara sauce – Use your favorite jarred or homemade. Sneak in 2 tbsp balsamic for extra zing.
- 2 cups grated Parmesan – Melts into the sauce for salty richness.
Remaining Ingredients (The Glue & Glory):
- 2 packages (18 oz) no-boil lasagna noodles – Lifesavers! If using regular noodles, boil until al dente and pat dry.
- 2 cups grated Parmesan (for layering) – Layer it generously between noodles!
- 3 lbs shredded mozzarella – Low-moisture melts best. Fresh mozz? Pat dry and slice thin.
- 2 batches basil vinaigrette – Recipe below! Make it while the lasagna bakes.
Let’s Build Some Layers, Lovelies!
Follow these steps for lasagna nirvana—no stress, just yum.
- Make the Béchamel: Melt butter in a heavy-bottomed saucepan over medium heat. Whisk in flour—cook 1-2 mins until it smells nutty (this cooks out raw flour taste!). Slowly whisk in milk, 1 cup at a time, letting it thicken slightly between additions. Chef’s hack: Warm the milk first to prevent lumps! Simmer 10 mins, stirring constantly—it should coat the back of a spoon. Remove from heat; stir in Parmesan, nutmeg, salt, and pepper. Cover with plastic wrap touching the surface to prevent a skin. Set aside.
- Prep the Vegetables: Heat olive oil in a large skillet or Dutch oven over medium-high. Sauté onions and carrots with a pinch of salt for 5 mins (salt draws out moisture!). Add remaining veggies in batches if needed—don’t overcrowd! Cook 12-15 mins until caramelized and tender. Tip: If things get watery, crank the heat to evaporate it! Stir in marinara and 2 cups Parmesan. Simmer 5 mins. Taste! Adjust salt/pepper. Let cool slightly.
- Assemble Like a Boss: Preheat oven to 375°F (190°C). Grab a 9×13-inch baking dish. Spread 1 cup veggie sauce on the bottom (prevents sticking!). Layer in this order:
- Noodles (slightly overlap them)
- ⅓ veggie sauce
- ⅓ béchamel
- 1 cup mozzarella + ¼ cup Parmesan
Repeat layers twice. Top with noodles, remaining béchamel, mozzarella, and Parmesan. Pro move: Leave ½-inch space at the top to prevent bubble-overs!
- Bake to Perfection: Cover tightly with foil. Bake 40 mins. Uncover—bake 15-20 mins until golden, bubbly, and noodles are tender when poked with a knife. Rest 15 mins (CRUCIAL for clean slices!). Drizzle with basil vinaigrette right before serving.
Plating Your Masterpiece
Slide a spatula under a generous square—hear that crispy cheese edge crackle? Plate it on something vibrant (white dishes make colors pop!). Drizzle extra basil vinaigrette over the top and around the plate. Garnish with fresh basil ribbons and cracked pepper. Pair with a simple arugula salad dressed in lemon juice and olive oil to balance the richness. And please: serve with crusty bread for sauce-mopping emergencies!
Make It Your Own!
This lasagna is a canvas! Try these twists:
- Green Goddess: Swap roasted veggies for 8 cups spinach/kale (sauté until wilted, squeeze out liquid!) and add 1 cup pesto to the béchamel.
- Protein Power: Layer in 2 cups ricotta mixed with lemon zest or 3 cups shredded rotisserie chicken.
- Gluten-Free/Dairy-Free: Use GF noodles and swap béchamel for cashew cream (blend 2 cups soaked cashews + 1 cup veg broth + ¼ cup nutritional yeast).
- Spicy Arrabbiata: Use spicy marinara and add red pepper flakes to veggies. Finish with chili oil instead of vinaigrette!
- Mushroom Lover’s: Replace half the mixed veggies with 4 cups sautéed wild mushrooms (shiitake + cremini = heaven).
Olivia’s Extra Crumb (a.k.a. Notes!)
This recipe evolved from my “clean out the fridge” days! The basil vinaigrette was a happy accident—I once mistook it for pesto while rushing. Best mistake ever! Over time, I learned to sauté watery veggies first (looking at you, zucchini!) to prevent a soggy lasagna. One hilariously chaotic Christmas, I forgot the noodles entirely—we ate it as a “deconstructed lasagna bowl” with garlic bread dippers. Verdict? Still delicious. Moral: Cooking should be joyful, not perfect. If your layers slide or cheese browns unevenly, lean in! Call it “rustic” and pass the Chianti.
Lasagna SOS: Your Questions, Solved!
Q: Can I make this ahead?
Absolutely! Assemble 1-2 days ahead. Cover and refrigerate. Add 10 mins to covered bake time if cold from fridge. Unbaked lasagna freezes beautifully for 3 months—thaw overnight in fridge before baking.
Q: Why is my lasagna watery?
Veggies are sneaky! Sauté them until all liquid evaporates. Salt draws out moisture—sprinkle chopped veggies with salt, wait 10 mins, then pat dry with paper towels. Also, let it rest before slicing—it firms up!
Q: Can I use regular lasagna noodles?
Yes! Boil until al dente (about 2 mins less than package says). Rinse in cold water, then lay flat on oiled parchment so they don’t stick. Pat dry before layering.
Q: Help! My béchamel is lumpy.
Don’t panic! Whisk vigorously while adding milk. If lumps remain, blend with an immersion blender or strain through a sieve. Next time, warm the milk first and add it slowly.
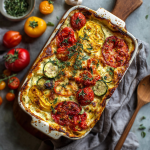
Vegetable Lasagna with Béchamel
- Total Time: 1 hr 40 min
Description
Welcome back to My Cozy Kitchen, friends! If the thought of bubbling cheese, tender noodles, and roasted veggies wrapped in a silky béchamel makes your heart skip a beat—you’re in the right place. This lasagna isn’t just delicious, it’s a feel-good feast wrapped in joy, finished with a zingy basil vinaigrette that cuts through the richness like magic. Whether it’s a snowy Sunday or a potluck showstopper, this one’s a keeper.
Ingredients
Béchamel Sauce
-
1 cup unsalted butter
-
1 cup all-purpose flour
-
8 cups milk (whole preferred)
-
2 cups grated Parmesan
-
Pinch of nutmeg
-
Salt & pepper to taste
Vegetable Filling
-
8 tbsp olive oil
-
2 yellow onions, diced
-
4 large carrots, diced
-
8 cups chopped mixed veggies (zucchini, squash, mushrooms, etc.)
-
48 oz marinara sauce
-
2 cups grated Parmesan
Lasagna Assembly
-
2 (18 oz) packs no-boil lasagna noodles
-
3 lbs shredded mozzarella
-
2 cups grated Parmesan
Basil Vinaigrette (optional but magic!)
-
1 cup fresh basil
-
½ cup olive oil
-
2 tbsp lemon juice
-
Salt to taste
-
Blend all until smooth
Instructions
-
Make Béchamel: Melt butter, whisk in flour. Cook 2 mins. Slowly add warm milk, whisking until smooth. Simmer 10 mins until thick. Stir in Parmesan, nutmeg, salt, and pepper.
-
Cook Veggies: Sauté onions/carrots 5 mins. Add veggies, cook 12–15 mins until tender. Stir in marinara and Parmesan. Simmer 5 mins.
-
Assemble: Preheat oven to 375°F. In a 9×13” dish, layer: noodles → ⅓ veggie mix → ⅓ béchamel → 1 cup mozzarella + ¼ cup Parmesan. Repeat twice. Finish with noodles, béchamel, mozzarella, Parmesan.
-
Bake: Cover with foil. Bake 40 mins. Uncover and bake 15–20 mins more until bubbly and golden. Rest 15 mins. Drizzle basil vinaigrette before serving.
Notes
-
Dry those veggies! Sauté until all moisture is gone—soggy lasagna is a no-go.
-
No béchamel? Use cashew cream or store-bought white sauce.
-
Make-ahead winner: Assemble, cover, and chill. Bake fresh when ready!
- Prep Time: 40 min
- Cook Time: 60 min
Nutrition
- Calories: 460 cal Per Serving
- Fat: 30g
- Carbohydrates: 28g
- Fiber: 4g
- Protein: 20g
Nutritional Nibbles (Per Serving)
Approx. 460 kcal | Carbs: 28g | Fat: 30g | Protein: 20g | Fiber: 4g
Note: Values are estimates. For lower fat, use skim milk and reduce cheese by 25%.
Final Thoughts
This lasagna is more than a recipe—it’s a celebration of imperfection and adaptability. Whether you’re riffing with seasonal veggies or swapping sauces, the heart of it lies in the joy of sharing. So embrace the messy layers, the cheese pulls, and the happy sighs around the table. After all, the best meals are the ones made with a little love and a lot of Parmesan. Buon appetito!
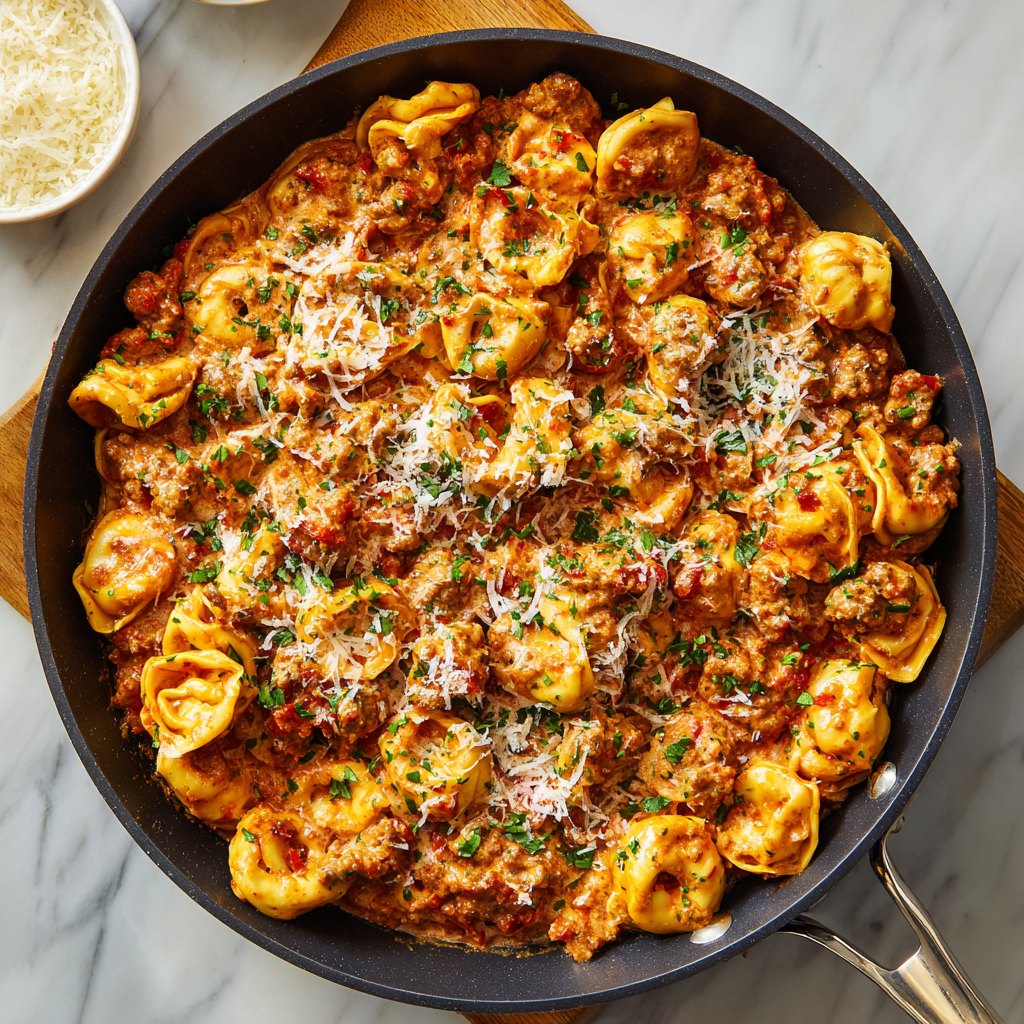
Creamy Spicy Sausage Tortellini
One Pan, Maximum Comfort: Creamy Spicy Sausage Tortellini
Hey there, kitchen friends! Olivia here, waving from my flour-dusted countertop. Can you smell that? It’s the sizzle of spicy sausage meeting garlic, the rich tang of tomato sauce bubbling away, and that velvety cloud of mascarpone swirling into everything. That, my friends, is the sound of your next favorite weeknight miracle coming together. This Creamy Spicy Sausage Tortellini isn’t just dinner—it’s a 30-minute hug in a bowl. Imagine plump, cheesy tortellini swimming in a sauce that’s bold, creamy, and just spicy enough to make you reach for seconds (and thirds). It’s the kind of dish that turns chaotic Tuesdays into cozy celebrations, where the only fancy equipment you need is one trusty skillet and a serious appetite. Whether you’re feeding a crowd or meal-prepping like a boss, this recipe is your golden ticket to flavor town. So grab your apron—let’s make magic happen!
My Italian Grandmother’s Sneaky Shortcut
Okay, story time! This dish always takes me back to my Nonna Rosa’s tiny, steam-fogged kitchen. She’d spend *hours* making fresh pasta, but on wild, rainy nights when my rowdy cousins and I were practically climbing the walls? She’d wink, pull out store-bought tortellini, and whisper, “Our little secret, cara.” Then, she’d whip up this fiery sausage sauce that made us forget all about her famous handmade noodles. That’s the spirit of this recipe: big, unapologetic flavor without the fuss. Nonna knew joy wasn’t in perfection, but in the chaos of us all crammed around her table, mopping up sauce with crusty bread. Now, whenever I make this, I still hear her laugh and feel that same rush of comfort—proof that the best meals are equal parts spice and soul.
Your Flavor Toolkit: Ingredients & Smart Swaps
- 24 ounces spicy Italian sausage, crumbled – The MVP! That fat = flavor gold. Chef’s tip: Squeeze it from casings for perfect crumbles. Swap with mild sausage + extra red pepper flakes if heat-averse.
- 8 garlic cloves, minced – Yes, EIGHT. They mellow into sweet goodness. No fresh garlic? Use 2 tsp garlic powder added with red sauce.
- 2 shallots, sliced – Softer than onions, with a hint of sweetness. Substitute with 1 small red onion.
- 2 teaspoons red pepper flakes – Your heat dial! Start with 1 tsp if nervous. For smokiness, try 1 tsp crushed Calabrian chiles.
- 4 cups red sauce – Your favorite jarred marinara works wonders! Insider hack: Rao’s Arrabbiata adds bonus spice.
- ½ cup heavy cream – Creates luscious body. For lightness, half-and-half works (sauce will be thinner).
- ½ cup mascarpone cheese – The secret silkiness! Cream cheese is a fine sub, but add 1 tbsp butter to mimic richness.
- 2 (9-ounce) packages refrigerated tortellini – Cheese-filled is classic. Pro move: Use spinach or mushroom tortellini for veggie boost!
- Kosher salt & black pepper – Season in layers! Taste after adding cheese.
- Freshly grated Parmesan – The salty, umami crown. Grana Padano or Pecorino Romano are fabulous too.
Let’s Build That Bowl: Step-by-Step
Step 1: Brown that sausage! Heat a large, deep skillet over medium. Add sausage crumbles (no oil needed—they’ll release fat). Cook 5-7 minutes until deeply browned, stirring occasionally. Chef’s hack: Press sausage flat with a spatula for max crispy edges. Drain all but 1 tbsp fat—keeps flavor without greasiness.
Step 2: Aromatics attack! Add garlic, shallots, and red pepper flakes to the sausage. Sizzle for 2-3 minutes until shallots soften and garlic turns fragrant (not brown!). Watch closely—garlic burns fast! This step builds your flavor foundation.
Step 3: Sauce time! Pour in red sauce, scraping any browned bits from the pan bottom (that’s liquid gold!). Bring to a lively simmer—you want bubbles dancing at the edges. Simmer uncovered for 3 minutes to meld flavors.
Step 4: Creamy dream time! Reduce heat to low. Stir in heavy cream, then dollop in mascarpone. Whisk gently until mascarpone melts into a velvety, sunset-orange sauce. No boiling now—high heat can make dairy separate!
Step 5: Tortellini tango! Gently fold in uncooked tortellini. They should be mostly submerged. Cover the skillet tightly and simmer for 4-5 minutes. DO NOT STIR—tortellini are delicate! Peek once to ensure even cooking. They’re done when plump and tender.
Step 6: Season to shine! Turn off heat. Taste (careful—it’s hot!). Add salt and pepper as needed—mascarpone mellows acidity, so you might need more salt than expected. Let sit 2 minutes; sauce thickens beautifully.
Plating Perfection: Serving Ideas
Slide a ladle straight from the skillet into shallow bowls—this dish craves cozy, not fussy! Top with a snowdrift of freshly grated Parmesan and maybe a basil leaf if you’re feeling fancy. Essential sides: Garlic bread for sauce-dunking theatrics, and a crisp arugula salad with lemon vinaigrette to cut the richness. For gatherings? Serve family-style with extra red pepper flakes and Parmesan on the side. And darling, never skip that final olive oil drizzle—it’s like flavor confetti!
Mix It Up: Delicious Twists
- Veggie Power: Swap sausage for 2 cups sliced mushrooms + 1 tsp fennel seeds. Add 2 cups baby spinach with tortellini.
- Chicken & White Wine: Use mild chicken sausage. Deglaze pan with ½ cup dry white wine before adding red sauce.
- Pesto Swirl: Stir 2 tbsp basil pesto into the finished dish for herbal brightness.
- Extra Creamy: Double mascarpone! Add ¼ cup grated fontina with tortellini for stretchy bliss.
- Lightened Up: Use turkey sausage, low-fat cream, and light cream cheese. Bulk up with zucchini ribbons.
The Art of Balancing Spice – How to Adjust Heat Like a Pro
Spice can make or break a dish—too little, and it’s bland; too much, and it’s overwhelming. This recipe walks the perfect line, but customization is key. Here’s how to tweak the heat to suit your taste.
Understanding the Heat Sources
-
Spicy Italian Sausage – The primary heat comes from the sausage, which typically contains red pepper flakes and fennel. If you’re sensitive to spice, opt for mild sausage and adjust later.
-
Red Pepper Flakes – These add a sharp, lingering heat. For a milder dish, reduce to 1 tsp or omit entirely. For extra kick, add ½ tsp more or use Calabrian chiles for a smoky depth.
-
Arrabbiata Sauce (Optional) – If using a spicy marinara like Rao’s Arrabbiata, be mindful—it packs extra heat. A classic marinara keeps things milder.
Ways to Cool It Down
-
Dairy is Your Friend – Mascarpone and heavy cream naturally temper spice. If the dish ends up too fiery, stir in an extra spoonful of mascarpone or a splash of cream.
-
Sweetness Counters Heat – A pinch of sugar or a drizzle of honey can balance excessive spice.
-
Serve with Cooling Sides – A crisp arugula salad with lemon vinaigrette or a dollop of whole-milk ricotta on top can offset the heat.
How to Amp Up the Spice
-
Spicy Garnishes – Finish with extra red pepper flakes, chili oil, or even sliced fresh jalapeños.
-
Hot Honey Drizzle – A trendy twist! Drizzle spicy honey over the finished dish for sweet heat.
-
Infused Sausage – Look for ‘hot’ or ‘extra spicy’ Italian sausage at the butcher counter.
Pro Tip: Always taste as you go—spice levels can vary between sausage brands and red pepper flakes.
Elevating Leftovers – Creative Ways to Reinvent This Dish
Leftovers don’t have to be boring. With a little creativity, this Creamy Spicy Sausage Tortellini can transform into entirely new meals. Here’s how to give yesterday’s dinner a delicious second act.
Breakfast Hash with a Twist
-
Sauté leftover tortellini in a skillet with a little olive oil until crispy.
-
Top with a fried egg and a sprinkle of Parmesan for a hearty breakfast.
-
Add roasted veggies (like bell peppers or spinach) for extra nutrition.
Stuffed Peppers or Tomatoes
-
Hollow out bell peppers or large tomatoes and fill them with the leftover tortellini mixture.
-
Top with mozzarella or breadcrumbs, then bake at 375°F until bubbly (about 20 minutes).
Creamy Tortellini Soup
-
Thin out leftovers with 2 cups of chicken or vegetable broth.
-
Add chopped kale or white beans for heartiness.
-
Simmer until warmed through, then finish with a swirl of pesto.
Baked Tortellini Casserole
-
Mix leftovers with extra marinara and shredded cheese (fontina or provolone work well).
-
Transfer to a baking dish, top with buttery breadcrumbs, and bake at 400°F until golden (about 15 minutes).
Tortellini Grilled Cheese
-
Spread leftover tortellini between sourdough bread with extra mozzarella.
-
Grill in butter until crispy—next-level comfort food!
Pro Tip: If freezing, store the sauce and tortellini separately to maintain texture.
Olivia’s Kitchen Confessions
Fun fact: This recipe was born during a snowstorm when my pantry was bare except for sausage, tortellini, and a jar of sauce! Over the years, it’s evolved: I started adding mascarpone after accidentally dropping some into the sauce (best mistake ever). My husband now calls it “cuddle pasta” because we always make it on lazy Sundays. One tip? Don’t skip the shallots—they add a subtle sophistication that onions just can’t match. And if your sauce ever feels too thick? A splash of pasta water fixes everything. Remember, friends: cooking is 10% recipe, 90% joy!
Your Questions, Answered!
Q: Can I use frozen tortellini?
A: Absolutely! No need to thaw—just add 2-3 extra minutes to the simmer time. Check for doneness by tasting one (the best part of cooking!).
Q: My sauce broke and looks grainy. Help!
A: Dairy can curdle if added to boiling sauce. Fix it by removing from heat, stirring in 1 tbsp cold butter, or blending with an immersion blender. Next time, lower heat before adding cream/mascarpone!
Q: Can I make this ahead?
A: Yes, but store components separately! Cook sausage sauce, then refrigerate. Add tortellini fresh when reheating (they get mushy if stored in sauce). Reheat gently on the stove with a splash of water.
Q: Too spicy for my kids?
A: Easy fix! Use mild sausage and omit red pepper flakes. Serve with a dollop of mascarpone on top to cool bites. Or reserve some sauce pre-spice for little ones!
Creamy Spicy Sausage Tortellini
- Total Time: 30 min
Description
Hey kitchen crew—Olivia here, stirring up a skillet of pure joy! Creamy Spicy Sausage Tortellini is the no-fuss, all-flavor dinner that saves hectic weeknights and makes rainy weekends feel gourmet. Loaded with juicy sausage, pillowy tortellini, and a silky tomato-mascarpone sauce, this one-pan wonder turns pantry staples into a bowl of wow. You bring the appetite—I’ve got the rest.
Ingredients
-
24 oz spicy Italian sausage, crumbled
-
8 garlic cloves, minced
-
2 shallots, sliced
-
2 tsp red pepper flakes (or to taste)
-
4 cups marinara or spicy red sauce
-
½ cup heavy cream
-
½ cup mascarpone cheese
-
2 (9 oz) packs cheese tortellini
-
Salt & black pepper, to taste
-
Fresh Parmesan, for topping
Instructions
-
Sizzle the Sausage: In a large skillet over medium, brown sausage for 5–7 mins. Drain excess fat, leaving 1 tbsp.
-
Build Flavor: Add garlic, shallots, and pepper flakes. Cook 2–3 mins until soft and fragrant.
-
Simmer the Sauce: Pour in red sauce, scrape browned bits, and simmer for 3 mins.
-
Make It Creamy: Reduce heat. Stir in cream and mascarpone until smooth and dreamy.
-
Cook the Tortellini: Fold in uncooked tortellini. Cover and simmer 4–5 mins until tender.
-
Final Touches: Taste and season with salt and pepper. Let rest 2 mins, then serve hot with Parmesan.
Notes
-
Don’t boil after adding cream/mascarpone—low and slow keeps it silky.
-
Use frozen tortellini? No problem—just add 2–3 extra mins.
-
Too thick? Add a splash of pasta water for silky rescue.
-
Serving idea: Garlic bread and arugula salad = perfect match.
- Prep Time: 10 min
- Cook Time: 20 min
Nutrition
- Calories: 480 cal Per Serving
- Fat: 32g
- Carbohydrates: 30g
- Fiber: 3g
- Protein: 18g
Nutritional Notes (Per Serving)
Approx. 480 kcal | Carbs: 30g | Fat: 32g | Protein: 18g | Fiber: 3g
Note: Values are estimates. For lower fat, try turkey sausage and reduced-fat dairy swaps.
Final Thoughts: More Than Just a Meal
This Creamy Spicy Sausage Tortellini isn’t just about convenience—it’s about joy, nostalgia, and the little kitchen victories. It’s the kind of dish that turns an ordinary Tuesday into something special, where the only thing better than the first bite is the second.
Whether you stick to the classic recipe or experiment with twists (hello, pesto swirl!), the beauty lies in its flexibility. It’s forgiving enough for beginners yet impressive enough for dinner parties. And most importantly, it’s a reminder that great food doesn’t have to be complicated—just made with heart (and maybe an extra sprinkle of Parmesan).
Garlic Chili Green Beans with Lemon Zest
Welcome to My Cozy Kitchen, Foodie Friends!
Is there anything more magical than that sizzle-hiss when veggies hit a hot pan? That’s the sound of dinner transforming from “meh” to “MORE!” right before your eyes. I’m Olivia Bennett – your apron-clad cheerleader for bold flavors and uncomplicated cooking. Whether you’re racing against the clock or craving that *pop* of restaurant-worthy flair at home, I’ve got your back. Today? We’re turning humble green beans into a jaw-dropping side dish that’ll steal the spotlight. Garlic Chili Green Beans with Lemon Zest are my weeknight superheroes: crispy, spicy, and brightened with citrus sunshine. They’re ready in 20 minutes flat but taste like you fussed for hours. No fancy skills needed – just a skillet, hungry hearts, and that beautiful mess we call cooking. Let’s make your tastebuds dance!
The Dinner Party That Sparked a Obsession
Picture this: It’s my first big dinner party after moving cross-country. I’m 23, sweating over a stubborn roast, when I realize… I forgot a vegetable dish. Panic mode! I grab the lone bag of green beans languishing in my fridge, some garlic, and the sad-looking lemon on my counter. In a blaze of “what’s the worst that could happen?”, I toss them with chili flakes and pray. Friends, those beans vanished faster than my nerves. My spicy-savvy Aunt Maria chased me around the kitchen for the recipe, laughing: “Olivia! You made rabbit food taste like FIRE!” That chaotic night taught me two things: 1) Imperfect meals create the best memories, and 2) Green beans deserve way more excitement. This recipe? It’s my love letter to quick fixes that wow crowds.
Gathering Your Flavor Arsenal
Makes 8 generous servings – halve easily for smaller crews!
- 2 lbs haricots verts or green beans, ends trimmed – Haricots verts are thinner and more tender (my fave!), but standard green beans work beautifully. Chef’s tip: Snapped beans > cut beans! Hold each end and bend – they break naturally at the perfect point.
- 4 tbsp olive oil – Extra virgin adds fruity depth. Swap: Avocado oil for higher smoke point if you crank the heat.
- 12 garlic cloves, chopped – Yes, TWELVE! They mellow when cooked. Chef’s confession: I often add 15. No vampires here.
- 2 shallots, thinly sliced – Softer, sweeter cousin of onions. Don’t have? Use 1/2 red onion + pinch of sugar.
- 2-4 tsp red pepper flakes – Start low if sensitive! Insider hack: Korean gochugaru flakes add smokiness.
- Flaky salt, to finish – Maldon or Jacobsen. That crunchy saline burst is GOLD.
- Zest of 1-2 lemons – Non-negotiable: Use a microplane! Oils in the zest make the flavor SING.
Let’s Make Magic: Crispy, Fiery, Zingy Perfection
Prep Time: 10 mins | Cook Time: 10 mins | Total Time: 20 mins
- Blanch Like a Boss: Bring a large pot of heavily salted water (tastes like the sea!) to a rolling boil. Add beans and cook just 2-3 minutes until bright green and crisp-tender. Why blanch? It locks in color and texture! Immediately drain and plunge into a bowl of ice water. Chef’s game-changer: Add ice cubes *on top* of beans to keep them fully submerged. Drain again and PAT DRY – soggy beans won’t crisp up!
- Sizzle Your Aromatics: Heat olive oil in a large skillet (cast iron = best crust!) over medium heat. Add garlic and shallots. STIR CONSTANTLY for 2-3 minutes until golden but NOT brown. Burn alert: Garlic turns bitter fast! Lower heat if needed.
- Bring the Heat: Sprinkle in red pepper flakes – listen for that fragrant sizzle! Add beans and toss aggressively with tongs to coat. Cook 2-3 minutes, letting beans char slightly in spots. Hear the crunch? That’s the sound of success!
- The Grand Finale: Remove from heat. Immediately zest lemon directly over skillet – residual heat wakes up the oils. Toss once more. Sprinkle with flaky salt. Pro move: Add extra zest at the table for a fragrant punch!
Plate It Pretty (or Just Fork-Straight-From-Skillet!)
Pile these glistening beans high on a warm platter. Drizzle any garlicky oil left in the pan over top – that’s liquid gold! For dinner parties, scatter extra lemon zest and a pinch of pepper flakes over the mound for Instagram-worthy vibes. They’re the ultimate wingman for simple grilled chicken, seared salmon, or sticky soy-glazed tofu. Weeknight hack? Serve straight from the skillet family-style with crusty bread to mop up the spicy oil. Leftovers? Ha. Good luck.
Shake It Up: 5 Delicious Twists
- Nutty Crunch: Toast 1/3 cup slivered almonds or sesame seeds with the garlic.
- Umami Bomb: Finish with 1 tbsp fish sauce or soy sauce + extra zest.
- Meaty Main: Toss in cooked shrimp or crumbled bacon during last 2 minutes.
- Vegan Creamy-Spicy: Swirl in 2 tbsp coconut milk at the end.
- Citrus Swap: Use lime zest + 1 tsp lime juice for tropical vibes.
Why This Recipe Works (The Science Behind the Deliciousness)
Ever wonder why these Garlic Chili Green Beans taste so much better than your average steamed side? There’s actually some kitchen science at play! Let’s break it down:
1. Blanching for Brightness & Bite
Blanching isn’t just a fancy chef move—it’s essential for locking in that vibrant green color and crisp-tender texture. When green beans hit boiling water, the heat deactivates enzymes that cause dullness and mushiness. The ice bath (a.k.a. “shocking”) halts the cooking instantly, preserving that satisfying snap. Skipping this step? You risk ending up with sad, olive-drab beans.
2. The Maillard Reaction = Flavor Fireworks
Searing the beans in hot oil after blanching triggers the Maillard reaction—the same chemical magic that gives grilled steaks and toasted bread their deep, savory flavor. Those slightly charred spots on your beans? That’s caramelized natural sugars meeting high heat, creating layers of umami.
3. Garlic’s Sweet Spot
Raw garlic punches; burnt garlic stings. But golden, gently sautéed garlic? Chef’s kiss. Cooking it low and slow (but not too slow!) transforms its sharp allicin into mellow, sweet notes. Bonus: Olive oil acts as a flavor carrier, infusing every bite with garlicky richness.
4. Chili Flakes’ Oil Infusion
Adding red pepper flakes to hot oil isn’t just for spice—it’s for flavor extraction. Capsaicin (the compound behind the heat) is fat-soluble, meaning the oil absorbs its vibrancy and distributes it evenly. Pro tip: For more complexity, toast the flakes in the oil for 10 seconds before adding garlic.
5. Lemon Zest’s Citrus Oils
Unlike juice, which can make beans soggy, zest packs concentrated aroma without acidity. The oils in lemon zest (limonene) are volatile—meaning they’re at their peak right after grating. Adding it off-heat preserves that bright, sunny pop.
Fun Experiment: Try swapping lemon zest with orange or grapefruit for a floral twist, or add a pinch of MSG to amplify the savory depth (no shame—it’s a game-changer!).
Pairing Perfection: What to Serve With Your Green Beans
These beans are versatile enough to complement almost any main, but here’s how to build a showstopping meal around them:
For a Light, Fresh Spread:
-
Main: Pan-Seared Lemon Butter Salmon
-
Pairing Logic: The beans’ spice cuts through the salmon’s richness, while the lemon zest ties both dishes together.
-
Add-Ons: Quinoa pilaf with toasted pine nuts, a crisp white wine (Sauvignon Blanc or Pinot Grigio).
For Comfort Food Nights:
-
Main: Garlic-Herb Roasted Chicken
-
Pairing Logic: The beans’ crunch contrasts the tender chicken, and the chili flakes echo any paprika in the rub.
-
Add-Ons: Creamy mashed potatoes (scoop up that extra garlic-chili oil!), a hoppy IPA beer.
For Vegetarian Feasts:
-
Main: Crispy Tofu with Soy-Ginger Glaze
-
Pairing Logic: The beans’ heat balances the glaze’s sweetness, creating a sweet-spicy-umami trifecta.
-
Add-Ons: Steamed jasmine rice, quick-pickled cucumbers.
For Fancy Dinner Parties:
-
Main: Herb-Crusted Rack of Lamb
-
Pairing Logic: The beans’ boldness stands up to lamb’s intensity, while the lemon zest lightens the dish.
-
Add-Ons: Roasted fingerling potatoes, a bold Cabernet Sauvignon.
Leftover Hacks (If You Somehow Have Any):
-
Breakfast: Fold into an omelet with feta cheese.
-
Lunch: Toss with cold soba noodles and tahini dressing.
-
Snack: Top toasted baguette slices with beans and goat cheese.
The Art of Prep: Time-Saving Tips for Busy Cooks
Love this recipe but short on time? Here’s how to streamline it without sacrificing flavor:
1. The Batch Blanch
Blanch a big batch of green beans on Sunday, ice-shock them, and store in a towel-lined container (squeeze out excess moisture). They’ll keep for 3 days—ready for quick sautéing on weeknights.
2. Garlic & Shallot Shortcuts
-
Pre-Chopped Garlic: Store-bought works in a pinch (use 1.5x the amount to compensate for milder flavor).
-
Freeze Your Aromatics: Chop garlic and shallots in bulk, freeze in teaspoon portions in ice cube trays, then pop out as needed.
3. Heat Control for No-Fuss Cooking
-
Nonstick Skillet Hack: Use medium heat only—no need to babysit.
-
Oven Finish: Too busy to stir? After sautéing, spread beans on a sheet pan and roast at 425°F for 5 minutes for extra crispness.
4. Kid-Friendly Adaptations
-
Mild Version: Replace chili flakes with smoked paprika for depth without heat.
-
Fun Presentation: Let kids “decorate” their plates with lemon zest “confetti.”
5. Disaster Recovery
-
Too Spicy? Add a drizzle of honey or maple syrup to balance.
-
Overcooked? Revive with a splash of vinegar (apple cider or rice wine) and call it a “warm bean salad.”
Pro Time-Saver: Use a mandoline for the shallots—paper-thin slices in seconds!
Olivia’s Extra Pinch of Love
This recipe evolved from my “kitchen sink” days into my most-requested side! Early versions used powdered garlic (cringe!), but fresh cloves make ALL the difference. Funny story: Once subbed cayenne for flakes while distracted by my barking pug… let’s just say we needed emergency yogurt on standby! Now I keep a bowl of cool yogurt on the table when serving spicy newbies. The beans also shrink slightly when cooked – don’t panic! That flavor concentration is intentional. Over the years, I’ve learned: UNDERCOOK them slightly during blanching. They’ll finish perfectly in the skillet. Trust the process – and your tastebuds!
Your Questions, My Answers!
Q: My beans turned out soggy! What went wrong?
A: Two likely culprits: Over-blanching (stick strictly to 2-3 mins!) or not drying thoroughly after the ice bath. Water = enemy of crispness! Pat like your crunch depends on it.
Q: Can I use frozen green beans?
A: Absolutely! Thaw completely and pat EXTRA dry. Skip blanching – sauté frozen beans 1 minute longer. Texture differs slightly, but flavor still rocks.
Q: How do I tone down the heat for kids?
A: Reduce flakes to 1 tsp and add them with the lemon zest OFF the heat (less oil infusion = milder spice). Serve yogurt or ranch for dipping!
Q: Can I prep components ahead?
A: YES! Blanch beans and ice-shock them up to 24 hours ahead. Store dried in a towel-lined container. Chop garlic/shallots morning-of. Sauté just before serving!

Garlic Chili Green Beans with Lemon Zest
- Total Time: 20 min
Description
Turn a humble veggie into a crowd-stunner with Olivia’s spicy, citrus-kissed green beans. Whether you’re hosting a dinner party or need a quick zingy fix for Tuesday night dinner, this recipe brings restaurant-level flavor without the stress. One skillet, zero stress, all the wow.
Ingredients
-
2 lbs green beans or haricots verts, ends trimmed
-
4 tbsp olive oil
-
12 garlic cloves, chopped
-
2 shallots, thinly sliced
-
2–4 tsp red pepper flakes (to taste)
-
Zest of 1–2 lemons
-
Flaky salt, to finish
Instructions
-
Blanch Like a Pro: Boil salted water. Cook beans for 2–3 mins till bright green. Ice-shock immediately, then pat dry.
-
Sizzle Magic: Heat oil over medium. Add garlic and shallots. Stir constantly for 2–3 mins till golden.
-
Bring the Fire: Add chili flakes. Toss in green beans, cook 2–3 mins till lightly charred.
-
Zest & Serve: Remove from heat. Zest lemon directly over the pan. Finish with flaky salt. Toss once more and serve hot!
Notes
-
Max crunch: Pat beans completely dry post-blanch.
-
Spice balance: Add chili flakes at the end for less heat.
-
Make ahead: Blanch beans 1 day early; sauté fresh before serving.
-
Zest smart: Microplane brings out citrus oils—don’t skip it!
- Prep Time: 10 min
- Cook Time: 10 min
Nutrition
- Calories: 120 cal Per Serving
- Fat: 8g
- Carbohydrates: 10g
- Fiber: 4g
- Protein: 3g
Nutritional Per Serving (Approx):
Calories: 120 | Carbs: 10g | Fat: 8g | Protein: 3g | Fiber: 4g
Final Thoughts: More Than Just a Side Dish
These Garlic Chili Green Beans aren’t just a recipe—they’re a reminder that the best meals often come from happy accidents (like my dinner party panic!). They celebrate how a few humble ingredients, treated with care, can outshine even the fanciest mains.
So here’s my challenge to you: Make this once as written, then play! Swap the chili for harissa, the lemon for yuzu, or toss in crispy prosciutto bits. Cooking isn’t about perfection; it’s about the sizzle, the smells, and the stories you’ll tell when your aunt begs for the recipe.
Now, go forth and make those beans sing. And when you do, tag me @OliviasCozyKitchen—I want to see your spicy, zesty masterpieces!

Loaded Vegetarian Enchiladas
Hey There, Enchilada Enthusiasts! Let’s Get Cozy with Veggie Magic
Is there anything more soul-warming than pulling a bubbling pan of enchiladas out of the oven? That waft of smoky spices, melted cheese, and roasted veggies feels like a hug for your taste buds. If you’re anything like me (Olivia!), you believe meatless meals should be bold, satisfying, and packed with personality. That’s exactly why these Loaded Vegetarian Enchiladas are my go-to for Taco Tuesday, potlucks, or anytime I need a guaranteed crowd-pleaser. Forget sad salads – we’re talking vibrant sweet potatoes, hearty black beans, charred corn, and peppers all wrapped up in a warm tortilla blanket, smothered in rich sauce, and baked until gloriously golden. It’s comfort food that celebrates vegetables, feeds a crowd without fuss, and leaves everyone licking their plates. Grab your favorite apron (the messy one tells the best stories!), and let’s turn simple ingredients into something unforgettable together.
The Fiesta That Started It All: My Enchilada “Aha!” Moment
Picture this: My tiny college apartment kitchen, circa 2010. I was hosting six friends for a “Frugal Fiesta,” determined to prove vegetarian food could wow even my most die-hard carnivore pals. My budget? Tight. My cooking confidence? Wobbly. I threw together roasted sweet potatoes, a can of black beans I’d rinsed like my life depended on, the last sad peppers from the fridge bin, and a packet of taco seasoning (don’t judge!). I rolled them haphazardly into tortillas, drowned them in a jar of sauce, and blanketed them with an entire bag of bargain cheese. As they baked, I panicked. “Is this just… gloppy bean mush?” But when I pulled that steaming dish out? Magic. The cheese was perfectly blistered, the sauce bubbled invitingly, and the scent? Heavenly. My friends DEVOURED them. One bite and my buddy Mark, notorious steak-lover, mumbled through a full mouth: “Okay, Bennet. You win. These are insane.” That messy, chaotic, cheese-filled triumph became the blueprint for this recipe. It taught me that heart, bold flavors, and a little melted cheese magic could turn humble veggies into pure celebration. Every time I make them now, I smile remembering that kitchen win.
Your Flavor-Packed Arsenal: What You’ll Need
Here’s the dream team of ingredients that makes these enchiladas sing. Don’t stress about perfection – cooking is about playing! I’ve sprinkled in my favorite swaps and chef secrets:
- 2–4 tbsp olive oil: Our flavor conductor! Use the full 4 tbsp if your skillet isn’t non-stick. Extra virgin adds fruitiness.
- 2 onions, diced: Yellow or white work best here. They build that essential sweet, savory base. No onions? Try leeks!
- 8 garlic cloves, roughly chopped: Don’t mince! Rough chops release flavor slowly while sautéing. Jarred minced works in a pinch (use 4 tsp).
- 2 red bell peppers, diced: Sweetness and color! Orange or yellow bells are great subs. Need heat? Swap one for a poblano or jalapeño.
- 2 small yams or sweet potatoes, diced small (about 1/2-inch cubes): *The* hearty star! Dicing small ensures they cook fast. Zucchini (salted & drained) works if you’re out, but sweet potato adds soul.
- 1 tsp salt: Crucial for layering flavors. Start here, taste later! I use kosher salt.
- 2 ears of corn, kernels cut off (or 2 cups frozen/other veggies): Fresh summer corn is bliss, but frozen (thawed) is 100% fine year-round. Peas or diced zucchini are fun swaps.
- 2 tsp ground cumin: Earthy, smoky warmth. Non-negotiable for that authentic vibe! Toast it briefly in the pan for extra oomph.
- 2 tsp ground coriander: Cumin’s bright, citrusy cousin. Lifts the whole spice blend. No coriander? Add an extra 1 tsp cumin + a pinch of lemon zest.
- 2 tsp dried oregano: Mexican oregano is ideal (slightly more floral), but regular Mediterranean works beautifully too.
- 2 (14-oz) cans black beans, rinsed and drained: Protein power! Rinsing removes excess sodium and that starchy can liquid. Pinto or kidney beans are tasty alternatives.
- ½ cup chopped cilantro (optional but recommended!): Fresh herb pop! If cilantro tastes soapy to you, use parsley or a squeeze of lime juice instead.
- 4 cups enchilada sauce: Homemade is divine, but a good store-bought red sauce is your weeknight hero (I love brands like Frontera or Hatch).
- 16 whole wheat or corn tortillas (8-inch): Corn = classic GF vibe. Whole wheat = nutty & sturdy. *Key Tip:* Warm them briefly (microwave or skillet) so they roll without cracking!
- 4 cups grated cheese (16–20 oz): MELTINESS! Pepper jack = spicy kick. Mexican blend = easy perfection. Cheddar = sharp comfort. Mozzarella = ultra-stretchy. Vegan? Violife or Miyoko’s shreds melt amazingly.
Optional Garnish Superstars: Sour cream (cooling!), avocado slices (creamy!), pickled red onions (tangy crunch!), hot sauce (fire!).
Let’s Roll! Your Foolproof Enchilada Assembly Line
Okay, team! Let’s transform these beauties from pantry to plate. Follow these steps, lean into my chef hacks, and you’ll have enchilada mastery in no time:
- Preheat & Prep: Crank that oven to 375°F (190°C). This ensures it’s perfectly hot when your dish is ready to bake. Grab two 9×13″ baking dishes – trust me, doubling up prevents overcrowding and ensures even cooking. Chef Hack: Lightly spray the dishes with oil for easier cleanup later!
- Sizzle Your Flavor Base: Heat the olive oil in a large skillet over medium heat. Toss in the onions, garlic, bell peppers, yams/sweet potatoes, and salt. Sauté for 8–10 minutes, stirring occasionally. You want those onions translucent and the sweet potatoes just starting to soften (they’ll finish cooking in the oven!). Chef Insight: Don’t rush this step! Building flavor here is KEY. If things stick, add a splash of water or broth.
- Spice It Up! Time for aroma therapy! Stir in the corn, cumin, coriander, and oregano. Cook for 2 more minutes, letting those spices toast and wake up. Your kitchen should smell incredible right now. Pro Tip: Smell the spices as you add them – if they lack punch, they might be old! Fresh spices make a world of difference.
- Beans & Greens Finale: Add the rinsed black beans and cilantro (if using). Stir everything gently but thoroughly to combine. Remove the skillet from the heat. Taste it! This is your moment. Need more salt? A pinch more cumin? Adjust now! Let the filling cool slightly while you prep the tortillas – hot filling = steamy, breakable tortillas.
- Sauce the Stage: Pour ½ cup enchilada sauce into the bottom of *each* baking dish. Spread it evenly. This creates a saucy barrier preventing sticking and adds flavor to every bite. No-Skip Hack!
- The Art of the Roll: Warm your tortillas – stack them on a plate, cover with a damp paper towel, and microwave for 30 seconds, OR heat individually in a dry skillet for 10-15 sec per side. Place a tortilla flat. Spoon a generous 1/3 to 1/2 cup of filling down the center. Sprinkle with a small handful of cheese (reserve most for the top!). Roll it up snugly but gently. Place it seam-side down in the sauced dish. Repeat, packing them snugly side-by-side. Rolling Pro-Tip: Don’t overfill! It makes rolling messy. 8 tortillas per dish is perfect.
- Smother & Bake: Pour the remaining enchilada sauce evenly over the rolled tortillas. Sprinkle the remaining cheese gloriously over the top – be generous! Cover the dishes tightly with foil. Bake for 20 minutes. This steams the enchiladas, melding flavors and heating them through. Then, remove the foil and bake for another 10–15 minutes until the sauce is bubbling enthusiastically around the edges and the cheese is melted, golden, and possibly slightly blistered in the best way. Watch Closely: Ovens vary! Your golden perfection signal is that gorgeous bubbling.
- Rest is Best: Resist the urge to dive in immediately! Let the enchiladas rest for 5-10 minutes after baking. This lets them set slightly, making serving WAY cleaner (no filling avalanche!).
Plating Perfection: Making It Look (and Taste!) Amazing
We eat with our eyes first! Use a sturdy spatula to lift out two enchiladas per serving. Slide them onto plates or shallow bowls with a little extra sauce spooned from the dish. Now, the fun part: garnish like an artist! A dollop of cool sour cream or tangy Greek yogurt, a few creamy avocado slices, a vibrant scatter of those zippy pickled red onions, and maybe a cheeky drizzle of hot sauce for the brave. A final sprinkle of fresh cilantro adds color and brightness. Serve immediately while everything is gloriously warm and melty! These pair amazingly with a simple green salad with lime vinaigrette or a refreshing mango salsa on the side.
Mix It Up! Delicious Twists on the Classic
This recipe is your canvas! Here are 5 fun ways to play:
- Butternut Bliss: Swap sweet potatoes for roasted butternut squash cubes. Add a pinch of cinnamon to the spices for warmth.
- Green Goddess: Use green enchilada sauce! Swap black beans for pinto, add a cup of chopped spinach to the filling when you add the beans, and use Monterey Jack cheese.
- Protein Power-Up: Crumble in 1 cup cooked lentils or quinoa with the beans for extra protein. Smoked tofu crumbles work too!
- Roasted Veggie Fiesta: Roast the sweet potatoes, peppers, and onions on a sheet pan at 400°F (200°C) for 20 mins before adding to the skillet. Deepens the flavor!
- Low-Carb Wrap: Skip the tortillas! Layer the filling and sauce like a lasagna using large slices of zucchini or eggplant. Top with cheese and bake.
Olivia’s Kitchen Confessions & Pro Insights
These enchiladas have seen some things! Remember that college fiesta? I once used flour tortillas so old they cracked like desert earth. Lesson learned: always warm your tortillas! Over the years, I’ve tweaked the spice balance (more coriander!), embraced frozen corn without guilt, and discovered the magic of lightly charring the peppers and corn in the skillet for extra depth (try it!). One snowy night, I added a cup of leftover roasted pumpkin – divine! The biggest evolution? Embracing the “messy apron” philosophy. Enchiladas aren’t meant to be pristine. Embrace the sauce splatters, the cheese strands, the slightly lopsided roll. It’s homemade, heart-made food. That little rest period after baking? Game-changer. Learned that after one too many “enchilada slides” onto plates. Now, I use that time to whip up the garnishes!
Your Enchilada Questions, Answered!
Let’s tackle those common kitchen hiccups before they happen:
- “Help! My tortillas keep cracking when I roll!” This is the #1 issue! WARM THEM PROPERLY! The steam makes them pliable. Cover stack with damp paper towel & microwave 30-60 sec, or heat individually in a dry skillet over medium heat for 10-15 sec per side until soft and flexible. Also, don’t overfill!
- “My enchiladas came out soggy. What went wrong?” Sogginess usually comes from: 1) Over-saucing inside the rolls – keep the filling fairly dry, sauce goes mainly on top/bottom. 2) Not reducing store-bought sauce enough – some brands are watery. Simmer it for 5-10 mins on the stove to thicken slightly before using. 3) Letting assembled enchiladas sit too long before baking – get them in the oven!
- “Can I make these ahead of time?” Absolutely! Assemble completely (sauce, rolled tortillas, top sauce/cheese) in the baking dishes. Cover TIGHTLY with foil and refrigerate for up to 24 hours. Bake straight from the fridge, adding 5-10 mins to the covered baking time. You can also freeze the assembled, unbaked dish (foil then plastic wrap) for up to 3 months. Thaw overnight in the fridge before baking as directed.
- “My cheese browned too fast before the inside was hot!” Your oven might run hot, or your rack is too high. Always bake covered for the first 20 mins! If the cheese browns too quickly *after* uncovering, tent loosely with foil again. Next time, try baking on the middle rack and double-check your oven temp with a thermometer.

Loaded Vegetarian Enchiladas
- Total Time: 1 hour
Description
Stuffed with roasted sweet potatoes, black beans, and charred corn, then smothered in smoky enchilada sauce and melted cheese – these veggie-packed enchiladas are hearty enough to satisfy even carnivores!
Ingredients
Filling:
-
2 tbsp olive oil
-
1 onion, diced
-
3 cloves garlic, minced
-
1 red bell pepper, diced
-
2 cups diced sweet potato (½-inch cubes)
-
1 tsp salt
-
2 tsp cumin
-
1 tsp coriander
-
2 cups corn kernels (fresh or frozen)
-
2 cans (15oz) black beans, rinsed
-
½ cup chopped cilantro
Assembly:
-
16 corn or flour tortillas (8-inch)
-
4 cups enchilada sauce
-
3 cups shredded cheese (Mexican blend or cheddar)
Garnishes (optional):
-
Avocado, sour cream, pickled onions, lime wedges
Instructions
-
Preheat oven to 375°F (190°C). Lightly grease two 9×13″ baking dishes.
-
Make filling:
-
Heat oil in a large skillet over medium heat. Sauté onion, garlic, bell pepper, and sweet potato with salt for 8-10 mins until softened.
-
Stir in spices and corn; cook 2 mins more.
-
Remove from heat. Mix in beans and cilantro.
-
-
Assemble enchiladas:
-
Spread ½ cup sauce in each baking dish.
-
Warm tortillas slightly (microwave 30 secs wrapped in a damp towel).
-
Fill each tortilla with ⅓ cup filling + sprinkle of cheese. Roll tightly and place seam-side down in dishes.
-
-
Bake:
-
Top with remaining sauce and cheese.
-
Cover with foil; bake 20 mins. Uncover and bake 10 more mins until bubbly.
-
-
Rest 5 mins before serving with garnishes.
Notes
✅ Warm tortillas first to prevent cracking
✅ Use freshly grated cheese for best meltiness
✅ Make ahead: Assemble unbaked enchiladas and refrigerate overnight
- Prep Time: 30 mins
- Cook Time: 30 mins
Nutrition
- Calories: 440 cal Per Serving
- Fiber: 10g
- Protein: 18g
Nutritional Info (Per Serving, Serves 8)
Approximate values based on specific ingredients used (e.g., store-bought sauce, full-fat cheese):
- Calories: ~440
- Fat: 20g
- Carbohydrates: 45g
-
Final Thoughts: More Than Just a Meal
These enchiladas represent everything I love about cooking: tradition meeting creativity, humble ingredients transformed into something extraordinary, and the joy of sharing food that nourishes both body and soul. They’ve been there for my college fiestas, snowy weeknights, and even postpartum meal trains—proving their versatility time and again.
What makes them truly special isn’t just the smoky spices or melty cheese (though those help!). It’s how they bring people together. There’s something magical about the communal act of passing a steaming pan, scraping up the crispy-edged bits, and watching even the most devout meat-lovers reach for seconds.
So whether you’re cooking for one or feeding a crowd, remember: perfection is overrated. A little mess, a lot of heart, and a generous hand with the sauce will always lead to enchiladas worth celebrating. Now, who’s ready for seconds?
Recent Posts
- Thai Shrimp Lettuce Wraps : Fresh, Flavorful & Ready in 20 Minutes

- Easy Hawaiian Pineapple Cake with Cream Cheese Frosting

- Strawberry Rhubarb Pie : A Sweet & Tangy Classic with a Flaky Crust

- Crispy Seafood Egg Rolls : Golden, Crunchy & Loaded with Flavor

- Chocolate Dump Cake : Rich, Gooey, and Amazingly Easy
