
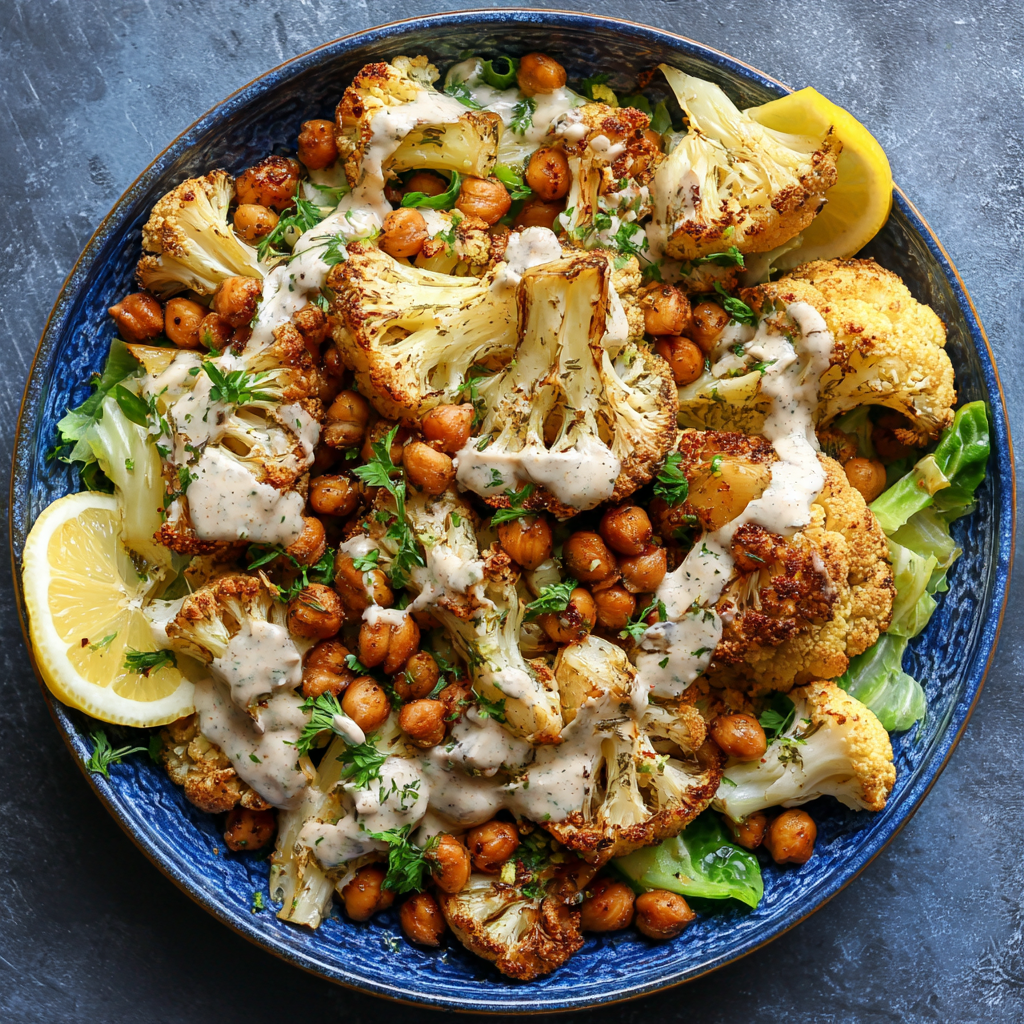
Roasted Cauliflower & Chickpeas
Roasted Cauliflower & Chickpeas with Za’atar Tahini Sauce: Your New Plant-Based Obsession
Hey there, kitchen friends! Olivia here, back with a recipe that’s about to become your weeknight superhero. Imagine this: golden, crispy-edged cauliflower and plump, toasty chickpeas tumbling out of the oven, all drenched in a luscious, herby tahini sauce that sings with Middle Eastern sunshine. That’s exactly what this Roasted Cauliflower & Chickpeas with Za’atar Tahini Sauce delivers – simple, nourishing, and exploding with flavor that makes your taste buds do a happy dance.
Whether you’re a dedicated plant-based foodie, a busy parent scrambling for a hearty side, or someone just craving a big ol’ bowl of cozy deliciousness, this dish is your jam. I’ve doubled the batch because, trust me, you’ll want leftovers. This isn’t just dinner; it’s tomorrow’s epic grain bowl topper, your lunch salad’s flavorful base, or even a surprising star at your next potluck. No fancy skills required – just good vibes, simple ingredients, and about 40 minutes. Let’s turn humble veggies into something unforgettable together!
Why do I adore this combo? Cauliflower is the ultimate blank canvas, soaking up spices and roasting into caramelized perfection. Chickpeas? They bring the protein punch and that addictive crunch. And that za’atar tahini sauce? Oh, honey. It’s creamy, tangy, earthy, and bright all at once – the kind of sauce you’ll want to drizzle on everything. Ready to fill your kitchen with the kind of aroma that makes everyone wander in asking, “What smells SO good?” Let’s get roasting!
The Little Spice Jar That Started It All
This recipe takes me straight back to a tiny, sun-drenched spice stall in Jerusalem’s Old City. I was 22, backpacking solo, feeling equal parts exhilarated and overwhelmed. The vendor, a man with kind eyes and flour-dusted hands, offered me a pinch of his family’s za’atar blend. “Taste the land,” he said. That first hit – the earthy sumac, the toasty sesame seeds, the wild thyme – felt like unlocking a secret. I bought a little jar, not knowing then how often I’d reach for it back home.
Years later, during one of those chaotic “what’s-left-in-the-pantry?” weeknights, that jar caught my eye. I tossed cauliflower and chickpeas with olive oil, roasted them until they sang, and whisked tahini with lemon, garlic, and that precious za’atar. The first bite? Pure magic. It tasted like adventure and comfort rolled into one. Now, every time I make this dish, I’m back at that bustling market, reminded that the simplest ingredients, sparked by a memory, can create the most joyful meals. It’s become my edible postcard – no plane ticket required.
Gather Your Flavor Squad (Double Batch = Double the Yum!)
Here’s everything you’ll need to whip up this plant-powered feast. Don’t stress about perfection – I’ve got swaps and insights for you!
For the Roast:
- 2 large heads of cauliflower, chopped into florets: The star! Look for tight, creamy-white heads. Chef’s Hack: Don’t discard the tender inner leaves/stems – chop and roast them too for zero waste! Sub: Broccoli works great if cauliflower’s MIA.
- 2 cans (15 oz each) cooked chickpeas, rinsed and drained: Protein & crunch heroes! Rinsing well removes excess sodium and that starchy liquid. Chef’s Tip: Pat them super dry with a towel – this is the secret to getting them crispy, not soggy! Sub: White beans like cannellini are milder but still tasty.
- 2 tbsp + 2 tsp olive oil: Our roasting magic. Use a good extra virgin for flavor. Sub: Avocado oil works beautifully for high heat.
- Salt & pepper to taste: Flavor foundations! Start with 1 tsp salt & ½ tsp pepper; adjust after roasting.
For the Za’atar Tahini Sauce:
- 4 tbsp tahini: Creamy sesame paste base. Chef’s Insight: Stir your tahini jar REALLY well first (oil separates). Use a good quality one – it makes all the difference! Sub: Plain Greek yogurt (not vegan) or sunflower seed butter for nut-free.
- 2 garlic cloves, minced: Flavor punch! Chef’s Hack: Use a microplane for super-fine mince that blends seamlessly. Sub: ½ tsp garlic powder if fresh is too intense.
- Juice of 1 lemon: Essential tang! Fresh is best here. Tip: Roll the lemon on the counter before juicing to get more yield.
- 4 tbsp water (add more for desired consistency): Thins the sauce. Start with 4 tbsp, add 1 tsp at a time until it’s drizzle-able.
- 2 tbsp za’atar: The flavor MVP! This Middle Eastern blend (thyme, sumac, sesame) is irreplaceable. Find it in spice shops or international aisles. Chef’s Note: Check the label – some blends have salt, so adjust your added salt accordingly.
- Salt & pepper to taste: Balance the sauce. Start with a pinch of each.
Let’s Make Some Magic: Step-by-Step
Follow these simple steps for crispy, golden goodness and creamy dreamy sauce. I’m sharing all my kitchen hacks along the way!
- Preheat & Prep (The Hot Start): Crank that oven to 425°F (220°C). Why so hot? High heat = maximum caramelization and crispy edges on our veggies and chickpeas! Chef’s Hack: Place your baking sheets in the oven while it preheats. A hot pan jumpstarts the crisping process the second the food hits it! (Just be careful when adding the veggies later!).
- Toss with Love (Coating is Key): In a large bowl, combine the cauliflower florets and the very well-dried chickpeas. Drizzle with the olive oil, sprinkle generously with salt and pepper. Now, get your hands in there! Toss, massage, and coat everything evenly. Chef’s Insight: Hands work better than spoons for ensuring every nook and cranny gets coated. This oil layer is what creates that glorious browning.
- Spread & Roast (Golden Perfection Awaits): Carefully remove the hot baking sheets from the oven (if you preheated them). Divide the cauliflower and chickpea mixture evenly between the two sheets. Spreading them out in a single layer is CRUCIAL! Overcrowding = steaming = soggy veggies. We want space for hot air to circulate. Pop them into the oven. Chef’s Hack: Position one rack in the upper third and one in the lower third of your oven. Rotate the sheets and swap racks halfway through roasting (around the 15-18 minute mark). This ensures even cooking and browning.
- Flip & Finish (Crisp Factor): Roast for 30-35 minutes total. At the halfway mark (when you rotate the sheets), grab a sturdy spatula and give everything a good flip/stir. This exposes new surfaces to the heat, maximizing crispiness. They’re done when the cauliflower is tender with deep golden-brown spots and the chickpeas are slightly shrunken and crispy. Chef’s Tip: If your chickpeas are browning too fast before the cauliflower is tender, you can scoop them out for the last 5-10 minutes.
- Whisk the Wonder Sauce (Creamy Dream): While the veggies roast, make the sauce. In a medium bowl, combine the tahini, minced garlic, lemon juice, water, za’atar, salt, and pepper. Whisk vigorously! At first, it might look lumpy or seize up – don’t panic! Keep whisking; it WILL smooth out into a creamy, dreamy consistency. Chef’s Hack: Add the water gradually. Start with 3 tbsp, whisk, then add the 4th (or more 1 tsp at a time) until it’s thick but pourable, like runny honey. Taste! Adjust lemon, salt, or za’atar as needed. Set aside.
- Serve & Shower with Sauce (The Grand Finale): Once the cauliflower and chickpeas are gloriously roasted, pull them out. Let them rest for just a minute (they crisp up a tad more!). Transfer to a large serving platter or divide among bowls. Now, the best part: drizzle that incredible za’atar tahini sauce GENEROUSLY over the top. Chef’s Flair: Finish with a flourish – a sprinkle of extra za’atar, some fresh chopped parsley or cilantro, maybe a little lemon zest? Boom. Restaurant-worthy at home.
How to Serve Your Masterpiece
This dish is a shape-shifter! Serve it piping hot straight off the baking sheet family-style for maximum cozy vibes. Pile it high on a platter, letting that tahini sauce cascade down the sides. For a heartier meal, spoon it warm over a bed of fluffy quinoa, brown rice, or couscous – it soaks up the sauce beautifully. Feeling salad-ish? Let the roasted mix cool slightly and toss it with fresh baby spinach or arugula; the warm veggies will gently wilt the greens. Leftovers? Cold from the fridge, it’s an amazing grain bowl component or wrap filling with hummus. Don’t forget those garnishes: a final sprinkle of za’atar, fresh herbs (parsley, cilantro, dill!), or bright lemon zest adds that fresh pop!
Mix It Up! 5 Flavorful Twists
Love the base? Try these fun spins to keep it exciting:
- Mediterranean Feta & Olive: Crumble over ½ cup of tangy feta cheese and a handful of chopped Kalamata olives after drizzling the sauce. (Not vegan).
- Harissa Heat: Whisk 1-2 tsp of harissa paste into the tahini sauce for a smoky, spicy kick. Or toss the veggies with 1 tsp harissa before roasting!
- Lemon-Herb Power Bowl: Serve the roast over greens, add sliced cucumber, cherry tomatoes, and avocado. Thin the tahini sauce with a bit more lemon juice and water for a vibrant dressing.
- Sweet Potato Boost: Add 1 large sweet potato (cut into ½-inch cubes) to the roasting pan. It adds sweetness and extra heartiness (roasting time might need 5 mins more).
- Nutty Crunch: Sprinkle with toasted pine nuts, slivered almonds, or pumpkin seeds just before serving for extra texture and richness.
Olivia’s Kitchen Chatter
This recipe? It’s evolved like a good friendship. That first Jerusalem-inspired version was simple, but over countless batches (and a few happy accidents!), it’s become this weeknight staple. Like the time I forgot the za’atar in the sauce until the *very* end – panic whisked it in, and discovered it actually preserved the blend’s vibrant aroma better! Now I always add it last. Or the chickpea saga: after one too many soggy batches, I learned the towel-drying trick, which was a total game-changer. The best part? Seeing how you guys make it your own! Tag me @OliviasCozyKitchen with your creations – I’ve seen everything from added roasted red peppers to using it as pizza topping (genius!). It’s proof that the best recipes aren’t set in stone; they’re living things that grow with us. Keep experimenting, keep tasting, and most importantly, keep enjoying the process. Messy aprons and all!
Your Questions, Answered!
Let’s tackle those common kitchen hiccups before they happen:
- Q: My chickpeas are still soft, not crispy! Help!
A: Soggy chickpeas are usually a moisture issue. Did you rinse AND pat them bone-dry with a clean kitchen towel? That’s step one! Also, ensure they’re in a single layer with space. If the pan’s crowded, they steam. Finally, oven temp is key – make sure it’s fully preheated to 425°F. If needed, roast them 5 mins longer than the cauliflower. - Q: My tahini sauce seized up/looks grainy! Did I ruin it?
A: Absolutely not! Tahini can be dramatic when it first meets lemon juice or cold water. Just keep whisking vigorously! It will magically smooth out. If it’s still too thick after whisk - Print

Roasted Cauliflower & Chickpeas
- Total Time: 40 mins
Description
Roasted Cauliflower & Chickpeas with Za’atar Tahini Sauce
*A crispy, creamy plant-powered dish ready in 40 minutes!*
Ingredients
ScaleFor the Roast:
-
1 large cauliflower, cut into florets (~6 cups)
-
1 can (15 oz) chickpeas, rinsed, drained, pat-dried
-
3 tbsp olive oil
-
½ tsp salt, ¼ tsp black pepper
For the Sauce:
-
¼ cup tahini (well-stirred)
-
2 tbsp lemon juice (fresh)
-
2 tbsp water (adjust for thickness)
-
1 garlic clove, minced
-
1 tbsp za’atar (+ extra for garnish)
-
¼ tsp salt
Optional Garnish:
-
Fresh parsley, lemon zest, chili flakes
Instructions
1. Roast the Veggies
-
Preheat oven to 425°F (220°C).
-
Toss cauliflower and dried chickpeas with olive oil, salt, and pepper. Spread on a parchment-lined baking sheet.
-
Roast 25-30 mins, flipping halfway, until golden and crispy.
2. Make the Sauce
-
Whisk tahini, lemon juice, water, garlic, za’atar, and salt until smooth. Add more water (1 tsp at a time) if too thick.
3. Serve
-
Drizzle sauce over roasted veggies. Garnish with extra za’atar, parsley, and lemon zest.
- Prep Time: 10 mins
- Cook Time: 30 mins
Nutrition
- Calories: 320 cal Per Serving
- Fat: 18g
- Carbohydrates: 32g
- Fiber: 10g
- Protein: 12g
-
Final Thoughts: Why This Dish Wins Every Time
This recipe is a celebration of simplicity and bold flavors. It’s:
-
Pantry-friendly (canned chickpeas, staple spices).
-
Meal-prep magic (roast once, eat all week).
-
Endlessly adaptable (swap veggies, proteins, or sauces).
Most importantly, it’s a reminder that plant-based eating doesn’t mean sacrificing flavor or satisfaction. With a few smart techniques—like dry-roasting chickpeas and emulsifying tahini—you can turn basic ingredients into something extraordinary.
So next time you’re staring at a head of cauliflower, remember: it’s not just a vegetable. It’s a blank canvas waiting to become crispy, caramelized, and smothered in herby tahini goodness. Happy roasting!
-

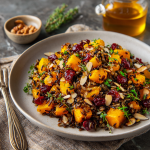
Wild Rice & Roasted Butternut Squash Salad
Fall’s Favorite Hug in a Bowl: Wild Rice & Roasted Butternut Squash Salad
Hey there, kitchen friends! Olivia here, waving from my flour-dusted countertop. Is there anything quite like the moment crisp autumn air collides with the warm, caramelized scent of something roasting in your oven? That’s pure magic, right? It’s that exact cozy-alchemy that inspired this Wild Rice & Roasted Butternut Squash Salad. Picture this: nutty, earthy wild rice tangled with sweet, tender squash, pops of tart cranberries, crunchy almonds, all wrapped up in a simple, herby balsamic hug. It’s not just a salad; it’s a hearty, nourishing bowl of fall comfort that feels like your favorite sweater feels – warm, reliable, and utterly delightful.
Whether you’re prepping lunches to conquer the week ahead (hello, meal prep heroes!), needing a stunning side dish that steals the show at Friendsgiving, or simply craving a vibrant, satisfying dinner that won’t leave you slumped on the couch, this salad is your new best friend. I’ve doubled the batch because, let’s be real, you’ll want leftovers. It’s forgiving, flexible, and celebrates simple ingredients doing extraordinary things. No fancy techniques needed here, just good vibes and big flavor. So, grab your favorite chopping board, put on that slightly-too-loud playlist, and let’s make something beautiful (and delicious) together!
The Salad That Saved Potluck Day (And Became a Tradition!)
This salad holds a special place in my heart, born from a near-potluck panic attack years ago! Picture it: my friend Sarah’s legendary autumn gathering. I’d ambitiously signed up for a “showstopper salad,” only to realize, mid-week chaos, I had zero plan. My fridge offered a lonely butternut squash, some wild rice leftover from soup night, and a bag of cranberries whispering from the pantry. Desperation breeds creativity, right? I roasted the squash until it was gorgeously caramelized, tossed everything together with a glug of balsamic and a generous sprinkle of thyme, praying it wouldn’t be a total flop.
Well, friends, it wasn’t just *not* a flop. That bowl vanished faster than pumpkin pie on Thanksgiving! People kept asking, “What *is* this? It’s incredible!” The combination of textures – the chewy rice, soft squash, juicy cranberry, crunchy almonds – and the sweet-tangy dressing just clicked. Sarah now *demands* it every year (“Bring The Salad, Liv!”), and it’s become my go-to for any cozy gathering. It reminds me that sometimes the best dishes aren’t meticulously planned, but born from a little resourcefulness, a lot of love, and whatever’s hanging out in your pantry. It’s proof that humble ingredients can absolutely shine.
Your Flavor Toolkit: Gathering the Good Stuff
Here’s everything you’ll need to create this autumn masterpiece (remember, it’s a generous double batch – perfect for sharing or savoring all week!). I’ve sprinkled in some insights and swaps because flexibility is key in my kitchen!
- 2 cups uncooked wild rice: The hearty, nutty backbone! Insight: True wild rice isn’t actually rice but a grass seed – that’s why it has such amazing texture and chew. Swap: A wild rice blend works beautifully too. Brown rice can sub in a pinch but will lack the wild rice’s distinct character.
- 5 cups butternut squash, peeled & cubed (about 3 lbs): Sweet, roasty perfection. Insight: Uniform 1-inch cubes ensure even cooking – no mushy bits alongside underdone chunks! Swap: Sweet potato or acorn squash are fabulous alternatives.
- 2 small yellow onions, chopped: Adds savory depth and sweetness when roasted. Insight: Yellow onions caramelize beautifully. Swap: Red onions work for a sharper bite, or shallots for a milder, sweeter note.
- 1 cup roasted almonds: Essential crunch and nutty richness. Insight: Using pre-roasted saves time, but toasting raw almonds yourself (350°F for 8-10 mins) amplifies flavor! Swap: Pecans, walnuts, or pepitas (pumpkin seeds) are equally delicious.
- 1 cup unsweetened dried cranberries: Bright, tart pops of joy. Insight: “Unsweetened” is key to balance – you control the sweetness via the dressing. Swap: Dried cherries, chopped apricots, or even golden raisins.
- 3-4 tbsp olive oil (for roasting): (Added based on directions!) Helps the veggies caramelize beautifully. Use a good extra virgin!
- 2 tbsp balsamic vinegar: The tangy soul of the dressing. Insight: A slightly thicker, aged balsamic adds lovely depth. Swap: Apple cider vinegar or red wine vinegar in a pinch.
- 1 tbsp honey: Balances the vinegar’s acidity with natural sweetness. Swap: Pure maple syrup (perfect for vegans!) or agave nectar.
- 3 tsp dried thyme (or 2 tbsp fresh): Earthy, aromatic herby goodness. Insight: Dried is convenient, but fresh thyme leaves stripped from the stems are truly special if you have it. Rub them between your fingers before adding to release oils!
- Salt & pepper, to taste: The essential flavor enhancers! Don’t be shy – season each layer (rice water, roasting veggies, dressing).
Let’s Build Some Delicious: Step-by-Step Magic
Ready to transform these simple ingredients? Let’s get cooking! I’ll guide you through each step with my favorite tips and little “chef hacks” to make it foolproof and fun.
- Conquer the Wild Rice: Cook your wild rice according to the package directions (it usually takes 45-55 mins simmering in salted water or broth). Chef Hack #1: Rinse the rice well under cold water before cooking! This removes excess starch and prevents gumminess. Chef Hack #2: Cook it in vegetable or chicken broth instead of water for an extra flavor boost. Once cooked, drain if needed, fluff it gently with a fork, and spread it out on a large baking sheet or plate to cool quickly and stop the cooking. Warm rice is fine for mixing, but hot rice can make the salad soggy.
- Roast to Perfection: Preheat your oven to 400°F (200°C). On a large rimmed baking sheet (use two if crowded!), toss the cubed butternut squash and chopped onions with 3-4 tablespoons of olive oil, a generous pinch of salt, and several grinds of fresh black pepper. Chef Hack #3: Spread everything in a SINGLE LAYER! Overcrowding steams the veggies instead of roasting them. We want caramelized edges and tender centers, not mush! Roast for 25-30 minutes, giving the pan a good shake or stir halfway through. You’ll know it’s done when the squash is easily pierced with a fork and has gorgeous golden-brown spots. Let it cool slightly.
- Whisk Up the Magic Dressing: In a small bowl or jar, combine the balsamic vinegar, honey (or maple syrup), dried thyme (or fresh!), another pinch of salt, and a grind of pepper. Whisk (or shake the jar!) vigorously until the honey is fully dissolved and everything is emulsified. Chef Hack #4: Taste it! Adjust with a tiny bit more honey if too tart, or a splash more vinegar if too sweet. Remember, it will mingle with all the other flavors.
- The Grand Toss: In a VERY large bowl (trust me, you need the space!), combine the slightly cooled wild rice, the warm roasted squash and onions (including any yummy bits from the pan!), the roasted almonds, and the dried cranberries. Chef Hack #5: Reserve a small handful of almonds and cranberries for a pretty garnish on top later! Pour about 3/4 of the dressing over everything.
- Bring It All Together: Gently toss everything together with a large spoon or spatula. Be kind to the squash – you want to keep those beautiful cubes mostly intact! Taste a bite. Need more dressing? Add the rest. Need more salt or pepper? Add it now. The goal is vibrant flavor in every forkful.
Plating Up Your Autumn Masterpiece
This salad is incredibly versatile! Serve it slightly warm (my personal favorite – it feels extra cozy), at room temperature (perfect for potlucks), or even chilled (great for meal prep lunches). For a casual family dinner, pile it high in a big, beautiful serving bowl. If you’re feeling fancy, use a ring mold for individual elegant stacks on plates. Garnish generously with those reserved almonds and cranberries for extra texture and visual pop! A few extra fresh thyme leaves scattered on top add a lovely fresh aroma. It’s substantial enough to be a satisfying vegetarian main course with some crusty bread on the side, or it shines as a standout side dish alongside roast chicken, turkey, or even grilled sausages. However you serve it, watch those smiles appear!
Make It Your Own: Delicious Twists & Swaps
The beauty of this salad is how easily it adapts! Here are some fun ways to play with the flavors:
- Cheesy Bliss: Crumble in 4-6 oz of tangy goat cheese, creamy feta, or sharp cheddar right before serving. The salty creaminess is divine!
- Green Goddess: Fold in 2-3 big handfuls of baby spinach, arugula, or massaged kale leaves just before serving for a fresh, green boost.
- Protein Powerhouse: Transform it into a main dish by adding 2 cups of shredded rotisserie chicken, diced leftover turkey, chickpeas (for plant-based!), or even pan-seared halloumi cubes.
- Fruity & Nutty Adventures: Swap cranberries for dried cherries or chopped figs. Swap almonds for toasted pecans, walnuts, or spiced pepitas (toss seeds with a pinch of chili powder before toasting!).
- Vegan Vibes: Easily done! Use maple syrup instead of honey, and ensure your dried cranberries are vegan-friendly (some have hidden honey). Add chickpeas for extra protein.
Liv’s Kitchen Confidential: Extra Bits & Bobs
This salad has truly evolved over the years! That first potluck version was much simpler – no onions, fewer almonds. Adding the roasted onions was a game-changer for savory depth. I’ve learned the hard way that rushing the rice cooling leads to a slightly mushy salad (patience is a virtue!). And one hilarious Thanksgiving, I accidentally grabbed smoked paprika instead of regular for the squash… let’s just say it became the “Mystery Smoky Salad” – surprisingly popular, but not quite the classic vibe! Now I double-check spice jars religiously.
This recipe is a testament to building flavor in layers: salting the rice water, seasoning the veggies well before roasting, and balancing the dressing. Don’t skip those steps! It’s also become my ultimate fridge-cleaner hero. Got some wilting herbs? Chop them in! A stray apple? Dice and roast it with the squash! A handful of leftover nuts? Toast ’em and toss ’em. It’s forgiving and always delicious. Make it your own kitchen story.
Your Salad Questions, Answered!
Let’s tackle those common kitchen conundrums:
Q: Can I use a different grain instead of wild rice?
A: Absolutely! Brown rice, farro, or quinoa are good substitutes. Adjust cooking times accordingly. Brown rice will be softer, farro chewier, quinoa lighter. Just aim for about 6-7 cups cooked grain total for this double batch.
Q: Help! My squash turned out mushy/watery. What happened?
A: This usually means overcrowding the pan or cutting the cubes too small. Veggies need space for moisture to evaporate and edges to caramelize! Use two baking sheets if needed, and stick to 1-inch cubes. Also, ensure your oven is fully preheated.
Q: How far ahead can I make this, and how do I store it?
A: This salad is a meal-prep dream! You can assemble it completely (hold back a few almonds/cranberries for garnish) up to 2 days ahead. Store covered in the fridge. The flavors meld beautifully! If making *way* ahead, store the dressing separately and toss it in an hour or two before serving. It keeps well refrigerated for 4-5 days. The almonds might soften slightly over time, but it’s still tasty.
Wild Rice & Roasted Butternut Squash Salad
- Total Time: 1 hr 5 mins
Description
Wild Rice & Roasted Butternut Squash Salad
A hearty, flavorful autumn salad packed with textures and sweet-savory goodness!
Ingredients
For the Salad:
-
2 cups uncooked wild rice (or blend) → yields ~6 cups cooked
-
5 cups butternut squash, peeled & cubed (1-inch pieces)
-
2 small yellow onions, chopped
-
3 tbsp olive oil (for roasting)
-
1 cup roasted almonds, roughly chopped
-
1 cup dried cranberries (unsweetened)
-
Salt & black pepper, to taste
For the Dressing:
-
2 tbsp balsamic vinegar
-
1 tbsp honey (or maple syrup)
-
3 tsp dried thyme (or 2 tbsp fresh)
-
2 tbsp olive oil
-
½ tsp salt, ¼ tsp black pepper
Instructions
1. Cook the Wild Rice
-
Rinse rice under cold water. Cook per package instructions (usually 45-55 mins in salted water or broth). Drain, fluff, and spread to cool.
2. Roast the Veggies
-
Preheat oven to 400°F (200°C).
-
Toss squash and onions with 3 tbsp olive oil, salt, and pepper. Spread on a baking sheet.
-
Roast 25-30 mins, stirring halfway, until tender and caramelized.
3. Make the Dressing
-
Whisk together balsamic, honey, thyme, 2 tbsp olive oil, salt, and pepper.
4. Assemble
-
In a large bowl, combine cooled rice, roasted veggies, almonds, and cranberries.
-
Drizzle with dressing and toss gently. Garnish with extra almonds/cranberries.
Notes
✅ Meal Prep Friendly: Stores well for 4-5 days in the fridge.
✅ Add Protein: Toss in chickpeas, chicken, or feta for extra heft.
✅ Vegan Swap: Use maple syrup instead of honey.
✅ Texture Matters: Don’t overcook the rice or squash—aim for al dente!
- Prep Time: 20 mins
- Cook Time: 45 mins
Nutrition
- Calories: 380 cal Per Serving
- Fat: 14g
- Carbohydrates: 58g
- Fiber: 7g
Final Thoughts: A Salad for All Seasons
This wild rice and butternut squash salad is more than a recipe—it’s a celebration of texture, balance, and seasonal abundance. It teaches us that salads don’t have to be light and leafy to be nourishing, and that the best dishes often come from improvisation. Keep it classic or make it your own with endless variations. However you serve it, may it bring warmth, color, and joy to your table. Now, go roast that squash like you mean it!
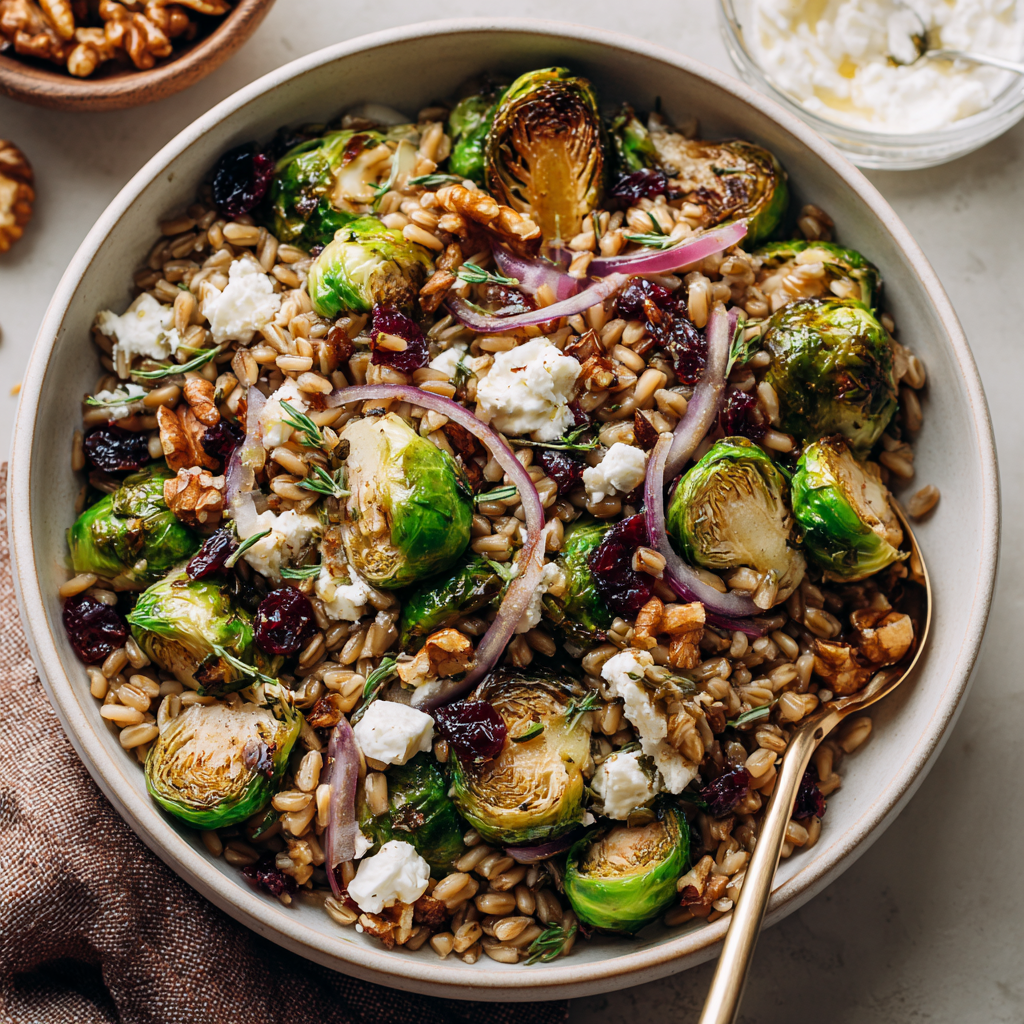
Roasted Brussels Sprouts Farro Salad
Fall in Love with Every Bite
Hey there, kitchen friend! Olivia here, waving from my inevitably flour-dusted countertop. Can you feel it? That crisp snap in the air, the golden light slanting through the trees, the sudden craving for flavors that feel like a warm hug? That’s autumn whispering, and it always sends me straight to my oven and my favorite big wooden salad bowl. Today? We’re making magic happen with a dish that perfectly captures that cozy-yet-vibrant fall energy: my Roasted Brussels Sprouts Farro Salad. Picture this: nutty, chewy farro grains, tangled up with caramelized Brussels sprouts that are crispy on the outside, tender-sweet inside. It’s tossed with pops of tart cranberries, crunchy toasted almonds, a whisper of sharp red onion, and all wrapped up in a luscious maple-balsamic dressing that sings of the season. This isn’t just a salad; it’s a textural party, a flavor fiesta, and the ultimate versatile sidekick. Whether you’re juggling a busy weeknight and need something hearty and fast (hello, sheet pan + one pot wonders!), or you’re dreaming up your holiday table centerpiece that’ll have everyone asking for seconds, this bowl of autumn goodness has your back. No fancy skills required – just good vibes, simple ingredients, and the promise of something truly delicious. Ready to make your kitchen smell incredible? Let’s do this!
From Skeptic to Superfan: My Brussels Sprouts Journey
Confession time: I wasn’t always a Brussels sprouts evangelist. My childhood memories involve suspiciously grey-green, mushy little cabbages lurking sadly on the dinner plate. Yikes! My turning point came embarrassingly late – maybe five years ago? I was hosting a chaotic Friendsgiving. My oven was overflowing, my timeline was crumbling, and I desperately needed a simple, room-temp side that could handle the chaos. Enter: roasted Brussels sprouts. On a whim, I tossed them with farro (a grain I’d been obsessed with), some dried cranberries left over from scone-making, and a quick maple-balsamic whisk. The result? Utter silence around the table, followed by a chorus of “WHAT is *this*?!” and frantic fork-clinking. Gone were the sad, boiled sprouts of yore. These were golden, crispy-edged, deeply savory little flavor bombs. Seeing my veggie-skeptic friends go back for thirds? That was the moment I knew this combo was pure gold. Now, this salad is my autumn anthem, a dish that whispers comfort and shouts flavor, reminding me that sometimes, the best kitchen discoveries come from happy accidents and a little roasted courage.
Gathering Your Autumn Harvest
Here’s what you’ll need to create this fall masterpiece! Don’t stress about exact perfection – cooking is about joy, not rigidity. Use what you love!
- 1 lb Brussels sprouts, trimmed and halved: The star! Look for firm, bright green sprouts. Smaller ones are often sweeter. Chef’s Insight: Don’t discard the loose outer leaves that fall off while trimming – toss them with oil and salt and roast them alongside the halves! They become addictive, crispy little chips.
- 1 tbsp olive oil: For roasting our sprouts to golden perfection. Avocado oil works great too for its high smoke point.
- Salt & pepper to taste: The essential flavor foundation. Be generous!
- 1 cup farro, rinsed: This ancient wheat grain brings a wonderful nutty flavor and satisfying chew. Substitution Tip: No farro? Try pearled barley, freekeh, or even brown rice or quinoa (adjust cooking time accordingly).
- 3 cups water or broth (for cooking farro): Broth (veggie or chicken) adds extra depth. Water is perfectly fine if that’s what you have!
- ½ red onion, thinly sliced: Adds a lovely sharp bite and vibrant color. Chef’s Hack: If raw onion is too strong, soak the slices in cold water for 10 minutes, then drain and pat dry. It mellows the bite beautifully!
- ½ cup dried cranberries or chopped dried figs: Sweet-tart bursts of autumn fruitiness. Figs add a deeper, honeyed note. Substitution Tip: Chopped dried apricots, cherries, or even golden raisins are delicious swaps.
- ¼ cup toasted almonds or walnuts: Essential crunch and nutty richness. Chef’s Insight: Toasting nuts is NON-NEGOTIABLE for maximum flavor! Just a few minutes in a dry pan over medium heat until fragrant. Watch them closely – they burn fast!
- Optional: crumbled goat cheese or feta: For creamy tang and richness. Substitution Tip: Vegan? Skip it or use a good plant-based feta. Prefer blue cheese? Go for it! That tang pairs amazingly with the sprouts.
For the Dressing (The Flavor Glue!):
- 2 tbsp balsamic vinegar: The deep, sweet-tart backbone. Aged balsamic is lovely if you have it.
- 1 tsp Dijon mustard: Adds complexity, tang, and helps emulsify the dressing.
- 1 tsp maple syrup: A touch of natural sweetness to balance the vinegar and complement the roasted sprouts. Honey works too.
- ¼ cup olive oil: Creates the luscious body of the dressing.
- Salt & pepper to taste: Season it well!
Let’s Build Your Flavor Bowl!
Okay, team! Time to transform these gorgeous ingredients into something spectacular. This process is simple, efficient, and oh-so-rewarding.
- Preheat & Prep Sprouts: Fire up that oven to 400°F (200°C). This high heat is KEY for getting those sprouts beautifully caramelized and crispy, not steamed. While it heats, grab your Brussels sprouts. Trim the woody ends, slice them in half lengthwise, and toss them in a large bowl with the 1 tbsp olive oil, salt, and pepper. Chef’s Hack: Get your hands in there! Massage the oil and seasoning onto every nook and cranny of those sprouts – it makes a huge difference in flavor distribution and crispiness. Spread them out in a single layer on a rimmed baking sheet, cut-side down where possible. This contact with the hot pan is the secret to maximum browning and crispy edges! Why? Laying them flat ensures more surface area gets direct heat, leading to that glorious caramelization we crave.
- Roast to Perfection: Slide that sheet pan into your preheated oven. Set your timer for 25 minutes. Chef’s Tip: DO NOT PEEK for at least the first 15 minutes! Let that oven work its magic. You want them deeply golden brown, maybe even a little charred on some edges – that’s flavor city! Give the pan a good shake about halfway through to ensure even cooking. They’re ready when tender when pierced with a fork and gloriously caramelized.
- Cook the Farro: While the sprouts work their magic, rinse your farro well under cold water in a fine-mesh strainer. This removes any dust or starch. Add it to a medium saucepan with the 3 cups of water or broth. Bring it to a boil over high heat, then reduce the heat to low, cover, and let it simmer. Chef’s Insight: Check your package directions! Cooking times vary slightly depending on the type of farro (pearled cooks fastest, about 15-20 mins; semi-pearled or whole takes longer, 25-40 mins). You want it tender but still pleasantly chewy – al dente! Once cooked, drain off any excess liquid (like you would pasta) and let it cool slightly in the colander. Why cool slightly? Hot farro can wilt delicate add-ins like the onion. Warm is perfect!
- Whisk the Magic Dressing: In a small bowl or jar, combine the balsamic vinegar, Dijon mustard, and maple syrup. Whisk them together until smooth. Now, slowly drizzle in the ¼ cup olive oil while whisking constantly. Chef’s Hack: This emulsifies the dressing, making it creamy and cohesive instead of separating. If using a jar, just pop the lid on and shake vigorously! Taste it – this is YOUR dressing. Need more tang? Add a splash more vinegar. Sweeter? A drizzle more maple syrup. Saltier? You know what to do! Season with salt and pepper to your liking.
- The Grand Assembly: Grab your largest, prettiest bowl – the one that makes you happy! Add the slightly cooled, drained farro. Now, gently tumble in those glorious roasted Brussels sprouts (including any crispy loose leaves!). Add the thinly sliced red onion, the dried cranberries (or figs), and the toasted almonds (or walnuts). Chef’s Tip: If adding cheese, hold off just for a sec! Pour about ¾ of the dressing over everything. Now, gently toss it all together with clean hands or salad tongs. Why gentle? You want to keep those beautiful roasted sprout halves mostly intact and avoid crushing the nuts. Taste again! Need more dressing? Add the rest. Need more salt or pepper? Go for it.
- The Finishing Touch: If you’re using cheese, now’s the time! Scatter the crumbled goat cheese or feta generously over the top of the salad. This keeps it looking pretty and prevents it from getting smashed during tossing.
How to Serve Your Autumn Masterpiece
This salad is incredibly versatile! Serve it warm straight from the bowl for ultimate cozy comfort – the farro is plump, the sprouts are still slightly crisp. Or, let it come to room temperature for about 15-20 minutes; the flavors meld beautifully. Pile it high in a beautiful rustic bowl for family-style sharing – it practically begs to be the centerpiece! For a more elegant touch, portion it onto individual plates. Garnish? A final sprinkle of extra toasted nuts or maybe a few fresh pomegranate arils for a festive pop of color and burst of juice. It’s a star alongside roasted chicken or pork chops, a hearty companion to a simple soup, or absolutely perfect as a satisfying vegetarian main course. It’s truly that adaptable!
Make It Your Own! Endless Twists
The beauty of this salad is its adaptability! Play with these ideas:
- Protein Powerhouse: Turn it into a main! Top with sliced grilled chicken breast, flaked roasted salmon, crispy chickpeas, or even crumbled cooked sausage.
- Cheese Swap: Trade goat cheese for sharp cheddar crumbles, creamy blue cheese, shaved Parmesan, or skip it for a vegan version (maybe add extra nuts or seeds like pepitas).
- Fruit & Nut Fiesta: Swap cranberries for chopped apples or pears (add just before serving). Use pecans, hazelnuts, or pistachios instead of almonds/walnuts. Add pomegranate seeds for festive jewels!
- Herb Garden Fresh: Stir in a handful of chopped fresh herbs just before serving – parsley, thyme, or rosemary work wonders.
- Sweet Potato Boost: Add 1-2 cups of cubed, roasted sweet potatoes alongside the Brussels sprouts for extra autumnal sweetness and heartiness.
Olivia’s Kitchen Confessions & Tips
This recipe has evolved from that frantic Friendsgiving side into my absolute go-to fall dish. I’ve learned a few things! First, don’t crowd the sprouts on the pan. If they’re piled on top of each other, they steam instead of roast. Use two pans if needed! I’ve also learned the hard way that forgetting the nuts toasting on the stove leads to… well, charcoal. Set a timer! My favorite evolution? Adding those crispy stray sprout leaves. It started accidentally but now it’s mandatory – they’re like little flavor chips! One funny fail: I once tried to rush the farro by cranking the heat. Big mistake. It boiled over spectacularly, creating a starchy volcano on my stovetop. Lesson learned: low and slow wins the race for perfectly chewy grains. The best part? This salad gets better as it sits (within reason), making leftovers a joy, not a chore. Make it, share it, love it – and make it your own!
Your Questions, Answered!
Let’s tackle some common queries to ensure your salad success:
- Q: Can I make this salad ahead of time?
A: Absolutely, and it’s fantastic for meal prep! Cook the farro and roast the sprouts up to 2 days ahead. Store them separately in airtight containers in the fridge. Slice the onion. Make the dressing and store it separately. Assemble the salad (hold the nuts and cheese) with the dressing up to 4-6 hours before serving. Store covered in the fridge. Add the nuts, cheese, and a final drizzle of dressing just before serving to keep everything crisp and fresh. - Print

Roasted Brussels Sprouts Farro Salad
- Total Time: 45 min
Description
Golden roasted Brussels sprouts meet nutty farro, tart cranberries, toasted almonds, and a velvety maple-balsamic dressing in this autumn-ready bowl of joy. It’s the kind of salad that’s hearty enough for a main, versatile enough for a side, and special enough to steal the spotlight at any holiday table. Best part? It’s as easy as it is stunning.
Ingredients
Scale-
1 lb Brussels sprouts, halved
-
1 tbsp olive oil
-
Salt & pepper to taste
-
1 cup farro, rinsed
-
3 cups water or broth
-
½ red onion, thinly sliced
-
½ cup dried cranberries (or figs)
-
¼ cup toasted almonds or walnuts
-
Optional: ½ cup crumbled goat cheese or feta
Maple-Balsamic Dressing
-
2 tbsp balsamic vinegar
-
1 tsp Dijon mustard
-
1 tsp maple syrup
-
¼ cup olive oil
-
Salt & pepper to taste
Instructions
-
Roast Brussels Sprouts: Toss halved sprouts with olive oil, salt, and pepper. Roast at 400°F for 25 mins until crispy and golden.
-
Cook Farro: Simmer farro in water or broth until tender (15–30 mins). Drain and let cool slightly.
-
Make Dressing: Whisk balsamic, Dijon, and maple. Slowly whisk in olive oil. Season to taste.
-
Assemble Salad: In a large bowl, combine farro, roasted sprouts, onion, cranberries, and nuts. Toss with dressing.
-
Finish: Top with crumbled cheese if using. Serve warm or room temp.
Notes
-
Add roasted sweet potatoes or crispy chickpeas for extra heartiness.
-
Use pecans or pistachios instead of almonds.
-
Sub farro with quinoa or brown rice for gluten-free.
-
Garnish with fresh herbs or pomegranate seeds for a festive twist.
- Prep Time: 15 min
- Cook Time: 30 min
Nutrition
- Calories: 420 cal Per Serving
- Fat: 24g
- Carbohydrates: 38g
- Protein: 10g
-
Final Thoughts: Why This Salad is More Than the Sum of Its Parts
This Roasted Brussels Sprouts Farro Salad isn’t just a dish—it’s a celebration of textures, flavors, and seasonal ingredients. It’s:
-
Versatile (works warm, room temp, or cold).
-
Meal-prep friendly (tastes even better the next day).
-
Crowd-pleasing (even for veggie skeptics).
Most importantly, it’s a reminder that the best meals come from simple, real ingredients treated with care. So whether you’re making it for a weeknight dinner or a holiday feast, this salad will make you fall in love with every bite.
-

Glazed Chicken Thighs with Broccoli & Brown Rice
Introduction
Hey there, kitchen friend! Olivia here, apron slightly dusted with cornstarch and smelling like a dreamy blend of ginger and oranges. If you’ve ever stared into your fridge after a long day, willing dinner to magically assemble itself… this recipe is your answer. These Citrus-Soy Glazed Chicken Thighs with Broccoli & Brown Rice are my forever go-to when life gets chaotic but my soul needs something vibrant, nourishing, and downright delicious. Imagine juicy chicken thighs, skin crisped to golden perfection, draped in a glossy glaze that’s tangy, savory, and subtly sweet—all in under 45 minutes!
Why do I adore this dish? It’s weeknight-friendly without tasting like a compromise. The orange-soy glaze is sunshine in a spoon, the broccoli stays bright and snappy, and the brown rice soaks up every drop of that sticky sauce. No fancy techniques, no obscure ingredients—just big, bold flavors that’ll make you feel like a rockstar. Whether you’re feeding hungry teens, meal-prepping lunches, or craving a dinner that feels *special*, this bowl hugs you back. Ready to make magic? Let’s grab our skillets!
My First Kitchen Victory (and Near-Disaster!)
Picture this: It’s 2015, and I’m hosting my now-husband’s parents for the first time. Nervous? Understatement. I wanted to impress them with something “gourmet” but secretly easy. Enter this glaze! I’d just learned the power of reducing citrus juices, so I whipped up a version of this sauce… and promptly forgot it on the stove. Cue frantic scraping of caramelized orange gunk while my future in-laws chatted obliviously in the living room! I salvaged it with extra OJ and a prayer, and guess what? They raved about the “complex caramel notes.” (Thank you, happy accidents!) That meal taught me two things: 1) Never walk away from simmering sugar, and 2) Simple, honest food—even slightly charred—connects us. Now, this dish is our family’s celebration staple. Birthdays, promotions, Tuesdays—it’s our edible high-five.
Gather Your Flavor Squad
Serves 8–10 (Perfect for leftovers!)
- 2 tbsp neutral oil (canola or avocado) – The MVP for crispy skin! Chef’s tip: Avocado oil has a higher smoke point, but vegetable oil works too.
- 12 (6-oz) bone-in, skin-on chicken thighs – Pat ’em DRY! Moisture is the enemy of crispiness. Swap: Skinless thighs or breasts (reduce cook time by 3–4 mins).
- 2 tsp salt, divided – Season in layers! We’ll salt the chicken first, then the sauce.
- 2 tbsp grated orange zest – Where the magic lives! Use organic oranges if possible.
- 1½ cups orange juice – Freshly squeezed or high-quality store-bought. No subs here—bottled “orange drink” won’t caramelize right!
- 4 tbsp reduced-sodium soy sauce – Balances sweetness. For gluten-free: Tamari or coconut aminos.
- 4 tsp sugar – Just enough to round out the tang. Honey or maple syrup also work!
- 4 tsp finely chopped fresh ginger – Grate it frozen for zero mess! Chef’s secret: Freezing ginger makes it easier to handle.
- 3 tsp cornstarch, divided – 2 tsp thickens the glaze; 1 tsp later for extra gloss.
- ½ tsp ground pepper – Freshly cracked if you’re fancy (I usually am not on weeknights).
- 4 (8.8-oz) packages precooked brown rice – My sanity-saver! From-scratch option: Cook 2 cups dry brown rice.
- 12 cups fresh broccoli florets – Broccolini or snap peas are fun swaps!
- ½ cup thinly sliced scallions – For fresh crunch. Chives or cilantro work too.
- 2 tbsp toasted sesame seeds – Don’t skip toasting! It doubles their nutty flavor.
Let’s Cook! (No Stress, I Promise)
Sear the chicken: Heat oil in a large skillet over medium-high. Season chicken with 1½ tsp salt. Place skin-side down—don’t crowd the pan! (Work in batches if needed.) Sear 6–8 mins until golden and crispy. Flip and cook 6–8 mins more until internal temp hits 165°F. Transfer to a plate. Chef’s hack: Press thighs gently with a spatula to ensure even skin contact!
Make the glaze: In a bowl, whisk orange juice, soy sauce, sugar, ginger, zest, pepper, and 2 tsp cornstarch. Pour into the same skillet (keep those browned bits!), scraping the bottom. Simmer 5 mins until it coats the back of a spoon. Too thin? Mix 1 tsp cornstarch with 1 tbsp water, then stir in.
Return chicken: Add chicken back to the skillet, skin-side up. Spoon glaze over thighs and simmer 3–5 mins. Pro move: Tilt the skillet to pool sauce, then baste constantly for max flavor!
While chicken finishes: Steam broccoli until bright green (4–5 mins). Microwave rice per package directions. Time-saver: Start broccoli when you flip the chicken!
Assemble bowls: Fluff rice, divide among bowls. Top with broccoli and chicken. Drizzle extra glaze (you’ll want every drop!). Garnish with scallions and sesame seeds.
Serving It Up with Style
Bowls = cozy vibes! I layer rice first, then broccoli to one side (keeps it crisp), and place chicken slightly tilted so that glossy skin stays crackly. Drizzle sauce over everything—yes, even the broccoli! Finish with a snowstorm of scallions and sesame seeds. Pair with a chilled riesling or sparkling water with lime. For family-style flair, pile everything on a big platter and let everyone dig in!
The Science of Crispy Skin & Glazy Goodness
What makes this dish so irresistible? Let’s geek out on the culinary science behind that perfect crispy skin and glossy glaze:
Crispy Chicken Skin 101
-
Patting dry removes surface moisture, allowing Maillard browning (not steaming!) to occur.
-
Avocado oil’s high smoke point (520°F) prevents burning while achieving deep golden color.
-
Resisting the flip is key—skin releases naturally when properly seared (about 6–8 minutes).
Glaze Chemistry: Sweet, Sour, & Sticky
-
Orange juice reduction concentrates sugars, creating a syrupy base. Fresh OJ contains pectin, which thickens naturally when simmered.
-
Soy sauce’s glutamates amplify umami, while ginger’s zingiberene adds aromatic warmth.
-
Cornstarch slurry forms a gel network when heated, giving that luscious cling.
Broccoli’s Bright Green Secret
Steaming (not boiling!) preserves chlorophyll and vitamin C by minimizing water contact. A 5-minute steam keeps it crisp-tender—any longer, and sulfur compounds turn it mushy and bitter.
Pantry Hacks & Dietary Swaps
No oranges? No problem! Here’s how to adapt this recipe for allergies, diets, and empty-fridge emergencies:
Citrus Alternatives
-
Lemon juice + 1 tsp honey = Bright, tangy glaze
-
Pineapple juice + 1 tbsp rice vinegar = Tropical twist
-
White wine + 2 tsp marmalade = Sophisticated depth
Protein Swaps
-
Tofu: Press extra-firm tofu, coat in cornstarch, and pan-fry before glazing.
-
Salmon: Sear skin-side down, then glaze last 2 minutes.
-
Pork chops: Reduce cook time by 3 minutes (internal temp 145°F).
Low-Sodium & Allergen-Free
-
Soy sauce substitute: 2 tbsp coconut aminos + ½ tsp fish sauce (or mushroom powder for vegan).
-
Cornstarch alternative: Arrowroot or tapioca starch (use 1.5x the amount).
-
Nut-free: Skip sesame seeds; use sunflower seeds or hemp hearts.
5-Ingredient Shortcut Version
-
Use bottled orange marmalade + soy sauce (equal parts) as glaze.
-
Swap fresh ginger for ½ tsp ground ginger.
-
Microwave steam-in-bag broccoli.
-
Use pre-cooked chicken thighs (reheat in glaze).
-
Garnish with pre-sliced scallions from the salad bar.
Leftover Remix: 7 Next-Day Creations
Turn leftovers into entirely new meals with these genius hacks:
1. Citrus-Soy Fried Rice
Chop chicken, sauté with cold rice, broccoli, and eggs. Drizzle with extra glaze.
2. Loaded Sweet Potatoes
Bake sweet potatoes, stuff with shredded chicken, broccoli, and a glaze-spiked Greek yogurt drizzle.
3. Asian-Inspired Tacos
Wrap chicken and slaw in tortillas with sriracha mayo.
4. Grain Bowl Upgrade
Layer with quinoa, edamame, and avocado.
5. Soup Boost
Simmer broth with shredded chicken, glaze, and udon noodles.
6. Pizza Topping
Substitute for BBQ chicken pizza with mozzarella and cilantro.
7. Breakfast Hash
Sauté with potatoes and top with a fried egg.
Shake It Up! 5 Tasty Twists
1. Spicy Kick: Add 1 tbsp sriracha or chili crisp to the glaze.
2. Pineapple Teriyaki: Swap OJ for pineapple juice + 1 tbsp mirin.
3. Veggie-Packed: Toss carrots or bell peppers into the broccoli steam.
4. Low-Carb: Serve over cauliflower rice; use honey instead of sugar.
5. Thai-Inspired: Stir 1 tbsp peanut butter into the glaze + top with crushed peanuts.
Olivia’s Kitchen Confessions
This recipe has survived 3 kitchens, 2 toddlers “helping,” and one memorable incident involving a smoke detector. Over the years, I’ve learned: Embrace the mess! That splattered glaze? Flavor confetti. I also double the sauce now (shhh!) because my kids lobby to drink it. Funny story: My 5-year-old once declared it “chicken candy,” which is now its official name in our house. If your glaze seizes up, just whisk in 2 tbsp hot water—no panic needed. This dish is resilient, just like us home cooks!
Your Questions, Answered!
Q: Can I make this ahead?
A: Absolutely! Cook chicken + glaze, then refrigerate separately for 3 days. Reheat chicken in the sauce on low. Fresh broccoli is best steamed day-of though.
Q: Why isn’t my skin crispy?
A: Three culprits: 1) Chicken wasn’t patted dry, 2) Pan was too crowded, or 3) You flipped it too soon! Wait until it releases easily from the pan.
Q: Sauce too thin/thick?
A> Thin: Simmer 2–3 more mins or add ½ tsp cornstarch slurry. Thick: Stir in 1–2 tbsp warm water or OJ.
Q: Can I use frozen broccoli?
A: Yes—thaw first, then pat dry. Or roast from frozen at 425°F for 15 mins (toss with oil + salt first!).

Glazed Chicken Thighs with Broccoli & Brown Rice
- Total Time: 45 min
Description
This one-skillet wonder is your ticket to a dinner that feels special without demanding hours in the kitchen. Crispy chicken thighs are bathed in an orange-soy glaze that’s sticky, bright, and packed with punch. Paired with fluffy brown rice and snappy broccoli, it’s a full meal in under 45 minutes—perfect for weeknights, meal prep, or impressing guests without breaking a sweat.
Ingredients
-
2 tbsp neutral oil (canola or avocado)
-
12 bone-in, skin-on chicken thighs
-
2 tsp salt, divided
-
2 tbsp grated orange zest
-
1½ cups orange juice
-
4 tbsp reduced-sodium soy sauce (or tamari)
-
4 tsp sugar (or honey/maple syrup)
-
4 tsp fresh grated ginger
-
3 tsp cornstarch, divided
-
½ tsp black pepper
-
4 packs precooked brown rice (or 2 cups dry)
-
12 cups broccoli florets
-
½ cup sliced scallions
-
2 tbsp toasted sesame seeds
Instructions
-
Sear Chicken: Pat chicken dry. Season with 1½ tsp salt. Sear in hot oil, skin-side down, for 6–8 mins per side until crispy and cooked through. Remove and set aside.
-
Make Glaze: In same skillet, whisk together OJ, soy sauce, sugar, ginger, zest, pepper, and 2 tsp cornstarch. Simmer 5 mins until thickened. Add slurry (1 tsp cornstarch + 1 tbsp water) if needed.
-
Glaze Chicken: Return chicken to pan. Spoon glaze over and simmer 3–5 mins.
-
Steam Broccoli & Heat Rice: While chicken simmers, steam broccoli 4–5 mins and microwave rice.
-
Assemble Bowls: Layer rice, broccoli, and chicken. Drizzle extra glaze. Garnish with scallions and sesame seeds.
Notes
-
Add sriracha for heat, or swap OJ with pineapple juice.
-
For a low-carb version, use cauliflower rice.
-
Add bell peppers or carrots for extra veggies.
- Prep Time: 10 min
- Cook Time: 30–35 min
Nutrition Per Serving (1 thigh + rice + broccoli)
Calories: ~550 | Protein: 36g | Carbs: 28g | Fat: 32g | Fiber: 4g | Sugar: 10g
Note: Using skinless thighs reduces fat to ~25g. Sodium can be lowered with coconut aminos!
Final Thoughts: Why This Recipe Wins
This dish is weeknight gold because it:
✅ Balances effort vs. payoff (minimal prep, restaurant-worthy results)
✅ Flexes with flavors (sweet, spicy, or herbaceous—it adapts)
✅ Feeds a crowd or meal preps like a champ
Most importantly? It’s forgiving. Burnt the glaze? Add OJ. Overcooked broccoli? Toss it in the sauce anyway. Cooking should be joyful, not stressful—and this recipe is your delicious proof.
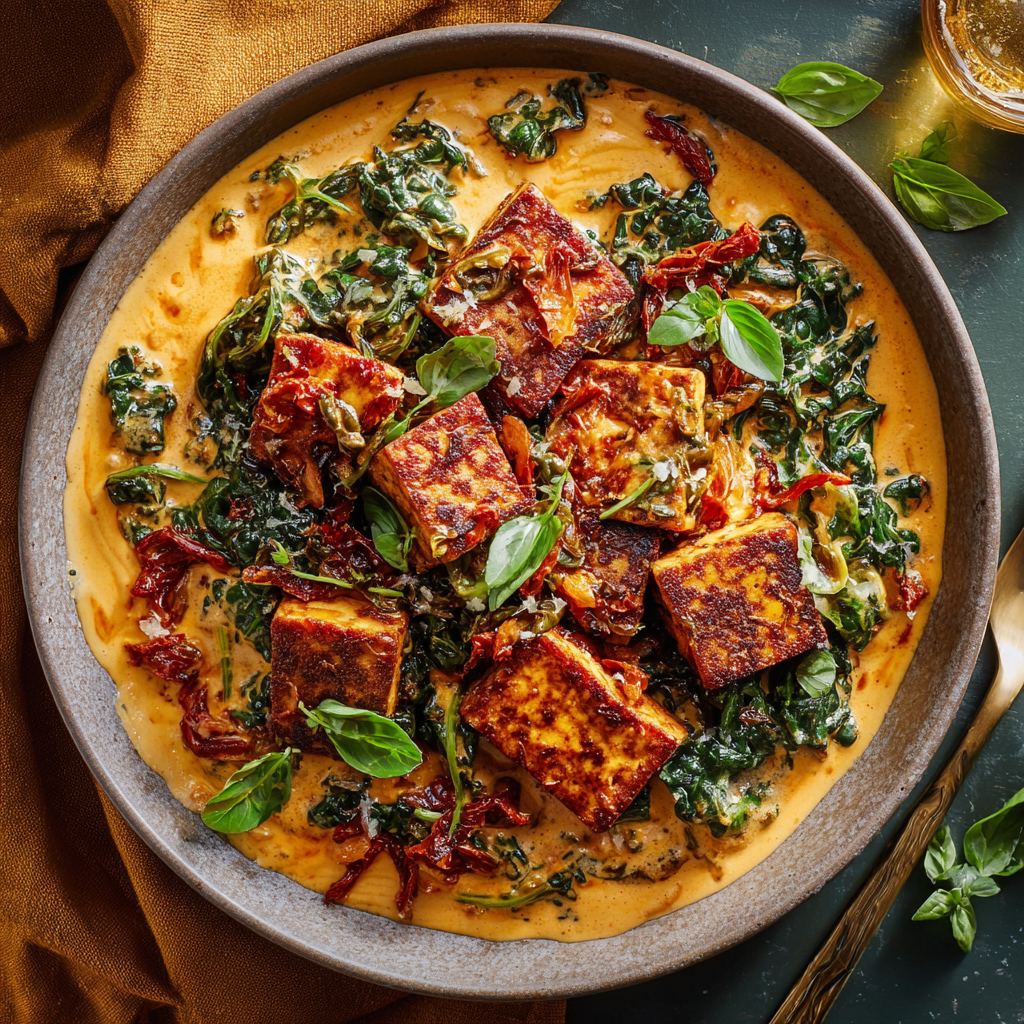
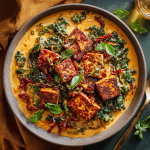
Creamy Sun-Dried Tomato Tempeh with Baby Kale
Welcome to My Cozy Kitchen: Let’s Make Magic Happen!
Hey there, fellow flavor adventurer! Olivia here, apron slightly dusted with paprika and a wooden spoon perpetually in hand. Can you smell that? It’s the sizzle of crispy tempeh meeting a velvety sun-dried tomato cream sauce – and trust me, your kitchen’s about to become the heart of the home. If you’ve ever craved a dish that hugs your soul while packing a serious protein punch, you’ve found it. This Creamy Sun-Dried Tomato Tempeh with Baby Kale & Basil isn’t just dinner; it’s a golden-hour glow on your stovetop. Imagine: nutty tempeh crisped to perfection, swimming in a luscious, herb-kissed sauce that clings to tender baby kale like a cozy blanket. Topped with a snowfall of Parm and confetti of fresh basil? Pure plant-forward comfort that’ll make carnivores swoon. Whether you’re a tempeh newbie or a veggie veteran, this recipe is your ticket to a 40-minute triumph. Let’s turn simple ingredients into something unforgettable – because life’s too short for bland food!
The Little Jar That Started It All
Picture this: It’s a rainy Portland afternoon, and my college dorm “kitchen” (read: hot plate + single skillet) feels gloomier than the weather. I’m homesick, craving my Nonna’s rich pasta sauces, but my student budget screams “ramen again.” Then I spot it – a half-used jar of sun-dried tomatoes in oil, abandoned in the pantry. On a whim, I toss them with the only protein I have (tragically underrated tempeh!) and a splash of cream begged off my roommate. The sizzle alone smelled like hope. That first bite? A revelation. The tomatoes’ tangy intensity transformed the humble tempeh into something luxurious, and suddenly my dingy dorm felt like a trattoria. I’ve tweaked that desperate experiment over a decade – adding kale for green vibrancy, Parm for salty depth – but that moment of resourceful joy? It’s still the soul of this dish. Every time I make it, I’m reminded: magic happens when we play with our food.
Your Flavor Toolkit: Ingredients & Smart Swaps
Gather these goodies! Pro tip: Use the sun-dried tomato oil – it’s liquid gold.
- 2 (8-oz) packages original tempeh: The star! Tempeh’s fermented soy gives a meaty bite and gut-loving probiotics. Swap: Extra-firm tofu (pressed well) or chickpeas for quicker prep.
- 6 tbsp oil from sun-dried tomato jar, divided: Infused with tomato essence! Chef insight: If short, use 4 tbsp tomato oil + 2 tbsp olive oil.
- 1 cup sun-dried tomatoes in oil, drained & chopped: Concentrated flavor bombs! Swap: 1/2 cup tomato paste + 1 tsp smoked paprika in a pinch.
- 1 tsp ground pepper + 1 tsp salt, divided: Season in layers! Chef hack: Use flaky sea salt for finishing.
- 2 large shallots, chopped (1 cup): Milder than onions, sweeter when golden. Swap: 1 sweet onion or 4 minced garlic cloves.
- 3 tbsp unsalted butter: For richness. Dietary swap: Vegan butter or 2 tbsp olive oil.
- 1½ cups unsalted vegetable broth: Controls saltiness. Insight: Homestock elevates it – save those veggie scraps!
- 8 cups packed baby kale: Wilts down beautifully. Swap: Spinach or arugula (add at the very end).
- 1 cup heavy cream: Silky backbone. Lighter swap: Full-fat coconut milk (adds subtle sweetness).
- 2 tsp Italian seasoning: Herbal hug in a jar. Chef upgrade: 1 tsp dried oregano + 1/2 tsp each rosemary & thyme.
- 1 cup grated Parmigiano-Reggiano, divided: Salty umami punch! Vegan swap: 3/4 cup nutritional yeast + 1/4 tsp white miso.
- 2 tbsp torn fresh basil: Non-negotiable freshness! Pro tip: Tear, don’t chop – prevents bruising.
Let’s Cook! Your Foolproof Roadmap
Don’t rush the crisp – golden tempeh is worth it!
- Prep & Crisp Tempeh: Slice tempeh into 1/4″ strips or 1/2″ cubes. Chef hack: Steam cubes for 10 mins first if you dislike slight bitterness! Heat 4 tbsp sun-dried tomato oil in a large skillet over medium-high. Add tempeh, pepper, and 1/2 tsp salt. Cook 6-8 mins, flipping occasionally, until deeply golden. Resist stirring too much – that’s how you get crunch! Transfer to a plate.
- Sauté Aromatics: In same skillet, add 2 tbsp oil, shallots, and butter. Cook 5 mins, stirring, until shallots are soft and smell sweet. Tip: Scrape up those tasty tempeh bits stuck to the pan – flavor foundation!
- Deglaze & Simmer: Add sun-dried tomatoes and broth. Simmer 3-4 mins until tomatoes soften and liquid reduces slightly. This is where the sauce gets its personality – let it bubble!
- Wilt Greens & Cream: Stir in kale by handfuls; it’ll wilt dramatically. Pour in cream, Italian seasoning, remaining 1/2 tsp salt, and 3/4 cup Parmesan. Simmer 3-4 mins, stirring, until sauce thickens to coat the back of a spoon. Chef insight: Don’t boil hard – cream can separate!
- Unite & Warm: Stir crispy tempeh back into the skillet. Cook 2 mins just to heat through. Tip: Tempeh soaks up sauce – serve promptly for max crispness!
- Finish with Flair: Remove from heat. Top with remaining Parmesan and basil. Critical step: Let it rest 2 mins – sauce thickens more!
Plating Perfection: Serving Up Comfort
This dish craves companionship! Spoon it generously over:
- Creamy Polenta: A dreamy, cornmeal canvas.
- Al Dente Pasta: Pappardelle or rigatoni catch every drop.
- Crusty Garlic Bread: For sauce-mopping euphoria.
Garnish with extra basil and a crack of black pepper. For brunch? Top with a fried egg! Serve family-style in a warm bowl – this is food meant for sharing (or not, no judgment!).
The Greens Factor – Why Baby Kale (Not Spinach) Wins
Not all greens behave alike! Here’s why baby kale is the MVP here:
Texture Matters:
-
Baby kale holds its structure when wilted, offering a slight chew that contrasts the creamy sauce.
-
Spinach turns silky fast (great for soups), but can get mushy here.
-
Arugula would add pepperiness, but lacks kale’s heartiness.
Nutrition Boost:
Kale is a cruciferous veggie, packed with sulforaphane (a cancer-fighting compound) and fiber. Unlike spinach, it doesn’t release much water when cooked, so your sauce stays luxuriously thick.
When to Add It:
Tossing kale in at the last minute preserves its bright color and nutrients. For extra flavor, massage it first with a pinch of salt and lemon juice!
Substitute Idea:
Try Swiss chard (stems removed)—its mild bitterness plays well with the sweet tomatoes.
Make It Your Own: 5 Tasty Twists
Play with these riffs – your kitchen, your rules!
- Mushroom Lover’s: Sauté 8 oz sliced creminis with shallots.
- Spicy Arrabbiata: Add 1 tsp red pepper flakes with tomatoes.
- Dairy-Free Delight: Use coconut cream + vegan Parm swap (from Ingredients).
- Protein Swap: Try chickpeas or shredded chicken.
- Lemon Zest Brightness: Stir in 1 tbsp zest at the end.
Olivia’s Extra Sprinkles of Wisdom
This recipe evolved from my “dorm desperation dinner” to my go-to dinner party hero! Funny story: Once, my cat Mr. Whiskers stole a tempeh strip mid-photo shoot – now I always cook extra for “quality control.” Over time, I learned two game-changers: 1) Using the tomato oil makes the flavor POP, and 2) Adding kale last-minute keeps it vibrant. Leftovers? Even better! The sauce soaks into the tempeh overnight. If it thickens too much, revive it with a splash of broth. This dish is forgiving – swapped kale for spinach during the Great Kale Shortage of 2020, and it was still divine. Remember: Cooking is a conversation, not a monologue. Taste as you go!
Your Questions, Answered!
Let’s troubleshoot like kitchen BFFs:
- Q: My tempeh tastes bitter! Help?
A: No worries! Steam slices for 10 minutes before frying. This mellows bitterness and helps it crisp. - Q: Sauce too thin? Too thick?
A: Thin: Simmer uncovered 2-3 mins more. Too thick? Stir in 2-3 tbsp broth or cream. Remember, it thickens as it cools! - Q: Can I make this ahead?
A: Absolutely! Cook tempeh and sauce separately. Combine & reheat gently on stove (add extra broth if needed). Don’t freeze – cream can separate. - Q: Heavy cream alternatives?
A: Full-fat coconut milk works beautifully! For lower fat, try half-and-half (simmer gently to avoid curdling).
Creamy Sun-Dried Tomato Tempeh with Baby Kale
- Total Time: 40 min
Description
This dish is proof that dinner can be bold, cozy, and totally weeknight-friendly. Crispy tempeh meets a luxurious sun-dried tomato cream sauce, with sweet shallots, vibrant kale, and fresh basil tying it all together. It’s rich without being heavy, packed with protein, and endlessly comforting. Whether you serve it over pasta, creamy polenta, or swoon-worthy toast, this recipe is a kitchen win you’ll want to revisit again and again.
Ingredients
-
2 (8 oz) packs tempeh, sliced
-
6 tbsp oil from sun-dried tomato jar (or mix with olive oil)
-
1 cup sun-dried tomatoes in oil, chopped
-
1 tsp salt + 1 tsp black pepper
-
2 large shallots, chopped
-
3 tbsp unsalted butter (or vegan butter)
-
1½ cups unsalted vegetable broth
-
8 cups baby kale (or spinach)
-
1 cup heavy cream (or full-fat coconut milk)
-
2 tsp Italian seasoning
-
1 cup grated Parmigiano-Reggiano, divided
-
2 tbsp fresh basil, torn
Instructions
-
Crisp Tempeh: Sauté tempeh in 4 tbsp tomato oil with ½ tsp salt + pepper for 6–8 mins until golden. Set aside.
-
Sauté Shallots: In same skillet, add 2 tbsp oil, shallots, and butter. Cook 5 mins until soft.
-
Deglaze & Simmer: Add tomatoes + broth. Simmer 3–4 mins.
-
Add Kale & Cream: Stir in kale, cream, Italian seasoning, remaining salt, and ¾ cup Parm. Simmer 3–4 mins until sauce thickens.
-
Finish: Stir in tempeh. Heat through. Top with basil + remaining Parm. Let sit 2 mins before serving.
Notes
-
Steam tempeh first to reduce bitterness.
-
Use chickpeas, mushrooms, or tofu as alt proteins.
-
Coconut milk makes a dreamy vegan version.
- Prep Time: 15 min
- Cook Time: 25 min
Nutritional Snapshot (Per Serving)
Calories: ~520 | Protein: 22g | Carbs: 16g | Fat: 40g | Fiber: 5g | Sugar: 5g
Note: Values estimated. For exact counts, use specific brands via apps like MyFitnessPal.
Final Thoughts: A Dish That Grows With You
This recipe is more than a meal—it’s a template for creativity. From my dorm-room experiments to your kitchen tweaks, it’s designed to adapt. Maybe you’ll add capers for brininess, or swirl in pesto instead of basil. Perhaps you’ll serve it over roasted squash next winter. However you make it, remember: the best dishes tell a story. Yours might start with “I was craving comfort” and end with “I can’t believe it’s vegan!” (or “I licked the plate”).
So keep that jar of sun-dried tomatoes stocked, embrace tempeh’s quirks, and never underestimate the power of a green garnish. Because when simple ingredients collide with a little courage? That’s where kitchen magic happens.
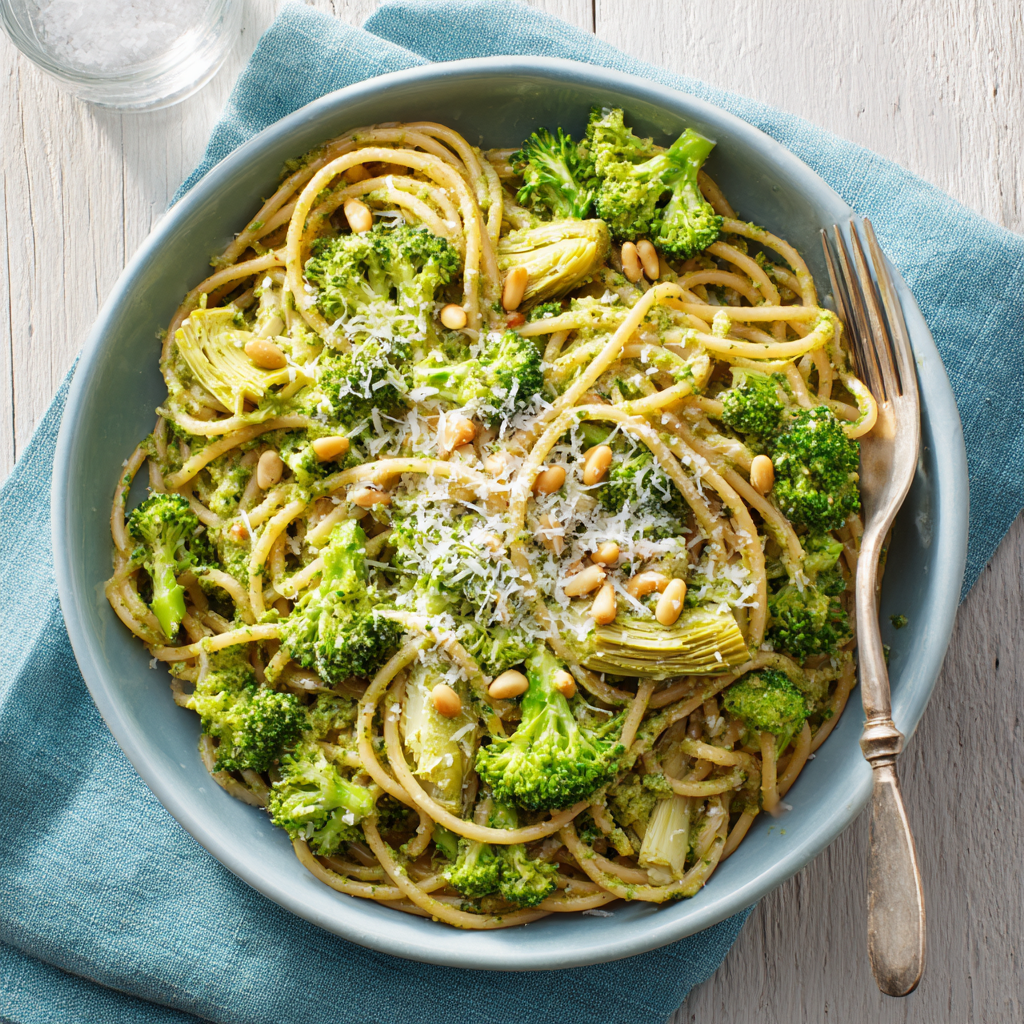
Broccoli, Artichoke & Basil Pesto Pasta
Hello, My Flavor-Loving Friends!
Is there anything more magical than the scent of fresh basil hitting a hot skillet? That herby perfume always transports me straight to sun-drenched Italian gardens, even if I’m just in my cozy, slightly chaotic home kitchen. If you’re like me—someone whose heart does a little happy dance when you’re elbow-deep in flour or hear the sizzle of garlic—then grab your favorite wooden spoon because we’re about to create pure comfort in a bowl. Today, we’re reinventing pesto in the most glorious way: my Broccoli, Artichoke & Basil Pesto Pasta. Imagine vibrant green sauce clinging to nutty whole-wheat spaghetti, studded with briny artichokes and crunchy pine nuts. It’s like spring decided to throw a party in your mouth! This isn’t just pasta; it’s a hug from your kitchen, packed with sneaky veggies and designed to make you feel like a rockstar cook without fancy skills. Let’s turn simple ingredients into something unforgettable together—apron stains guaranteed!
The Garden Mishap That Started It All
This recipe was born from a happy accident one summer when my basil plant went wild and my broccoli harvest exploded. Picture me, arms overflowing with way too much produce, frantically texting my sister: “EMERGENCY! Need pesto ideas STAT before this basil stages a coup!” She jokingly said, “Just throw broccoli in it—double the green!” Challenge accepted. I tossed everything into my food processor, crossed my fingers, and served it to my skeptical nephews. Their verdict? “Aunt Liv, this tastes like pizza pasta!” (High praise from tiny humans who usually treat broccoli like kryptonite.) Now, this pesto is our family’s secret weapon for turning veggie-phobes into clean-plate champions. Every bite takes me back to that sunny chaos—proof that the best recipes often sprout from happy messes!
Your Flavor Toolkit: Ingredients & Smart Swaps
Gather these goodies! Pro tip: Ingredients at room temperature blend smoother.
- 6 cups fresh broccoli florets – Our stealthy veggie base! Use just the florets—they blend creamier than stems. Chef’s hack: Save stems for stir-fries!
- 1½ cups packed fresh basil leaves – The soul of pesto! Rub a leaf—if it smells like summer, it’s perfect. Sub: In a pinch, swap half with baby spinach, but basil is non-negotiable for that authentic punch.
- 4 garlic cloves, smashed – Smash with your knife’s flat side to release oils. Insight: Smashed garlic blends smoother than minced—no bitter chunks!
- 2 tsp grated lemon zest – Brightness MVP! Use a microplane to avoid bitter pith. Chef’s secret: Zest lemons BEFORE juicing (way easier!).
- 2 cups water-packed artichoke hearts – Pat them DRY (wet pesto = sad pesto). Why water-packed? Oil-packed makes the sauce greasy. Sub: Frozen artichokes, thawed and squeezed dry.
- 1½ cups grated Parmigiano-Reggiano – Spend extra on the real deal—it’s nuttier and melts like a dream. Sub: Pecorino for saltier kick, or Asiago for mellower flavor.
- ½ cup pine nuts, toasted – Toast in a dry pan until golden—they go from zero to burnt FAST! Sub: Walnuts or almonds work beautifully for budget-friendly crunch.
- 1½ tsp salt, divided – We season in layers! Diamond Crystal kosher salt is my fave for even distribution.
- ¾ cup + ½ cup extra-virgin olive oil, divided – Splurge on good EVOO for the pesto; use regular olive oil for tossing. Why divided? We’ll use the extra ½ cup to create luxurious silkiness at the end!
- 16 oz whole-wheat spaghetti – Its earthiness balances the pesto. Sub: Regular pasta or gluten-free spaghetti—just adjust cook time.
Let’s Get Cooking: Your Foolproof Roadmap
Don’t rush—savor the process! I’m talking you through every step like you’re beside me at the stove.
- Cook the broccoli: Bring a pot of water to a rolling boil. Drop in broccoli florets and cook for exactly 3 minutes—we want tender-crisp, not mushy! Chef’s hack: Toss in a pinch of baking soda to keep that vibrant green color. Drain immediately and spread on a tray to cool. (Hot broccoli = wilted basil. Patience, grasshopper!)
- Toast those pine nuts: While broccoli cools, toast nuts in a dry skillet over medium-low heat. Shake the pan constantly—they’ll go golden in 2-3 minutes. Watch closely: They burn faster than a TikTok trend! Pour onto a plate to stop cooking.
- Blitz the pesto: In your food processor, combine cooled broccoli, basil, smashed garlic, lemon zest, 1½ cups artichokes (reserve the rest!), 1 cup Parmesan, ¼ cup toasted pine nuts, 1 tsp salt, and ¾ cup EVOO. Pulse 5 times, then run for 30 seconds. Scrape down sides. Texture tip: Want it silkier? Run processor another 15 seconds. Chunky? Stop earlier—it’s YOUR pesto!
- Cook pasta like a pro: Boil spaghetti in heavily salted water (it should taste like the sea!). Cook 1 minute LESS than package says—it’ll finish cooking in the sauce. SCOOP OUT 1 cup pasta water (golden liquid!), then drain pasta. Never rinse: Starchy pasta = sauce adhesion!
- The magic toss: In a big bowl, combine hot pasta, pesto, and ¼ cup reserved pasta water. Stir vigorously—the heat “wakes up” the flavors. Add remaining artichokes and ½ cup olive oil. Why extra oil now? It creates a restaurant-worthy sheen! Too thick? Add more pasta water 1 tbsp at a time.
- The grand finale: Top with remaining Parmesan, pine nuts, and a flaky salt sprinkle. Pro move: Let it sit 2 minutes—pasta absorbs flavors like a delicious sponge!
Plate It Pretty (Or Just Dig In!)
This pasta shines family-style! Pile it high in a warm rustic bowl. Drizzle with a little extra EVOO for gloss, then artfully scatter reserved pine nuts and artichokes on top. Grab your microplane and shower it with bonus Parmesan—because cheese is always a good idea. Serve with: A crisp white wine (Pinot Grigio loves basil!), garlic-rubbed toast for sauce-mopping, and a simple arugula salad with lemon vinaigrette to cut the richness. Leftovers? Toss with roasted cherry tomatoes next day—they’re pesto’s BFF!
Make It Your Own: Delicious Twists
This recipe is your canvas—get creative!
- Protein Power-Up: Fold in 2 cups shredded rotisserie chicken or sautéed shrimp during step 5.
- Vegan Vibes: Skip Parmesan, use ⅓ cup nutritional yeast + 1 tbsp white miso in pesto. Garnish with toasted sunflower seeds.
- Lemony Zing: Add 1 tbsp lemon juice with the pesto and extra zest on top.
- Spice It Up: Blend 1 deseeded jalapeño with the pesto or top with chili flakes.
- Low-Carb Love: Swap pasta for zucchini noodles or chickpea pasta—add them raw to hot pesto to soften.
Liv’s Kitchen Confessions
True story: The first time I made this, I accidentally used a whole head of garlic (yikes!). My breath could’ve knocked out a vampire, but my husband still licked the bowl! Over the years, I’ve tweaked it—adding that final ½ cup olive oil was a game-changer for silkiness. Sometimes I sneak in a handful of baby kale when basil prices spike. And confession: I’ve served this cold as a “pesto pasta salad” at picnics—it slays every time! The biggest evolution? Learning to undercook the broccoli slightly. Mushy broccoli = sad pesto texture. Now go make memories (and maybe a little mess) with it!
Your Questions, Answered!
Let’s tackle common kitchen hiccups:
- Q: My pesto turned out bitter! Help?
A: Likely culprits—overtoasted nuts or overprocessed basil. Pulse, don’t puree! Also, remove basil stems (they can be bitter). Fix it: Stir in 1 tsp honey or maple syrup to balance. - Q: Can I freeze this pesto?
A: Absolutely! Freeze pre-cheese pesto in ice cube trays. Thaw, then stir in fresh Parmesan. Frozen pesto lasts 3 months. Pro tip: Top with olive oil before freezing to prevent browning. - Q: Sauce feels too thick/grainy. SOS!
A: Easy fixes! Too thick? Add warm pasta water 1 tbsp at a time. Grainy? Your broccoli might’ve been overcooked OR food processor needs scraping. Next time, blend broccoli alone first, then add other ingredients. - Q: Can I use jarred artichokes?
A: Yes, but AVOID marinated ones (too vinegary). Water-packed only, and pat them obsessively—excess liquid is the enemy of clingy sauce!

Broccoli, Artichoke & Basil Pesto Pasta
Description
Welcome to your next pasta obsession! This luscious green sauce blends broccoli, basil, and artichokes into a bright, herby dream that clings to every noodle. Toasted pine nuts add crunch, lemon zest brings the sparkle, and just the right touch of Parmesan seals the deal. It’s fresh, comforting, and sneakily full of greens—perfect for weeknights or weekend dinner parties alike.
Ingredients
-
6 cups broccoli florets
-
1½ cups packed fresh basil leaves
-
4 garlic cloves, smashed
-
2 tsp lemon zest
-
2 cups water-packed artichoke hearts, drained & patted dry (reserve ½ cup)
-
1½ cups grated Parmigiano-Reggiano
-
½ cup pine nuts, toasted
-
1½ tsp salt, divided
-
¾ cup + ½ cup extra virgin olive oil, divided
-
16 oz whole-wheat spaghetti
Instructions
-
Blanch Broccoli: Boil florets for 3 mins, drain, cool, and pat dry.
-
Toast Pine Nuts: In dry skillet, toast until golden (2–3 mins).
-
Make Pesto: Blend broccoli, basil, garlic, zest, 1½ cups artichokes, 1 cup Parmesan, ¼ cup pine nuts, 1 tsp salt, and ¾ cup EVOO. Pulse until creamy.
-
Cook Pasta: Boil in salty water until just shy of al dente. Reserve 1 cup pasta water, then drain.
-
Combine: Toss pasta with pesto, ¼ cup pasta water, remaining ½ cup EVOO, and extra artichokes. Stir until glossy. Add more water if needed.
Notes
-
Add chicken, shrimp, or tofu for a protein boost.
-
Use nutritional yeast + miso for a vegan version.
-
Chill leftovers for a killer pasta salad!
Nutrition
- Calories: 480 cal Per Serving
- Fat: 30g
- Carbohydrates: 40g
- Protein: 17g
Nutritional Per Serving (Serves 6)
Calories: ~480 • Protein: 17g • Carbs: 40g • Fat: 30g • Fiber: 6g • Sugar: 3g
Note: Values are estimates. Want lower fat? Reduce final olive oil to ¼ cup.
Final Thoughts: More Than a Recipe
This dish isn’t just about feeding your body—it’s a celebration of kitchen intuition. Cooking, like life, thrives on experimentation. Maybe you’ll burn the pine nuts (I have!) or over-salt (yep, that too). But those “oops” moments lead to breakthroughs.
So here’s my challenge to you: Make this recipe once as written, then tweak it fearlessly. Swap Brazil nuts for pine nuts. Toss in roasted red peppers. Forget the pasta and stuff it into chicken breasts. Let your palate guide you.
Because the best recipes aren’t just followed—they’re lived in, messed up, and reborn as your own. Now go forth and pesto with abandon, my friends. The kitchen (and your taste buds) will thank you.

Crispy Sesame Tofu Bowls with Kimchi
Why This Crispy Sesame Tofu Bowl Is Your New Go-To Happy Place
Hey there, kitchen friends! Olivia here, waving at you from my flour-dusted countertop. Can we talk about those nights when you crave something that hugs your soul but doesn’t chain you to the stove? That magical intersection of crispy, creamy, tangy, and fresh? That’s exactly why I’m head-over-apron for these Crispy Sesame Tofu Bowls. Imagine golden cubes of tofu crackling with sesame seeds, piled high with charred broccoli and zingy kimchi, then drizzled with a spicy yogurt sauce that’ll make your taste buds dance. It’s Korean-inspired comfort in a bowl—fast enough for Tuesday nights but vibrant enough to impress weekend guests. And here’s the secret weapon: that sauce! It’s a creamy, dreamy blend of yogurt, mayo, and kimchi juice that ties everything together like a flavor ribbon. Whether you’re tofu-obsessed or just tofu-curious, this bowl celebrates texture, heat, and freshness in every bite. Let’s turn simple ingredients into something unforgettable together!
The Kimchi Connection: How a Midnight Snack Sparked a Love Affair
This recipe started with a jet-lagged fridge raid after my first trip to Seoul. Picture it: 2 AM, me in pajamas, ravenous after a 14-hour flight. I spotted leftover tofu, wilting broccoli, and a nearly empty kimchi jar. In my sleepy haze, I tossed it all in a skillet with sesame seeds and yogurt (don’t ask why yogurt—desperation breeds creativity!). That chaotic midnight mash-up became an obsession. I recreated it for my sister’s potluck months later, bracing for her “healthy food is boring” eye-roll. Instead, she inhaled two bowls and demanded the recipe. Now, it’s our standing tradition: every time she visits, we make this while blasting K-pop and swapping stories. It’s proof that the best kitchen magic often starts with a happy accident and a hungry heart.
Your Flavor Toolkit: Ingredients & Pro Tips
Gather these goodies (and breathe easy—swaps totally allowed!):
- Extra-firm tofu (2 packs): The crispy star! Press it firmly between towels to banish water—soggy tofu is the enemy of crunch. Swap: Super-firm tofu needs no pressing!
- Cornstarch (4 tbsp): Our crispy fairy godmother. Creates that irresistible golden shell. Swap: Arrowroot or potato starch work too.
- Sesame seeds (4 tbsp): Use black, white, or both for nutty crunch and gorgeous contrast.
- Gochugaru (3 tsp): Korean chili powder—mild, fruity heat. Swap: Smoked paprika + pinch cayenne if desperate.
- Kimchi + juice (2 cups + 6 tbsp): The tangy soul! Reserve juice for the sauce—it’s liquid gold. Chef insight: Vegan? Check kimchi for fish sauce!
- Broccoli (12 cups): Cut uniform florets so they char evenly. Swap: Cauliflower or broccolini.
- Yogurt-mayo sauce base: Creaminess with a kick! Whole-milk yogurt adds tang; mayo brings richness. Dietary hack: Use vegan mayo + coconut yogurt.
- Edamame (2 cups): Protein pop! Frozen and shelled = weeknight hero.
Let’s Build Your Bowl: Step-by-Step with Chef Cheerleading!
Crisp the tofu: Cube tofu into 1-inch pieces—pat bone-dry (trust me, moisture is crunch kryptonite!). Toss with cornstarch, sesame seeds, 1½ tsp gochugaru, and a salt pinch. Heat 4 tbsp oil in a large skillet over medium-high until it shimmers. Add tofu in a single layer (crowd it and you’ll steam it—batch cook if needed!). Fry 4-5 mins per side until GOLDEN and crackly. Hack: Don’t touch it until it releases easily—that’s your crunch cue! Transfer to paper towels.
Sizzle the veggies: In that same glorious skillet, add 2 tbsp oil. Toss in broccoli + salt. Stir only every 2 mins—let it char! After 5 mins, add kimchi + 3 tbsp kimchi juice. Cook 2 mins until broccoli is tender-crisp and kimchi caramelizes. Secret: That brown stuff on the pan? Flavor gold! Scrape it up.
Whisk the wow-sauce: In a bowl, whisk yogurt, mayo, sesame oil, vinegar, ginger, garlic, remaining kimchi juice (3 tbsp), gochugaru (1½ tsp), and ¼ tsp salt. Pro move: Taste! Want more kick? Add extra gochugaru or a squeeze of lime.
Assemble the happiness: Fluff brown rice in bowls. Top with tofu, broccoli-kimchi mix, and edamame. Drizzle generously with sauce. Layer tip: Rice first = saucy base that holds everything together!
Plating Perfection: Serving with Style
Bowl food is meant to feel abundant and inviting! I use wide, shallow bowls so every layer shines. Start with a cozy rice base, then artfully pile tofu and veggies in sections—it’s a flavor journey in every forkful. Garnish with scallions, extra sesame seeds, and a playful pinch of gochugaru for color. Serve with extra sauce on the side for drizzle control (because joy is personal!). Pair with iced barley tea or a crisp lager to cut the heat.
The Science of Crispy Tofu: Why This Method Works
Let’s geek out for a moment about why this tofu turns into little golden nuggets of joy. The magic lies in three key factors: moisture removal, starch coating, and oil temperature.
1. Moisture is the Enemy of Crunch
Tofu is packed with water—even the extra-firm kind. When water hits hot oil, it creates steam, which softens the exterior instead of crisping it. That’s why pressing your tofu (or using super-firm tofu) is non-negotiable. Here’s a pro trick: After pressing, pat the cubes again with a paper towel right before coating. Any lingering moisture will sabotage your crunch.
2. Cornstarch: The Crisp Catalyst
Cornstarch isn’t just a thickener—it’s a textural wizard. When heated, it forms a delicate, porous crust that absorbs oil evenly, creating a light yet sturdy shell. Unlike flour, which can taste doughy, cornstarch fries up almost transparently crisp. The sesame seeds add another layer of texture, toasting in the pan and releasing nutty oils that cling to the tofu.
3. Oil Temperature: The Goldilocks Zone
Too cold, and your tofu will soak up oil like a sponge. Too hot, and the outside burns before the inside heats through. The ideal temp? Around 350–375°F (medium-high on most stoves). Test it by flicking a sesame seed into the oil—if it sizzles immediately, you’re golden. And resist the urge to stir the tofu too soon! Let it form a crust before flipping (about 4–5 minutes per side).
Bonus Tip: The “Double Fry” Hack
For next-level crispiness, try this restaurant trick: Fry the tofu until lightly golden, let it rest on a rack for 5 minutes, then fry again for 1–2 minutes. The first fry cooks the interior; the second fry deepens the crunch.
The Sauce Breakdown: Why This Combination is Genius
This isn’t just a sauce—it’s the umami-packed glue that ties the bowl together. Let’s dissect why it works so well:
1. Creaminess with Balance
The combo of yogurt (tangy) and mayo (rich) creates a lush base without heaviness. Greek yogurt adds protein and acidity, while mayo brings silkiness. Vegan? Coconut yogurt and avocado mayo work beautifully.
2. Kimchi Juice: The Secret Weapon
That brine in your kimchi jar is fermented gold. Packed with lactic acid, garlic, and chili, it adds depth and a subtle funk. When whisked into the sauce, it cuts through the creaminess like a flavor scalpel.
3. Layered Heat
Gochugaru (Korean chili powder) isn’t just spicy—it’s slightly sweet and smoky. Combined with fresh garlic and ginger, it builds a slow heat that lingers. For extra dimension, add a splash of rice vinegar to brighten everything up.
Sauce Science Tip: Emulsification Matters
If your sauce splits, it’s likely due to temperature shock (cold kimchi juice hitting room-temp mayo). Fix it by:
-
Whisking the kimchi juice into the yogurt first, then adding mayo.
-
Using a blender for ultra-smooth results.
Make-Ahead Magic
This sauce improves overnight as the flavors meld. Store it in a squeeze bottle for easy drizzling—it’s killer on tacos, roasted veggies, or even as a burger spread!
The Veggie Strategy: Charred vs. Fresh Textures
A great bowl balances textures, and this recipe nails it with two contrasting veggie techniques:
1. Charred Broccoli: Maillard Magic
High-heat roasting unlocks broccoli’s hidden sweetness. The trick? Don’t stir too soon! Letting it sit for 2-minute intervals allows caramelization (those brown bits = flavor bombs). Adding kimchi late prevents it from turning mushy while infusing the broccoli with tangy heat.
2. Edamame: Fresh Contrast
The bright, firm beans add a pop of color and protein. For extra zing, toss them with a squeeze of lime and flaky salt before serving.
Veggie Swaps for Seasonality
-
Summer: Swap broccoli for grilled zucchini or corn.
-
Winter: Use roasted Brussels sprouts or kabocha squash.
-
Quick-Pickled Add-Ins: Thinly sliced radishes or cucumbers soaked in rice vinegar + sugar for 10 minutes add crunch.
Pro Plating Tip
Group components in distinct sections (tofu here, veggies there) rather than mixing. It’s visually stunning and lets eaters customize each bite.
Shake It Up: Delicious Twists
This bowl is a canvas—make it yours!
- Protein swap: Use crispy tempeh or shrimp instead of tofu.
- Grain-free: Swap rice for quinoa or crunchy cabbage slaw.
- Spice level: Add sriracha to sauce or top with sliced jalapeños.
- Veggie fun: Toss in shredded carrots or quick-pickled cucumbers.
- Nutty twist: Swap sesame seeds for crushed peanuts.
Olivia’s Notebook: Confessions & Upgrades
This recipe has evolved more than my taste in kitchen aprons! Originally, I deep-fried the tofu (delicious but messy). Now, shallow pan-frying gives the same crunch without the oil bath. Funny fail: Once I used sweet kimchi by accident—turned the sauce weirdly sugary! Moral? Taste your kimchi first. My favorite upgrade? Adding grated ginger to the sauce—it wakes up every other flavor. And yes, I’ve eaten this straight from the skillet… no shame. Pro tip: Double the sauce and stash it in your fridge. It’s insane on grain bowls, salads, or even as a dip!
Your Questions, Answered!
Q: My tofu isn’t crispy! What went wrong?
A: Sogginess usually means excess moisture. Press tofu longer (30 mins minimum!), pat aggressively, and ensure oil is hot before adding tofu. Crowding the pan is another culprit—cook in batches!
Q: Can I make this ahead?
A: Absolutely! Cook components separately. Store tofu, broccoli-kimchi mix, rice, and sauce in fridge containers. Reheat tofu in the air fryer (5 mins at 375°F) for maximum crunch revival.
Q: Too spicy for my kids! Help?
A: Skip gochugaru in the tofu/sauce. Use mild kimchi and reduce kimchi juice to 2 tbsp in the sauce. Serve chili powder only as garnish for adults.
Q: Why is my sauce splitting?
A: If sauce looks curdled, your kimchi juice was likely too cold. Use room-temp ingredients and whisk slowly. Still split? Blend it smooth!

Crispy Sesame Tofu Bowls with Kimchi
- Total Time: 40 min
Description
Need dinner that’s fast, flavor-packed, and secretly healthy? These tofu bowls check all the boxes. Crispy sesame-crusted tofu meets charred broccoli and tangy kimchi, all layered over fluffy rice and topped with a zingy yogurt sauce that ties it together. Vegan-adaptable, protein-rich, and utterly addictive—it’s your new favorite way to do comfort food.
Ingredients
-
2 packs extra-firm tofu (pressed & cubed)
-
4 tbsp cornstarch
-
4 tbsp sesame seeds (white or black)
-
3 tsp gochugaru (Korean chili powder)
-
2 cups kimchi + 6 tbsp kimchi juice
-
12 cups broccoli florets
-
2 cups shelled edamame
-
4 tbsp neutral oil
-
3 cups cooked brown rice
Sauce:
-
½ cup whole-milk yogurt
-
¼ cup mayo (vegan if needed)
-
1 tbsp sesame oil
-
1 tbsp rice vinegar
-
1 tsp grated ginger
-
1 clove garlic, grated
-
3 tbsp kimchi juice
-
1½ tsp gochugaru
-
Salt to taste
Instructions
-
Crisp the Tofu: Toss dry tofu with cornstarch, sesame seeds, 1½ tsp gochugaru, and salt. Pan-fry in hot oil until golden and crisp (4–5 min/side).
-
Sear the Veggies: In same pan, char broccoli with oil + salt for 5 min. Add kimchi + 3 tbsp kimchi juice. Cook 2 min more.
-
Make Sauce: Whisk yogurt, mayo, sesame oil, vinegar, ginger, garlic, remaining kimchi juice, gochugaru, and salt until smooth.
-
Assemble Bowls: Layer rice, tofu, broccoli mix, edamame. Drizzle sauce generously. Garnish with scallions + sesame seeds.
Notes
-
Swap tofu for shrimp or tempeh.
-
Use quinoa or slaw instead of rice.
-
Mild it down for kids by reducing gochugaru.
-
Make extra sauce—it’s magic on everything!
- Prep Time: 20 min
- Cook Time: 20 min
Nutrition
- Calories: 520 cal Per Serving
- Fat: 30g
- Carbohydrates: 42g
- Fiber: 6g
- Protein: 23g
Nutrition Per Serving (1 bowl)
Calories: ~520 | Protein: 23g | Carbs: 42g | Fat: 30g | Fiber: 6g | Sugar: 5g
Note: Stats include all components. Vegan? Use plant-based swaps for yogurt/mayo!
Final Thoughts: Why This Bowl Wins
This Crispy Sesame Tofu Bowl isn’t just a meal—it’s a textural symphony and a lesson in flexibility. It celebrates pantry staples (tofu, frozen edamame, kimchi) while feeling gourmet. The sauce is a masterclass in balance, the tofu proves plant-based can be indulgent, and the veggies keep it vibrant.
Most importantly, it’s forgiving. Burn the broccoli? Toss in extra kimchi. Out of gochugaru? Use smoked paprika. Forgot to press the tofu? Bake it at 400°F for 20 minutes to dry it out.
This bowl is a reminder that cooking should be joyful, not rigid. So grab your skillet, crank up the K-pop, and let flavor—not rules—guide you. Happy crunching!

Creamy Sun-Dried Tomato Pasta with Caramelized Onions
Hey, Pasta Lover! Let’s Make Magic in a Bowl
Picture this: golden caramelized onions glistening like edible treasure, tangy sun-dried tomatoes bursting with Mediterranean sunshine, and a creamy balsamic sauce hugging every curve of hearty pasta. That’s exactly what’s simmering on my stove today—my go-to Creamy Sun-Dried Tomato Pasta that’s equal parts comfort food and showstopper. If your idea of happiness involves twirling forkfuls of saucy noodles while your kitchen smells like an Italian nonna’s dream, you’re my people. This isn’t just dinner; it’s a warm hug with Parmesan on top. Best part? It’s stupidly easy to make. No fancy techniques, no obscure ingredients—just pure, unapologetic flavor that’ll make your taste buds throw a party. Whether you’re cooking for your soulmate or feeding a rowdy friend squad, this dish turns “What’s for dinner?” into “Can I have seconds?” Let’s grab our aprons (messy ones encouraged!) and make something unforgettable.
The Night My Pasta Saved Dinner (and My Ego)
Rewind to my early cooking days—I was hosting my now-husband’s parents for the first time. Cue panic! I’d planned an elaborate menu, but halfway through, my sauce split like a bad relationship. With 30 minutes left, I spotted a jar of sun-dried tomatoes and thought, “What the heck?” I caramelized onions (slowly, praying!), tossed in those ruby tomatoes, splashed in balsamic… and magic happened. That pasta became our family’s edible love language. Now, every time I make it, I remember how something born from kitchen chaos became our most requested dish. It’s proof that great food isn’t about perfection—it’s about passion, a little improv, and sharing the delicious results with people who matter.
Your Flavor Dream Team (Plus Clever Swaps!)
Here’s your grocery list—think of these as your kitchen Avengers. Each one brings a superpower!
- Sun-dried tomatoes in oil (2 jars): These are the MVP! Their oil is liquid gold—use it for sautéing. Chef tip: Don’t skip draining them—unless you want oily sauce (ask me how I know!). Swap: Dry-packed? Soak in warm water for 15 mins first.
- Yellow onions (4 medium): They’re the sweet, mellow backbone. Insight: Thin slices = even caramelization. Swap: Red onions work but add a sharper bite.
- Garlic cloves (8): Thinly slice—no mincing! We want gentle bursts of flavor. Swap: 1 tsp garlic powder in a pinch (but fresh is best!).
- Balsamic vinegar (4 tbsp): It’s not just tang—it adds depth and sticky sweetness. Chef hack: Splurge on the good stuff. Swap: Red wine vinegar + 1 tsp honey.
- Half-and-half (1 cup): Creamy but not heavy. Swap: Full cream for decadence, or coconut milk for dairy-free.
- Parmesan (⅔ cup grated): Freshly grated melts like a dream. Chef rant: Pre-grated won’t blend as smoothly!
- Whole-wheat penne (24 oz): Hearty and holds sauce like a champ. Swap: Regular pasta, gluten-free, or chickpea pasta.
- Basil (½ cup chopped): Adds freshness! Rule: Add it LAST to keep it vibrant.
- Pine nuts (½ cup toasted): Nutty crunch! Swap: Toasted walnuts or slivered almonds.
- Crushed red pepper (½ tsp): Just a whisper of heat. Omit if sensitive.
Let’s Cook! (No Stress, Just Yum)
Follow these steps like you’re dancing—no stiff moves, just feel the rhythm!
- Caramelize those onions LOW & SLOW: Heat 2 tbsp sun-dried tomato oil in your largest skillet over medium. Add onions. Critical tip: Don’t rush this! Stir every 5 minutes for 20-25 mins until they’re jammy and golden-brown. If they sizzle loudly, lower the heat—this isn’t a stir-fry! Patience = flavor gold.
- Garlic + balsamic party: Push onions aside. Add garlic to the skillet center—let it sizzle 30 seconds until fragrant (don’t brown!). Pour in balsamic and water—it’ll hiss and steam! Scrape the brown bits (fond!) with your spatula—that’s free flavor! Stir everything together. Add salt and red pepper. Hack: The water helps unstick the fond without diluting taste.
- Pasta power: While onions cook, boil pasta in salted water (taste it—it should be like the sea!). Cook until al dente. Save ½ cup pasta water!! This starchy liquid is sauce insurance. Drain pasta.
- Build the creamy dream: Add drained pasta to the onion skillet. Toss to coat. Reduce heat to low. Stir in sun-dried tomatoes, half-and-half, and Parmesan. Chef move: Add pasta water 1 tbsp at a time until sauce clings luxuriously to noodles. Too thick? More water. Too thin? Let it simmer 1 min.
- Basil’s grand entrance: Kill the heat! Fold in basil—the residual warmth wakes up its aroma without wilting it to oblivion.
Plate It Like You Mean It
Grab big, shallow bowls—this dish deserves to shine! Pile pasta high, then shower it with toasted pine nuts and extra Parmesan. A final flourish of fresh basil leaves makes it Instagram-worthy. Pair with a crisp arugula salad (lemon vinaigrette cuts the richness) and crusty bread for sauce-mopping emergencies. For wine? A Chianti or Pinot Grigio sings with those tomatoes. Family-style serving = guaranteed empty plates and happy sighs.
The Art of Caramelizing Onions – A Love Story in a Skillet
Caramelizing onions is where the magic begins in this dish—a slow, sweet alchemy that transforms humble onions into a rich, jammy foundation. But let’s be honest: many home cooks rush this step, ending up with either burnt bits or limp, underdeveloped onions. The secret? Low heat, patience, and a little bit of faith.
Why Low and Slow Wins the Race
When onions cook slowly over medium-low heat, their natural sugars break down and deepen in flavor. The Maillard reaction (that fancy term for browning) works its magic, turning sharp, pungent onions into something sweet, complex, and almost meaty in depth. If your onions are sizzling aggressively within the first few minutes, your heat is too high. The ideal pace? A gentle sizzle, with occasional stirring, for a full 20-25 minutes.
Common Mistakes (And How to Avoid Them)
-
Overcrowding the pan: If your onions are piled high, they’ll steam instead of caramelize. Use a wide skillet and give them space.
-
Stirring too often: Constant stirring prevents proper browning. Let them sit for 4-5 minutes between stirs.
-
Adding salt too early: Salt draws out moisture, which can slow caramelization. Wait until they’re golden before seasoning.
The Flavor Boosters
Want to take your onions to the next level? Try these tricks:
-
Deglaze with wine: After caramelizing, splash in a bit of white wine before adding balsamic. It adds acidity and depth.
-
Add a pinch of sugar: If your onions aren’t sweet enough, a teaspoon of sugar can help things along.
-
Fresh thyme or bay leaves: Toss in a few sprigs while cooking for an herby undertone.
Caramelized onions aren’t just for pasta—they elevate grilled cheese, burgers, soups, and even pizza. Master this step, and you’ll have a kitchen superpower.
Sun-Dried Tomatoes – The Mediterranean Flavor Bomb
Sun-dried tomatoes are the unsung heroes of this dish—intense, tangy, and packed with umami. But not all sun-dried tomatoes are created equal, and how you use them makes all the difference.
Oil-Packed vs. Dry-Packed: Which to Choose?
-
Oil-packed: These come submerged in oil (usually olive oil), making them softer and more flavorful. Bonus: The oil is infused with tomato goodness—use it for sautéing!
-
Dry-packed: Chewier and more concentrated, but they need rehydrating. Soak in warm water for 15 minutes before using.
Why Sun-Dried Tomatoes Work So Well
Unlike fresh tomatoes, which can water down a sauce, sun-dried tomatoes bring bold, concentrated flavor without excess liquid. Their natural sweetness balances the acidity of balsamic vinegar, while their chewy texture adds contrast to creamy pasta.
Creative Ways to Use Them Beyond Pasta
-
Blend into dips: Whirl them into hummus or cream cheese for a tangy spread.
-
Top pizzas or flatbreads: Their intense flavor stands up to strong cheeses like feta or goat cheese.
-
Chop into salads: Adds a punch to grain bowls or Mediterranean salads.
Pro Tip: If your sauce tastes too sharp, a teaspoon of honey or a splash of heavy cream can mellow it out.
The Science of the Perfect Creamy Sauce (Without Breaking It)
Creamy pasta sauces can be tricky—too thin, too thick, or (worst of all) broken and greasy. Here’s how to nail it every time.
Why Pasta Water is Non-Negotiable
That starchy, salty liquid is the glue that binds your sauce. The starch helps emulsify the fats (cheese, cream, and oil), creating a silky, clingy texture. Always reserve at least ½ cup before draining your pasta.
How to Avoid a Broken Sauce
-
Temper the dairy: Adding cold cream to a hot pan can cause separation. Warm it slightly first.
-
Low heat is key: High heat can make the sauce grainy. Stir in cheese and cream off the heat or on low.
-
Gradual additions: Add pasta water a tablespoon at a time until the sauce reaches the perfect consistency.
Dairy-Free? No Problem.
-
Coconut milk (full-fat) mimics creaminess beautifully.
-
Cashew cream (blend soaked cashews with water) adds richness.
-
Nutritional yeast gives a cheesy flavor without dairy.
Bonus Trick: If your sauce does break, a splash of hot pasta water and vigorous stirring can often save it.
Shake It Up! 5 Tasty Twists
- Protein boost: Add 2 cups shredded rotisserie chicken or sautéed shrimp with the tomatoes.
- Veggie-loaded: Stir in 3 cups baby spinach or roasted mushrooms with the onions.
- Dairy-free: Swap half-and-half for coconut milk and Parmesan for ¼ cup nutritional yeast.
- Spicy kick: Double the red pepper flakes or add sliced chili with the garlic.
- Pesto vibes: Swirl in ¼ cup basil pesto at the end for herbaceous depth.
Olivia’s Behind-the-Scenes Scoop
This recipe’s evolved more than my taste in kitchen towels! Originally, I used cream cheese (too clumpy!) and skipped pine nuts (mistake!). The balsamic was a “hmm, let’s try this” moment that stuck. Fun fact: Once, mid-caramelization, my neighbor texted an emergency—I turned off the heat, ran outside for 20 mins, then resumed cooking. Those onions? Even better! Low heat forgives distractions. Now, I double the batch—leftovers taste even richer next day (add a splash of milk when reheating). It’s taught me that cooking, like life, is better when you’re generous with flavor and grace with yourself.
Your Questions? Answered!
Q: My sauce looks oily. Help!
A: Did you drain those sun-dried tomatoes? Pat them dry! If it’s still greasy, toss in a handful of spinach—it absorbs excess oil.
Q: Can I freeze this pasta?
A: Cream-based sauces can get grainy when frozen. Instead, freeze just the caramelized onion-tomato mixture (sans dairy). Thaw, reheat, then add cream/Parmesan with freshly cooked pasta.
Q: Why reserve pasta water?
A: That starchy liquid helps emulsify the sauce, making it silky and helping it cling to noodles. It’s a game-changer!
Q: Onions burning before caramelizing?
A: Too high heat! Lower it to medium-low. Add 1 tbsp water if they dry out. Good caramelization takes patience—20 mins minimum!

Creamy Sun-Dried Tomato Pasta with Caramelized Onions
- Total Time: 45 min
Description
This cozy, flavor-loaded pasta is your weeknight hero. Slow-cooked onions meet sweet-tart tomatoes and a velvety cream sauce in a dish that’s both impressively rich and shockingly simple. No fancy tools or pro skills required—just pantry staples, a little stirring love, and a big appetite.
Ingredients
-
2 jars sun-dried tomatoes in oil (drained, oil reserved)
-
4 yellow onions, thinly sliced
-
8 garlic cloves, thinly sliced
-
4 tbsp balsamic vinegar
-
½ cup water
-
1 cup half-and-half (or coconut milk for dairy-free)
-
⅔ cup freshly grated Parmesan
-
24 oz whole-wheat penne (or your fave pasta)
-
½ cup chopped fresh basil
-
½ cup toasted pine nuts
-
½ tsp red pepper flakes
-
Salt, to taste
Instructions
-
Caramelize Onions: Heat 2 tbsp reserved tomato oil in a skillet. Cook onions low and slow (20–25 min) until jammy.
-
Add Garlic & Balsamic: Push onions aside. Sauté garlic 30 sec. Stir in balsamic + water. Scrape up brown bits. Add salt + red pepper.
-
Cook Pasta: Boil pasta in salted water until al dente. Reserve ½ cup pasta water. Drain.
-
Make Sauce: Add pasta to onion skillet. Stir in sun-dried tomatoes, half-and-half, and Parmesan. Loosen sauce with pasta water as needed.
-
Finish: Kill heat. Fold in basil. Top with pine nuts and more Parmesan to serve.
Notes
-
Add chicken, shrimp, or spinach for extra protein or veggies.
-
Use nutritional yeast + coconut milk for a dairy-free twist.
-
Leftovers? Reheat with a splash of milk for creaminess.
- Prep Time: 15 min
- Cook Time: 30 min
Nutrition
- Calories: 480 cal Per Serving
- Fat: 22g
- Carbohydrates: 52g
- Protein: 17g
Nutrition Per Serving (1 of 8)
Calories: ~480 • Protein: 17g • Carbs: 52g • Fat: 22g • Fiber: 7g • Sugar: 9g
Note: Using full cream adds ~50 calories; dairy-free options reduce fat.
Final Thoughts: Why This Pasta is More Than Just a Meal
This dish isn’t just about ingredients—it’s about imperfections becoming strengths, about turning kitchen mishaps into something unforgettable. It’s a reminder that the best meals aren’t always the most polished, but the ones made with a little courage and a lot of heart.
So next time you’re staring at a jar of sun-dried tomatoes or a pile of onions, remember: great cooking isn’t about following rules—it’s about creating flavor, one delicious mistake at a time. Now go forth, twirl that pasta, and make magic.

Twice-Baked Potatoes with Rotisserie Chicken & Veggies
Welcome to My Cozy Kitchen: Let’s Make Magic Happen!
Hey there, friend! Come on in – can you smell that? It’s the warm, earthy scent of potatoes roasting in the oven, mingling with the promise of melted cheese and savory chicken. That’s right, today we’re diving fork-first into my ultimate comfort food love affair: Twice-Baked Potatoes with Rotisserie Chicken & Veggies. If your idea of happiness involves crispy potato skins hugging a cloud of fluffy filling loaded with juicy chicken, vibrant veggies, and a golden blanket of Cheddar, you’ve found your people. I’m Olivia, your slightly flour-dusted guide, and I live for dishes that turn “just dinner” into a hug on a plate. These twice-baked wonders? They’re the culinary equivalent of your favorite cozy sweater – reliable, deeply satisfying, and guaranteed to make everyone at the table lean in for seconds (and thirds!). Perfect for busy weeknights, lazy Sunday suppers, or when you need to feed a crowd without losing your cool. Forget complicated techniques or obscure ingredients; we’re celebrating the glorious simplicity of real food, big flavors, and the pure joy of creating something deliciously homemade. So tie on that apron (embrace the mess!), preheat your oven, and let’s transform humble spuds into something truly extraordinary together. Trust me, your taste buds are about to throw a party!
Why These Potatoes Feel Like Home
These potatoes aren’t just a recipe; they’re a scrapbook page for me. Picture this: It’s a blustery fall evening years ago, rain lashing the windows. My fridge held half a leftover rotisserie chicken, some lonely carrots, and a bag of frozen peas – the universal “what on earth do I cook?” scenario. My then-boyfriend (now husband!) was coming over, and takeout felt like defeat. Inspiration struck: baked potatoes! But plain felt… meh. I remembered my grandma scooping out fluffy middles for her famous loaded skins. What if I mashed it all together? I roasted the potatoes, scraped them out, and mixed in that chicken and those peas and carrots with reckless abandon. Added cheese (because cheese!), fresh herbs snipped from my windowsill pot, and piled it all back in. The smell alone was heavenly. When he took that first bite? Eyes wide, a muffled “Oh. Wow.” That simple, thrown-together meal became *our* dish. It fueled late-night study sessions, celebrated promotions, and comforted us through tough days. It’s the taste of resilience, resourcefulness, and the warm, cheesy proof that the best meals often start with “Hmm, what’s left in the fridge?” and end with full bellies and happy hearts.
Your Flavor-Packed Toolkit: Ingredients & Insights
Gathering your ingredients is like assembling your dream team! Here’s what you need for 8 satisfying servings, along with my chef-ly whispers to guide you:
- 8 medium russet potatoes, scrubbed: Russets are MVP here – their thick skin crisps beautifully, and their starchy flesh mashes up fluffy and light. Chef Tip: Give them a good scrub! Dirt hides in nooks.
- 1 cup half-and-half: This creates luxuriously creamy mash. Sub Alert: Whole milk works, or even warmed chicken broth for richness without extra dairy. Sour cream adds tang but thickens more.
- ½ cup unsalted butter, cut into cubes: Unsalted lets you control salt. Cubes melt faster into the hot potato! Insider Trick: Use room temp butter for even easier blending.
- 4 cups shredded rotisserie chicken: The ultimate flavor and time hack! Use both white and dark meat. Pro Move: Shred it yourself for better texture than pre-shredded packs.
- 2 cups frozen carrots and peas, thawed: Frozen is your friend for freshness and ease. Thawing prevents sogginess. Mix it Up: Try corn, chopped broccoli, or bell peppers!
- 1½ cups shredded sharp Cheddar cheese, divided: Sharp Cheddar packs a punch. Dividing ensures cheesy goodness *inside* and glorious melt *on top*. Sub Idea: Smoked Gouda or Pepper Jack for a kick!
- 2 tbsp chopped fresh thyme (plus more for garnish): Fresh herbs are non-negotiable! Thyme adds earthy warmth. Chef Love: Rub leaves off stems for max flavor. Dried thyme works (use 2 tsp) but fresh shines.
- 2 tbsp chopped fresh chives (plus more for garnish): Chives bring bright, oniony freshness. Garnish Gold: That extra sprinkle makes it look restaurant-fancy!
- 1 tsp salt: Season as you go! Start here, taste after mixing, and adjust. Potatoes need love.
- 1 tsp ground pepper: Freshly cracked black pepper is best for vibrant flavor.
Let’s Build Those Potato Masterpieces: Step-by-Step!
Alright, team! Let’s transform these ingredients into golden, cheesy bliss. Don’t rush – good things take time (mostly oven time!).
- Bake Potatoes (The Foundation): Preheat your oven to 400°F (200°C). Grab those scrubbed russets and pierce them all over with a fork – this is crucial! It lets steam escape so they don’t explode (trust me, potato shrapnel is no joke!). Place them directly on the oven rack. No pan needed! This lets heat circulate for even cooking. Bake for 50-60 minutes. They’re ready when a fork slides in easily with zero resistance. Chef Hack: Give them a gentle squeeze (with an oven mitt!) – they should yield softly. Let them cool just enough to handle, about 10-15 minutes. Don’t skip cooling; hot potato burns are the worst!
- Prepare the Filling (Fluff & Flavor!): Carefully slice each potato in half lengthwise. Now, the fun part: scooping! Use a spoon to gently scoop the fluffy insides into a large bowl, leaving a sturdy ¼-inch shell. Be gentle – you want those skins intact! Pro Tip: Hold the potato skin in a kitchen towel for a better grip and to protect your hands. To the bowl of warm potato, add the half-and-half and cubed butter. Mash it all together! I love a potato masher for this – you want it creamy but a few small lumps are okay (it’s homemade charm!). Insider Secret: Mash while the potato is still warm – it absorbs the butter and cream beautifully.
- Mix it All Together (The Party Starts!): Now, the party! Add your glorious shredded rotisserie chicken, the thawed peas and carrots, 1 cup of that sharp Cheddar, the chopped fresh thyme and chives, salt, and pepper. Grab a sturdy spoon or spatula and gently fold it all together. Chef Wisdom: Don’t overmix! We want distinct bits of chicken and veggies peeking through that fluffy potato. Taste it! This is your moment. Need more salt? Pepper? A pinch of garlic powder? Adjust now.
- Stuff & Top (The Grand Finale!): Generously spoon this incredible filling back into those waiting potato boats. Pile it high – they can take it! Smooth the tops slightly. Now, shower the remaining ½ cup of shredded Cheddar evenly over all your potato halves. Presentation Perk: Sprinkle a little extra fresh thyme or chives over the cheese now for color that bakes in beautifully.
- Bake Again (Melt & Crisp!): Carefully place your loaded potato halves onto a baking sheet (for easy handling). Pop them back into your 400°F oven. Bake for 15-20 minutes. You’re looking for the filling to be piping hot all the way through and that cheese to be gloriously melted, bubbly, and maybe even just starting to get golden brown in spots. Watch Closely: Ovens vary! If the cheese isn’t browning to your liking, pop them under the broiler for 1-2 minutes at the end (but don’t walk away!).
Serving Up Comfort on a Plate
These beauties deserve a grand entrance! Let them rest for just 5 minutes after baking – molten cheese is tempting but dangerous. Garnish generously with that extra chopped fresh thyme and chives – the vibrant green makes them pop! Serve them warm, straight off the baking sheet or arranged on a big rustic platter. For a main dish, two halves per person are perfect alongside a simple green salad dressed with lemon vinaigrette to cut the richness. As a hearty side? One half alongside grilled steak or roasted fish is pure bliss. Pass around extra sour cream for dolloping and maybe some hot sauce for the adventurous souls at the table. The crackle of the skin giving way to that creamy, cheesy, chicken-filled center? Pure magic.
Make It Your Own: Delicious Twists!
Love the base recipe? Here are some fun spins to keep it exciting:
- Southwest Fiesta: Swap the peas/carrots for black beans, corn, and diced green chiles. Use Pepper Jack cheese! Add 1 tsp cumin and ½ tsp chili powder to the filling. Top with avocado slices and cilantro after baking.
- Loaded “Bacon” Ranch: Mix in ½ cup cooked, crumbled bacon with the chicken. Swap half the half-and-half for ranch dressing. Use a Colby Jack blend. Garnish with extra bacon and green onions.
- Mediterranean Sunshine: Skip the peas/carrots. Use chopped sun-dried tomatoes, spinach (wilted and squeezed dry), and kalamata olives. Swap Cheddar for feta cheese. Add 1 tsp dried oregano. Garnish with fresh dill.
- Veggie Power (Vegetarian): Omit chicken. Add 2 cups more veggies – sautéed mushrooms, zucchini, and bell peppers work great! Boost protein with 1 can (drained) white beans or lentils. Use veggie broth instead of half-and-half if desired.
- Buffalo Chicken: Toss the shredded chicken in ¼ cup Buffalo sauce before mixing. Swap peas/carrots for diced celery. Use a blue cheese crumble instead of half the Cheddar. Drizzle with ranch after baking.
Olivia’s Kitchen Confessions & Tips
Oh, these potatoes! They’ve seen some things in my kitchen. Remember that “don’t skip piercing” warning? Yeah, learned that the hard way during a dinner party years ago. One loud *POP* later, and I was cleaning potato off the ceiling! Lesson learned. Over time, I’ve embraced the “thawed” frozen veggies rule – adding them frozen once led to watery sadness. I also started dividing the cheese religiously after an early batch where all the cheese was inside, and the tops looked… lonely. The biggest evolution? Confidence! I used to measure herbs obsessively. Now? I grab a big handful from my garden and chop with abandon. Taste as you go – that’s the real secret. These potatoes are forgiving. Too thick? Add a splash more half-and-half. Extra chicken? Toss it in! Leftover roasted veggies? Chop ’em up! They’re a canvas for your fridge clean-out creativity. The messy apron is always worth it when you see those smiles.
Your Questions, Answered!
Let’s tackle those kitchen hiccups before they happen:
- Q: My potato shells tore! Help! Can I still use them?
A: Don’t panic! It happens, especially with thinner-skinned spuds. As long as you have most of the shell, carefully spoon the filling back in. They might be a bit floppy, but the taste is still 100%. For a backup plan, you can mash the torn skins *into* the filling, pile it all into a greased baking dish, top with cheese, and bake as a “Twice-Baked Potato Casserole” – equally delicious! - Q: Can I make these ahead of time?
A: Absolutely! They are a meal-prep dream. Bake the potatoes, scoop, mix the filling, and stuff the shells. Cover tightly and refrigerate for up to 24 hours *before* the second bake. When ready, pop them straight from the fridge into the preheated oven. You might need to add 5-10 minutes to the baking time since they start cold. Don’t top with the final cheese until just before baking the second time. - Q: Why is my filling gluey/gummy?
A: Overmixing is the usual culprit! When you mash the potatoes initially, stop once they’re creamy. When adding the chicken and veggies, fold gently just until combined. Using a hand mixer or over-stirring releases too much starch, leading to glue. Also, ensure your peas/carrots are thoroughly thawed and drained if they seem watery. - Q: Can I freeze twice-baked potatoes?
A: Yes, but with caveats. Freeze them *after* stuffing and *before* the second bake and adding the final cheese topping. Wrap individual stuffed potatoes tightly in plastic wrap, then foil, or place them in a single layer in a freezer-safe container. Freeze for up to 2 months. Thaw overnight in the fridge. Unwrap, top with cheese, and bake as directed, adding 5-10 minutes if needed. Freezing after the second bake can make the potatoes watery upon reheating.

Twice-Baked Potatoes with Rotisserie Chicken & Veggies
- Total Time: 1 hr 40 min
Description
Think fluffy mashed potatoes swirled with juicy rotisserie chicken, sweet peas and carrots, sharp cheddar, and fresh herbs—all piled back into crispy potato skins and baked to perfection. These twice-baked beauties are easy to prep, endlessly customizable, and taste like home. Whether you’re feeding a family or meal-prepping for the week, this is cozy food at its finest.
Ingredients
-
8 medium russet potatoes
-
1 cup half-and-half (or whole milk)
-
½ cup unsalted butter, cubed
-
4 cups shredded rotisserie chicken
-
2 cups thawed frozen carrots & peas
-
1½ cups shredded sharp Cheddar, divided
-
2 tbsp fresh thyme, chopped
-
2 tbsp fresh chives, chopped
-
1 tsp salt
-
1 tsp black pepper
Instructions
-
Bake Potatoes: Preheat oven to 400°F (200°C). Pierce potatoes and bake directly on oven rack for 50–60 mins. Cool slightly.
-
Scoop & Mash: Slice in half. Scoop insides into a bowl, leaving ¼-inch shell. Add butter and half-and-half. Mash until creamy.
-
Mix Filling: Stir in chicken, veggies, 1 cup cheddar, herbs, salt, and pepper. Fold gently.
-
Stuff & Top: Spoon filling into shells. Top with remaining ½ cup cheese.
-
Second Bake: Bake 15–20 mins until hot and cheese is bubbly. Broil 1–2 mins for golden tops.
Notes
-
Add Buffalo sauce, ranch, or smoked paprika for fun flavor twists.
-
Make vegetarian by skipping chicken and adding beans or mushrooms.
-
Freeze before second bake for easy future meals!
- Prep Time: 25 min
- Cook Time: 75 min
Nutrition
- Calories: ~460 cal Per Serving
- Fat: 24g
- Protein: 28g
Nutritional Info (Per Serving – 1 Stuffed Potato Half)
Calories: ~460 | Protein: 28g | Carbs: 36g | Fat: 24g | Fiber: 4g | Sugar: 3g
Note: Nutritional values are estimates based on specific ingredients used. Values can vary depending on potato size, chicken fat content, exact cheese amount, etc.
Prep Time: 25 mins | Cook Time: 1 hr 15 mins | Total Time: 1 hr 40 mins
Final Thoughts: More Than Just a Recipe
Twice-baked potatoes are a lesson in culinary alchemy—transforming humble ingredients into comfort-food gold. They teach us to embrace imperfections (so what if a skin tears?), celebrate resourcefulness (leftover chicken? Perfect!), and share joy through food. Whether you stick to the classic or globe-trot with flavors, remember: the best meals are the ones made with a dash of love and a sprinkle of adventure. Now, go forth and stuff those spuds!
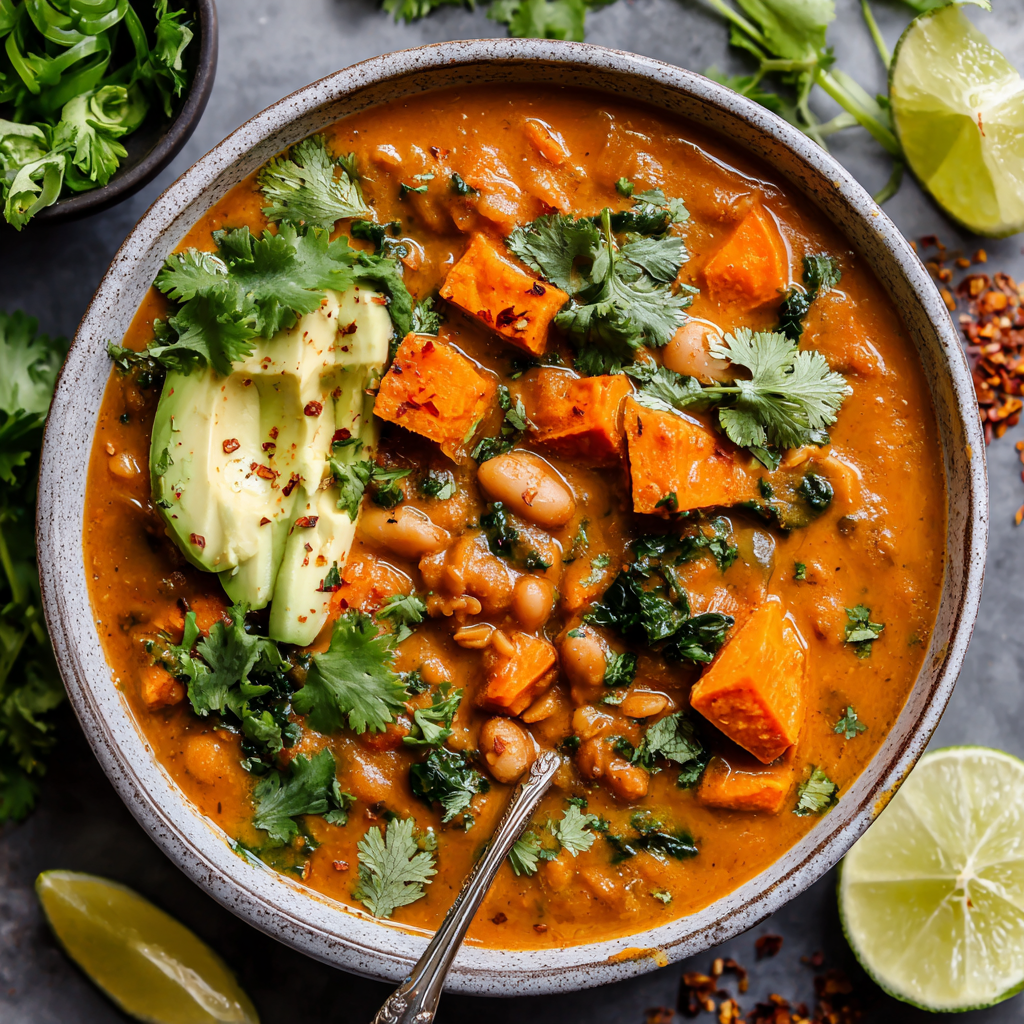
Creamy Sweet Potato & White Bean Chili
Hey There, Cozy Kitchen Friend!
Is there anything more soul-warming than a big, bubbling pot of chili on a crisp day? That incredible aroma wrapping around your kitchen like a hug, the promise of creamy, spicy-sweet goodness in every spoonful… *sigh* Pure comfort. If you’re anything like me (Olivia!), your heart does a little happy dance at the thought of a hearty, veggie-packed meal that’s equal parts nourishing and downright delicious. This isn’t just any chili, though – this is my Creamy Sweet Potato & White Bean Chili, a recipe that’s become a legend in my house and with everyone I’ve ever shared it with. Imagine tender chunks of sweet potato melting into a velvety, cumin-scented broth, plump great northern beans adding heft, and a sneaky hit of green chiles giving it just the right background buzz. The magic touch? A generous block of cream cheese stirred in at the end, transforming it from great to *unforgettable*. It’s vegetarian comfort food at its absolute finest – simple enough for a busy weeknight (we’re talking under an hour, friends!), yet impressive enough to serve to your hungriest weekend guests. It reheats like a dream for meal prep, feeds a crowd without breaking the bank, and honestly? That creamy texture combined with the natural sweetness of the potatoes is pure magic. Grab your favourite pot and your coziest apron – let’s make some kitchen magic happen together!
A Bowl Full of Snowy Day Memories
This chili recipe always whisks me back to one particularly epic snowstorm a few years back. The power flickered, the wind howled like a hungry wolf, and my then-boyfriend (now husband!) Dan was stranded at my tiny apartment after a movie night gone long. We were down to pantry basics: sweet potatoes, a few cans of beans, some lonely broth, and a block of cream cheese meant for bagels. Desperation (and rumbling stomachs!) breeds creativity, right? I started chopping and sautéing, throwing in spices with hopeful abandon. When I stirred in that cream cheese and watched it melt into this luscious, orange-hued potion… well, let’s just say the mood shifted dramatically. The power *stayed* out, but we lit every candle we could find, piled blankets high, and devoured bowl after bowl of this accidental masterpiece by candlelight, laughing at our luck. It felt like we’d conjured pure coziness from nothing. That storm passed, but this chili? It became our tradition, our “snow’s coming!” signal. It’s proof that sometimes the best things – the warmest memories – really do come from simple ingredients and a little kitchen courage.
Gathering Your Chili Dream Team
Here’s everything you’ll need to create this creamy hug in a bowl. Don’t stress about perfection – I’ve got notes!
- 2 tbsp neutral oil (canola or avocado): Just enough to get things sizzling without overpowering. Avocado oil is my go-to for its high smoke point and mild flavor, but canola or grapeseed work perfectly!
- 2 large sweet potatoes, coarsely chopped (about 7 cups): The sweet, earthy heart of the dish! Chop them into roughly 1-inch chunks – they’ll soften beautifully. No sweet potatoes? Butternut squash is a fantastic swap, offering similar sweetness and texture.
- 2 medium yellow onions, chopped (about 4 cups): The flavor foundation. Yellow onions caramelize sweetly. Red onions work in a pinch, but they’re a bit sharper.
- 8 garlic cloves, minced (about 4 tbsp): Garlic = non-negotiable flavor depth! Minced fresh is best, but 4 tsp of good-quality garlic paste works if you’re in a rush.
- 3 tsp ground cumin: Our warm, earthy spice superstar. Toasting it briefly with the garlic unlocks incredible aroma. Smoked paprika (½ tsp) added with it is a chef-y hack I love for extra depth.
- ½ tsp salt: Start here! We use unsalted broth and beans, so you’ll likely need to add more later. Always taste before serving!
- 4 (15-oz) cans no-salt-added great northern beans, rinsed: Creamy, mild, and perfect for chili. RINSING is key to avoid a starchy, thick broth. Cannellini beans are a great substitute if that’s what you have. Using salted beans? Omit the added salt initially!
- 5 cups unsalted vegetable broth: Gives body and flavor. Unsalted lets *you* control the seasoning. A good low-sodium chicken broth works if you’re not strictly veggie.
- 2 (4-oz) cans chopped green chiles, undrained: Mild heat and tangy flavor! Undrained = more flavor. Not spicy at all, promise. For more kick, add a diced jalapeño with the onions.
- 8 oz reduced-fat cream cheese: The SECRET to the dreamy texture! Reduced-fat works beautifully and lightens it up slightly without sacrificing creaminess. Full-fat is decadent, or for vegan, use 1 cup soaked raw cashews blended smooth with ½ cup broth. *Chef Insight:* Cube it for faster melting!
Optional for Serving:
- Fresh cilantro leaves: Bright, herbal pop! Hate cilantro? Flat-leaf parsley is lovely.
- Lime wedges: A squeeze of lime juice just before eating? *Chef’s kiss* Cuts the richness perfectly.
Let’s Get This Cozy Pot Party Started!
Ready? This is where the magic happens. It’s simple, but I’ve packed in my favorite tips for chili success!
- Sauté the Veggie Base (8-10 mins): Grab your largest, heaviest pot or Dutch oven – this makes a lot! Heat the oil over medium heat. Dump in those gorgeous sweet potato chunks and chopped onions. Give them a good stir. Now, here’s the key: don’t rush this! Cook them, stirring occasionally, for about 8-10 minutes. You want the onions translucent and the sweet potatoes just starting to soften on the edges (they won’t be cooked through yet). *Chef Hack:* Cover the pot for the first 5 minutes – it traps steam and helps the potatoes soften faster without burning!
- Wake Up the Aromatics (1 min): Push the veggies to the side a bit. Add the minced garlic, cumin, and that ½ tsp salt right into the cleared spot in the pot. Let it sizzle for just 30 seconds to 1 minute – you’ll smell the garlic and cumin blooming and becoming incredibly fragrant! *Crucial Tip:* Don’t let the garlic burn – burnt garlic is bitter. Stir everything together immediately after that minute.
- Bring on the Beans & Broth (Bring to Boil, then Simmer 20-25 mins): Time to add the hearty stuff! Pour in the rinsed beans, vegetable broth, and those undrained green chiles. Give it a really good stir, scraping up any tasty bits stuck to the bottom of the pot (that’s flavor gold!). Crank the heat up to high and bring this beautiful mixture to a lively boil. Once it’s bubbling enthusiastically, reduce the heat down to low-medium – you want a gentle simmer, not a rolling boil. Cover the pot with a lid slightly ajar. Let it bubble away happily for 20-25 minutes. *Chef Check-in:* At around 15 minutes, poke a sweet potato chunk with a fork. It should be very tender but not mushy. If it’s still firm, give it another 5-10 minutes. The beans will soften further too!
- Create the Creamy Dream (Simmer 5 mins): This is the TRANSFORMATION moment! Reduce the heat to low. Take your cream cheese (remember my cube tip? Works wonders!) and add it to the pot. Now, stir patiently and constantly. It will look a bit lumpy at first – that’s normal! Keep stirring gently as the cream cheese melts into the hot liquid. Within a few minutes, you’ll have a gloriously smooth, creamy, orange-hued chili. *Pro Tip:* If it seems stubborn, you can take a cup of the hot chili out, whisk the cream cheese into that cup until smooth, then whisk it back into the main pot. Once smooth, let it simmer uncovered for just 5 more minutes to let the flavors meld perfectly. Taste it NOW! This is when you adjust the seasoning – add more salt (I usually add another ½ to 1 tsp total) and maybe a pinch of black pepper. Love it spicy? A dash of cayenne or hot sauce is perfect here.
Dishing Up the Cozy
Ladle that steaming, creamy goodness into deep bowls – it’s thick and luxurious! Now, the fun part: toppings! A generous shower of bright, fresh cilantro leaves adds a pop of color and freshness. Don’t forget those lime wedges on the side – squeezing a little juice over each bowl just before eating is *essential*. It cuts through the richness and brightens every single flavor. For an extra cozy night, serve it with warm cornbread for dipping or crumbling right in. Crunchy tortilla strips or a dollop of cool avocado are also fantastic additions. It’s all about making it *your* perfect bowl of comfort!
Make It Your Own: Delicious Twists!
This chili is a fantastic canvas! Here are some fun ways to play:
- Smoky & Spicy: Add 1 tsp smoked paprika with the cumin and stir in 1-2 chipotle peppers in adobo (minced) for a deep, smoky heat.
- Vegan Dream: Skip the cream cheese! Blend 1 cup soaked raw cashews with ½ cup vegetable broth until silky smooth, then stir it in at the end. Top with avocado!
- Meaty Addition (Not Veggie): Brown 1 lb of ground turkey, chicken, or Italian sausage with the onions. Drain fat before proceeding.
- Different Bean Scene: Swap one can of great northern beans for black beans or pinto beans for extra color and texture.
- Pumpkin Power: Stir in ½ cup pure pumpkin puree with the cream cheese for an extra fall vibe and nutrient boost.
Olivia’s Extra Scoop
This recipe has truly evolved from that snowy night scramble! I initially used full-fat cream cheese (still delicious!), but found reduced-fat gives that same luxurious texture without feeling quite as heavy, especially for seconds (and there *will* be seconds!). The biggest lesson? **Taste before serving!** Broth saltiness varies, and your perfect seasoning might need an extra pinch or two. One hilarious fail? I once forgot to rinse the beans… let’s just say we had chili *paste*. Learn from my messy-apron mistakes! This pot is also a fridge miracle. It thickens gloriously overnight, making leftovers even more decadent. Dan still requests it the minute the temperature drops below 60, claiming it’s his “storm survival food.” Honestly? I just love how something so simple, born from pantry staples, can become a dish that feels like a warm embrace. It’s the heart of my cozy kitchen philosophy.
Your Chili Questions, Answered!
Let’s tackle some common kitchen curiosities:
- Q: Can I use regular cream cheese instead of reduced-fat? A: Absolutely! Full-fat cream cheese will make it even richer and more decadent. The texture will be slightly thicker and silkier. Just be mindful if you’re watching calories – but for pure indulgence, go for it!
- Q: My chili seems too thin/thick! Help! A: No worries, easy fixes! *Too Thin:* Simmer it uncovered for an extra 5-10 minutes to reduce and concentrate the liquid. You can also mash a small portion of the beans and sweet potatoes against the side of the pot with a fork and stir them back in to thicken naturally. *Too Thick:* Stir in a splash more vegetable broth or even a little water, ¼ cup at a time, until it reaches your perfect consistency. Remember, it thickens as it cools!
- Q: How long does this chili last, and can I freeze it? A: This is a meal prep superstar! Store cooled chili in airtight containers in the fridge for up to 5 days. It reheats beautifully on the stove or in the microwave (stir in a tiny splash of broth or water if needed). Yes, it freezes well! Cool completely, then freeze in portions for up to 3 months. Thaw overnight in the fridge and reheat gently. The cream cheese might separate *slightly* after freezing – just whisk vigorously while reheating, it’ll come back together.
- Q: Is there a way to make this in a slow cooker or Instant Pot? A: You bet! *Slow Cooker:* Sauté onions, sweet potatoes, garlic, and spices on the stove as per steps 1 & 2. Transfer to the slow cooker. Add beans, broth, and chiles. Cook on LOW for 6-7 hours or HIGH for 3-4 hours, until potatoes are tender. Stir in cubed cream cheese until melted (cover for 10 mins after stirring). *Instant Pot:* Use Sauté function for steps 1 & 2. Add beans, broth, and chiles. Secure lid, set valve to sealing. Cook on HIGH pressure for 4 minutes. Quick release pressure. Stir in cubed cream cheese until melted.

Creamy Sweet Potato & White Bean Chili
- Total Time: 50 min
Description
When crisp weather rolls in, this chili is the warm bowl you’ll crave. Packed with sweet potatoes, tender white beans, green chiles, and finished with a swirl of cream cheese, it’s nourishing, comforting, and deceptively simple. Whether you’re snowed in or just need a weeknight win, this creamy chili will keep you full, happy, and coming back for seconds.
Ingredients
-
2 tbsp neutral oil (avocado or canola)
-
2 large sweet potatoes (chopped, ~7 cups)
-
2 yellow onions (chopped, ~4 cups)
-
8 garlic cloves (minced)
-
3 tsp ground cumin
-
½ tsp salt (plus more to taste)
-
4 cans (15 oz each) great northern beans, rinsed
-
5 cups unsalted vegetable broth
-
2 cans (4 oz each) green chiles, undrained
-
8 oz reduced-fat cream cheese (cubed)
Optional Garnishes:
-
Fresh cilantro
-
Lime wedges
-
Cornbread, tortilla chips, or avocado
Instructions
-
Sauté Base: Heat oil in a large pot over medium. Add sweet potatoes + onions, cook 8–10 min until softened.
-
Bloom Aromatics: Push veggies aside. Add garlic, cumin, salt. Cook 1 min until fragrant.
-
Simmer: Add beans, broth, and chiles. Bring to boil, then simmer partially covered 20–25 min.
-
Creamy Finish: Lower heat. Stir in cream cheese until melted and smooth. Simmer 5 more min.
-
Serve: Ladle into bowls, top with cilantro and lime. Add sides or extras to make it yours!
Notes
-
Use butternut squash instead of sweet potatoes.
-
Want spice? Add chipotle or diced jalapeño.
-
Vegan? Swap cream cheese for blended cashews (1 cup soaked + ½ cup broth).
-
Too thick? Add broth. Too thin? Mash some potatoes into the mix.
- Prep Time: 15 min
- Cook Time: 35 min
Nutrition
- Calories: 380 cal Per Serving
- Fat: 16g
- Carbohydrates: 45g
- Fiber: 9g
- Protein: 15g
Nourishment Note (Approximate Per Serving)
This hearty chili packs a nutritious punch! Based on 10 servings (it’s generous!):
Calories: ~380 | Protein: 15g | Carbs: 45g | Fiber: 9g (That’s a great boost!) | Sugar: 6g (Mostly natural from the sweet potatoes!) | Fat: 16g
Prep Time: 15 mins | Cook Time: 35 mins | Total Time: 50 mins
Final Thoughts: More Than Just a Recipe
This Creamy Sweet Potato & White Bean Chili isn’t just a meal—it’s an experience. It’s the warmth of a snowy night, the joy of improvisation, and the comfort of familiar flavors. It’s a dish that invites experimentation, whether you add smoky paprika, swap in butternut squash, or go fully vegan with cashew cream.
But beyond the ingredients, this chili represents something deeper: the idea that the best meals often come from simplicity, from using what you have, and from sharing with those you love. It’s proof that cooking doesn’t have to be complicated to be extraordinary.
Recent Posts
- Thai Shrimp Lettuce Wraps : Fresh, Flavorful & Ready in 20 Minutes

- Easy Hawaiian Pineapple Cake with Cream Cheese Frosting

- Strawberry Rhubarb Pie : A Sweet & Tangy Classic with a Flaky Crust

- Crispy Seafood Egg Rolls : Golden, Crunchy & Loaded with Flavor

- Chocolate Dump Cake : Rich, Gooey, and Amazingly Easy
