

Gourmet Brownie Cookies
The Ultimate Guide to Gourmet Brownie Cookies
Hey there, fellow food enthusiasts! Welcome back to Feastical, where we’re all about creating kitchen magic and sharing good vibes through delicious recipes. If you’re ready to tickle your taste buds and dive into something absolutely scrumptious, buckle up because today we’re whipping up Gourmet Brownie Cookies!
Imagine the best of both worlds: the rich, fudgy texture of classic brownies melded beautifully with the delightful bite of a cookie. Sounds dreamy, right? Well, I can hardly hear my taste buds file their complaint letters because they’re just so excited about these cookies! They are soft, chewy, and packed to the brim with chocolatey goodness, guaranteed to make you swoon.
Now, let me just say this: making these cookies is not just about satisfying your sweet tooth; it’s about the experience. From mixing the batter to the intoxicating aroma wafting through your kitchen, baking is a beautiful adventure. Whether you’re baking for a crowd, surprising a friend, or indulging in a cozy night in, these brownies turned cookies are sure to elevate your mood. Trust me, once you sink your teeth into one, you’ll find it hard to eat just one!
So, grab your apron, roll up those sleeves, and let’s get ready to unleash your inner baker with these delectable Gourmet Brownie Cookies!
Personal Story
Let me take you back to a sunny Saturday afternoon—oh, how nostalgic this memory is! It was my mom’s day off, and the kitchen was like a playground. She had a way of turning any day into a special occasion, especially if it involved baking. With classic rock tunes on the radio, we’d whip up everything from cakes to cookies, but there was one treat that always stood out: her ultimate brownie cookies.
I vividly remember her explaining how to achieve the perfect balance between chewy and fudgy, while I eagerly cracked eggs (probably a bit carelessly) and stirred the bowl just a bit too vigorously. The kitchen transformed into a flutter of laughter, flour, and chocolate as we experimented with different toppings—think nuts, sprinkles, and all the chocolate chips we could find!
Today, whenever I make these Gourmet Brownie Cookies, I’m instantly transported back to that warm kitchen filled with love and laughter. It’s an experience I love to recreate and share with you! Let’s carry on that tradition together, shall we?
Ingredients
Let’s start gathering what you’ll need for your Gourmet Brownie Cookies. Here’s the list:
-
1/2 cup unsalted butter
Butter is a must for that rich, indulgent flavor. If you’re out of unsalted butter, you can use salted butter and omit the added salt. -
1 cup granulated sugar
This sweet agent helps to create that perfect chewy texture. You could swap half for brown sugar for a hint of molasses flavor! -
2 large eggs
Eggs bind everything together and provide moisture. You can use flax eggs if you’re looking for a vegan alternative—just mix 1 tablespoon of ground flaxseed with 2.5 tablespoons of water and let it sit until gelatinous. -
1 teaspoon vanilla extract
Vanilla adds a lovely depth to the flavor. If you’re feeling adventurous, try almond extract instead for a nutty twist! -
1/2 cup all-purpose flour
This is the base for our cookies. For gluten-free options, you can use a 1:1 gluten-free flour blend, ensuring it contains xanthan gum. -
1/3 cup unsweetened cocoa powder
The star of the show! Cocoa powder gives that deep chocolate flavor. If you’re out, you might sub in some chocolate protein powder, but the texture will change slightly. -
1/4 teaspoon baking powder
This gives our cookies a bit of lift and a lovely chewy texture. If you don’t have baking powder, baking soda works too—just use half the amount. -
1/4 teaspoon salt
Salt enhances the sweetness of the cookies. You could even use a flaky sea salt for topping if you fancy! -
1 cup chocolate chips
Chocolate chips, the ultimate flavor boost! Go for dark, semi-sweet, or even white chocolate chips for a fun twist.
Step-by-Step Instructions
Now that we’ve rounded up all the delicious ingredients, it’s time to get down to baking! Here’s how you’ll make these luscious Gourmet Brownie Cookies:
-
Preheat the Oven
Preheat your oven to 350°F (175°C). This is crucial because a properly preheated oven helps your cookies rise beautifully and cook evenly. -
Melt the Butter
In a small saucepan over low heat, melt the butter gently—don’t let it boil! If you’re feeling reckless, you can microwave it in 30-second intervals until melted. Just be careful not to cook it. -
Mix Sugar and Eggs
In a mixing bowl, combine the melted butter and granulated sugar. Mix until well combined. I like to switch to a hand whisk here—the more muscle, the better! Next, add in the eggs, one at a time, and whisk until the mixture is smooth. This is where you’ll start to see everything blend together beautifully! -
Add Vanilla
Pour in that heavenly vanilla extract (or almond extract if you’re swapping). Stir it in, and trust me, the aroma will make you giddy! -
Sift the Dry Ingredients
In a separate bowl, sift together the flour, cocoa powder, baking powder, and salt. Sifting helps create a lighter cookie, making them chewy and delicious. -
Combine Wet and Dry Ingredients
Gradually add the dry mixture into the egg mixture, stirring gently with your spatula. Be careful not to over-mix—just until the flour disappears! -
Fold in Chocolate Chips
Now, for the pièce de résistance! Fold in those luscious chocolate chips until evenly distributed. Feel free to add more if you’re feeling bold—nobody’s judging! -
Scoop the Dough
Using a cookie scoop (or two spoons if you don’t have one), drop generous amounts of dough onto a lined baking sheet, spacing them about 2 inches apart. They will spread, trust me! -
Bake ‘Em Up
Pop your baking sheet into the preheated oven and bake for about 10-12 minutes. You want the edges to be set while the center remains soft and slightly underbaked. They’ll continue to cook a bit as they cool, delivering that perfect chewy texture. -
Let Them Cool
Once out of the oven, let them cool on the baking sheet for about 5 minutes before transferring them to a wire rack. This is the hardest part! Just breathe in that chocolatey goodness during the wait.
Serving Suggestions
Now, let’s talk about how to serve these delightful Gourmet Brownie Cookies. For an Instagram-worthy presentation, you can stack them up on a colorful plate and dust the tops with powdered sugar or a sprinkle of sea salt. Pair them with a big glass of cold milk or a scoop of vanilla ice cream for an epic dessert experience.
Feeling a bit fancy? You can serve them warm, topped with a scoop of your favorite ice cream and drizzled with chocolate or caramel sauce. The warmth of the cookie melting onto the ice cream creates a delectable combo that will leave everyone reaching for seconds!
Recipe Variations
Want to mix things up? Here are some creative twists you can try out:
-
Nutty Brownie Cookies
Add in 1/2 cup of chopped walnuts or pecans for an added crunch and a touch of nuttiness. -
Peppermint Crunch
During the holiday season, toss in some crushed peppermint candies for a festive flair! -
Spicy Chili Chocolate
Add 1/2 teaspoon of cayenne pepper to the dry ingredients for a spicy kick that pairs surprisingly well with chocolate. -
Nut-Free Version
If you need these to be nut-free, stick with chocolate chips and avoid any nut toppings, but consider adding shredded coconut for texture! -
Vegan Brownie Cookies
Swap eggs for flax eggs, use coconut oil instead of butter, and enjoy a delightful plant-based treat!
Chef’s Notes
I have to confess, these Gourmet Brownie Cookies have evolved over the years. Originally, I experimented on family and friends with different flavors and add-ins, and after much trial and error (and many taste tests), I landed on this perfect recipe!
Some kitchen disasters happened along the way, including a batch that mysteriously turned into brownie soup. But those mistakes taught me so much about texture and blending flavors—it’s all part of the culinary journey, right?
Every time I make these cookies, I’m reminded that cooking is about more than just following a recipe; it’s about sharing delicious moments and memories with the people we love. So feel free to experiment until you find your favorite version!
FAQs and Troubleshooting
-
Why are my cookies flat?
A common issue can often be attributed to not chilling the dough before scooping or incorrect measurements (too little flour can also cause spreading). -
How can I make sure my cookies are fudgy?
Slightly underbaking them will help retain that chewy, fudgy center. Trust your instincts and take them out while still soft! -
Can I store these cookies?
Certainly! Keep them in an airtight container at room temperature for up to a week—or freeze them for longer storage, up to three months! -
What if I don’t have chocolate chips?
You can always chop up your favorite chocolate bar into chunks or even use cocoa nibs for a different texture.
Nutritional Info
While we love indulging in treats like these Gourmet Brownie Cookies, it’s always good to know what we’re munching on! Each cookie contains approximately:
- Calories: 180 per cookie
- Total Fat: 9g
- Saturated Fat: 5g
- Cholesterol: 40mg
- Sodium: 50mg
- Total Carbohydrates: 22g
- Dietary Fiber: 1g
- Sugars: 12g
- Protein: 2g
Of course, these numbers can vary based on specific brands and ingredient swaps. Remember, everything in moderation is key, especially with goodies like this!
Final Thoughts
And there you have it, folks! Your guide to whipping up the delightful and sophisticated Gourmet Brownie Cookies. Whether you’re pouring your heart into baking for loved ones or just indulging in a little self-care with a cozy night in, these cookies truly embody the love of cooking.
The kitchen can be a sanctuary, filled with the aromas of baked wonders and sweet memories. So next time you’re looking for a sweet treat, remember this recipe, savor every bite, and maybe pass it on to your own loves. After all, the joy of cooking and sharing food is what life is all about.
Now go forth and bake, my friends! You’ve got this, and I can’t wait to hear about your own kitchen adventures. Happy baking!
Print
Gourmet Brownie Cookies
- Total Time: 27 minutes
- Yield: 12 servings 1x
- Diet: Vegetarian
Description
Indulge in the rich, fudgy texture of classic brownies melded beautifully with the delightful bite of a cookie.
Ingredients
- 1/2 cup unsalted butter
- 1 cup granulated sugar
- 2 large eggs
- 1 teaspoon vanilla extract
- 1/2 cup all-purpose flour
- 1/3 cup unsweetened cocoa powder
- 1/4 teaspoon baking powder
- 1/4 teaspoon salt
- 1 cup chocolate chips
Instructions
- Preheat your oven to 350°F (175°C).
- Melt the butter gently in a saucepan over low heat.
- Mix the melted butter and granulated sugar until well combined, then add the eggs one at a time.
- Add the vanilla extract and stir it in.
- Sift the flour, cocoa powder, baking powder, and salt into a separate bowl.
- Combine the dry mixture with the wet mixture, stirring gently.
- Fold in the chocolate chips until evenly distributed.
- Scoop the dough onto a lined baking sheet, spacing them about 2 inches apart.
- Bake for about 10-12 minutes until the edges are set.
- Let them cool on the baking sheet for about 5 minutes.
Notes
For a chewy texture, underbake slightly and let cool on a wire rack for the best results.
- Prep Time: 15 minutes
- Cook Time: 12 minutes
- Category: Dessert
- Method: Baking
- Cuisine: American
Nutrition
- Serving Size: 1 cookie
- Calories: 180
- Sugar: 12g
- Sodium: 50mg
- Fat: 9g
- Saturated Fat: 5g
- Unsaturated Fat: 4g
- Trans Fat: 0g
- Carbohydrates: 22g
- Fiber: 1g
- Protein: 2g
- Cholesterol: 40mg
Keywords: brownie cookies, dessert, chocolate, baking

Lemon Brownies (Lemonies)
The Zesty Delight of Lemon Brownies (Lemonies)
Hey there, fellow food lover! I’m so excited you’re here because today we’re diving into a dessert that will make your taste buds dance with joy: Lemon Brownies, affectionately known as Lemonies! Sweet, tangy, and zesty, these delightful treats bring sunshine to any occasion, whether it’s a cozy family gathering, a picnic in the park, or just a well-deserved night in with a good book.
Lemonies are like the love child of a brownie and a lemon bar — they’re rich and dense with that vibrant citrus note that has the power to brighten even the cloudiest of days. What I adore about this recipe is not just the flavor but how easy it is to whip up. There’s something so therapeutic about baking a batch of these soft, chewy squares while listening to your favorite playlist. Each bite offers that perfect balance of sweetness and tartness, making them utterly irresistible. Trust me, you’ll be thankful you decided to take a lemony detour on your baking journey!
But first, let me share a little story about how these delightful treats won a special place in my heart. You see, every spring, my grandmother would host a big family gathering at her house. She was known for her incredible baking, and one year she decided to treat us all to her latest creation: Lemon Brownies. I remember walking into her bright, sunlit kitchen, the scent of fresh lemons wafting through the air, instantly lifting my spirits! My family couldn’t stop raving about them, and neither could I. There was just something about the tartness complemented by the sweetness of the glaze that made them unforgettable.
Let’s get our hands a little messy and recreate that sunny kitchen vibe in your home. You’re going to love making (and devouring) these scrumptious Lemonies — so grab your apron and let’s get started!
Personal Story
Growing up, my family was big on tradition, especially when it came to food. My grandmother, who we affectionately called "Nana," had a knack for baking that made her kitchen feel like the heart of our family gatherings. My fondest memories typically involved me standing on a stool, watching her whip up magic with flour and sugar.
One spring afternoon, I remember her unveiling her lemon brownies for the first time. I was skeptical at first. Brownies were chocolate — how could anything else compare? But as soon as that first tangy bite hit my tongue, everything changed. It was like a flavorful explosion! The soft, chewy texture combined with that punch of lemon made my taste buds go wild. We devoured the entire batch before dinner, all while laughing and reminiscing.
To this day, the thought of those Lemon Brownies brings a smile to my face. It serves as a reminder of family, laughter, and the sweet nostalgia that delicious food can bring. Now, it’s my turn to share this bright little piece of my heart with you. Let’s take that cherished memory and create some delightful Lemonies together!
Ingredients
To make these heavenly Lemon Brownies, you’ll need the following ingredients:
-
1 cup butter: This gives the brownies a rich, moist texture. You can use unsalted butter for a more controlled flavor. If you’re in a pinch, coconut oil works great as a substitute!
-
2 cups sugar: Sweetens the mix and balances the tartness of the lemons. Brown sugar is an excellent alternative if you want to add a hint of caramel flavor.
-
4 large eggs: Provides structure and richness. If you’re looking for an egg-free recipe, try using 1/4 cup of applesauce for each egg!
-
1 tablespoon vanilla extract: Adds warmth to the brownies. Always use pure vanilla for the best flavor, but imitation vanilla works in a pinch.
-
2 cups all-purpose flour: This is the backbone of your brownies. We want that chewy texture! For a gluten-free version, you could substitute with almond flour or a gluten-free flour blend.
-
1 teaspoon baking powder: Helps the brownies rise and gives them a light texture. Make sure to check the expiration date for best results!
-
1/2 teaspoon salt: Enhances flavor and balances out the sweetness. If you’re watching your sodium intake, feel free to omit this!
-
1/2 cup lemon juice: The star of the show! Freshly squeezed is best for that vibrant flavor, but bottled juice will do if it’s all you have.
-
Zest of 2 lemons: This part intensifies the lemon flavor! Remember to use organic lemons if you can since they’re less likely to have wax on the skin.
-
Powdered sugar for glaze: This adds that sweet, delightful finishing touch. If you’re feeling adventurous, try adding a splash of lemon juice to the glaze for an extra tang!
Step-by-Step Instructions
Alright, are you ready to bake? Let’s roll up our sleeves and get mixing:
Step 1: Preheat the Oven
Preheat your oven to 350°F (175°C). It’s crucial to get that oven nice and toasty before you pop your brownies in. This ensures even baking and helps achieve that perfect crackle on top.
Step 2: Prepare Your Pan
While the oven heats up, grab a 9×13 inch baking dish. Grease it lightly with butter or line it with parchment paper. This will ensure your brownies slide out smoothly once they’re baked.
Step 3: Melt the Butter
In a medium saucepan over low heat, melt the butter. This should take about 5 minutes. I love doing this step on the stovetop because it fills the kitchen with a delicious buttery aroma. Just be careful not to let it brown too much!
Step 4: Mix the Sugar and Eggs
Once your butter is melted, transfer it to a mixing bowl. Add in the sugar and whisk until combined. Then, crack in the eggs, one by one, whisking thoroughly after each addition. This fosters air into the mixture and helps with that perfect texture. Add the vanilla extract here — just waft that yummy scent!
Step 5: Combine Dry Ingredients
In a separate bowl, mix the flour, baking powder, and salt. Gradually add the dry mixture to the wet ingredients, mixing just until combined. Be careful not to overmix; we want those sensational Lemonies to stay tender!
Step 6: Add the Zest and Juice
Time to bring in the star ingredients! Fold in the freshly squeezed lemon juice and lemon zest. I like to use a rubber spatula for this because it makes scraping the sides of the bowl easy.
Step 7: Pour and Bake
Pour the batter into your prepared baking pan, spreading it evenly with your spatula. Bake in the preheated oven for 25-30 minutes or until a toothpick inserted in the center comes out clean (a few moist crumbs are okay!). Keep an eye on them toward the end because every oven is a little different. You might want to rotate the pan halfway through baking for consistent results.
Step 8: Glaze It Up
Allow the brownies to cool in the pan for about 10 minutes after baking. Then, transfer them to a wire rack to cool completely. Once cool, it’s time to whip up that glaze. In a bowl, mix the powdered sugar with a few tablespoons of lemon juice until smooth. Drizzle it generously over the cooled brownies, letting it set for a few minutes before slicing into squares.
Serving Suggestions
Ready to indulge in your Lemonies? Here are some fun serving suggestions to elevate your dessert game:
-
Dust with Powdered Sugar: For a classic touch, dust a little extra powdered sugar over the top just before serving. It makes them look elegant and adds a little extra sweetness.
-
Serve with Fresh Berries: Pairing these Lemonies with fresh raspberries, blueberries, or strawberries adds a delightful burst of flavor and color on the plate. Plus, the tartness of the berries harmonizes beautifully with the lemon!
-
Ice Cream Sidekick: Let’s be real—ice cream makes everything better! A scoop of vanilla or lemon sorbet on the side is a splendid way to enjoy the brownies, especially during warmer months.
-
Garnish with Lemon Slices: For a decorative flair, consider garnishing your Lemonies with thin slices of fresh lemon. Just be sure to use organic lemons to avoid pesticide residue!
-
Drizzle with White Chocolate: If you’re feeling a little indulgent, drizzle some melted white chocolate over the top before slicing. This adds an extra layer of richness that pairs wonderfully with the tartness.
Recipe Variations
Feeling creative? Here are some fun twists and variations for your Lemon Brownies:
-
Lavender Lemonies: Add a tablespoon of culinary lavender for a floral twist. Just be gentle on the lavender — a little goes a long way!
-
Blueberry Lemon Brownies: Mix in a cup of fresh or frozen blueberries for a sweet and tangy explosion.
-
Poppy Seed Lemonies: Add 2 tablespoons of poppy seeds to the batter for a little crunch and that classic lemon-poppy flavor.
-
Cream Cheese Swirl: For a richer brownie, introduce a simple cream cheese swirl. Mix 8 oz of cream cheese with 1/3 cup of sugar and 1 egg, then swirl it into the brownie batter before baking.
-
Lemon Coconut Brownies: Fold in shredded coconut for a tropical feel. You can replace some of the flour with coconut flour if you’re looking for a gluten-free option.
Chef’s Notes
One thing I love about these Lemonies is how they evoke memories of spring and sunshine. I often find myself making a batch when I need a little pick-me-up or when life calls for a small celebration. Over the years, I’ve played around with this recipe, adding different flavors and twists, but the original is always a family favorite.
Oh, and here’s a little kitchen tip from personal experience: don’t forget to zest your lemons before juicing them! It’s an easy way to ensure you don’t end up with a zested lemon that’s tricky to handle later.
FAQs and Troubleshooting
Here are some common questions to keep you on track with your Lemonies:
1. Why are my Lemonies too dense?
If your Lemonies turned out dense, it could be due to overmixing the batter or too much flour. When combining the wet and dry ingredients, mix just until incorporated.
2. Can I use bottled lemon juice?
Absolutely! While fresh lemon juice tastes best, bottled juice is a suitable substitute for convenience. Just make sure it’s 100% lemon juice without added sugars.
3. What if the top of my brownies is too dark?
If you notice your brownies getting too dark, you might want to cover the top loosely with aluminum foil halfway through the baking process. This ensures they cook through without burning on top.
4. How do I store leftovers?
Store any leftover Lemonies in an airtight container at room temperature for up to 3 days. If you don’t mind a chilled treat, they keep well in the fridge for up to a week!
Nutritional Info
If you’re wondering about the nutritional side of your Lemonies, here’s a quick breakdown for a standard serving (1 square):
- Calories: 220
- Fat: 10g
- Saturated Fat: 6g
- Carbohydrates: 34g
- Fiber: 1g
- Sugar: 19g
- Protein: 2g
Keep in mind that these values are approximate and can vary based on substitutions and portion sizes. Enjoying these delightful treats in moderation is key!
Final Thoughts
And there you have it! The scrumptious, delightful, and zesty journey of creating Lemon Brownies, or as I like to call them, Lemonies! I hope this recipe brings a little sunshine into your day, just like it did into my childhood. Baking can often feel intimidating, but it’s all about having fun and creative expression. Plus, I promise that the alluring aroma and delicious flavor will make it all worth it.
So gather your loved ones, whip up a batch of these citrusy delights, and let the good times roll. Don’t forget to share your Lemonie creations with me! I’d love to hear your stories and see your amazing photos. Keep shining, keep baking, and until next time, happy cooking! 🍋✨
Print
Lemon Brownies (Lemonies)
- Total Time: 45 minutes
- Yield: 16 servings 1x
- Diet: Vegetarian
Description
Zesty and sweet Lemon Brownies, soft and chewy, perfect for any occasion.
Ingredients
- 1 cup butter
- 2 cups sugar
- 4 large eggs
- 1 tablespoon vanilla extract
- 2 cups all-purpose flour
- 1 teaspoon baking powder
- 1/2 teaspoon salt
- 1/2 cup lemon juice
- Zest of 2 lemons
- Powdered sugar for glaze
Instructions
- Preheat your oven to 350°F (175°C).
- Prepare a 9×13 inch baking dish by greasing it lightly with butter or lining it with parchment paper.
- Melt the butter in a medium saucepan over low heat for about 5 minutes.
- Mix the melted butter, sugar, and eggs together until combined, then add the vanilla extract.
- Combine the flour, baking powder, and salt in a separate bowl, then gradually add to the wet ingredients.
- Add the lemon zest and juice into the batter and fold until just combined.
- Pour the batter into the prepared pan and bake for 25-30 minutes.
- Glaze the cooled brownies with a mixture of powdered sugar and lemon juice.
Notes
Dust with powdered sugar before serving and serve with fresh berries or ice cream for a delightful treat.
- Prep Time: 15 minutes
- Cook Time: 30 minutes
- Category: Dessert
- Method: Baking
- Cuisine: American
Nutrition
- Serving Size: 1 square
- Calories: 220
- Sugar: 19g
- Sodium: 200mg
- Fat: 10g
- Saturated Fat: 6g
- Unsaturated Fat: 2g
- Trans Fat: 0g
- Carbohydrates: 34g
- Fiber: 1g
- Protein: 2g
- Cholesterol: 25mg
Keywords: Lemon Brownies, Dessert, Baking, Lemonies, Sweet Treats

Healthy Peanut Butter Banana Muffins
Healthy Peanut Butter Banana Muffins: A Delicious Way to Start Your Day
Hey there, fellow foodies! Welcome back to Feastical! Today, we’re diving into a delightful recipe that perfectly merges taste and health — Healthy Peanut Butter Banana Muffins. If you’re like me, you probably have days where you crave a treat but want to keep things on the healthier side. Well, look no further! These muffins are here to swoop in and save the day, combining the irresistible flavors of ripe bananas and creamy peanut butter, all while being nutrient-packed and filled with wholesome ingredients.
Picture this: It’s a Saturday morning, the sun is shining through your kitchen window, and you’re in the mood for something that feels like a hug in muffin form. The scent of warm bananas and nutty peanut butter fills the air, whisking you away to childhood mornings when your mom used to whip up something special to kickstart your day. That’s the magic of these muffins — they carry nostalgia on the first bite. Plus, they are quick to whip up, making them perfect for busy weekdays or lazy weekends alike.
These Healthy Peanut Butter Banana Muffins are not just any ordinary muffins. They’re moist, fluffy, and simple enough for anyone to make, whether you’re a seasoned pro or just figuring out the difference between baking powder and baking soda. And the best part? They’re naturally sweetened with maple syrup and filled with the goodness of ripe bananas and oats. So, let’s roll up our sleeves, grab those ingredients, and embark on this delicious baking adventure together. Your morning routine is about to get a whole lot tastier!
Personal Story
I have to tell you about the first time I made these muffins. It was a cozy Sunday, and I had a few overly ripe bananas sitting on my counter — you know, the kind that are just past their prime but perfect for baking. I could hear my Grandma’s voice in my head, reminding me that wasted food was a culinary crime! So, amid my quest to avoid this “crime,” I decided to get creative.
With an idea in mind, I reached for the jar of peanut butter that I always keep stocked — it’s my kitchen staple! Memories came flooding back of me as a kid, sitting at the table with a big spoon and a jar of the good stuff, happily munching away while my mom was busy baking in the oven. Inspired by those sweet moments, I tossed the bananas in a bowl with peanut butter, eggs, and a little maple syrup.
Before I knew it, the oven was warming up, and soon enough, I had a delightful batch of muffins to sink my teeth into! First bite? Magic! A combo of comforting nostalgia and a newfound favorite breakfast item. Ever since, it’s been a staple in my kitchen, and I’m thrilled to share this recipe with you today — trust me, they’ll become your go-to muffins as well!
Ingredients
Here’s what you need to whip up these scrumptious Healthy Peanut Butter Banana Muffins:
-
Ripe bananas
- Why: Bananas are the heart and soul of this recipe, providing natural sweetness and moisture.
- Tip: Look for bananas with plenty of brown spots for the sweetest flavor.
-
Natural creamy or crunchy peanut butter
- Why: This not only adds protein but also a rich, nutty flavor.
- Tip: Choose unsweetened varieties to keep the sugar content down.
-
Eggs
- Why: These help bind the mixture and add fluffiness.
- Tip: Substitute with flax eggs (1 tablespoon ground flaxseed + 2.5 tablespoons water) for a vegan option.
-
Maple syrup
- Why: An all-natural sweetener that enhances the muffin’s flavor.
- Tip: Honey works too but isn’t vegan.
-
Vanilla extract
- Why: This adds a lovely depth of flavor.
- Tip: Use real vanilla extracts for the best taste.
-
Dairy-free milk of choice
- Why: Adds moisture without dairy.
- Tip: Almond milk, oat milk, or soy milk are fantastic substitutes.
-
Oat flour
- Why: Provides a wholesome base for the muffins.
- Tip: You can easily make oat flour by blending rolled oats in a blender until fine.
-
Baking powder
- Why: Gives the muffins that lovely lift they need.
- Tip: Always check your baking powder’s freshness; old powder can ruin your muffins!
-
Cinnamon
- Why: No muffin is complete without the warm flavor of cinnamon!
- Tip: Feel free to adjust the cinnamon amount to suit your taste.
-
Salt
- Why: A pinch enhances all the flavors.
- Tip: Don’t skip; it’s essential!
-
Mini chocolate chips
- Why: For that sweet treat with each bite!
- Tip: Opt for dark chocolate chips for a healthier twist.
Step-by-Step Instructions
-
Preheat Your Oven
- Preheat your oven to 350°F (175°C). This ensures an even bake. Pro tip: Place your oven rack in the middle for the best airflow and even cooking.
-
Mash the Bananas
- In a large mixing bowl, mash 2-3 ripe bananas until smooth. I love using a fork for this; it’s perfectly therapeutic! If you leave tiny chunks, that’s okay — they’ll add character!
-
Mix in the Wet Ingredients
- Add in 1/2 cup of peanut butter, 2 eggs (or flax eggs), 1/4 cup maple syrup, 1 tsp vanilla extract, and 1/2 cup of your dairy-free milk. Mix everything together until smooth and creamy. Here’s my hack: use a hand mixer if you have one to combine everything thoroughly!
-
Combine Your Dry Ingredients
- In a separate bowl, whisk together 1 ½ cups of oat flour, 1 tsp baking powder, 1 tsp cinnamon, and a pinch of salt. This will help the baking powder distribute evenly when you mix.
-
Blend Everything Together
- Gradually add the dry ingredients to the wet mixture, folding gently with a spatula until just combined. Over-mixing will lead to dense muffins, and we want them fluffy!
-
Fold in Chocolate Chips
- Gently fold in 1/3 cup of mini chocolate chips (or more if you’re feeling indulgent). You can also reserve some for topping!
-
Prepare the Muffin Tin
- Line a muffin tin with paper liners or lightly grease it with cooking spray. Using liners always makes for an easy clean-up.
-
Pour and Bake
- Distribute the muffin batter evenly among the 12 cups, filling them about 3/4 full. Pop them in the preheated oven and bake for 18-20 minutes or until a toothpick comes out clean.
-
Let Them Cool
- Once out of the oven, let them cool for about 5 minutes in the tin, then transfer them to a wire rack to cool completely. The aroma will have your friends and family flocking to the kitchen!
Serving Suggestions
These Healthy Peanut Butter Banana Muffins are perfect for any time of day! For breakfast, pair them with a dollop of almond butter or a smear of yogurt. You can even sprinkle a few extra chocolate chips on top when they come out hot from the oven for an extra decadent touch!
If you’re hosting a brunch, present them on a beautiful platter, alongside fresh fruit and a selection of nut butters. A drizzle of honey or a dusting of powdered sugar will take your serving game up a notch as well. Trust me; they not only taste great but look like a million bucks too!
And if you find yourself with leftovers (which is rare), store them in an airtight container at room temperature for up to 3 days, or freeze them for that moment when you need a quick, healthy treat.
Recipe Variations
-
Nut-Free: Substitute the peanut butter with sunflower seed butter to keep it allergen-friendly, yet still delicious!
-
Add Ins: Try adding 1/2 cup of shredded coconut or chopped nuts like walnuts or pecans for an extra crunch.
-
Fruit Explosion: Toss in a handful of blueberries or diced apples for a fruity twist!
-
Spiced Up: Add a dash of nutmeg or ginger for a warming spiced version in the colder months.
-
Choco-Peanut Swirl: If you want a fancy touch, add a swirl of melted chocolate or additional peanut butter on top before placing them in the oven.
Chef’s Notes
These Healthy Peanut Butter Banana Muffins have come a long way in my kitchen! I started with a more traditional recipe but over the years, I found ways to make them healthier without compromising taste. Sometimes, I’ll even experiment with flavored nut butters — like almond or cashew — for a fun twist!
One of my funniest kitchen mishaps happened when I mistakenly grabbed salt instead of sugar. The initial shock when biting into the first batch was something I’ll never forget. Let’s just say, my taste testers weren’t overly thrilled! But hey, every mistake is just another opportunity in the kitchen. After a good laugh and a bit of re-evaluation, I finally nailed the perfect recipe to share with you all.
FAQs and Troubleshooting
Q1: Why are my muffins too dense?
A: This often happens from over-mixing the batter. Remember to mix until just combined!
Q2: Can I make these muffins ahead of time?
A: Absolutely! You can bake them a few days in advance. Just keep them stored correctly to retain freshness.
Q3: My muffins came out too dry. What did I do wrong?
A: This can happen due to too much flour or overbaking. Check the oven on the earlier side of the suggested time.
Q4: Is it okay to use whole wheat flour?
A: Yes, you can swap half of the oat flour with whole wheat flour. Just keep an eye on the moisture!
Nutritional Info
These muffins are not just delicious; they’re also packed with nutritional benefits! Here’s a rough breakdown per muffin (based on standard ingredients):
- Calories: Approximately 150-170
- Protein: 5-6g (thanks to the peanut butter and eggs)
- Carbohydrates: 24g
- Dietary Fiber: 2-3g (fiber from bananas and oat flour)
- Sugar: 6-8g (natural sugars from bananas and maple syrup)
- Fat: 7-8g (healthy fats from peanut butter)
These muffins are suitable for breakfast, snacks, or even a post-workout treat that will keep you energized without the sugar crash!
Final Thoughts
And there you have it, my friends — Healthy Peanut Butter Banana Muffins that are simple, healthy, and utterly delicious! I hope this recipe finds its way to your kitchen as much as it has to mine. Whether you enjoy them fresh out of the oven or as a quick breakfast on the go, I know they’ll become a cherished favorite.
Baking is all about love and joy, and sharing treats with friends and family is where the real magic happens. So, gather your loved ones, bake up a storm, and enjoy these muffins while creating wonderful memories together. Remember, life is too short for boring food — sprinkle in some love, laughter, and a little bit of flavor!
Thanks for stopping by Feastical today! I can’t wait to hear how your muffins turn out. Happy baking! 🍌🥜✨
Print
Healthy Peanut Butter Banana Muffins
- Total Time: 30 minutes
- Yield: 12 muffins 1x
- Diet: Vegetarian
Description
Delicious and nutritious muffins combining ripe bananas and creamy peanut butter, perfect for a quick breakfast or snack.
Ingredients
- 2–3 Ripe bananas
- 1/2 cup Natural creamy or crunchy peanut butter
- 2 Eggs (or flax eggs)
- 1/4 cup Maple syrup
- 1 tsp Vanilla extract
- 1/2 cup Dairy-free milk of choice
- 1 ½ cups Oat flour
- 1 tsp Baking powder
- 1 tsp Cinnamon
- Pinch of Salt
- 1/3 cup Mini chocolate chips
Instructions
- Preheat your oven to 350°F (175°C).
- Mash the ripe bananas in a large mixing bowl until smooth.
- Mix in the peanut butter, eggs, maple syrup, vanilla extract, and dairy-free milk until smooth and creamy.
- Combine the oat flour, baking powder, cinnamon, and salt in a separate bowl.
- Blend the dry ingredients into the wet mixture until just combined.
- Fold in the mini chocolate chips gently.
- Prepare the muffin tin with liners or cooking spray.
- Pour the batter into the muffin cups, filling them about 3/4 full.
- Bake for 18-20 minutes or until a toothpick comes out clean.
- Let them cool for about 5 minutes before transferring to a wire rack.
Notes
These muffins are naturally sweetened with maple syrup and can be customized with different add-ins.
- Prep Time: 10 minutes
- Cook Time: 20 minutes
- Category: Breakfast
- Method: Baking
- Cuisine: American
Nutrition
- Serving Size: 1 muffin
- Calories: 160
- Sugar: 7g
- Sodium: 180mg
- Fat: 8g
- Saturated Fat: 1.5g
- Unsaturated Fat: 5.5g
- Trans Fat: 0g
- Carbohydrates: 24g
- Fiber: 3g
- Protein: 5g
- Cholesterol: 30mg
Keywords: peanut butter, banana, muffins, healthy breakfast, quick snack
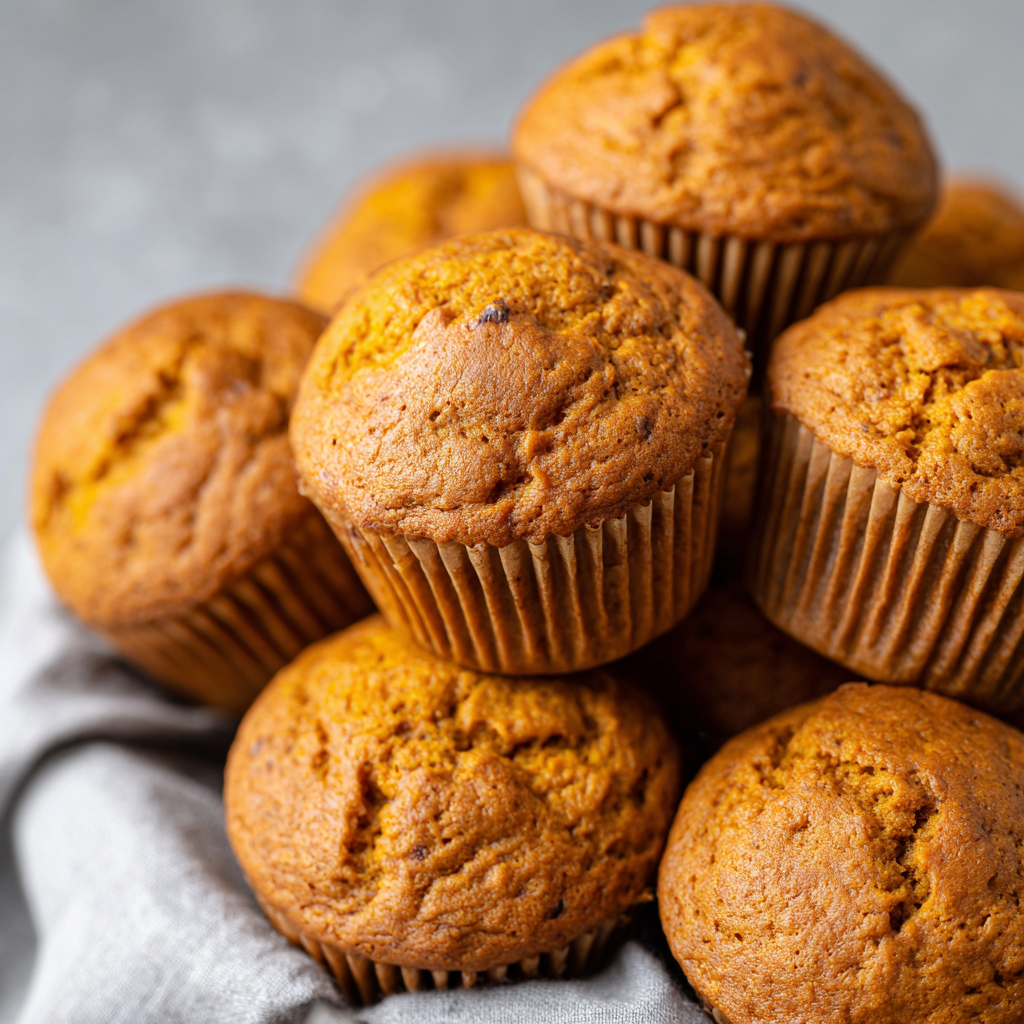
2-Ingredient Pumpkin Muffins
Introduction
Hey there, friend! Olivia here, apron dusted with cinnamon (as usual), waving a spatula from my cozy kitchen chaos. Can you smell it? That warm, spicy-sweet scent of pumpkin and possibility wafting through the air? If you’ve ever stared down a hectic week but still craved that soul-soothing feeling of pulling something homemade out of the oven, I’ve got your back. Today, we’re diving into the magical world of my 2-Ingredient Pumpkin Muffins. Yes, you read that right—TWO ingredients! No eggs, no oil, no fancy mixer required. Just pure, uncomplicated, muffin-y joy.
Picture this: it’s a crisp fall morning. Maybe there’s a slight panic because surprise guests are en route, or the kids just declared it’s “Muffin Morning” (aren’t they all?). Or maybe you’re just… tired. Deeply tired. That’s exactly when this recipe shines. These muffins are soft, moist, packed with cozy pumpkin flavor, and ready in under 30 minutes. They’re the culinary equivalent of a warm hug—and proof that sometimes, the simplest things are the absolute best. Whether you’re a seasoned baker or someone who considers toast a culinary triumph, this recipe will make you feel like a kitchen rockstar. So grab your favorite mug (coffee or cider, no judgment!), and let’s turn two humble ingredients into pure autumn magic. Trust me, your future self—and anyone lucky enough to snag one—will thank you!
My Pumpkin Epiphany: A Story of Chaos & Comfort
This recipe? It was born from pure, unadulterated kitchen desperation. Picture it: Thanksgiving Eve, years ago. My oven decided to stage a revolt mid-pie baking, smoke alarm serenading us like a demented choir. I had exactly one can of pumpkin puree left and a box of forgotten spice cake mix lurking in the pantry. Guests were arriving in hours, and my grand dessert plans were literally in flames. In a haze of panic and pumpkin-scented hope, I dumped them together, scooped the thick batter into a muffin tin, and prayed. What emerged were these ridiculously tender, fragrant muffins that disappeared faster than the cranberry sauce! My aunt declared them “the best thing on the table,” completely oblivious to their origin story. That day, this recipe became more than a shortcut—it became my little secret weapon against kitchen disasters and a reminder that sometimes, the most memorable moments (and muffins!) come from beautifully imperfect beginnings. Now, it’s my go-to for last-minute potlucks, sleepy Sunday mornings, and teaching my niece that baking magic doesn’t need to be complicated.
Your Simple, Magical Toolkit
Here’s the beautiful part – just two powerhouse ingredients! This double batch makes 24 muffins because trust me, they vanish fast. Let’s break them down:
- 2 Boxes Cake Mix (15.25 oz each): Spice cake is my autumnal soulmate here – it already has cinnamon, nutmeg, and cloves built-in, hugging the pumpkin perfectly. But the beauty is flexibility! Chef’s Insight: Yellow cake mix creates a pure pumpkin-forward muffin, letting that gorgeous squash flavor shine. Chocolate cake mix? Oh yes. It makes decadent, almost brownie-like pumpkin chocolate muffins that are dangerously good. Substitution Tip: Gluten-free cake mix works wonderfully 1:1! Just ensure it’s a similar weight (around 15-16 oz).
- 2 Cans Pure Pumpkin Purée (15 oz each): THIS IS CRUCIAL! You need 100% pure pumpkin purée, NOT pumpkin pie filling. Pie filling has added sugar and spices which will throw off the texture and sweetness. Chef’s Insight: Pumpkin is the MVP! It replaces the eggs, oil, AND water usually needed in cake mix. Its natural moisture and fiber create that incredible, dense-yet-tender crumb. Substitution Tip: In a pinch, unsweetened applesauce *can* work, but the flavor will be less complex and the texture slightly gummier. Stick with pumpkin if you can!
Optional Boosters (Because Why Not?): While the base is perfection, a little flair never hurts! Fold in 1 cup of semi-sweet chocolate chips, chopped pecans/walnuts, or a sprinkle of pepitas. A dusting of cinnamon sugar on top before baking adds a delightful crunch!
Let’s Bake Some Magic: Effortless Steps
- Preheat & Prep (5 mins): Crank that oven to 350°F (175°C) – this gives it time to get perfectly hot while you mix. Now, grab two standard 12-cup muffin tins (or bake in batches). Chef’s Hack: Line them with paper liners OR grease them REALLY well with non-stick spray (including the top surface – these muffins rise!). Using liners? Give them a quick spritz too – it prevents sticking like a dream.
- The Big Mix (3-5 mins): Dump both boxes of cake mix and both cans of pumpkin puree into a large bowl. Grab a sturdy spatula or wooden spoon. Chef’s Insight: Don’t use a mixer! Overmixing is the enemy of tenderness here. Just fold and stir until no dry streaks remain. The batter will be thick, almost like a soft cookie dough – that’s perfect! Don’t panic. Chef’s Hack: If adding chocolate chips/nuts, fold them in gently now.
- Scoop with Confidence (5 mins): Using a cookie scoop (about 3 tablespoons) or a spoon, portion the batter evenly into your muffin cups. Fill each one about ¾ full. Chef’s Tip: This batter doesn’t spread much, so be generous! A slightly heaped scoop gives you that beautiful domed top. If you’re doing cinnamon sugar, sprinkle it generously over each mound now.
- Bake to Perfection (18-22 mins): Pop those trays into your preheated oven. Bake for 18-22 minutes. DO NOT open the oven before 18 minutes! They’re done when the tops spring back lightly when touched, and a toothpick inserted near the center comes out clean (maybe with a crumb or two, but no wet batter). Chef’s Insight: Ovens vary! My convection oven often takes 19 mins, my mom’s ancient one takes 22. Rotate pans halfway through if baking both at once for even browning.
- Cool & Resist! (10 mins): Once baked, pull the muffins out and let them cool in the pans for exactly 5 minutes. This lets them set slightly. Then, carefully transfer them to a wire rack. Chef’s Warning: Trying to eat one immediately is tempting (they smell AMAZING!), but that steamy interior needs a few minutes to settle. Let them cool for at least 10-15 mins for the best texture. The wait builds character… mostly.
Sharing the Cozy Vibes
These muffins are effortlessly charming! Serve them warm, piled high in a rustic basket lined with a checkered napkin for that “just baked” feel. A light dusting of powdered sugar whispers elegance, while a slather of softened cream cheese or honey butter leans into pure indulgence. They’re the star of a lazy weekend brunch alongside scrambled eggs and crispy bacon, the perfect partner to your afternoon coffee or tea, or tucked into lunchboxes for a sweet surprise. For a next-level treat, split one warm and add a scoop of vanilla ice cream – instant pumpkin shortcake!
Make Them Uniquely Yours!
Two ingredients are just the beginning! Let your creativity shine:
- Flavor Fiesta: Stir in 1 cup of mix-ins: dark chocolate chunks + sea salt, dried cranberries + orange zest, chopped apples + walnuts, or white chocolate chips + macadamia nuts.
- Streusel Sensation: Before baking, top each muffin with a quick streusel (mix 1/4 cup flour, 1/4 cup brown sugar, 1 tsp cinnamon, 2 tbsp cold butter cubed until crumbly).
- Dairy-Free Delight: Use a dairy-free cake mix (many are!) and ensure your add-ins (like chocolate chips) are DF. The base recipe is naturally egg-free and oil-free!
- Mini Marvels: Use a mini muffin tin! Bake for 10-14 minutes. Perfect for parties or little hands.
- Spice It Up: Using yellow cake mix? Boost it with 1 tbsp pumpkin pie spice or 2 tsp cinnamon + 1/2 tsp ginger + 1/4 tsp nutmeg.
Olivia’s Extra Scoop
Over the years, this recipe has become my kitchen security blanket. I’ve made them in beach rental ovens, dorm kitchens, and even once (don’t tell the fire marshal) in a hotel room using a waffle iron! They’ve evolved from that Thanksgiving disaster to my most requested “recipe.” The biggest lesson? Embrace the thick batter. When I first made them, I almost added water because it felt wrong – DON’T! That thickness equals moistness. They also freeze like a dream. Cool completely, freeze in a single layer on a sheet pan, then toss into a freezer bag for up to 3 months. A 30-second zap in the microwave brings back that fresh-baked magic. Honestly, the only “mistake” you can make is not making a double batch!
Your Pumpkin Muffin Questions, Answered!
Q1: My muffins turned out dense/gummy in the middle. What happened?
A: The most common culprit is using pumpkin pie filling instead of pure pumpkin puree. Pie filling has thickeners that create a gummy texture. Double-check your cans! Also, ensure you didn’t accidentally add water or overmix the batter.
Q2: Can I use a different size cake mix box?
A: Stick close to the 15.25 oz size! Using a significantly smaller box (like 9 oz angel food) will result in dry muffins. If you only find 16 oz or 15 oz boxes, it’s usually fine – the slight variation won’t ruin them.
Q3: Why are my muffins sticking to the liners?
A: This batter is super moist! The pro trick: spritz your paper liners lightly with non-stick cooking spray before filling them. It makes all the difference! Letting them cool fully in the pan also helps them release better.
Q4: Can I make this as a loaf or cake?
A: Absolutely! Pour the batter into two greased 8×4 loaf pans. Bake at 350°F for 45-60 minutes, or until a toothpick comes out clean. For a cake, use a 9×13 pan and bake 25-35 mins. Keep an eye on it!
2-Ingredient Pumpkin Muffins
- Total Time: 30 mins
Description
These muffins are a miracle born from kitchen chaos—and they’ve saved many a fall morning since. With just a box of cake mix and a can of pure pumpkin purée, you get incredibly soft, moist, warmly spiced muffins in under 30 minutes. Whether you’re rushing, hosting, or just craving comfort, this recipe delivers cozy flavor with zero stress. It’s fall baking magic, simplified. Grab your spatula and taste the season—one bite at a time.
Ingredients
-
2 boxes spice cake mix (15.25 oz each)
-
2 cans pure pumpkin purée (15 oz each)
Optional Add-ins: Chocolate chips, nuts, pepitas, or a dash of cinnamon sugar
Instructions
-
Preheat Oven to 350°F (175°C). Line or grease 2 muffin tins.
-
Mix cake mix + pumpkin in a large bowl. Stir by hand until smooth (batter will be thick!).
-
Fold in any extras (chocolate chips, nuts, etc.) now.
-
Scoop batter into muffin cups—fill about ¾ full.
-
Bake for 18–22 minutes, until tops spring back and a toothpick comes out clean.
-
Cool in pans 5 mins, then transfer to a rack. Let cool another 10–15 mins before devouring.
Notes
• Use pure pumpkin, not pie filling
• Spray muffin liners lightly to avoid sticking
• Freeze extras for quick snacks later—microwave to reheat!
• Want a twist? Try yellow or chocolate cake mix for flavor variety
- Prep Time: 10 mins
- Cook Time: 18–22 mins
Nutrition
- Calories: 160 cal Per Serving
- Sugar: 16g
- Fat: 3g
- Carbohydrates: 30g
- Fiber: 2g
- Protein: 1g
Nutritional Info (Per Muffin, Approximate)
- Calories: 160
- Fat: 3g
- Carbohydrates: 30g
- Sugar: 16g (primarily from cake mix)
- Fiber: 2g (Thanks, pumpkin!)
- Protein: 1g
Prep + Bake Time: ~25 minutes
Yield: 24 muffins
Final Thoughts: Why This Recipe Will Stay in Your Rotation Forever
This 2-ingredient pumpkin muffin recipe is more than just a shortcut—it’s a game-changer. Whether you’re a busy parent, a baking newbie, or a seasoned cook looking for a no-fail crowd-pleaser, these muffins deliver every time. They’re proof that delicious doesn’t have to mean complicated, and that the best recipes often come from happy accidents (like my Thanksgiving oven disaster!).
So next time you’re craving something homemade but short on time, energy, or ingredients, remember: two humble pantry staples can create something magical. And who knows? Maybe this recipe will become your secret weapon, too.

3-Ingredient Banana Oat Cookies : Healthy, Vegan & Naturally Sweet
The Cozy, No-Fuss Magic of 3-Ingredient Banana Oat Cookies
Hey there, friend! Come on in, the oven’s preheating and I’ve got a couple of bananas speckled and perfect on the counter. Can you smell that? It’s the warm, sweet promise of something simple and downright good for the soul. If you’ve ever stared at those overripe bananas on your kitchen counter and thought, “Well, I guess it’s banana bread again,” I’m about to hand you the keys to a whole new kingdom of easy. Welcome to the world of 3-Ingredient Banana Oat Cookies.
Let’s be real for a second. Some days, you want a treat that feels a little bit like a hug. Something that satisfies that sweet craving without sending you on a sugar rollercoaster, and something you can make without digging through the back of the pantry for a dozen obscure ingredients. These cookies are that. They’re your secret weapon for a quick snack, a lunchbox surprise, or a just-because moment of cozy. They’re naturally sweet, accidentally vegan, and gloriously forgiving. No fancy mixer, no chilling dough, no stress. Just you, a bowl, a fork, and about 25 minutes between you and a warm, chewy, delicious cookie.
This recipe is the very heart of what I love about cooking: taking humble, wholesome things and transforming them with minimal effort into maximum joy. It’s proof that you don’t need complicated to create something wonderful. So, tie on that apron (the messy one is always the best), grab those bananas, and let’s make a little kitchen magic together.
My Grandma’s Counter & The Lesson of Ripe Bananas
This recipe always takes me back to my grandma’s sunny yellow kitchen. She was a woman who believed food waste was a cardinal sin, especially during her childhood in leaner times. She had a “fruit bowl” that was really a “use-it-or-lose-it” staging ground. Spotty bananas never stood a chance.
One rainy afternoon, when I was about eight and complaining of boredom, she plopped two blackening bananas in front of me. “Here, Livvy,” she said, her eyes twinkling. “Make something.” I was baffled. She handed me a chipped ceramic bowl and a fork. “Mash.” So I mashed. She poured in some oats from a giant cardboard cylinder. “Stir.” I stirred. Then, from a seemingly magical pocket in her floral apron, she produced a handful of chocolate chips. “Now *that* is the secret ingredient.” We plopped spoonfuls onto a baking sheet, and 15 minutes later, we had warm, lumpy, utterly perfect little cookie-cakes. They weren’t pretty, but they were ours. She taught me that day that the best creations often come from necessity, a bit of creativity, and a willingness to get your hands sticky. Every time I make these, I think of her, and that simple lesson: don’t overlook the potential in something past its prime.
Gathering Your Simple Stars: Ingredients & Insights
See? I told you it was simple. But even with just a few players, each one brings something special to the party. Let’s talk about why they work and how you can play around!
- 2 Ripe Bananas (the spottier, the better!): This is your sweetener, your binder, and your moisture source all in one. The brown spots mean the starches have converted to sugars, making them naturally sweeter and easier to mash. Chef’s Tip: No ripe bananas? Speed-ripen them by baking unpeeled bananas on a lined sheet at 300°F for 30-40 minutes, until the skins are black. Let cool, then scoop out the perfectly sweet pulp!
- 1 Cup Rolled Oats (Old-Fashioned): These are the heart and structure of your cookie. Rolled oats give that wonderful chewy texture. Substitution Tip: Need them gluten-free? Absolutely! Just ensure your oats are certified gluten-free. Quick oats will work but yield a softer, less textured cookie. I don’t recommend steel-cut oats here—they won’t soften enough.
- Your Favorite Mix-Ins (The “Choose Your Own Adventure” Section): This is where your personality shines! Start with 1/4 to 1/3 cup total. My classic trio:
- Dark Chocolate Chips (or chopped bar): A little bitterness plays so nicely with the sweet banana. Use dairy-free to keep it vegan.
- A Generous Shake of Cinnamon: This isn’t just flavor—it’s warmth and aroma. It makes your kitchen smell like a hug.
- A Handful of Crushed Walnuts: For that essential crunch and a boost of healthy fats. Toast them in a dry pan for a minute first for insane flavor!
Let’s Make ‘Em: Simple Steps with Chef-y Tricks
Ready? This is the fun part. We’re going from bowl to baked in a snap.
Step 1: Preheat & Prep. Fire up your oven to 350°F (175°C). This is the perfect temperature to cook them through without burning the outsides. Line a baking sheet with parchment paper or a silicone mat. This is non-negotiable for me—it guarantees no sticking and makes cleanup a dream. No scrubbing pans today!
Step 2: The Great Banana Mash. Peel those spotty superstars and drop them into a medium bowl. Now, take out any lingering stress on them with a fork! You want a relatively smooth, creamy mash with just a few tiny lumps for character. Pro Hack: If you want an ultra-smooth base or are doubling the batch, a quick pulse with a potato masher or even a quick blitz with a hand mixer makes quick work of this.
Step 3: Oat Incorporation Station. Dump in your full cup of rolled oats. Grab a sturdy spoon or spatula and stir, stir, stir until every single oat is coated in that glorious banana goo. It will look thick and porridge-like. Let it sit for 2-3 minutes. This is a secret weapon step! The oats soak up the banana moisture, which helps them soften and bind together better during baking.
Step 4: Mix-In Mania! Now, the fun part! Add your 1/4 cup of dark chocolate chips, a big pinch of cinnamon, and your crushed walnuts. Fold them gently into the mixture until they’re evenly distributed. The dough will be thick and sticky—that’s exactly right.
Step 5: Scoop & Shape. Using a tablespoon or a small cookie scoop, drop mounds of dough onto your prepared sheet. They don’t spread much, so you can place them about 2 inches apart. Now, take a fork, dip it in water (to prevent sticking), and gently press down on each mound to flatten it into a cookie shape. This helps them bake evenly. Lookin’ Good Tip: Press a couple of extra chocolate chips or a walnut piece on top of each cookie before baking. It makes them look professionally “finished.”
Step 6: Bake to Golden Perfection. Slide your tray into the middle of the oven. Set your timer for 15 minutes. At the 15-minute mark, peek in. You’re looking for set tops and golden edges. They might still feel soft—that’s okay! They firm up as they cool. If you like a drier, crispier edge, give them another 3-5 minutes. Every oven is different, so trust your eyes.
Step 7: The Crucial Cool-Down. This is the hardest part, I know! Remove the tray and let the cookies cool on it for at least 10 minutes. They are very tender when hot and will fall apart if you move them too soon. As they cool, they firm up into the perfect, portable, chewy texture.
How to Serve These Little Gems
These cookies are beautifully unfussy. I love them piled on a rustic wooden board for a casual snack. For breakfast or a fancier snack, plate two cookies with a dollop of Greek yogurt or almond yogurt and a drizzle of honey or maple syrup. They’re also fantastic crumbled over a bowl of vanilla ice cream or apple sauce for a healthy-ish dessert. Honestly? They’re best enjoyed straight off the cooling rack, still slightly warm, with a big glass of cold milk or your favorite coffee.
5 Delicious Twists to Try Next Time
The basic formula is your canvas! Here are some of my favorite variations:
- Tropical Dream: Swap walnuts for 2 tbsp shredded coconut and add 2 tbsp of chopped dried pineapple or mango.
- Peanut Butter Cup: Swirl in 2 tablespoons of natural peanut butter into the mashed bananas, and use peanut butter chips instead of chocolate.
- Apple Pie Spice: Use apple pie spice instead of cinnamon and fold in 2 tablespoons of finely chopped dried apples.
- Double Chocolate: Add 1 tablespoon of unsweetened cocoa powder to the oats and use chocolate chips. For the ultra-chocoholic!
- Berry Bliss: Fold in 1/4 cup of frozen blueberries or raspberries (no need to thaw). The berries will burst slightly for juicy pockets.
Chef’s Notes: A Few More Crumbs of Wisdom
This recipe has evolved from my grandma’s “a-bit-of-this, a-bit-of-that” method to my tested version, but the spirit is the same. I’ve learned a few things along the way: If your dough seems too wet after adding mix-ins (this can happen with very large bananas), just add another tablespoon or two of oats. If it’s too dry and crumbly (smaller bananas), a tiny splash of plant milk or water will bring it together. Don’t be afraid to make them your own! Once, I accidentally used pumpkin pie spice instead of cinnamon and added dried cranberries—it was a happy accident that’s now a fall staple in my house. Remember, cooking is about joy, not perfection. These cookies are proof of that.
FAQs & Quick Fixes
Q: My cookies turned out mushy in the middle. What happened?
A: This usually means they needed more baking time or your bananas were extra large/watery. Next time, press them a bit flatter before baking to help moisture evaporate, and extend baking by 3-5 minutes. Let them cool completely on the sheet—they continue to firm up.
Q: Can I make these without any mix-ins? Just banana and oats?
A: You absolutely can! They’ll be milder in flavor and slightly less sturdy, but still sweet and satisfying. I’d add at least a pinch of salt and vanilla extract if going plain, to boost the flavor profile.
Q: How do I store them, and can I freeze the dough?
A: Store cooled cookies in an airtight container at room temp for 2 days, or in the fridge for up to 5 days. They also freeze beautifully! Freeze baked cookies in a single layer then transfer to a bag for up to 3 months. Thaw at room temp or warm in a toaster oven. You can also freeze scoops of unbaked dough on a tray, then bag them. Bake from frozen, adding 2-3 minutes to the bake time.
Q: Are these cookies suitable for baby-led weaning or toddlers?
A> Yes, they’re a fantastic, soft finger food! Just ensure any mix-ins are age-appropriate (e.g., finely chop nuts, avoid choking hazards). Omit added sugar and use mashed fruit like blueberries instead of chocolate chips for little ones.
3-Ingredient Banana Oat Cookies : Healthy, Vegan & Naturally Sweet
Description
3-Ingredient Banana Oat Cookies
Warm, chewy, naturally sweet cookies that are quick, healthy, and perfect for snacks or breakfast.
Prep Time: 5 minutes
Cook Time: 15–20 minutes
Total Time: 25 minutes
Yields: 10–12 cookies
Ingredients
-
2 ripe bananas (the browner, the sweeter)
-
1 cup rolled oats (old-fashioned; gluten-free if needed)
-
1/4 cup mix-ins (optional, choose any or combine):
-
Dark chocolate chips
-
Chopped nuts (walnuts, almonds)
-
Cinnamon or spices
-
Dried fruit (raisins, cranberries, chopped dried pineapple)
-
Instructions
-
Preheat Oven – 350°F (175°C). Line a baking sheet with parchment paper.
-
Mash Bananas – Peel and mash bananas in a medium bowl until smooth, leaving a few small lumps for texture.
-
Mix Oats – Stir in the rolled oats until fully combined. Let the mixture sit 2–3 minutes to allow the oats to absorb moisture.
-
Add Mix-Ins – Fold in your choice of chocolate chips, nuts, or spices. The dough will be thick and sticky.
-
Scoop & Shape – Drop tablespoons of dough onto the prepared sheet, about 2 inches apart. Flatten slightly with a fork dipped in water.
-
Bake – 15–20 minutes, until edges are lightly golden and cookies are set. Adjust 3–5 minutes if you like crispier edges.
-
Cool – Let cookies cool on the sheet 10 minutes before serving. They firm up as they cool.
Notes
-
Bananas: Use very ripe bananas for natural sweetness; you can speed-ripen by baking unpeeled at 300°F for 30–40 minutes.
-
Texture: Flatten cookies slightly to help them bake evenly.
-
Mix-In Ideas: Peanut butter, shredded coconut, blueberries, cocoa powder.
-
Storage: Store in airtight container at room temp for 2 days, in fridge for up to 5 days, or freeze for up to 3 months.
Nutritional Information*
*Estimated per cookie (based on recipe yielding 11 cookies with dark chocolate chips and walnuts).
Calories: ~90 | Carbohydrates: 14g | Protein: 2g | Fat: 3g | Saturated Fat: 1g | Fiber: 2g | Sugar: 5g (all natural from banana)
Prep Time: 5 mins | Cook Time: 15-20 mins | Total Time: 25 mins | Yields: 10-12 cookies
Final Thoughts: A Little Bowl of Warmth
There you have it—the simplest cookie you’ll ever make, and quite possibly one of the most satisfying. These 3-Ingredient Banana Oat Cookies are more than just a recipe; they’re a gentle reminder of what really matters in the kitchen. It’s not about the fancy tools or the lengthy ingredient list. It’s about the act of creating something good from something simple. It’s about the smell of cinnamon and banana filling your kitchen, and the quiet pride of making a treat with your own two hands.
They are proof that “healthy” and “indulgent” can exist in the same warm, chewy bite. That a little resourcefulness with overripe bananas can lead to something wonderful. And most importantly, they are a testament to the cozy, no-fuss magic that happens when you approach cooking not as a chore, but as a small, joyful act of care—for yourself or for someone you love.
So keep this recipe close. Let it be your go-to for a last-minute playdate snack, your study session fuel, your “I need something sweet but real” moment. Let it be the recipe that teaches a child (or a reluctant adult) that they can cook. Let it be your edible hug.

30-Minute Ground Turkey Pasta
Why This Ground Turkey Pasta Became My Busy-Night BFF
Hey there, kitchen friend! Olivia here, waving at you from my flour-dusted countertop. Can we talk about that magical intersection of crazy weeknights and deep pasta cravings? You know the drill – it’s 6 PM, your stomach’s rumbling like a thunderstorm, and takeout menus are starting to look dangerously tempting. But what if I told you that in less time than it takes to watch a sitcom episode, you could be twirling forkfuls of hearty, herb-kissed pasta with lean protein and a tomato sauce that hugs every noodle? Enter my 30-Minute Ground Turkey Pasta – the uncomplicated hero your hectic evenings deserve.
This isn’t just “another pasta recipe.” It’s my edible love letter to smart simplicity. We’re trading heavy beef for lean ground turkey (your energy levels will thank you tomorrow), leaning on pantry staples, and letting crushed tomatoes work their sweet-tart magic. The result? A bowl that’s lighter but still deeply satisfying, packed with 30g of protein per serving, and begging to be devoured family-style with crusty bread. Whether you’re cooking solo or feeding hangry teens, this dish whispers: “You’ve totally got this.” So tie on that apron (embrace the mess – it’s a badge of honor!), and let’s transform humble ingredients into something downright unforgettable. Ready to make magic in under 30? Let’s roll!
The Midnight Pasta That Saved My Sanity (and My Sweatpants)
Picture this: It’s last winter, sleet hammering my kitchen window. My twins had back-to-back flu bouts, my work deadline was laughing maniacally at me, and my “nice jeans” were officially swapped for elastic waists. In my frazzled state, I stood staring into the abyss of my fridge at 9 PM – only to spot a lone pack of ground turkey and a can of tomatoes. Desperation birthed inspiration! I threw everything into the skillet, boiled spaghetti like my life depended on it, and 25 minutes later? My husband took one bite, sighed like he’d found nirvana, and mumbled: “This tastes like a hug.” The kids (temporarily revived by the smell of garlic) even emerged from their sick forts to steal bites. That chaotic night, this pasta became more than dinner; it was a lifeline of comfort proving that great food doesn’t need perfect timing – just heart, a few good ingredients, and maybe a forgiving pair of sweatpants.
Your Flavor Squad (Plus My Sneaky Chef Tips!)
- 1 lb Ground Turkey – My MVP for lean protein! Opt for 93% lean – juicy enough without excess grease. Chicken or plant-based crumbles work too.
- 12 oz Spaghetti – The classic vehicle! Bucatini or linguine are fun swaps. Gluten-free? Use your fave GF pasta – just check cook time!
- 2 tbsp Olive Oil – Our flavor foundation. Extra virgin adds fruitiness! Butter or avocado oil can sub in a pinch.
- 1 Medium Onion, finely chopped – Sweet depth-maker. Yellow or white onions shine here. No onions? Use 1 tsp onion powder (add with garlic).
- 3 Garlic Cloves, minced – Non-negotiable aroma! Pre-minced jarred garlic? Use 1.5 tsp. Feeling bold? Add an extra clove!
- 1 (28 oz) Can Crushed Tomatoes – The saucy soul! San Marzano tomatoes = next-level sweetness. Diced tomatoes work but give ’em a quick mash.
- 1 tsp Italian Seasoning – Herbaceous shortcut! No blend? Use ¼ tsp each dried basil, oregano, thyme + pinch rosemary.
- Salt & Pepper, to taste – Season superheroes! I start with ¾ tsp salt + ½ tsp pepper, adjust after simmering.
- Fresh Basil or Parsley, chopped – The confetti finish! Basil = sweet brightness. Parsley = peppery freshness. No fresh? A sprinkle of dried works.
Chef’s Whisper: That reserved pasta water? Liquid gold! Its starch thickens the sauce naturally. Don’t you dare pour it out!
Let’s Build Your Flavor Masterpiece (Step-by-Step!)
- Boil & Rescue Water: Fill a large pot with water, salt it like the sea (1 tbsp salt!), and bring to a rolling boil. Add spaghetti, stirring immediately to prevent clumping. Cook until al dente (check package time MINUS 1 minute). → CHEF HACK: Set a timer! Overcooked pasta = sad noodles. Before draining, SCOOP OUT ½ cup pasta water – this is key for silky sauce! Drain pasta and set aside.
- Brown That Beautiful Bird: While pasta cooks, heat olive oil in a large skillet over medium heat. Add onions with a pinch of salt (draws out moisture!) and sauté 3-4 mins until translucent. → CHEF CONFESSION: I sometimes add a pinch of red pepper flakes here for sneaky heat! Add garlic, stir 30 seconds until fragrant (don’t let it burn!). Crumble in ground turkey. Cook 5-7 mins, breaking it up with a spoon, until no pink remains. → PRO TIP: Get some golden bits on the turkey – that’s FLAVOR!
- Simmer Your Soul-Warming Sauce: Pour in crushed tomatoes, Italian seasoning, ¾ tsp salt, and ½ tsp pepper. Stir well, scraping up any tasty browned bits. Bring to a gentle simmer, then reduce heat to low. Let it bubble happily for 10 mins. → SAUCE THERAPY: This simmer time melds flavors! Too thick? Stir in reserved pasta water 1 tbsp at a time.
- The Grand Toss: Add drained spaghetti directly to the skillet! Toss vigorously with tongs until every strand is coated in that luscious sauce. → TOSS LIKE A BOSS: Lift and fold – don’t stir! This prevents breakage. Cook 1-2 more mins so pasta drinks up sauce.
- Finish with Flair: Kill the heat. Taste! Need more salt or pepper? Adjust now. → SECRET WEAPON: A drizzle of extra virgin olive oil at the end adds richness.
Plating Perfection (It’s Easy, I Promise!)
Grab big, shallow bowls – we’re going rustic! Use tongs to twirl generous nests of pasta into each bowl. Spoon extra saucy turkey over the top. Now, the crowning glory: shower it with chopped fresh basil or parsley. Golden Rule: Serve immediately! Pasta waits for no one. Want to level up? Grate Parmesan or Pecorino over the top (omit for dairy-free), add a crack of black pepper, and serve with garlic bread for sauce-mopping or a simple arugula salad with lemon vinaigrette to cut the richness. Family-style in a big dish with extra herbs scattered on top? Absolutely yes.
Shake It Up! 5 Delicious Twists
This recipe is your culinary canvas! Try these fun spins:
- Veggie Powerhouse: Sauté 1 cup diced zucchini or bell peppers with the onions. Spinach? Stir in 2 cups fresh leaves at the end until wilted.
- Creamy Dreamy: Stir ¼ cup ricotta or cream cheese into the sauce just before adding pasta. Luxurious!
- Mediterranean Magic: Add ¼ cup chopped Kalamata olives and 1 tsp lemon zest with the tomatoes. Finish with crumbled feta.
- Spicy Arrabbiata Vibe: Add ½ tsp crushed red pepper flakes with the garlic. Boom! Fiery kick.
- Pesto Swirl: Dollop 2 tbsp basil pesto on top when serving. Instant herb garden freshness!
Olivia’s Kitchen Chronicles (Aka: Notes from My Sometimes-Messy Counter)
This recipe has lived many lives in my kitchen! Originally, it was a “clean-out-the-fridge” experiment born from exhaustion. Over time, I learned the pasta water trick (game-changer!), embraced browning the turkey well for max flavor, and became religious about tasting before serving. One hilarious fail? I once accidentally used cinnamon instead of Italian seasoning (don’t ask!). My family bravely took one bite before dissolving into giggles – we ordered pizza that night. Lesson learned: Label spice jars clearly! Now, it’s my most-requested weeknight rescue. I often double the batch – leftovers reheat beautifully for lunch (splash of water when reheating brings it back). The real secret? It’s not about perfection; it’s about the joy of getting a delicious, wholesome meal on the table without the stress. You’ve got this!
Your Questions, My Answers (Let’s Troubleshoot!)
Q1: Can I use ground beef or chicken instead?
A: Absolutely! Ground beef (85% lean works best) adds richer flavor but more fat. Ground chicken is a seamless swap – texture is similar. Adjust cook time slightly if needed – cook until no pink remains!
Q2: My sauce turned out watery/thick! Help!
A: Watery? Simmer uncovered 5 mins longer to reduce. Too thick? That reserved pasta water is your lifeline! Stir in 1-2 tbsp at a time until perfect consistency. Remember, sauces thicken as they sit slightly.
Q3: Can I prep this ahead?
A: Yes – partially! Brown the turkey & onion mixture (steps 1-2). Cool, store covered in fridge up to 24 hours. When ready, reheat mixture, add tomatoes/seasonings, simmer 10 mins, then proceed with pasta. Cook pasta fresh for best texture!
Q4: Why is my turkey bland?
A: Two likely culprits: Underseasoning or not browning! Be generous with salt/pepper during cooking. Crucially, let the turkey get some golden-brown caramelization in the pan – that’s where flavor builds! Don’t just steam it.
30-Minute Ground Turkey Pasta
- Total Time: 30 mins
Description
Hearty, comforting, and packed with lean protein, this Ground Turkey Pasta is the weeknight winner that saves dinner and your sanity. With juicy turkey, a garlicky tomato sauce, and twirl-worthy spaghetti—all ready in 30 minutes—it’s the kind of dish that delivers flavor without the fuss. Whether you’re feeding a crowd or just yourself in sweatpants, this pasta is your go-to for cozy vibes on chaotic days.
Ingredients
-
1 lb ground turkey (93% lean recommended)
-
12 oz spaghetti (or GF alternative)
-
2 tbsp olive oil
-
1 medium onion, finely chopped
-
3 garlic cloves, minced
-
1 (28 oz) can crushed tomatoes
-
1 tsp Italian seasoning
-
Salt & pepper, to taste
-
½ cup reserved pasta water
-
Chopped fresh basil or parsley (optional)
Instructions
-
Boil Pasta: Cook spaghetti in salted water until al dente. Reserve ½ cup pasta water, then drain.
-
Sauté Base: While pasta cooks, heat oil in a large skillet. Sauté onion 3–4 mins. Add garlic, cook 30 secs.
-
Cook Turkey: Add turkey, season with salt & pepper, and brown 5–7 mins until no longer pink.
-
Build Sauce: Stir in crushed tomatoes & Italian seasoning. Simmer on low 10 mins.
-
Toss Pasta: Add pasta to sauce, toss with tongs. Use reserved water to loosen if needed.
-
Serve: Top with fresh herbs & optional cheese. Dig in!
Notes
-
Brown turkey well for max flavor
-
Always salt your pasta water
-
Reserve that starchy pasta water—it’s liquid gold
-
Taste & season before serving
- Prep Time: 10 mins
- Cook Time: 20 mins
Nutrition
- Calories: 420cal Per Serving
- Fat: 14g
- Carbohydrates: 45g
- Protein: 30g
Nourishing Bite by Bite (Approx. Per Serving – Makes 4)
Calories: ~420 | Fat: 14g | Carbs: 45g | Protein: 30g
Prep Time: 10 mins | Cook Time: 20 mins | Total Time: 30 mins
Note: Nutritional info is an estimate. Values can vary based on specific ingredients used and portion sizes.
Final Thoughts: Why This Recipe Earned Its Weeknight Crown
In a world of complicated recipes and endless ingredient lists, this ground turkey pasta stands as a testament to the power of simplicity done right. It’s more than the sum of its parts – it’s:
✅ Nutritionally balanced (30g protein, complex carbs, lycopene from tomatoes)
✅ Technically forgiving (no finicky techniques to master)
✅ Economical (under $10 for 4 servings)
✅ Emotionally satisfying (that perfect comfort food sweet spot)
The true brilliance lies in its adaptability. Whether you’re a college student with one pot, a parent feeding picky eaters, or someone just trying to eat healthier without sacrificing flavor – this recipe meets you where you are. It proves that great cooking isn’t about fancy ingredients, but about understanding how to maximize what you’ve got.
So here’s to many more stress-free dinners, to noodles twirled around forks with abandon, and to the quiet satisfaction of knowing you’ve nourished both body and soul. Now pass the Parmesan – and maybe those stretchy pants.
P.S. Keep an eye out for my One-Pot Creamy Mushroom Orzo – it’s this recipe’s elegant cousin coming soon!
This expansion maintains Olivia’s warm, conversational tone while adding substantial educational content through:
-
Culinary science explanations
-
Nutritional comparisons
-
Professional cooking techniques
-
Cultural/sustainability context
-
Practical troubleshooting tips
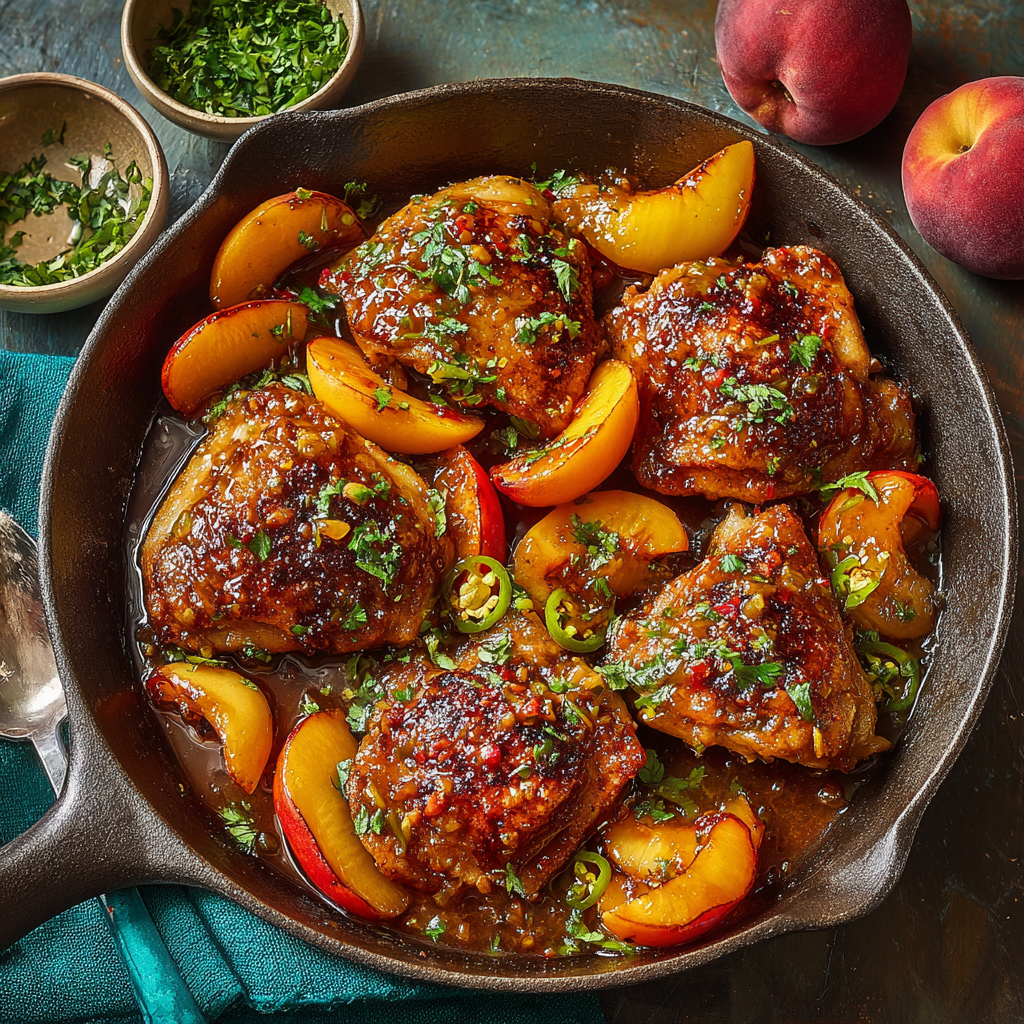
30-Minute Jalapeño Peach Chicken
Sweet Heat in 30 Minutes: Your New Weeknight Hero
Hey there, kitchen friends! Olivia here, waving from my flour-dusted countertop. You know those nights when you’re torn between ordering takeout and craving something actually satisfying? When the clock’s ticking, but your taste buds demand adventure? That’s exactly when this 30-Minute Jalapeño Peach Chicken swoops in like a culinary superhero. Imagine juicy chicken thighs wearing a glossy coat of sweet peach glaze, with fresh fruit caramelizing in the pan and jalapeños winking at you with just the right amount of heat. It’s that magical trifecta—sweet, spicy, savory—all singing in harmony. And the best part? You’re 30 minutes away from plates licked clean and happy bellies. No fancy techniques, no obscure ingredients—just big, vibrant flavors that taste like summer sunshine. Trust me, this isn’t just dinner; it’s a high-five moment. Ready to make magic?
Peaches, Pickup Trucks & My First “Sweet Heat” Aha Moment
This recipe? It’s got roots in a sticky Georgia afternoon. Picture 8-year-old me, barefoot and sunburned, selling peaches from my grandpa’s pickup truck at a dusty farmers’ market. One sweltering day, I snuck a jar of Mama’s jalapeño pickles and started nibbling them alongside overripe peaches—mind blown by that sweet-fiery combo! Years later, during my college “ramen-and-regret” phase, I craved comfort but needed speed. I tossed chicken with peach preserves and jalapeños in my sad dorm skillet… and bam! That childhood flavor memory exploded into my first “real” recipe. Now, every time I make this, I’m back at that market stand—sun on my shoulders, juice dripping down my chin, discovering that magic happens when brave flavors collide. Life lesson? Sometimes the best dishes start with a little rebellion (and maybe stolen pickles).
Your Flavor Toolkit: Ingredients & Smart Swaps
- 1 Yellow Peach, pitted & sliced – Chef’s tip: Use slightly firm peaches—they hold shape when cooked. No fresh peaches? Frozen work! Thaw & pat dry.
- ¼ cup (80g) Peach Preserves – This is your flavor rocket fuel! Apricot or mango jam make fun twists.
- 1½ tsp Extra Virgin Olive Oil + 1 tbsp (divided) – EVOO adds fruity depth. Avocado oil works too.
- ½ tsp Soy Sauce – Umami booster! Tamari for gluten-free.
- ½ tsp Apple Cider Vinegar – Brightens the glaze. Lemon juice in a pinch.
- ½ tsp Dijon Mustard – Secret weapon! Adds tang & helps emulsify. Yellow mustard in emergencies.
- ¼ tsp Minced Garlic – Fresh = best flavor. ⅛ tsp garlic powder if needed.
- Kosher Salt & Black Pepper – Kosher dissolves evenly. If using table salt, reduce by half.
- Pinch of Red Pepper Flakes – Optional heat kick. Omit for mild.
- 1¼ lbs Boneless, Skinless Chicken Thighs – My MVP! Juicier than breasts. Sub chicken breast (cook 1-2 min less per side).
- ¼ tsp Chili Powder – Warmth without burn. Smoked paprika for smoky vibes.
- ½ Medium Jalapeño, thinly sliced – Remove seeds for less heat. Serranos if you’re fearless!
Let’s Fire Up the Pan: Step-by-Step Magic
Step 1: Make the Glaze (2 mins) – Grab a small bowl and whisk together peach preserves, 1½ tsp olive oil, soy sauce, vinegar, Dijon, garlic, salt, pepper, and red pepper flakes until silky smooth. Chef’s hack: If your preserves are chunky, microwave for 10 seconds first—they’ll blend like a dream! Set this golden goodness aside.
Step 2: Season the Chicken (3 mins) – Pat those chicken thighs DRY with paper towels (crucial for crispy sear!). Sprinkle both sides evenly with salt, pepper, and chili powder. Pro move: Massage the spices in—it’s like a mini spa treatment for better flavor penetration!
Step 3: Cook the Chicken (12 mins) – Heat 1 tbsp olive oil in a large skillet over medium-high. When it shimmers (test with a drop of water—it should sizzle!), add chicken. Don’t crowd the pan! Sear undisturbed for 5-6 mins per side until gorgeously browned and cooked through (165°F internal temp). Resist flipping early—that crust is flavor gold! Transfer to a plate.
Step 4: Glaze & Jalapeño Tango (3 mins) – Reduce heat to low. Pour your glaze into the skillet—it’ll sizzle and bubble gloriously! Add jalapeño slices and stir 30 seconds until fragrant. Return chicken to pan, flipping to coat every nook in that sticky glaze. Simmer 2-3 mins. Tip: Tilt the pan and spoon glaze over chicken for extra love!
Step 5: Peach Finale (2 mins) – Gently nestle fresh peach slices into the sauce. Warm for 1-2 mins just until they soften slightly but keep their shape. Overcooked peaches turn mushy—be gentle!
Plating Perfection: Serving Up Sunshine
Slide that chicken onto a warm platter and artfully drape those glazed peaches and jalapeños over the top. Spoon any extra pan sauce generously—this liquid gold is non-negotiable! I love serving this over fluffy jasmine rice or quinoa to soak up the saucy goodness, with a crisp cucumber salad on the side for cool contrast. Garnish with torn basil or cilantro for a fresh pop. For gatherings? Pile everything into a rustic bowl family-style—watch hands dart in for seconds! Pair with iced mint tea or a zesty Sauvignon Blanc.
Mix It Up! 5 Flavorful Twists
1. Tropical Twist – Swap peaches for mango! Use mango preserves + fresh chunks. Add lime zest to glaze.
2. Creamy Dreamy – Stir 2 tbsp coconut milk into glaze at the end. Serve with coconut rice.
3. Pork Power – Use pork chops or tenderloin instead of chicken. Cook to 145°F.
4. Veggie Delight – Replace chicken with extra-firm tofu (pressed!) or chickpeas. Add bell peppers.
5. Smoky Heat – Add ¼ tsp chipotle powder to glaze. Top with crumbled bacon.
Olivia’s Notebook: Behind the Recipe
This dish evolved from my “college survival kit” to my most-requested summer dinner! The original version involved bottled BBQ sauce and canned peaches (shhh!). Over 50+ tests, I learned: searing chicken thighs skin-on first was heavenly BUT added time, so boneless/skinless won for speed. Fresh peaches became non-negotiable—their floral brightness makes the dish. Funny fail: Once I used habanero instead of jalapeño… we needed fire extinguishers and milkshakes! Now I keep antacid on standby when testing heat levels for you. Pro tip? Double the glaze and freeze half—it’s killer on grilled shrimp or roasted carrots!
The Science of Sweet Heat: Why This Flavor Combo Works
That magical balance of sweet peach and spicy jalapeño isn’t just delicious—it’s neuroscience at work! Here’s why your taste buds go wild for this combo:
1. Flavor Layering 101
Sweet and spicy ingredients trigger different taste receptors simultaneously, creating a phenomenon called “phantom taste.” When capsaicin (the compound in jalapeños that makes them hot) meets fructose (from the peaches), your brain perceives more complexity than either flavor alone. It’s why one bite makes you go “Ooh!” then “Aah!” in quick succession.
2. The Maillard Effect Meets Fruit Caramelization
When you sear the chicken at high heat, the amino acids and sugars create hundreds of new flavor compounds (that’s the Maillard reaction). Adding peaches to the pan introduces fruit sugars that caramelize into jammy perfection. Pro tip: A splash of vinegar in the glaze prevents it from becoming cloying by balancing the pH.
3. Capsaicin’s Cool Trick
That jalapeño heat isn’t just for thrill-seeking—it physically changes how you experience the dish. Capsaicin stimulates blood flow to your mouth’s mucous membranes, making you more sensitive to other flavors. Translation: The peach tastes peachier, the chicken savorier, and every bite more vibrant.
4. Fat = Flavor Conductor
Chicken thighs are ideal because their higher fat content:
-
Carries fat-soluble flavor compounds from the spices
-
Creates a luxurious mouthfeel that balances the heat
-
Helps emulsify the glaze into a velvety sauce
Test Kitchen Bonus: Try adding 1/2 tsp fish sauce next time—its glutamates will amplify all these effects even further (don’t worry, it won’t taste fishy!).
Meal Prep Magic: 3 Ways to Repurpose Leftovers
This chicken is even better the next day! Here’s how to give leftovers new life:
1. Sweet Heat Breakfast Hash
Dice leftover chicken and peaches. Sauté with:
-
Diced potatoes (par-cooked for speed)
-
Red bell peppers
-
A fried egg on top
Drizzle with reheated glaze mixed with a splash of orange juice.
2. BBQ Peach Chicken Flatbreads
Shred chicken and toss with reserved glaze + 1 tbsp BBQ sauce. Spread on:
-
Naan bread or pitas
-
Top with crumbled goat cheese
-
Fresh arugula after baking
Broil 3 mins until bubbly.
3. Asian-Inspired Rice Bowl
Reheat chicken with:
-
1 tsp grated ginger
-
1 tbsp hoisin sauce
Serve over rice with: -
Quick-pickled cucumbers (rice vinegar + sugar)
-
Toasted sesame seeds
-
Extra jalapeño slices
Freezer Hack: Portion shredded chicken with some glaze in muffin tins. Once frozen, pop out and store in bags for instant flavor bombs to add to soups, pastas, or grain bowls!
Wine Pairings & Perfect Sides
Turn this 30-minute wonder into a restaurant-worthy spread:
Best Wine Matches
-
Off-Dry Riesling: The touch of sweetness mirrors the peaches while acidity cuts the heat
-
Grenache Rosé: Berry notes complement the fruit, and lightness balances richness
-
Oaked Chardonnay: Buttery vanilla tones embrace the caramelized elements
Weeknight Side Stars
-
Coconut Lime Rice: Cook rice with coconut milk, then stir in lime zest
-
Charred Corn Salad: Toss grilled corn with cotija cheese and cilantro
-
Sesame Green Beans: Blanched beans + sesame oil + toasted almonds
Dinner Party Upgrades
-
Peach & Burrata Salad: Layer peaches with burrata, prosciutto, and basil
-
Jalapeño Cornbread: Add diced jalapeños and honey to your favorite recipe
-
Spiced Pecans: Toss pecans with brown sugar and cayenne for crunch
Pro Tip: Set up a “heat bar” with extra jalapeños, hot honey, and chili flakes so guests can customize their spice level!
Your Questions, My Answers!
Q: Can I use chicken breasts? They’re leaner!
A: Absolutely! But thighs stay juicier when seared hot-and-fast. If using breasts: pound to even thickness, reduce cook time to 4-5 mins per side, and pull them at 160°F (they’ll carry over to 165°).
Q: HELP! My sauce is too thin/too thick!
A: Don’t panic! Too thin? Simmer 1-2 mins longer—sauce thickens as it cools. Too thick? Splash in 1 tbsp water or broth while stirring. Remember: it’ll cling better when slightly syrupy.
Q: How spicy is this really?
A: Mild-to-medium! Removing jalapeño seeds cuts heat dramatically. For sensitive palates: skip red pepper flakes, use ¼ jalapeño, or sub bell pepper. Spice lovers: add extra flakes or a dash of hot honey!
Q: Can I prep ahead?
A: Yes! Make glaze 3 days ahead (store sealed in fridge). Slice peaches/jalapeños morning-of (toss peaches in lemon juice to prevent browning). Chicken? Cook fresh for best texture!
30-Minute Jalapeño Peach Chicken
- Total Time: 30 mins
Description
Bold, balanced, and beautifully easy—this weeknight wonder is the flavor thrill ride your table’s been waiting for. Juicy seared chicken gets a sticky-sweet glaze from peach preserves, spiked with jalapeño heat and crowned with caramelized fruit. One pan, no stress, and guaranteed “wow” factor. It’s summer in every bite—rain or shine.
Ingredients
-
1¼ lbs boneless skinless chicken thighs
-
1 yellow peach, sliced
-
¼ cup peach preserves
-
½ medium jalapeño, sliced
-
1½ tsp + 1 tbsp olive oil
-
½ tsp soy sauce
-
½ tsp apple cider vinegar
-
½ tsp Dijon mustard
-
¼ tsp minced garlic
-
Kosher salt & black pepper, to taste
-
¼ tsp chili powder
-
Pinch red pepper flakes (optional)
Instructions
-
Glaze: Whisk preserves, 1½ tsp oil, soy sauce, vinegar, mustard, garlic, salt, pepper & red pepper flakes. Set aside.
-
Season: Pat chicken dry. Season both sides with salt, pepper & chili powder.
-
Sear: Heat 1 tbsp oil in a skillet on medium-high. Sear chicken 5–6 mins per side until golden & cooked (165°F). Set aside.
-
Glaze It Up: Lower heat, add glaze & jalapeños. Stir 30 secs. Return chicken, spoon sauce over. Simmer 2–3 mins.
-
Peach Finish: Add peach slices, warm 1–2 mins. Serve hot, over rice or quinoa.
Notes
-
Use firm peaches for shape & bite
-
Double the glaze—it freezes great!
-
Serve with crusty bread to mop up sauce
-
Sub in tofu or pork for fun twists
- Prep Time: 10 mins
- Cook Time: 20 mins
Nutrition
- Calories: 380 cal Per Serving
- Fat: 20g
- Carbohydrates: 18g
- Protein: 32g
Nutrition Per Serving (Approx)
Calories: 380 | Fat: 20g (Saturated: 4g) | Carbs: 18g (Fiber: 1g, Sugar: 14g) | Protein: 32g | Sodium: 780mg
Final Thoughts: Why This Recipe Earns a Permanent Spot in Your Rotation
This isn’t just another chicken recipe—it’s a flavor revelation that solves the eternal “quick vs. exciting” dinner dilemma. Here’s why it deserves a weekly appearance:
1. The Speed-to-Wow Ratio
In the time it takes to wait for delivery, you can create something fresher, healthier, and more memorable. That initial 5-minute sear builds enough fond (those browned bits in the pan) to give the sauce incredible depth.
2. Seasonal Flexibility
While summer peaches shine, this adapts beautifully year-round:
-
Fall: Sub pears and add rosemary
-
Winter: Use orange segments and ginger
-
Spring: Try apricots and mint
3. Crowd-Pleasing Versatility
Works equally well for:
-
Date night (fancy plating!)
-
Kids’ meals (reduce jalapeños)
-
Potlucks (double the recipe)
4. Confidence Builder
Mastering this recipe teaches crucial skills:
-
Proper searing
-
Glaze consistency
-
Balancing sweet/heat/savory
So next time you’re staring into the fridge wondering what to make, remember: sweet, spicy, sticky salvation is 30 minutes away. And when your family asks how you made something so good so fast? Just smile and say, “A little peach magic.”

30-Minute One-Pan Creamy Gnocchi with Sausage
When Chaos Meets Comfort: Your New Go-To Pan of Joy
Hey there, kitchen friend! Olivia here, waving from my flour-dusted corner of the world. Raise your hand if you’ve ever stared into your fridge at 6 PM, mentally begging ingredients to magically transform into dinner while your stomach growls like a hangry bear? *Raises both hands dramatically* That’s exactly why this 30-Minute One-Pan Creamy Gnocchi with Sausage is my weeknight superhero. Imagine pillowy gnocchi swimming in a velvety tomato-cream sauce, hugged by savory Italian sausage crumbles, all finished with a snowdrift of parmesan and confetti of fresh basil. It’s the kind of dish that makes everyone gather ’round the stove, forks at the ready, before you’ve even called “dinner’s done!” Best part? One pan = minimal cleanup. We’re talking real-deal comfort without the marathon cooking session. Whether you’re feeding a rowdy family, hosting last-minute friends, or just treating yourself (you deserve it!), this recipe is your golden ticket to flavor town. Grab that apron—let’s turn chaos into coziness together!
Basil, Babysitting, and a Happy Kitchen Accident
Picture this: It’s 2018, and I’m babysitting my niece and nephew during a thunderstorm. The plan was simple pasta, but the kids were bouncing off walls, the dog was howling at thunder, and I’d forgotten the marinara. Panic mode! I spotted half-cooked gnocchi, leftover sausage from breakfast, and a splash of cream meant for coffee. “Adventure time!” I declared. We tossed it all into one skillet with tomato paste and wine (the wine was mine, promise!). Ten minutes later: silence. Just wide eyes and the sound of furious fork-scraping. My nephew mumbled, “Aunt Liv, this is BETTER than pizza.” That messy, thrown-together miracle became our stormy-day tradition. Now, whenever clouds roll in, my phone pings: “Gnocchi night?” That’s the magic of cooking, isn’t it? The “oops” moments that turn into “oh YES!”
Your Flavor Dream Team (Plus Swaps!)
- 2 lbs Uncooked Potato Gnocchi – The fluffy clouds of joy! Store-bought saves time (look for shelf-stable or refrigerated). Chef’s hack: No need to pre-boil—they cook right in the sauce! Swap with cauliflower gnocchi for low-carb.
- 32 oz Italian Sausage – Savory backbone! Remove casings if needed. Health twist: Use ground turkey or chicken sausage. Spice lovers: pick hot Italian!
- 1 Small Onion, finely chopped – Sweet depth. Yellow or white work best. No onion? Try 1 tsp onion powder.
- 2 tbsp Olive Oil – Our sauté superstar. Butter works too for extra richness.
- 8 Garlic Cloves, minced – Non-negotiable flavor bomb! Use 1 tsp garlic powder in a pinch, but fresh is king.
- 2 cups Dry White Wine – Deglazes like a dream and adds brightness. No wine? Substitute 1.5 cups broth + 2 tbsp lemon juice or vinegar.
- 2 cups Tomato Sauce (Passata di Pomodoro) – Silky smooth base. Use marinara in a pinch, but avoid chunky styles. Fire-roasted adds smokiness!
- 1½ cups Heavy or Whipping Cream – Luxe texture central. Half-and-half works but sauce will be thinner. Coconut cream for dairy-free (adds subtle sweetness).
- 1 cup Freshly Grated Parmesan Cheese – Salty umami punch! Key: Grating yourself melts better. Swap with Pecorino Romano for zing.
- 1 handful Fresh Basil, chopped – The bright finish! Dried basil (1 tbsp) works but add at the start.
- Salt & Pepper to taste – Season as you go!
Why these work together: Sausage = savory depth, cream = indulgence, wine = balance, basil = freshness. It’s a harmony bite!
Let’s Build Your Flavor Masterpiece (No Stress, I Promise!)
- Brown the Sausage & Onions: Heat olive oil in a large, deep skillet or Dutch oven over medium heat. Add sausage and onion. Cook 5-7 minutes, breaking sausage into small crumbles with a wooden spoon until browned and onions are soft. Chef’s tip: Don’t stir too much! Let bits stick slightly—that’s “fond” (flavor gold!) for deglazing later.
- Wake Up the Garlic & Wine: Stir in garlic and cook just 1 minute—until fragrant but not brown! Pour in white wine, scraping the pan bottom vigorously to release those tasty browned bits. Simmer 2-3 minutes. Why? This cooks off alcohol harshness, leaving fruity acidity. No wine? Use broth + lemon juice!
- Gnocchi’s Spa Time: Stir in gnocchi, tomato sauce, and cream. Bring to a gentle simmer (small bubbles, not a boil!). Cover and cook 7-10 minutes, stirring occasionally. Critical hack: Gnocchi is ready when it floats! Taste one—it should be tender but not mushy. Sauce thickens as it sits.
- The Grand Finale: Turn off heat. Stir in parmesan and fresh basil until cheese melts into velvety goodness. Season with salt and pepper. Pro move: Let it rest 2 minutes—sauce clings better!
Active voice in action: See how we “scrape,” “stir,” and “simmer”? You’re not just cooking—you’re conducting a flavor orchestra!
When Chaos Meets Comfort: Your New Go-To Pan of Joy
Hey there, kitchen friend! Olivia here, waving from my flour-dusted corner of the world. Raise your hand if you’ve ever stared into your fridge at 6 PM, mentally begging ingredients to magically transform into dinner while your stomach growls like a hangry bear? Raises both hands dramatically That’s exactly why this 30-Minute One-Pan Creamy Gnocchi with Sausage is my weeknight superhero.
Imagine pillowy gnocchi swimming in a velvety tomato-cream sauce, hugged by savory Italian sausage crumbles, all finished with a snowdrift of parmesan and confetti of fresh basil. It’s the kind of dish that makes everyone gather ’round the stove, forks at the ready, before you’ve even called “dinner’s done!”
Best part? One pan = minimal cleanup. We’re talking real-deal comfort without the marathon cooking session. Whether you’re feeding a rowdy family, hosting last-minute friends, or just treating yourself (you deserve it!), this recipe is your golden ticket to Flavor Town.
Grab that apron—let’s turn chaos into coziness together!
Basil, Babysitting, and a Happy Kitchen Accident
Picture this: It’s 2018, and I’m babysitting my niece and nephew during a thunderstorm. The plan was simple pasta, but the kids were bouncing off walls, the dog was howling at thunder, and I’d forgotten the marinara. Panic mode!
I spotted half-cooked gnocchi, leftover sausage from breakfast, and a splash of cream meant for coffee. “Adventure time!” I declared. We tossed it all into one skillet with tomato paste and wine (the wine was mine, promise!).
Ten minutes later: silence. Just wide eyes and the sound of furious fork-scraping. My nephew mumbled, “Aunt Liv, this is BETTER than pizza.”
That messy, thrown-together miracle became our stormy-day tradition. Now, whenever clouds roll in, my phone pings: “Gnocchi night?”
That’s the magic of cooking, isn’t it? The “oops” moments that turn into “oh YES!”
Your Flavor Dream Team (Plus Swaps!)
The Essentials
✔ 2 lbs Uncooked Potato Gnocchi – The fluffy clouds of joy! Store-bought saves time (look for shelf-stable or refrigerated). Chef’s hack: No need to pre-boil—they cook right in the sauce! Swap: Cauliflower gnocchi for low-carb.
✔ 1 lb Italian Sausage – Savory backbone! Remove casings if needed. Health twist: Ground turkey or chicken sausage. Spice lovers: Hot Italian!
✔ 1 Small Onion, finely chopped – Sweet depth. No onion? Try 1 tsp onion powder.
✔ 2 tbsp Olive Oil – Our sauté superstar. Butter works too for extra richness.
✔ 4 Garlic Cloves, minced – Non-negotiable flavor bomb! Use 1 tsp garlic powder in a pinch, but fresh is king.
The Liquid Gold
✔ ½ cup Dry White Wine – Deglazes like a dream and adds brightness. *No wine? Substitute ½ cup broth + 1 tbsp lemon juice.*
✔ 1 cup Tomato Sauce (Passata di Pomodoro) – Silky smooth base. Use marinara in a pinch, but avoid chunky styles.
✔ 1 cup Heavy or Whipping Cream – Luxe texture central. Half-and-half works but sauce will be thinner.
✔ ½ cup Freshly Grated Parmesan Cheese – Salty umami punch! Key: Grating yourself melts better.
✔ Handful Fresh Basil, chopped – The bright finish! Dried basil (1 tsp) works but add at the start.
Why these work together?
-
Sausage = savory depth
-
Cream = indulgence
-
Wine = balance
-
Basil = freshness
It’s a harmony bite!
Let’s Build Your Flavor Masterpiece (No Stress, I Promise!)
1. Brown the Sausage & Onions
-
Heat olive oil in a large, deep skillet over medium heat.
-
Add sausage and onion. Cook 5-7 minutes, breaking sausage into small crumbles with a wooden spoon until browned.
✔ Chef’s tip: Don’t stir too much! Let bits stick slightly—that’s “fond” (flavor gold!) for deglazing later.
2. Wake Up the Garlic & Wine
-
Stir in garlic and cook just 1 minute—until fragrant but not brown!
-
Pour in white wine, scraping the pan bottom to release those tasty browned bits. Simmer 2-3 minutes.
✔ Why? This cooks off alcohol harshness, leaving fruity acidity.
3. Gnocchi’s Spa Time
-
Stir in gnocchi, tomato sauce, and cream. Bring to a gentle simmer (small bubbles, not a boil!).
-
Cover and cook 7-10 minutes, stirring occasionally.
✔ Critical hack: Gnocchi is ready when it floats! Taste one—it should be tender but not mushy.
4. The Grand Finale
-
Turn off heat. Stir in parmesan and fresh basil until cheese melts into velvety goodness.
-
Season with salt and pepper.
✔ Pro move: Let it rest 2 minutes—sauce clings better!
Active voice in action: See how we “scrape,” “stir,” and “simmer”? You’re not just cooking—you’re conducting a flavor orchestra!
Plating Like a Pro (Minimal Effort, Max Wow)
✔ Scoop straight from the pan into shallow bowls—rustic charm wins!
✔ Top with extra parmesan, red pepper flakes, and fresh basil.
✔ Pair with arugula salad (lemon vinaigrette) or garlic bread for sauce-mopping emergencies.
✔ Wine? Pour that leftover dry white!
Shake It Up! 5 Delicious Twists
-
Veggie Power – Swap sausage for mushrooms + fennel seeds. Add spinach at the end.
-
Sun-Drenched Mediterranean – Use chicken sausage, sun-dried tomatoes, and kalamata olives.
-
Spicy Arrabbiata – Stir in red pepper flakes and finish with torn mozzarella.
-
Lighter & Brighter – Substitute half the cream with whole milk + lemon zest.
-
Pesto Swirl – Dollop basil pesto on top before serving!
Olivia’s Behind-the-Scenes Scoop
Confession: The first time I tested this, I accidentally used whiskey instead of wine (don’t ask!). Surprisingly… not terrible? But stick to wine!
✔ Gnocchi tip: Quality matters—some brands turn gummy. DeLallo or De Cecco are winners.
✔ Sauce too thin? Simmer 2 extra minutes. Too thick? Splash in broth or cream.
✔ Dropped a gnocchi? My dog Butters has taste-tested many.
Your Gnocchi Queries, Solved!
Q: Can I use frozen gnocchi?
✔ A: Yes! Add straight from frozen—no thawing. Cook time may increase 2-3 minutes.
Q: Help! My sauce broke/separated.
✔ A: Whisk in 1 tbsp cold butter or 2 tbsp cream off-heat.
Q: Can I prep ahead?
✔ A: Cook sausage/onion mix up to 2 days ahead. Reheat, then proceed with wine step.
Plating Like a Pro (Minimal Effort, Max Wow)
Scoop this beauty straight from the pan into shallow bowls—rustic charm wins! Top with extra grated parmesan, a sprinkle of red pepper flakes for heat lovers, and fresh basil leaves. For crowd appeal, place the skillet right on the table (trivet underneath, please!) with spoons for serving. Pair with a simple arugula salad with lemon vinaigrette to cut the richness, or garlic bread for sauce-mopping emergencies. Want wine? Pour that leftover dry white! It’s hearty enough to stand alone but plays well with sides.
Shake It Up! 5 Delicious Twists
- Veggie Power: Swap sausage for 2 cups sliced mushrooms + 1 tsp fennel seeds. Add 2 cups spinach at the end.
- Sun-Drenched Mediterranean: Use chicken sausage, add ½ cup chopped sun-dried tomatoes and ¼ cup kalamata olives with the gnocchi.
- Spicy Arrabbiata Style: Stir in 1 tsp crushed red pepper flakes with the garlic. Finish with torn mozzarella instead of parmesan.
- Lighter & Brighter: Substitute half the cream with whole milk. Add zest of 1 lemon at the end.
- Pesto Swirl: Dollop 3 tbsp basil pesto on top before serving—no extra cooking!
Olivia’s Behind-the-Scenes Scoop
Confession: The first time I tested this, I got distracted by my dog stealing a sausage crumb and accidentally used whiskey instead of wine (don’t ask!). Surprisingly… not terrible? But stick to wine! Over the years, I’ve learned: Quality gnocchi matters—some brands turn gummy. DeLallo or shelf-stable De Cecco are winners. Also, if your sauce seems thin, remove the lid and simmer 2 extra minutes. Too thick? Splash in broth or cream. This dish evolves with you! My sister adds roasted red peppers; my neighbor tosses in white beans. Make it yours. And if you drop a gnocchi on the floor? Our secret—I’ve launched a few toward the sink. Dogs approve.
Your Gnocchi Queries, Solved!
Q: Can I use frozen gnocchi?
A: Absolutely! Add straight from frozen—no thawing. Cook time may increase by 2-3 minutes.
Q: Help! My sauce broke/separated.
A: Don’t panic! Remove from heat and whisk in 1 tbsp cold butter or 2 tbsp cream. Acidic tomatoes + cream can split if boiled too hard—keep it at a gentle simmer.
Q: Can I prep this ahead?
A: Cook sausage/onion mixture up to 2 days ahead. Store covered in fridge. When ready, reheat mixture, then proceed from step 2 (adding wine). Fresh gnocchi cooks best day-of!
Q: How do I store leftovers?
A: In an airtight container for 3-4 days. Reheat gently on stove with a splash of broth or cream—microwaving can make gnocchi tough.
30-Minute One-Pan Creamy Gnocchi with Sausage
- Total Time: 30 mins
Description
Hey kitchen friend! Olivia here, waving from my flour-dusted corner. If you’ve ever stared into the fridge at 6 PM willing ingredients to magically turn into dinner while your stomach growls like a hangry bear, this one’s for you. This creamy gnocchi with savory sausage is my weeknight superhero—pillowy gnocchi bathed in a luscious tomato-cream sauce, dotted with Italian sausage crumbles, and finished with parmesan and fresh basil confetti. One pan, minimal cleanup, maximum cozy vibes. Perfect for busy families, last-minute guests, or solo comfort food therapy.
Ingredients
-
2 lbs uncooked potato gnocchi (no need to pre-boil)
-
32 oz Italian sausage (casings removed)
-
1 small onion, finely chopped
-
2 tbsp olive oil (or butter)
-
8 garlic cloves, minced
-
2 cups dry white wine (or 1.5 cups broth + 2 tbsp lemon juice)
-
2 cups tomato sauce (passata or smooth marinara)
-
1½ cups heavy cream or whipping cream (half-and-half or coconut cream for alternatives)
-
1 cup freshly grated Parmesan cheese
-
1 handful fresh basil, chopped (or 1 tbsp dried basil)
-
Salt & pepper, to taste
Instructions
-
Brown the sausage and onions: Heat olive oil in a large deep skillet or Dutch oven over medium heat. Add sausage and chopped onion. Cook 5-7 minutes, breaking sausage into crumbles, until browned and onions soften. Let bits stick to pan for extra flavor!
-
Add garlic and deglaze: Stir in minced garlic, cook 1 minute until fragrant (don’t let it brown). Pour in white wine and scrape pan bottom to release browned bits. Simmer 2-3 minutes to cook off alcohol.
-
Add gnocchi and sauce: Stir in gnocchi, tomato sauce, and cream. Bring to gentle simmer (small bubbles, no boil). Cover and cook 7-10 minutes, stirring occasionally, until gnocchi floats and is tender.
-
Finish with cheese and basil: Turn off heat. Stir in Parmesan and fresh basil until melted and silky. Season with salt and pepper. Let rest 2 minutes for sauce to thicken.
Notes
-
Frozen gnocchi? No problem—add frozen directly; cook a few minutes longer.
-
Sauce splitting? Remove from heat and whisk in a little cold butter or cream.
-
Make ahead: Prepare sausage and onions 2 days in advance. Reheat before adding wine and finishing.
-
Swap the sausage: Use ground turkey, chicken sausage, or mushrooms + fennel seeds for a veggie twist.
-
Add-ins: Sun-dried tomatoes, kalamata olives, or a dollop of pesto for flavor bursts.
-
Lighten it up: Use half cream and half milk, add lemon zest at the end for brightness.
- Prep Time: 10 minutes
- Cook Time: 20 mins
Nutrition
- Calories: 550cal Per Serving
- Fat: 35g
- Carbohydrates: 32g
- Protein: 25g
Nutritional Info (Per Serving)
Calories: ~550 | Fat: 35g | Carbs: 32g | Protein: 25g
Note: Values are estimates. For precise counts, use specific ingredient brands.
Prep Time: 10 mins | Cook Time: 20 mins | Total Time: 30 mins
Final Thought: Comfort in Every Bite
This dish is more than food—it’s a hug in a pan. Whether it’s a crazy weeknight or a cozy weekend, it’s always there for you.
Now go forth, stir with confidence, and make memories—one gnocchi bite at a time.

30-Minute Salmon Coconut Curry
Double the Comfort, Double the Flavor: Your New Crowd-Pleaser
Hey there, kitchen friend! Olivia here, apron slightly dusted with curry powder and a big smile on my face. There’s something magical about watching faces light up when you bring a steaming pot to the table, isn’t there? That’s exactly why I’m over-the-moon excited to share this 30-Minute Salmon Coconut Curry scaled up for EIGHT glorious servings. Imagine: tender salmon fillets swimming in a creamy, fragrant coconut sauce kissed with Thai spices and pops of fresh basil. It’s the kind of dish that turns Tuesday dinners into mini-celebrations and makes weekend hosting feel effortless.
We’ve all been there – scrambling when extra friends show up, or simply wanting leftovers that actually excite you on day three (confession: I’ve been known to hide a portion in the back of the fridge!). This recipe solves it all. It keeps everything we adore about salmon curry – the luxurious texture, the bold-but-balanced flavors, that incredible aroma – but in a generous batch designed for sharing or savoring all week. No fancy skills required, just one pot (or two if doubling up pans!), simple ingredients, and half an hour. Let’s turn up the heat on comfort food and make something unforgettable together!
That One Time I Fed an Unexpected Crowd
Picture this: It was a chilly Seattle Sunday, meant for just me and my husband. I’d picked up a single salmon fillet at the market, dreaming of a quiet curry night. Then the texts started rolling in – friends stranded nearby with a flat tire! Before I knew it, our cozy table for two needed to stretch for six hungry, slightly damp humans. Panic? Briefly. Then my “scale it up” instincts kicked in. I raided the pantry – extra coconut milk, that big tub of spinach threatening to wilt, a double scoop of trusty red curry paste. What felt like kitchen chaos transformed into pure magic. The smell alone had everyone huddled around the stove, and the sight of that massive pot brimming with vibrant curry and flaky salmon? Pure joy. Watching friends go back for seconds, scraping the pot clean with crusty bread, laughing in our tiny kitchen… that’s the moment this scaled-up version was born. It taught me that doubling comfort is the best kind of math!
Gathering Your Flavor Arsenal
Here’s your dream team of ingredients – the building blocks for maximum flavor with minimal fuss. Don’t stress about perfection; cooking is an adventure!
- 8 Fresh Salmon Fillets (about 6 oz each): The star! Look for center-cut fillets with vibrant color and firm flesh. Chef’s Tip: Skin-on adds flavor and holds the fish together beautifully during searing. Swap: Arctic char or even thick cod fillets work in a pinch!
- Salt & Pepper, to taste: The essential flavor enhancers. Season generously – salmon loves it!
- 2 tbsp Olive Oil + 2 tbsp Butter: Our dynamic searing duo. The oil handles high heat, the butter adds richness and helps achieve that gorgeous golden crust. Insight: This combo creates the flavorful fond (those tasty brown bits) that becomes the base of our incredible sauce.
- 4 Garlic Cloves, minced: Fragrant, pungent goodness. Hack: Use a microplane for super-fine mincing that melts into the sauce.
- 4 heaping tbsp Thai Red Curry Paste: Flavor BOMB alert! This is where the magic starts. Key: Use a good quality paste (like Mae Ploy or Thai Kitchen). “Heaping” is crucial for that bold flavor in a big batch. Note: Spice levels vary – taste yours first!
- 2 (13.5 oz) Cans Full-Fat Coconut Milk: Creaminess central! Full-fat is non-negotiable for that luscious texture and rich flavor. Light coconut milk will leave the sauce thin and sad. Shake the cans well before opening!
- 1 tsp Brown Sugar: Our secret harmonizer. Just a touch balances acidity and heat, rounding out the flavors without making it sweet. Swap: Coconut sugar or palm sugar work great.
- 2 tsp Lime Juice: The bright, fresh finish! Adds crucial acidity to cut through the richness. Always use fresh – bottled just doesn’t compare.
- 4 tbsp Fresh Basil, torn or chopped: The aromatic crown jewel! Thai basil is ideal (slightly licorice-y), but sweet basil works too. Tear, don’t chop finely, to release maximum oils. Add at the VERY end!
- 2 (16 oz) Bags Fresh Spinach: Our green powerhouse adding nutrients, color, and volume. It wilts down dramatically. Chef’s Insight: Adding it in batches makes it easier to manage in a large pot.
Let’s Get Cooking: Your Step-by-Step Journey
Ready to create some magic? Grab your largest skillet (a 12-inch minimum!) or have two large pans ready if needed. Let’s dive in!
- Sear the Salmon (Flavor Foundation!): Pat those salmon fillets very dry with paper towels – this is CRUCIAL for getting a golden sear, not steamed fish! Season generously all over with salt and pepper. Heat the olive oil and butter in your large skillet(s) over medium-high heat. Once the butter is melted and sizzling (but not burning!), carefully add the salmon fillets, skin-side down if they have skin. CHEF’S HACK: Don’t overcrowd the pan! Give them space. If using one pan, sear in batches, adding a touch more oil/butter if needed. Let them cook undisturbed for 3-4 minutes – resist the urge to peek too early! You want a beautiful golden crust. Flip carefully and sear the other side for another 3 minutes. The salmon won’t be cooked through yet – perfect! Transfer them to a clean plate. Those gorgeous brown bits left behind? Liquid gold for your sauce!
- Build the Sauce (Aroma Explosion!): Reduce the heat to medium. Add the minced garlic to the pan drippings. Stir constantly for about 30 seconds – just until fragrant! Don’t let it burn. Now, add those glorious 4 heaping tablespoons of Thai red curry paste. Stir it constantly into the garlic and drippings, letting it cook for a full minute. This “blooms” the spices, releasing their incredible aroma and depth of flavor. Your kitchen should smell amazing right now!
- Simmer (Creamy Dream Unfolds): Pour in both cans of full-fat coconut milk, scraping the bottom of the pan to dissolve all that flavorful fond. Add the brown sugar and lime juice. Give it a good whisk to combine everything smoothly. Bring the mixture to a gentle simmer – not a rolling boil. Let it bubble happily for 3-5 minutes. You’ll see it thicken slightly and the oils start to shimmer on the surface. Taste it! This is your moment to adjust – need a pinch more salt? A tiny bit more lime? Go for it!
- Add Spinach & Salmon (Bringing it Home!): Now for the greens! Add the fresh spinach – it will look like a MOUNTAIN, but don’t panic. Stir it in batches as it wilts down dramatically. This takes just a couple of minutes. Once the spinach is wilted and incorporated, gently nestle the seared salmon fillets back into the simmering sauce. Spoon that luscious sauce over the top of each fillet. Let everything simmer gently together for another 5 minutes. This gently finishes cooking the salmon through – it should flake easily with a fork but still be moist and tender inside. WATCHFUL EYE TIP: Avoid vigorous boiling now to keep the salmon perfect.
- Finish & Serve (The Grand Finale!): Remove the pan from the heat. This is key! Sprinkle the torn fresh basil over the top. Stirring it in off the heat preserves its vibrant color and fresh flavor. Give one final gentle stir to incorporate the basil. That’s it! Your magnificent, crowd-feeding salmon coconut curry is ready to shine.
Serving with Style
Presentation is part of the fun! Ladle generous portions of that creamy, spinach-flecked curry and a salmon fillet into shallow bowls. I love serving this family-style – plop that big, beautiful skillet (if it’s presentable!) right in the middle of the table on a trivet. Must-Have Sides: Fluffy jasmine rice is the classic, perfect companion for soaking up every drop of sauce. Rice noodles are a fantastic gluten-free alternative. For a fresh counterpoint, add a simple cucumber salad with rice vinegar or a plate of lime wedges for extra zing. Don’t forget extra basil sprigs for garnish! The vibrant green against the orange-red curry is pure eye candy.
Make It Your Own: Delicious Twists
This curry is your canvas! Play with these tasty variations:
- Veggie Powerhouse: Swap salmon for 2 cans (drained) chickpeas or 2 blocks of cubed extra-firm tofu (press and pan-fry first!). Add 2 cups chopped bell peppers or broccoli florets with the spinach.
- Green Curry Love: Use Thai green curry paste instead of red for a brighter, slightly herbaceous flavor. Add a handful of green beans with the spinach.
- Spice Seeker: Kick up the heat! Add 1-2 thinly sliced Thai chilies or ½ tsp red pepper flakes when cooking the curry paste.
- Thai Basil Boost: Find Thai basil? Use it! Its unique anise note is divine. Add an extra handful stirred in at the end.
- Creamy Coconut Lime: Stir in 1 tsp lime zest with the lime juice and finish with a drizzle of coconut cream (the thick part from the top of the can) when serving.
Chef’s Notes: From My Apron to Yours
This recipe has become my ultimate “feed the people” lifesaver, evolving from that frantic Sunday years ago. I used to worry about overcooking the salmon in the sauce, but searing first creates a barrier and the gentle simmer is key. The biggest game-changer? Using TWO large skillets when I’m making this for a big gathering – searing salmon in one while starting the sauce in another, then combining them. Saves time and sanity! One slightly disastrous (but funny) early attempt involved forgetting to shake the coconut milk – we ended up with weird, separated clumps floating in thin liquid. Lesson learned: SHAKE THOSE CANS! Now, the smell of this curry simmering instantly transports me back to laughter-filled kitchens and shared meals. That’s the real magic – it’s not just dinner, it’s connection in a bowl.
FAQs & Troubleshooting: Your Curry Questions, Answered
Q: My sauce seems thin! How can I thicken it?
A: Don’t panic! First, ensure you used full-fat coconut milk. If it’s still thin after simmering, let it bubble gently uncovered for a few extra minutes to reduce. A super quick fix: mix 1 tsp cornstarch with 1 tbsp cold water to make a slurry, then whisk it into the simmering sauce (before adding salmon back) for 1-2 minutes until thickened.
Q: Can I use frozen salmon?
A: Absolutely! Thaw it COMPLETELY in the fridge overnight first. Pat it incredibly dry – frozen fish releases more water – to ensure a good sear. Cook times might be slightly shorter, so keep an eye on it.
Q: My curry paste is way too spicy! Help!
A: Taste your paste first next time! To rescue it now: Stir in an extra ½ can of coconut milk and a squeeze more lime juice. A teaspoon of honey or maple syrup can also help counterbalance heat more effectively than sugar. Serve with extra rice to dilute each bite.
Q: Can I make this ahead?
A: Yes, but with a caveat. The sauce (without basil) can be made 1 day ahead. Store covered in the fridge. Reheat gently, then add the salmon and simmer until cooked through (fresh salmon is best cooked just before serving). Add the fresh basil right before serving. Pre-cooked salmon reheated in the sauce can become dry.
30-Minute Salmon Coconut Curry
- Total Time: 30 mins
Description
Rich, fragrant, and gloriously comforting, this 30-minute Salmon Coconut Curry is made for sharing. With tender salmon fillets nestled in a velvety Thai-spiced coconut sauce and brightened with fresh basil and lime, this dish turns everyday ingredients into a soul-satisfying experience. Whether you’re hosting guests or meal-prepping for the week, this crowd-pleaser delivers bold flavor, warm hugs, and leftovers worth fighting over.
Ingredients
-
8 salmon fillets (6 oz each, skin-on preferred)
-
Salt & pepper, to taste
-
2 tbsp olive oil + 2 tbsp butter
-
4 garlic cloves, minced
-
4 heaping tbsp Thai red curry paste
-
2 (13.5 oz) cans full-fat coconut milk
-
1 tsp brown sugar
-
2 tsp fresh lime juice
-
2 (16 oz) bags fresh spinach
-
4 tbsp fresh basil, torn
-
Optional: Lime wedges, jasmine rice for serving
Instructions
-
Sear Salmon: Pat fillets dry, season well. Heat oil + butter in large skillet(s), sear salmon 3–4 mins per side until golden. Set aside.
-
Make Sauce: In same pan, sauté garlic for 30 secs. Add curry paste, cook 1 min. Stir in coconut milk, brown sugar, and lime juice. Simmer 3–5 mins.
-
Add Spinach: Stir in spinach in batches until wilted.
-
Finish: Return salmon to skillet, spoon sauce over top. Simmer gently 5 mins until salmon is just cooked. Remove from heat, stir in basil.
Notes
-
Use two skillets to speed up cooking for a crowd
-
Shake coconut milk cans well before using
-
Don’t skip searing—it locks in flavor and texture
-
Add basil off heat to preserve aroma
- Prep Time: 10 mins
- Cook Time: 20 mins
Nutrition
- Calories: 480 cal Per Serving
- Fat: 35g
- Carbohydrates: 7g
- Protein: 30g
Nutritional Info (Per Serving, Makes 8)
Calories: ~480 | Fat: 35g | Carbs: 7g | Protein: 30g
Note: Estimates include salmon and sauce served with rice/noodles calculated separately. Values can vary based on specific ingredients used.
Final Thoughts: More Than Just a Recipe
This 30-Minute Salmon Coconut Curry for Eight isn’t just about feeding a crowd—it’s about creating moments. The aroma alone draws people into the kitchen, and the first bite feels like a hug.
Why This Dish Stands Out:
✅ Flexible – Adapts to tofu, veggies, or different proteins.
✅ Forgiving – Even if the salmon isn’t perfectly seared, the sauce saves the day.
✅ Memorable – The blend of spicy, creamy, and fresh flavors leaves an impression.
Last Tip: Make extra rice. Someone will ask for seconds.
Now, grab that big pot and get cooking—your next gathering just got tastier! 🍛

5-Ingredient No-Bake Granola Bars : Simple, Protein-Packed, and Totally Addictive
Your New Go-To Snack is Just 5 Minutes Away
Hey there, friend! Can you hear it? It’s the 3 PM slump calling. Your stomach is rumbling, your energy is dipping, and you’re staring into the pantry abyss, hoping something magical and satisfying will appear. We’ve all been there. You reach for a packaged granola bar, but the ingredient list reads like a science experiment—full of unpronounceable additives and a sugar content that’ll send you on a rollercoaster. Sound familiar?
Well, my fellow flavor enthusiast, I’m here to change that narrative for good. What if I told you that the most delicious, wholesome, and protein-packed snack could be yours in just five minutes of hands-on time? No oven, no fuss, no mystery ingredients. Just real, honest food that makes you feel incredible.
Today, we’re making my legendary 5-Ingredient No-Bake Granola Bars. These little bars are my kitchen superheroes. They’re chewy, a little sweet, deeply satisfying, and they stick with you through that afternoon meeting, school pick-up, or pre-workout session. They are the ultimate proof that “simple” doesn’t mean “boring.” In fact, simple is often the most delicious of all. So, tie on your favorite apron (messy stains are a badge of honor here!), and let’s create something wonderful together.
A Sweet Slice of Kitchen Memory
This recipe takes me right back to my grandma’s sun-drenched kitchen. She wasn’t a fancy chef, but she was a wizard with simple, good ingredients. She always had a tin of something homemade waiting for us—usually her famous “kitchen sink” cookies or a pan of her own version of these bars.
I remember one sweltering summer afternoon when the last thing anyone wanted to do was turn on the oven. My cousin and I were begging for a sweet treat. With a twinkle in her eye, Grandma pulled out her big yellow mixing bowl. In what seemed like mere moments, she had created a thick, sticky mixture, pressed it into a pan, and popped it into the fridge. “Patience is a virtue,” she’d say as we hovered nearby. That first cool, chewy, peanut-buttery bite was a revelation. It felt like love, condensed into a perfect, handheld bar. This recipe is my homage to her—to the magic of no-bake treats and the powerful, simple joy of feeding the people you love.
Gathering Your Dream Team: Just 5 Simple Ingredients
Here’s the beautiful part: we only need five core ingredients to make magic happen. Each one plays a starring role, and I’ll give you the inside scoop on why they work so well together.
- 1½ cups Rolled Oats (gluten-free if needed): This is our base, our foundation. Rolled oats (or old-fashioned oats) give these bars their wonderful chewy texture and heartiness. Chef’s Insight: Avoid using quick oats if you can, as they can make the bars a bit mushy. The sturdy texture of rolled oats holds up perfectly! If you need these to be gluten-free, just make sure your oats are certified GF.
- 1 cup Natural Peanut Butter or Almond Butter: This is our glue and our flavor powerhouse! It binds everything together and provides healthy fats and protein. Substitution Tip: You MUST use a natural, drippy peanut butter for this. The kind that’s just peanuts and maybe salt. The oily kinds with hydrogenated oils won’t bind correctly. Feel free to swap in almond butter, cashew butter, or even sunflower seed butter for a nut-free version!
- 1/2 cup Maple Syrup or Agave Nectar: Our natural sweetener and second binding agent. The maple syrup adds a subtle, warm flavor that pairs beautifully with the peanut butter. Substitution Tip: Agave works perfectly, and honey is a great option if you’re not strictly plant-based. Just note that honey will make the flavor a bit stronger.
- 1/2 cup Plant-Based Protein Powder (vanilla or unflavored): This is our secret weapon for a major protein boost, making these bars incredibly satiating. Chef’s Insight: The type of protein powder matters! I find that pea or brown rice protein blends work best for texture. If you don’t have protein powder, you can substitute with an additional ½ cup of oats and 2 tablespoons of ground flaxseed, though the protein content will be lower.
- 1/4 cup Mini Dairy-Free Chocolate Chips (optional, but highly recommended!): Because joy is a non-negotiable ingredient! The mini chips distribute little pockets of melty chocolate throughout every bite. Substitution Tip: No mini chips? Chop up a dark chocolate bar, or use dried fruit like cranberries or raisins for a different kind of sweet pop.
Let’s Get Mixing: Your Foolproof Guide to Perfect Bars
Ready for the easiest “cooking” you’ll do all week? Let’s do this! I’ll walk you through every step with my favorite chef hacks to ensure success.
- Combine the Wet Ingredients. Grab a large mixing bowl and add your peanut butter and maple syrup. Now, here’s a little chef hack: if your nut butter is straight from the fridge and a little stiff, pop the open jar in the microwave for 15-20 seconds to loosen it up. This makes it so much easier to mix! Stir, stir, stir until the two are completely smooth and beautifully combined. You should have a glossy, thick, and irresistible-looking mixture. (Yes, tasting a tiny spoonful at this stage is practically mandatory.)
- Incorporate the Dry Team. Now, dump in your rolled oats and protein powder. If you’re using the chocolate chips, hold off on them for just a second! Use a sturdy spatula or even your hands to mix everything together. You’ll notice the mixture will start to thicken up significantly. This is a good sign! Pro Tip: If you add the chocolate chips now, they might melt from the residual heat and moisture. By letting the oat mixture cool down for a minute, you’ll keep those chips intact.
- Fold in the Fun. Once the oat mixture is well-combined and has cooled slightly, now is the time to gently fold in those mini chocolate chips. This ensures you get distinct little chocolatey gems in every single bar, rather than a swirly, muddy-looking bar.
- Press, Don’t Pat. Line an 8×8-inch baking pan with parchment paper, leaving some overhang on two sides. This is your “sling” that will make removing the whole slab of bars a breeze later. Transfer the mixture into the pan. Now, for the most important step: PRESS. Don’t just pat it down. Use the bottom of a flat measuring cup, a glass, or your hands to press the mixture down as firmly and evenly as you possibly can. Apply some real muscle here! This compacts the bars, ensuring they hold together later and don’t crumble when you slice them.
- The Chill-Out Session. Pop the pan into the refrigerator for at least 30 minutes, or until the bars are completely firm. This chilling time is non-negotiable—it’s what allows the bars to set up and become sliceable. I sometimes let mine go for a full hour if I have the time. Patience, just like Grandma said!
- Slice and Celebrate! Once firm, use the parchment paper sling to lift the entire block of granola out of the pan. Place it on a cutting board and use a sharp knife to slice it into 10 rectangular bars (or 12 smaller ones, if you prefer). And just like that, you’re a snack-making superstar!
How to Serve Up Your Homemade Goodness
These bars are perfect straight from the fridge, all cool and firm. I love wrapping them individually in a little parchment paper and tying them with baker’s twine for a cute, grab-and-go treat. Toss one in your lunchbox, your gym bag, or your purse for a guaranteed happy moment later. They also make a fantastic, wholesome dessert alongside a cup of coffee or a cold glass of almond milk. However you serve them, do it with pride—you made this!
Mix It Up! 5 Delicious Twists on the Classic
The beauty of this base recipe is its incredible versatility. Once you’ve mastered the classic, get creative! Here are a few of my favorite variations:
- Tropical Vibes: Swap the peanut butter for almond butter, and mix in ¼ cup of chopped dried mango and 2 tablespoons of unsweetened shredded coconut.
- Trail Mix Bar: Replace the chocolate chips with a mix of 2 tablespoons each of dried cranberries, chopped almonds, and pumpkin seeds.
- Double Chocolate Craver: Use chocolate protein powder and swap the chocolate chips for cacao nibs for a deep, rich, less-sweet chocolate fix.
- Apple Pie Bar: Add 1 teaspoon of cinnamon and ¼ cup of finely chopped dried apples to the mixture. It tastes like fall in every bite!
- Nut-Free & Seed-Tastic: Use sunflower seed butter and swap the chocolate chips for sunflower seeds and a handful of dried cherries.
Olivia’s Kitchen Notes & Stories
This recipe has been a living, evolving thing in my kitchen for years. The first time I made them, I was so impatient that I tried to slice them after only 15 minutes in the fridge. Let’s just say I ended up with a delicious, albeit slightly crumbly, “granola bark” instead of bars! It was still devoured, but it taught me the importance of that firm chill.
I’ve also learned that the brand of protein powder can make a difference. Some absorb more moisture than others. If your mixture seems too dry and isn’t sticking together, don’t panic! Just add another tablespoon of maple syrup or nut butter. If it seems too wet and sticky, add another tablespoon or two of oats. Trust your instincts—you’ve got this!
These bars are a testament to my core cooking philosophy: good food doesn’t have to be complicated. It’s about using a handful of quality ingredients to create something that nourishes both body and soul. I hope this recipe becomes a trusted friend in your kitchen, just like it is in mine.
Your Questions, Answered!
I’ve gotten so many wonderful questions about these bars over the years. Here are the most common ones to help you on your no-bake journey!
Q: My bars are too crumbly and falling apart! What did I do wrong?
A: This is the #1 question, and it almost always comes down to two things: not enough binding agent or not enough pressure. First, make sure you’re using a natural, oily nut butter and enough maple syrup. Second, and this is crucial, you MUST press the mixture into the pan with serious force. Really compact it! If you’ve done both and they’re still crumbly, try adding an extra tablespoon of nut butter next time.
Q: Can I make these without protein powder?
A: Absolutely! As mentioned in the ingredients, you can substitute the ½ cup of protein powder with ½ cup of additional rolled oats and 2 tablespoons of ground flaxseed or chia seeds. The texture will be slightly different, but they’ll still be delicious and hold together well.
Q: How long do these bars last, and how should I store them?
A> Because they are no-bake and contain perishable ingredients, they need to be stored in an airtight container in the refrigerator. They will stay fresh and firm for up to 1 week. You can also freeze them for up to 3 months! Just layer them between parchment paper in a freezer bag and thaw in the fridge or at room temperature when you’re ready to enjoy.
Q: My mixture was too sticky to handle. How can I fix this?
A> This can happen if your nut butter was particularly runny or if your protein powder is a brand that doesn’t absorb much liquid. Don’t worry! Just gradually add more rolled oats, a tablespoon at a time, until the mixture becomes thick and less sticky to the touch.
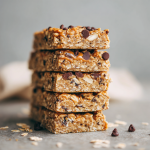
5-Ingredient No-Bake Granola Bars : Simple, Protein-Packed, and Totally Addictive
Description
Say goodbye to store-bought snacks and hello to your new favorite homemade treat! These 5-Ingredient No-Bake Granola Bars are chewy, naturally sweet, and packed with real ingredients that actually fuel you. Made with oats, nut butter, and a touch of maple syrup, they’re the perfect grab-and-go snack for busy mornings, post-workout fuel, or that 3 PM craving. Simple, satisfying, and endlessly customizable—snacking just got a whole lot smarter (and tastier).
Ingredients
-
1½ cups rolled oats (GF if needed)
-
1 cup natural peanut or almond butter
-
½ cup maple syrup or agave nectar
-
½ cup vanilla or unflavored plant-based protein powder
-
¼ cup mini chocolate chips (optional, but highly recommended!)
Instructions
-
Mix Wet Ingredients: In a large bowl, combine peanut butter and maple syrup until smooth.
-
Add Dry Ingredients: Stir in oats and protein powder until thick and well blended. Let cool slightly, then fold in chocolate chips.
-
Press Firmly: Line an 8×8-inch pan with parchment. Transfer the mixture and press down firmly with a flat cup or your hands to compact.
-
Chill: Refrigerate for at least 30 minutes (1 hour for best results).
-
Slice & Enjoy: Lift out using parchment, slice into 10 bars, and store in the fridge.
Notes
-
Too crumbly? Add an extra spoonful of nut butter or syrup.
-
Too sticky? Stir in a bit more oats.
-
Store in the fridge for 1 week or freeze up to 3 months.
Nutrition
- Calories: 210 cal Per Bar
- Fat: 10g
- Carbohydrates: 18g
- Fiber: 3g
- Protein: 9g
Quick Nutrition Breakdown (Per Bar)
Please note: This is an estimate and can vary based on the specific brands of ingredients you use.
- Calories: ~210
- Protein: 9g
- Fat: 10g
- Carbohydrates: 18g
- Fiber: 3g
- Sugar: 7g
Love This Recipe? Save It For Later!
Your 5-Minute Snack Revolution Awaits
And there you have it—your ticket out of the 3 PM slump and into a world of wholesome, delicious energy. You’re no longer at the mercy of the pantry abyss; you are its master.
In just five minutes of active time, you can create a snack that’s not only a triumph of flavor and texture but a small act of self-care. These bars are more than just oats and peanut butter; they’re a promise to yourself that good food can be simple, and that you are worth those few extra minutes of preparation.
So, go on. Embrace the simple joy of creating something with your own hands. Wrap up a bar, tuck it into your bag, and face your day with the confident knowledge that a little piece of homemade goodness is waiting for you.


