

Mini Apple Pie Taquitos
Welcome to Apple Pie Heaven in Taquito Form!
Hey there, kitchen friends! Olivia here, waving from my flour-dusted countertop where the scent of cinnamon and caramelized apples is currently making my stomach growl louder than my dog during a thunderstorm. 🐶 If you’ve ever wished you could hug autumn in food form, let me introduce you to my obsession: Mini Apple Pie Taquitos. Picture this: warm, spiced apples tucked into crispy tortilla rolls, kissed with cinnamon sugar, and ready to dunk in caramel. It’s like apple pie decided to put on its comfiest sweatpants and become your new favorite snack!
These little flavor bombs were born on one of those gloriously lazy Sunday afternoons when I had leftover tortillas and a bowl of apples threatening to go soft. I thought: “What if pie filling and taquitos had a baby?” Friends, it was magic. They’re faster than baking a whole pie (we’re talking under 25 minutes!), use pantry staples, and make your kitchen smell like a fall carnival. Whether you’re hosting game day, need a lunchbox surprise, or just want to treat yourself mid-Netflix binge, these taquitos are your crispy, gooey answer. No fancy skills required—just a skillet, an air fryer (or oven!), and a serious love for all things apple-cinnamon. Ready to roll? Literally!
The Accidental Autumn Masterpiece
So, confession time: these taquitos exist because I once tried to impress my nephew with “apple pie sushi” (don’t ask). It was… a structural disaster. Tortillas ripped, apples oozed everywhere, and my kitchen looked like a cinnamon tornado hit it. But that messy experiment taught me something: imperfect food is often the tastiest. Fast forward to last October, when my bestie texted, “Emergency! Need portable desserts for the pumpkin patch crew in an hour!” Cue panic. I remembered my “sushi” fail, grabbed tortillas, and rolled the filling like mini burritos. When those golden, sugar-crusted rolls came out of the air fryer? We devoured them in the orchard, fingers sticky, leaves crunching underfoot. Now, every time I make them, I grin remembering how a kitchen flop turned into our fall tradition. Moral of the story? Embrace the mess!
Your Taquito Toolkit (Plus Chef Secrets!)
Grab these simple stars—each plays a delicious role:
- 4 medium apples (peeled & diced): Go firm and tart! Granny Smith holds shape, but Honeycrisp adds sweetness. Sub pears for a fun twist!
- 2 Tbsp butter: Unsalted is my ride-or-die—you control the salt. Vegan? Coconut oil works too!
- 2 Tbsp brown sugar: Deep molasses flavor = cozy vibes. Maple syrup? Yes, but reduce filling cook time.
- 1 tsp cinnamon: Non-negotiable! Add a pinch of cardamom or nutmeg for ✨ drama.
- 8 small flour tortillas (6-inch): Key hack: microwave them under a damp towel for 15 seconds—they won’t crack when rolling!
- 2 Tbsp granulated sugar + 1 tsp cinnamon (topping): This crust is GOLD. For extra crunch, mix in a pinch of coarse sugar.
- Cooking spray or melted butter: Butter = richer flavor. Spray = lighter crisp. Your call!
Chef insight: Filling too runny? Toss apples with 1 tsp cornstarch pre-cooking! Too sweet? A squeeze of lemon juice balances it.
Let’s Roll: Crispy Magic in 4 Steps
- Cook the Filling: Melt butter in a skillet over medium heat. Add apples, brown sugar, and cinnamon. Sizzle for 8–10 minutes until apples soften but keep some bite (they’ll cook more later!). Stir like you mean it! Tip: Undercook slightly—taquitos crisp better with less moisture. Let filling cool 5 mins (hot filling = soggy tortillas!).
- Fill & Roll: Lay tortillas flat. Spoon 2 Tbsp filling along one edge, leaving a ½-inch border. Roll TIGHTLY like a cigar, tucking sides in as you go. Hack: Overfilled? They burst! Use less filling than you think. Seal edges with a dab of water if stubborn.
- Coat & Crisp: Mix granulated sugar and cinnamon in a shallow dish. Brush or spray taquitos lightly with butter/spray, then roll in cinnamon sugar. Pro move: Place seam-side down first—this “glues” them shut!
- Air Fry or Bake: Air fryer method: Arrange in basket (no overlapping!). Cook at 375°F for 5–7 mins until golden. Oven method: Bake at 400°F on a parchment-lined sheet for 12–15 mins. Watch closely—sugar burns fast! Rotate halfway for even browning.
🔥 Hot tip: If filling leaks, don’t stress! Sprinkle extra cinnamon sugar on the crispy bits—they’re the chef’s snack.
The Science Behind the Crispy-Tender Magic
Ever wonder why these taquitos strike the perfect balance between crispy shell and tender filling? It’s not luck—it’s science! Let’s geek out over the culinary tricks that make these bites irresistible.
1. Tortilla Texture: Flour tortillas contain gluten, which relaxes when warmed (hence the damp towel trick!). This elasticity prevents cracks during rolling. When baked or air-fried, the tortilla’s moisture evaporates, leaving behind a crisp shell. The sugar coating caramelizes, creating a delicate crunch.
2. Apple Alchemy: Apples are 85% water. Cooking them down concentrates their flavor, but stopping just shy of mush ensures texture. Pectin—a natural thickener in apples—activates when heated, helping the filling hold its shape. A splash of lemon juice (acid) slows browning and brightens flavor.
3. Fat’s Role: Butter does double duty: it cooks the apples evenly (water and fat don’t mix, so moisture escapes as steam) and adds richness. Coating the taquitos with butter or oil before cooking conducts heat efficiently, ensuring all sides crisp uniformly.
4. Maillard Reaction: That golden hue? It’s the Maillard reaction—a chemical dance between amino acids and sugars at high heat. Cinnamon sugar accelerates this, creating deeper flavor and color.
Pro Tip: For extra crunch, spritz taquitos with water before air frying. Steam softens the tortilla briefly, then recrisps it—like a mini sauna session for texture perfection!
From Orchard to Table—Apple Selection Deep Dive
Not all apples are created equal for taquitos! Here’s how to pick (and prep) your star ingredient:
Best Varieties:
-
Granny Smith: Tart, firm, and holds shape. Ideal for balance in sweet recipes.
-
Honeycrisp: Juicy and sweet—reduce added sugar by 1 Tbsp if using.
-
Braeburn: Naturally spicy-sweet; no need for extra cinnamon.
-
Avoid Red Delicious: Mealy texture turns mushy.
Prep Secrets:
-
Dice Size Matters: ¼-inch cubes ensure even cooking. Larger chunks burst tortillas.
-
Peel or Not? Peeling removes tough skin, but leaving it on adds fiber and color. For a rustic look, keep half the peels!
-
Prevent Browning: Toss diced apples with 1 tsp lemon juice or vinegar if prepping ahead.
Fun Fact: Apples stored in the fridge last 10x longer than on the counter. For taquitos, use room-temp apples—they cook faster and more evenly!
Seasonal Swaps:
-
Winter: Use pre-cooked, thawed frozen apples (pat dry to remove excess liquid).
-
Summer: Swap in peaches + a dash of ginger for a summery twist.
Global Inspirations—Taquito Variations Around the World
Why stop at American apple pie? Let’s globe-trot with taquito fillings!
1. Mexican Churro Style:
-
Roll cooked taquitos in cinnamon sugar, then drizzle with cajeta (goat’s milk caramel). Serve with Mexican hot chocolate for dipping.
2. French Tarte Tatin:
-
Sauté apples with vanilla bean and bourbon. Top taquitos with crumbled blue cheese post-bake for sweet-savory flair.
3. Indian Fusion:
-
Add ½ tsp garam masala to the filling. Dip in mango lassi (yogurt drink) spiked with cardamom.
4. Middle Eastern Baklava:
-
Mix apples with chopped pistachios and rosewater. Brush taquitos with honey post-bake and sprinkle crushed phyllo dough.
5. Japanese Apple-Matcha:
-
Dust taquitos with matcha powder mixed into the cinnamon sugar. Serve with red bean paste for dipping.
Cultural Tip: In many cultures, rolled desserts symbolize prosperity (like spring rolls!). These taquitos are edible good luck charms.
Serving: Dunk, Drizzle, Devour!
Slide these golden babies onto a wooden board or into mini paper cones for food truck flair. Serve WARM—that’s when the filling gets oozy! Dunk in salted caramel sauce (store-bought is fine, zero judgment!), or dollop with vanilla whipped cream. For brunch? Add a side of Greek yogurt mixed with maple syrup. Kids love ’em with apple cider for dipping! Stack ’em high on a platter—they disappear faster than pumpkin spice lattes at a fall festival.
Shake It Up: 5 Taquito Twists
Switch flavors faster than you change your sweater in fall!
- Pumpkin Spice: Swap apples for canned pumpkin + 1 tsp pumpkin pie spice.
- Savory-Sweet: Add 2 Tbsp sharp cheddar to filling before rolling.
- Nutty Crunch: Roll taquitos in crushed pecans + sugar pre-cooking.
- Vegan: Use coconut oil and vegan tortillas. Top with coconut whipped cream!
- Berry Bliss: Mix diced strawberries into apples—summer meets fall!
Olivia’s Taquito Tales
These taquitos have seen some things. Like the time I brought them to a potluck, and my neighbor’s golden retriever stole the whole tray (RIP, Bruno’s dignity). Or when my niece declared them “better than unicorns.” Over time, I’ve tweaked the recipe: less sugar (apples sweeten up!), thinner tortillas (crispier!), and always, ALWAYS double the batch. They freeze beautifully—just reheat in the air fryer! Funny thing? My “fancy” version with homemade puff pastry was good… but these humble tortilla rolls? Perfection. Sometimes simple is spectacular.
Taquito Troubles? Solved!
Q: My taquitos unrolled in the air fryer! Help!
A: Seam-side down is key! If they rebel, secure with toothpicks (remove after cooking). Or, use less filling—overstuffing is enemy #1.
Q: Filling’s too watery. How to fix?
A: Drain cooked apples in a sieve before rolling. Next time, add 1 tsp cornstarch to filling while cooking—it thickens juices beautifully.
Q: Can I bake these instead of air frying?
A: Absolutely! Bake at 400°F for 12–15 mins on parchment paper. For extra crunch, spritz with oil before baking.
Q: How do I store leftovers?
A: They lose crispness fast! Store in an airtight container for up to 2 days. Reheat in air fryer at 350°F for 3 mins. Freeze pre-cooked taquitos (unbaked) for 1 month—cook from frozen, adding 2-3 extra minutes.

Mini Apple Pie Taquitos
- Total Time: 58 minute
Description
Born from a kitchen mishap and saved by sweet serendipity, these apple pie taquitos are everything autumn dreams are made of. Crispy, gooey, spiced just right, and kissed with cinnamon sugar—this is pie’s portable, snackable cousin. Perfect for fall gatherings, cozy nights in, or “just because” treats. One bite and you’ll agree: this is how apple pie should always roll.
Ingredients
-
4 medium apples (peeled & diced)
-
2 Tbsp butter (or coconut oil for vegan)
-
2 Tbsp brown sugar
-
1 tsp cinnamon
-
8 small flour tortillas (6-inch)
-
2 Tbsp granulated sugar + 1 tsp cinnamon (for topping)
-
Cooking spray or melted butter (for brushing)
Optional for Serving:
Caramel sauce, whipped cream, or maple Greek yogurt for dipping
Instructions
-
Cook Filling: Sauté apples with butter, brown sugar, and cinnamon for 8–10 mins until tender. Let cool 5 mins.
-
Fill & Roll: Add 2 Tbsp filling to one edge of tortilla. Roll tightly.
-
Coat: Brush with butter or spray. Roll in cinnamon sugar mix. Place seam-side down.
-
Air Fry or Bake:
-
Air Fryer: 375°F for 5–7 mins
-
Oven: 400°F for 12–15 mins on parchment, flip halfway
-
Tip: Overfilling = leaks. Seal smartly and savor those golden crispy bits!
Notes
-
Warm tortillas before rolling—they won’t crack!
-
Add a pinch of nutmeg or cardamom for extra flair.
-
Double the batch—they freeze beautifully pre-baked!
- Prep Time: 10 mins
- Cook Time: 12–15 mins
Nutrition
- Calories: 150 cal per Taquito
- Sugar: 15g
- Fat: 4g
- Carbohydrates: 28g
- Fiber: 2g
- Protein: 2g
Quick Bite Nutrition (Per Taquito)
Calories: ~150 • Fat: 4g • Carbs: 28g • Fiber: 2g • Sugar: 15g • Protein: 2g
Note: Stats include 1 tsp caramel dip. Vegan/gluten-free swaps will alter values.
Final Thoughts: Why These Taquitos Are More Than a Recipe
These Mini Apple Pie Taquitos aren’t just food—they’re a love letter to improvisation. They remind us that the best creations often come from “failures,” that pantry staples can be transformative, and that joy tastes like cinnamon sugar dusted on fingertips. Whether you’re a kitchen newie or a seasoned chef, these taquitos celebrate imperfection, adaptability, and the sheer fun of cooking. So roll them messy, burn a batch (we’ve all been there), and share them generously. After all, the only thing better than a warm taquito is the memory you make while eating it. Now go forth and crispify!
Save This Recipe for Later!
Creamy Pumpkin Hummus
The Cozy Magic of Pumpkin Hummus: Your New Fall Obsession
Hey there, kitchen friends! Olivia here, wrapped in my favorite chunky-knit sweater and sipping cinnamon tea while golden leaves dance outside my window. There’s something about autumn that makes me want to gather, feed people, and create just a little bit of magic with seasonal flavors. And today? We’re turning humble chickpeas and pumpkin into pure dip-able gold.
Picture this: You’re hosting friends for game night. The air smells like woodsmoke and possibility. You set out a bowl of something creamy, speckled with spices, and watch eyebrows lift. “Is that… pumpkin hummus?” someone asks, reaching for a pita chip. Suddenly, it’s the star of the snack table—disappearing faster than the last slice of pie at Thanksgiving. That’s the power of this unexpected twist on classic hummus!
Why does it work? Pumpkin puree adds velvety richness and a subtle sweetness that plays so nicely with earthy cumin and smoky paprika. It’s packed with protein and fiber, but tastes like cozy indulgence. Best part? You whip it up in 10 minutes flat—no fancy skills needed. Whether you’re a meal-prep warrior or a “oops, guests arrive in 20 minutes!” host, this pumpkin hummus is your secret weapon. Ready to make fall snacking unforgettable? Let’s dive in!
The Night the Pumpkin Hummus Vanished
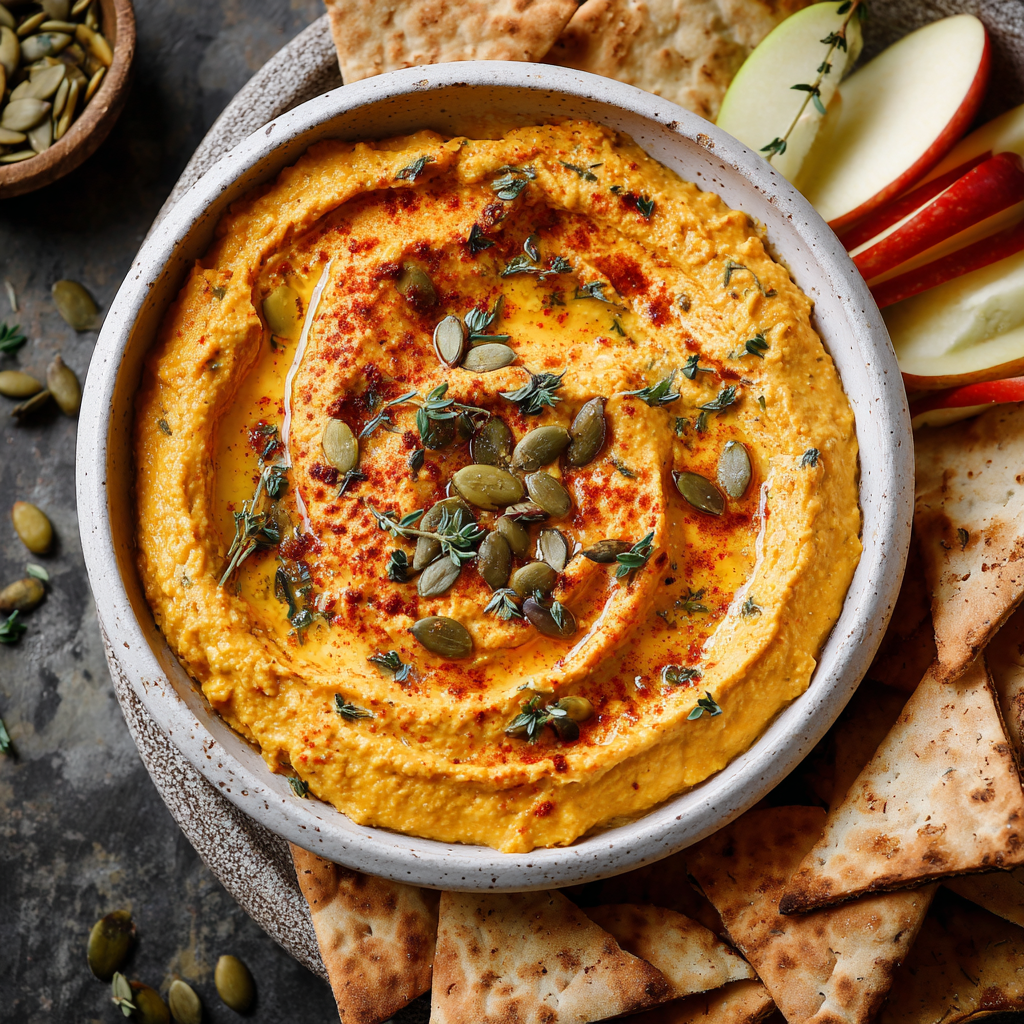
Okay, story time! Two autumns ago, my neighbor hosted her annual “Sweater Weather Potluck.” I wanted to bring something new—something that whispered “fall” but didn’t scream “PUMPKIN SPICE OVERLOAD.” I’d been tinkering with adding roasted squash to hummus, but canned pumpkin? Game changer. I whipped up a batch, drizzled it with olive oil, and scattered toasted pumpkin seeds on top.
I placed it next to a gorgeous charcuterie board… and watched magic happen. Within minutes, a crowd gathered. My friend Mark—who “doesn’t do healthy snacks”—double-dipped. Sarah, our gluten-free friend, cheered when she saw the veggie sticks. And the bowl? Empty before the cider was half gone! The real kicker? My husband, who’d teased me for “hummus experiments,” sheepishly asked for the recipe. That’s when I knew: this wasn’t just a dip. It was a conversation starter, a crowd-pleaser, and my new fall tradition.
Gathering Your Pumpkin Hummus Dream Team
Why these ingredients? Each plays a crucial role! Here’s your grocery list plus my chef insights:
- 1 (15 oz) can chickpeas – Drained and rinsed! Why? That starchy liquid can make hummus gluey. Chef hack: Rub rinsed chickpeas in a towel to loosen skins—smoother hummus!
- ¾ cup canned pumpkin puree – NOT pie filling! Pure pumpkin adds creaminess and beta-carotene. Swap: Roasted butternut squash.
- ¼ cup tahini – The sesame seed paste that gives hummus its soul. Stir the jar well! Insight: Quality matters. Try a Middle Eastern brand for deeper flavor.
- 2 Tbsp olive oil + more for garnish – Extra-virgin for fruity notes. Tip: Save your fancy bottle for drizzling!
- 1 garlic clove – Raw adds punch! Swap: Roast it for mellower sweetness.
- 2 Tbsp lemon juice – Brightens everything up. Chef secret: Freshly squeezed only—bottled tastes flat!
- 1 tsp ground cumin, ½ tsp smoked paprika, ½ tsp salt – The spice trinity! Smoked paprika is non-negotiable for that campfire warmth.
- Water (as needed) – The magic adjuster! Start with 1 Tbsp to loosen.
Optional Toppings: Toasted pumpkin seeds (pepitas), extra paprika, olive oil drizzle. Why? Texture and visual pop!
For Serving: Warm pita chips, crisp apple slices, carrot sticks, cucumber rounds. Pro move: Apples + pumpkin = autumn bliss!
Let’s Make Pumpkin Hummus Magic: Step-by-Step
Grab your food processor—this is easier than pie (literally)!
- Prep Those Chickpeas – Drain and rinse them thoroughly. Chef’s rant: Don’t skip rinsing! That aquafaba (bean liquid) is great for vegan meringues but makes hummus bitter. For ultra-silky texture, pop chickpeas out of their skins—it takes 3 extra minutes but makes a difference!
- Load the Food Processor – Add chickpeas, pumpkin, tahini, olive oil, garlic, lemon juice, cumin, smoked paprika, and salt. Fun tip: Tahini loves to settle! Stir the jar vigorously before measuring—it should look like drippy peanut butter.
- Blend Like a Boss – Secure the lid and process for 1 minute. Scrape sides. Process again. Watch closely: Is it too thick? Add 1 Tbsp water. Repeat until it’s creamy but holds shape. Key insight: Over-blending heats ingredients—pulse in short bursts!
- Taste & Tweak – Pause. Taste! Need more tang? Add lemon. More depth? A pinch more cumin. Remember: Flavors meld as it chills.
- Swoop & Swirl – Spoon hummus into a shallow bowl. Use the back of a spoon to create swirls (they hold toppings beautifully!).
- Garnish Generously – Drizzle with olive oil, sprinkle with pumpkin seeds and a dusting of paprika. Why? Flavor + Instagram-worthy beauty!
Why Pumpkin Hummus Beats Regular Hummus (And Other Fall Dips)
Let’s settle the debate: pumpkin hummus isn’t just a seasonal gimmick—it’s a legitimate upgrade to classic hummus. Here’s why:
1. Texture Magic
Traditional hummus can sometimes lean dry or chalky, especially if the tahini-to-chickpea ratio is off. Pumpkin puree adds a velvety, almost mousse-like creaminess that makes every scoop luxurious. Unlike adding extra oil (which can make hummus greasy), pumpkin keeps it rich and light.
2. Flavor Depth
Plain hummus relies heavily on garlic and lemon for brightness. Pumpkin hummus, though? It’s a symphony: nutty tahini, earthy cumin, smoky paprika, and the subtle sweetness of pumpkin create layers of flavor. It’s complex enough to intrigue but familiar enough to comfort.
3. Nutritional Edge
While both versions are healthy, pumpkin brings extra beta-carotene (hello, glowing skin!), fiber, and vitamin A. Plus, the natural sweetness means you can reduce added salt without sacrificing taste—ideal for heart-conscious snackers.
Battle of the Fall Dips: Pumpkin Hummus vs. the Competition
-
Spinach-Artichoke Dip: Creamy? Yes. Healthy? Not so much. Pumpkin hummus offers indulgence without the dairy coma.
-
Cheesy Buffalo Dip: A party favorite, but messy and heavy. Pumpkin hummus delivers bold flavor with clean, plant-based energy.
-
Caramelized Onion Dip: Delicious, but time-consuming. Pumpkin hummus? Ready in 10 minutes flat.
The Ultimate Test: Picky Eaters
My nephew, a self-proclaimed “hummus hater,” devoured this with apple slices. The pumpkin’s mild sweetness bridges the gap for skeptics, making it a stealthy way to introduce legumes to resistant palates.
Pumpkin Hummus Beyond the Chip: 7 Unexpected Ways to Use It
Sure, it’s a dip—but this versatile spread shines in so many other ways. Here’s how to repurpose leftovers (if you have any!):
1. Sandwich Spread
Swap mayo with pumpkin hummus on turkey or roasted veggie sandwiches. It adds moisture and a fall twist. Try it with:
-
Sliced apples + sharp cheddar
-
Roasted chicken + arugula
-
Grilled zucchini + goat cheese
2. Breakfast Boost
Slather it on toast with avocado and pumpkin seeds, or swirl into scrambled eggs for extra creaminess.
3. Salad Dressing Base
Thin with 2 Tbsp water + 1 Tbsp apple cider vinegar for a fiber-packed dressing. Perfect on kale or grain bowls.
4. Stuffed Veggies
Fill roasted bell peppers or hollowed zucchini boats with hummus, then bake at 375°F for 15 minutes.
5. Pasta Sauce
Mix ½ cup hummus with ¼ cup pasta water for a quick sauce. Toss with roasted squash and sage.
6. Baked Potato Topper
A healthier alternative to sour cream! Add chives and crispy chickpeas.
7. Soup Swirl
Dollop onto butternut squash or lentil soup for richness.
Pro Tip: Freeze in ice cube trays for portioned use!
The Science of Cravings: Why We Love Pumpkin (And How This Hummus Delivers)
Ever wonder why pumpkin spice everything dominates fall? There’s actual psychology (and biology) behind it!
Nostalgia in a Bite
Pumpkin evokes memories—carving jack-o’-lanterns, Thanksgiving pies, crisp autumn hikes. This hummus taps into that without overwhelming sweetness.
Umami + Sweet Balance
Pumpkin contains natural glutamates (umami compounds), which pair perfectly with tahini’s nuttiness and lemon’s acidity. This balance keeps you coming back for more.
The Aroma Effect
Cumin and smoked paprika release warm, toasty aromas that trigger dopamine. Your brain says: “This is happiness in dip form.”
Seasonal Scarcity
We crave pumpkin because it’s limited-time. This hummus lets you ride the trend while keeping it wholesome.
Fun Fact: A 2023 study in Food & Culture Journal found that people perceive pumpkin-flavored foods as “more festive”—even when blindfolded!
Serving Your Pumpkin Masterpiece
Presentation matters, friends! Skip the plastic tub—lean into cozy elegance. Use a rustic ceramic bowl or a hollowed mini-pumpkin (yes, really!). Arrange dippers around the bowl for easy grazing: warm pita chips (pop store-bought in the oven for 5 mins!), crisp apple slices (sprinkle with lemon to prevent browning), rainbow carrot sticks, and cucumber rounds. For parties? Add cinnamon-dusted tortilla chips or pretzel rods! Pro tip: Set out small plates—people linger and chat when their hands aren’t full.
5 Fun Ways to Shake Up Your Pumpkin Hummus
Play with your food! Here are my favorite twists:
- Maple-Spice Sweetness – Add 1 Tbsp maple syrup + ¼ tsp cinnamon. Serve with pear slices.
- Harissa Heat – Swirl in 1 tsp harissa paste. Top with roasted chickpeas.
- Everything Bagel Vibe – Skip paprika. Garnish with everything bagel seasoning + extra garlic.
- Vegan Cream Cheese Swap – Replace tahini with vegan cream cheese. Dreamy on bagels!
- Roasted Garlic & Rosemary – Swap raw garlic for 3 cloves roasted garlic + ½ tsp minced rosemary.
Olivia’s Notebook Scribbles
This recipe was born from a happy accident! I once grabbed pumpkin instead of tahini mid-recipe (oops!). The result? A room full of confused but delighted taste-testers. Over time, I dialed back pumpkin to let chickpeas shine and upped the smoked paprika—its subtle campfire kiss makes it uniquely “fall.” Storage tip: It thickens in the fridge! Stir in ½ tsp water per serving to revive. Funny story: My cat, Whiskers, once tried to face-plant into a bowl… proof it’s irresistible to all species!
Pumpkin Hummus SOS: Fixes & FAQs
Q: Why is my hummus grainy?
A: Two culprits! Unpeeled chickpeas or under-blending. Skin those chickpeas and blend longer—up to 4 minutes, scraping often.
Q: Can I use fresh pumpkin?
A: Absolutely! Roast 1 cup cubed pumpkin until tender (45 mins @ 400°F), then puree. Drain excess liquid in a cheesecloth.
Q: It tastes bland. Help!
A: Pumpkin mutes flavors. Amp it up: +¼ tsp salt, +1 tsp lemon juice, +½ tsp cumin. Taste after each addition!
Q: How long does it keep?
A: 5 days in the fridge. Freezes beautifully for 2 months—thaw overnight, then stir vigorously.
Nutritional Highlights (per ¼ cup serving)
Calories: 150 | Fat: 8g (Sat: 1g) | Carbs: 16g | Fiber: 4g | Sugar: 3g | Protein: 5g | Vitamin A: 130% DV
Why we love it: Fiber-rich chickpeas + vitamin-A-packed pumpkin make this a nutrient-dense snack! Tahini adds healthy fats.
Save This Recipe for Later!
Pin Title: Creamy Pumpkin Hummus | 10-Minute Fall Snack Hit
Pin Description (400+ characters): Whip up the ultimate fall appetizer! This creamy Pumpkin Hummus blends savory chickpeas, spiced pumpkin puree, tahini, and smoked paprika into a protein-packed dip that disappears at parties. Ready in 10 minutes with pantry staples! Perfect with pita chips, apples, or veggies. Includes easy variations (maple-spice, harissa heat!), storage tips, and step-by-step photos. Gluten-free, vegan-friendly, and kid-approved. Your go-to autumn snack for game days, Thanksgiving, and cozy nights. #pumpkinhummus #falldips #healthyappetizers #veganrecipes #easyhummus
SEO Meta Description: Creamy pumpkin hummus recipe! Ready in 10 mins. Vegan, gluten-free fall snack with smoked paprika & cumin. Serves 6. Perfect for parties or meal prep.
“`html
The Cozy Magic of Pumpkin Hummus: Your New Fall Obsession
Hey there, kitchen friends! Olivia here, wrapped in my favorite chunky-knit sweater and sipping cinnamon tea while golden leaves dance outside my window. There’s something about autumn that makes me want to gather, feed people, and create just a little bit of magic with seasonal flavors. And today? We’re turning humble chickpeas and pumpkin into pure dip-able gold.
Picture this: You’re hosting friends for game night. The air smells like woodsmoke and possibility. You set out a bowl of something creamy, speckled with spices, and watch eyebrows lift. “Is that… pumpkin hummus?” someone asks, reaching for a pita chip. Suddenly, it’s the star of the snack table—disappearing faster than the last slice of pie at Thanksgiving. That’s the power of this unexpected twist on classic hummus!
Why does it work? Pumpkin puree adds velvety richness and a subtle sweetness that plays so nicely with earthy cumin and smoky paprika. It’s packed with protein and fiber, but tastes like cozy indulgence. Best part? You whip it up in 10 minutes flat—no fancy skills needed. Whether you’re a meal-prep warrior or a “oops, guests arrive in 20 minutes!” host, this pumpkin hummus is your secret weapon. Ready to make fall snacking unforgettable? Let’s dive in!
The Night the Pumpkin Hummus Vanished
Okay, story time! Two autumns ago, my neighbor hosted her annual “Sweater Weather Potluck.” I wanted to bring something new—something that whispered “fall” but didn’t scream “PUMPKIN SPICE OVERLOAD.” I’d been tinkering with adding roasted squash to hummus, but canned pumpkin? Game changer. I whipped up a batch, drizzled it with olive oil, and scattered toasted pumpkin seeds on top.
I placed it next to a gorgeous charcuterie board… and watched magic happen. Within minutes, a crowd gathered. My friend Mark—who “doesn’t do healthy snacks”—double-dipped. Sarah, our gluten-free friend, cheered when she saw the veggie sticks. And the bowl? Empty before the cider was half gone! The real kicker? My husband, who’d teased me for “hummus experiments,” sheepishly asked for the recipe. That’s when I knew: this wasn’t just a dip. It was a conversation starter, a crowd-pleaser, and my new fall tradition.
Print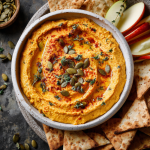
Creamy Pumpkin Hummus
- Total Time: 10 minutes
Description
There’s something about the first hint of fall that makes my kitchen crave warmth and connection. This pumpkin hummus was born on a chilly evening with a can of pumpkin and a curious heart—and now, it’s a fall favorite. Creamy, lightly spiced, and endlessly scoopable, it’s perfect for cozy gatherings or quiet moments with a good book and a warm pita. Trust me—this one-bowl wonder will have everyone asking, “What’s in this?”
Ingredients
-
1 (15 oz) can chickpeas, drained & rinsed
-
¾ cup canned pumpkin purée (not pie filling)
-
¼ cup tahini (well stirred)
-
2 Tbsp olive oil (plus more for drizzling)
-
1 garlic clove
-
2 Tbsp lemon juice (freshly squeezed)
-
1 tsp ground cumin
-
½ tsp smoked paprika
-
½ tsp salt
-
Water, as needed (start with 1 Tbsp)
Optional Toppings:
-
Toasted pumpkin seeds (pepitas)
-
Extra paprika
-
Olive oil drizzle
For Dipping: Pita chips, apple slices, carrot sticks, cucumber rounds
Instructions
-
Prep Chickpeas: Rinse and rub gently with a towel to remove skins for a smoother blend.
-
Blend: In a food processor, combine all ingredients. Blend 1 min, scrape, and repeat. Add water 1 Tbsp at a time until silky.
-
Taste Test: Adjust lemon, cumin, or salt to your liking.
-
Serve: Spoon into a shallow bowl. Swirl the top, drizzle olive oil, and sprinkle toppings.
-
Dip & Enjoy: Serve with fresh dippers. Perfect warm or chilled!
Notes
-
Use a rustic bowl or hollowed mini pumpkin for festive flair.
-
Dip thick? Add water. Too thin? Add a spoon of tahini.
-
Want a twist? Stir in maple, harissa, or roasted garlic.
- Prep Time: 10 mins
Nutrition
- Calories: 150 cal ¼ cup
- Fat: 8g
- Carbohydrates: 16g
- Fiber: 4g
- Protein: 5g
-
Final Thoughts: More Than Just a Dip
Pumpkin hummus isn’t just a recipe—it’s a vibe. It’s the warmth of a shared appetizer at a Friendsgiving, the quiet joy of a solo snack with a book, the secret weapon for last-minute hosts. It bridges the gap between healthy and indulgent, simple and special.
So grab your food processor and lean into autumn’s coziest ritual: spreading, dipping, and savoring the season—one creamy bite at a time.

Crispy Sweet Potato Fries
Crispy Sweet Potato Fries + Fluffy Marshmallow Dip – A Fall Treat You’ll Crave! 🍬
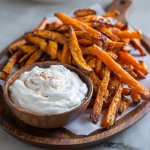
Hey there, kitchen friends! Olivia here, waving from my flour-dusted countertop. Can you feel it? That crisp snap in the air, the leaves blushing crimson, and the undeniable urge to wrap yourself in a chunky sweater? Fall isn’t just a season—it’s a vibe. And nothing captures that cozy magic quite like the sweet, earthy aroma of roasted sweet potatoes mingling with… wait for it… fluffy marshmallow clouds. I know what you’re thinking: “Olivia, are you giving sweet potato casserole a glow-up?” You bet I am! Imagine all those nostalgic flavors—warm spices, caramelized sweetness, pillowy marshmallow—but transformed into crispy, dippable fries with a cloud-like dip you’ll want to eat by the spoonful. No fancy equipment or chef-level skills needed. Just grab your favorite baking sheet, crank up the oven, and let’s turn humble roots and pantry staples into a snack that’ll make your taste buds throw a fall festival. Trust me, one bite of these salty-sweet wonders, and you’ll be hosting “Fry-day” nights all season long!
The Sunday Whim That Started It All
Picture this: It’s a lazy Sunday last October. Rain’s tapping the window, my kids are building a blanket fort, and I’m staring at a mountain of sweet potatoes from our farm box. We’d planned soup for dinner, but honestly? My soul craved comfort with a capital C. Then I spotted a lonely jar of marshmallow fluff in the pantry—leftover from s’mores season—and had a “what if?” moment. What if I roasted those sweet potatoes extra crispy and whipped up a fluffy dip? Cue skeptical looks from my crew (“Mom, fries with marshmallow?”). Twenty minutes later, the smell of cinnamon and paprika had them hovering by the oven. The verdict? My 8-year-old dunked a fry, took one bite, and declared: “This tastes like Thanksgiving… but FUN!” We devoured the whole batch, laughing as sticky fingers reached for more. Now? It’s our official fall kickoff ritual. Every time those first leaves drop, my kids ask, “When are we making the happy fries?” Mission accomplished, friends.
🧁 Your Flavor Toolkit: Ingredients & Why They Shine
Gather these goodies! Each one plays a starring role in our sweet-salty masterpiece. Don’t stress—I’ve got swaps and chef secrets for ya.
- 2 large sweet potatoes (peeled & cut into fries): Pick firm, vibrant-orange ones—they’re sweeter! Chef insight: Cut fries ¼-inch thick for max crispiness. Swap with yams if you prefer a deeper caramelized flavor.
- 2 Tbsp olive oil: Coats those spuds for golden crunch. Sub tip: Avocado oil works great for higher heat, or melted coconut oil for a hint of tropical sweetness.
- ½ tsp cinnamon + ½ tsp smoked paprika + ¼ tsp nutmeg: Our “hug in a spice jar” trio! Smoked paprika adds earthy depth, cinnamon brings warmth, nutmeg ties it all together. Fun twist: Add a pinch of cayenne if you like heat!
- ½ tsp salt: Balances the sweetness. Always use coarse kosher salt—it sticks better!
- 1 cup marshmallow fluff: The dip’s dreamy base. Chef confession: I’ve melted regular marshmallows (1.5 cups) with 1 tsp corn syrup in a pinch!
- 4 oz cream cheese (softened): Makes the dip luxuriously fluffy. Critical tip: SOFTEN IT! Microwave for 15 seconds if needed. For vegan, use dairy-free cream cheese.
- 1 Tbsp maple syrup: Deepens that autumnal sweetness. Sub: Honey or brown rice syrup work too.
- Pinch of salt: Secret weapon! Makes the dip taste richer, not cloying.
👩🍳 Let’s Get Cooking: Crispy Fries & Cloud-Like Dip
Ready? Aprons on, oven preheating—let’s do this! I’ll walk you through each step with my favorite hacks.
- Preheat & Prep: Crank that oven to 425°F (220°C). Chef hack: Place a baking sheet inside while preheating—a hot pan = crispier fries!
- Spud Surgery: Peel potatoes and slice into ¼-inch thick fries. Tip: Keep them uniform so they cook evenly! Soak in cold water for 10 minutes (removes starch for extra crunch), then pat DRY with towels. Wet fries = soggy sadness.
- Spice It Up: In a big bowl, toss dry fries with olive oil, cinnamon, smoked paprika, nutmeg, and salt. Fun trick: Use your hands! Massage those spices in like you’re giving the fries a mini spa treatment.
- Bake to Perfection: Spread fries in a SINGLE layer on the hot baking sheet (no crowding!). Bake 15 minutes. Flip ’em. Bake another 10-15 minutes until edges caramelize. Watch closely: Sweet potatoes go from golden to charred fast! If some are thinner, pull them early.
- Whip the Dip: While fries bake, beat softened cream cheese in a bowl until smooth. Add marshmallow fluff, maple syrup, and salt. Whip 2-3 minutes with a hand mixer until fluffy as a cloud. Chef secret: Chill dip for 10 minutes—it thickens beautifully!
- Serve with Joy: Pile warm fries on a platter. Scoop dip into a bowl. Watch faces light up!
The Science Behind the Crispy Magic
Ever wonder why some sweet potato fries turn out soggy while others achieve that perfect crispy edge? It all comes down to science—and a few chef-approved tricks!
1. The Starch Factor: Sweet potatoes contain more moisture and sugar than regular potatoes, which means they caramelize beautifully but can also steam instead of crisp if not treated right. Soaking the cut fries in cold water for 10 minutes pulls out excess starch, preventing them from sticking together and helping them crisp up in the oven.
2. The Oil Choice: Olive oil is my go-to for its rich flavor, but its smoke point (around 375°F) means it can brown quickly. If you’re nervous about burning, avocado oil (smoke point: 500°F) is a great swap. The oil’s job? Coat each fry evenly so the heat transfers uniformly, creating that golden crunch.
3. The Spice Strategy: Cinnamon and smoked paprika aren’t just for flavor—they play a role in texture too! Sugar in cinnamon promotes caramelization, while paprika’s earthy notes balance the sweetness. A pinch of salt draws out moisture during baking, further aiding crispiness.
4. The Single-Layer Rule: Overcrowding the baking sheet is the #1 reason fries turn limp. When fries are too close, they steam instead of roast. If needed, use two pans or bake in batches. Pro tip: Preheat the baking sheet in the oven—it jumpstarts the crisping process the moment the fries hit the hot surface!
5. The Flip Factor: Flipping halfway ensures even exposure to heat. But resist the urge to fuss with them too early—letting them sit undisturbed for the first 15 minutes allows a crust to form.
Fun experiment? Try tossing a handful of fries in cornstarch (1 tsp per potato) before oil for an extra-crispy coating—it’s a diner-style hack that works wonders!
Marshmallow Dip: From Fluff to Flawless
That cloud-like dip isn’t just melted marshmallows—it’s a carefully crafted balance of textures and flavors. Here’s how to nail it every time:
1. Cream Cheese Matters: The dip’s structure hinges on softened cream cheese. Cold cream cheese = lumpy disaster. To save time, cut it into cubes and let it sit for 30 minutes, or microwave in 5-second bursts (don’t let it melt!). Whipping it alone first ensures silkiness.
2. Marshmallow Science: Marshmallow fluff (or melted marshmallows) is mostly sugar and air. When whipped with cream cheese, it creates a stable, mousse-like texture. If using regular marshmallows, melt them low and slow with a splash of corn syrup to prevent seizing.
3. Salt’s Secret Role: A pinch of salt cuts the sweetness and enhances the marshmallow’s vanilla notes. Think salted caramel vibes! For depth, add a drop of vanilla extract or a sprinkle of cinnamon.
4. The Chill Effect: After mixing, refrigerate the dip for 10 minutes. This lets the cream cheese firm up slightly, making it dippable instead of runny. If it thickens too much post-chill, fold in a teaspoon of milk.
5. Make It Gourmet: Elevate the dip with mix-ins:
-
Browned butter: Drizzle in 1 Tbsp for a nutty richness.
-
Orange zest: Brightens the flavor profile.
-
Toasted coconut: Stir in 2 Tbsp for texture.
Storage tip: The dip keeps for 3 days in the fridge. If it separates, re-whip with a hand mixer.
The Ultimate Pairing Guide: Beyond Fries
This marshmallow dip is too good to limit to sweet potato fries! Here are 5 unexpected ways to enjoy it:
1. Fruit Fondue: Dunk apple slices, pear wedges, or strawberries for a healthy-ish dessert. The dip clings beautifully to fruit’s curves.
2. Pancake/Waffle Topping: Swap syrup for a dollop of dip—it melts luxuriously over warm carbs. Bonus: Sprinkle with candied pecans.
3. Graham Cracker Sandwiches: Spread between crackers for a s’mores-inspired snack. Add a layer of peanut butter for a “Fluffernutter” upgrade.
4. Pretzel Dip: Salty pretzel rods or twists create a killer sweet-salty contrast.
5. Ice Cream Swirl: Fold ½ cup of dip into softened vanilla ice cream, then re-freeze for a marshmallow ripple effect.
Savory Twist: Use the spiced sweet potato fries as a base for loaded nachos—top with black beans, jalapeños, and a drizzle of marshmallow dip mixed with lime juice (trust me, it works!).
✨ Serving Up the Cozy
Presentation matters, friends! I serve these on a rustic wooden board or in a parchment-lined basket for that “harvest feast” feel. Nestle the marshmallow dip in a small mason jar or ramekin right in the center—it’s adorable and functional! Sprinkle fries with extra cinnamon or flaky salt for Instagram-worthy flair. Pair with hot apple cider or pumpkin spice lattes for the ultimate fall moment. Pro tip: Double the dip. Trust me, you’ll want leftovers for apple slices tomorrow!
🔄 Mix It Up: Delicious Twists
Got a craving? Try these fun spins:
- Savory-Spicy Kick: Add ¼ tsp cayenne to fries + mix 2 tsp sriracha into the dip.
- Vegan Delight: Use coconut oil on fries + vegan cream cheese and Dandies marshmallow fluff.
- Maple-Bacon Bliss: Top fries with crumbled crispy bacon + swirl extra maple syrup into the dip.
- Pumpkin Spice Everything: Swap nutmeg for pumpkin spice in fries + add 2 tbsp pumpkin puree to the dip.
- Loaded Fries: Sprinkle baked fries with toasted pecans and dried cranberries—dip optional (but encouraged)!
🍂 Chef Olivia’s Extra Crumb of Wisdom
This recipe? It’s my kitchen happy place. Over the years, I’ve learned a few things: First, patience is key—don’t flip those fries early! Second, my dip used to be lumpy (shh!) until I realized cream cheese MUST be room-temp. Game-changer! Third, this dish sparks joy beyond taste. Last fall, my neighbor brought her grandkids over, and we made a triple batch. Watching those little hands (and big ones!) dunk fries while sharing stories? That’s the real magic. Oh, and pro tip: If your dip feels too thick, add a splash of milk. Too thin? More fluff! Cooking’s an adventure—embrace the sticky fingers.
❓ Your Questions, Answered!
Let’s tackle common hiccups so you succeed on the first try!
- Why aren’t my fries crispy? Three culprits: 1) Overcrowded pan (they steam instead of roast). 2) Skipped the soaking/drying step (starch = sogginess). 3) Oven temp too low—use an oven thermometer! If needed, broil 1-2 minutes at the end.
- Can I use regular potatoes? Absolutely! Russets work, but reduce bake time by 5 mins. They’ll be less sweet, so add an extra pinch of cinnamon.
- Can I make this ahead? Fries: Best fresh! But you can prep/spice them 4 hours ahead (store covered in fridge). Dip: Make it 2 days ahead—it thickens delightfully in the fridge. Just re-whip before serving.
- Help! My dip is lumpy. Cream cheese wasn’t soft enough! Microwave cold cream cheese in 5-second bursts until pliable. Or, press lumps against the bowl with a spatula while mixing.
Crispy Sweet Potato Fries
- Total Time: 35 mins
Description
Born from a rainy day craving and a forgotten jar of marshmallow fluff, these fries are now our official welcome to fall. Sweet, spiced sweet potato fries meet a cloud-like marshmallow-maple dip—think Thanksgiving in finger-food form! Whether for movie night or a cozy family snack, this recipe makes the season taste like home. Grab a baking sheet, turn up the oven, and let’s bring joy to your table—one dunk at a time.
Ingredients
For the Fries:
-
2 large sweet potatoes, peeled & cut into ¼-inch fries
-
2 Tbsp olive oil (or avocado/coconut oil)
-
½ tsp cinnamon
-
½ tsp smoked paprika
-
¼ tsp nutmeg
-
½ tsp kosher salt
For the Dip:
-
1 cup marshmallow fluff (or 1.5 cups mini marshmallows + 1 tsp corn syrup)
-
4 oz cream cheese, softened
-
1 Tbsp maple syrup
-
Pinch of salt
Instructions
-
Preheat oven to 425°F (220°C). Place baking sheet inside to heat.
-
Soak fries in cold water 10 mins, then pat dry—crispiness starts here!
-
Toss fries with oil and spices in a bowl, then spread in a single layer on the hot pan.
-
Bake for 15 mins, flip, and bake 10–15 more mins. Watch the edges for golden crisp!
-
Mix dip: Beat cream cheese until smooth. Add fluff, syrup, salt, and whip till fluffy (2–3 mins). Chill 10 mins if desired.
-
Serve warm fries with chilled dip and big smiles!
Notes
-
Don’t crowd the pan! Fries need space to crisp.
-
Room temp cream cheese = smooth dip.
-
Add toasted pecans or cranberries for a festive crunch.
- Prep Time: 10 mins
- Cook Time: 25 mins
Nutrition
- Calories: 260 calories per serving
- Fat: 12g
- Carbohydrates: 38g
- Fiber: 4g
- Protein: 3g
📊 Nourishment Notes
This treat packs nutrients too! Sweet potatoes deliver vitamin A (hello, glowing skin!), fiber, and antioxidants. Per serving (¼ recipe): ~260 calories, 12g fat (4g saturated), 38g carbs, 4g fiber, 3g protein. Enjoy mindfully—balance is beautiful!
Final Thoughts: Embrace the Playfulness
This recipe isn’t just about flavors—it’s about joy. The first time I served these fries at a fall gathering, a friend skeptically eyed the dip… then proceeded to “accidentally” eat half the bowl with a spoon. That’s the magic of unexpected combos!
Sweet potatoes and marshmallow might seem unconventional, but that’s what makes it memorable. Cooking should be fun, a little daring, and full of “why not?” moments. So whether you’re making these for kids, a party, or a solo treat (no judgment here), lean into the mess, the sticky fingers, and the raised eyebrows that turn into delighted smiles.
📌 Save This Recipe for Later!

Trail Mix Apple Rings
When Crunchy Meets Cheerful: Why These Apple Rings Will Steal Your Heart
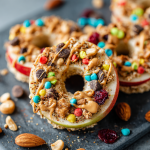
Hey there, kitchen friend! Olivia here, waving from my flour-dusted countertop where something magical is happening. You know that moment when you discover a snack that’s equal parts nostalgic, nutritious, and downright fun? That’s exactly how I feel about these Trail Mix Apple Rings. They’re like edible sunshine—crunchy, colorful, and guaranteed to make you smile mid-bite.
Picture this: crisp apple slices transformed into tiny edible canvases, slathered with velvety peanut butter and crowned with confetti-like trail mix. They’re the snack version of your coziest sweater—comforting yet full of personality! Whether you’re packing lunchboxes, fueling a hiking adventure, or just craving a 3 PM pick-me-up, these rings deliver joy in every bite. And the best part? They come together faster than you can say “second snack please!”
I’ve always believed the best recipes are the ones that spark creativity. These apple rings? They’re a blank slate for your imagination. Raid your pantry, grab those almost-empty trail mix bags, and let’s turn ordinary ingredients into something extraordinary. Trust me—once you see how these jewel-toned bites make eyes light up (whether they belong to kids or grown-up kids!), you’ll be hooked. Ready to make snack time the highlight of your day? Aprons on!
The Backpack Epiphany: How These Rings Became My After-School Hero
Let me take you back to my chaotic kitchen circa 2018. My youngest, Leo, would burst through the door after school like a tornado—backpack flying, shoes abandoned mid-stride, and one urgent question: “What’s for snack?” One rainy Tuesday, faced with near-empty cabinets (why does grocery day always feel lightyears away?), I spotted two lonely apples and a half-eaten bag of trail mix. Desperation birthed inspiration.
I sliced those apples into rings, swiped them with almond butter (we were out of peanut butter—story of my life!), and sprinkled that glorious trail mix confetti over top. Leo’s skeptical eyebrow lift? Priceless. But then—silence. The kind of quiet only achieved when a hangry kid is too busy chewing to complain. “These are like edible LEGOs, Mom!” he declared, already reaching for seconds. That’s when I knew: this wasn’t just a snack hack. It was a tiny edible hug, a crunchy high-five, a way to turn “I’m bored” into “Can I help make more?”
Now, these rings are our edible love language. We’ve made them for bake sales, road trips, even as edible “confetti” for New Year’s Eve. Every bite tastes like that first moment of kitchen triumph—proof that magic happens when we embrace the beautiful mess.
Your Colorful Cast of Characters
Gather these pantry pals—no fancy grocery runs needed! Pro tip: Use what you love and swap freely. Cooking’s like jazz, friends—improvise!
- 2 large apples (any variety!) – Crisp ones like Honeycrisp or Granny Smith hold their shape best. No apples? Pears work in a pinch!
- ¼ cup peanut butter – Creamy hugs the apple best. Allergic? Almond, sunflower, or Wowbutter (soy-based) are fantastic stand-ins.
- ¼ cup trail mix – The confetti! Raid your stash—granola, mini chocolate chips, pumpkin seeds, chopped almonds, even crushed pretzels. Cheat code? Leftover Halloween candy chopped small!
- 1 tbsp lemon juice (optional) – Your anti-browning superhero! Vinegar works too, but lemon adds zing.
Chef’s Whisper: Thicker nut butters? Microwave 10 seconds to spread like velvet. Trail mix too chunky? Give it a rough chop so it sticks!
Let’s Build Some Edible Rainbows!
Ready for the easiest kitchen project ever? No oven, no fancy tools—just crunchy, creamy, chewy joy in 10 minutes flat!
- Core & Slice: Wash those apples! Use an apple corer (or knife) to remove cores. Slice into ¼-inch rings—thinner? They’ll snap. Thicker? Toppings slide off! My hack? Slice vertically from stem end for perfect “O” shapes!
- Fend Off Brown: Optional but smart for meal prep! Brush rings lightly with lemon juice using a pastry brush (or your fingertip). No lemon? Dunk slices in cold saltwater (1 tsp salt per cup) for 2 minutes, then rinse.
- Spread the Love: Warm nut butter slightly if it’s stubborn. Use a butter knife to spread a thin layer on each ring. Pro move: Leave a tiny rim bare—it’s your non-slip grip zone!
- Shower with Confetti: Hold ring over a bowl and sprinkle trail mix generously. Press toppings GENTLY so they stick without smooshing your masterpiece.
- Serve or Stash: Devour immediately (my favorite method!) or layer in an airtight container with parchment between layers. Best eaten within 4 hours—apples weep and toppings soften over time.
Hot Tip: Kids love the “decorate your own ring” station! Set out small bowls of toppings and let them go wild.
The Science of Snack Satisfaction: Why This Combo Works
Have you ever wondered why certain foods just feel right? There’s actual science behind why these Trail Mix Apple Rings hit all the right notes. Let’s break it down like a food psychologist with a clipboard (but way more fun).
Texture Symphony:
The magic starts with contrast. Crisp apple rings provide a sturdy base, while creamy nut butter adds lushness—like a crunchy-meets-silky duet. Then comes the trail mix: chewy dried fruit, crunchy nuts, and maybe even a chocolatey surprise. This trio triggers what food scientists call dynamic contrast, keeping your brain engaged with every bite. It’s the same principle behind trail mix’s addictiveness, but the apple base adds hydration and freshness, balancing out denser ingredients.
Flavor Layers:
Apples bring natural sweetness and acidity (especially Granny Smiths), which cut through the richness of nut butter. The trail mix? A flavor fireworks show! Salty, sweet, and umami notes mingle, creating what chefs call flavor bounce. Pro tip: Add a pinch of flaky salt on top to amplify every layer.
The Psychology of Play:
Foods we can interact with—like decorating these rings or eating them finger-first—trigger dopamine hits. A study in Food Quality and Preference found that playful presentation increases perceived tastiness (take that, sad desk salads!). Kids aren’t the only ones who eat with their eyes; adults are 43% more likely to enjoy snacks that look vibrant, per Cornell research.
Nutritional Synergy:
This isn’t just tasty—it’s a smart fuel combo. Apples offer fiber and vitamin C, nut butter provides protein and healthy fats, and trail mix adds minerals like magnesium (hello, energy boost!). The fiber-fat-protein trio stabilizes blood sugar, making these rings a smarter pick than, say, a granola bar with hidden sugars.
Pro Hack: For extra staying power, add a sprinkle of chia seeds to the nut butter. They’ll absorb moisture and create a gel-like layer that keeps toppings glued on!
From Lunchboxes to Party Platters: 5 Unexpected Ways to Serve These Rings
Who says snacks can’t be shape-shifters? Here’s how to spin this recipe for any occasion:
1. The “Snackle Box” Upgrade:
Borrow the fishing tackle box trend! In a bento box, arrange apple rings alongside cubes of cheese, olives, and whole-grain crackers. The sweet-salty balance makes it picnic-perfect. Bonus: The apples’ acidity prevents cheese from tasting overly rich.
2. Edible Game Pieces:
Game night just got tastier. Use mini cookie cutters to turn apples into stars or hearts, then decorate with team-colored toppings (e.g., dried blueberries for “Team Blue”). Players nibble their pieces after each turn—Monopoly has never been this deliciously cutthroat.
3. Salad’s Fun Cousin:
Crumbled apple rings transform salads! Toss arugula with vinaigrette, then top with crumbled rings (like apple “croutons”), goat cheese, and candied pecans. The textures? Chef’s kiss.
4. Dessert Charcuterie:
Swap the nut butter for mascarpone mixed with honey, then top with crushed amaretti cookies and dark chocolate shavings. Serve alongside wine for a “grown-up” platter that’ll upstage cheesecake.
5. Breakfast Sundaes:
Layer Greek yogurt, apple rings, and granola in a parfait glass. Drizzle with maple syrup and pretend you’re at a brunch buffet. Pro tip: Freeze rings for 10 minutes first—they’ll stay crunchier!
Storage Twist: For parties, prep toppings and nut butter separately. Let guests DIY their rings—interactive and no soggy apples!
The Global Apple Ring: 3 International Twists
Why stop at trail mix? Let’s globe-trot with flavors:
1. Japanese Matcha Moment:
Mix white chocolate and matcha powder into nut butter for a vibrant green base. Top with puffed rice, black sesame seeds, and diced dried persimmons. It’s like a Kyoto tea garden in snack form.
2. Mexican Fiesta:
Swap peanut butter for spiced tahini (cinnamon + cayenne), then top with pepitas, tajín, and crumbled chorizo (or soyrizo for vegans). Sweet, spicy, and tan sabroso.
3. Italian Dolce Vita:
Almond butter + chopped figs + rosemary-infused honey + shaved Parmesan. Bellissimo! Pair with espresso for an afternoon merenda (Italian snack time).
Cultural Note: In Sweden, apple slices with cinnamon are a classic (äppelknyckar). In South India, fruit with chaat masala is ubiquitous. This recipe’s adaptability proves snacks are a universal love language!
Making Snack Time a Celebration
Presentation is half the fun! Stack these rings like mini towers on a vibrant plate. Pack lunchboxes by nestling them in silicone cupcake liners—they’ll stay put and look like edible jewels! For parties, arrange them on a wooden board with toothpicks. Pair with Greek yogurt for dipping, or alongside cheese cubes for balance. Watching them disappear? That’s your standing ovation!
Make It Uniquely Yours!
This recipe is your playground! Try these twists:
- Tropical Vibes: Sunflower butter + dried pineapple/mango + coconut flakes + macadamia bits
- Birthcake Mode: Cream cheese + sprinkles + crushed graham crackers (yes, really!)
- Savory Surprise: Hummus + everything bagel seasoning + sunflower seeds
- Nut-Free Fiesta: Tahini or cookie butter + chia seeds + cacao nibs + dried cherries
- Pumpkin Spice: Almond butter + pepitas + cinnamon + chopped crystallized ginger
Confessions from My Messy Apron Pocket
Okay, real talk: The first time I made these, I got overzealous with the peanut butter. Picture this: apple rings sliding off the plate like tipsy little UFOs! Lesson learned: thin layer = happy toppings. Over the years, we’ve turned this into a “clean out the pantry” ritual—those three almonds and last pretzels? They’re stars now! My favorite evolution? Using mini cookie cutters on apples for hearts/stars. Extra effort? Yes. Extra squeals from kids? Absolutely worth it.
Funny story: I once brought these to a potluck labeled “grown-up snacks.” Imagine my surprise when they vanished before the artichoke dip! Moral? Never underestimate the power of playful food. Life’s too short for boring snacks!
Your Questions, My Answers!
Q: Help! My apple rings turned brown!
A: Oxygen is the culprit! Lemon juice is your BFF. If prepping ahead, store UNTOPPED rings in cold water with 1 tbsp lemon juice for up to 4 hours. Drain and pat dry before decorating.
Q: Toppings won’t stick! What’s the trick?
A: Two things: 1) Nut butter must be spreadable—warm it! 2) Press toppings gently right after spreading so they “melt” into the butter. Too thick? Sprinkle, then flip ring upside-down onto plate to “set.”
Q: Can I make these gluten-free/vegan?
A> Easily! Use certified GF oats/nuts in trail mix. Vegan? Skip honey-coated ingredients or dairy chocolate chips—dark chocolate or cacao nibs work beautifully!
Q: Best apples for crunch that lasts?
A> Granny Smith, Honeycrisp, or Pink Lady hold up best. Avoid mealy ones like Red Delicious—they weep!
Trail Mix Apple Rings
- Total Time: 10 minutes
Description
When Crunchy Meets Cheerful – The Snack That Smiles Back!
One rainy afternoon, with only two apples and a handful of trail mix, I made a snack that’s now our family favorite. These colorful apple rings are like edible hugs—nutty, fruity, crunchy, and joyfully simple. Whether for after-school smiles or midday pick-me-ups, they’re ready in minutes and make snack time feel like playtime. Let’s make magic from pantry bits—because the best bites come from creativity!
Ingredients
-
2 large apples (Honeycrisp or Granny Smith work best)
-
¼ cup peanut butter (or almond, sunflower, or soy butter)
-
¼ cup trail mix (your mix, your rules!)
-
1 tbsp lemon juice (optional, prevents browning)
Instructions
-
Core & Slice apples into ¼-inch rings.
-
Brush with lemon juice to keep them fresh-looking.
-
Warm nut butter slightly and spread thinly on each ring.
-
Sprinkle trail mix and gently press so it sticks.
-
Serve immediately or store in layers with parchment—best within 4 hours.
Notes
-
Too chunky? Rough chop your trail mix.
-
Let kids decorate their own—fun and fuss-free!
-
Cookie cutters = apple hearts for extra smiles!
- Prep Time: 10 minutes
Nutrition
- Calories: 140per serving
- Sugar: 10g
- Fiber: 3g
- Protein: 4g
Nourishment Notes (Because Curiosity is Delicious!)
Per serving (2 rings): Calories: 140 | Protein: 4g | Fiber: 3g | Sugar: 10g (natural from apples). Packed with healthy fats from nuts/seeds and complex carbs for sustained energy. Naturally nut-free/vegan options work beautifully!
Final Thoughts: More Than Just a Snack
These Trail Mix Apple Rings aren’t just about filling tummies—they’re edible joy, a reminder that cooking can be whimsical and nourishing. Whether you’re a parent sneaking veggies into picky eaters (try hiding spinach puree in the nut butter!) or an office worker dodging the vending machine, this recipe celebrates imperfection. So what if your rings aren’t Instagram-perfect? Lopsided toppings taste just as good.
As food writer M.F.K. Fisher once said, “First we eat, then we do everything else.” Let these apple rings be your delicious pause button in a chaotic world—one crunchy, cheerful bite at a time.

High-Protein Romesco Salad
Welcome to My Flavor-Packed World!
Hey there, fellow flavor adventurer! Olivia Bennett here, and I’m practically buzzing with excitement to share today’s recipe. You know that feeling when you discover a dish that’s *so* deliciously satisfying, yet so vibrantly healthy, it feels like a secret superpower? That’s exactly what this High-Protein Romesco Salad is all about. If you’ve ever thought “healthy eating” meant bland salads or sacrificing joy at the dinner table, prepare for a delicious revolution!
Picture this: creamy butter beans doing a happy dance with crisp, lemony zucchini, all wrapped in a smoky, velvety romesco-inspired sauce that’s secretly packed with protein power. We’re talking tofu and almonds joining forces with roasted peppers and sun-dried tomatoes for a flavor explosion that’ll make your taste buds sing. This isn’t just a salad; it’s a bold, plant-powered meal that’ll leave you energized and utterly smitten. Perfect for busy weeknights, sunny picnics, or when you need a vibrant lunch that actually keeps you full. Best part? It whips up in 15 minutes flat – zero cooking required. Grab your favorite bowl and let’s make magic happen together!
The Barcelona Market That Sparked It All
This recipe? Oh, it’s got a little piece of my heart woven right in. Years ago, I got gloriously lost in Barcelona’s La Boqueria market. The air hummed with the scent of garlic, ripe tomatoes, and smoky pimentón. I stumbled upon a tiny stall where a woman with flour-dusted hands served warm bread slathered thickly with romesco sauce – a Catalan classic made from nuts, peppers, and fire. One bite, and I was hooked. That deep, smoky-sweet tang was pure magic!
Fast forward to last summer: I was craving that Barcelona vibe but needed something lighter and protein-packed for post-yoga lunches. My fridge held zucchini, butter beans, and a block of tofu. The memory of that romesco sparked! I blended tofu into the sauce for creaminess and protein, tossed it with lemony zucchini and beans, and boom – this vibrant, powerhouse salad was born. It’s my sunny, Spanish-market daydream transformed into a quick, nourishing reality. Every bite still takes me back to that bustling market stall!
Your Flavor Toolkit: Ingredients & Smart Swaps
Gather these beauties! Don’t stress if you need to swap – cooking is an adventure.
For the Zesty Salad Base:
- 3 small zucchinis, thinly sliced: Look for firm, glossy skin. Chef’s Tip: Use a mandoline (carefully!) or sharp knife for paper-thin slices. They “cook” in the lemon! Swap: Cucumbers or shaved asparagus.
- Juice & zest of 1.5 lemons (~¼ cup juice): Zest FIRST before juicing! This brightens everything. Insight: Meyer lemons add sweeter notes if you have them.
- 1 garlic clove, minced: Fresh is key! Grate it on a microplane for no chunks. Swap: ½ tsp garlic powder in a pinch.
- Salt & pepper to taste: Start with ¼ tsp salt; you can add more later. Freshly cracked pepper adds punch!
- 1½ cups cooked butter beans: Creamy and protein-rich! Rinse canned beans well. Swap: Cannellini beans or chickpeas work great.
- 20g plant-based feta, crumbled: Adds salty tang. Brands like Violife or Follow Your Heart are fab. Swap: Regular feta if not vegan, or omit for nut-free.
- 1½ tbsp toasted pine nuts: Toasting is non-negotiable! It unlocks their buttery magic. Swap: Toasted slivered almonds or sunflower seeds.
- 1 handful fresh basil, chopped: Tear, don’t chop, to avoid bruising. Adds sweet freshness. Swap: Fresh parsley or mint.
For the Protein-Packed Romesco Sauce:
- 2 jarred roasted red bell peppers: The smoky soul! Drain well. Chef’s Hack: Save the marinade juice – we use it!
- 2 tbsp sun-dried tomatoes (oil-packed): Intensifies the umami. Include a bit of their oil for richness.
- 150g extra firm tofu, pressed & cubed: Protein Powerhouse! Pressing removes water for a thicker sauce. Essential Step! Swap: Silken tofu for silkier texture (reduce water).
- ¼ cup almonds: Raw or toasted. Adds body and healthy fats. Swap: Walnuts or pepitas.
- ½ tbsp olive oil: Extra virgin for best flavor. Insight: Use the oil from the sun-dried tomatoes jar!
- 1 tsp smoked paprika (sweet or hot): The “smoky” key! Use sweet for warmth, hot for a kick.
- Juice from the pepper marinade (~1-2 tbsp): Free flavor gold! Adds tangy depth.
- Salt & pepper to taste: Blend first, then taste and season. Smoked paprika can be salty!
Let’s Build Flavor: Simple Steps & Pro Hacks
Ready? This comes together faster than you can say “¡Olé!”
- Blitz the Dreamy Romesco Sauce: “Dump all sauce ingredients into your blender or food processor. Blend until super smooth, scraping down sides as needed. Chef’s Commentary: “Don’t rush this! Let it blend for a good minute – we want silky, not gritty. If it’s too thick, add water 1 tbsp at a time. It should coat the back of a spoon thickly but pourably. Hack: Taste NOW! Adjust salt, pepper, or paprika. Want more tang? Add a splash of the reserved pepper juice or lemon juice. Set this gorgeousness aside.”
- Wake Up the Zucchini: “In a large mixing bowl, combine the thinly sliced zucchini, lemon juice, lemon zest, minced garlic, salt, and pepper. Now, get hands-on! Massage it gently for about 30 seconds. Why massage? The acid softens the zucchini slightly, making it tender-crisp and infusing it with bright flavor. It’s like a quick pickle! Let it sit for 10 minutes. Pro Tip: This is the perfect time to toast your pine nuts in a dry pan over medium-low heat until golden (watch them like a hawk – they burn fast!).”
- Bring the Party Together: “After 10 minutes, your zucchini will look brighter and slightly softened. Add the butter beans, crumbled plant-based feta, toasted pine nuts, and chopped basil right into the bowl with the zucchini. Chef’s Insight: “Be gentle with the beans and feta – we want them to stay mostly intact for texture contrast!””
- Dress to Impress: “Pour that luscious romesco sauce over the salad components. Now, the fun part: Toss! Use a large spoon or clean hands to fold everything together gently until it’s beautifully coated. Hack Alert: “Start with ¾ of the sauce, toss, then add more if you like it saucier. Some folks love it drenched, others prefer it lightly dressed – you do you!””
- Serve Your Masterpiece: “You can absolutely dig in right now for a fresh, zingy experience. But here’s a secret: “If you can resist, pop it covered in the fridge for 30-60 minutes. The flavors get cozy, the sauce permeates everything, and it becomes even more magical. It’s worth the wait!””
Plating Up the Sunshine
Presentation is the final flourish! For a casual meal, spoon generous portions into deep bowls. Craving elegance? Pack the salad lightly into a wide-rimmed bowl or plate it flat. Scatter extra crumbled feta, pine nuts, a few whole basil leaves, and maybe a twist of black pepper on top. A final drizzle of extra virgin olive oil or a tiny squeeze of lemon adds gloss. This salad shines solo as a hearty main, but it’s also fantastic alongside grilled crusty bread for scooping up every last bit of sauce, or with a simple green salad. Serve it chilled or cool – it’s sunshine on a plate!
Make It Your Own: Tasty Twists
This salad is a canvas! Try these spins:
- Mediterranean Mezze: Add ¼ cup chopped Kalamata olives and 2 tbsp chopped artichoke hearts.
- Spicy Fiesta: Blend ½ a chipotle pepper in adobo into the sauce and add ½ cup roasted corn kernels to the salad.
- Herb Garden Delight: Swap basil for equal parts fresh dill and mint – so refreshing!
- Nut-Free & Soy-Free: Replace tofu with ½ cup cooked white beans in the sauce. Swap pine nuts for toasted sunflower seeds. Use sunflower-based “feta” or omit.
- Roasted Veg Boost: Toss in ½ cup cooled roasted eggplant or cherry tomatoes for deeper flavor.
Olivia’s Kitchen Confessions & Evolution
Okay, real talk? The first time I tried blending tofu into romesco, my skeptical partner raised an eyebrow. “Tofu? In *romesco*?” One bite later, silence… then a request for seconds! It’s become our warm-weather staple. Over time, I’ve learned pressing the tofu REALLY well is non-negotiable for thickness, and massaging the zucchini makes a HUGE difference – don’t skip it! This recipe is forgiving. Too much garlic? Add a touch more lemon. Sauce too thick? Splash in water or marinade juice. It’s evolved from a fridge-cleanout experiment into a blog reader favorite because it’s fast, flexible, and punches WAY above its weight in flavor. Pro confession: I’ve been known to eat the leftover sauce straight from the blender with a spoon… it’s THAT good.
Your Questions, Answered!
Let’s tackle some common kitchen hiccups:
- Q: My sauce is grainy! What did I do wrong?
A: Don’t panic! Two culprits: 1) The almonds weren’t blended long enough. Keep blending! High-powered blenders work best. 2) The tofu wasn’t pressed well. Excess water can cause separation. Fix it: Blend longer! If it’s still grainy, strain it through a fine-mesh sieve (a bit messy, but effective). Next time, blend the almonds alone first into a coarse meal before adding other sauce ingredients. - Q: Can I make this ahead? How long does it keep?
A: Absolutely! The sauce can be made 2-3 days ahead and stored airtight in the fridge. Prep the zucchini/lemon mix (step 2) up to 4 hours ahead. Combine everything (steps 3 & 4) up to 1 day ahead. The flavors meld beautifully! Store covered in the fridge. It’s best within 2 days, as the zucchini softens. - Q: My salad seems watery after sitting. Help!
A: This usually means the zucchini released more liquid or the tofu wasn’t pressed enough. Prevention: Press tofu thoroughly! Slice zucchini thin and don’t skip the massaging/resting step – it draws out some liquid. Solution: Drain any excess liquid pooling at the bottom before serving. Stirring in an extra spoonful of sauce or nuts can also help absorb moisture. - Q: I can’t find plant-based feta. What now?
A: No stress! Options: 1) Use regular feta if dairy is okay. 2) Swap in 2 tbsp nutritional yeast for a cheesy, umami boost. 3) Add 2 tbsp capers for salty tang. 4) Simply omit it! The beans and sauce are plenty flavorful.
High-Protein Romesco Salad
Description
Inspired by Barcelona’s vibrant markets, this salad blends creamy butter beans and tender zucchini with a smoky, protein-packed romesco sauce made from roasted peppers, sun-dried tomatoes, tofu, and almonds. It’s fresh, filling, and perfect for any occasion—from quick lunches to picnic star moments.
Ingredients
Romesco Sauce
-
2 jarred roasted red peppers (drained; save 1–2 tbsp of the marinade)
-
2 tbsp oil-packed sun-dried tomatoes (include a bit of oil)
-
150 g extra-firm tofu (pressed & cubed)
-
¼ cup almonds (raw or toasted)
-
½ tbsp olive oil (or use sun-dried tomato oil)
-
1 tsp smoked paprika (sweet or hot)
-
Lemon juice or pepper marinade to loosen sauce
-
Salt & pepper, to taste
Salad Base
-
3 small zucchinis, thinly sliced
-
Juice & zest of 1½ lemons (~¼ cup juice)
-
1 garlic clove, minced
-
Salt & pepper, to taste
-
1½ cups cooked butter beans (rinsed)
-
20 g plant-based feta (crumbled)
-
1½ tbsp toasted pine nuts
-
Handful fresh basil, chopped
Instructions
1. Make the Romesco Sauce
Blend all sauce ingredients until smooth—about 1 minute—adding water or marinade juice until it coats a spoon but still pours. Taste and adjust seasoning or tang as desired.
2. Prep the Zucchini
In a large bowl, mix zucchini, lemon juice, zest, garlic, salt, and pepper. Massage gently for 30 seconds, then let sit 10 minutes. Meanwhile, toast pine nuts until golden and fragrant.
3. Assemble the Salad
Add butter beans, crumbled feta, pine nuts, and basil to the zucchini bowl—handle beans and feta gently for texture.
4. Dress and Toss
Pour in the romesco sauce—start with about ¾ and add more as you like. Toss gently until everything is beautifully coated.
5. Serve or Chill
Enjoy fresh or let it rest in the fridge 30–60 minutes for deeper, melded flavors. Serve alone or with crusty bread.
Notes
-
Press tofu thoroughly for a rich sauce texture—water ruins thickness.
-
Grate zucchini finely or thinly for optimal texture and flavor infusion.
-
Mash and press marinade juice into the sauce for a bright boost.
Nutrition
- Calories: 400per serving
- Fat: 18 g
- Carbohydrates: 45 g
- Fiber: 12 g
- Protein: 20 g
Nourishing Bites (Approximate per serving)
This salad packs a nutritional punch! Based on 3 servings: ~400 calories, 20g protein, 45g carbs (12g fiber!), 18g fat (mostly healthy fats from almonds, pine nuts, olive oil). Rich in Vitamins C & A (thanks to peppers and lemon), iron (beans, tofu), and calcium (tofu, fortified feta). A balanced, energizing plant-based meal!
Final Thoughts
This High-Protein Romesco Salad is more than a recipe—it’s a celebration of how vibrant, protein-packed eating can (and should!) be. Whether you’re vegan, gluten-free, or just craving a burst of Mediterranean sunshine, this dish adapts to your needs without compromising flavor.
So here’s to meals that nourish and excite, to kitchen experiments that turn into staples, and to that glorious moment when you realize—healthy eating never tasted so good. Now, go forth and romesco
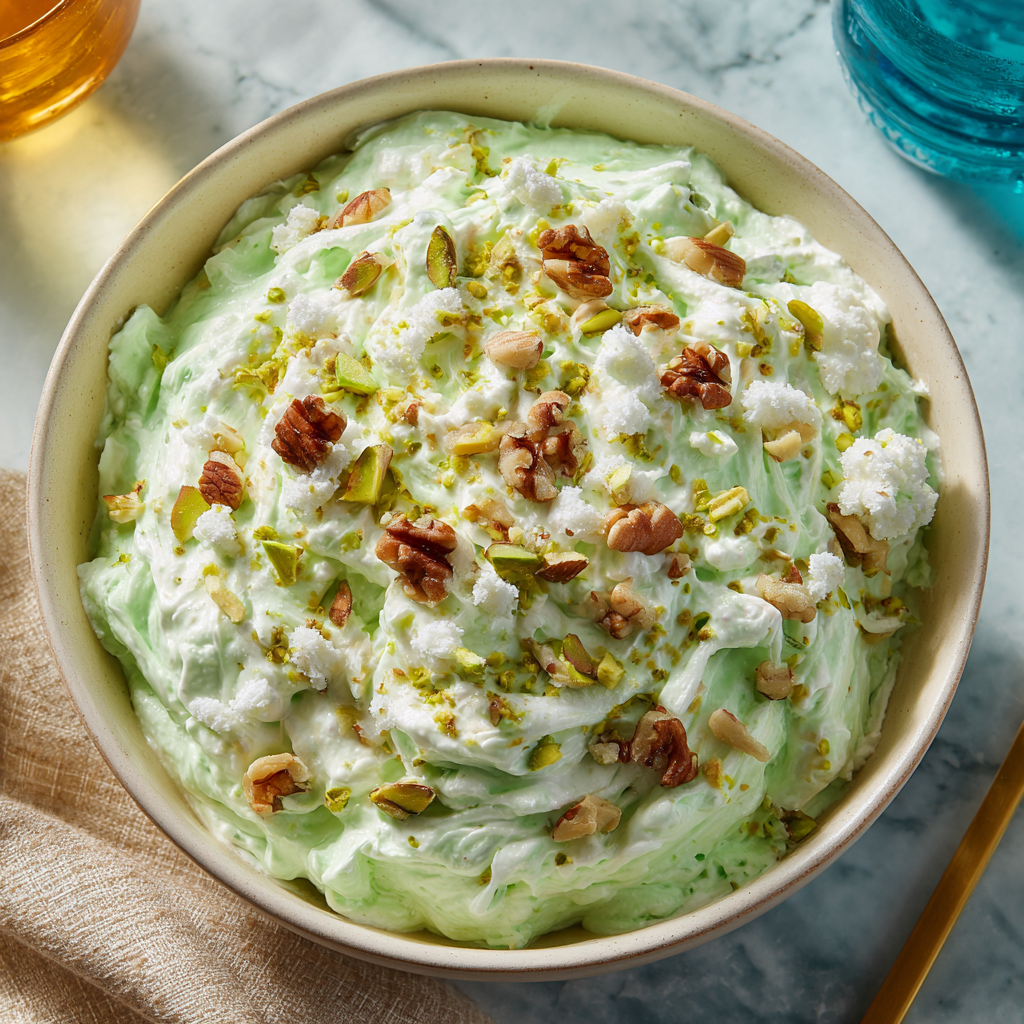
Watergate Salad
Welcome to My Cozy Kitchen, Foodie Friends!
Hey there, lovely people! Olivia here, apron slightly dusted with powdered sugar and heart full of excitement. If you’ve ever found yourself grinning at the first whiff of baking cookies or felt that warm rush of joy when someone moans over your cooking, pull up a stool – you’re my kind of tribe. Today, we’re diving fork-first into a retro legend that’s like a edible time machine: Watergate Salad. This fluffy, pistachio-green wonder isn’t just a dessert (or salad, depending on who you ask!). It’s a cloud of nostalgia that’ll transport you straight to grandma’s holiday table or sun-drenched summer potlucks. No fancy techniques needed – just five simple ingredients that do a magical jig in your bowl. Whether you’re a kitchen newbie or a seasoned stirrer, this recipe is your ticket to becoming the MVP of any gathering. Ready to whip up some sweet memories? Let’s get mixing!
My First Taste of Magic
Picture this: It’s 1997. I’m eight years old, feet dangling from a folding chair at my Aunt Margie’s Fourth of July barbecue. The air smells like charcoal and sunscreen. Amidst the sea of potato salads and deviled eggs, there’s this glowing green UFO of a dish that has kid-me utterly mesmerized. When Aunt Margie plopped a scoop onto my plate, I eyed it suspiciously. Marshmallows? In salad? But one bite – oh, that cool, creamy sweetness with little chewy pillows and nutty crunch – and I was hooked. I spent the whole party “helping” by sneaking extra spoonfuls when the adults weren’t looking. Years later, when I made it myself for a friend’s baby shower, I finally understood its superpower: that first spoonful makes everyone’s eyes light up like sparklers. It’s not just food; it’s a happiness generator.
Your Treasure Map to Fluffy Bliss
Gather these simple stars – they’ll do all the heavy lifting!
- 1 (3.4 oz) package instant pistachio pudding mix: The MVP! This gives the salad its signature flavor and dreamy texture. Chef’s hack: If you can’t find pistachio, vanilla or lemon pudding work surprisingly well (add ¼ tsp almond extract for a nutty vibe).
- 1 (8 oz) can crushed pineapple, WITH juice: Non-negotiable! The juice hydrates the pudding mix. Sub tip: Use tidbits if you prefer chunkier bites, but never fresh pineapple – its enzymes break down dairy.
- 1 cup miniature marshmallows: The fun factor! They melt slightly into pillowy clouds. Insight: Toss them in 1 tsp cornstarch first to prevent sinking.
- ½ cup chopped walnuts: For earthy crunch. Allergy-friendly swap: Pecans, toasted coconut, or even sunflower seeds.
- 4 oz frozen whipped topping (like Cool Whip), thawed: The fluff-maker! Pro move: For richer texture, fold in ½ cup freshly whipped cream.
Why these work: The pudding sets the base, pineapple adds tangy moisture, marshmallows bring playful chew, walnuts ground it, and whipped topping makes it ethereal. It’s science – delicious science!
Let’s Make Some Magic: Step-by-Step
Ready? Channel your inner kitchen wizard with me!
- Unite the Base Buddies: In a large bowl, dump in the pistachio pudding mix and the ENTIRE can of pineapple (juice included!). Grab a spatula and stir gently but thoroughly for 1 minute. Watch the magic: It’ll thicken into a glossy, jade-green paste. Don’t rush – we want zero dry pockets!
- Fold in the Fun Stuff: Add marshmallows and walnuts. Now, scoop in your thawed whipped topping. Here’s the critical step: Use a folding motion (cut through the center, sweep around the edges) until JUST combined. Why? Overmixing deflates the fluff! Think “gentle clouds,” not “cement mixer.”
- The Patience Payoff: Cover the bowl with cling film (press it right onto the salad surface to prevent drying). Chill for at least 1 hour, but 2-3 is golden. Secret weapon: This rest lets the marshmallows soften into gooey pockets and flavors marry like old friends.
- Fluff & Serve: Right before serving, give it one gentle fold to redistribute goodies. Taste (chef’s privilege!) – need more sweetness? A drizzle of honey. More crunch? Extra nuts on top.
Hot tip: Use a metal bowl chilled in the freezer for 10 minutes first – it keeps everything extra cool and fluffy!
Watergate Salad: The Story Behind the Scandalously Good Dish
Before we dive deeper into this retro classic, let’s settle the biggest mystery—why is it called Watergate Salad?
The Name Game: A Delicious Mystery
This fluffy green dessert salad first appeared in the 1970s, around the same time as the infamous Watergate scandal. But the connection? That’s where things get fuzzy.
-
Theory #1: The Hotel Connection
Some say it was created at the Watergate Hotel in Washington, D.C., where the political scandal unfolded. But there’s no solid proof—just a fun coincidence. -
Theory #2: “Covered in Nuts”
Others joke that the salad is “covered in nuts,” just like the Watergate scandal was “covered up.” (Groan-worthy pun? Absolutely. But it stuck!) -
Theory #3: Pistachio Pudding’s Rise
The 1970s saw instant pistachio pudding mix hit grocery stores, and this recipe capitalized on its novelty. The green hue made it stand out at potlucks—just like the scandal dominated headlines.
Whatever the truth, the name adds to its quirky charm. Now, let’s make it!
The Perfect Watergate Salad: Pro Tips & Troubleshooting
Why This Recipe Works (Every Time!)
-
Instant Pudding Mix is Key – Unlike cook-and-serve pudding, instant sets quickly with just liquid (here, pineapple juice!). No waiting, no fuss.
-
Undrained Pineapple = Moisture Magic – The juice hydrates the pudding mix, creating a creamy base. Never drain it!
-
Mini Marshmallows > Big Ones – They soften just enough without turning into glue. Pro move: Freeze them for 10 minutes before mixing to prevent melting.
-
Fold, Don’t Stir! – Overmixing deflates the fluff. Gentle folds keep it airy.
Common Mistakes (And How to Fix Them!)
🚫 Problem: Runny salad
✅ Fix: Did you drain the pineapple? Oops! Thicken it by folding in 1-2 tbsp instant vanilla pudding mix.
🚫 Problem: Marshmallows vanished!
✅ Fix: They melt into gooey pockets (which some love!). For distinct shapes, add them last before chilling.
🚫 Problem: Too sweet!
✅ Fix: Use sugar-free pudding mix or add a squeeze of lemon juice to balance it.
🚫 Problem: Nuts got soggy
✅ Fix: Toast walnuts first for extra crunch, and fold them in right before serving.
Make-Ahead Magic
This salad gets better with time! Make it 1-2 days ahead, but hold back some marshmallows and nuts to sprinkle on top before serving.
Beyond the Bowl: Creative Ways to Serve Watergate Salad
Why stop at a scoop? Here are 5 fun ways to reinvent this retro classic:
1. Watergate Salad Parfaits
Layer it in glasses with crushed graham crackers and whipped cream for a trifle-like treat.
2. Frozen Watergate Pops
Blend with an extra ½ cup whipped topping, pour into popsicle molds, and freeze. Creamy, dreamy, and kid-approved!
3. Watergate Salad-Stuffed French Toast
Spread between thick brioche slices, dip in egg batter, and griddle for a next-level brunch.
4. Pistachio Salad Ice Cream
Churn with vanilla ice cream base for a no-churn dessert. Add extra marshmallows and nuts at the end.
5. Watergate Salad Dip
Serve with vanilla wafers, pretzels, or apple slices for a sweet-and-salty snack.
Dishing Up the Nostalgia
Presentation is part of the fun! Scoop into a vintage glass trifle bowl to show off those layers, or for a cute individual touch, use mason jars. Garnish with a sprinkle of chopped pistachios or walnuts, a few extra mini marshmallows, and a maraschino cherry on top for retro flair. Serve it COLD – the chill makes the texture sublime. Pairs beautifully with grilled meats (it cuts through richness) or as a light dessert after heavy mains. Pro tip: Set it on a bed of crushed ice during summer parties!
Make It Your Own: 5 Delicious Twists
This salad is a canvas! Try these riffs:
- Tropical Escape: Swap walnuts for toasted coconut + add ½ cup diced mango.
- Berry Blast: Fold in 1 cup fresh raspberries (gently!) after chilling + use white chocolate pudding.
- Nut-Free & Dreamy: Skip walnuts, use pumpkin seeds + add 2 tbsp chia seeds for texture.
- Adults-Only Indulgence: Soak marshmallows in 2 tbsp rum or amaretto first!
- Lighter Breeze: Sugar-free pudding mix + light whipped topping + ¼ cup Greek yogurt.
Olivia’s Extra Pinch of Love
This recipe is my kitchen time traveler! Over the years, I’ve learned a few things: The original 1970s version sometimes included cottage cheese (too lumpy for me, hard pass). And the name “Watergate Salad”? Theories abound – some say it was invented at the D.C. hotel, others joke it’s because it’s “covered in nuts” like the scandal! My evolution? I started adding a whisper of lemon zest to brighten it. Funny story: Once, I accidentally used lime pudding – my book club dubbed it “Swamp Salad” and devoured it anyway! Moral: Don’t stress perfection. This dish is about joy, not precision.
Your Questions, Solved!
Let’s tackle those kitchen hiccups:
Q: Can I make this ahead?
A: Absolutely! It’s better on day 2. Make up to 48 hours ahead; just add extra nuts/marshmallows before serving as they soften.
Q: Why is my salad runny?
A: Three culprits: 1) You drained the pineapple (don’t!), 2) Didn’t chill long enough (minimum 1 hour!), 3) Overmixed the whipped topping. Fix: Fold in 2 tbsp instant vanilla pudding powder to thicken.
Q: Can I use fresh whipped cream instead?
A: Yes, but stabilize it! Whip 1 cup cream + 2 tbsp powdered sugar + 1 tsp vanilla until stiff peaks. Fold in gently. Note: It’ll be richer but deflate faster – serve within 4 hours.
Q: Help! My marshmallows disappeared!
A: They melt into gooey pockets (which is lovely!). For distinct shapes, fold them in LAST, right before chilling, and use starch-coated mallows.

Watergate Salad
- Total Time: 5 minutes
Description
Cool, Creamy, and Unapologetically Green
This fluffy, pistachio-hued dessert-salad hybrid is the ultimate throwback treat. With just five simple ingredients and a chill in the fridge, you’ll serve up a bowl of pure joy that bridges potlucks and holiday tables with every spoonful.
Ingredients
-
1 (3.4 oz) box instant pistachio pudding mix
-
1 (8 oz) can crushed pineapple with juice
-
1 cup miniature marshmallows
-
½ cup chopped walnuts (or pecans/coconut)
-
4 oz frozen whipped topping (like Cool Whip), thawed
Instructions
-
In a large bowl, stir pudding mix and undrained pineapple until smooth and thick.
-
Fold in marshmallows and walnuts.
-
Gently fold in whipped topping until just combined—do not overmix!
-
Cover and chill for at least 1 hour (2-3 hours preferred).
-
Stir before serving and garnish with extra nuts or a cherry on top.
Notes
-
Chill a metal bowl before mixing for extra fluff.
-
For distinct marshmallows, fold them in right before chilling.
-
Add-ins like shredded coconut, lemon zest, or diced fruit = flavor upgrade!
- Prep Time: 5 mins
Nutrition
- Calories: 190 per serving
- Sugar: 19g
- Sodium: 160mg
- Fat: 8g
- Carbohydrates: 27g
- Protein: 2g
Nutritional Snapshot (Per Serving)
Prep Time: 5 min | Chill Time: 1 hour | Serves: 6
Calories: 190 | Fat: 8g (Saturated: 3g) | Carbs: 27g | Sugar: 19g | Protein: 2g | Sodium: 160mg
Note: Light variations cut calories/sugar significantly!
Final Thoughts: Why This Recipe Endures
Watergate Salad isn’t just a dessert—it’s a time capsule of joy. It reminds us of family gatherings, summer picnics, and the simple pleasure of something sweet.
-
For new cooks, it’s a foolproof first triumph.
-
For busy hosts, it’s a 5-minute lifesaver.
-
For nostalgia lovers, it’s a spoonful of memories.
So whether you’re serving it at a potluck, sneaking spoonfuls from the fridge, or reinventing it into something new, this salad is here to stay.
Now, go make some (delicious) history!
Share the Love!
Cheesy Creamed Spinach
When Comfort Calls, Spinach Answers
Hey there, kitchen friends! Olivia here, apron dusted with Parmesan (as usual), ready to dive into one of my all-time favorite dishes: **Cheesy Creamed Spinach**. If you’ve ever craved something that feels like a warm hug after a long day, this is it. Picture velvety greens swimming in garlicky cream, draped with melty provolone and nutty Parmesan—it’s the kind of side dish that elbows its way to center stage. Whether you’re pairing it with a holiday roast, grilled chicken, or just scooping it straight from the pan with crusty bread (no judgment!), this recipe turns humble spinach into pure magic. And guess what? You don’t need chef-level skills. Just 25 minutes, one skillet, and a whole lot of appetite for coziness. Let’s make your kitchen smell like a grandmother’s dream!
Nana’s Spinach & the Snowstorm That Started It All
My love affair with creamed spinach began during a blizzard when I was 10. Trapped at my Nana’s farmhouse, we lost power—but she just chuckled, lit her gas stove, and whipped up this very recipe by candlelight. As snow piled against the windows, we huddled at her checkered tablecloth, forks clinking against mismatched bowls. “Spinach is armor against cold, darling,” she’d say, winking as I licked cream from my thumb. That storm lasted three days. We ate creamed spinach for breakfast, lunch, and dinner—and I never once complained. Decades later, I still make it when life feels chaotic. It’s my edible security blanket. Funny how a simple green can hold so much love, isn’t it?
🧾 Your Flavor Toolkit: Ingredients & Swaps
Why these ingredients work: Creamed spinach thrives on fat + umami + freshness. Here’s how to nail it (or tweak it!):
- Fresh spinach (3 bags, 10 oz each): Must be fresh, not frozen! Bagged spinach saves time, but feel free to sub with 2 large bunches. The water content wilts perfectly for that lush texture.
- Butter (¼ cup): Unsalted is key—you control the salt! Vegan? Swap equal parts olive oil or plant-based butter.
- White onion (3 tbsp minced): Sweet and mild. No onions? Try shallots or 1 tsp onion powder.
- Garlic (2 tbsp minced): DOUBLE this if you’re a garlic fiend (I do!). Pre-mined jarred garlic works in a pinch.
- Heavy cream (1¼ cups): Non-negotiable for silkiness! For lighter versions, half-and-half works, but expect less richness.
- Provolone (6 slices): Melts like a dream! Swiss or mozzarella are great subs. Avoid pre-shredded cheese—it won’t melt as smoothly.
- Parmesan (½ cup, freshly grated): The salty, nutty backbone. Pecorino or aged Asiago shine too.
- Salt & pepper: Season in layers! I add a pinch when sautéing onions, then finish to taste.
Chef’s Tip: Got leftovers? Stir in crispy bacon or roasted mushrooms!
👩🍳 Let’s Get Creamy: Your Foolproof Steps
Don’t rush the wilt—great creamed spinach is all about patience and layers!
- Butter, onions & garlic = your flavor base. Melt butter over medium heat. Add onions and garlic. Sauté 3-4 minutes until they’re soft and smell like heaven. (Hack: Stir constantly so garlic doesn’t burn! Burnt garlic = bitterness.)
- Spinach in batches—yes, batches! Add ⅓ of the spinach. Stir until wilted (1-2 min), then add more. Repeat. Why batches? Overcrowding steams instead of sautées, making your spinach watery. We want concentrated flavor!
- Cream = the velvetizer. Pour in heavy cream. Reduce heat to low. Simmer 3-5 minutes until it thickens slightly. Watch for bubbles: If it boils hard, the cream might separate. Gentle simmer only!
- Cheese time—low and slow. Tear provolone into pieces (melts faster!). Stir until fully melted. Off heat, add Parmesan. Biggest mistake? Adding cheese to boiling cream—it can get grainy. Remove pan from heat first!
- Season like you mean it. Taste! Add salt and pepper. Remember: Parmesan is salty, so go easy. Secret weapon: A pinch of nutmeg (trust me—it brightens everything).
Chef’s Save: Too thin? Simmer 2 more minutes. Too thick? Splash in cream or broth.
The Science of Spinach: Why Fresh Beats Frozen (and How to Rescue a Watery Disaster)
Spinach is 91% water—which makes mastering its texture critical for creamed spinach success. Here’s why fresh spinach reigns supreme, and how to fix common pitfalls:
Why Fresh Wins
-
Cell Structure: Fresh spinach wilts evenly, releasing water gradually. Frozen spinach’s cell walls rupture during freezing, turning it mushy when cooked.
-
Flavor: Frozen spinach often develops a metallic taste from oxidation during processing. Fresh leaves retain their earthy sweetness.
-
Color: Blanched fresh spinach stays vibrant green. Frozen can dull to army green (thanks to enzyme activity!).
But If You Must Use Frozen…
-
Thaw Completely: Microwave in 30-second bursts or leave in the fridge overnight.
-
Squeeze Like Your Dish Depends On It: Use a cheesecloth or clean dish towel to wring out every drop of water (seriously—do it twice).
-
Sauté First: Cook the squeezed spinach in butter for 2 minutes to evaporate residual moisture before adding cream.
Rescuing a Watery Batch
-
Cornstarch Slurry: Mix 1 tsp cornstarch + 1 tbsp cold water, stir into simmering cream.
-
Reduction: Cook uncovered on low heat, stirring frequently, to evaporate excess liquid.
-
Cheese Backup: Add 2 tbsp grated Parmesan—it absorbs moisture while boosting flavor.
Pro Tip: For extra insurance, salt fresh spinach lightly after wilting, let it sit 5 minutes, then press with a spatula to drain.
The Cheese Matrix: How to Pick (and Melt) the Perfect Blend
Not all cheeses play nice in creamed spinach. Here’s how to build a flawless melt:
The Roles Each Cheese Plays
-
Provolone: The “stretchy glue.” Its high moisture content and medium acidity melt smoothly without breaking. Subs: Fontina, young Gouda.
-
Parmesan: The “flavor bomb.” Aged cheeses add umami and help thicken the sauce. Subs: Pecorino, Grana Padano.
Cheese Melting 101
-
Low Heat Only: Cheese proteins tighten into rubbery clumps when overheated. Remove the pan from heat before stirring in cheese.
-
Grate Your Own: Pre-shredded cheese contains anti-caking agents (like cellulose) that can make sauces grainy.
-
Acid = Your Friend: A splash of lemon juice or white wine stabilizes the emulsion, preventing separation.
Unexpected Cheese Twists
-
Cream Cheese: Adds tang and luscious body. Stir in 2 oz at the end.
-
Blue Cheese: Crumbled Gorgonzola (1/4 cup) gives a grown-up, funky kick.
-
Smoked Mozzarella: For a campfire vibe (great with bacon additions!).
Disaster Fixes
-
Grainy Sauce? Blend with an immersion mixer or whisk in 1 tbsp hot cream.
-
Oil Pooling? Stir in 1 tsp mustard (the lecithin acts as an emulsifier).
Beyond the Side Dish: 5 Leftover Hacks You’ll Adore
Creamed spinach is a shapeshifter! Here’s how to reinvent leftovers:
1. Spinach & Artichoke Dip Upgrade
Mix 2 cups creamed spinach with 1 cup chopped marinated artichokes, 1/2 cup sour cream, and 1/4 cup shredded mozzarella. Bake at 375°F (190°C) until bubbly. Serve with pita chips.
2. Stuffed Chicken or Pork
Butterfly thick cutlets, stuff with chilled spinach (mixed with breadcrumbs for stability), sear, then finish in the oven.
3. Gourmet Grilled Cheese
Spread between sourdough with sharp cheddar. Butter the outside, grill low and slow for maximum melt.
4. Savory Crepe Filling
Layer inside warm crepes with roasted mushrooms and a fried egg.
5. Pasta Sauce
Thin with pasta water, toss with rigatoni, and top with chili flakes.
Freezing Tips
-
Portion First: Freeze in muffin tins, then transfer to bags for single servings.
-
Reheating: Thaw overnight, then warm on low with a splash of cream to revive texture.
🍽️ Serving: Where Comfort Meets Creativity
This dish is a social butterfly! For family style, pour it into a warm bowl and let everyone dig in. Fancy vibes? Individual ramekins topped with extra Parmesan and broiled until golden. Pair it with juicy roast chicken, seared steak, or baked salmon. Unexpected MVP: Spoon it over baked potatoes or fold into scrambled eggs. And please—serve with crusty bread for swiping every last drop. (That’s mandatory in my kitchen.)
✨ 5 Fun Twists to Shake It Up
Once you master the base, play with these riffs:
- “Everything Bagel” Spinach: Swirl in 2 tbsp cream cheese + top with everything seasoning.
- Vegan Dream: Use coconut cream, nutritional yeast (¼ cup), and vegan mozzarella.
- Spicy Tex-Mex: Add diced green chiles, cumin, and top with cotija cheese.
- Mushroom Lover’s: Sauté 8 oz sliced mushrooms with the onions.
- Keto Protein Boost: Mix in 1 cup diced cooked ham or crumbled sausage.
💭 Olivia’s Kitchen Confessions
This recipe has evolved from my Nana’s “a little of this, a pinch of that” approach to my tested version—but the soul remains. Once, I accidentally used pepper jack instead of provolone. SPICY happy accident! Now my husband begs for that version. Another time, my cat jumped on the counter mid-wilt… let’s just say I learned to chop spinach away from curious paws. Pro tip: Double the batch and freeze half in muffin tins for instant single servings. Because sometimes? You need emergency creamed spinach at midnight.
❓ Your Questions—Answered!
Q: Can I use frozen spinach?
A: Technically yes (thaw and SQUEEZE DRY!), but fresh wins. Frozen often tastes metallic and releases too much water, diluting the cream.
Q: Why did my cheese turn stringy?
A: High heat is the culprit! Cheese hates boiling. Melt it off-heat or on very low temps. If it seizes, whisk in 1 tsp lemon juice or cream.
Q: Can I make this ahead?
A: Absolutely! Prep up to adding cream. Day-of, reheat the spinach, add cream/cheese, and finish. Leftovers keep 3 days in the fridge.
Q: Too watery? Help!
A: Cook spinach longer to evaporate moisture, or add a slurry (1 tsp cornstarch + 1 tbsp water) while simmering cream.

Cheesy Creamed Spinach
- Total Time: 25 minutes
Description
Born in a snowstorm, perfected by candlelight—this rich, velvety creamed spinach is pure edible nostalgia. Fresh greens, buttery garlic, and bubbling cheese come together in just one skillet. No stress. Just creamy, melty joy.
Ingredients
-
3 (10 oz) bags fresh spinach
-
¼ cup unsalted butter
-
3 tbsp minced white onion
-
2 tbsp minced garlic
-
1¼ cups heavy cream
-
6 slices provolone cheese, torn
-
½ cup freshly grated Parmesan
-
Salt & pepper to taste
-
Optional: pinch of nutmeg
Instructions
-
Sauté aromatics: Melt butter in a large skillet over medium heat. Add onion and garlic; cook 3–4 mins until soft and fragrant.
-
Wilt spinach: Add spinach in thirds, letting each batch wilt before adding more.
-
Cream it up: Reduce heat to low. Stir in heavy cream; simmer 3–5 mins until slightly thickened.
-
Cheese melt: Off heat, stir in provolone until melted. Add Parmesan. Season to taste.
-
Rest & serve: Let sit 2 mins to thicken. Optional: top with extra cheese and broil until bubbly.
Notes
-
Don’t boil the cheese—melt gently off-heat.
-
Too thin? Simmer longer. Too thick? Add cream or broth.
-
Add-ins like bacon or mushrooms make it a full meal!
- Prep Time: 25 minutes
Nutrition
- Calories: 280 per cup
- Sodium: 300mg
- Fat: 23g
- Carbohydrates: 5g
- Protein: 10g
🍃 Nutrition Per Serving (1 cup):
Calories: 280 • Fat: 23g (Saturated: 14g) • Carbs: 5g • Fiber: 2g • Protein: 10g • Sodium: 300mg
Note: For lighter versions, see swaps in Ingredients section!
Final Thoughts: Spinach as a Love Language
This dish isn’t just about greens and cream—it’s about the memories we stir into the pot. Whether it’s Nana’s snowstorm survival tactic or your own twist with smoked cheese, creamed spinach is a canvas for connection. So next time you’re wilting those leaves, remember: You’re not just making a side dish. You’re crafting edible comfort, one buttery spoonful at a time. Now go forth and let spinach work its cozy magic!
Creamy Cornbread Casserole
Welcome to Comfort Food Heaven: Creamy Cornbread Casserole
Hey there, kitchen friend! Olivia here, apron dusted with cornmeal and heart full of excitement. Have you ever craved that magical dish that makes everyone at the table go quiet except for happy murmurs and the clink of serving spoons? That’s exactly what this Creamy Cornbread Casserole does. Imagine golden edges hugging a center so lush and velvety it’s like sunset in a baking dish—sweet corn niblets floating in a custardy sea, sharp cheddar weaving through every forkful, all held together with cozy cornbread warmth. It’s not just a side dish; it’s a hug from your oven. Whether it’s Thanksgiving, potluck Sunday, or just a Tuesday needing extra joy, this casserole turns “just dinner” into a moment. And guess what? You don’t need chef-level skills or fancy tools. Just a bowl, a spoon, and that beautiful urge to feed people you love. Ready to make magic?
Why This Casserole Feels Like Home
Picture this: My grandma’s farmhouse kitchen, 1998. Snow’s falling outside, and inside, every burner’s occupied. Just as Aunt Carol frets, “Did we forget a starch?!” my mom pulls out this humble casserole—golden, bubbling, smelling like buttery sunshine. I remember scraping the crispy corner piece while pretending to “help” clean up. Years later, when I hosted my first Friendsgiving, panic set in until Mom texted: “Make the casserole, Liv. It never fails.” She was right. My friend Mark—now my husband—took three helpings and whispered, “This tastes like childhood.” That’s the secret power of this dish: It’s a time machine. Every bite carries stories of snowy windows, crowded tables, and that glorious moment when someone asks, “Who made THIS?!”
Your Casserole Toolkit: Simple Ingredients, Big Flavor
- 1 (15 oz) can whole kernel corn, drained (reserve ½ liquid) – That starchy liquid? Liquid gold! It boosts corn flavor without watery texture. Chef’s swap: Use 1.5 cups fresh/frozen corn + 2 tbsp milk if avoiding cans.
- 1 (14.75 oz) can cream-style corn – The “creamy” hero! Creates custard-like texture. Insider tip: Brands matter! Look for ones with minimal additives.
- 2 eggs – Your binding agents. Room temp eggs blend smoother. Vegan? Flax eggs (2 tbsp ground flax + 5 tbsp water) work beautifully.
- 1 (8 oz) package dry cornbread mix – The cozy backbone. Pro insight: Avoid “sweet” mixes—they overpower. Jiffy or generic works great!
- 1 cup sour cream – Tangy richness queen. Lighter option: Greek yogurt (full-fat!) or cottage cheese blended smooth.
- 8 oz shredded Cheddar – Sharpness cuts the sweetness. Chef’s secret: Hand-shred it! Pre-shredded cheese has anti-caking starch that affects meltiness.
Let’s Build That Golden Dream: Step-by-Step
Step 1: Preheat oven to 350°F (175°C). Grease your 9×13″ baking dish with butter or non-stick spray—get those corners! Why? Crispy edges are sacred. ☺️
Step 2: In a large bowl, combine both corns (plus HALF the reserved liquid—trust me!), eggs, sour cream, and cornbread mix. Stir until JUST combined—no overmixing! Biggest hack: Use a silicone spatula and fold gently. Lumps are fine; overmixing = tough casserole.
Step 3: Fold in ¾ of the shredded cheddar. Chef’s trick: Reserve your cheesiest, prettiest shreds for the top layer!
Step 4: Pour into your prepped dish. Smooth the top gently. Sprinkle remaining cheese like confetti. Golden edge bonus: Run a thin butter smear along the dish rim pre-baking.
Step 5: Bake 40-45 minutes. Don’t peek before 35 mins! It’s done when edges are deep gold and center barely jiggles (like cheesecake). Oven realities: Rotate dish at 30 mins if your oven runs hot.
Step 6: REST 10 minutes! This lets custard set. Patience payoff: Clean cuts + epic cheese pulls.
The Science of Creamy vs. Crunchy: Perfecting Texture
Why does this casserole strike the ideal balance between velvety center and crispy edges? Let’s break it down:
1. The Cream-Style Corn Effect
Cream-style corn is the MVP. Unlike whole kernels, its pulpy texture acts as a natural thickener, blending with eggs and sour cream to form a custard. The starch granules swell during baking, creating that lush interior.
Pro Tip: For extra silkiness, blend half the cream-style corn before mixing.
2. The Maillard Reaction (a.k.a. Why Edges Rule)
That golden crust? Thank the Maillard reaction—the chemical dance between amino acids and sugars at high heat. The casserole’s edges, exposed to direct oven heat, caramelize into a savory-sweet crispness. To maximize this:
-
Use a metal pan (glass slows browning).
-
Butter the dish generously (milk solids = more browning).
3. Eggs: The Structure Keepers
Eggs do double duty:
-
Yolks add richness and emulsify the batter.
-
Whites set the structure when heated, preventing a mushy middle.
Overmixing = Tough Casserole
Vigorous stirring develops gluten (even in cornmeal!) and overworks egg proteins. Fold gently—a few lumps are fine!
From Oven to Table: Serving as Storytelling
How you present this casserole sets the tone for the meal. Here’s how to make it memorable:
The Art of the Scoop
-
For Family Style: Serve straight from the dish with a rustic spoon. Let guests admire the layers.
-
Plated Elegance: Use a round cookie cutter to mold individual portions. Drizzle with hot honey and garnish with microgreens.
-
Brunch Twist: Layer slices in a mason jar with scrambled eggs and salsa for a “breakfast parfait.”
Pairings That Sing
| Occasion | Perfect Pair | Why It Works |
|---|---|---|
| Game Day | Spicy Chili | Cool creaminess balances heat |
| Holiday Feast | Glazed Ham | Sweet/savory harmony |
| Summer BBQ | Pulled Pork | Cornbread + pork = Southern dream |
Leftover Wizardry
-
Cornbread Croutons: Cube leftovers, toast in butter, and top soups.
-
Savory Bread Pudding: Mix with milk, cheese, and herbs; bake until puffed.
Optional Sidebar: Regional Variations
-
Texas: Add diced green chiles and top with queso fresco.
-
New England: Swap cheddar for sharp Vermont white cheddar + maple syrup drizzle.
-
Midwest: Mix in browned sausage and serve with apple butter.
Serving Your Masterpiece
Slice squares straight from the dish—those crispy corners are trophies! Garnish with chives or smoked paprika for pop. Pair it with slow-cooked chili, honey-glazed ham, or tangy collard greens. For brunch? Top with poached eggs and hot sauce! Leftovers? Pan-fry squares in butter for next-level “cornbread pancakes.”
Make It Your Own: 5 Delicious Twists
1. Southwest Fiesta: Add 1 diced jalapeño + ½ tsp cumin + black beans. Swap cheddar for pepper jack.
2. Herb Garden: Fold in 2 tbsp fresh thyme or rosemary + lemon zest. Use havarti cheese.
3. Cozy Breakfast: Mix in cooked crumbled bacon + maple syrup drizzle pre-bake.
4. Vegetarian Luxe: Sauté mushrooms/spinach, layer bottom before adding batter.
5. Gluten-Free: Use GF cornbread mix + 1 tbsp cornstarch. Check labels on canned corn!
Behind the Apron: My Casserole Confessions
This recipe evolved from my grandma’s “kitchen sink” approach—she once used leftover biscuit dough! My version? Born during a pantry raid in my first apartment. I accidentally added sour cream instead of milk… best happy accident ever! Over the years, I learned: Doubling the recipe for crowds? Use two dishes—deep pans won’t cook evenly. And that time I forgot to drain the corn? We nicknamed it “Cornbread Soup” 😂—still tasty, but lesson learned! Now, my kids fight to sprinkle the cheese. Watching them, I realize: This dish isn’t about perfection. It’s about showing up, butter on your cheek, and sharing what’s warm.
Your Questions, My Answers!
Q: Why is my casserole soggy in the middle?
A: Three culprits: 1) Overlooked liquid reserve step—drain whole corn well! 2) Underbaking—check center jiggle. 3) Cutting too soon. Let it rest 10+ minutes.
Q: Can I make this ahead?
A: Absolutely! Assemble (unbaked) up to 24 hours ahead. Cover, refrigerate. Add 5-7 mins bake time. Or freeze unbaked (wrap tight!) for 1 month—thaw overnight first.
Q: Help! Mine turned out too sweet.
A: Your cornbread mix might be heavy on sugar. Next time, use a savory mix or add 1 tsp apple cider vinegar to balance. For now, serve with spicy chili!
Q: Can I use homemade cornbread batter?
A: Yes! Swap dry mix for 1 cup cornmeal + ½ cup flour + 1 tsp baking powder + ½ tsp salt. Adjust liquid if batter feels too thick.

Creamy Cornbread Casserole
- Total Time: 55 mins
Description
This isn’t just a side—it’s a comfort food legend. With sweet corn, tangy sour cream, melty cheddar, and a soft custardy center, this casserole turns everyday ingredients into a table-silencing moment. Easy to prep, even easier to love.
Ingredients
-
1 (15 oz) can whole kernel corn, drained (reserve ½ liquid)
-
1 (14.75 oz) can cream-style corn
-
2 eggs
-
1 (8 oz) package dry cornbread mix (like Jiffy)
-
1 cup sour cream
-
8 oz shredded sharp cheddar cheese
Instructions
-
Preheat oven to 350°F. Grease a 9×13” baking dish.
-
Mix base: In a large bowl, stir together both corns (plus half the reserved liquid), eggs, sour cream, and cornbread mix until just combined.
-
Add cheese: Fold in ¾ of the cheddar. Pour into dish, top with remaining cheese.
-
Bake 40–45 mins until golden with a slight center jiggle.
-
Rest 10 mins before slicing. Enjoy warm.
Notes
-
Use hand-shredded cheese for best melt.
-
Let rest after baking—it firms up for clean slices.
-
Want extra crust? Bake in a cast iron skillet!
- Prep Time: 10 mins
- Cook Time: 45 mins
Nutrition
- Calories: 320 per serving
- Sodium: 450mg
- Fat: 20g
- Carbohydrates: 28g
- Protein: 9g
Nutritional Information
Prep Time: 10 mins | Cook Time: 45 mins | Servings: 8
Per Serving: Calories: 320 | Fat: 20g (Sat: 10g) | Carbs: 28g | Protein: 9g | Sodium: 450mg
Final Thoughts: More Than a Recipe
This casserole is a testament to how simple ingredients can create profound comfort. It’s the dish you bring to new neighbors, the one that sparks “Remember when?” at reunions, and the stealth MVP of holiday tables. As my grandma used to say while scraping the last bites from the pan: “Food tastes better when you make it with your hands and serve it with your heart.”
Now, go preheat that oven—and don’t forget the crispy corner piece is yours by right.

Apple Dump Cake
Hey There, Kitchen Friends! Let’s Bake Some Magic
Is your kitchen calling you for a cozy adventure? You know that feeling – when you crave something warm, comforting, and smelling like a hug? That’s exactly why we’re diving into the world of Apple Dump Cake today. If you’ve never made a dump cake before, prepare to have your mind blown! This isn’t just dessert; it’s a golden, bubbling, cinnamon-kissed miracle that transforms pantry staples into pure comfort. Picture tender apples swimming beneath a buttery crumb topping that crackles like autumn leaves underfoot. Best part? You won’t need fancy equipment or hours of free time. Whether you’re juggling homework, wrangling toddlers, or just want a sweet reward after a long day, this recipe is your edible exhale. So tie on that apron (messy is encouraged!), preheat your oven, and let’s turn simple ingredients into something unforgettable together.
Why do I adore dump cakes? They’re the ultimate kitchen equalizer – no pastry degree required! This humble dessert celebrates what matters most: flavor, ease, and that gorgeous moment when you pull something steaming from the oven that makes everyone gather ’round. It’s the dessert version of your favorite oversized sweater. And trust me, once you experience how five minutes of prep creates this caramelized wonder, you’ll be hooked. So grab your favorite baking dish – we’re about to create magic!
My Aunt Maggie’s “Abracadabra Cake”
Every time I make this dump cake, I’m transported to my Aunt Maggie’s farmhouse kitchen. Picture this: It’s Thanksgiving 2004, I’m 16, and I’ve just volunteered to “help” with dessert. Aunt Maggie winks, pulls out three ingredients, and declares: “Watch this, Liv – it’s my abracadabra cake!” She dumped pie filling into a chipped ceramic dish, shook cake mix over it like fairy dust, then drizzled melted butter like liquid gold. “No stirring!” she warned, waving a wooden spoon like a wand. Forty-five minutes later? Pure sorcery. That pan emerged bubbling and bronzed, smelling like cinnamon and childhood. My cousins and I demolished it before the coffee finished brewing. Aunt Maggie just laughed, saying “Told ya! Some magic doesn’t need fancy tricks.” That moment taught me that the best cooking isn’t about perfection – it’s about joy, simplicity, and the courage to trust the process. Every time I make this cake now, I hear her voice: “Just dump it, honey. The oven knows what to do.”
Your Magical Toolkit: Ingredients & Wisdom
Gather these simple stars – and remember, flexibility is your friend!
- 2 (21 oz) cans apple pie filling – Your flavor foundation! I love the lazy luxury of canned filling, but here’s my chef secret: Stir in ½ tsp cinnamon and a squeeze of lemon juice to brighten it. Substitution tip: Use homemade stewed apples or swap with cherry/blueberry filling!
- 1 (15.25 oz) box yellow cake mix – The crispy, crackly crown! The dry mix creates that irresistible crumble. Chef insight: Spice it up by whisking ¼ tsp nutmeg into the powder. Gluten-free? Use a 1:1 GF cake mix – works like a charm!
- ½ cup butter, melted – The golden glue! Real butter makes the topping caramelize into crispy shards. Pro hack: Brown your butter first for a nutty depth (just cool slightly before drizzling). Vegan? Coconut oil works, but add a pinch of salt.
Bonus add-ins: Feeling fancy? Toss ½ cup chopped pecans or oats into the cake mix before sprinkling. Or sneak in 2 tbsp bourbon with the melted butter for a grown-up twist!
Let’s Create Magic: Step-by-Step
Ready for the easiest dessert performance of your life? Here’s how we make the magic happen:
- Preheat & Prep: Fire up your oven to 350°F (175°C). Now grab that trusty 9×13-inch baking dish – give it a quick butter hug or non-stick spray. Why? A well-greased dish means those crispy edges won’t stick! (Learned this the hard way during my “I’ll just skip it” phase.)
- Apple Foundation: Dump both cans of pie filling into the dish. Use a spatula to spread it evenly – we want every bite appley! Chef hack: Run a knife through the apples to break up big chunks so they bake evenly.
- The Sprinkle Heard ‘Round the World: Here’s where the magic starts! Slowly sprinkle the ENTIRE box of dry cake mix over the apples. Critical tip: Resist stirring! We’re creating steam pockets for that fluffy-crisp texture. Pretend you’re dusting snow over a winter village.
- Butter Ballet: Drizzle melted butter evenly across every inch of cake mix. Pro move: Use a fork to gently “tickle” any dry powder patches with butter – no mixing, just coaxing coverage. This creates those glorious golden crumbles!
- Bake & Bask: Slide your creation into the oven. Bake 45-50 minutes until the top looks like a sun-kissed cobblestone path – golden brown with bubbling lava peeking through. Secret test: Give the dish a gentle wiggle. If the center jiggles like a happy belly, it’s done!
Hot Tip: Place a baking sheet underneath to catch any buttery overflow – saves oven cleanup! And if spots brown too fast, tent loosely with foil.
The Science Behind the Simplicity: Why Dump Cakes Work
At first glance, dumping ingredients into a pan seems too good to be true. But there’s brilliant food science at play! Let’s break down why this method creates such irresistible texture:
The Steam Power Principle
When the cake mix hits the moist pie filling, magic begins. As the oven heats up, the apples release steam that rises through the dry cake mix. This steam partially cooks the flour and sugar from below, creating a tender base layer. Meanwhile, the butter on top melts downward, coating the mix to create crispy clusters. The result? A perfect duality – soft and pudding-like beneath, crunchy and caramelized on top.
Butter’s Double Role
That melted butter isn’t just for flavor – it’s a texture transformer. As it heats, the water in butter evaporates, leaving behind milk solids that brown (hello, Maillard reaction!). Meanwhile, the fat coats the flour particles, preventing too much gluten formation. This stops the topping from becoming tough like traditional cake, instead creating those delightful crumbly shards. Pro tip: Using cold butter cubes instead of melted yields a more biscuit-like topping – great for variety!
Sugar’s Secret Jobs
The cake mix’s sugar does more than sweeten. At high heat, it caramelizes, deepening flavor and color. It also absorbs moisture from the apples, helping thicken the filling into a luscious syrup. If your filling seems too runny, try sprinkling 1 tbsp of instant tapioca or cornstarch over the apples before adding the cake mix – this boosts thickening power without altering flavor.
Acid Balance
Notice how many recipes add lemon juice to the apples? There’s chemistry here! The acid prevents the apples from breaking down into mush during baking, helping them maintain some texture. It also balances the sweetness, keeping the dessert from feeling cloying. For an extra flavor boost, try apple cider vinegar instead – just ½ tsp will do!
Understanding these principles lets you troubleshoot: Too soggy? Use less butter next time or bake longer to evaporate more liquid. Topping too dry? Add an extra tablespoon or two of butter. Play food scientist – it’s how great bakers are born!
Dump Cake Around the World: Global Comfort Food Cousins
While dump cakes feel distinctly American, the concept of layered, fuss-free desserts spans cultures. Here’s how similar treats compare:
British Apple Crumble
The closest relative! Both feature fruit beneath a buttery topping, but crumbles use a flour-sugar-butter rub for a denser, oat-less texture (though some modern recipes blur the lines). Key difference: Crumbles often include zest and spices mixed into the topping, while dump cakes let the cake mix shine.
French Clafoutis
This rustic cherry dessert pours a pancake-like batter over fruit. While more eggy than a dump cake, it shares the same “dump and bake” spirit. Try adapting your dump cake by replacing half the cake mix with ¼ cup flour + 2 eggs + ¾ cup milk for a hybrid!
German Streuselkuchen
The streusel-topped “crumble cake” layers yeasted dough beneath fruit and buttery crumbs. Its topping is closer to a dump cake’s, but the base is bread-like. For a fun twist, spread store-bought croissant dough in your pan before adding apples and cake mix.
Asian Steamed Fruit Cakes
In Malaysia and Singapore, “kek buah” steams fruit with a simple batter in banana leaves. While cooking methods differ, the philosophy aligns – let the fruit shine with minimal interference.
Latin Postre Chaja
This Uruguayan treat layers sponge cake, peaches, and whipped cream in a dish to meld overnight. It proves every culture has a “lazy genius” dessert!
Why does this matter? Recognizing these connections turns baking into a cultural adventure. Next time you make a dump cake, imagine you’re part of a global tradition of smart, resourceful cooks who prioritize flavor over fuss.
Beyond Dessert: Savory Dump Dinners for Busy Nights
The dump method isn’t just for sweets! Apply the same principles to create effortless savory meals:
Cheesy Chicken & Rice Dump
• 2 cups uncooked rice
• 1 can cream of mushroom soup + 1 soup can water
• 1 lb chicken thighs
• 1 packet onion soup mix
• 2 cups shredded cheese
Method: Dump rice, soup, and water in a 9×13 dish. Place chicken on top, sprinkle with soup mix. Cover with foil, bake at 375°F for 1 hour. Uncover, add cheese, bake 10 more mins.
Taco Pasta Bake
• 1 lb ground beef (browned)
• 1 jar salsa
• 2 cups uncooked penne
• 2 cups beef broth
• 1 packet taco seasoning
Method: Combine everything in a dish. Cover, bake at 375°F for 45 mins. Top with cheese and crushed tortilla chips.
Vegetable Cobbler
• 4 cups mixed veggies (fresh or frozen)
• 1 can cream of celery soup
• 1 cup milk
• 1 cup Bisquick mix + ½ cup milk + 1 egg (for topping)
Method: Mix veggies, soup, and milk in a dish. Whisk Bisquick, ½ cup milk, and egg; dollop over veggies. Bake at 400°F for 30 mins.
Why It Works for Dinner:
-
Starch Absorption – Just like cake mix soaks up fruit juices, rice/pasta absorbs broth for perfect doneness.
-
Protein Protection – The “dump and cover” method keeps chicken/beef moist via steam.
-
Flavor Layering – Dry soup mixes or seasoning packets distribute evenly without stirring.
Pro Tip: For all savory dumps, always check that meats reach safe internal temperatures (165°F for poultry, 160°F for ground beef).
Showtime: Serving Your Masterpiece
This cake demands drama! Serve it straight from the oven in its baking dish – rustic charm is key. Ladle generous scoops into bowls while still warm (that bubbling syrup is liquid gold!). Now, the essential accessories: A fluffy cloud of whipped cream melts luxuriously into the cracks, while vanilla ice cream creates hot-cold nirvana. For brunch? Pair with strong coffee. Hosting dinner? Drizzle with caramel sauce and scatter toasted pecans for crunch. Remember: This is a communal dessert – hand out spoons and let everyone dig in family-style!
Make It Your Own: Delicious Twists
Once you master the basic spell, try these enchanting variations:
- Caramel Apple Dream: Swirl ½ cup caramel sauce into pie filling before adding cake mix. Top finished bake with sea salt flakes.
- Berry Bliss: Swap apple filling for mixed berries + 1 tbsp cornstarch (to thicken juices). Use vanilla cake mix.
- Pecan Praline: Add ¾ cup chopped pecans to dry cake mix. Use butter pecan cake mix if available!
- Vegan Vibes: Use plant-based butter and vegan cake mix. Opt for fruit filling without lard.
- Spiced Chai: Stir 1 tsp cardamom + ½ tsp ginger into apple filling. Use spice cake mix.
Olivia’s Notebook: Stories & Secrets
This recipe has been my kitchen companion for 15 years – and it keeps evolving! When my nephew had a tree nut allergy, we skipped pecans and added crushed graham crackers to the cake mix. During a camping trip, I made it in a Dutch oven over coals (total hit!). One hilarious disaster? The time I used “fluffy white frosting” mix instead of cake mix – let’s just say we ordered pizza that night. Moral: Always check the label! These days, I love using homemade slow-cooker apples when I have extra time, but canned filling still wins for speed. The true beauty? This cake taught me that imperfection is delicious. Lumps, bumps, and buttery craters? That’s character, friends!
Your Questions, My Answers!
Q: My topping stayed powdery in spots! What happened?
A: Ah, the dreaded dry patches! This happens when butter doesn’t fully saturate. Next time, drizzle slower and use a fork to gently redistribute butter onto dry areas (no stirring!). Adding 1-2 tbsp extra melted butter won’t hurt!
Q: Can I make this ahead?
A: Absolutely! Bake as directed, cool completely, then cover. Reheat servings 20 secs in the microwave. Or assemble the uncooked dump cake, cover tightly, and refrigerate overnight – just add 5 mins to bake time!
Q: Is a metal or glass pan better?
A> Glass gives you crispier edges (my fave!), while metal heats faster. If using dark metal, reduce oven temp to 325°F to prevent over-browning.
Q: Can I use fresh apples?
A> Yes! Swap canned filling with 6 cups peeled/thinly sliced apples (like Honeycrisp). Toss with ⅓ cup sugar, 2 tbsp flour, 1 tsp cinnamon, and 1 tbsp lemon juice. Bake 55-60 mins.

Apple Dump Cake
- Total Time: 50 min
Description
Warm, cinnamon-swirled apples under a golden, buttery crust—this dump cake is rustic comfort at its best. Inspired by Aunt Maggie’s “abracadabra” bake, it’s proof that the simplest things often bring the biggest smiles. No mixing, no fuss. Just dump, drizzle, and bake your way to cozy bliss.
Ingredients
-
2 (21 oz) cans apple pie filling
-
1 (15.25 oz) box yellow cake mix (gluten-free works!)
-
½ cup butter, melted
Optional Add-Ins
-
½ tsp cinnamon + 1 tsp lemon juice (into filling)
-
½ cup chopped pecans or oats (into cake mix)
-
2 tbsp bourbon (with butter)
Instructions
-
Preheat oven to 350°F (175°C). Grease a 9×13″ baking dish.
-
Add filling: Dump apple pie filling into the dish. Spread evenly.
-
Sprinkle cake mix evenly over apples—do not stir!
-
Drizzle butter over dry mix, covering as much as possible.
-
Bake for 45–50 minutes until top is golden and edges are bubbling.
-
Serve warm with whipped cream or ice cream. Pure magic.
Notes
-
Use a fork to gently spread butter over dry patches—no stirring!
-
Tent with foil if top browns too quickly.
-
Try caramel drizzle or crushed grahams on top for extra charm.
- Prep Time: 5 min
- Cook Time: 45 min
Nutrition
- Calories: 320 per serving
- Sugar: 35g
- Carbohydrates: 52g
- Protein: 2g
Nutritional Notes (Because Balance!)
Per serving (1/12th cake, without toppings): Calories 290 • Fat 11g (Saturated 7g) • Carbs 46g • Fiber 1g • Sugar 27g • Protein 2g • Sodium 300mg. While this is a treat, using no-sugar-added apple filling cuts sugar by 30%!
Final Thoughts: The Joy of Imperfect Baking
What makes dump cakes truly special isn’t just their ease – it’s their celebration of imperfection. Unlike finicky soufflés or tiered cakes demanding precision, dump cakes thrive on improvisation. That lopsided crater where butter pooled? It becomes a caramelized treasure. The uneven edges? Extra crispy bites to fight over.
In a world obsessed with picture-perfect food, the dump cake is a rebellious reminder that some of life’s greatest pleasures come from letting go. It invites beginners to bake without fear and gives experienced cooks a canvas for creativity. Most importantly, it turns ingredients you likely already have into something that feels like a warm hug.
So the next time life feels overwhelming, remember: Sometimes the best solution is to literally dump it all in a pan and let the oven work its magic. After all, as Aunt Maggie would say, “The best memories are made from messes – and this cake proves it!”

Turkey Salad
The Magic of Leftovers: My Ultimate Turkey Salad Recipe
Hey there, kitchen friends! Olivia here, waving from my flour-dusted countertop. Can we talk about the unsung hero of holiday weekends? That glorious moment when the feast is over, the stretchy pants are on, and you’re staring at a mountain of leftover turkey with equal parts love and exhaustion. I used to dread the “what now?” phase until my grandma taught me the art of transformation. She’d wink, tie on her gingham apron, and whisper: “Watch this, little bean—we’re making magic.” And magic it was. Her turkey salad wasn’t just a solution; it was a revelation—crisp, tangy, bright, and somehow better than the original roast. Today, I’m sharing my spin on that legacy, perfected over 15 years of post-Thanksgiving experiments. Whether you’re a meal-prep newbie or a leftover warrior, this salad is your ticket to effortless elegance. It’s not just food; it’s a celebration of resourcefulness, turning “meh” into “MORE!” with just a chop and a stir. Ready to make your fridge leftovers the star of the show? Let’s dive in!
Grandma’s Kitchen Alchemy
Picture this: It’s the Friday after Thanksgiving, 1998. I’m eight years old, still in reindeer pajamas, watching Grandma Betty at her Formica counter. The air smells like coffee and possibility. She’d pull the turkey carcass from the fridge—practically a family member by then—and declare, “This bird’s got more stories to tell!” With surgical precision, she’d strip every shred of meat, humming Sinatra. I’d nibble celery while she diced, sneaking me slivers of red pepper like they were contraband candy. Her secret weapon? A vintage mustard jar with “MAGIC SAUCE” scrawled on the lid. When she mixed it all together, it felt like a spell—the dull leftovers sparkling with color and tang. We’d eat it on saltines, perched on stools, legs swinging. “See, Liv?” she’d say, “Good cooking’s not about fancy ingredients. It’s about seeing treasure where others see trash.” Thirty years later, every time I make this salad, I swear I hear her laugh when the vinegar hits the bowl.
Your Turkey Salad Toolkit
Gather these simple heroes! Pro tip: Leftover turkey works best, but I’ll share swaps for off-season cravings.
- ¾ lb cooked turkey, chopped – Chef’s insight: Use both white and dark meat! Dark adds richness. Rotisserie chicken works in a pinch.
- 2 stalks celery, diced – Why? CRUNCH factor! Swap jicama or radishes for extra pep.
- 2 green onions, sliced – Pro move: Use the green and white parts. No green onions? Chives or ¼ red onion work.
- ½ red bell pepper, finely chopped – Color hack: Yellow or orange bells are sweeter; green add sharper bite.
- 3 tbsp mayonnaise – Sub tip: Greek yogurt or avocado mash for lighter vibes.
- 2 tbsp Dijon mustard – Secret weapon: Grainy mustard adds texture. Honey mustard brings sweetness.
- 1 tbsp cider vinegar – Kitchen science: Cuts richness. Lemon juice or white wine vinegar sub beautifully.
- 1 tsp white sugar – Balance act: Maple syrup or honey for depth.
- ¼ tsp salt – Timing tip: Always add last—turkey’s already seasoned!
Fun fact: My grandma added a pinch of celery seed. Try it for a nostalgic kick!
Crafting Your Masterpiece: Step by Step
Let’s make magic! Total hands-on time: 15 minutes. Promise.
- The Chop & Mingle: Grab your biggest, prettiest bowl (rainbow bowls = extra joy!). Toss in turkey, celery, green onions, and bell pepper. Chef’s hack: Chop everything slightly smaller than your pinky nail—perfect forkability! If your turkey’s dry, splash 1 tbsp broth over it now.
- Dressing Alchemy: In a jam jar or small bowl, whisk mayo, Dijon, vinegar, sugar, and salt. Game-changer: Whisk for 60 seconds—it emulsifies into creamy velvet. Taste! Want brighter? Add vinegar pinch by pinch.
- The Grand Union: Pour dressing over turkey mix. Fold gently with a rubber spatula—don’t stir aggressively (keeps veggies crisp). Watch the magic: The dressing will blush pale pink from the pepper!
- Patience, Padawan: Cover and refrigerate 30+ minutes. Critical step: This lets flavors marry. I stash mine overnight for epic next-day lunches. Stir once before serving.
- Victory Lap: Taste and adjust. Need zing? Extra mustard. Too tangy? Drizzle honey. Serve chilled—your fridge did half the work!
Hot tip: Add-ins? Toss in halved grapes, toasted pecans, or fresh dill AFTER chilling to keep textures perfect.
The Psychology of Leftover Reinvention
There’s something deeply satisfying about transforming leftovers into something new—it taps into our innate love of problem-solving and creativity. This turkey salad isn’t just a recipe; it’s a mindset shift. After days of rich holiday meals, our palates crave contrast: coolness against warmth, crunch against softness, brightness against savoriness. That’s why this salad feels like a revelation—it’s not just “using up” leftovers, but elevating them.
Psychologists call this “functional fixedness”—the tendency to see objects (or in this case, turkey) only in their original form. Breaking that mental block is liberating. When you take that familiar roast and reinvent it into a zippy salad, you’re not just cooking; you’re flexing your cognitive flexibility. It’s why kids adore this dish too (like my nephew with his “confetti chicken” theory)—they instinctively understand food as play.
There’s also the emotional economy of leftovers. For many of us, holiday meals carry weight—family tensions, nostalgia, or exhaustion. Repurposing the turkey into something fresh and different creates psychological distance from any stress attached to the original meal. It’s a culinary reset button. My grandma knew this instinctively when she’d hum while chopping—the ritual wasn’t just practical, it was therapeutic.
And let’s talk about waste guilt. In a world where 40% of food gets thrown out, recipes like this are quietly revolutionary. That turkey carcass isn’t just bones; it’s potential. The celery limp from fridge dehydration? Still has crunch to give. This salad teaches us to see abundance where others see depletion. Every time we reinvent leftovers, we’re voting for a more sustainable kitchen—one where “scraps” become the starring act.
The Science of Texture & Flavor Balance
Great salads live and die by texture and contrast—this turkey salad is a masterclass in both. Let’s geek out on why it works so well:
1. The Crunch Matrix
Celery and bell peppers aren’t just colorful; they’re structural geniuses. Their cell walls contain pectin and cellulose, which resist breaking down in the dressing, maintaining crunch for days. Cutting them small (but not tiny) ensures each bite has textural intrigue without being unwieldy.
2. The Fat-Acid Tightrope
The mayo (fat) and vinegar (acid) ratio is calibrated for bliss. Fat coats the tongue, carrying flavor; acid cuts through, making the richness feel light. Emulsifying them—whisking vigorously—creates a stable suspension that clings to every ingredient without pooling.
3. Umami Amplification
Cooked turkey is packed with glutamates (natural umami compounds). Dijon mustard contains enzymes that further break down proteins into savory amino acids. Together, they create a flavor bomb that makes your brain light up like a pinball machine.
4. Sugar’s Hidden Role
That 1 tsp sugar isn’t just for sweetness—it’s a flavor bridge. It rounds out vinegar’s sharpness and enhances the pepper’s natural sugars, making the vegetables taste fresher.
5. The Chilling Effect
Refrigerating isn’t just about cooling—it’s science in action. As the salad chills:
-
Salt draws moisture from the veggies, creating a light brine that seasons the turkey.
-
Starches in the mayo rearrange into a tighter matrix, thickening the dressing.
-
Flavors diffuse evenly through osmosis.
Pro tip: Adding crunchy elements (nuts, chips) after chilling preserves their texture—a trick chefs use in composed salads.
Cultural Roots & Global Cousins
While this recipe feels distinctly American (hello, post-Thanksgiving fridge raids!), its DNA spans continents:
1. French Confit Salads
In Gascony, duck confit is shredded into salads with cornichons and mustard—a luxurious cousin to our humble turkey version.
2. Chinese Chicken & Jicama
Sichuan street vendors mix poached chicken with crunchy jicama, chili oil, and peanuts—proof that the meat+crunch+zing formula is universal.
3. Mexican Tinga
Shredded turkey simmers in chipotle-tomato sauce, then gets piled onto tostadas with avocado. Same transformation principle, bolder flavors.
4. Indian Kachumber
While not meat-based, this cucumber-tomato-onion salad with lemon and chaat masala shows how acid and crunch can revive leftover proteins.
5. Scandinavian Smørrebrød
Open-faced sandwiches topped with remoulade-dressed meats prove that cold salads on bread are a global comfort.
This turkey salad is part of that lineage—a democratic dish that crosses borders. It’s why substitutions work so well (like curry powder or lime juice); the template welcomes interpretation. Food historians might call it “peasant ingenuity”—the global tradition of making scraps shine.
Serving: Where the Fun Begins!
This salad’s a social butterfly! For lunchbox glam: Pack into butter lettuce cups with avocado slices. Weekend vibes: Heap onto croissants with arugula and crispy bacon. Party mode? Scoop onto cucumber rounds or rainbow carrot chips. My favorite? Open-face sourdough toast, salad piled high, topped with pickled red onions and a sprinkle of smoked paprika. Colorful food = happy hearts!
Mix It Up: 5 Flavor Adventures
This recipe’s your canvas! Try these twists:
- Curry Coconut Dream: Swap mayo for coconut milk + 1 tsp curry powder. Add golden raisins and cashews.
- California Crunch: Use lime juice instead of vinegar, add diced avocado and crushed tortilla chips right before serving.
- Protein Power: Replace turkey with chickpeas or lentils (great vegan option!).
- Harvest Style: Add ¼ cup diced apples + 1 tbsp maple syrup. Toasted walnuts optional but recommended!
- Keto-Friendly Kick: Skip sugar, use avocado mayo, add crumbled bacon and blue cheese.
Olivia’s Notebook Scribbles
Confession: I once made this with post-Christmas ham (don’t tell Grandma!). It was… interesting. Stick to poultry! Over the years, I’ve learned: Moisture matters. If your turkey’s Sahara-dry, soak chunks in warm broth for 5 minutes before mixing. Also—trust your veggies. I once subbed celery with fennel during a fridge emergency. Now it’s a regular in my winter version! Funny story: My nephew calls this “Confetti Chicken” (even with turkey). He thinks the peppers are sprinkles. I don’t correct him.
Turkey Salad SOS: Your Questions, Answered!
Q: Can I freeze this?
A: Technically yes, but I don’t recommend. Mayo separates, and veggies get soggy. Best fresh within 3 days!
Q: Mine turned out watery! Help?
A> No panic! Drain excess liquid before mixing dressing. If it’s post-chill, stir in 1 tbsp crushed crackers or almond flour to absorb moisture.
Q: Too tangy! How to rescue?
A> Sweeten the deal! Fold in 1 tsp honey or maple syrup + 2 tbsp chopped toasted nuts for balance.
Q: Can I use canned turkey/chicken?
A> Absolutely—drain well and pat dry. Pro tip: Sauté it lightly with onion powder for fresher flavor.

Turkey Salad
- Total Time: 15 minutes
Description
Born in Grandma Betty’s kitchen and perfected through years of post-holiday fridge foraging, this salad turns humble leftovers into a zesty, colorful delight. It’s creamy, crunchy, tangy, and ready in minutes. A celebration of simplicity—and second helpings done right.
Ingredients
-
2 celery stalks, diced
-
2 green onions, sliced
-
½ red bell pepper, finely chopped
-
3 tbsp mayonnaise
-
2 tbsp Dijon mustard
-
1 tbsp apple cider vinegar
-
1 tsp white sugar
-
¼ tsp salt
Instructions
-
Mix the salad: In a large bowl, combine turkey, celery, green onions, and bell pepper.
-
Make dressing: Whisk mayo, mustard, vinegar, sugar, and salt in a small bowl until smooth.
-
Combine: Pour dressing over salad. Gently fold to coat everything evenly.
-
Chill: Refrigerate 30 minutes to let flavors meld. Stir before serving.
-
Taste & tweak: Add more mustard for zing or a drizzle of honey if too tangy.
Serving Ideas
-
Spoon into lettuce cups or onto toast
-
Scoop with veggie chips or crackers
-
Make next-level croissant sandwiches
Notes
-
If turkey’s dry, moisten with 1 tbsp warm broth first.
-
Keep extras crisp by adding nuts/fruits after chilling.
- Prep Time: 15 minutes
Nutrition
- Calories: 220 per serving
- Sodium: 310mg
- Fat: 14g
- Carbohydrates: 4g
- Protein: 18g
Nutritional Nibbles (Per Serving)
Calories: 220 | Fat: 14g (Sat: 2g) | Carbs: 4g (Fiber: 1g, Sugar: 2g) | Protein: 18g | Sodium: 310mg
Note: Values estimated. Lower sodium? Skip added salt—turkey’s already seasoned!
Final Thoughts
This turkey salad is more than a recipe—it’s a philosophy of thrift, joy, and reinvention. In a world obsessed with “new,” there’s radical power in respecting leftovers enough to make them glorious. Every time we chop, whisk, and chill, we’re participating in a tradition as old as cooking itself: the alchemy of transformation.
Recent Posts
- Moist Vegan Banana Bread : One-Bowl, No-Fail Classic
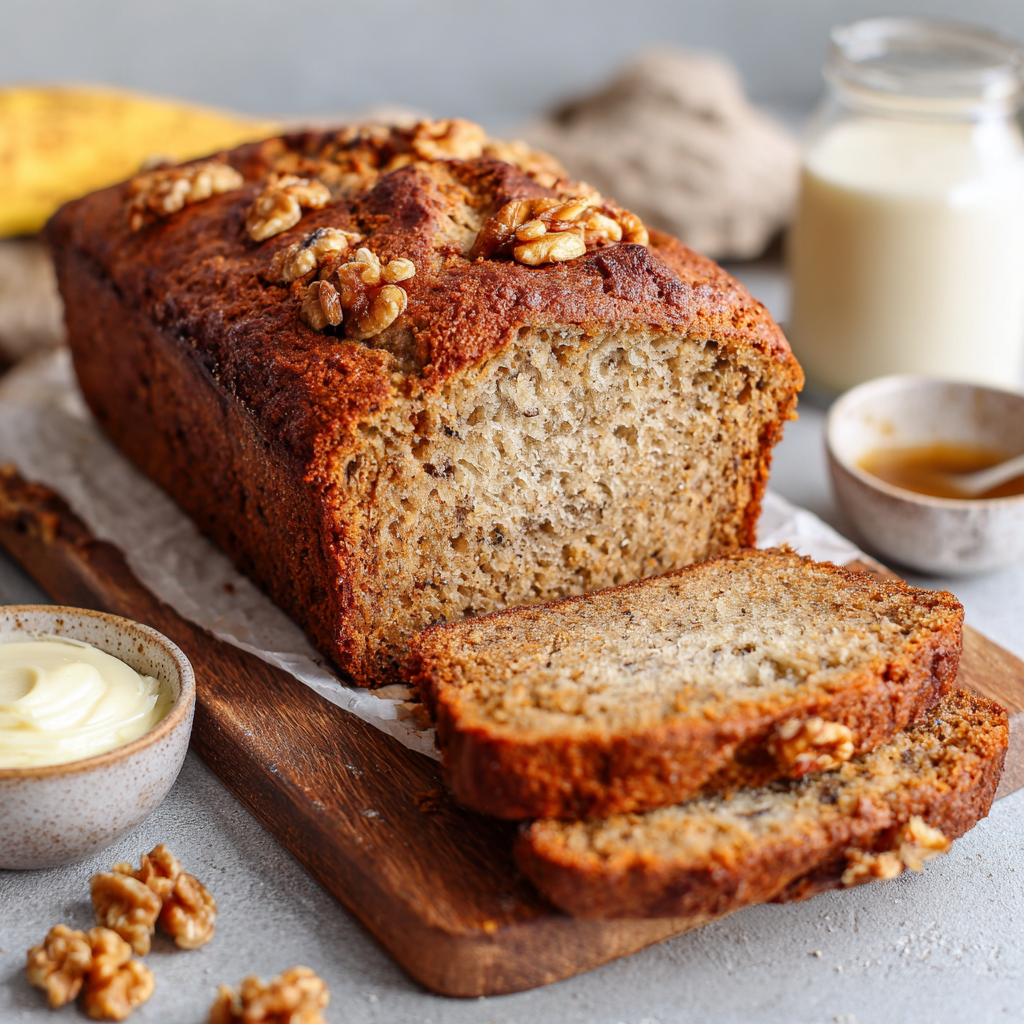
- Homemade Turkey Gravy : Rich, Silky, and Full of Flavor
- Easy Keto Broccoli Salad : Low-Carb, Crunchy, and Totally Craveable
- Hearty Vegan Chili : One-Pot, Protein-Packed & Totally Comforting
- The Best Crispy Baked Chicken Nuggets : Healthy, Easy & Kid-Approved
