
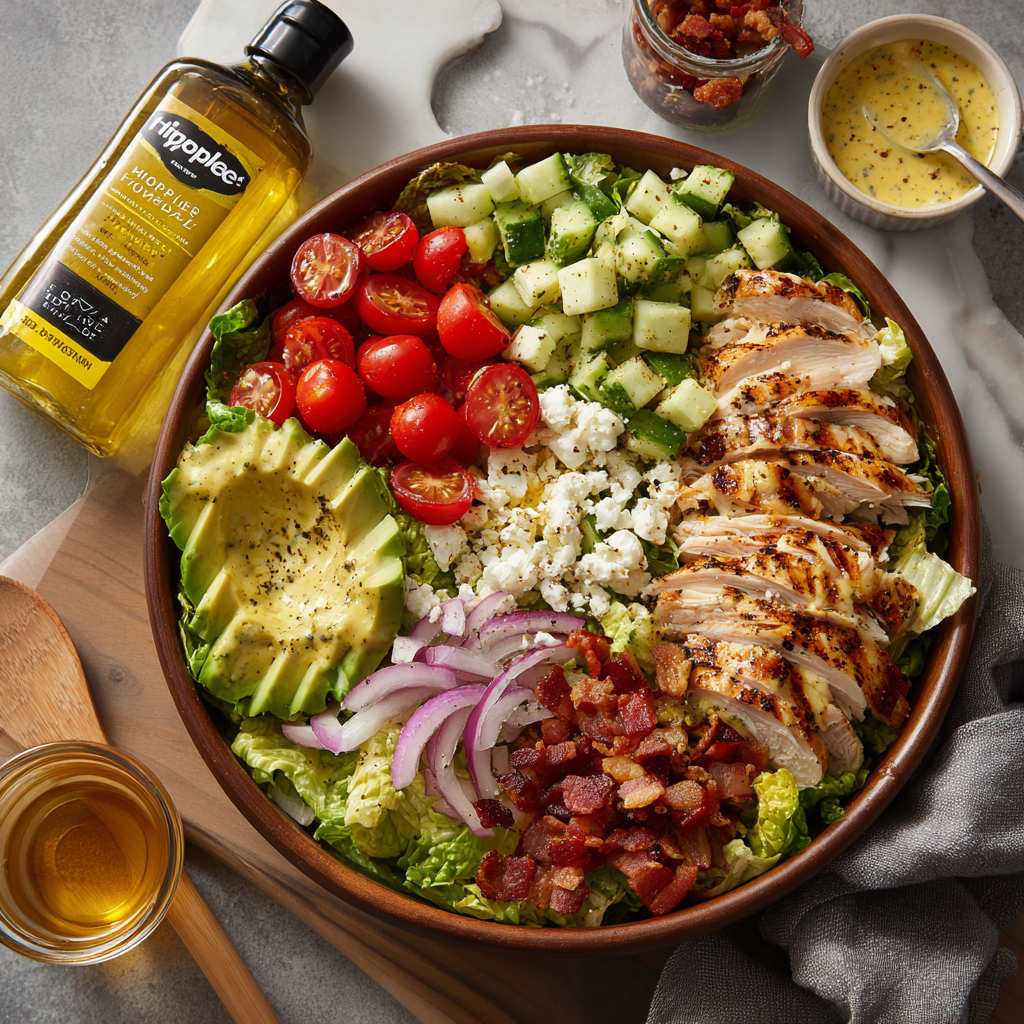
Chopped Chicken Salad with Honey Mustard Dressing
Your New Go-To Salad That Feels Like a Hug in a Bowl
Hey there, salad skeptic! If you’re imagining sad, wilted greens and boring rabbit food, hold that thought. I’m Olivia Bennett (your kitchen cheerleader!), and I’m about to change your salad game forever. This Chopped Chicken Salad with Honey Mustard Dressing isn’t just a side dish—it’s a crunchy, creamy, savory party on a plate that’ll make you actually crave greens. Imagine tender rotisserie chicken mingling with crispy bacon, creamy avocado, and tangy feta, all tossed in a homemade dressing that dances between sweet honey and punchy Dijon. It’s the salad I make when I want something lightning-fast but still feel like I’m treating myself (or my favorite people!). Perfect for chaotic weeknights, lazy Sundays, or when you need to wow guests without breaking a sweat. Grab your favorite chopping knife—we’re about to build layers of flavor and texture that turn “just a salad” into the star of the table!
The Picnic That Started It All
Picture this: It’s a sweltering July afternoon, my nieces are splashing in the kiddie pool, and my brother texts, “Surprise! Bringing 6 friends for lunch.” Cue panic. My fridge held random bits—leftover rotisserie chicken, half an avocado, lonely bacon slices. In a sweaty, 10-minute kitchen flurry, I chopped everything into bite-sized confetti, whisked honey and mustard like my life depended on it, and tossed it all together. The result? Silence. Then, “Olivia, this is stupid good.” My niece even ate the red onions! That messy, thrown-together moment became our family’s most requested summer dish. Now, every time I make it, I’m back at that sun-drenched picnic table, laughing as bacon crumbs tumble onto my lap. Food magic happens when we embrace imperfection, friends!
Your Flavor Toolkit: What We’re Using & Why
Salad Ingredients:
- 2 cups shredded rotisserie chicken – The ultimate time-saver! Juicy and flavorful. Chef Tip: No rotisserie? Poach 2 chicken breasts with garlic and herbs.
- 4 cups chopped iceberg lettuce – That CRUNCH is non-negotiable! Sub: Romaine hearts for extra sturdiness.
- ½ cup cherry tomatoes, halved – Bursts of freshness. Insight: Toss with a pinch of salt first to intensify flavor.
- ½ cup diced cucumber – Cool, crisp contrast. Chef Hack: Scoop seeds first for less wateriness.
- ¼ cup red onion, thinly sliced – Zingy bite! Soak in ice water for 5 mins to mellow sharpness.
- 1 ripe avocado, diced – Creamy richness. Add last to avoid mush!
- 4 slices cooked bacon, chopped – Salty, smoky magic. Sub: Turkey bacon or omit for vegetarian.
- ¼ cup crumbled feta cheese – Tangy saltiness. Goat cheese or blue cheese work beautifully too.
Honey Mustard Dressing Ingredients:
- 3 tbsp Dijon mustard – Complex tang! Yellow mustard works in a pinch but lacks depth.
- 2 tbsp honey – Natural sweetness. Maple syrup for vegan version.
- 3 tbsp olive oil – Silky emulsion base. Avocado oil is great too.
- 1 tbsp fresh lemon juice – Bright acidity. Bottled works, but fresh sings.
- Salt & black pepper to taste – Flavor enhancers. Start with ¼ tsp salt; you can add more!
Let’s Build Your Flavor Masterpiece!
- Make the Dressing: Grab a small bowl and whisk together the Dijon mustard, honey, olive oil, lemon juice, salt, and pepper like you mean it! Chef Hack: Whisk in 1 tsp water if it’s too thick—it’ll cling better to salad! Taste and adjust—maybe more honey for sweetness or lemon for zing. Pro Insight: Let it sit 5 mins; flavors marry beautifully.
- Combine Salad Ingredients: In a large bowl (trust me, you need wiggle room!), gently toss together the shredded chicken, chopped iceberg, halved tomatoes, diced cucumber, sliced red onion, chopped bacon, and crumbled feta. Critical Tip: Add the avocado LAST, right before dressing, to keep it pretty! Toss with clean hands or salad tongs—be kind to those tender greens.
- Dress & Serve: Drizzle that glorious honey mustard dressing over your salad mountain. Start with half, toss gently, then add more as needed. Chef Secret: Undressed salad keeps in fridge for hours—add dressing ONLY when ready to eat for max crunch! Serve immediately. Cue the happy dance!
Making It Pretty & Practical
Presentation matters! Scoop salad into wide, shallow bowls so all those gorgeous layers shine. For extra flair, top with a sprinkle of extra bacon, feta, and cracked black pepper. Pair it with crusty garlic bread for soaking up dressing, or keep it light with a crisp white wine like Sauvignon Blanc. Pack leftovers (undressed!) in mason jars—dressing at the bottom, sturdy veggies next, greens on top. Screw on the lid, refrigerate, and shake when hunger strikes for a ready-made meal!
Shake It Up! 5 Delicious Twists
This salad is your canvas! Try these riffs:
- Protein Swap: Shredded BBQ chicken, crispy chickpeas (vegan!), or flaked salmon.
- Cheese Change-Up: Smoked gouda, sharp cheddar, or tangy goat cheese.
- Seasonal Veg: Swap cucumber for roasted corn in summer, apples & walnuts in fall, or roasted squash in winter.
- Dressing Remix: Add 1 tsp smoked paprika or sriracha to dressing for a kick.
- Low-Carb Style: Skip lettuce—serve over cauliflower rice or stuffed in avocado halves!
Olivia’s Behind-the-Scenes Secrets
This recipe has seen some glow-ups! Originally, I used bottled dressing (gasp!), but homemade honey mustard was the game-changer—it took 3 tries to nail the honey-to-mustard ratio without it tasting like a beehive! Once, mid-toss, my cat Luna leaped onto the counter and tried to bat a bacon piece like it was a toy. Chaos ensued, bacon flew… we still laugh about “The Great Salad Heist.” Over time, I learned smaller chops = better flavor distribution (no one wants a giant onion chunk!). And if my apron’s stained with mustard? Consider it a badge of honor. Make it messy, make it yours—that’s where the magic lives.
Your Salad Questions, Answered!
Q: Can I make this ahead?
A: Absolutely! Prep ingredients separately (store chopped veggies in containers, dressing in a jar) for up to 2 days. Combine only when ready to eat—especially the avocado and dressing—to prevent sogginess.
Q: My dressing is too thick/too tangy. Help!
A: Too thick? Whisk in 1 tsp water or lemon juice at a time. Too tangy? Balance with ½ tsp more honey. Always taste as you go—your palate rules!
Q: Salad got watery overnight. Salvageable?
A> Drain liquid, pat veggies dry with paper towels. Revive with extra chicken/bacon/feta for texture. Tomorrow? Store undressed ingredients separately!
Q: Can I add grains?
A> Yes! ½ cup cooked quinoa or farro makes it heartier. Add grains with the chicken so they soak up dressing.

Chopped Chicken Salad with Honey Mustard Dressing
- Total Time: 15 minutes
Description
Forget boring greens—this Chopped Chicken Salad is the crunchy, creamy, savory-sweet meal you didn’t know you were missing. With juicy rotisserie chicken, crispy bacon, creamy avocado, and tangy feta tossed in a zesty honey mustard dressing, this bowl delivers all the comfort of your favorite sandwich in fresh, forkable form. It’s fast, flexible, and full of feel-good flavor. Let’s chop to it!
Ingredients
Salad:
• 2 cups shredded rotisserie chicken
• 4 cups chopped iceberg lettuce (or romaine)
• ½ cup cherry tomatoes, halved
• ½ cup cucumber, diced
• ¼ cup red onion, thinly sliced
• 1 ripe avocado, diced
• 4 slices cooked bacon, chopped
• ¼ cup feta cheese, crumbled
Honey Mustard Dressing:
• 3 tbsp Dijon mustard
• 2 tbsp honey
• 3 tbsp olive oil
• 1 tbsp lemon juice
• Salt & pepper to taste
Instructions
-
Make Dressing: Whisk all dressing ingredients in a small bowl. Adjust honey/lemon to taste. Let sit 5 mins to develop flavor.
-
Assemble Salad: In a large bowl, combine chicken, lettuce, tomatoes, cucumber, onion, bacon, and feta.
-
Add Avocado: Gently fold in avocado just before serving.
-
Dress & Toss: Drizzle with dressing, toss gently. Serve immediately for ultimate crunch!
Notes
• Add grains: Mix in ½ cup cooked quinoa or farro.
• Spice it up: Add smoked paprika or sriracha to the dressing.
• Go seasonal: Try roasted corn in summer, apples and walnuts in fall.
• Protein swap: Use BBQ chicken, salmon, or chickpeas.
• Dairy-free: Skip feta or use a plant-based version.
- Prep Time: 15 mins
Nutrition
- Calories: 475per serving
- Fat: 30g
- Carbohydrates: 15g
- Protein: 35g
Nourishment Notes (Because Balance is Delicious!)
This salad packs a nutritional punch! Per serving (approx 1.5 cups): 450-500 calories, 35g protein (chicken & bacon!), 10g fiber (veggies & avocado), plus healthy fats from olive oil and avocado. Gluten-free naturally! For lower sodium, reduce bacon/feta or use low-sodium versions.
Final Thought: More Than Just a Salad
This isn’t just a meal—it’s a celebration of texture, flavor, and ease. It’s the salad that made my veggie-hesitant niece ask for seconds, the one my friends request at potlucks, and my go-to when life feels chaotic but I still want something nourishing.
So here’s to imperfect chopping, to dressing that clings just right, and to salads that feel like a big, delicious hug. Now go forth and toss with abandon!

Avocado Chicken Salad
When Life Gives You Avocados… Make Magic!
Hey there, kitchen friend! Olivia here, waving from my flour-dusted countertop. Can we talk about that beautiful moment when you crave something creamy, satisfying, AND fresh? That’s exactly where this Avocado Chicken Salad was born—right between “I need comfort” and “I want sunshine in a bowl.” Forget gloppy mayo-based versions; we’re trading it for ripe avocado hugs and Greek yogurt tang. This isn’t just chicken salad—it’s a confetti party of textures with juicy chicken, pops of tomato, and cilantro confetti. It comes together in 10 minutes flat, tastes like a vacation, and works equally well scooped onto crusty bread or devoured straight from the mixing bowl (no judgment!). Whether you’re meal-prepping lunches or needing a hero for picnic season, this recipe’s your flavorful, guilt-free BFF. Ready to make magic?
Picnic Blankets & Kitchen Mishaps: Why This Salad Stole My Heart
Picture this: It’s 2018, and I’m frantically scrambling to pack for a lakeside picnic with my best friend. I’d promised “elevated chicken salad,” but my mayo jar was… fuzzy. (Oops.) Panic mode! I spotted two avocados begging to be used and thought, *Why not?* I mashed them with Greek yogurt, tossed in leftover rotisserie chicken, and grabbed whatever veggies looked perky in the fridge. The result? We devoured it so fast, seagulls gave us side-eye. But here’s the real win: My friend’s mayo-averse husband actually asked for seconds! That messy kitchen accident became our summer staple—proof that the best recipes often start with “uh-oh” moments. Now, I always keep avocados on standby for hungry surprises.
Your Grocery Lineup: Fresh, Flexible & Full of Flavor
- 2 cups cooked chicken, shredded – Rotisserie chicken is my MVP! Shred it while warm for tender bites. Swap: Canned chicken (drained well) in a pinch, or leftover grilled turkey.
- 1 ripe avocado, mashed – Go for slightly soft but not mushy. Chef hack: Sprinkle with lime juice immediately to prevent browning!
- ½ cup Greek yogurt – Adds tangy creaminess and protein. Swap: Sour cream or mashed silken tofu for dairy-free.
- ¼ cup red onion, finely chopped – Soak in ice water for 5 minutes if you dislike raw bite. Swap: Green onions or chives.
- ½ cup cherry tomatoes, halved – Their burstiness is key! Swap: Diced cucumber for crunch.
- ¼ cup cilantro, chopped – Love it or leave it? Swap: Flat-leaf parsley or fresh dill.
- Juice of 1 lime – Non-negotiable for zing! Chef insight: Roll lime on the counter first to maximize juice.
- Salt and pepper to taste – Start with ¼ tsp salt; avocados soak it up!
Why this works: Avocado + yogurt = lush base. Onion/tomato add freshness. Lime balances richness. Simple, but genius!
Let’s Make It Happen: Foolproof Steps & Pro Hacks
- Mash & Mix Foundation: In your largest bowl, scoop that gorgeous avocado. Mash with a fork until mostly smooth (tiny lumps = texture joy!). Add Greek yogurt and lime juice. **Chef hack:** Use the back of a wooden spoon for quicker mashing. Stir until it looks like creamy green clouds!
- Fold in the Goodness: Add shredded chicken, red onion, tomatoes, and cilantro. **Critical tip:** Fold gently with a spatula—don’t stir aggressively! We want fluffy chicken, not mush.
- Season to Shine: Sprinkle with salt and pepper. Taste! Need more zing? Add lime zest. Too mild? Pinch of garlic powder. **Flavor booster:** Let it sit 5 minutes—avocado absorbs seasoning like a dream.
- Texture Check: Is it creamy enough? If too thick, drizzle in 1 tsp water or olive oil. Too thin? Add extra chicken or diced avocado. **Pro move:** Toss in a handful of toasted pepitas here for crunch!
Why folding matters: Overmixing breaks down avocado. Gentle = fluffy perfection!
Serving Vibes: From Fancy Toast to “No Bowl Needed”
This salad screams versatility! For brunch glam, pile it high on toasted sourdough with microgreens. Lunchbox hero? Stuff into butter lettuce cups or halved avocados. Snack attack? Scoop with cucumber rounds or pita chips! My favorite? Heaped onto a warm sweet potato with extra cilantro. Hot tip: Drizzle with sriracha honey for a sweet-heat kick!
Mix It Up: 5 Flavor Adventures
- Mediterranean Twist: Swap cilantro for parsley, add diced olives + feta, and use lemon juice.
- Spicy Mango Fiesta: Add ½ cup diced mango + minced jalapeño. Swap lime for lime zest + orange juice.
- Protein-Powered: Mix in ½ cup black beans or chickpeas. Perfect for vegetarian friends!
- Crunchy Asian: Use rice vinegar instead of lime, add shredded carrots + sesame seeds. Top with wonton strips.
- Keto-Friendly: Replace tomatoes with diced celery. Serve in bell pepper “boats.”
Olivia’s Kitchen Confessions
This recipe has seen some *drama*. Once, I subbed yogurt with coconut cream (don’t ask)—it was… interesting. Another time, my cat tried to steal avocado mash mid-photoshoot (#catcheflife). But through it all, the core stayed: simple ingredients = big joy. Over the years, I’ve added more lime (because zing!) and learned to under-season initially—avocados mellow over time. Pro tip: Make it fresh! Avocado oxidizes, so leftovers get sad. Unless… you store the pit IN the salad! (It helps, I swear.)
Your Questions, Solved!
Q: Can I make this ahead?
A: Honestly? It’s best fresh. But if you MUST, prep everything EXCEPT avocado/yogurt mix. Combine max 1 hour before serving. Store pit in salad to slow browning.
Q: Why is my salad watery?
A: Likely overripe avocado or juicy tomatoes. Fix: Pat tomatoes dry before adding. If already mixed, drain excess liquid or stir in 1 tbsp almond flour.
Q: Can I use canned chicken?
A: Yes! Drain VERY well, pat dry with paper towels, and fluff with a fork. For best flavor, sauté it briefly with garlic powder first.
Q: Too bland? Help!
A: Avocados need aggressive seasoning! Boost with: extra lime zest, garlic powder, smoked paprika, or a dash of tamari. Taste as you go!

Avocado Chicken Salad
- Total Time: 10 minutes
Description
Ditch the mayo and meet your new salad soulmate! This Avocado Chicken Salad is creamy, tangy, and refreshingly light—perfect for quick lunches, picnic days, or last-minute dinners. With ripe avocado, Greek yogurt, zippy lime, juicy tomatoes, and a cilantro twist, it’s a spoonable ray of sunshine. Scoop it, stuff it, sandwich it—just don’t blink, because it disappears fast!
Ingredients
• 2 cups shredded cooked chicken
• 1 ripe avocado, mashed
• ½ cup plain Greek yogurt
• ½ cup cherry tomatoes, halved
• ¼ cup red onion, finely chopped
• ¼ cup fresh cilantro, chopped
• Juice of 1 lime
• Salt and pepper to taste
Instructions
-
Mash & Mix: In a large bowl, mash avocado with lime juice. Stir in Greek yogurt until smooth.
-
Add the Good Stuff: Fold in chicken, tomatoes, red onion, and cilantro. Gently mix to combine.
-
Season & Adjust: Add salt and pepper to taste. Let sit 5 minutes for flavors to blend.
-
Serve It Up: Spoon onto toast, stuff into lettuce cups, or devour straight from the bowl!
Notes
• Mediterranean: Add olives, feta, and swap lime for lemon.
• Mango Magic: Add diced mango + jalapeño.
• Plant-Based: Use chickpeas or black beans instead of chicken.
• Crunch Factor: Toss in toasted pepitas or serve with pita chips.
• Low-Carb: Serve in halved bell peppers or avocados.
- Prep Time: 10 mins
Nutrition
- Calories: 300per serving
- Fat: 18g
- Carbohydrates: 9g
- Fiber: 5g
- Protein: 22g
Nourishment Notes (Because You Asked!)
Per serving (¼ recipe): ≈300 calories • 22g protein • 18g healthy fats • 9g carbs • 5g fiber. Packed with vitamin C (lime/tomatoes), potassium (avocado), and probiotics (yogurt). Gluten-free naturally!
Final Thoughts: A Salad That Feels Like a Hug
This Avocado Chicken Salad is more than a recipe—it’s a reminder that healthy food doesn’t mean boring food. It’s:
-
Quick (10 minutes!)
-
Adaptable (endless variations)
-
Nourishing (protein, healthy fats, and veggies in one bowl)
Whether you’re packing lunch, hosting a picnic, or just craving something fresh yet comforting, this salad delivers. So grab that avocado, channel your inner kitchen rebel, and make something deliciously unexpected.
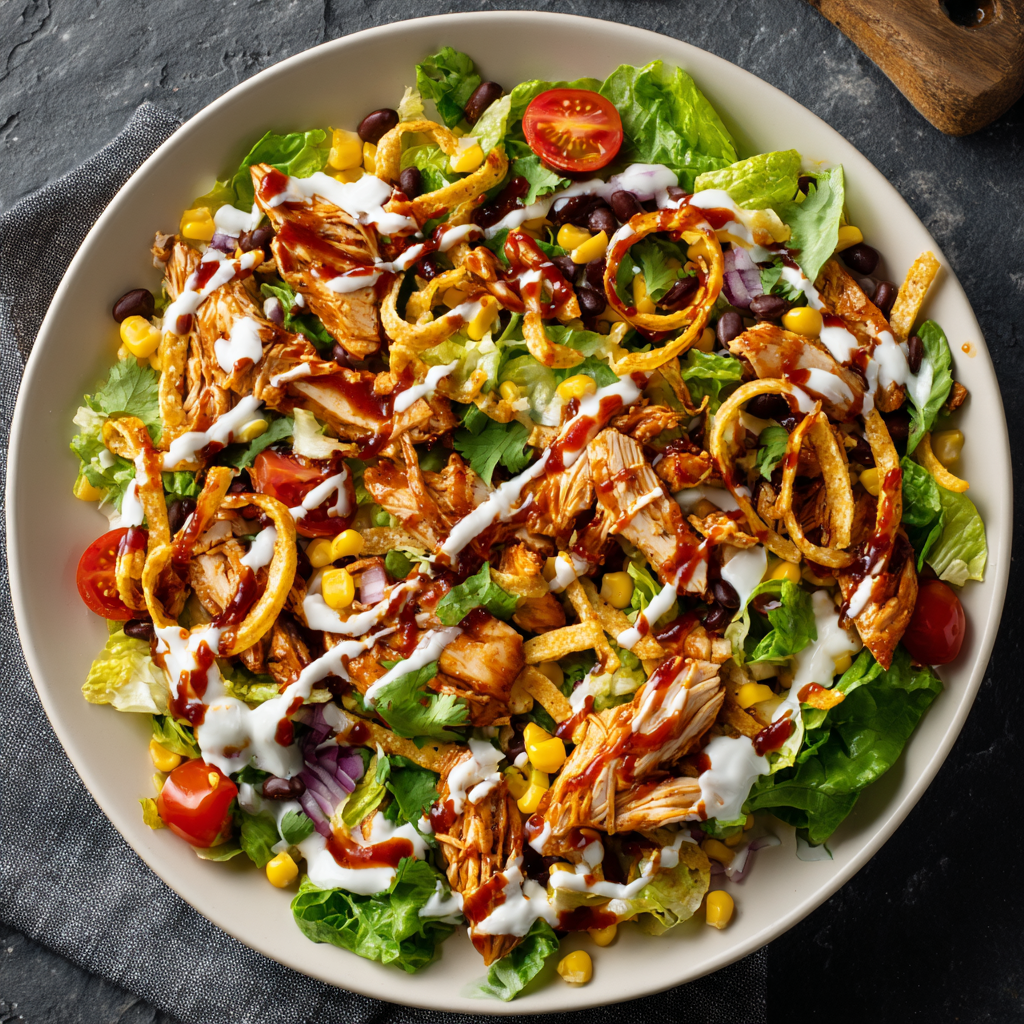
BBQ Chicken Salad
BBQ Chicken Salad: Your New Go-To for Flavor-Packed Fun!
Hey there, kitchen friends! Olivia here, apron slightly dusted with paprika and probably humming a happy tune because today we’re diving into one of my all-time favorite warm-weather heroes: BBQ Chicken Salad. Picture this – smoky-sweet BBQ chicken dancing with crisp greens, pops of juicy corn, creamy beans, and that irresistible ranch drizzle. It’s like your favorite backyard barbecue decided to put on a fresh, vibrant salad costume and wow, does it ever shine!
Whether you’re feeding a crowd at a potluck or just craving something hearty-yet-refreshing on a busy Tuesday, this salad is your golden ticket. No fancy skills needed – just big flavors and happy vibes. What I adore most is how it transforms humble ingredients into pure magic. That sticky-sweet BBQ sauce clinging to tender chicken? The cool ranch cutting through the smokiness? The CRUNCH of tortilla strips? Pure texture heaven! So grab your biggest bowl – we’re making memories today.
The Picnic That Started It All
This recipe always takes me back to my first summer in Austin when my friends and I organized a “bring whatever’s in your fridge” picnic at Zilker Park. I had leftover grilled chicken, half a bottle of spicy BBQ sauce, and a crisper drawer full of veggies. In a eureka moment, I tossed everything together in an old mixing bowl (classy, I know). When my buddy Marco took his first bite, his eyes got huge and he yelled, “This tastes like summer exploded in my mouth!” We passed that dented bowl around like a trophy while blues music floated from a nearby stage. That messy, laughter-filled moment taught me the best recipes aren’t about perfection – they’re about joy, improvisation, and sharing the love. Every time I make this salad now, I add an extra handful of corn just for Marco.
Your Flavor Toolkit (Serves 4)
- 2 cups cooked chicken, shredded or diced – Rotisserie chicken works beautifully here! Leftover grilled chicken adds extra smokiness. Vegetarian? Swap in blackened chickpeas or crispy tofu.
- 4 cups mixed greens (spinach, romaine, etc.) – I love a 50/50 blend of crunchy romaine and tender spinach. Kale holds up well if prepping ahead – just massage it first!
- 1 cup corn – Fresh-off-the-cob is summer magic, but frozen (thawed) or canned works great year-round. Chef hack: Char it in a dry skillet for 3 minutes!
- ½ cup black beans, rinsed and drained – Removes that metallic can taste. Kidney beans make a fun color twist.
- ½ cup cherry tomatoes, halved – Their sweetness balances the BBQ sauce. Grape tomatoes or diced heirlooms work too.
- ¼ cup red onion, thinly sliced – Soak in ice water for 10 minutes if you dislike raw onion bite.
- ½ cup barbecue sauce – Choose your adventure: Smoky for depth, sweet for balance, or spicy for kick! Thin with 1 tbsp apple cider vinegar if too thick.
- ¼ cup ranch dressing (optional but highly recommended) – The creamy yin to BBQ’s yang. Blue cheese or avocado lime dressing are delicious rebels.
- Tortilla strips for garnish – Crushed lime chips, toasted pepitas, or even crispy chow mein noodles add that essential CRUNCH.
Let’s Build Some Deliciousness!
Step 1: BBQ Chicken Tango – In a medium bowl, toss warm shredded chicken with barbecue sauce until every nook is coated. Why warm? It helps the sauce cling like a flavor hug! Let it sit 5 minutes while you prep other ingredients – this lets the chicken soak up that saucy goodness. If using rotisserie chicken, remove the skin first (but save it for chef snacks!).
Step 2: The Rainbow Layer – In your largest serving bowl (mine’s a vintage turquoise number!), layer greens first. Top artfully with corn, beans, tomatoes, and onions. Pro tip: Distribute ingredients in sections rather than mixing – it looks gorgeous and lets people customize bites!
Step 3: Chicken Crown – Pile saucy chicken right in the center. Spoon any extra sauce over the top – it’ll trickle down beautifully. If prepping ahead, keep chicken separate until serving to prevent soggy greens.
Step 4: Drizzle & Destroy (Politely!) – Zigzag ranch dressing over everything. Less is more initially – serve extra on the side. Scatter tortilla strips generously. Want maximum crunch? Add strips JUST before serving so they stay crisp.
Step 5: The Grand Finale – Serve immediately with big salad spoons! Toss gently at the table for drama – watch everyone lean in with anticipation.
Setting the Scene
This salad loves to be the star! Serve it family-style in a wide, shallow bowl so all the colors shine. For individual portions, line plates with greens first, then artfully stack toppings. Perfect pairings: Iced sweet tea with lemon, buttery cornbread muffins, or chilled watermelon wedges. Outdoor dining? Layer everything in mason jars – screw lids on tight, then shake vigorously when ready to eat for instant fun!
Make It Your Own
1. Tex-Mex Fiesta: Add diced avocado, pickled jalapeños, and swap ranch for cilantro-lime crema. Bonus: Use chipotle BBQ sauce!
2. Appalachian Summer: Add roasted sweet potatoes and apples. Use cider-vinegar based BBQ sauce and top with candied pecans.
3. Protein Power-Up: Add crispy bacon, hard-boiled eggs, or blackened shrimp instead of chicken.
4. California Cool: Skip ranch – use green goddess dressing. Add sliced strawberries and cucumber ribbons.
5. Low-Carb Love: Swap greens for chopped romaine + shredded cabbage. Skip corn and beans – add extra chicken and pepitas.
Behind the Apron Stories
This recipe has evolved more than my taste in kitchen towels! Originally, I used bottled ranch exclusively… until the day I ran out mid-recipe and subbed Greek yogurt mixed with lime juice and dill. My husband declared it “life-changing,” so now I often whip up quick yogurt ranch. Another funny fail: I once used blueberry BBQ sauce (don’t ask) – let’s just say fruit and beans don’t play nice. Lesson learned! Over the years, I’ve learned this salad is incredibly forgiving. Forgot the tomatoes? Throw in roasted bell peppers. No tortilla strips? Crush some Doritos! The spirit is adaptability – make it work for YOUR kitchen today.
Your Questions, Answered!
Q: Can I prep this ahead without it getting soggy?
A: Absolutely! Store components separately: undressed greens in one container, mixed veggies in another, sauced chicken in a third. Keep ranch and tortilla strips separate. Assemble 5 minutes before serving. Pre-dressed salad keeps poorly – the greens wilt dramatically!
Q: My BBQ sauce makes everything too sweet! Help!
A: Easy fix! Balance with acidity: Add 1 tbsp apple cider vinegar or lime juice to the sauce before tossing with chicken. Or choose a vinegar-based BBQ sauce next time (like a Carolina style).
Q: How do I prevent the chicken from drying out?
A: Two tricks! 1) Use thighs instead of breasts – they stay juicier. 2) When reheating leftover chicken, add 1 tbsp water or broth and cover tightly. Only warm until just heated through – don’t overcook!
Q: Can I make this vegetarian without losing the “BBQ heart”?
A: Yes! Smoky roasted chickpeas are fantastic: Toss 1.5 cups rinsed chickpeas with 2 tsp smoked paprika + 3 tbsp BBQ sauce. Roast at 400°F (200°C) for 20 minutes until sticky. Use instead of chicken!

BBQ Chicken Salad
- Total Time: 15 minutes
Description
Need a salad that feels like a cookout and eats like a meal? This BBQ Chicken Salad is your go-to for bold flavor and total satisfaction. Think juicy barbecue chicken, crisp greens, sweet corn, creamy beans, and a ranch drizzle that pulls it all together. It’s fresh, hearty, and downright craveable—perfect for potlucks, meal prep, or spontaneous Tuesday feasts. No stress, no bland bites—just smoky, saucy joy in every forkful.
Ingredients
• 2 cups cooked chicken, shredded or diced
• ½ cup BBQ sauce (smoky, sweet, or spicy!)
• 4 cups mixed greens (romaine + spinach combo works great)
• 1 cup corn (charred if possible)
• ½ cup black beans, rinsed and drained
• ½ cup cherry tomatoes, halved
• ¼ cup red onion, thinly sliced
• ¼ cup ranch dressing (or Greek yogurt ranch)
• Tortilla strips for garnish
Optional: Apple cider vinegar (to thin BBQ sauce), lime wedges, cilantro for topping
Instructions
-
Flavor the Chicken: Toss warm chicken with BBQ sauce. Let it rest for 5 mins.
-
Layer the Base: In a large bowl, layer greens. Arrange corn, beans, tomatoes, and onions in sections.
-
Top with Chicken: Pile BBQ chicken in the center and drizzle extra sauce if you’ve got it.
-
Finish It Off: Drizzle with ranch and scatter tortilla strips. Serve immediately!
Notes
• Tex-Mex Style: Add avocado, jalapeños, and chipotle BBQ sauce.
• Protein Boost: Add crispy bacon or hard-boiled eggs.
• Vegetarian Swap: Use BBQ chickpeas or tofu.
• Sweet Twist: Add apples and use cider BBQ sauce.
• Dressing Swap: Try avocado lime or green goddess dressing.
- Prep Time: 15 mins
Nutrition
- Calories: 385per serving
- Fat: 12g
- Carbohydrates: 42g
- Protein: 28g
Nourishment Notes
Approximate per serving (with 1 tbsp ranch): 385 calories | 28g protein | 42g carbs | 12g fat. Packed with vitamin A (greens!), fiber (beans + veggies), and lean protein. For lower calories: Skip tortilla strips, use Greek yogurt ranch, and increase veggies.
Final Thoughts: More Than Just a Salad
This BBQ Chicken Salad is a culinary chameleon—equally at home at a backyard potluck or a fancy lunch. What makes it special isn’t just the flavors (though they’re glorious), but how it invites creativity. Forgot an ingredient? Improvise. Craving adventure? Take it global. Need comfort? Stick to the classic.
It’s also a reminder that great food doesn’t require perfection. Like that first picnic in Austin, the best meals often come from spontaneity and shared joy. So whether you’re meal-prepping for the week or feeding a crowd, remember: the secret ingredient is always fun.
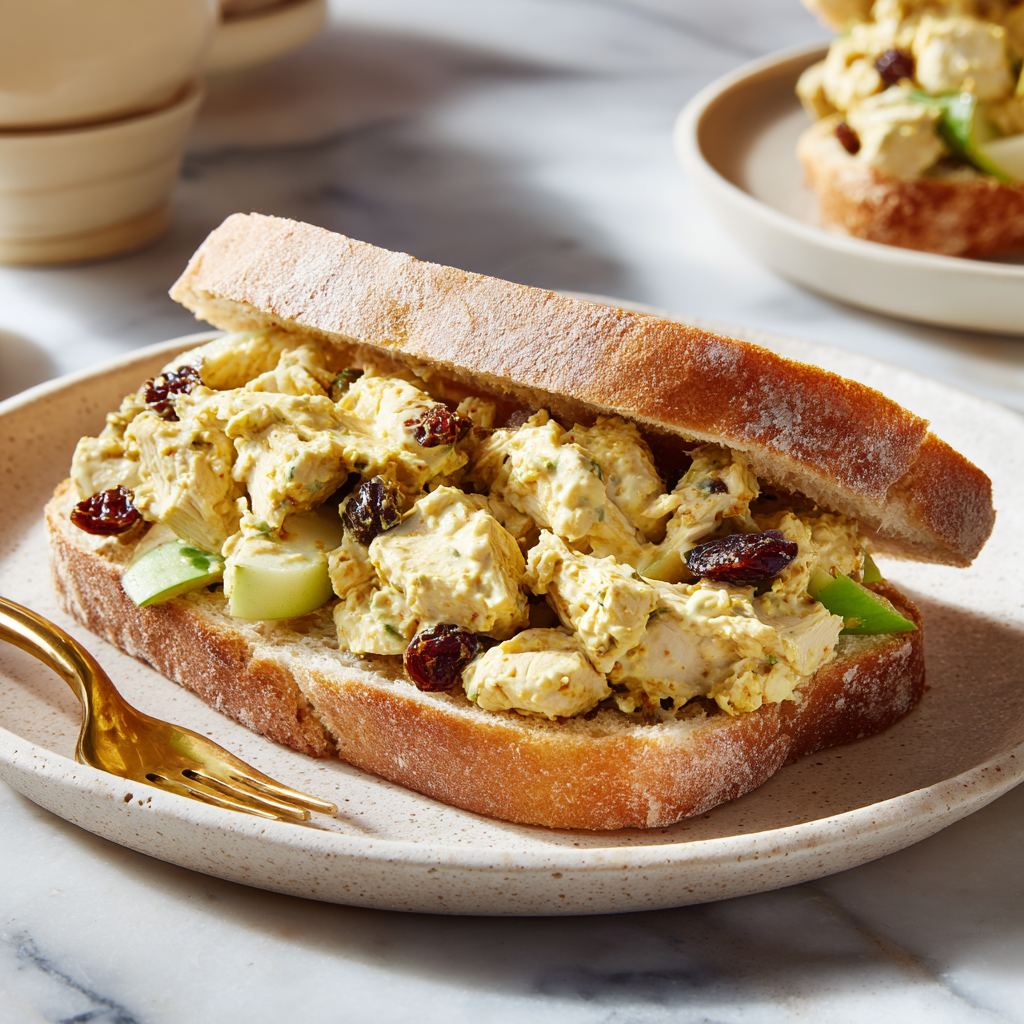
Curried Chicken Salad
Spice Up Your Lunch Life: Curried Chicken Salad Magic!
Hey there, kitchen friends! Olivia here, apron slightly dusted with turmeric (as usual), ready to share one of my all-time favorite flavor adventures. If you’ve ever stared into your fridge wondering how to turn leftover chicken into something extraordinary, or if you’re just craving a lunch that’s anything but boring, you’ve hit the jackpot. This Curried Chicken Salad isn’t just food—it’s a confetti explosion of textures and tastes that makes your taste buds dance. Imagine tender chicken hugging sweet-tart apples, chewy raisins popping like flavor jewels, and crisp celery adding that perfect crunch—all swirled in a creamy, golden curry dressing that’s equal parts cozy and exciting. It’s the kind of recipe that turns “just lunch” into a mini vacation for your senses. Whether you’re packing a picnic, hosting book club, or treating yourself to a fancy solo sandwich, this dish delivers joy in every bite. And guess what? You don’t need chef-level skills or fancy tools—just a bowl, a spoon, and a willingness to play with spices. Ready to make magic? Let’s dive in!
My Curry Epiphany: A Train Ride & A Life-Changing Sandwich
Picture this: Me, 22 years old, backpacking through London on a shoestring budget. Rain tapping against the train windows, stomach growling louder than the engine after a long day exploring. I stumbled into a tiny café near King’s Cross, desperate for warmth. What landed in front of me? A humble chicken salad sandwich—but oh, this was no ordinary sandwich. One bite and fireworks went off: creamy curry warmth, sweet plump raisins, and this mysterious crunch I later learned was apple. It tasted like adventure and comfort had a delicious baby. Turns out, the café owner’s grandma had tweaked her British coronation chicken recipe for 40 years. That sandwich became my daily ritual for a week! When I got home, I recreated it through trial and error (and many “meh” versions). My final twist? Swapping heavy cream for yogurt to let those spices shine bright. Now, every time I make this salad, I’m back on that rainy platform, reminded that the best food memories start with a little courage and a hungry heart.
Your Flavor Toolkit: Ingredients & Why They Shine
Gather these goodies! Pro tip: This salad thrives on flexibility—use what you love.
- 2 cups cooked chicken, diced (Leftover rotisserie chicken is GOLD here! Shred it for extra texture. No chicken? Canned chickpeas or firm tofu work beautifully for a veggie twist.)
- ½ cup plain yogurt (My secret for tangy lightness! Greek yogurt adds extra protein, but regular keeps it mellow. Dairy-free? Coconut yogurt rocks.)
- ¼ cup mayonnaise (The creamy dream team partner with yogurt. Kewpie mayo adds umami magic, or use avocado oil mayo for healthier vibes.)
- 2 tbsp curry powder (CHEF’S INSIGHT: Toast it first! Dry-toast in a pan for 1 minute until fragrant. Trust me—it unlocks deep, complex flavors. Mild or hot? Your call!)
- ½ cup raisins or dried cranberries (Raisins = classic sweetness. Cranberries = zingy twist. Soak them in warm tea for 5 mins to plump up like flavor balloons!)
- ½ cup diced apple (Crisp Granny Smiths add tart crunch. Honeycrisp = sweeter. Toss in lemon juice to prevent browning.)
- ¼ cup celery, diced (The refreshing crunch factor! No celery? Try jicama or cucumber for that fresh bite.)
- Salt and pepper to taste (Season in layers—start light, taste after mixing!)
- Lettuce leaves for serving (Butter lettuce cups feel fancy, or pile it on sourdough!)
Let’s Build Your Flavor Masterpiece: Step-by-Step
Ready? Aprons on! This comes together faster than you can say “seconds please.”
- Wake Up Your Curry Powder: Grab a small skillet. Add 2 tbsp curry powder and toast over medium heat for 60-90 seconds, stirring constantly until it smells like a spice market dream. (CHEF’S HACK: This burns fast—pull it off heat the second it’s aromatic! Cool completely.)
- Create the Dreamy Dressing: In a big bowl, whisk together yogurt, mayo, cooled toasted curry powder, ½ tsp salt, and ¼ tsp black pepper. Taste! Need more oomph? Add a pinch of cayenne or a squeeze of honey. (KITCHEN CONFESSION: I use a fork for this—less cleanup!)
- Fold in the Goodness: Add chicken, raisins/cranberries, apple, and celery to the bowl. Gently fold with a spatula—don’t aggressively stir or you’ll mush the apples. (CHEF’S WHISPER: Fold = cut through middle, lift up, and turn. Keep it fluffy!)
- The Patience Payoff: Cover and chill 30+ minutes if you can. This lets the raisins soak up dressing and flavors mingle like best friends at a party. (NO TIME? Eat immediately—it’s still delicious! But leftovers taste even better.)
- Final Taste Tweak: Right before serving, taste again. Adjust salt/pepper? Add a splash of lemon juice for brightness? You’re the boss!
Serving It Up: Make It Pretty & Practical
Presentation is playground time! For a light lunch, spoon onto butter lettuce cups—they look like edible green flowers. Hosting brunch? Layer it thick on warm croissants with arugula. Picnic-bound? Pack it in mason jars with crackers for DIY scooping. Garnish with cilantro, toasted almonds, or extra black pepper. Pro tip: Serve with iced chai tea—the spices harmonize perfectly!
Mix It Up: 5 Fun Twists to Try
This recipe loves a costume change! Here’s how to play:
- Tropical Vibes: Swap apples for mango, raisins for chopped dried pineapple, and add toasted coconut flakes.
- Protein Power: Use canned salmon or flaked cooked lentils instead of chicken.
- Nutty Crunch: Fold in ⅓ cup toasted cashews or pepitas with the celery.
- Keto-Friendly: Replace raisins with chopped sugar-free dried apricots, use full-fat Greek yogurt, and serve in avocado halves.
- Curry-Goes-Green: Add ¼ cup chopped chives and 2 tbsp minced mint for a fresh herb kick.
Olivia’s Kitchen Chronicles: Notes & Nostalgia
This recipe has been on quite the journey! My first attempt involved accidentally using cinnamon instead of curry powder (don’t ask—it tasted like dessert gone rogue). Over the years, I’ve learned: 1) ALWAYS label spice jars, 2) This salad is a fridge superhero—it lasts 4 days and gets better, and 3) It’s my ultimate “happy food.” I’ve served it at baby showers (in tiny cucumber cups), taken it camping (stuffed in pitas), and even won over my curry-skeptic uncle with it. The biggest evolution? Toasting the curry powder—thanks to a tip from a Mumbai chef I met at a food festival. He winked and said, “Spices need love to sing.” Now, that’s kitchen poetry. P.S. If you see turmeric stains on my apron? That’s just curry confetti.
Curry Conundrums? Solved!
Q: My salad tastes bland. Help!
A: Curry powders vary! Next time, add 1 tsp garam masala or a dash of cumin to the dressing. If it’s already mixed, stir in 1 tbsp mango chutney or lime zest for instant zing.
Q: Can I make this dairy-free?
A: Absolutely! Use coconut yogurt and vegan mayo. For extra creaminess, blend ¼ cup soaked cashews into the dressing.
Q: Apples got soggy overnight. Fix?
A: Toss apple dice in 1 tsp lemon juice before adding—it’s a natural barrier. If prepping ahead, store apples separately and mix in before serving.
Q: Too much mayo tang?
A: Balance it with 1 tsp honey or maple syrup. Or, swap half the mayo with mashed avocado for buttery richness.

Curried Chicken Salad
- Total Time: 10 minutes
Description
Say goodbye to boring sandwiches and hello to bold, creamy, crunchy magic! This Curried Chicken Salad is your golden ticket to flavor—where juicy chicken meets toasty curry, sweet raisins, crisp apples, and a creamy yogurt-mayo dressing that hits every note. It’s cozy and exotic, simple yet wow-worthy. Whip it up in minutes, chill if you can wait, and turn everyday chicken into something extraordinary. Your lunchbox is about to level up.
Ingredients
• 2 cups cooked chicken, diced or shredded
• ½ cup plain yogurt (or Greek/coconut yogurt)
• ¼ cup mayonnaise
• 2 tbsp curry powder, toasted
• ½ cup raisins or dried cranberries
• ½ cup apple, diced (tossed in lemon juice)
• ¼ cup celery, diced
• Salt and pepper to taste
Optional: pinch cayenne, squeeze of honey
Instructions
-
Toast Curry Powder: Heat in a dry pan for 60–90 seconds until fragrant. Cool.
-
Mix Dressing: In a large bowl, whisk yogurt, mayo, toasted curry powder, salt, and pepper.
-
Fold It All In: Add chicken, raisins, apple, and celery. Gently fold to combine.
-
Chill & Serve: Refrigerate 30 mins to let flavors mingle—or dig in right away! Taste and adjust seasoning before serving.
Notes
• Tropical Vibe: Mango + coconut flakes + dried pineapple.
• Plant-Powered: Sub chickpeas or lentils for chicken.
• Nutty Crunch: Add toasted cashews or pepitas.
• Low Carb: Use sugar-free dried fruit + full-fat yogurt.
• Herb Love: Add fresh mint or chives for brightness.
- Prep Time: 10 mins
Nutrition
- Calories: 320per serving
- Fat: 16g
- Carbohydrates: 24g
- Protein: 22g
Nutritional Cheat Sheet (Per Serving)
Calories: ~320 | Protein: 22g | Carbs: 24g | Fat: 16g (varies with subs)
Packed with protein, vitamin-rich apples, and gut-friendly yogurt. Gluten-free adaptable!
Final Thoughts: More Than Just a Salad
This curried chicken salad isn’t just a recipe—it’s a mindset. It’s about seeing potential in leftovers, playing with spices fearlessly, and turning lunch into a tiny celebration. Whether you stick to the classic or spin it into a dozen variations, remember: Cooking is supposed to be fun. Stain your apron. Burn a batch of curry powder (we’ve all been there). Share it with someone who claims they “don’t like curry” and watch their eyes light up.
Because the best meals aren’t just fed to the body—they feed the soul. Now go forth and make magic, one golden, crunchy, sweet-spicy bite at a time.

Apple Walnut Chicken Salad
Apple Walnut Chicken Salad: Your New Go-To Crunchy Comfort Food
Hey there, kitchen friends! Olivia here, apron slightly dusted with flour (as usual), ready to share one of my all-time favorite quick fixes. If you’ve ever stood in front of the fridge wondering how to turn leftovers into something extraordinary, this Apple Walnut Chicken Salad is about to become your secret weapon. Picture this: tender chicken, crisp apples, buttery walnuts, and sweet cranberries all hugged by a tangy-lemony mayo dressing. It’s like autumn in a bowl—but honestly? I crave it year-round. Whether you’re packing lunches, hosting a girls’ brunch, or just need a no-fuss dinner win, this salad delivers big flavors with barely any effort. No fancy techniques or obscure ingredients—just pure, uncomplicated joy. Grab your favorite mixing bowl and let’s make magic happen!
Why This Salad Feels Like Home
This recipe takes me straight back to my grandma’s sun-drenched kitchen. Every Sunday after church, she’d pull leftover roast chicken from the fridge, wink, and say, “Watch this, Livvy—leftovers aren’t boring!” She’d chop apples from her tree, toss in walnuts we’d cracked on the porch, and fold in cranberries “for a little sparkle.” I’d perch on the counter, sneaking celery sticks while she hummed old jazz tunes. That salad tasted like love and resourcefulness—transforming humble bits into something celebratory. Years later, when I hosted my first dinner party (a near-disaster involving smoke alarms), this salad saved the day. My guests raved, never guessing it took 10 minutes. Grandma’s spirit lives on in every batch I make—and now, I’m passing that cozy magic to you.
What You’ll Need (And Why!)
- 2 cups cooked chicken, diced – Rotisserie chicken is my MVP here (hello, flavor and time-saver!). Leftover grilled or baked chicken works beautifully. Chef tip: Avoid canned chicken—it lacks texture.
- 1 apple, diced – Insight: Honeycrisp adds sweetness, Granny Smith brings tartness. Toss in lemon juice immediately to prevent browning!
- ½ cup celery, diced – The crunch backbone! No celery? Jicama or cucumber works.
- ½ cup walnuts, chopped – Toast them first! 5 minutes in a dry pan = deeper flavor. Pecans or almonds rock too.
- ¼ cup dried cranberries – Soak in warm water for 5 minutes if they’re stiff. Cherries or golden raisins make fun swaps.
- ¼ cup mayonnaise – Full-fat for creaminess. Greek yogurt or avocado mash for lighter options.
- 1 tbsp lemon juice – Brightens everything! Lime juice or apple cider vinegar in a pinch.
- Salt and pepper – Season in layers—start light, taste after mixing.
Let’s Build That Flavor! (Step-by-Step)
Step 1: In your favorite big bowl (mine’s chipped blue ceramic—full of stories!), whisk mayo, lemon juice, ¼ tsp salt, and ⅛ tsp pepper. Chef hack: Add a teaspoon of Dijon mustard here for extra zing—it’s my not-so-secret weapon!
Step 2: Drop in the chicken, apples, celery, walnuts, and cranberries. Big tip: Fold gently with a spatula instead of stirring! Vigorous mixing bruises the apples and crushes walnuts. We want texture, not mush.
Step 3: Taste! This is crucial. Adjust salt/pepper or add another squeeze of lemon if needed. Remember: flavors bloom as it chills.
Step 4: Cover and refrigerate 15-30 minutes. Why? Chilling lets the cranberries soften and the flavors marry. But if you’re starving? Eat immediately—I won’t judge!
Step 5: Serve your way! Scoop into buttery croissants, pile onto crisp romaine leaves, or enjoy straight from the bowl with a fork. Final flourish: Top with microgreens or extra walnuts for Instagram-worthy vibes.
Serving It Up with Style
This salad’s versatility is its superpower! For picnics, pack it in mason jars (dressing at the bottom, greens on top—shake to mix!). Lunchbox hero? Stuff into mini pita pockets. Hosting brunch? Serve in endive spears with champagne. Feeling cozy? Layer it between toasted sourdough with sharp cheddar. And if we’re being real? My Tuesday-night move is eating it straight from the mixing bowl while standing at the counter—zero shame!
5 Delicious Twists to Try
- Curry Kiss: Add 1 tsp curry powder + 2 tbsp golden raisins.
- Protein Power: Swap chicken for chickpeas or lentils (vegan win!).
- Harvest Bowl: Mix in quinoa, roasted sweet potatoes, and kale.
- Bacon Bliss: Fold in ¼ cup crispy bacon + swap walnuts for pecans.
- Tropical Twist: Use pineapple instead of apple + macadamia nuts.
Olivia’s Extra Nuggets of Wisdom
This recipe evolved from my “clean-out-the-fridge” desperation! Once, I used pear instead of apple (delicious, but softer) and another time, subbed mayo with avocado (turned green by lunch—oops!). Lesson learned: acid is key for brightness! Over the years, I’ve added toasted walnuts after a friend’s “meh” reaction to raw ones (“Tastes like tree bark, Liv!”). Now, toasting is non-negotiable. Funny story: My husband once ate a whole batch before our picnic. I found him grinning, bowl in hand, saying, “What? It’s research!” Moral: Double the recipe if you have snackers nearby!
Your Questions, Answered!
Q: Can I make this ahead?
A: Absolutely! It keeps 3-4 days in the fridge. Pro tip: Store apples separately if prepping >24 hours ahead—toss them in last minute to keep crunch.
Q: Why is my salad watery?
A: Likely the apple! Pat diced apples dry with paper towels after tossing in lemon juice. If using yogurt, strain it first.
Q: Help—it tastes bland!
A: Boost it! Add a pinch of garlic powder, more salt, or a dash of maple syrup. Bland salads usually need acid or salt.
Q: Nut allergies?
A: Skip walnuts! Try toasted sunflower or pumpkin seeds. Same crunch, zero nuts.

Apple Walnut Chicken Salad
- Total Time: 10 minutes
Description
Craving something fresh, filling, and secretly soul-soothing? This Apple Walnut Chicken Salad is your go-to for instant flavor without the fuss. Tender chicken, juicy apples, toasted walnuts, and tart cranberries all tossed in a lemon-kissed mayo dressing—it’s cozy, crunchy magic in a bowl. Perfect for work lunches, impromptu brunches, or straight-from-the-fridge snacking. Grab a fork and fall in love with leftovers all over again.
Ingredients
• 2 cups cooked chicken, diced
• 1 apple, diced (Honeycrisp or Granny Smith)
• ½ cup celery, diced
• ½ cup walnuts, toasted and chopped
• ¼ cup dried cranberries
• ¼ cup mayonnaise (or Greek yogurt)
• 1 tbsp lemon juice
• Salt & pepper to taste
Optional: 1 tsp Dijon mustard for a zesty kick
Instructions
-
Make the Dressing: In a large bowl, whisk together mayo, lemon juice, salt, pepper, and optional Dijon.
-
Build the Bowl: Gently fold in chicken, apples, celery, walnuts, and cranberries.
-
Taste & Chill: Adjust seasoning, then refrigerate 15–30 minutes for best flavor (or enjoy immediately!).
-
Serve It Up: Spoon into croissants, over greens, or into pita pockets. Top with extra walnuts for flair.
Notes
• Curry Vibes: Add 1 tsp curry powder and golden raisins.
• Vegan Swap: Use chickpeas instead of chicken and dairy-free mayo.
• Harvest Style: Toss with quinoa and kale.
• Smoky Bliss: Add crumbled bacon and pecans.
• Tropical Fun: Use pineapple + macadamia nuts.
- Prep Time: 10 mins
Nutrition
- Calories: 335per serving
- Fat: 22g
- Carbohydrates: 15g
- Fiber: 3g
- Protein: 22g
Nutritional Per Serving (Approx)
Calories: 335 | Protein: 22g | Fat: 22g (Healthy fats from walnuts!) | Carbs: 15g | Fiber: 3g | Sugar: 9g (Natural from fruit!). Note: Values vary with subs like yogurt.
Final Thoughts: Why This Salad Deserves a Spot in Your Recipe Rotation
Apple Walnut Chicken Salad isn’t just a recipe—it’s a celebration of simplicity and flavor. It’s adaptable enough for fancy brunches and humble enough for midnight snacks. Whether you’re a meal-prep enthusiast, a busy parent, or just someone who loves good food, this dish delivers.
Why I Keep Coming Back to It:
-
Nostalgic Comfort: Reminds me of my grandma’s kitchen.
-
Endlessly Customizable: Sweet, savory, spicy—it can be anything.
-
Satisfying & Balanced: Protein, crunch, creaminess, and a touch of sweetness in every bite.
So next time you’re staring at leftover chicken, remember: a little creativity turns it into something extraordinary. Happy cooking, friends!

Banana Chip Smoothie
Why This Banana Chip Smoothie Feels Like a Warm Hug in a Glass
Hey there, kitchen friend! Ever have one of those mornings where your alarm feels like a personal betrayal, but the thought of a chocolatey treat makes your eyes pop open? Or maybe you’re dragging after a workout, craving something that doesn’t scream “health food” but actually nourishes you? That’s exactly where this Banana Chip Smoothie struts onto the scene – like your favorite cozy sweater meets a dessert menu, but packed with enough protein to power your day. Imagine the nostalgic flavors of banana bread and chocolate chips doing a happy dance in your blender, swirling into something creamy, dreamy, and secretly good for you. No fancy techniques or obscure ingredients here – just pure, uncomplicated joy that whips up in 5 minutes flat. Whether you’re rushing out the door or savoring a quiet moment at the kitchen counter, this sip is your edible permission slip to enjoy dessert for breakfast. So grab that blender (and maybe your favorite mug – we don’t judge here), and let’s make your taste buds do a happy dance!
How a Rainy Morning & Ripe Bananas Sparked My Smoothie Obsession
Picture this: It’s a dreary Tuesday, rain tap-dancing on my kitchen window, and I’m staring at two bananas that have gone from sunny yellow to leopard-spot brown. My grandma’s voice echoes in my head: “Waste not, want not, Olivia!” Suddenly, I’m 8 years old again in her farmhouse kitchen, stealing chocolate chips from her cookie jar while she laughs and says, “Bananas and chocolate are soulmates, sweet pea.” Fast-forward to that rainy morning – I threw those spotted bananas in the freezer, then later blitzed them with almond milk, a scoop of protein powder (my post-yoga staple), and yes, those chocolate chips. That first sip? Pure magic. It tasted like childhood comfort and grown-up nutrition had a party. Now, whenever I catch that whiff of overripe bananas, I don’t see compost – I see potential. It’s become my edible love letter to Grandma’s wisdom and those simple moments when food just feels like home.
Your Banana Chip Smoothie Dream Team (Plus Clever Swaps!)
- Ice (½ cup): The chill factor! Gives that milkshake-thick texture. Chef’s hack: Skip it if your banana is frozen solid – it’ll blend creamier without extra ice crystals.
- 1 frozen banana (spotty ones are best!): Nature’s ice cream! Freezing amps up the creaminess and sweetness. Swap: No frozen? Use fresh + extra ice, but expect a slightly thinner sip.
- 1 serving vanilla or chocolate protein powder (@nuzest): The muscle behind the magic. Vanilla lets banana shine; chocolate doubles down on decadence. Insider tip: Any plant-based powder works – just avoid unflavored unless you enjoy drinking chalk!
- 1 tbsp peanut butter: Our nutty anchor! Adds richness and healthy fats. Pivot power: Almond butter for elegance, sunflower seed butter for allergies, or PB2 powder for lower calories.
- 1 tbsp hemp seeds: Tiny but mighty! Packed with omega-3s and protein. No hemp? Sub: Chia seeds (they thicken!) or flax seeds for a nutty punch.
- 1 tbsp cocoa nibs: The “chip” in banana chip! They add crunch and antioxidant-rich chocolate essence without sugar bombs. Chef’s confession: If you’re out, smash dark chocolate chunks or use cacao powder (start with 1 tsp!).
- 1 cup almond milk: Our silky base. Pro move: Oat milk makes it creamier; coconut milk adds tropical vibes. Adjust amount for your perfect thickness!
- Dash of cinnamon: The flavor fairy! Lifts all the cozy, warm notes. Bonus: A pinch of sea salt makes flavors POP if you’re feeling fancy.
Blending Bliss: Your Foolproof Smoothie Roadmap
- Prep Like a Pro: Grab your blender – any kind works, but high-speed blenders (like Vitamix) give that velvety finish. Toss in almond milk FIRST. Why? Liquids at the bottom prevent powder tornadoes and help blades move freely! Kitchen hack: Running low on milk? Brewed coffee or cold brew adds a mocha kick!
- Layer with Love: Add peanut butter, hemp seeds, protein powder, and cinnamon directly into the liquid. This helps them incorporate smoothly instead of clumping on the sides. Watch & learn: If using cacao powder instead of nibs, add it here too – it blends better with liquids.
- Banana Time: Break your frozen banana into chunks (careful – it’s hard!). Drop them in along with ice. Texture tip: For extra decadence, add ¼ avocado – you won’t taste it, but hello, silkiness!
- Blend Smart, Not Hard: Secure that lid tightly (trust me, smoothie ceilings aren’t chic). Start on LOW for 10 seconds to pull ingredients down, then ramp up to HIGH for 30-45 seconds. Chef’s secret: Stop and scrape sides once if needed. Aim for lava-flow consistency – thick but pourable.
- The Grand Finale: Add cocoa nibs LAST and pulse just 2-3 times. This preserves their satisfying crunch! Presentation pro-tip: Run a banana slice around the glass rim and dip it in extra cocoa nibs for Instagram-worthy flair.
- Pour & Swoon: Immediately pour into your favorite glass. The cocoa nibs will float like little chocolate islands – gorgeous! Final touch: Dust with cinnamon like you’re sprinkling edible confetti.
Serving Up Smiles: How to Enjoy Your Masterpiece
This smoothie shines brightest in a clear mason jar or wide-mouth glass to showcase those gorgeous cocoa nib flecks! For a cozy vibe, sip it from your favorite mug (yes, really – it’s like a healthy hot chocolate cousin). Top with extra nibs, a banana coin, or a tiny sprinkle of hemp seeds for crunch. Pair it with a warm almond butter toast for a hearty breakfast, or sip solo post-workout while you stretch. If you’re feeling fancy, add a reusable straw – it makes every sip feel like a café treat. Pro tip: Drink it within 20 minutes for optimal texture and that frosty, just-blended magic!
5 Tasty Twists to Make This Smoothie Your Own
This recipe is your culinary playground! Try these riffs:
- Tropical Escape: Swap almond milk for coconut milk, add ¼ cup frozen pineapple, and a squeeze of lime. Hello, vacation vibes!
- Green Goddess: Sneak in ½ cup spinach or kale – you won’t taste it, but you’ll glow! Add a teaspoon of honey if you prefer extra sweetness.
- Cookie Dough Dream: Use vanilla protein powder, add 1 tbsp rolled oats and ½ tsp vanilla extract. Top with mini chocolate chips!
- Vegan Delight: Ensure protein powder is plant-based (Nuzest works!), use maple syrup instead of honey if needed, and opt for soy milk for extra protein.
- Mocha Madness: Replace ¼ cup almond milk with cold brew coffee and add 1 tsp cacao powder. Perfect for afternoon slumps!
Olivia’s Kitchen Chronicles: Smoothie Confessions & Evolution
Okay, real talk: The first time I made this, I got overzealous with cocoa nibs and my blender sounded like it was grinding rocks! Lesson learned – pulse them gently. This recipe evolved from my “desperation smoothie” days when I’d throw anything green or protein-packed into the blender. Over time, I realized balance is key: enough sweetness (thank you, banana!), texture (hello, nibs!), and nourishment (hemp seeds, you hero). It’s been my post-yoga ritual for 3 years now – my mat is literally next to my blender. Funny story: My husband once tried to “improve” it by adding a raw carrot (“for vitamins!”). Spoiler: It tasted like earthy regret. Stick to the script, friends! Now it’s our toddler’s favorite “chocolate milk” – I just reduce the nibs for her. Seeing her little mustache after sipping it? Priceless.
Smoothie SOS: Your Questions Answered!
Q: My smoothie turned out gloopy/thin! Help?
A: Texture tantrums happen! Too thick? Add 1-2 tbsp milk or water while blending. Too thin? Toss in 3-4 ice cubes or ¼ frozen banana. Remember: bananas vary in size, so adjust liquids gradually!
Q: Can I prep this ahead for busy mornings?
A: Honestly, it’s best fresh (nibs lose crunch!). BUT – freeze your smoothie in a mason jar (leave 1″ space for expansion!). Thaw overnight in the fridge, shake well, and maybe add fresh nibs. Or prep ingredient packs: baggie with banana, protein powder, seeds, etc. – just dump and blend!
Q: I hate peanut butter. What else works?
A: No problem! Almond butter adds elegance, tahini gives a savory twist, or use 1 tbsp coconut cream for richness. For nut-free, sunflower seed butter is my fave – it’s shockingly delicious here!
Q: My protein powder makes it chalky. Solutions?
A> Ugh, the chalky curse! First, blend longer (full minute on high). If that fails, try a different brand (Nuzest blends beautifully!). Adding ½ tsp vanilla extract or 1 date can mask chalkiness too. Also, ensure you’re using enough liquid!

Banana Chip Smoothie
- Total Time: 5 minutes
Description
This Banana Chip Smoothie isn’t just a drink—it’s your favorite chocolate chip banana bread, blended into creamy, sip-worthy comfort. Packed with protein, healthy fats, and nostalgic flavor, it’s the ultimate fuel for busy mornings, lazy weekends, or anytime your soul craves sweet, peanut-buttery bliss. Ready in 5 minutes, made with pantry staples, and totally customizable, it’s breakfast… upgraded.
Ingredients
• ½ cup ice (skip if banana is frozen)
• 1 frozen banana (chunked)
• 1 scoop vanilla or chocolate protein powder
• 1 tbsp peanut butter (or almond/sunflower butter)
• 1 tbsp hemp seeds (or chia/flaxseed)
• 1 tbsp cocoa nibs (or chopped dark chocolate)
• 1 cup almond milk (or oat/coconut milk)
• Dash of cinnamon + pinch of sea salt (optional but delicious)
Instructions
-
Layer It Right: Add almond milk, peanut butter, hemp seeds, protein powder, and cinnamon to blender.
-
Frozen Fun: Add banana chunks and ice. Blend on low, then high for 30–45 seconds.
-
Crunchy Magic: Add cocoa nibs and pulse 2–3 times to keep the crunch.
-
Serve: Pour into your favorite glass, dust with cinnamon, and top with extra nibs or banana slices.
Notes
• Tropical Vibe: Use coconut milk + pineapple chunks.
• Mocha Mood: Add ¼ cup cold brew + 1 tsp cacao.
• Green Power: Blend in spinach—trust, you won’t taste it!
• Cookie Dough Remix: Add oats + vanilla extract, top with mini chips.
• Vegan & Nut-Free: Use sunflower butter + soy milk.
- Prep Time: 5 mins
Nutrition
- Calories: 320per serving
- Fat: 14g
- Carbohydrates: 25g
- Fiber: 6g
- Protein: 20g
Banana Chip Smoothie Nutrition (Per Serving)
Approximate stats: Calories: ~320 | Protein: ~20g | Carbs: ~25g | Fat: ~14g | Fiber: ~6g
Note: Numbers vary based on exact ingredients (especially milk and protein powder). This is a balanced blend of healthy fats (hemp, nut butter), complex carbs (banana), and protein – keeping you full and energized!
Final Thoughts: More Than a Smoothie
This Banana Chip Smoothie is a Trojan horse—disguised as a treat, packed with nourishment, and loaded with emotional resonance. It’s proof that eating well doesn’t mean sacrificing joy, and that the smallest rituals (blending, sprinkling, sipping) can anchor us in a frantic world. Whether it’s the science of satiety, the psychology of comfort, or the art of slowing down, this recipe isn’t just about feeding your body. It’s about feeding your whole self—one chocolate-flecked sip at a time.
Ready to Blend? Save This Recipe for Later!
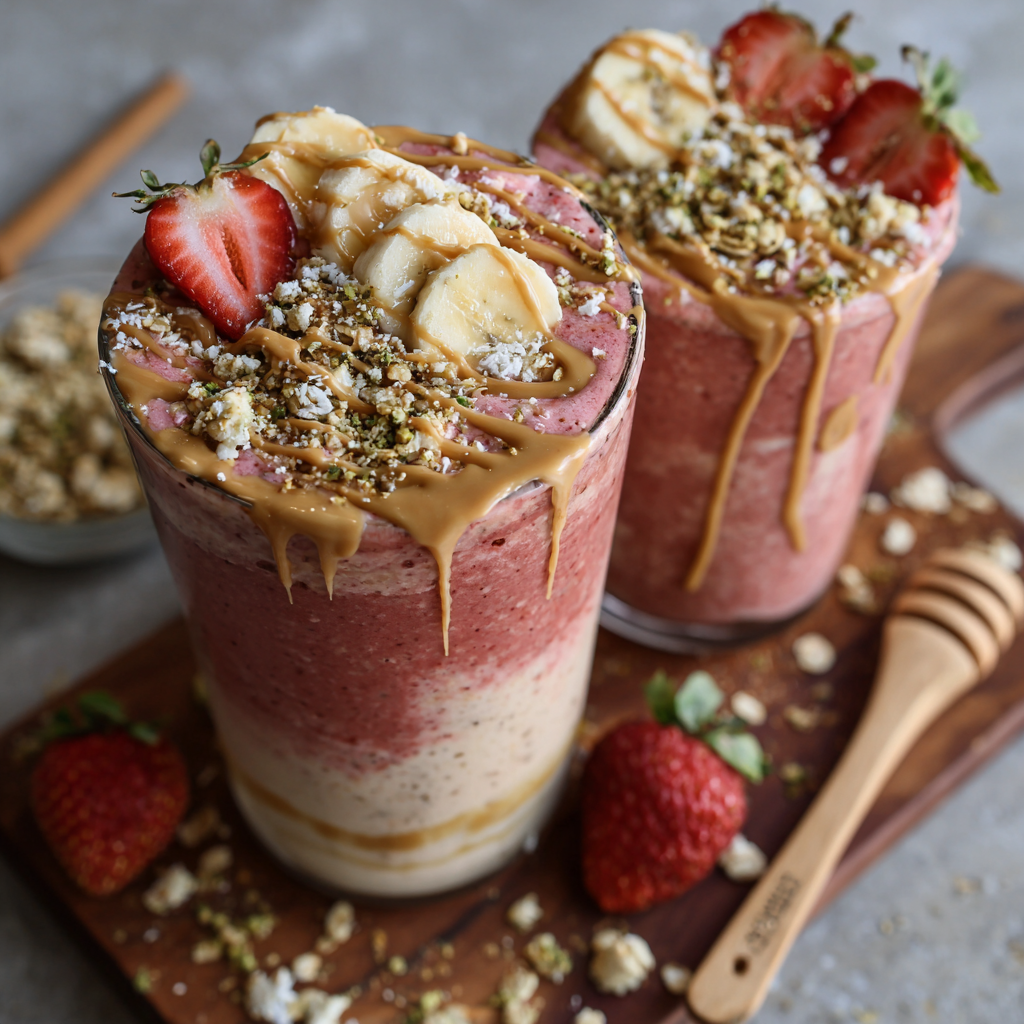
Strawberry PB Banana Smoothie
There’s Magic in That First Sip: Your New Favorite Smoothie Awaits!
Hey there, friend! Grab your favorite blender cup and pull up a stool at my kitchen island. Can you smell that? It’s the sweet promise of ripe strawberries and nutty peanut butter dancing through the air – and it means we’re about to make something truly special together. If your mornings feel rushed or your afternoons need a bright spot, this Strawberry PB Banana Smoothie is about to become your edible hug in a glass. 🍓🥜
Picture this: velvety banana hugging tart strawberries, swirled with rich peanut butter that tastes like your childhood lunchbox upgraded for grown-up tastebuds. Then imagine topping it all with crunchy granola that crackles like autumn leaves underfoot. It’s nostalgia and nourishment in one sip – and the best part? You’re five minutes away from holding this masterpiece. No fancy skills needed! Just like that cozy sweater you reach for when life gets chaotic, this smoothie wraps you in comfort while packing protein, fiber, and joy. Whether you’re juggling work calls or craving post-yoga fuel, consider this your invitation to pause, blend, and taste the moment.
I designed this recipe for real life – using ingredients that won’t have you hunting through specialty stores. Every element serves a purpose: frozen bananas for creaminess (no ice needed!), hemp seeds for omega-3s, and protein powder that actually tastes like dessert. So tie on that messy apron (we’re kindred spirits, you and I!), and let’s make magic happen. Your blender’s humming? Mine too. Let’s go!
Sunshine & Sticky Fingers: Why This Smoothie Tastes Like Home
Funny how food carries memories, isn’t it? Every time I make this smoothie, I’m instantly back at my grandma’s farmhouse table. Age eight, legs swinging under the chair, watching her mash strawberries from her garden into thick peanut butter sandwiches. She’d wink and say, “Livvy-girl, sweet and salty is the secret handshake of happy tastebuds.” That combo became my love language.
Years later, during my broke college days, I’d recreate those flavors with frozen bananas and discount berries – my version of a “milkshake” that wouldn’t wreck my budget or energy. One rainy Tuesday, I threw in a scoop of protein powder after a tough exam, topped it with granola for crunch… and boom. The first sip felt like a warm hug from Grams herself. Now, when I blend this up for my kids (who insist on “helping” by dropping strawberries everywhere!), I see her hands guiding mine. That’s the power of food, isn’t it? It’s never just fuel. It’s love, memories, and sticky-fingered joy, all whirring together in a blender.
Your Flavor Toolkit: Simple Ingredients, Big Impact
Gather these heroes! Every piece plays a role – and I’ve got swaps for whatever’s in your pantry:
- 1 frozen banana (broken into chunks) – Your creamy base! Freezing ripe bananas amplifies sweetness and creates that luscious milkshake texture. Swap: No frozen banana? Use ½ fresh banana + ½ cup ice cubes.
- 2–3 fresh strawberries (hulled) – Brightness bombs! Fresh berries give vibrant flavor vs. frozen’s intensity. Chef’s Trick: Rub hulled berries with a pinch of sugar to intensify juices.
- 1 scoop Truvani banana cinnamon protein powder – Secret flavor booster! Adds warmth and 15g plant-based protein. Swap: Vanilla protein powder + ¼ tsp cinnamon works great!
- ¼ cup Greek yogurt (plain or vanilla) – Tangy richness! Thickens while adding probiotics. Dairy-Free? Coconut yogurt or silken tofu blend beautifully.
- 1 tbsp peanut butter – Heart-healthy fats! Use natural, runny PB for best blending. Nut-Free? Sunflower seed butter adds the same cozy richness.
- 1 tbsp hemp seeds – Nutrition ninjas! Packed with omega-3s and protein. No hemp? Chia seeds or flaxseed meal work too (add after blending to avoid gelling).
- ¾ cup almond milk (I love MALK Organics!) – Liquid gold! Unsweetened keeps sugar in check. Swap: Oat milk for creaminess, coconut water for lightness.
Toppings (Don’t Skip!):
- Strawberry banana granola (Seven Sundays is my fave) – Crunchy contrast! Adds fiber and makes it feel decadent. Chef’s Tip: Toast granola in a dry pan first for extra aroma!
- Extra hemp seeds + fresh strawberry slice – Pretty & nutritious! Optional but oh-so-instagrammable.
Blend Your Way to Bliss: Let’s Build Layers of Yum
Ready? Plug in that blender! We’ll layer ingredients strategically for the smoothest blend:
- Liquid First: Pour almond milk into the blender jar. Why? Liquids at the bottom help blades move freely! Toss in hemp seeds – they’ll hydrate as we add other ingredients.
- Soft Stuff Next: Add Greek yogurt, peanut butter, and fresh strawberries. Pro Tip: Smear PB on the blender wall – it won’t stick to the bottom!
- Frozen Power: Drop in frozen banana chunks and protein powder. Hack Alert: Break bananas into small chunks before freezing – your blender will thank you!
- Blend Smart: Start on LOW for 10 seconds to combine, then ramp up to HIGH for 45-60 seconds. Stop and scrape sides if needed. Texture Check: Want it thicker? Add 2 ice cubes. Thinner? Splash in 1 tbsp milk.
- The Grand Finale: Pour into your happiest glass. Drizzle extra PB artistically down the sides (use a squeeze bottle or warm slightly). Generously pile granola on top – it should look like a crunchy island! Add strawberry slice and hemp seeds.
Critical Tip: Drink IMMEDIATELY for that perfect hot-cold contrast! Granola loses its crunch if it sits too long. Trust me – I learned this the sad, soggy way during a photoshoot once. 😅
Serve With a Side of Sunshine
This smoothie is a whole mood! Serve it in a clear mason jar to show off those gorgeous pink swirls and crunchy toppings. Add a reusable straw (bamboo or metal) for sipping around the granola mountain. Pair it with:
- Morning hustle: Keep toppings separate in a tiny bowl for commute-friendly sipping
- Weekend vibes: Serve alongside warm almond butter toast
- Post-workout recharge: Add an extra scoop of protein powder and sip slowly
Remember – the granola topping isn’t just garnish; it’s a textural adventure! Encourage everyone to dive in with a spoon first.
Shake Up Your Sip: 5 Delicious Twists
This recipe is your canvas! Try these riffs:
- Chocolate Dream: Swap PB for chocolate almond butter + add 1 tbsp cacao powder. Top with cacao nibs!
- Tropical Escape: Use coconut milk + swap strawberries for ¼ cup mango. Top with toasted coconut flakes.
- Berry Blast: Replace strawberries with mixed berries (raspberries + blueberries). Add ½ tsp lemon zest for zing!
- Green Goddess: Sneak in ½ cup spinach (trust me, you won’t taste it!) + swap PB for almond butter.
- Cookie Dough Delight: Add 1 tbsp oat flour + ½ tsp vanilla. Top with mini chocolate chips!
From My Apron Strings to Yours
This smoothie has serious journey vibes! It started as a desperate college hack, evolved through my “health coach” phase (where I added spirulina – don’t recommend 😂), and finally found balance. The granola topping? Inspired by my toddler who demanded “crunchies” on everything! Over time, I learned:
- Freeze bananas at PEAK ripeness (brown spots = extra sweet!) in reusable bags.
- Hemp seeds > chia in smoothies – they blend smoother without turning gelatinous.
- Protein powder matters: Truvani’s cinnamon-banana makes it taste like dessert, but any clean vanilla works.
Funny story: Once I accidentally used salted caramel protein powder. It tasted like liquid peanut butter cookies! Sometimes mistakes are delicious… but maybe stick to the recipe first time around. 😉
Smoothie SOS: Your Questions, Solved!
Q: My smoothie turned out watery! What went wrong?
A> Three common culprits: 1) You used fresh banana instead of frozen (freeze it next time!), 2) Your yogurt was runny (opt for full-fat Greek), or 3) Too much milk. Start with ½ cup, adding more only if needed!
Q: Can I prep this ahead?
A> Blend base only (no toppings!) and store in fridge for 12 hours. Shake well before pouring. But – granola must be added fresh! Prep toppings in a jar the night before.
Q: Help! My protein powder made it chalky.
A> Two fixes: 1) Blend powder with liquid FIRST for 10 seconds before adding other ingredients, or 2) Switch brands. Truvani and Nuzest blend beautifully. Chalkiness usually means lower quality powder.
Q: Is this toddler/kid-friendly?
A> My kids DEVOUR it! For under 3s: Omit hemp seeds (choking risk), use sunflower butter instead of PB, and skip protein powder. Serve as a “smoothie bowl” with spoon!

Strawberry PB Banana Smoothie
- Total Time: 5 minutes
Description
Need a quick mood-lifter or energy boost that tastes like a PB&J hug? Meet your new favorite blend: the Strawberry PB Banana Smoothie. It’s a creamy swirl of ripe fruit, nutty richness, and crunchy granola magic. Ready in 5 minutes, this glass of nostalgia meets nutrition is perfect for busy mornings, post-workout refuels, or snack o’clock bliss. Let’s blend something that feels like home.
Ingredients
• 1 frozen banana (chunked)
• 2–3 fresh strawberries, hulled
• 1 scoop banana cinnamon protein powder (or vanilla + ¼ tsp cinnamon)
• ¼ cup plain or vanilla Greek yogurt (or coconut yogurt)
• 1 tbsp peanut butter (natural and runny works best)
• 1 tbsp hemp seeds (or chia/flax meal)
• ¾ cup almond milk (or preferred milk)
Toppings:
• Granola (strawberry-banana preferred)
• Extra hemp seeds + sliced strawberry
• Optional: Drizzle of warm peanut butter
Instructions
-
Start with Liquid: Pour almond milk into blender, add hemp seeds.
-
Add Soft Ingredients: Layer in yogurt, peanut butter, and strawberries.
-
Add Frozen & Powder: Drop in frozen banana chunks, protein powder.
-
Blend: Start on low, then high for 45–60 seconds until smooth. Adjust thickness with ice or milk.
-
Top It Off: Pour into glass, drizzle with warm PB, and add granola, extra seeds, and fruit.
Notes
• Tropical Vibes: Swap strawberries for mango + coconut milk.
• Chocolate Crave: Add cacao powder and chocolate granola.
• Green Boost: Sneak in spinach (you won’t taste it!).
• Berry Zing: Use mixed berries + lemon zest.
• Cookie Dough Fun: Add oat flour + vanilla, top with mini chocolate chips.
- Prep Time: 5 mins
Nutrition
- Calories: 350per serving
- Fat: 15g
- Carbohydrates: 30g
- Fiber: 6g
- Protein: 20g
Nourishment Breakdown (Approximate)
Per Serving: Calories: 350 | Protein: 20g | Carbs: 30g (Fiber: 6g) | Fat: 15g
Note: Stats vary based on exact brands/milk used. Includes granola topping. This balanced combo delivers sustained energy – the protein/fat/fiber trio prevents sugar crashes!
Final Thoughts: More Than a Smoothie—A Ritual
This recipe isn’t just about mixing ingredients—it’s a tiny act of self-care. The 5 minutes you spend blending are 5 minutes of mindfulness: the whir of the motor, the scent of strawberries, the first cold sip that makes you pause. In a world of grab-and-go meals, this smoothie is an invitation to slow down and savor.

Loaded Dessert Yogurt Bowl
Why This Dessert Bowl Feels Like a Hug in a Bowl
Hey there, kitchen friend! Olivia here, and I can practically feel your happy sigh when I tell you we’re making a dessert that’s equal parts indulgence and nourishment. Imagine this: creamy coconut yogurt swirled with vanilla protein, piled high with caramelized bananas, crunchy cocoa puffs, clusters that go *snap*, melty chocolate chunks, and rivers of peanut butter bliss. This Loaded Dessert Yogurt Bowl isn’t just food – it’s a texture party in your favorite bowl! No fancy techniques, no hours chained to the stove – just pure, unapologetic joy scooped straight from your kitchen. Whether you’re craving post-workout fuel, a sweet afternoon pick-me-up, or a “I deserve this” moment after wrangling laundry mountain, this bowl delivers. It’s the edible equivalent of fuzzy socks and your favorite playlist. So grab that slightly stained apron (mine’s currently rocking berry splatters!), and let’s build something deliciously wholesome together. Trust me, your spoon is about to become your new best friend.
That Time My Midnight Craving Sparked a Love Affair
Okay, confession time: this glorious bowl was born from a classic “Olivia Needs Chocolate NOW” moment. Picture it: midnight, pouring rain, fridge looking sadder than a deflated balloon. My post-yoga hunger had morphed into a full-blown chocolate emergency. I grabbed the only players on my pantry bench: a lonely banana, some leftover cocoa cereal, a dollop of peanut butter, and the last container of coconut yogurt. In a sleep-deprived haze, I layered them like my sanity depended on it. That first bite? Pure magic. The cool creaminess hugged the crunchy clusters, the banana turned sweet and soft, and that PB drizzle… oh, it was a sticky, glorious mess. It instantly transported me back to Saturday mornings as a kid, mixing everything into my yogurt with abandon. Now, it’s my go-to “happy place” recipe – proof that the best kitchen adventures often start with a rumbling tummy and a dash of desperation!
Your Dream Team Ingredients (And How to Wing It!)
- Coconut Yogurt + Vanilla Protein Powder: The dreamy, creamy base! (Chef’s Insight:) Coconut yogurt’s natural tang balances the sweet toppings. Mixing protein powder right in boosts staying power without grittiness if you whisk thoroughly! Sub: Greek yogurt for extra protein, or almond yogurt if nut-free.
- 1 Ripe Banana, Sliced: Nature’s caramel! (Tip:) Spotty bananas = sweeter flavor. Sub: Sliced peaches or stewed berries work beautifully.
- Cocoa Cereal or Grain-Free Cocoa Puffs: Your crunchy chocolate fix! (Why I Love It:) Adds playful texture without overpowering sweetness. Sub: Crushed dark chocolate rice cakes or cacao-dusted nuts.
- Peanut Butter Crunch Bites/Clusters: The satisfying *CRUNCH* factor! (Chef’s Secret:) These little nuggets hold their texture against the yogurt longer than plain granola. Sub: DIY mix: toss oats, nuts, PB, and maple syrup, then bake in clumps!
- Cookie or Oat-Based Granola: Hearty, toasty goodness. (Pro Tip:) Choose low-sugar granola since we’ve got other sweet elements. Sub: Toasted coconut flakes or chopped seed crackers.
- Dark Chocolate or Date-Sweetened Chunks: Melty pockets of joy! (Flavor Boost:) Chopped chunks > chips – more irregular melty bits! Sub: Cacao nibs for intense bite or chopped dried figs.
- Peanut Butter Drizzle: The liquid gold ribbon! (Hack Alert:) Warm PB slightly with a splash of almond milk for perfect drizzling consistency.
- Cacao Nibs (Optional): Bitter crunch contrast! (Why Add Them?:) They cut through richness and add antioxidants. Sub: Finely chopped espresso beans for coffee lovers.
Building Your Edible Masterpiece: Step-by-Step
Step 1: The Velvety Base
Grab a small bowl and your coconut yogurt. Sprinkle in that vanilla protein powder. Now, channel your inner whisk warrior! (Chef’s Whisper:) Whisk vigorously for 30 seconds – this prevents any chalky lumps and makes it luxuriously smooth, almost like vanilla mousse. Lazy-day hack? Add both to a jar, screw on the lid, and shake like a polaroid picture!
Step 2: Banana Blanket
Pour that creamy dream into your serving bowl (the wider, the better for topping real estate!). Artfully arrange your banana slices in a slightly overlapping layer. (Pro Move:) Sprinkle a tiny pinch of cinnamon over the bananas here – it adds warmth and makes them taste extra caramelized!
Step 3: The Crunchy Carnival
Now, the fun part – PILE IT ON! Scatter the cocoa cereal, peanut butter clusters, and granola generously. (Texture Tip:) Think “variety” – mix bigger clusters with finer granola bits. Don’t skimp! Then, nestle in those chocolate chunks. (Secret:) Tuck some chunks *under* other toppings so they get slightly melty from the yogurt’s chill.
Step 4: Drizzle & Drama
Take your slightly warmed peanut butter (or PB thinned with milk) and drizzle with abandon! Zigzags, swirls, love hearts – go wild! (Presentation Perk:) Drizzle some directly on the bananas and some over the crunchy bits for different textures. Finally, if using, sprinkle those cacao nibs like edible confetti for a sophisticated bitter note.
Step 5: Dive In!
No delay allowed! Grab your spoon and dig in immediately. (Why Rush?:) This ensures maximum contrast between the cold base, room-temp fruit, and crunchy toppings before they soften. The symphony of textures is half the magic!
Making It Look as Good as It Tastes
Serve this beauty in a wide, shallow bowl – think pasta bowl or deep plate. It showcases all those gorgeous layers! Clear glass is extra fun for seeing the colorful strata. For serious “wow” factor, serve with a cute patterned spoon and a little extra drizzle swirled on the rim. If you’re feeling fancy, a mint leaf or edible flower adds a pop, but honestly? That glorious, messy mountain of goodness speaks for itself. This is meant to be eaten curled up on the couch, sunshine streaming in, or cozied under a blanket – zero pretension required!
Shake It Up! 5 Delicious Twists
1. Berry Bliss: Swap banana for mixed berries. Use vanilla yogurt (no protein needed) and swap PB drizzle for almond butter. Top with freeze-dried raspberries for punch!
2. Tropical Escape: Use mango chunks instead of banana. Mix passionfruit pulp into the yogurt base. Top with toasted coconut flakes, macadamia nuts, and a honey drizzle.
3. Nut-Free Nirvana: Use sunflower seed butter instead of PB. Swap PB clusters for pumpkin seed clusters. Ensure granola & cereal are nut-free.
4. Chocoholic’s Dream: Add 1 tsp cacao powder to the yogurt mix. Use double chocolate granola & chocolate clusters. Drizzle with melted dark chocolate AND PB!
5. Protein Powerhouse: Add a scoop of collagen peptides WITH the protein powder. Top with hemp seeds and chopped roasted chickpeas for extra crunch & protein!
Olivia’s Notebook Scribbles
This bowl has become my culinary security blanket! It’s evolved SO much since that desperate midnight raid. I started adding the protein powder after realizing it kept me full through morning meetings. The peanut butter drizzle thickness became a science experiment – too thick and it clumps, too thin and it disappears! My biggest laugh? The time I tried “artfully” drizzling with a squeeze bottle… only to have it explode like a PB volcano all over my white countertop. Lesson learned: a spoon works just fine! The beauty is its flexibility. My husband adds a shot of espresso powder to his yogurt (madness!), my kiddo piles on extra chocolate. It’s less a rigid recipe, more a joyful blueprint for building YOUR perfect bite. Play with what makes your tastebuds sing!
Your Questions, Answered!
Q: My yogurt base got super thick! Did I mess up?
A: No worries! Different protein powders absorb moisture differently. Just stir in a tiny splash of plant milk (almond, oat) or even water, 1 tsp at a time, until it’s creamy again. It happens to me too!
Q: Can I prep this ahead for breakfast?
A: You can mix the yogurt/protein base and slice bananas the night before (store separately). BUT assemble everything else right before eating. Toppings will get soggy if left sitting on the yogurt. Prep components, then build fast!
Q: Help! I don’t have coconut yogurt. What’s the best swap?
A: Greek yogurt is my top pick! It’s thicker and tangier, so you might want a touch more vanilla extract or a drizzle of honey. For dairy-free, almond or oat yogurt works, but they’re often thinner – drain excess liquid in a fine-mesh strainer for 10 mins first.
Q: Why did my peanut butter drizzle harden?
A: Cold yogurt + cooler PB = quick setting! Ensure your PB is *warm* (not hot) and slightly thinned. Drizzle it last, right before serving. If it hardens a little, it’s still delicious – think “peanut butter chips”!
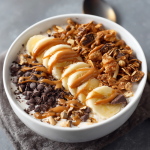
Loaded Dessert Yogurt Bowl
- Total Time: 5 minutes
Description
Imagine a bowl that feels like a warm hug but tastes like dessert heaven. This Loaded Dessert Yogurt Bowl is where creamy coconut yogurt meets dreamy protein, caramelized banana, cocoa crunch, peanut butter drizzle, and melty dark chocolate chunks. It’s indulgent, balanced, and endlessly customizable—whether you’re post-yoga hungry or just treating yourself after a long day. Dive into comfort, one spoonful at a time.
Ingredients
• ½ cup coconut yogurt + 1 scoop vanilla protein powder
• 1 ripe banana, sliced
• 2 tbsp cocoa cereal or cocoa puffs
• 2 tbsp peanut butter clusters or granola
• 1 tbsp oat or cookie-based granola
• 1 tbsp dark chocolate chunks
• 1 tbsp peanut butter (warm for drizzle)
• Optional: cacao nibs or cinnamon
Instructions
-
Whisk the Base: Mix coconut yogurt and protein powder until smooth and mousse-like.
-
Layer It Up: Spoon into a wide bowl. Add banana slices and sprinkle cinnamon.
-
Crunch Time: Top with cocoa cereal, clusters, granola, and chocolate chunks.
-
Drizzle: Warm peanut butter and drizzle generously. Optional: top with cacao nibs.
-
Enjoy Immediately: Best served fresh for max crunch and contrast!
Notes
• Berry Vibes: Swap banana for berries and use almond butter.
• Tropical Touch: Try mango, coconut flakes, and honey.
• Nut-Free: Use sunflower butter and seed-based clusters.
• Double Choco: Add cocoa powder to yogurt and drizzle with dark chocolate.
• Extra Protein: Add collagen and hemp seeds.
- Prep Time: 5 mins
Nutrition
- Calories: 475per serving
- Fat: 24g
- Carbohydrates: 42g
- Fiber: 7g
- Protein: 22g
Nourishment Notes (Approx Per Serving)
Calories: ~475 | Protein: ~22g | Carbs: ~42g (Natural Sugars: ~18g) | Fat: ~24g (Mostly Healthy Fats!) | Fiber: ~7g
Note: Values can vary based on specific brands and exact quantities used. This bowl packs protein for satiety, healthy fats for energy, fiber for digestion, and natural sweetness. It’s a balanced treat!
Final Thoughts: More Than Just a Dessert
This Loaded Dessert Yogurt Bowl isn’t just a recipe—it’s a mini wellness ritual. It’s proof that indulgence and nourishment can coexist, that cravings don’t need to be “fixed” with deprivation, and that the simplest foods can become tiny celebrations. Whether you’re meal-prepping components for busy mornings or treating yourself after a long day, this bowl adapts to your needs with zero judgment.
So here’s to midnight kitchen experiments, to embracing the mess (PB drips and all), and to desserts that make you feel good. Now, go grab that spoon—your edible hug awaits!
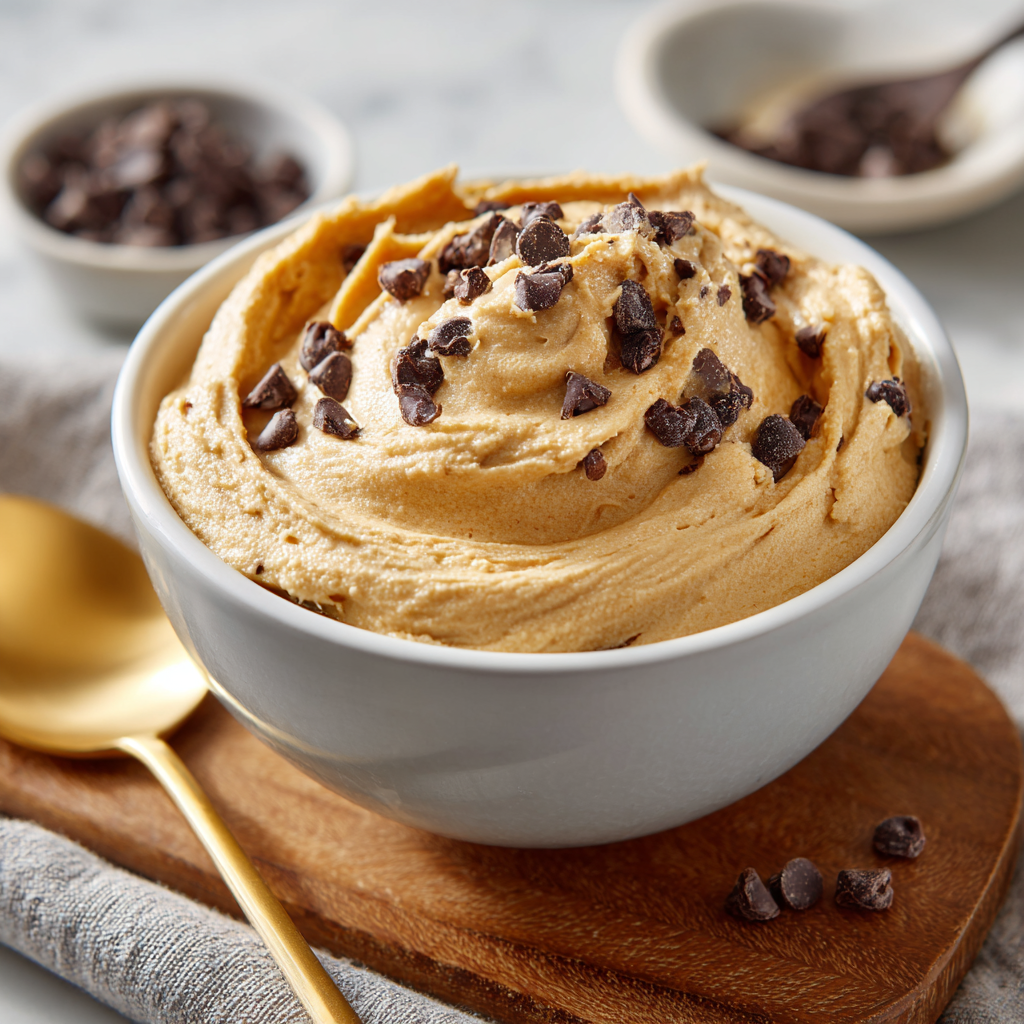
Peanut Butter Cookie Dough Bowl
Your Dreamy, No-Bake Cookie Dough Escape Is Here!
Hey friend! Olivia here, apron slightly dusted with cocoa powder (as usual), waving my spoon from my cozy kitchen. Can we talk about those moments when a cookie dough craving hits like a freight train? You know the ones – where only that rich, peanut-buttery, chocolate-studded magic will do? But then that little voice whispers, “Maybe… something with a *bit* more oomph?” Enter my Peanut Butter Cookie Dough Bowl – your instant, no-bake, protein-packed hug in a dish.
This isn’t just dessert; it’s your secret weapon. It’s the answer to 3 PM slumps, post-workout rewards, or those “I need comfort NOW” evenings. Forget heating up the oven or waiting for cookies to cool! We’re whipping up edible cookie dough bliss in under 5 minutes using simple, wholesome ingredients that love you back. Think creamy Greek yogurt meets melty peanut butter, hugged by nutty flour and pools of dark chocolate – all swirling together in one gloriously dippable bowl. It’s indulgence without the sugar crash, comfort without the compromise. Whether you’re a seasoned kitchen whiz or just figuring out your whisk from your spatula, this recipe is your instant win. So grab your favorite spoon (the big one!), and let’s make magic happen!
That One Summer & the Forbidden Bowl
Picture this: Me, age 12, visiting my grandma. Her kitchen smelled like perpetual warmth – cinnamon, roasting chicken, and always, *always* chocolate chip cookies cooling on the rack. One scorching afternoon, the siren song of leftover cookie dough in her mixing bowl was too strong. I snuck a fingerful (okay, maybe five) of that raw, buttery heaven. Pure joy! Until Grandma caught me mid-scoop. “Olivia Grace!” she scolded, eyes wide. “Raw eggs! Flour! You’ll get sick!” My heart sank. The forbidden dough tasted even sweeter after that.
Years later, that memory sparked this recipe. I wanted that childhood thrill – the cool creaminess, the sweet-salty hit, the chocolate chunks – but without the worry. My first experiments involved mashed chickpeas (a noble effort, but… no). Then, Greek yogurt waltzed in, bringing tang and protein. Nut flour joined for that authentic doughy feel. Honey became the sweet whisper. Suddenly, I had it: a bowl that tasted like sneaking Grandma’s dough, but that she’d actually *approve* of. Now, every spoonful feels like a delicious little rebellion – safe, nourishing, and utterly nostalgic.
Gather Your Cookie Dood Dream Team
Here’s the beautiful part – just 5 simple stars create this symphony! Look for quality, especially in the peanut butter and chocolate. Let’s break it down:
- 2 tbsp Peanut Butter: Creamy is king here for that smooth dough texture! Go natural (just peanuts + salt) for pure flavor. Chef’s Tip: If your PB is stiff, warm it slightly for easier mixing. Swap: Almond butter, cashew butter, or even sunflower seed butter for nut-free.
- 2 tbsp Almond Flour or Oat Flour: Almond flour gives a richer, nuttier base (my fave!), while oat flour is slightly heartier and budget-friendly. Chef’s Insight: This replaces raw flour, making it safe AND adding fiber/protein. Swap: Use certified gluten-free oat flour if needed.
- ¼ cup Greek Yogurt: Plain, full-fat Greek yogurt is our MVP! It brings creaminess, tang, and a whopping protein punch. Chef’s Tip: Full-fat = richer texture. Swap: Thick coconut yogurt (for dairy-free) or Skyr for even more protein.
- 1 tbsp Honey: Pure magic for binding and natural sweetness. Chef’s Insight: Adjust to your sweet tooth! Start with 1 tsp and add more if needed. Swap: Pure maple syrup, agave, or a pinch of date paste.
- 2 tbsp Dark Chocolate Chips or Chunks: The non-negotiable crown jewels! Dark chocolate (70%+) balances sweetness beautifully. Chef’s Tip: Chop a chocolate bar for melty pockets! Swap: Milk chocolate chips, cacao nibs for crunch, or chopped nuts.
Let’s Build Your Blissful Bowl (No Oven Required!)
Ready for the easiest “cooking” session ever? Grab one medium mixing bowl, a sturdy spoon or spatula, and let’s dive in:
- The Creamy Foundation: Plop that glorious peanut butter and Greek yogurt right into your bowl. Add the honey too! Chef’s Hack: If your peanut butter is cold from the fridge, microwave JUST the PB for 10 seconds first. It blends like a dream! Use your spoon or spatula to mash and stir them together vigorously. You want it smooth and completely combined – no yogurt or PB streaks! This takes about 30 seconds of enthusiastic stirring. Why? Starting creamy ensures everything else incorporates evenly.
- Bring in the “Dough”: Sprinkle in your almond flour or oat flour. Chef’s Pro Tip: Add it gradually! Dump it all in at once, and you might get a mini flour explosion (ask me how I know…). Stir, stir, stir! The mixture will thicken significantly and start looking wonderfully dough-like. It should pull away slightly from the sides of the bowl. If it feels too stiff, add 1 tsp of milk (dairy or plant-based) or water. Too loose? A tiny pinch more flour. Texture Check: Aim for thick, scoopable, and luscious.
- Chocolate Chunk Celebration: Time for the grand finale! Add those beautiful dark chocolate chips or chunks. Chef’s Secret: Reserve a small handful! Fold them in gently with your spatula. “Folding” means using a soft, turning motion – don’t aggressively stir, or you might break the chips. We want distinct melty pockets of chocolate! Bonus Joy: Throwing in that reserved handful on top looks gorgeous.
- Chill or Thrill (Your Choice!): Your edible cookie dough is READY! Grab a spoon and dive in immediately for a softer, almost dip-like experience. OR For a firmer, truer-to-traditional-cookie-dough texture, pop the bowl in the fridge for 10-15 minutes. Chef’s Confession: I can rarely wait the full 10 minutes… but that slight chill makes the chocolate chunks extra satisfying!
Presenting Your Peanut Butter Masterpiece
This bowl is pure, uncomplicated joy, so serving is delightfully simple! Scoop it straight from the mixing bowl you made it in – zero fuss. Want to elevate the vibe? Transfer it to a cute little cereal bowl, mini mason jar, or even a fancy dessert glass. The key is using a spoon you LOVE – maybe that oversized wooden one or a vintage teaspoon. For a final touch of pizzazz, sprinkle a few extra chocolate chips or a tiny pinch of flaky sea salt on top right before serving. That salt? It makes the peanut butter and chocolate SING. Pair it with a big mug of cold almond milk or a hot coffee for peak cozy contentment.
Mix It Up! Your Dough, Your Rules
This bowl is your blank canvas! Here are 5 fun ways to riff on it:
- Berry Blast: Fold in 2 tbsp of fresh or frozen (thawed/drained) raspberries or chopped strawberries with the chocolate. Sweet-tart perfection!
- Salty Pretzel Crunch: Swap half the chocolate chips for crushed salted pretzel pieces. Sweet, salty, crunchy bliss!
- Protein Powerhouse: Stir in 1 scoop of vanilla or chocolate protein powder (add 1-2 tsp extra milk/yogurt if needed). Ultimate post-workout treat.
- Chocolate Overload: Use chocolate protein powder *and* stir in mini chocolate chips *and* drizzle with melted chocolate. For serious chocoholics only!
- Sunflower Seed Sensation (Nut-Free): Use sunflower seed butter and sunflower seeds instead of chocolate chips. Safe and delicious for nut-free friends!
Olivia’s Extra Scoops of Wisdom
This little bowl has become my kitchen security blanket! It started as a desperate attempt to satisfy a pregnancy craving without turning on the oven in July. Over time, it’s evolved – I tried adding mashed banana (too sweet), pumpkin puree (interesting, but not cookie dough), and even a dash of espresso powder (win!). The version you see is the happy, streamlined result of many delicious experiments. One hilarious fail involved using coconut flour instead of almond… friends, a little coconut flour goes a VERY long way! I ended up with a dense, Sahara-dry puck. Lesson learned! Now, I keep a jar of almond flour specifically labeled “FOR DOUGH BOWLS ONLY” so my sleepy morning brain doesn’t grab the wrong bag. The best part? Seeing my kids make it now. They feel like kitchen rockstars, and I love knowing they’re getting a treat packed with good stuff. It’s proof that simple, real ingredients can create pure magic (and happy memories!).
Your Cookie Dough Bowl Questions, Answered!
Let’s tackle those common kitchen hiccups before they happen!
- Q: My dough seems too runny! Help!
A: Don’t panic! This usually happens if the yogurt was extra watery or the nut butter was very oily. Pop the bowl in the fridge for 15-20 minutes – the cold firms it up beautifully. Next time, you can slightly reduce the yogurt by 1 tsp or add an extra 1/2 tsp of flour. - Q: Can I make this ahead of time?
A: Absolutely! It keeps wonderfully in the fridge for up to 2 days in a sealed container. The texture gets firmer, almost like truffle filling – so good! Give it a quick stir before eating. I don’t recommend freezing, as the yogurt texture can get icy. - Q: Is oat flour or almond flour better?
A: It’s totally about preference! Almond flour gives a richer, more decadent, slightly marzipan-like vibe and keeps it lower carb. Oat flour has a heartier, oatier flavor (like cookie dough meets oatmeal) and is usually cheaper. Try both! You can’t go wrong. - Q: Can I use regular flour? It’s what I have!
A: Important! Do NOT use raw all-purpose or whole wheat flour in this recipe. Regular flour needs to be heat-treated (baked) to kill potential bacteria before eating raw, which defeats our “no-bake” purpose! Stick to almond flour, oat flour, or other safe nut/seed flours listed.
Peanut Butter Cookie Dough Bowl
- Total Time: 5 minutes
Description
Craving that spoonful of cookie dough magic without the raw-egg worry or sugar crash? Say hello to this creamy, dreamy, protein-packed Peanut Butter Cookie Dough Bowl. It’s rich, salty-sweet, and endlessly satisfying—ready in under 5 minutes with zero baking and total joy. Think post-gym reward, movie-night treat, or late-night comfort you’ll feel good about. Let’s spoon into happiness.
Ingredients
• 2 tbsp creamy peanut butter (or almond/cashew butter)
• 2 tbsp almond flour or oat flour
• ¼ cup plain full-fat Greek yogurt
• 1 tbsp honey (or maple syrup)
• 2 tbsp dark chocolate chips or chunks
Instructions
-
Blend the Base: In a bowl, stir together peanut butter, yogurt, and honey until silky smooth.
-
Create the Dough: Gradually mix in flour until thick and doughy. Adjust with a splash of milk if too stiff.
-
Add Chocolate: Gently fold in chocolate chips. Save a few for topping!
-
Serve or Chill: Eat immediately for soft, dip-like texture, or refrigerate 10–15 minutes for a firmer, scoopable bowl.
Notes
• Berry Bliss: Fold in chopped berries for a tart pop.
• Pretzel Crunch: Swap half the chocolate for crushed pretzels.
• Nut-Free? Use sunflower seed butter and seeds.
• Boosted: Stir in protein powder for an extra punch.
- Prep Time: 5 mins
Nutrition
- Calories: 350per serving
- Fat: 22g
- Carbohydrates: 20g
- Protein: 15g
Nourishment in Every Bite (Approximate per Serving)
- Calories: ~350
- Protein: ~15g (Thanks, Greek yogurt & nut butter!)
- Carbohydrates: ~20g
- Fat: ~22g (Mostly the good, healthy fats from nuts!)
- Fiber: ~3g
Remember: This varies based on your specific brands and any swaps (like using maple syrup or different nut butter). It’s a satisfying treat that fuels you!
Final Thoughts: A Bowl Full of Joy
This Peanut Butter Cookie Dough Bowl is more than a recipe—it’s a reminder that treats can be both indulgent and nourishing. It’s quick enough for busy days, wholesome enough for daily enjoyment, and delicious enough to feel like a real dessert.
Whether you stick to the classic or experiment with fun twists, one thing’s for sure: every spoonful is pure happiness. So grab your bowl, take a deep breath, and savor the moment. You deserve it.
Frozen PB Whip Cup
Hey there, fellow flavor-chaser! Raise your hand if you’ve ever stared into your freezer at 9 p.m., desperately craving something sweet-but-not-too-sinful, creamy-but-not-complicated. ✋ Been there, done that, burned the midnight oven mitts. That’s exactly why I’m practically sprinting to share this Frozen PB Whip Cup with you today. Imagine fluffy clouds of whipped topping swirled with salty-sweet peanut butter magic, crowned with chocolatey peanut butter cups, all frozen into spoonable perfection. It’s like a peanut butter cup’s dreamy, melt-in-your-mouth cousin!
This isn’t just a recipe—it’s your secret weapon. Crazy week? Impromptu guests? Midnight snack emergency? Done, done, and deliciously done in 5 minutes flat. No fancy equipment, no baking, just a bowl, a spoon, and that beautiful freezer of yours. I live for recipes that make you feel like a kitchen rockstar without the stress, and this one? It’s a standing ovation every single time. Whether you’re a dessert newbie or a seasoned sweet-treat slinger, this fuss-free wonder is about to become your go-to. So grab your coziest apron (or don’t—zero judgment here!), and let’s make magic happen!
Why This Recipe Tastes Like a Hug (With Extra Peanut Butter)
Picture this: It’s 2018, my tiny Brooklyn apartment kitchen is hotter than a jalapeño in July, and my best friend texts, “Surprise! Be there in 20 with wine!” Cue panic. My oven’s broken, my fruit bowl’s down to one sad lemon, and my dessert game is… nonexistent. Then I spot it: leftover Cool Whip from a pie experiment, powdered peanut butter stashed in the pantry (my running fuel!), and a rogue bag of Reese’s cups hiding behind the coffee beans. Hail Mary time!
I frantically mixed everything, chucked it in the freezer, and crossed my fingers. Twenty minutes later? Pure. Gold. My friend took one bite, eyes wide, and whispered, “Is this… cloud PB&J?!” We demolished it straight from the ramekin, giggling like kids who’d discovered candy nirvana. That messy, sweaty, improvised moment birthed this recipe. Now, it’s my edible happy place—a reminder that sometimes the best things aren’t Pinterest-perfect, but joyfully, deliciously thrown together with love (and maybe a little desperation!). Every spoonful still tastes like that first giddy summer night.
Your 3-Ingredient Treasure Trove
Gather your edible MVPs! Here’s why these picks matter—and how to swap like a boss:
- 1 cup extra creamy whipped topping (like Cool Whip): This is your fluffy backbone! The “extra creamy” version holds up best when frozen, giving that dreamy, mousse-like texture. Chef’s Hack: Thaw it in the fridge for 1–2 hours—it should be soft but still chilly. Sub Alert: For a vegan twist, use coconut whipped topping. Homemade whipped cream works too, but add 1 tbsp powdered sugar and whip it stiff (it’ll be softer when frozen).
- 1–2 tbsp powdered peanut butter (or regular creamy peanut butter): Powdered PB is my ride-or-die here! It blends seamlessly without weighing down the fluff and packs intense peanut flavor minus the oiliness. Chef’s Secret: Start with 1 tbsp, taste, then add more if you’re a PB fiend. Sub Alert: Regular PB works—warm it for 5 seconds first so it folds in smoothly. Almond or cashew butter? Go for it!
- 1–2 chopped peanut butter cups (any kind!): The crunchy, chocolatey grand finale! Chopping them small ensures every bite has pockets of joy. Pro Tip: Freeze them for 10 minutes first—they won’t melt as you chop! Sub Alert: Vegan cups? Crushed pretzels? Chocolate chips? Yes, yes, and heck yes!
Let’s Whip Up Some Joy (Step by Step!)
Ready? Set? Let’s swirl! Follow these foolproof steps—I’ve packed ’em with kitchen-tested hacks:
- Fold, Don’t Fight! In a medium bowl, gently add your peanut butter (powdered or regular) to the whipped topping. Key Move: Use a rubber spatula to “fold” (scoop from the bottom up and over) instead of stirring. Why? We’re protecting those precious air bubbles! Pro Tip: If using powdered PB, sift it in to avoid lumps. For regular PB, warm it slightly—it’ll incorporate like a dream. Fold until just combined (overmixing = sad, deflated fluff).
- Choose Your Adventure Vessel Grab a 6–8 oz ramekin, mini mason jar, or even a cute teacup! Lightly spritz it with cooking spray (trust me—easy scooping later). Spoon in your PB fluff. Chef’s Flair: Swirl the top with the back of a spoon for a fancy finish!
- Top It Like It’s Hot (But It’s Cold!) Sprinkle those chopped peanut butter cups evenly over the top. Secret Hack: Gently press them in with your fingers—just enough to anchor them so they don’t tumble off your spoon! Feeling extra? Add a tiny flaky sea salt pinch here. ✨
- Freeze Your Masterpiece Pop it uncovered into the freezer for 20–30 minutes. Timing is Everything: At 20 mins, it’s like a mousse-softie; at 30 mins, it’s firmer (think ice cream). Storage Smarts: Freezing longer? Cover with plastic wrap after the first 30 minutes to prevent frosty bites.
That’s it! Your spoon is your passport to peanut butter paradise. 🥄✨
Serving Up the Smiles
This little cup of joy is a solo star—serve it right in its dish with a mini spoon (aesthetics matter, friends!). For ✨pizzazz✨, drizzle melted chocolate or caramel over top right before eating, or add a dollop of extra whipped cream. Pair it with cold brew coffee for an afternoon pick-me-up, or alongside a cheesy movie for maximum cozy points. Remember: it’s meant to be dug into straight from the freezer—no need to thaw!
Shake It Up! 5 Delicious Twists
Customize your Whip Cup like a flavor artist:
- Cookie Monster: Swap PB cups for 2 tbsp crushed Oreos or Nutter Butters.
- Salty-Sweet Crunch: Mix in 1 tbsp crushed pretzels and use salted caramel cups on top.
- Berry Bliss: Layer with fresh raspberries or a swirl of jam before freezing.
- Vegan Victory: Use coconut whipped topping + vegan PB cups.
- Elvis Special: Add ½ sliced banana + 1 tsp honey to the mix (freeze 30+ mins).
Olivia’s Extra Scoop
This recipe is my kitchen’s happy accident that stuck around! Over the years, I’ve learned powdered peanut butter is the MVP—it prevents that weird “peanut butter cement” texture regular PB can cause when frozen. Fun story: Once, my nephew dumped in entire peanut butter cups instead of chopping them… and honestly? The gooey, chunky mess was iconic. We still make “Lazy Logan Cups” in his honor! For peak nostalgia, I love using mini Reese’s—they remind me of Halloween buckets. If you’re doubling the batch (wise move!), freeze in individual portions. Life’s too short for mediocre desserts—this one’s your low-effort, high-reward hug in a cup!
Your Questions, Solved!
Q: Why’s my whip cup icy or watery?
A: Ah, the freezer foe! This happens if your whipped topping thawed too much pre-mixing. Keep it cold! If using regular PB, excess oil can also cause separation—powdered PB fixes this. For store-bought topping, check the expiry date (older ones get weepy).
Q: Can I make this dairy-free?
A: Absolutely! Use coconut whipped topping (chill the can overnight first) and vegan PB cups. Powdered peanut butter is usually dairy-free, but check labels!
Q: Help—mine turned out dense, not fluffy!
A: Overmixing is the culprit! Fold gently—stop as soon as no white streaks remain. Also, avoid regular peanut butter straight from the fridge; warm it slightly for smoother blending.
Q: How long can I freeze it?
A: 30 mins for soft-serve vibes; 2–3 hours max for firmer texture. Beyond that, it gets too hard. If frozen solid, let it sit 8–10 minutes before scooping.
Frozen PB Whip Cup
- Total Time: 3 minutes
Description
Say hello to the 3-minute wonder that’s here to rescue your sweet tooth—without sabotaging your snack sanity. This Frozen PB Whip Cup is cool, creamy, crunchy, and full of peanut butter joy. Whether it’s a late-night nibble or a last-minute guest-pleaser, this freezer-friendly delight is your edible hug in a ramekin. Ready to whip up happiness?
Ingredients
• 1 cup extra creamy whipped topping (like Cool Whip)
• 1–2 tbsp powdered peanut butter (or creamy PB, slightly warmed)
• 1–2 peanut butter cups, chopped
Instructions
-
Fold, Don’t Stir: In a bowl, gently fold peanut butter into the whipped topping using a rubber spatula. Keep it airy—don’t overmix.
-
Scoop & Style: Spoon into a small ramekin or jar (lightly greased). Swirl the top with the back of a spoon.
-
Top & Press: Sprinkle chopped peanut butter cups on top and gently press in. Optional: pinch of flaky salt.
-
Freeze: Pop into the freezer for 20–30 minutes. Serve straight from the freezer with a mini spoon!
Notes
• Crunchy Kick: Add crushed pretzels or cookie bits.
• Berry Boost: Swirl in jam or fresh raspberries.
• Vegan? Use coconut whipped topping and vegan PB cups.
• Elvis Remix: Fold in sliced banana and a touch of honey.
- Prep Time: 3 mins
Nutrition
- Calories: 200–250per serving
- Fat: 10g
- Carbohydrates: 20g
- Protein: 6g
Nutritional Nibbles (Per Serving)
Calories: ~200–250 • Protein: 6g • Fat: 10g • Carbs: 20g
Note: Stats vary based on brands and subs. Powdered PB slashes fat/cals vs regular!
Final Thoughts: Why This Recipe Deserves a Spot in Your Life
This isn’t just a dessert—it’s a mindset. It’s about embracing imperfection (hello, last-minute substitutions!), finding joy in simplicity, and treating yourself without the guilt. Whether you’re a busy parent, a midnight snacker, or just someone who believes peanut butter is a food group, this recipe is your edible high-five.
So next time life gets messy, remember: 5 minutes, 3 ingredients, and one freezer can solve a lot. Now go forth and whip up some happiness!
Recent Posts
- Moist Vegan Banana Bread : One-Bowl, No-Fail Classic
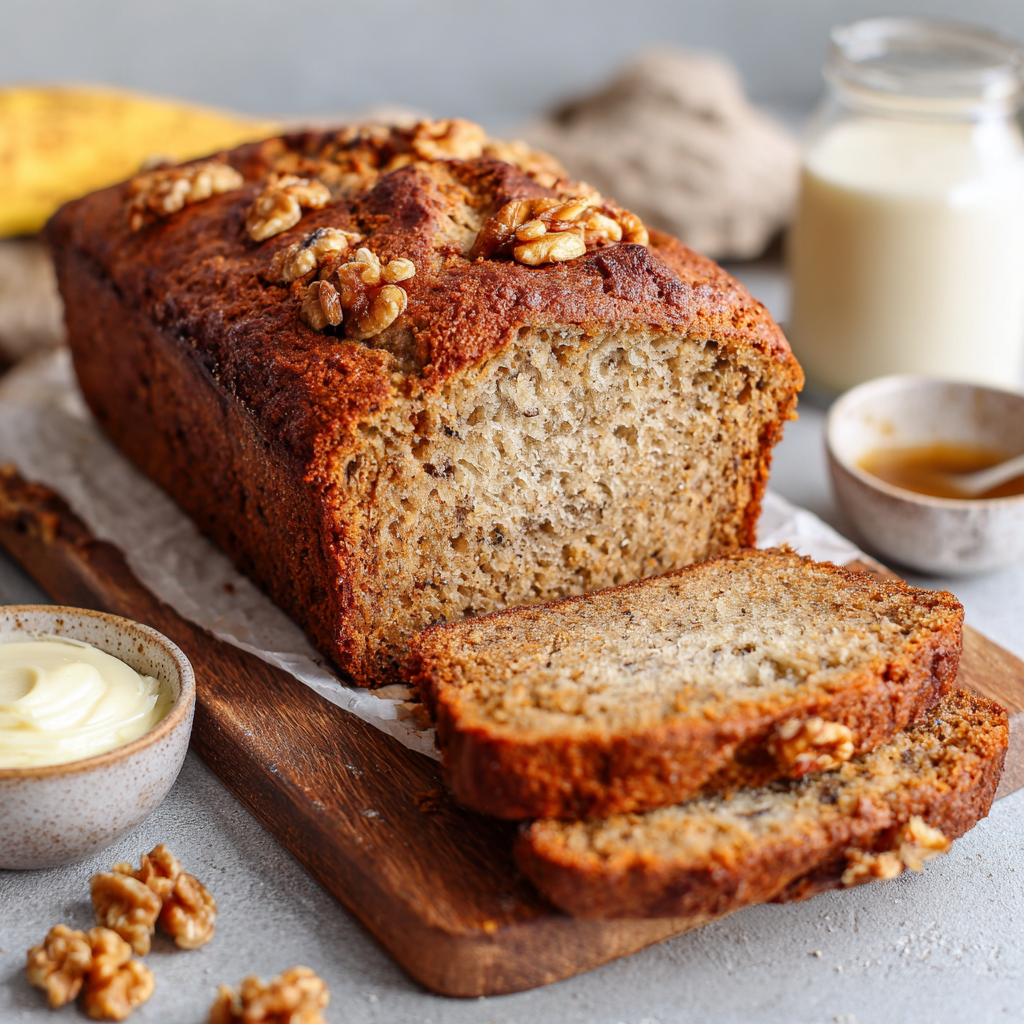
- Homemade Turkey Gravy : Rich, Silky, and Full of Flavor
- Easy Keto Broccoli Salad : Low-Carb, Crunchy, and Totally Craveable
- Hearty Vegan Chili : One-Pot, Protein-Packed & Totally Comforting
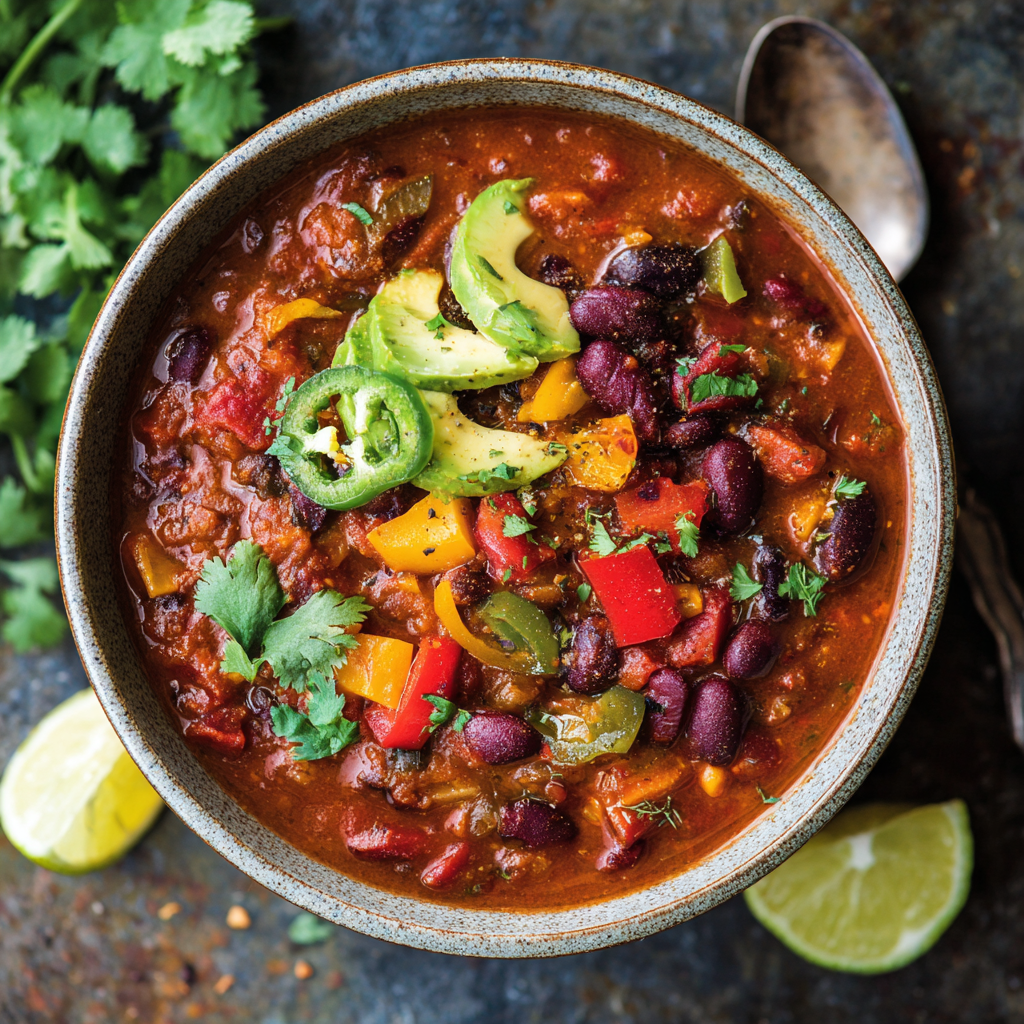
- The Best Crispy Baked Chicken Nuggets : Healthy, Easy & Kid-Approved
