Apple Cheddar Grilled Cheese: The Ultimate Cozy Upgrade
Hey there, friend! Come on in, pull up a stool. Can you smell that? It’s the unmistakable, soul-warming scent of onions slowly caramelizing in butter, mingling with the toasty aroma of bread browning in a skillet. It’s the kind of smell that makes everyone in the house drift into the kitchen, eyes wide with curiosity and stomachs rumbling. If you’re like me, you believe that a perfectly made grilled cheese is a love language all its own. But what if I told you we could take that classic, beloved comfort food and turn it into something truly spectacular?
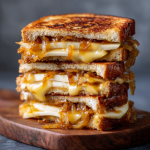
Today, we’re making my absolute favorite sandwich: an Apple & Cheddar Grilled Cheese with sweet, jammy Caramelized Onions. This isn’t just a sandwich; it’s an experience. It’s the perfect harmony of flavors and textures—sharp, melty cheese, crisp and slightly sweet apple slices, deeply savory onions, all hugged by two slices of glorious, golden-brown, butter-toasted bread. It’s cozy enough for a rainy day but sophisticated enough to serve with a glass of wine. It’s the sandwich that will make you feel like a culinary genius with minimal effort. So, grab your favorite skillet and let’s make some magic together!
A Slice of Nostalgia & A Pinch of Curiosity
This sandwich has a fun little origin story in my kitchen. It all started a few years ago during a particularly crisp fall afternoon. My husband and I had just gone apple picking and returned home with a comical surplus of fruit. We had apple pies, apple crisps, and applesauce coming out of our ears. I was staring at this mountain of Honeycrisps, wondering what else I could possibly make, when I remembered a classic flavor pairing: apples and sharp cheddar. It’s a combo I’ve loved since I was a kid at my grandma’s house, where she’d always serve apple pie with a slice of cheese on the side.
I thought, “Why not put it *inside* the grilled cheese?” And then, because I firmly believe caramelized onions make everything better, I tossed those in too. The result was nothing short of a revelation. That first bite was a warm, gooey, sweet-and-savory masterpiece. It instantly became a staple in our house, a recipe I’ve tweaked and perfected and shared with countless friends. It’s more than a recipe; it’s a happy little accident born from a bounty of apples and a love for cozy food. It reminds me that the best dishes often come from a place of playful experimentation.
Gathering Your Cozy Ingredients
Here’s everything you’ll need to create this masterpiece. Don’t stress about exact brands—this is about using what you love and have on hand!
- 4 slices sourdough or rustic bread: The foundation! I love sourdough for its tangy flavor and sturdy structure, which holds up to the fillings without getting soggy. A good country loaf or even a hearty whole wheat works beautifully too.
- 2 tablespoons butter, softened: Softened is the key word here! It allows for an even, thin layer that toasts the bread to a perfect golden brown without burning. Salted or unsalted both work fine.
- 1 cup sharp white cheddar, shredded or sliced: The star of the show! Sharp cheddar has the bold flavor needed to stand up to the sweet apples and onions. I prefer white cheddar for its classic look, but orange is just as tasty. Chef’s Tip: Grating your own cheese from a block melts far better than pre-shredded cheese, which contains anti-caking agents.
- ½ apple, thinly sliced: I adore Honeycrisp for their sweet-tart balance and firm texture that doesn’t turn to mush. Granny Smith is a fantastic tangy alternative. Just be sure to slice them thinly so they soften slightly in the heat.
- ½ cup caramelized onions: The secret weapon! They add a deep, sweet, umami richness. See below for how to make them. Pro move: Caramelize a big batch ahead of time and keep them in the fridge for easy sandwich, pizza, or burger upgrades all week!
For the Caramelized Onions:
- 1 large yellow onion, thinly sliced: Yellow onions are perfect here—they have the right sugar content for caramelizing.
- 1 tablespoon butter or olive oil: Butter adds incredible flavor, but olive oil works great too.
- A big pinch of salt: This helps draw the moisture out of the onions, speeding up the process.
Let’s Build the Ultimate Grilled Cheese!
Okay, apron on! Let’s do this step-by-step. Remember, low and slow is the motto for the best results.
- Caramelize Your Onions (if you haven’t already): This is the step that requires the most patience, but I promise it’s worth it. In a skillet over low heat, melt your tablespoon of butter. Add the thinly sliced onions and a pinch of salt. Cook, stirring occasionally, for 25-30 minutes. Don’t rush this by turning up the heat! You want them to become a deep golden brown, soft, and sweet. If they start to stick, add a tiny splash of water. Set them aside when done.
- Prep Your Sandwich Station: While the onions are working their magic, get everything else ready. Thinly slice your apple. Grate or slice your cheese. Soften your butter. This mise en place (fancy chef talk for “everything in its place”) makes assembly a breeze.
- Butter the Bread: Spread a thin, even layer of softened butter on one side of each slice of bread. This will become the gorgeous, crispy exterior of your sandwich.
- Build the Sandwich: Place two slices of bread, buttered side down, on your cutting board. On the unbuttered side, start layering: first, a generous layer of cheese. This creates a “glue” that helps hold everything together. Next, a single layer of apple slices, followed by a hearty spoonful of those glorious caramelized onions. Top it all off with another layer of cheese—this is crucial for sealing the deal! Place the remaining slices of bread on top, buttered side out.
- Grill to Perfection: Heat a skillet or griddle over medium-low heat. Yes, medium-low! We want the heat to gently penetrate the sandwich and melt all that cheese without burning the beautiful, buttery crust. Place your sandwiches in the skillet. Cook for 3-4 minutes, until the bottom is a deep golden brown. Chef’s Hack: Press down gently with a spatula now and then for even contact. Carefully flip and cook the other side for another 3-4 minutes, until equally golden and the cheese is visibly oozy and melted.
- The Final Test: If you press lightly on the top of the sandwich with your spatula and see a gentle, cheesy squish, you know it’s ready. If the bread is browning too quickly before the cheese melts, just turn the heat down a smidge.
How to Serve Your Masterpiece
Okay, the moment of truth! Immediately transfer your gorgeous grilled cheese to a cutting board and let it rest for just a minute—this allows the cheese to set slightly so it doesn’t all squirt out on the first bite. Slice it in half diagonally (because it just tastes better that way, right?). I love serving this sandwich on a simple wooden board or a colorful plate. It’s rich and satisfying all on its own, but it’s incredible with a side of tomato soup for dipping, a simple green salad with a bright vinaigrette to cut through the richness, or even a handful of crispy potato chips for that perfect crunch contrast.
Make It Your Own: Delicious Variations
The beauty of this recipe is its versatility! Here are a few ways to switch it up:
- Add a Protein: Crumble in some cooked bacon or sliced ham for a heartier, saltier kick.
- Spice It Up: Add a layer of whole grain mustard or a drizzle of hot honey on the inside of the bread before assembling for a sweet and spicy twist.
- Go Gourmet: Swap the cheddar for Gruyère or Fontina cheese for an even more complex, nutty flavor.
- Herbaceous Twist: Add a few fresh thyme leaves or a sprinkle of chopped rosemary in with the onions for an aromatic note.
- Gluten-Free/Dairy-Free: Use your favorite gluten-free bread and a good melting vegan cheese (and vegan butter). The apples and onions will still provide tons of flavor!
Chef Olivia’s Notebook
This recipe has truly evolved in my kitchen. The first time I made it, I was so impatient that I cranked the heat to high for the onions. Let’s just say I ended up with slightly burnt, still-crunchy onions and a smoky kitchen—not my finest hour! I learned that low and slow is non-negotiable for true caramelization. Now, I often caramelize a huge batch of onions on a lazy Sunday afternoon while I’m puttering around the kitchen listening to music. It’s become a therapeutic ritual. I’ve also learned that the type of apple really does matter. I once tried it with a Red Delicious (in a moment of desperation) and it turned to complete applesauce inside the sandwich. Stick with the firmer varieties for the best texture! This sandwich is a reminder that sometimes the simplest ideas, executed with a little care and patience, are the ones that become lifelong favorites.
Your Questions, Answered!
Q: My cheese isn’t melting by the time my bread is burning! What did I do wrong?
A: Ah, the classic grilled cheese dilemma! The heat is almost certainly too high. Grilled cheese is a lesson in patience. You want to cook it over medium-low heat to give the heat time to travel through the bread and gently melt the cheese without scorching the exterior. If this happens, just lower the heat and maybe even tent the skillet with a lid for a minute to trap heat and help the cheese along.
Q: Can I make this ahead of time?
A: You can prep the components ahead of time! Caramelize the onions and store them in the fridge for up to 5 days. Slice your cheese and apples (to prevent browning, toss the apple slices in a tiny bit of lemon juice). But for the best texture, assemble and cook the sandwiches just before serving.
Q: My sandwich is too soggy. How can I prevent that?
A: Sogginess usually comes from two things: 1) The onions weren’t cooked long enough and still have too much moisture, or 2) The apple slices were too thick. Ensure your onions are deeply caramelized and have no liquid left in the pan, and slice your apples paper-thin so they just warm through without releasing much water.
Q: What’s the best way to slice the sandwich without squishing it?
A: Use a sharp chef’s knife and a gentle sawing motion. Don’t press down with all your weight! Let the sharp blade do the work. Some people even swear by using dental floss (unflavored, obviously!) to slice through gooey grilled cheese cleanly.
Apple & Cheddar Grilled Cheese with Caramelized Onions
- Total Time: 45 minutes (mostly hands-off for onions)
Description
This grilled cheese is the ultimate cozy upgrade. It combines sharp, melty cheddar, crisp sweet apple, and deeply savory caramelized onions between two slices of perfectly golden, buttery bread. It’s a simple sandwich that feels incredibly gourmet.
Ingredients
-
4 slices sourdough or rustic bread
-
2 tbsp butter, softened
-
1 cup sharp white cheddar cheese, shredded
-
½ a firm apple (Honeycrisp or Granny Smith), thinly sliced
-
For Caramelized Onions:
-
1 large yellow onion, thinly sliced
-
1 tbsp butter or olive oil
-
A big pinch of salt
-
Instructions
1. Caramelize the Onions:
* This step requires patience but is worth it! In a skillet over low heat, melt 1 tbsp of butter. Add the sliced onions and salt.
* Cook for 25-30 minutes, stirring occasionally, until the onions are deeply golden brown, soft, and sweet. If they stick, add a tiny splash of water. Set aside.
2. Prep Your Ingredients:
* While onions cook, thinly slice the apple and shred the cheese. Soften the 2 tbsp of butter for spreading.
3. Build the Sandwiches:
* Spread a thin layer of softened butter on one side of each bread slice.
* Place two slices, buttered-side down. Layer on each: half the cheese, the apple slices, a generous spoonful of caramelized onions, and the remaining cheese.
* Top with the remaining bread slices, buttered-side up.
4. Cook to Perfection:
* Heat a clean skillet or griddle over medium-low heat.
* Place the sandwiches in the pan. Cook for 3-4 minutes per side, pressing down gently with a spatula, until the bread is golden brown and the cheese is fully melted.
* Tip: If the bread is browning too fast before the cheese melts, reduce the heat.
5. Serve:
* Let the sandwich rest for 1 minute before slicing diagonally. Serve immediately.
Notes
-
Low and Slow is Key: Don’t rush the onions or the grilling process. Low heat for both ensures sweet, jammy onions and a perfectly melted interior without burnt bread.
-
Grate Your Own Cheese: Cheese grated from a block melts much smoother and creamier than pre-shredded cheese.
-
Make-Ahead: Caramelize a big batch of onions ahead of time and store them in the fridge for up to 5 days for quick sandwich assembly.
-
Prevent Soggy Bread: Ensure your caramelized onions are cooked until all their moisture has evaporated, and slice your apples very thinly.
- Prep Time: 10 minutes (plus onion time)
- Cook Time: 10 minutes
Nutrition
- Calories: 460 cal Per Sandwich
- Sodium: 550mg
- Fat: 27g
- Saturated Fat: 15g
- Fiber: 3g
Nutritional Information*
Per Sandwich:
Calories: ~460 | Fat: 27g | Saturated Fat: 15g | Cholesterol: 70mg | Sodium: 550mg | Carbohydrates: 38g | Fiber: 3g | Sugars: 8g | Protein: 14g
Final Thoughts: The Comfort of a Classic, Perfected
The humble grilled cheese sandwich is a universal comfort food for a reason. It’s simple, satisfying, and deeply nostalgic. This Apple Cheddar version doesn’t seek to replace that classic; it seeks to elevate it into something that feels both special and familiar. It takes a beloved formula and introduces layers of complexity—sweetness, depth, texture, and sophistication—without ever losing its soul.
This recipe is a celebration of patience (with those onions), quality (in the cheese and bread), and balance (in every bite). It proves that with a little extra care and attention to technique, a weeknight staple can be transformed into a culinary event. It’s a sandwich that feels right at home on a weeknight dinner table alongside a bowl of soup, but it’s also impressive enough to serve to guests at a casual autumn gathering. It’s a reminder that the best cooking often isn’t about following a recipe to the letter, but about understanding principles: low heat for melting, contrast for texture, and the timeless power of a perfect flavor pairing. So here’s to the grilled cheese—a simple pleasure, made extraordinary.