
Welcome to My Cozy Kitchen: Let’s Bake Some Magic!
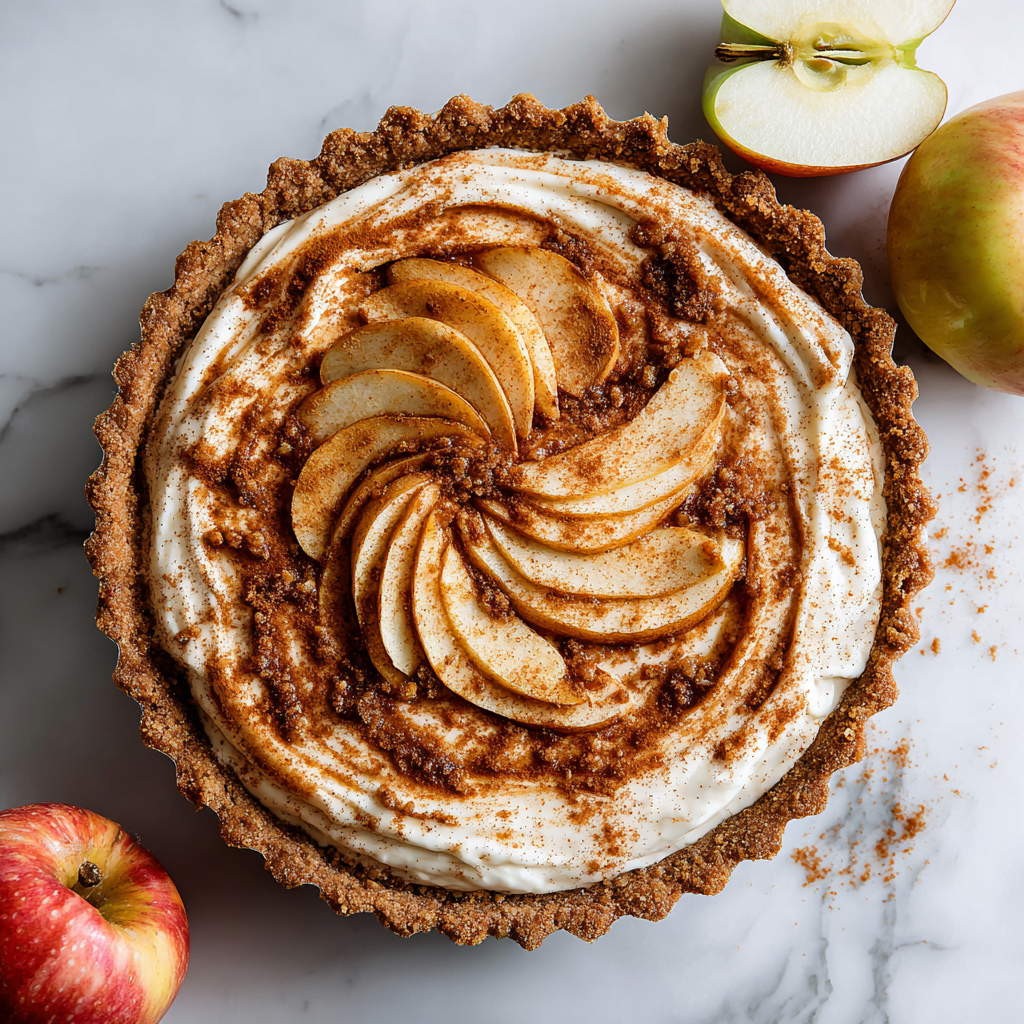
Hey there, friend! Olivia here, wiping flour off my apron as I type. Is there anything more comforting than the scent of baked apples and warm spices swirling through your kitchen? That’s exactly what we’re conjuring up today with this showstopping Apple Butter Cream Cheese Tart. Imagine: a crisp graham cracker crust hugging a cloud of vanilla-kissed cream cheese, all crowned with a glossy layer of spiced apple butter. It’s like autumn captured in a tart pan—equal parts elegant and homey, fancy enough for your holiday table but simple enough for a Tuesday treat with coffee. Whether you’re a seasoned baker or just dipping your toes into the world of pastry, this recipe is your golden ticket. No fancy techniques, no obscure ingredients—just pure, uncomplicated deliciousness that’ll make your kitchen smell like a cider mill. So grab your favorite mixing bowl (the one with the little chip on the rim, you know the one), and let’s turn simple ingredients into something unforgettable!
The Apple Orchard Epiphany: Where This Tart Was Born
Picture this: It’s my first fall living in Vermont, and I’m completely overwhelmed by apple season. My tiny kitchen counter is buried under a mountain of Honeycrisps after a weekend orchard trip. I’m drowning in applesauce and pies when my neighbor Margot—a feisty 80-year-old with legendary baking skills—tosses me a jar of her homemade apple butter. “Stop fussing, girl,” she says. “Just swirl this into something lazy.” Challenge accepted! I whipped up a basic cream cheese filling, pressed a graham crust into my grandma’s tart pan, and swirled in Margot’s magic potion. What emerged from the oven was pure alchemy—the tangy cream cheese perfectly offsetting the deep, caramelized apple butter, all held by that buttery crunch. Margot took one bite, winked, and declared: “Now that’s how you respect an apple.” Every time I make it, I’m back in that leaf-strewn Vermont kitchen, learning that sometimes the best recipes aren’t complicated—they’re just heartfelt.
Your Grocery List: Simple Stars, Big Flavor
Here’s the beautiful part: every ingredient plays a specific role, and I’ve got tips to make this your own. Pro tip: measure everything before you start—we call this mise en place (fancy for “get organized!”).
- Graham Cracker Crumbs (1¼ cups): The cozy campfire of crusts! They bring honeyed warmth and that essential crunch. Chef’s Swap: No grahams? Digestive biscuits or vanilla wafers work beautifully.
- Sugar (¼ cup + ¼ cup): Divided between crust and filling. It’s our sweet backbone! Chef’s Insight: In the filling, superfine sugar dissolves faster for a silkier texture.
- Melted Butter (6 tbsp): The glue for our crust. Salted butter adds depth, but unsalted works too (just add a pinch of salt to crumbs). Pro Tip: Melted, not softened—this ensures every crumb gets coated for perfect cohesion.
- Cream Cheese (8 oz, softened): Our filling’s lush foundation. Non-Negotiable: FULL FAT. Light cream cheese weeps during baking. And please soften it properly—leave it on the counter for 2 hours! Cold cheese = lumpy filling.
- Egg (1 large): The binding agent that gives structure. Chef’s Secret: Crack it into a separate bowl first to avoid shell surprises in your filling!
- Vanilla Extract (½ tsp): The quiet harmony-maker. Splurge on pure extract—imitation can taste medicinal.
- Apple Butter (½ cup): The autumnal superstar! Key Insight: Use thick, spiced apple butter—homemade or quality store-bought (look for apples as first ingredient). Runny applesauce won’t work!
- Garnishes (optional): Thin apple slices (tossed in lemon juice to prevent browning), cinnamon dusting, toasted pecans. Presentation Power: A few strategically placed pecans make it look bakery-worthy!
Let’s Build This Beauty: Step-by-Step with Chef Cheers!
Ready? Tie that apron, preheat your oven to 350°F (175°C), and let’s create layers of joy. I’ll walk you through every step with my favorite kitchen hacks!
- Make the Crust: In a medium bowl, combine graham crumbs and ¼ cup sugar. Drizzle in melted butter and stir until it resembles wet sand. Chef’s Hack: Test cohesion by squeezing a handful—it should hold its shape without crumbling. Pour into a 9-inch tart pan with removable bottom. Use a flat-bottomed glass or measuring cup to press firmly into an even layer, climbing slightly up the sides. Why it matters: Uneven crust = uneven baking! Bake for 8-10 minutes until fragrant. Let cool on a rack—NO filling goes into a hot crust! Cool Trick: Speed up cooling by placing the pan on a chilled baking sheet.
- Whip Up the Filling: In a large bowl, beat softened cream cheese and ¼ cup sugar with a hand mixer (or stand mixer) on medium until completely smooth—about 2 minutes. Stop Scraping? Nope! Scrape bowl sides constantly. Add egg and vanilla. Beat on LOW just until incorporated (30 seconds max). Critical Tip: Overbeating after adding the egg incorporates air, causing puffing then cracking. We want satin, not soufflé! Pour into cooled crust, smoothing the top.
- Swirl the Apple Butter: Dollop apple butter over cream cheese layer in spoonfuls. Use a knife or toothpick to gently swirl—don’t overmix! Artistic Advice: Think “marble,” not “mud.” Leave some distinct cream cheese patches. For a cleaner look, gently spread apple butter almost to the edges.
- Bake to Perfection: Bake 20-25 minutes. Doneness Test: Edges should be slightly puffed, center should jiggle like Jell-O when nudged—it sets while cooling. Oven Hack: Place tart pan on a preheated baking sheet for even heat distribution. Overbaking causes cracks and rubberiness!
- Chill Out (Seriously): Cool completely at room temperature (about 1 hour), then refrigerate UNCOVERED for at least 2 hours (4 is better). Science Lesson: Covering it while warm creates condensation, making the crust soggy. Chilling firms everything for clean slices.
Showtime: Serving Your Masterpiece
Slide a knife around the tart pan’s edge, then gently lift out the removable bottom. Place on a cake stand or plate. For gorgeous slices: run a sharp knife under hot water, wipe dry, and cut with confident downward presses—repeat between slices. Garnish with a fan of paper-thin apple slices (brushed with maple syrup for shine), a snowfall of cinnamon, or toasted pecans. Serve chilled! Pair it with strong coffee, a drizzle of salted caramel, or a dollop of barely-sweetened whipped cream. It’s stunning solo, but for brunch? Add crispy bacon on the side—sweet-salty heaven!
Make It Your Own: Delicious Twists
This tart is a fantastic canvas! Here are my favorite riffs:
- Pumpkin Spiced: Swap apple butter for pumpkin butter + ½ tsp pumpkin spice in filling.
- Maple Pecan: Add ¼ cup finely chopped toasted pecans to crust + replace sugar in filling with pure maple syrup.
- Ginger Snap Crust: Use gingersnap crumbs instead of grahams for a spicy kick.
- Gluten-Free: Use certified GF graham crackers or almond flour (1¼ cups almond flour + 2 tbsp sugar + 5 tbsp melted butter).
- Bourbon Kissed: Stir 1 tbsp bourbon into apple butter before swirling.
From My Heart (and Messy Counter) to Yours
This tart has evolved from my frantic apple-overload days! My first version used a fussy pastry crust (never again—graham is quicker and sturdier). I also learned the hard way about over-swirling: one Thanksgiving, I got overzealous and created a murky brown layer instead of pretty swirls—my brother lovingly called it “mud pie.” Now I embrace imperfect swoops! I always double the recipe in fall—one for now, one frozen (unbaked filling on unbaked crust, wrap tightly) for surprise guests. Thaw overnight in fridge, then bake. It’s become my edible hello card for new neighbors. Remember: baking is about joy, not perfection. If your crust crumbles a little? Call it “rustic” and add extra pecans!
Your Questions, Answered!
Let’s tackle common tart-tastrophes before they happen:
Q: Can I use a springform pan instead of a tart pan?
A: Absolutely! Use a 9-inch springform. Press crust 1.5 inches up sides. Baking time may increase by 5 minutes.
Q: Why did my filling crack? 😭
A: Three likely culprits: 1) Overbeating after adding the egg (creates air bubbles), 2) Overbaking (center should wobble slightly!), or 3) Cooling too fast (avoid drafts!). Good news: cracks taste delicious! Cover them with garnishes.
Q: Can I make this ahead?
A: YES! It’s actually better on day 2. Bake, cool, chill covered after the initial 2 hours. Add garnishes within 1 hour of serving. Stays fabulous refrigerated for 4 days.
Q: My crust is soggy! What went wrong?
A: Did you add filling to a warm crust? Always cool completely first. Also, ensure your apple butter is thick—excess liquid seeps down. Pressing the crust firmly creates a moisture barrier too!
Apple Butter Cream Cheese Tart
- Total Time: 3 hrs 40 mins
Description
Warm, spiced apple butter meets tangy cream cheese on a buttery graham crust—it’s autumn in every bite. This tart is elegant enough for the holidays yet simple enough for a midweek treat. No pastry skills required—just a little mixing, swirling, and chilling, and you’ve got a bakery-worthy showstopper.
Ingredients
Crust
-
1 ¼ cups graham cracker crumbs
-
¼ cup sugar
-
6 tbsp melted butter
Filling
-
8 oz cream cheese, softened (full fat)
-
¼ cup sugar
-
1 egg
-
½ tsp vanilla extract
-
½ cup thick apple butter
Optional Garnishes
-
Thin apple slices (tossed in lemon juice)
-
Cinnamon dusting
-
Toasted pecans
Instructions
-
Make the crust: Mix crumbs, sugar, and butter until it resembles wet sand. Press into 9” tart pan. Bake at 350°F (175°C) for 8–10 mins. Cool fully.
-
Prepare filling: Beat cream cheese + sugar until smooth (2 mins). Add egg + vanilla, beat on low just until blended. Pour into cooled crust.
-
Swirl apple butter: Dollop apple butter, swirl gently with knife. Leave distinct streaks for a marbled look.
-
Bake: 20–25 mins at 350°F, until edges puff and center jiggles slightly.
-
Chill: Cool 1 hr at room temp, then refrigerate at least 2 hrs before serving.
-
Serve: Garnish with apple slices, pecans, or cinnamon. Slice with a warm knife for clean cuts.
Notes
Don’t over-swirl the apple butter—distinct marbling makes it stunning. This tart tastes even better the next day once the flavors meld!
- Prep Time: 15 mins
Nutrition
- Calories: 310 cal Per slice
- Fat: 20g
- Saturated Fat: 12g
- Carbohydrates: 28g
- Protein: 4g
Nutritional Notes (Approximate Per Serving)
Slice (1/8th of tart): ~310 kcal | 4g protein | 20g fat (12g saturated) | 28g carbs (20g sugars) | 1g fiber. Remember: This is a treat meant to be savored slowly with good company!
Final Thoughts: More Than a Tart—A Story in Every Slice
This Apple Butter Cream Cheese Tart is more than a dessert—it’s a scrapbook of my culinary journey, from Vermont orchards to your kitchen. What I love most is how it adapts: swap the crust for gluten-free friends, dial down sugar for a subtler treat, or dress it up with edible gold leaf for celebrations.
But the real magic? The way it gathers people. There’s something about slicing into that glossy, spice-specked surface that makes guests lean in, forks at the ready. It’s a recipe that says “stay awhile”—whether you’re serving it on paper plates at a picnic or china at a dinner party.


