

Why These Bars Will Become Your Kitchen Legend
Hey there, fellow flavor adventurer! Olivia here, apron dusted with cocoa powder and heart full of excitement. If your soul does a little happy dance when you spot a gooey, crunchy, chocolatey treat, pull up a stool – we’re about to become best friends. Today, we’re making Brownie Marshmallow Crunch Bars, the triple-layered masterpiece that turns “just a brownie” into a full-blown celebration.
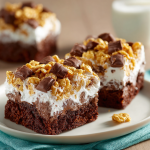
Picture this: a base so fudgy it practically whispers sweet nothings, crowned with a cloud of vanilla-kissed marshmallow fluff, all wrapped in a crackly chocolate-peanut butter armor studded with crispy cereal. It’s like your favorite childhood candy bar grew up, put on a tuxedo, and decided to throw a party in your mouth. The magic? They’re shockingly simple. No pastry degree required – just pure, unadulterated joy in bar form.
Whether you’re prepping for a bake sale that’ll make you the neighborhood hero, needing a guaranteed crowd-pleaser for game night, or just treating yourself after a *day* (we’ve all been there!), these bars are your edible hug. They’re the recipe people beg you to bring, the one that disappears before the coffee’s even poured. Ready to create some kitchen magic? Let’s bake memories!
The Midnight Bake That Started It All
Let me take you back to my college days – tiny apartment kitchen, questionable oven, and a serious need for comfort during finals week. My roommate Sarah and I were running on cold pizza and caffeine fumes. At 11 PM, fueled by stress and sugar cravings, we raided our sparse pantry: a box of brownie mix, a forgotten tub of marshmallow fluff, cereal, and the last dregs of peanut butter.
What started as a desperate “throw-everything-together” experiment became legendary. We layered that fudgy base with fluffy marshmallow, then melted chocolate chips with peanut butter and stirred in cereal, giggling like maniacs as we spread it over the top. The fridge vigil felt eternal, but that first bite? Pure revelation. The crispy-crunchy top gave way to pillowy fluff and dense chocolate bliss. We devoured half the pan standing right there at the counter, powdered sugar on our noses.
That messy, spontaneous bake became our tradition. Breakups, promotions, Tuesday nights – these bars were our edible therapy. They remind me that the best kitchen moments aren’t always picture-perfect; they’re about joy, connection, and the magic that happens when you dare to play with your food. Every time I make them now, I taste that midnight magic.
Gathering Your Sweet Symphony
Here’s your grocery list for happiness! Don’t stress about perfection – I’ve got notes to make it foolproof:
- 1 (18.4 oz) box Pillsbury™ Chocolate Fudge Brownie Mix: The trusty foundation! This specific mix gives that perfect fudgy density. Chef’s Insight: If you’re a from-scratch purist, swap in your favorite homemade brownie batter (aim for a fudgy, not cakey, version).
- ⅔ cup vegetable oil: Creates that moist, rich crumb. Sub Tip: Melted coconut oil works beautifully for a hint of tropical flair!
- ¼ cup water: Just what the box mix calls for – simple as that!
- 2 eggs: Binds our brownie base. Pro Tip: Use room temp eggs for smoother mixing! Pop cold eggs in warm water for 5 minutes.
- 1 (12 oz) container Pillsbury™ Vanilla Marshmallow Fluffy Frost™: The star of the middle layer! Its smooth, spreadable texture is key. Sub Alert: Marshmallow creme works too, but Fluffy Frost™ is slightly easier to spread without tearing the brownies.
- 2 cups (12 oz) semisweet chocolate chips: Balances sweetness with depth. Chef’s Choice: Use high-quality chips – it makes a difference! Dark chocolate chips are a decadent swap for bittersweet lovers.
- 1 cup peanut butter: Creamy is king here for smooth melting! Allergy-Friendly Swap: Sunflower seed butter or almond butter are fantastic alternatives.
- 1 tbsp butter: Adds silkiness to the topping. Salted butter gives a lovely sweet-salty contrast!
- 1½ cups crisp rice cereal: Our CRUNCH factor! Fun Twist: Swap in cornflakes for bigger shards or crushed pretzels for salty-sweet vibes.
Let’s Build Some Magic: Step-by-Step
Ready? Aprons on! Let’s transform these simple ingredients into showstoppers. Follow these steps and my sneaky chef hacks for guaranteed success:
- Bake the Brownie Base (The Foundation of Flavor!): Fire up your oven to 350°F (175°C). Grease that trusty 9×13-inch pan like you mean it – I love using butter wrappers for this! In a big bowl, whisk the brownie mix, oil, water, and eggs JUST until combined. CHEF’S SECRET: Don’t overmix! A few lumps are totally fine; overbeating makes tough brownies. Pour the gorgeous, glossy batter into your pan, spreading it evenly. Slide it into the oven and bake for 25-30 minutes, until a toothpick poked near the *center* comes out with moist crumbs (not wet batter). CRUCIAL TIP: Set a timer for 5 minutes *less* than the box says – ovens vary! Let the pan cool COMPLETELY on a wire rack. Rushing this = melty marshmallow disaster. Patience, grasshopper!
- Swirl on the Marshmallow Cloud (The Fluffy Hug!): Once your brownies are cool (seriously, touch the pan bottom – it shouldn’t feel warm!), grab your tub of Fluffy Frost™. Spoon generous dollops all over the surface. GENIUS HACK: Lightly grease your spatula or offset knife with cooking spray! This makes spreading the sticky marshmallow dreamily smooth, like spreading cold butter on warm toast. Cover every inch in a beautiful, even layer. Admire its fluffy whiteness – it won’t last long!
- Whip Up the Crunchy Crown (The Grand Finale!): Time for the saucepan! Combine chocolate chips, peanut butter, and that pat of butter. Melt them over LOW heat, stirring constantly. WATCHFUL EYE NEEDED: Low and slow is the mantra! Chocolate scorches easily. Once it’s a velvety, smooth pool of deliciousness, take it off the heat. Quickly stir in the crisp rice cereal until every little piece is thoroughly coated in chocolatey-peanut butter goodness. PRO MOVE: Let this mixture cool for about 2-3 minutes. It thickens slightly, making spreading easier and preventing it from sinking into the marshmallow.
- The Big Assembly (Channel Your Inner Architect!): Carefully pour the slightly cooled cereal mixture over the marshmallow layer. Gently spread it out using your greased spatula or the back of a spoon. BE GENTLE: Think “soft clouds,” not “cement layer.” Press down lightly just to ensure contact, but don’t smash the marshmallow fluff.
- Chill Out & Set the Stage (The Hardest Part!): Pop the whole glorious pan into the refrigerator. Let it chill for at least 1 hour, or until the topping is firm and set. IMPORTANT: Don’t skip the chill! This sets all the layers and makes cutting clean bars possible. Use this time wisely – dance in the kitchen, wash dishes (ugh), or dream about your first bite.
- Slice & Shine (The Victory Lap!): Time for the reveal! Run a sharp knife under very hot water, dry it quickly, and use it to cut your masterpiece into bars. HOT KNIFE TRICK: Wiping the knife clean and reheating it under hot water between cuts gives you those Instagram-perfect, clean edges. Wipe, heat, slice, repeat! Lift them out carefully with a small offset spatula or fork.
Showtime: Serving Your Masterpiece
These bars are stars all on their own! For maximum wow factor:
- Arrange them on a simple white platter or rustic wooden board – let those gorgeous layers speak for themselves!
- Dust VERY lightly with cocoa powder or powdered sugar right before serving for a bakery-worthy touch (use a fine-mesh sieve!).
- Serve them slightly cool from the fridge for that satisfying crisp-chewy texture contrast. They soften beautifully at room temperature after about 10 minutes if you prefer a softer bite.
- Pair them with a cold glass of milk, a steaming mug of coffee, or even a scoop of vanilla ice cream for pure decadence. Perfect for potlucks, picnics (pack them in a single layer!), or gifting in cute boxes lined with parchment.
Make It Your Own: Delicious Twists
Once you master the classic, play with these fun variations!
- Salted Caramel Swirl: Before adding the marshmallow layer, drizzle 1/2 cup of thick salted caramel sauce over the cooled brownies. Swirl gently, then add fluff and topping. Sweet, salty, sublime!
- Cookie Monster: Stir 1 cup of mini chocolate chips or crushed Oreo pieces into the brownie batter before baking. Extra chocolatey goodness!
- Nut-Free Nirvana: Swap the peanut butter in the topping for sunflower seed butter. Use certified nut-free chocolate chips and ensure your cereal is nut-free (like regular Rice Krispies®). Top with flaky sea salt.
- Pretzel Power Crunch: Replace half the rice cereal with coarsely crushed salted pretzel pieces in the topping. The salty-sweet crunch is insane!
- Mocha Magic: Add 1-2 teaspoons of instant espresso powder to the brownie mix before adding wet ingredients. Deepens the chocolate flavor beautifully.
Olivia’s Extra Scoop & Kitchen Confessions
This recipe is my kitchen security blanket – it’s evolved but never failed me. That college version? We used cheap chocolate and stirred mini marshmallows *into* the brownie batter (which sank and caramelized – delicious chaos!). The marshmallow fluff layer was a game-changer for smoothness.
Confession time: I once tried to speed-chill the pan in the freezer. Big mistake! The topping set TOO hard and cracked when I cut it. Lesson learned: the fridge is your friend. Another time, I got overzealous with warm topping and it melted the fluff into a delicious but messy swirl – tasty, but not the pretty layers we crave!
My best advice? Embrace the process. Lick the spatula. Let the kids (or your inner child) sprinkle the cereal. These bars are about joy as much as flavor. They freeze amazingly well too (see FAQs!) – I always stash a few for emergency sweetness.
Your Questions, Answered!
Let’s tackle those common kitchen conundrums:
- “Help! My marshmallow layer is melting into the topping!” Ah, the classic rush job! This usually means either: a) Your brownies weren’t COMPLETELY cool (patience is key!), or b) Your chocolate/peanut butter topping was too hot when spread. Always let the brownies cool to room temp and let the topping cool slightly (2-3 mins off heat) before spreading. If it happens, just chill well – it’ll still taste incredible, just swirlier!
- “Can I freeze these bars?” Absolutely, and I highly recommend it! Cut them first. Place them in a single layer on a parchment-lined baking sheet, freeze until solid (1-2 hours), then transfer to an airtight container or freezer bag with parchment between layers. Freeze for up to 2 months! Thaw overnight in the fridge or for 30-60 minutes at room temp.
- “My topping cracked when I cut the bars. What went wrong?” Likely the knife or the chill level. Using a cold knife on very cold topping can cause cracks. Use my hot knife trick! Run the knife under very hot water, dry it quickly, and make clean cuts. Also, if the topping chilled *too* long (like overnight), it can get extra hard. Let the pan sit at room temp for 5-10 minutes before cutting.
- “Can I use homemade brownies instead of a mix?” 100% Yes! Use your favorite fudgy brownie recipe baked in a 9×13 pan. Just ensure it’s fully cooled before topping. Aim for a recipe that yields a similar height/density to a box mix brownie for best layering.
Brownie Marshmallow Crunch Bars
- Total Time: 20 min prep + 1 hr chill
Description
When brownies meet marshmallow fluff and crispy chocolate-peanut butter crunch—pure magic happens! These Brownie Marshmallow Crunch Bars are gooey, crackly, nostalgic, and so easy, you’ll want to make them for every bake sale, sleepover, or “just because” craving. They’re the edible hug you didn’t know your kitchen needed!
Ingredients
-
1 (18.4 oz) box Pillsbury™ Chocolate Fudge Brownie Mix
-
⅔ cup vegetable oil (or melted coconut oil)
-
¼ cup water
-
2 eggs (room temp)
-
1 (12 oz) tub Pillsbury™ Vanilla Marshmallow Fluffy Frost™ (or marshmallow creme)
-
2 cups semisweet chocolate chips
-
1 cup creamy peanut butter (or sunflower seed butter)
-
1 tbsp butter
-
1½ cups crisp rice cereal
Instructions
1️⃣ Bake Brownies: Preheat oven to 350°F (175°C). Grease a 9×13-inch pan. Mix brownie batter as directed. Pour into pan, bake 25–30 mins until toothpick comes out with moist crumbs. Cool completely!
2️⃣ Marshmallow Layer: Spread Fluffy Frost™ evenly over cooled brownies. Lightly grease your spatula for smooth spreading!
3️⃣ Crunch Topping: In a saucepan over low heat, melt chocolate chips, peanut butter & butter until smooth. Remove from heat, stir in crisp rice cereal. Let cool 2–3 mins.
4️⃣ Assemble: Gently spread chocolate-cereal mix over marshmallow layer. Press lightly—don’t squish the fluff!
5️⃣ Chill & Slice: Chill in fridge at least 1 hr until topping is set. Cut into bars with a hot, clean knife for crisp edges.
Notes
-
Add a swirl of caramel on the brownies before the marshmallow.
-
Swap peanut butter for almond butter or Nutella!
-
Stir in pretzel pieces for sweet-salty crunch.
-
Store extras in the freezer—emergency chocolate fix, sorted!
Nutrition
- Calories: 290 cal Per Bar
- Fat: 18g
- Carbohydrates: 30g
- Protein: 4g
Nutritional Info (Approximate per bar)
Remember, these are a treat! Enjoy them mindfully.
- Calories: 290
- Fat: 18g
- Carbohydrates: 30g
- Sugar: 20g
- Protein: 4g
Final Thoughts: More Than a Dessert
These Brownie Marshmallow Crunch Bars are edible alchemy—transforming humble ingredients into joy you can hold in your hand. They remind us that the best recipes aren’t about perfection, but about connection: the midnight baking sessions with friends, the potlucks where they vanish first, the lunchboxes packed with love.
What makes them truly special is their versatility. They’re equally at home at a fancy party (arranged on a cake stand with gold flakes) as they are eaten straight from the pan after a tough day. That’s the magic of comfort food—it meets you where you are.
So bake them for others to create memories, or make them just for yourself as an act of sweetness in a busy world. And when someone inevitably asks for the recipe, pass it on with a smile—because good food, like happiness, is meant to be shared.


