

The Lunchbox Revolution: How a Simple Roll-Up Brings Joy (and Saves the Day!)
Hey there, friend! Olivia here, apron tied and ready to chat. Have you ever stood in front of the fridge at 7 AM, lunchboxes staring you down, feeling that familiar wave of “what on earth do I pack today?” Or maybe you’re staring at your own sad desk lunch, wishing it was something that sparked a little delight? I’ve been there more times than I can count. The struggle is real, and it’s why I’m practically buzzing to share one of my all-time favorite kitchen hacks: The Roll-Up Fun Box.
This isn’t just a recipe; it’s a philosophy. It’s about turning the daily chore of packing lunch into a tiny, edible celebration. Imagine opening a container to find a rainbow of colorful, bite-sized pinwheels, crisp veggies, and a little treat, all arranged like a happy little picnic. It’s fun for kids, absolutely dreamy for adults, and so simple it feels like you’ve discovered a secret. The best part? You probably have everything you need already. We’re taking humble tortillas, a few spreadable favorites, and whatever veggies or proteins are hanging out in your fridge, and we’re transforming them into something special. No fancy skills required, just a willingness to spread, roll, and slice your way to lunchbox glory. So, let’s ditch the boring sandwiches and dive into the world of roll-ups. Trust me, this little trick is about to become your new best friend for school, work, road trips, and those “I need a snack NOW” moments.
The Pinwheel Epiphany: A Story of Smashed Sandwiches and Happy Kids
This whole roll-up obsession started, like many of my kitchen adventures, out of a minor disaster. Picture this: my niece and nephew were over for a “fun aunt” day, which of course meant cooking together. The mission: pack a picnic for the backyard. We assembled what we thought were majestic, multi-layered sandwiches, only to watch them get utterly demolished in their lunch bags—soggy bread, filling squishing out the sides, the whole sad affair. My nephew looked up, ketchup on his chin, and said, “Aunt Liv, it’s all… fallen apart.”
In a moment of pure desperation (and to avoid tears, theirs and mine!), I grabbed the leftover tortillas from taco night, slathered them with cream cheese, layered on some turkey and spinach, and rolled them into tight little logs. Slicing them revealed these perfect, spiral pinwheels. I piled them in a container with some berries and pretzels. The kids’ eyes went wide. “They look like candy!” my niece squealed. They ate every single one, marveling at the “swirls.” That was the lightbulb moment. It wasn’t just food; it was an experience. It was playful, manageable, and, most importantly, it held together. That messy kitchen moment birthed our beloved Roll-Up Fun Box, a testament to the fact that sometimes the best solutions are the simplest, and the most fun food often comes from a happy accident.
Gathering Your Roll-Up Toolkit
The beauty here is in the customization. Think of this as your blueprint. Here’s what you need for the basic building blocks, plus my favorite combos to get you started.
- Large Flour Tortillas or Sandwich Wraps: This is your canvas! I like the burrito-sized ones for maximum roll-ability. Chef’s Insight: For a sturdier, more flavorful base, try spinach or tomato herb wraps. If you’re going gluten-free, there are fantastic GF tortilla options now—just warm them slightly first to make them more pliable and less likely to crack.
- Your “Glue” (The Spread): This is crucial for holding everything together and adding moisture. Cream Cheese (softened at room temp for easy spreading), Hummus (any flavor you love!), or Peanut Butter (or almond/sun butter for allergies) are my top three. Sub Tip: Mashed avocado with a squeeze of lime, whipped ricotta, or even a thin layer of pesto work wonders too!
- Your Main Filling: Keep it thin! Deli Turkey or Ham, Thinly Sliced Cucumber (use a peeler or mandoline for paper-thin slices), or Banana. Chef’s Insight: The key is an even, thin layer. Piling on thick chunks will make rolling impossible and cause fallout when slicing.
- Bonus Flavor & Crunch (Optional but Awesome): This is where you shine! A handful of baby spinach, shredded carrots, very thinly sliced bell peppers, or a sprinkle of everything bagel seasoning can add color, texture, and nutrition without complicating the roll.
My Go-To Combos for 1-2 Boxes:
- The Classic Savory: Cream cheese + turkey + a line of baby spinach.
- The Garden Crunch: Roasted red pepper hummus + paper-thin cucumber + shredded carrot.
- The Sweet Treat: Peanut butter + banana + a tiny drizzle of honey (add after slicing to avoid mess).
Let’s Roll! Your Foolproof Step-by-Step Guide
Ready to make some magic? Follow these steps for perfect pinwheels every single time.
- Prep Your Station: Clear a clean cutting board or counter space. Get your tortillas, fillings, and a sharp knife ready. Chef’s Hack: If your tortillas are straight from the fridge, warm them for about 10 seconds in the microwave or a dry skillet. This makes them incredibly flexible and prevents cracking during the roll.
- Spread with Abandon (But Leave a Border): Lay your tortilla flat. Take your chosen spread and schmear it evenly over the entire surface, right out to the edges. Here’s the pro tip: Leave a bare ½-inch border along the top edge (the edge farthest from you). This clean margin will be the final seal on your log, preventing filling from squishing out when you roll.
- Layer with Strategy: Arrange your main fillings in a thin, even layer over the spread. If you’re adding spinach or delicate greens, place them on top of the meat or under it to protect them from making the tortilla soggy. For the banana, place it just below the center line of the tortilla.
- The Tight Roll: This is the moment! Starting from the edge closest to you, begin rolling the tortilla away from you, keeping the fillings tucked in. Use your fingers to hold the fillings in place as you initiate the roll. Once you have one tight turn, continue rolling firmly but gently until you reach that clean border at the top. The spread there will act as your “glue” to seal the log. Give it a gentle pat.
- The Chill (Your Secret Weapon): For the cleanest, most perfect slices, wrap your tortilla log tightly in plastic wrap. Pop it in the fridge for 30-60 minutes. Why this matters: This chills the spread, firms everything up, and allows the tortilla to “set” around the fillings. It’s the difference between a neat pinwheel and a messy squish. In a pinch, 15 minutes in the freezer works too!
- Slice with Confidence: Unwrap your log and place it on a cutting board. Using a sharp serrated knife (like a bread knife), gently saw through the log, creating 1-inch slices. Wipe your knife between cuts if filling starts to build up. See those beautiful swirls? You did that!
Building Your Beautiful Fun Box
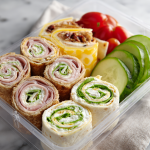
Now for the really fun part: assembly! Grab a divided container (bento-style boxes are perfect). Arrange your pinwheels in one section. Fill the other sections with colorful sides that add crunch and freshness: a handful of cherry tomatoes, whole-grain crackers, apple slices, grapes, or sugar snap peas. Add one mini cookie or a small square of dark chocolate for that “I feel special” treat. The visual appeal is half the joy—aim for a rainbow of colors and a mix of textures. It’s a happy little lunchtime mosaic!
Mix It Up! Endless Roll-Up Variations
Once you master the basic roll, the flavor world is your oyster! Here are a few twists to keep things exciting:
- Pizza Party: Spread with marinara sauce, sprinkle with shredded mozzarella, and add mini pepperoni. Roll, slice, and serve with a side of extra sauce for dipping!
- Thanksgiving Leftovers: Mashed sweet potato or cranberry sauce as the “glue,” with diced turkey and a whisper of stuffing.
- Mediterranean Vibes: Tzatziki or garlicky hummus as the base, with chopped olives, diced cucumber, and crumbled feta.
- Dessert Roll-Up: Spread with Nutella or mascarpone, add sliced strawberries, and roll. Dust with powdered sugar after slicing.
- Vegan & Protein-Packed: Use a black bean spread or mashed chickpeas (like a chunky chickpea “salad”) as your hearty, flavorful filling.
Olivia’s Kitchen Notes & Stories
This recipe has become such a staple in our home that my friends now text me pictures of their “roll-up creations.” It’s evolved from a fridge-clean-out trick to a planned weekly prep. I often make 3-4 different flavored logs on Sunday afternoon, wrap them tightly, and slice them as needed throughout the week. They keep beautifully for 3-4 days. The funniest evolution? The “competitive roll-up” game my partner and I started. We raid the fridge and have 10 minutes to create the most gourmet or bizarre roll-up combo. His was pickles and peanut butter (surprisingly not terrible?). Mine was brie, apple, and a drizzle of honey (winner, in my humble opinion!). The moral is: don’t be afraid to play. Some of the best combinations come from a daring spirit and a well-stocked fridge.
Your Roll-Up Questions, Answered!
Q: My tortilla keeps cracking when I roll it. What am I doing wrong?
A: This is almost always a temperature issue! Tortillas straight from the fridge are prone to cracking. Your best fix is to warm them gently. A 10-second zap in the microwave (covered with a damp paper towel) or a quick pass in a warm, dry skillet will make them soft and pliable. Also, don’t overfill—too much bulk stresses the tortilla.
Q: The fillings squish out the ends when I slice. Help!
A: Two tips: First, make sure you’re leaving that clean border at the top when spreading—it’s your seal! Second, the chill time is non-negotiable for neat slices. It firms everything up. Finally, use a sharp, serrated knife and use a gentle sawing motion instead of pressing straight down.
Q: Can I make these the night before for school lunches?
A: Absolutely, and I highly recommend it! Keep the unsliced, plastic-wrapped log in the fridge overnight. Slice it in the morning and pack. The pinwheels will stay fresh and the tortilla won’t get soggy. Avoid super watery veggies (like fresh tomatoes inside the roll) if prepping more than a day ahead.
Q: Are there any spreads that don’t work well?
A: I’d avoid super runny spreads like straight mayo or a very oily vinaigrette, as they can make the tortilla soggy and compromise the structure. If you want that flavor, mix a little mayo into a thicker base like cream cheese or mashed avocado.
Roll-Up Fun Box : Easy Lunchbox Idea Kids & Adults Love
Description
Transform your boring sandwiches into a playful, portable, and satisfying meal! The Roll-Up Fun Box is all about colorful pinwheels, crunchy veggies, and a small treat—perfect for school, work, or on-the-go snacking.
Ingredients
Tortilla Base:
-
1 large flour or sandwich wrap tortilla (spinach, tomato herb, or gluten-free options work too)
Spread (“Glue”):
-
2–3 tbsp cream cheese (softened), hummus, or nut/seed butter
-
Optional: mashed avocado, whipped ricotta, pesto
Main Filling:
-
Deli turkey, ham, or thinly sliced cucumber
-
Optional: banana for a sweet roll
Bonus Crunch & Flavor (Optional):
-
Baby spinach, shredded carrots, thinly sliced bell peppers
-
Sprinkle of everything bagel seasoning
Sides for the Box:
-
Cherry tomatoes, apple slices, grapes, sugar snap peas
-
Whole-grain crackers or a mini cookie/dark chocolate square
Instructions
1. Prep the Tortilla:
-
Warm slightly if straight from the fridge (10 seconds in the microwave or a quick dry skillet pass) to prevent cracking.
2. Spread:
-
Evenly cover the tortilla with your chosen spread. Leave a ½-inch border along the edge farthest from you to seal the roll.
3. Layer Fillings:
-
Thin, even layers of protein or veggies. For delicate greens, layer on top of the protein.
4. Roll Tightly:
-
Roll from the edge closest to you, tucking fillings as you go. Seal the log with the clean border.
5. Chill:
-
Wrap tightly in plastic wrap and refrigerate for 30–60 minutes. (Quick tip: 15 minutes in the freezer works in a pinch.)
6. Slice:
-
Using a sharp serrated knife, cut 1-inch slices to reveal the pinwheel spirals.
Assemble Your Fun Box
-
Arrange pinwheels in one section of a divided container.
-
Add colorful sides in the other sections: veggies, fruit, crackers, or a small treat.
-
Aim for a rainbow of colors and textures for visual appeal and balanced nutrition.
Notes
-
Prevent Cracking: Warm tortillas slightly; don’t overfill.
-
Avoid Squishy Ends: Leave a clean border, chill the log, slice with a serrated knife.
-
Make Ahead: Unsliced, wrapped logs last 1 day in the fridge; slice in the morning for fresh pinwheels.
-
Best Spreads: Avoid runny mayo or oily vinaigrette; mix with a thicker base if desired.
A Note on Nutrition
This is a framework for a balanced meal! The protein comes from your spread and filling (turkey, hummus, nut butter). The carbs from the tortilla and sides like crackers or fruit. The veggies, well, they’re your vitamins and crunch! By choosing whole-grain tortillas, lean proteins, and loading up on colorful veggie sides, you can create a lunchbox that’s energizing and satisfying. Each box will vary, but a typical savory box with turkey, cream cheese, a spinach tortilla, and veggie sides ranges from 350-500 calories and packs a solid 15-25g of protein.
Final Thoughts
The Lunchbox Revolution: How a Simple Roll-Up Brings Joy (and Saves the Day!)
Hey there, friend! Olivia here, apron tied and ready to chat. Have you ever stood in front of the fridge at 7 AM, lunchboxes staring you down, feeling that familiar wave of “what on earth do I pack today?” Or maybe you’re staring at your own sad desk lunch, wishing it was something that sparked a little delight? I’ve been there more times than I can count. The struggle is real, and it’s why I’m practically buzzing to share one of my all-time favorite kitchen hacks: The Roll-Up Fun Box.
This isn’t just a recipe; it’s a philosophy. It’s about turning the daily chore of packing lunch into a tiny, edible celebration. Imagine opening a container to find a rainbow of colorful, bite-sized pinwheels, crisp veggies, and a little treat, all arranged like a happy little picnic. It’s fun for kids, absolutely dreamy for adults, and so simple it feels like you’ve discovered a secret. The best part? You probably have everything you need already. We’re taking humble tortillas, a few spreadable favorites, and whatever veggies or proteins are hanging out in your fridge, and we’re transforming them into something special. No fancy skills required, just a willingness to spread, roll, and slice your way to lunchbox glory. So, let’s ditch the boring sandwiches and dive into the world of roll-ups. Trust me, this little trick is about to become your new best friend for school, work, road trips, and those “I need a snack NOW” moments.


