
Easter Bunny Jello Parfaits: Your New Favorite No-Bake Holiday Magic
Hey there, friend! Olivia here. Can you feel it? That little hum of excitement in the air? Spring is peeking through, daffodils are nodding in the breeze, and my kitchen is officially buzzing with holiday energy. I absolutely live for this time of year—the planning, the gathering, the sheer joy of a table full of loved ones. But let’s be real for a hot second: as much as I love a from-scratch masterpiece, sometimes you need a showstopper that doesn’t require you to be chained to the oven all day.
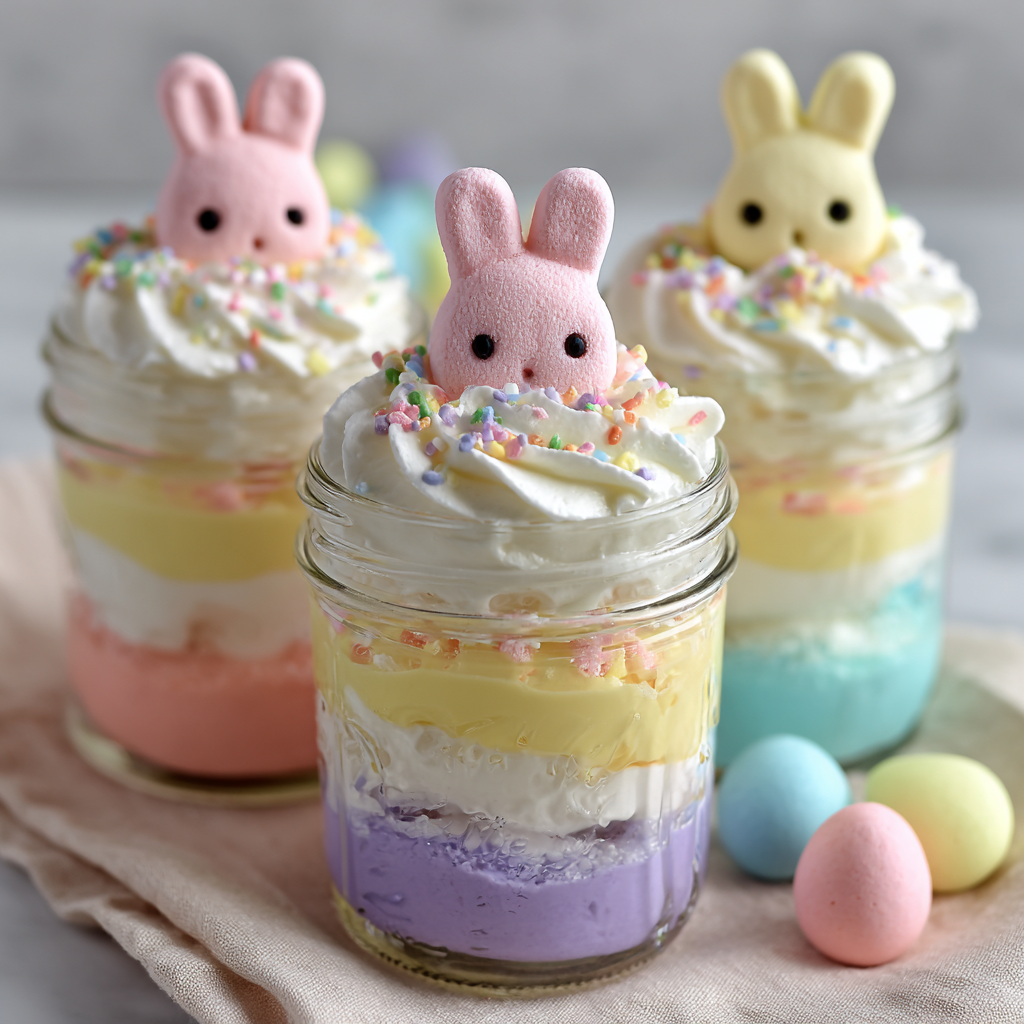
Enter my absolute favorite trick for effortless Easter entertaining: the Easter Bunny Jello Parfait. Imagine layers of fluffy, cloud-like pastel gelatin mousse, stacked high in a cute mason jar, and crowned with a whimsical bunny Peep and a shower of sprinkles. It’s a dessert that looks like you fussed for hours, but the secret is that it’s gloriously no-bake, surprisingly simple, and 100% gluten-free. These parfaits are pure, edible joy. They make kids (and let’s be honest, adults too) light up with delight. They’re portable, portion-perfect, and add that Pinterest-worthy pop of color to your Easter brunch or dinner table without any of the stress. So, tie on your favorite apron (the cute one with the pockets!), and let’s make some holiday magic that’s as fun to create as it is to eat.
A Spoonful of Nostalgia: My Jelly Journey
This recipe always takes me right back to my grandma’s linoleum-floored kitchen. Easter at her house meant two things: a lace tablecloth heavy with food, and her famous “ribbon jelly salad” wiggling proudly in a giant cut-glass bowl. To me, that shimmering tower of red, green, and yellow was the height of sophistication. I’d watch, mesmerized, as she carefully poured each layer, the whole process wrapped in the quiet patience that only grandmas possess.
My version is a little less patient (hello, instant gratification!) and a lot more playful. I’ve traded the formal salad for individual jars you can hold in your hand, swapped solid jelly for a fluffy mousse, and added a bunny on top because—why not? It’s a happy nod to those cherished memories, but with a modern, Instagram-ready twist. It captures that same sense of wonder and celebration, proving that sometimes, the best new traditions are just old ones dressed up in a pastel party dress.
Gathering Your Pastel Palette: Ingredients & Insights
Here’s everything you’ll need to build these edible rainbows. The beauty of this recipe is its flexibility—I’ll give you all my best tips and swaps!
- Strawberry, Grape, Lemon, & Berry Blue Gelatin (½ a 3 oz package each): This is our color story! Using four different flavors gives each layer its own unique, fruity personality. Chef’s Insight: You can absolutely use sugar-free gelatin here with fantastic results. Feel like mixing up the colors? Lime, orange, or raspberry are all fabulous choices!
- Boiling Water (3 cups total) & Cold Water (1⅓ cups total): The hot water dissolves the powder perfectly, and the cold water helps it start to cool down and set. Always use freshly boiled water for the clearest, smoothest gelatin.
- Whipped Topping (16 oz, thawed): This is the magic ingredient that transforms firm jelly into a light, moussey cloud. Make sure it’s fully thawed so it folds in smoothly. Substitution Tip: For a richer flavor, you can use an equal amount of freshly whipped heavy cream sweetened with a tablespoon or two of powdered sugar. For a dairy-free version, a non-dairy whipped topping works great.
- Whipped Cream, Pastel Sprinkles, & Bunny Peeps: The grand finale! The extra whipped cream adds height, the sprinkles give a festive crunch, and the Peep is the star of the show. Fun Swap: Try a chick Peep, a chocolate bunny, or even a homemade piped buttercream bunny for a totally custom look.
- 5 (8-ounce) Mason Jars: Our edible canvas. The clear glass shows off every beautiful layer. Don’t have jars? Clear plastic cups or even pretty glasses work in a pinch!
Let’s Layer! Your Step-by-Step Guide to Parfait Perfection
Ready? Let’s do this. I’ll walk you through each step with all my favorite kitchen hacks to ensure your parfaits are flawless.
- Dissolve the Gelatin: Grab four medium mixing bowls. Add ½ a package of each gelatin flavor to its own bowl. Now, carefully pour ¾ cup of boiling water into each bowl. Whisk, whisk, whisk until every last granule has vanished. This is key for a smooth texture. Then, stir in ⅓ cup of cold water into each bowl. Little Chef Hack: Set these bowls on a kitchen towel in the fridge—it prevents any sliding and makes for easy transport.
- The First Chill: Pop all four bowls into the refrigerator. We’re not looking for a full set here, just a slight thickening. Think “syrupy” or like raw egg whites. This should take about 20-30 minutes. Do not skip this step! It’s what allows the whipped topping to blend in evenly instead of just melting.
- Create the Mousse: Once slightly thickened, pull out one bowl at a time. Gently fold in about 1 cup of the thawed whipped topping. Use a spatula and a light hand—we’re incorporating air, not beating it out. Fold until you have a beautifully smooth, homogenous, and fluffy pastel mousse. Repeat with each color. Pro Tip: If your mixture seems a bit lumpy, a quick whisk can smooth it out, but be gentle.
- Set to Perfection: Return all four bowls to the fridge. Now we let the mousse firm up enough to pipe and hold sharp layers. This takes 1 to 1.5 hours. It should be thick and spoonable, like softly set pudding. Patience is your friend here!
- The Art of Layering: This is the fun part! Spoon each color into a separate piping bag fitted with a large round tip (or just snip the corner off a zip-top bag). Starting with your bottom color (I love purple!), pipe about a 1-inch layer into each jar. Gently tap the jar on the counter to settle and smooth the layer. Repeat with the next color, tapping again. Continue until all four colors are stacked. My Secret: Tapping is non-negotiable! It removes air bubbles and gives you those clean, restaurant-quality lines.
- The Final Chill: Cover the jars loosely with lids or plastic wrap and refrigerate for at least 4 hours, or ideally overnight. This long chill ensures every layer is perfectly set and the flavors have time to mellow and meld beautifully.
- Dress to Impress: Just before serving, pipe or dollop a little fresh whipped cream on top, add a generous pinch of pastel sprinkles, and lovingly nestle a bunny Peep right on top. Ta-da! You’ve just created edible happiness.
Serving Up the Smiles
Presentation is everything with these little gems! I love lining them up down the center of my Easter table as a edible centerpiece. You can also set them on a tray garnished with a few scattered jelly beans or fresh spring flowers. Provide long-handled spoons so everyone can dive all the way down to the bottom layer in one glorious scoop. Watch as they turn the jar, admiring the layers before that first sweet, fluffy bite.
Make It Your Own: Delicious Twists & Swaps
The fun doesn’t stop here! This recipe is a fantastic base for creativity.
- Tropical Bunny: Use pineapple, lime, mango, and berry blue gelatin. Top with a toasted coconut flake and a pineapple chunk.
- Sherbet Dream: Mix ½ cup of blended raspberries or strawberries into the corresponding gelatin layer before adding the whipped topping for a fresh fruit swirl.
- “Bunny Bait” Crunch: Add a thin layer of crushed vanilla wafers or gluten-free graham crackers between the mousse layers for a fun textural surprise.
- Adult Elegance: For a sophisticated twist, replace 2 tablespoons of the cold water in each flavor with a corresponding liqueur (like Chambord for berry, limoncello for lemon).
- Vegan/DF Adaptation: Use agar-agar flakes (prepare according to package directions for a mousse) and your favorite brand of non-dairy whipped topping. Check that your sprinkles and Peeps are vegan-friendly (many brands are!).
Olivia’s Kitchen Notes & Stories
This recipe has seen some… interesting… experiments in my kitchen. The first time I made it, I was so impatient I tried to layer it before the mousse was set. Let’s just say we ended up with “Easter Bunny Jello Soup in a Jar.” Not the look I was going for! I’ve also learned the hard way that gelatine sets faster than you think. I once answered a phone call mid-process and came back to a bowl of rubber. Now, I set a timer for everything and treat it like a sacred meditation. Over the years, I’ve streamlined the process (piping bags are a game-changer!) and learned that making them the night before is not just convenient, it actually makes them taste better. The flavors become friends overnight. So, embrace the make-ahead magic—your future, less-stressed holiday self will thank you.
Your Questions, Answered!
Q: My layers are blending together, not staying separate! What did I do wrong?
A: This almost always means the mousse wasn’t chilled long enough before layering. Each layer needs to be thick enough to support the weight of the next one. If it’s still too runny, just pop the bowl back in the fridge for another 15-20 minutes and test again. Also, always tap the jar firmly to settle each layer flat before adding the next.
Q: Can I make these more than a day ahead?
A: Absolutely! They keep beautifully for 2-3 days in the fridge. Just wait to add the final whipped cream, sprinkles, and Peep until right before you serve, so the toppings stay fresh and the Peep doesn’t dry out or bleed color.
Q: Help! My gelatin didn’t set at all.
A: Oh no! This is usually a ratio issue. Did you accidentally add too much liquid? Or perhaps the water wasn’t boiling hot enough to fully dissolve the powder? If it’s still soupy after the full chilling time, you can try re-melting it gently (microwave in short bursts) and starting the process again, ensuring your measurements are precise.
Q: I can’t find the exact gelatin flavors. What should I do?
A: No problem at all! Use what you can find. Any four pastel colors will look stunning. You can even use two packages of the same flavor divided in half to make two different colored layers by adding a drop or two of natural food coloring to one portion. Get creative with your palette!

Easter Bunny Jello Parfait in a Jar : Easy No-Bake Mason Jar Dessert (Gluten Free)
Description
A pastel, no-bake, layered treat that’s whimsical, colorful, and perfect for Easter. Gluten-free, fun, and surprisingly simple to make!
Ingredients
-
½ package each (3 oz) strawberry, grape, lemon, and berry blue gelatin
-
3 cups boiling water (divided)
-
1⅓ cups cold water (divided)
-
16 oz thawed whipped topping (or sweetened whipped cream)
-
Whipped cream, pastel sprinkles, and Bunny Peeps for garnish
-
5 (8-oz) mason jars or clear cups
Instructions
-
Dissolve Gelatin
-
Divide each gelatin flavor into 4 bowls. Add ¾ cup boiling water to each; whisk until fully dissolved. Stir in ⅓ cup cold water per bowl.
-
-
Slightly Chill
-
Refrigerate each bowl for 20–30 minutes until the mixture thickens slightly, like syrup.
-
-
Create the Mousse
-
Fold in about 1 cup whipped topping into each gelatin bowl, gently combining to keep it airy and smooth.
-
-
Chill for Layering
-
Return to fridge 1–1.5 hours until thick and spoonable.
-
-
Layer the Parfaits
-
Use piping bags (or a zip-top bag with the corner snipped). Pipe 1-inch layers into jars in your desired order, tapping jars gently after each layer to remove air bubbles.
-
-
Final Chill
-
Cover jars loosely and refrigerate at least 4 hours or overnight.
-
-
Garnish & Serve
-
Top with whipped cream, sprinkles, and a bunny Peep before serving.
-
Notes
-
Tropical Bunny: Pineapple, lime, mango, berry blue gelatin; top with toasted coconut and a pineapple chunk.
-
Sherbet Dream: Fold blended raspberries or strawberries into the corresponding gelatin layer.
-
Bunny Bait Crunch: Add crushed vanilla wafers or graham crackers between layers.
-
Adult Elegance: Replace 2 tbsp cold water per layer with liqueur (Chambord, limoncello).
-
Vegan/DF: Use agar-agar and non-dairy whipped topping; ensure toppings are vegan-friendly.
Nutritional Info (Per 1 Jar)
Please note: This is an approximate calculation based on the specific ingredients listed and can vary significantly with substitutions, especially using sugar-free or dairy-free alternatives.
- Calories: 311
- Fat: 23g
- Carbohydrates: 23g
- Sugar: 22g
- Protein: 4g
**Yield:** 5 servings | **Prep Time:** 10 minutes | **Chill Time:** 6 hours | **Total Time:** 6 hours 10 minutes
Final Thoughts: A Little Jar Full of Easter Magic
And there you have it, sweet friend—five little jars, each one a tiny tower of pastel joy, topped with a marshmallow bunny who looks almost as pleased to be there as you should feel right now.
Here’s the truth about recipes like this one: they’re not really about the gelatin.
Oh, sure, the layers are pretty. The colors photograph beautifully, and the Peep on top gets all the Instagram love. But that’s not why you made these. You made them because Easter morning should feel special. Because you wanted to put something on the table that makes the kids gasp and the grandparents pull out their phones. Because somewhere in the back of your mind, you remember what it felt like to be small and see something magical waiting just for you.
These parfaits carry that same energy—the energy of a holiday that believes in pastel colors and marshmallow bunnies and dessert before 10 a.m. because why not?
So here’s my final piece of advice, wrapped up with a bow:
Don’t stress about perfectly straight layers. The slightly wobbly ones have more personality.
Don’t panic if you drop a sprinkle or two on the floor. That’s just a gift for the Easter cleaning fairy.
And for heaven’s sake, save one jar for yourself. Sit down somewhere quiet, take that first spoonful all the way to the bottom, and let the soft, sweet, nostalgic cloud of it remind you why we do this whole holiday thing in the first place.


