
The Magic of Slow-Roasted Beef Brisket: Your New Favorite Centerpiece
Hey there, friend! Come on in. Can you smell that? It’s the deep, savory, impossibly good scent of garlic and onions softening into sweetness, mingling with the rich perfume of beef that’s been roasting for hours. It’s the smell of anticipation, of a gathered table, of a meal that says “you are loved.” That, my friend, is the magic of a perfectly slow-roasted beef brisket.
If the idea of cooking a large cut of meat makes you a little nervous, I’m here to give you the biggest virtual hug and tell you: you’ve got this. This isn’t about fancy techniques or constant fussing. This is about patience, a few simple ingredients, and letting low, gentle heat work its transformative power. We’re going to turn a tough cut into something so tender you can practically pull it apart with a fork, with slices that are juicy, flavorful, and utterly impressive.
Whether you’re planning a holiday table for Easter, a cozy Sunday supper, or any gathering where you want a main dish that does all the talking (in the most delicious whisper), this brisket is your answer. So, tie on your apron—the messy ones are the most loved—and let’s create some memories together. This is more than a recipe; it’s an invitation to slow down, savor the process, and deliver pure comfort on a platter.
My First Brisket & The “Trust the Process” Lesson
I have to confess, my first brisket was a leap of faith that felt more like a stumble. It was for a big family Thanksgiving, and I, in my youthful kitchen confidence (read: naivety), decided to go off-book. I cranked the heat, thinking I could outsmart the clock. What emerged hours later was… less than tender. Let’s just say it had character. And required very sharp knives.
But then my grandma, the undisputed queen of comfort food, took me under her wing. She showed me her method: low heat, a tight cover, and time. “Stop poking it, Livvy,” she’d say. “Let it do its thing.” The next one I made under her watchful eye was a revelation. The connective tissue had melted into unctuous, flavor-packed goodness, the meat was yielding, and the pan juices were liquid gold. That experience taught me the core philosophy of my kitchen: respect the ingredients, trust the process, and good things come to those who wait (especially in a 300°F oven). This recipe is that lesson, shared with you.
Gathering Your Flavor Team: Simple Ingredients, Big Impact
Here’s what you’ll need. Don’t be fooled by the short list—each player has a crucial role. I’ve added my notes so you know exactly why it’s there and what you can swap if needed.
- 4–5 lb beef brisket: This is the star! Look for a cut with a nice cap of fat on one side—that’s your flavor and moisture insurance. A “packer cut” is great, but a flat cut works beautifully too. Don’t trim too much fat!
- 2 tbsp olive oil: Our glue for the spice rub and a helper for browning. Any neutral oil like avocado or canola works perfectly.
- 2 tsp salt (preferably kosher): Crucial for seasoning the meat deeply. Kosher salt is less salty by volume than table salt and easier to control. If using fine table salt, start with 1.5 tsp.
- 1 tsp black pepper: Freshly cracked is ideal for the brightest flavor, but pre-ground is just fine in a pinch.
- 2 tsp smoked paprika: This is my secret weapon! It adds a warm, smoky depth that makes the brisket taste like it’s been kissed by a wood fire. Sweet paprika works if it’s all you have.
- 1 tsp garlic powder & 1 tsp onion powder: These pantry heroes create a foundational savory flavor that permeates the meat perfectly. Fresh is great for the braise, but powder sticks to the rub better.
- 1 large onion, sliced: They’ll caramelize and soften into a sweet bed for the brisket, flavoring the juices. Yellow or white onions are perfect.
- 4 garlic cloves, smashed: Smashing, not mincing, lets them release flavor slowly without burning. No need to peel!
- 2 cups beef broth: This creates the steam-braising environment. Use low-sodium if possible, as we’ve already salted the meat. A rich bone broth is a fabulous upgrade.
- 1 tbsp tomato paste (optional): My little “umami booster.” It adds a touch of richness and color to the pan sauce. Don’t worry, it won’t taste like tomatoes!
- Fresh thyme or rosemary (optional): A few sprigs add an aromatic, herby note. Dried herbs (1 tsp) can be sprinkled in with the rub.
Step-by-Step: Your Path to Brisket Bliss
Ready? Let’s walk through this together. I promise it’s more waiting than working.
- Preheat & Prep: Position your oven rack in the lower third and preheat your oven to 300°F (150°C). This low-and-slow temperature is non-negotiable for tenderness. While it heats, pat your brisket very dry with paper towels. This is KEY for the spice rub to stick and for proper browning. Chef’s Tip: A dry surface = a beautiful sear (if you choose to sear) and better bark.
- The Flavor Rub: In a small bowl, mix the salt, pepper, smoked paprika, garlic powder, and onion powder. Drizzle the olive oil all over the brisket, then massage the spice mix onto every surface. Don’t be shy! Get it on all sides. This isn’t just seasoning; it’s creating a flavor crust. Chef’s Tip: You can do this step up to 24 hours ahead, wrap the brisket, and let it marinate in the fridge. The flavor penetration is incredible!
- Build Your Braising Bed: Scatter the sliced onions and smashed garlic cloves in the bottom of a roasting pan or a large, heavy-duty Dutch oven. Place the brisket on top, fat side up. This is important! As the fat renders during the long cook, it will baste the meat continuously, keeping it juicy.
- Add the Liquid: Pour the beef broth around the sides (not over the top, to keep your rub intact). If using, add the tomato paste and whisk it a bit into the broth. Tuck in your fresh herb sprigs. Chef’s Tip: For an extra layer, a splash of red wine or a tablespoon of Worcestershire sauce in the broth is divine.
- The Long, Slow Roast: Cover the pan very tightly with a lid or a double layer of heavy-duty aluminum foil. This traps the steam, creating a braising environment that breaks down the tough fibers. Place it in the oven and… walk away. For at least 3.5 hours. Do not peek! Trust the process. We’re looking for a probe thermometer to read around 200-205°F for “pull-apart” tenderness, or for a fork to slide in and out with zero resistance. This usually takes 4 to 4.5 hours total.
- Uncover & Brown: In the last 30 minutes of cooking, carefully remove the foil. This allows the top to brown and the sauce to reduce slightly. The aroma at this point is your reward for patience.
- The Most Important Step: Rest! Once out of the oven, loosely tent the brisket with foil (not tight) and let it rest on the counter for at least 20-30 minutes. This allows the frantic, hot juices to redistribute throughout the meat. If you slice it right away, all those beautiful juices will run out onto the cutting board. Patience, grasshopper!
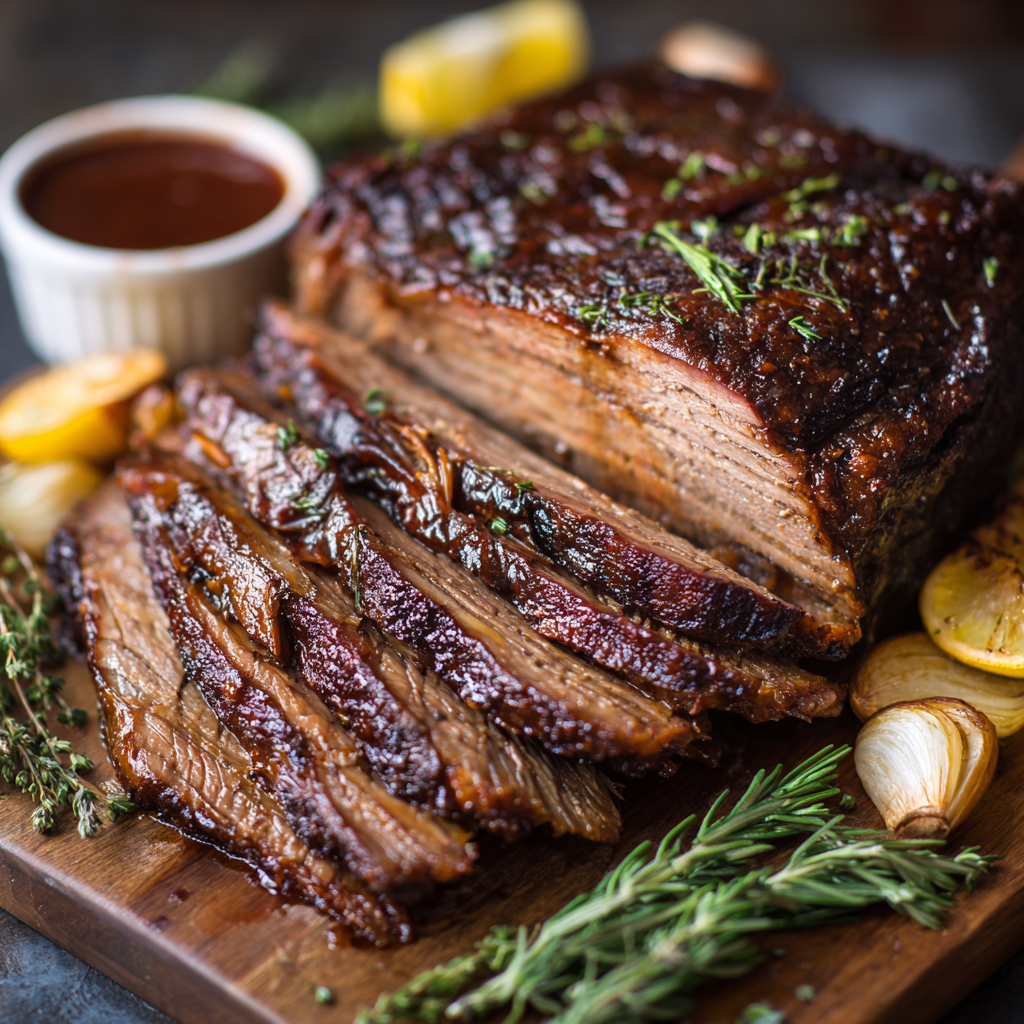
- Slice & Serve: Transfer the brisket to a cutting board. Look for the direction of the muscle fibers (the “grain”). Using a sharp knife, slice against the grain (perpendicular to those lines). This shortens the muscle fibers, making each piece melt-in-your-mouth tender. Serve with the strained or simply skimmed, glorious pan juices poured over the top.
How to Serve Your Masterpiece
Presentation is part of the joy! Slice the brisket and fan it out on a large, warm platter. Pour some of those rich, onion-studded pan juices right over the top. Garnish with a few fresh thyme sprigs or a sprinkle of flaky sea salt for a pretty touch. This brisket loves classic, comforting sides: creamy mashed potatoes or parsnip puree to soak up the juice, simple roasted carrots or green beans, a bright, tangy coleslaw for crunch, or a big, buttery dinner roll for mopping. Keep it simple and let the brisket shine.
Make It Your Own: Delicious Variations
Once you master the basic method, the world is your brisket! Here are a few fun twists:
- Texas-Style BBQ: Swap the spice rub for 2 tbsp coarse black pepper, 1 tbsp kosher salt, and 1 tsp garlic powder. Skip the broth and use 1 cup of beef broth mixed with ½ cup of apple cider vinegar. Smoke it if you have a smoker, or roast as directed—the vinegar adds amazing tang.
- Sweet & Sticky Asian-Inspired: For the liquid, use 1 cup beef broth + ½ cup soy sauce (or tamari) + ⅓ cup honey or brown sugar + 2 tbsp rice vinegar. Add a few slices of fresh ginger to the onion bed.
- Set-It & Forget-It (Slow Cooker): After seasoning, follow all steps but place everything in your slow cooker. Cook on LOW for 8-10 hours. For a better texture, transfer to a baking sheet and broil for 3-5 mins after cooking to brown the top.
- Wine-Braised Elegance: Replace 1 cup of the beef broth with a dry red wine like Cabernet Sauvignon. Add a bay leaf. The result is incredibly rich and perfect for a dinner party.
- Keto/Paleo Friendly: This recipe is naturally great! Just ensure your broth has no sugar, skip the optional tomato paste if strict, and serve with cauliflower mash and roasted veggies.
Chef’s Notes: A Few More Things From My Kitchen to Yours
Over the years, this recipe has become my culinary security blanket. It’s the dish I bring to potlucks when I want to hear a collective “Wow!” and the one I make on rainy Sundays just because. It has evolved—sometimes I add a splash of coffee to the braising liquid for depth (sounds weird, tastes amazing!), sometimes I throw in a handful of whole mushrooms.
The biggest evolution? My attitude. I no longer stress the exact hour. I use the fork test as my guide, and if dinner is late because the brisket needed another 30 minutes, so be it. It’s always worth the wait. And the leftovers? Even better the next day. Shredded on tacos, piled high on a sandwich with pickles, or chopped into chili. This recipe is a gift that keeps on giving. Most importantly, remember that the slight mess in your kitchen, the waiting, the gathering—it’s all part of the love you’re cooking into this meal. You’re doing great.
Your Brisket Questions, Answered
Let’s tackle some common hiccups before they happen:
- Q: My brisket seems tough/dry. What went wrong?
A: The two most likely culprits are not cooking it long enough or slicing it with the grain. Brisket needs to reach an internal temp of 200-205°F to break down all the collagen into gelatin. If it’s below that, it can be tough. If it’s dry, it may have been overcooked (past 210°F) or not had enough fat. Always slice against the grain! - Q: Can I sear the brisket before roasting?
A: Absolutely! It adds fantastic flavor. After step 2, heat a skillet with a little oil over medium-high. Sear the brisket for 3-4 minutes per side until deeply browned, then proceed to step 3. You can even sear it right in your Dutch oven if it’s oven-safe. - Q: The fat cap is really thick. Should I trim it?
A: Trim it down to about ¼ inch thickness. You want some fat to render and baste the meat, but a massive cap won’t fully render and can make the dish greasy. A little fat is flavor; a huge slab is just fat. - Q: How do I store and reheat leftovers?

Slow-Roasted Beef Brisket (Tender, Juicy & Holiday-Ready)
Description
A slow-roasted brisket is one of those meals that feels special without requiring complicated techniques. With low heat, simple seasoning, and enough time, a tough cut turns into fork-tender slices packed with rich flavor. It’s perfect for holidays, family dinners, or any day you want a true comfort-food centerpiece.
Ingredients
-
4–5 lb (1.8–2.3 kg) beef brisket
-
2 tbsp olive oil
-
2 tsp kosher salt
-
1 tsp black pepper
-
2 tsp smoked paprika
-
1 tsp garlic powder
-
1 tsp onion powder
-
1 large onion, sliced
-
4 garlic cloves, smashed
-
2 cups beef broth (low sodium preferred)
-
1 tbsp tomato paste (optional)
-
2–3 sprigs thyme or rosemary (optional)
Instructions
-
Preheat oven
Heat to 300°F (150°C). Place rack in lower third. -
Prep the brisket
Pat brisket dry. Rub all over with olive oil. -
Season
Mix salt, pepper, paprika, garlic powder, and onion powder. Coat brisket on all sides. -
Build the pan
Scatter onions and smashed garlic in a roasting pan or Dutch oven. Place brisket on top fat side up. -
Add liquid
Pour broth around (not over) the meat. Stir tomato paste into the liquid if using. Add herbs. -
Cover tightly
Seal with lid or double foil — tight seal is important for tenderizing steam. -
Slow roast
Roast 4–4½ hours without opening often. Brisket is ready when a fork slides in easily or internal temp reaches 200–205°F (93–96°C). -
Uncover to brown
Remove cover for the last 30 minutes to develop color and reduce sauce. -
Rest
Rest loosely tented with foil for 20–30 minutes. -
Slice correctly
Slice against the grain for maximum tenderness. Spoon pan juices over top.
Notes
-
Leave about ¼ inch fat cap — it keeps meat moist.
-
Tight cover = tender brisket. Steam is your friend.
-
Don’t rush the temperature — tenderness comes late.
-
If it’s tough, it likely needs more time, not less.
-
A thermometer removes guesswork.
Final Thoughts
Take a moment. Really. Pause right here, before you dive into slicing or plating or serving eager guests. Just stand at your counter, peek through the oven door, and breathe in that impossibly rich aroma filling your kitchen. This is it. This is the moment patience becomes reward, and simple ingredients become something sacred.
You just made brisket. Brisket. That intimidating, centerpiece-worthy, Sunday-supper-showstopper of a dish. And here’s what I hope you’re realizing: it was never about the meat. It was about the rhythm—the quiet confidence of seasoning by feel, the trust required to close the oven door and walk away, the deep satisfaction of pulling back the foil to reveal something you created, slowly and surely, with your own two hands.
This recipe isn’t really a recipe at all. It’s permission. Permission to stop rushing. Permission to let time do what time does best—transform, tenderize, deepen. Permission to serve a meal that didn’t demand you hover over it, that didn’t leave you frazzled while your guests arrive. While they sip wine and laugh in the other room, your brisket is simply… finishing. Doing its job. Making you look like a hero while you actually enjoy your own party.
And isn’t that the best kind of cooking? The kind that feeds everyone, including the cook?
I think about my grandma often when I make this. Not because I’m recreating her recipe—I’ve tweaked and tested and made it my own over the years—but because I finally understand what she was really doing in that warm, flour-dusted kitchen of hers. She wasn’t just feeding us. She was showing us, bite after tender bite, that some things can’t be rushed. That love, in its purest form, is patience with an apron on.
That’s what this brisket is, friend. It’s patience you can eat.
So tonight, when you set that platter on the table and watch everyone go quiet for that first bite, remember: you didn’t just follow instructions. You paid attention. You trusted yourself. You learned when to act and when to wait—a skill that carries far beyond the kitchen. And if the slices aren’t magazine-perfect? If the sauce is a little thin or the onions stuck to the pan? Not one person at that table will notice or care. They’ll remember how it tasted. How it felt. How you made them feel.
That’s the magic you actually made today.
Now go pour those pan juices over everything. Lick the spoon when no one’s looking. Accept the compliments with a humble smile while secretly knowing exactly how good you are. And tomorrow, when you’re standing in front of the open fridge at noon, staring at those glorious leftovers? Make a sandwich so tall it barely fits in your mouth. Shred some into your eggs. Call it dinner and eat it straight from the container.
You earned every bite.


