

Lemon Raspberry Easter Cake: A Slice of Sunny Spring
Hey there, friend! Come on in, grab an apron, and let’s bake some sunshine. Is there anything that whispers “spring is here” quite like the bright, cheerful combo of lemon and raspberry? I’m talking about that first whiff of citrus zest hitting the air, the pop of a sweet-tart berry, and the promise of longer, warmer days ahead. This Lemon Raspberry Easter Cake is my love letter to this gorgeous season.
It’s the cake I dream of when I see daffodils pushing through the soil. It’s not a dense, heavy dessert. Oh no. This beauty is all about light, soft layers perfumed with real lemon, a vibrant raspberry filling that sings with freshness, and a swoop of dreamy pastel frosting that looks like a soft sunset. It’s elegant enough for your Easter table but simple enough to make any Sunday feel special. Whether you’re hosting the family, surprising a neighbor, or just treating yourself (because you deserve it!), this cake is about creating a moment of pure, homemade joy. So, preheat that oven, and let’s make something unforgettable together!
The Cake That Sparked a Tradition
This cake has a little bit of my heart baked right into it. Years ago, long before this blog was even a twinkle in my eye, I was tasked with bringing dessert to my family’s Easter lunch. I was so nervous! I wanted to impress my nana, a legendary baker herself. My kitchen was a disaster zone—flour on the ceiling, I’m not kidding—and I was certain I’d created a lemon-scented brick.
But when I pulled those golden layers from the oven and sandwiched them with the ruby-red raspberry jam I’d clumsily simmered, something magical happened. The whole house smelled like spring and hope. At the table, when my nana took her first bite, she didn’t say a word. She just closed her eyes, smiled, and gave me a slow, knowing nod. That silent chef’s approval meant the world. Now, every spring, the making of this cake is my ritual. It’s less about perfection and more about that feeling—the messy, beautiful, love-filled process of creating something to share. Every berry mash and zest sprinkle is a happy little reminder of where it all began.
Gathering Your Sunshine Ingredients
Here’s everything you’ll need to build this spring masterpiece. I’ve added my little chef notes because knowing your ingredients is half the fun (and the secret to great baking)!
For the Lemon Cake Layers:
- 2 ½ cups all-purpose flour: The trusty foundation. For a slightly lighter crumb, you can swap ½ cup with cake flour, but all-purpose works beautifully.
- 2 ½ teaspoons baking powder: Our lift agent! Make sure it’s fresh for maximum rise.
- ½ teaspoon salt: The flavor enhancer. It balances the sweetness and makes the lemon pop.
- 1 cup (2 sticks) unsalted butter, softened: Key word: softened. Leave it out for an hour. It should dent easily when pressed. This is non-negotiable for that light, fluffy texture we crave.
- 1 ¾ cups granulated sugar: Sweetness and structure. We’re creaming it with the butter to create air pockets.
- 4 large eggs, at room temperature: Room temp eggs incorporate so much better! Just place them in a bowl of warm water for 5 minutes if you forgot.
- Zest of 2 lemons: This is where the magic lemon *fragrance* lives. Use a microplane and get just the yellow part, not the bitter white pith.
- ¼ cup fresh lemon juice: About 1-2 lemons. Fresh is best—it gives that bright, authentic tang bottled juice can’t match.
- 1 cup whole milk, at room temperature: Full-fat milk gives the best richness and tenderness.
- 1 teaspoon pure vanilla extract: The cozy background note that makes everything taste more “homemade.”
For the Raspberry Filling:
- 2 cups fresh raspberries: Frozen work perfectly here too! No need to thaw. They break down beautifully.
- 2 tablespoons granulated sugar: Just enough to sweeten the berries’ natural tartness.
- 1 teaspoon lemon juice: A bright little boost to help the berries along.
For the Pastel Frosting & Decoration:
- 1 cup (2 sticks) unsalted butter, softened: Yes, more butter. This is the base for our luscious, silky frosting.
- 3–4 cups powdered sugar: Start with 3 cups and add more to reach your desired sweetness and thickness. Sift it if you hate lumps!
- 2–3 tablespoons milk or heavy cream: Cream makes it extra rich. Add slowly to control consistency.
- 1 teaspoon pure vanilla extract: The perfect pairing for the lemon cake.
- Pastel food coloring (optional): Gel colors are my go-to—they give vibrant color without thinning the frosting. A tiny drop of pink, lavender, or mint green makes it so festive!
- Extra fresh raspberries & lemon slices for decorating: The final, fresh flourish!
Let’s Bake: Step-by-Step Sunshine
Ready? Let’s do this! I’m walking you through each step with all my favorite tips.
Step 1: Prep & Preheat
Preheat your oven to 350°F (175°C). This is crucial for an even bake. Now, grease two 8-inch round cake pans with butter or baking spray. Line the bottoms with parchment paper circles—this is your insurance policy for perfect, stick-free release! I just trace the pan on parchment and cut it out. Set them aside.
Step 2: Mix the Dry Team
In a medium bowl, whisk together the 2 ½ cups flour, 2 ½ tsp baking powder, and ½ tsp salt. Whisking by hand is perfect here—we just want to evenly distribute the baking powder and salt throughout the flour. No need to break out the mixer for this part. Set this “dry team” aside.
Step 3: Cream the Butter & Sugar (The Most Important Step!)
In your stand mixer or a large bowl with a hand mixer, beat the 1 cup of softened butter and 1 ¾ cups sugar together on medium-high speed. Now, don’t rush this! We’re looking for a mixture that is noticeably lighter in color and fluffy, about 3-4 minutes. This step incorporates air, which is what gives our cake its lovely texture. Scrape down the bowl halfway through.
Step 4: Incorporate Eggs & Lemon
With the mixer on medium, add the 4 eggs, one at a time, letting each fully incorporate before adding the next. This prevents the batter from breaking. Now, mix in the lemon zest, ¼ cup lemon juice, and 1 tsp vanilla. It might look a little curdled—that’s the lemon juice reacting. Don’t panic! It will all come together when we add the dry ingredients.
Step 5: Alternate Wet & Dry
Reduce your mixer speed to low. Add about one-third of your dry flour mixture and mix until just combined. Follow with half of the 1 cup milk. Repeat: another third of flour, the rest of the milk, and finally the last of the flour. Mix until *just* combined—a few streaks of flour are okay! Overmixing is the enemy of tender cake. Use a spatula to give one final, gentle fold from the bottom of the bowl.
Step 6: Bake & Cool
Divide the batter evenly between your prepared pans. I like to use a kitchen scale for precision, but eyeballing works too! Smooth the tops. Bake for 25-30 minutes, until the tops are springy to the touch and a toothpick inserted into the center comes out clean. Let the cakes cool in their pans on a wire rack for 10 minutes. Then, run a knife around the edge, invert them, peel off the parchment, and let them cool completely. Patience is key here—frosting a warm cake is a recipe for a melty mess!
Step 7: Make the Raspberry Filling
While the cakes cool, let’s make the simple filling. In a small saucepan, combine the 2 cups raspberries, 2 tbsp sugar, and 1 tsp lemon juice. Cook over medium heat, stirring and mashing the berries with your spoon as they soften. Let it simmer for 8-10 minutes until it thickens to a loose jam consistency. It will thicken more as it cools. Pour it into a bowl and let it cool completely.
Step 8: Whip Up the Pastel Frosting
In a clean bowl, beat the 1 cup of softened butter on medium speed until very smooth. With the mixer on low, gradually add 3 cups of powdered sugar. Once incorporated, add the 1 tsp vanilla and 2 tbsp of milk/cream. Beat on medium-high for a full 2-3 minutes until incredibly light and fluffy. This whipping time is what makes it silky! If it’s too thick, add more milk a teaspoon at a time. Too thin? Add a bit more powdered sugar. If using, add a tiny drop of gel food coloring and beat to combine.
Step 9: Assemble Your Masterpiece!
Place one completely cooled cake layer on your serving plate or cake stand. Spread a thin, even layer of frosting over the top (this creates a “dam” to hold the filling). Then, spoon the cooled raspberry filling in the center, spreading it almost to the edges. Carefully place the second cake layer on top. Apply a thin “crumb coat” of frosting all over the cake—a thin layer that traps any loose crumbs. Pop it in the fridge for 15 minutes to set. Finally, use the remaining frosting to generously and smoothly frost the entire outside of the cake. Have fun with it—swirls, swoops, or a smooth finish are all beautiful!
How to Serve This Spring Showstopper
Presentation is the final act of love! I like to decorate the top with a casual cascade of fresh raspberries and maybe a few thin twists of lemon zest or delicate edible flowers. Let the cake sit at room temperature for about 20 minutes before slicing—this allows the frosting to soften just enough for the perfect, clean cut. Use a sharp knife dipped in hot water and wiped dry between slices. Serve on pretty plates with a cup of tea or coffee, and watch those smiles appear.
Make It Your Own: Fun Variations
This recipe is wonderfully adaptable! Here are a few twists:
- Lemon Blueberry Bliss: Swap the raspberry filling for a blueberry version. Use 2 cups blueberries and simmer with 1 tbsp sugar and a pinch of cinnamon.
- Easter Egg Nest Topping: Frost the cake smoothly. Top with a ring of toasted coconut “grass” and place a few mini chocolate eggs in the center.
- Meyer Lemon Magic: Use sweeter, fragrant Meyer lemons for the zest and juice for a more nuanced citrus flavor.
- Dairy-Free Delight: Use plant-based butter sticks and unsweetened almond or oat milk in both cake and frosting. The filling is naturally dairy-free!
- Layer Cake for a Crowd: Bake the batter in three 6-inch pans for a taller, more dramatic cake. Reduce baking time to 20-25 minutes.
Olivia’s Chef Notes & Kitchen Confessions
This recipe has seen it all in my kitchen! One year, I was so excited I added the lemon juice straight from the bottle without measuring… let’s just say we had a VERY puckery cake. Lesson learned: measure your acids, friends! Over time, I’ve learned that the quality of your zest truly matters. Organic lemons are fantastic if you can, as you’re using the outer skin. And about that “messy apron” I mentioned? It’s almost guaranteed when I make this. Between the berry splatters and the powdered sugar cloud, it’s a glorious, delicious mess. Don’t stress about a picture-perfect frosting job either. A homemade look, with visible swoops and swirls, has so much more heart. It says, “Made with love,” not “Made by a robot.”
Your Questions, Answered!
Can I make this cake ahead of time?
Absolutely! You can bake the cake layers up to 2 days in advance. Let them cool completely, wrap tightly in plastic wrap, and store at room temperature. The raspberry filling can be made 3 days ahead and kept in the fridge. Assemble and frost the cake the day you plan to serve it for the freshest taste and texture.
My cake layers are domed! How do I get them flat?
Ah, the classic cake dome! It happens. First, make sure your baking powder is fresh. You can also try using bake-even strips (those fabric strips you soak and wrap around the pan). My simple hack? Once the cakes are out of the oven and have cooled for 10 minutes, I gently press down on the dome with a clean kitchen towel while it’s still warm and pliable. Or, you can simply slice the dome off with a serrated knife once the cake is completely cool to create a flat surface.
Why is my frosting runny or greasy?
Runny frosting usually means the butter was too warm, or you added too much liquid. Pop the whole bowl into the fridge for 15-20 minutes to firm up the butter, then re-whip. Greasy frosting can happen if the butter was too soft or the cake layers were even slightly warm when you frosted. Always ensure everything is cool! If it’s greasy, beating in an extra ½ to 1 cup of sifted powdered sugar can often rescue it.
Can I use frozen berries for the filling?
Yes, and it’s a fantastic, economical option! Use them straight from the freezer—no need to thaw. They may release a bit more liquid as they cook, so just let the mixture simmer for a couple of extra minutes until it reaches a jammy consistency.
Print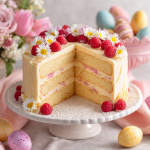
Lemon Raspberry Easter Cake : Light Layers with Pastel Frosting
Description
This Lemon Raspberry Easter Cake is everything you want in a spring dessert: light, fluffy lemon cake layers, sweet-tart raspberry filling, and silky pastel frosting. It’s elegant for Easter or spring gatherings but simple enough to make any day feel special.
Ingredients
Lemon Cake Layers
-
2 ½ cups all-purpose flour
-
2 ½ tsp baking powder
-
½ tsp salt
-
1 cup (2 sticks) unsalted butter, softened
-
1 ¾ cups granulated sugar
-
4 large eggs, room temperature
-
Zest of 2 lemons
-
¼ cup fresh lemon juice (about 1–2 lemons)
-
1 cup whole milk, room temperature
-
1 tsp pure vanilla extract
Raspberry Filling
-
2 cups fresh or frozen raspberries
-
2 tbsp granulated sugar
-
1 tsp lemon juice
Pastel Frosting
-
1 cup (2 sticks) unsalted butter, softened
-
3–4 cups powdered sugar
-
2–3 tbsp milk or heavy cream
-
1 tsp pure vanilla extract
-
Gel food coloring (optional)
Decoration
-
Fresh raspberries and thin lemon slices (optional)
Instructions
1. Prep & Preheat
-
Preheat oven to 350°F (175°C).
-
Grease two 8-inch round cake pans and line with parchment circles.
2. Mix Dry Ingredients
-
Whisk together flour, baking powder, and salt. Set aside.
3. Cream Butter & Sugar
-
Beat butter and sugar 3–4 minutes until light and fluffy.
4. Add Eggs & Lemon
-
Beat in eggs one at a time. Add lemon zest, juice, and vanilla. Mixture may look curdled—this is normal.
5. Alternate Wet & Dry
-
On low speed, add 1/3 of flour, then half the milk, repeat, ending with remaining flour. Fold gently to combine.
6. Bake & Cool
-
Divide batter between pans. Bake 25–30 minutes until tops spring back and toothpick comes out clean.
-
Cool 10 minutes in pans, remove parchment, and cool completely.
7. Make Raspberry Filling
-
Simmer raspberries, sugar, and lemon juice 8–10 minutes until thickened. Cool completely.
8. Make Frosting
-
Beat butter until smooth. Gradually add powdered sugar, vanilla, and milk/cream. Beat 2–3 minutes until light and fluffy. Add gel coloring if desired.
9. Assemble Cake
-
Place one cake layer on a plate. Spread a thin frosting “dam,” then spoon in raspberry filling. Top with second cake layer.
-
Apply crumb coat and chill 15 minutes. Finish with remaining frosting and decorate with berries and lemon slices.
Notes
-
Make Ahead: Cake layers 2 days ahead; raspberry filling 3 days ahead. Frost the day of serving.
-
Flat Layers: Use bake-even strips or trim domes after cooling.
-
Frosting Fix: If runny, chill butter 15–20 min and re-whip. Add extra powdered sugar if greasy.
-
Frozen Berries: Cook a few minutes longer to reach jammy consistency.
Nutritional Info (Per Slice, Approximate)
This is a celebratory treat, so enjoy every bite! Based on a 12-slice yield: Calories: ~420 | Protein: 5g | Carbohydrates: 58g | Fat: 20g.
Final Thoughts
As the last swirl of pastel frosting settles and you nestle those final raspberries into place, take a step back. Look at what you’ve created. This isn’t just a cake; it’s a tangible piece of spring, a labor of love baked into every lemony layer and swirled with joy.
Remember, the true beauty of this cake lies not in flawless perfection, but in the story it tells. It’s the story of flour-dusted counters and the bright scent of zest filling your kitchen. It’s the story of a shared nod of approval that turned into a yearly tradition. Whether this becomes your new Easter centerpiece or a bright spot in an ordinary week, you’ve woven a little bit of your own heart into it.
So when you present it, slice it with pride. Watch as the golden crumb gives way to that vibrant ribbon of ruby red. Listen for the happy sighs and the “Mmm, lemon!” that are sure to follow. You’ve made more than dessert; you’ve made a memory.
Thank you for baking this sunshine with me. May your spring be as sweet, bright, and full of promise as this cake.
With love and a sprinkle of zest,
Olivia


