

Easter Swiss Roll: Your New Spring Tradition Awaits!
Hey there, friend! Can you smell that? It’s the sweet, promising scent of a cake baking, mixed with the crisp, hopeful air of spring. Welcome back to my kitchen—I’m so glad you’re here. As the days get longer and the world outside starts to blush with pastel colors, my baking instincts kick into high gear. There’s something magical about creating a dessert that doesn’t just taste good, but looks like a celebration. That’s exactly what this Easter Swiss Roll is all about.
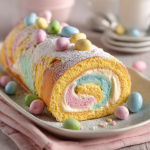
Imagine slicing into a cloud-soft, marbled sponge cake, revealing a swirl of dreamy cream cheese filling dotted with cheerful bits of pastel candy. It’s whimsical, it’s delicious, and it has that undeniable “wow” factor that makes everyone at the table lean in for a closer look. But here’s my favorite part: it’s deceptively simple. If you’ve ever felt intimidated by the elegant spiral of a roll cake, I’m here to be your guide. We’re going to walk through this together, step-by-cozy-step, and I’ll share all my favorite kitchen hacks to ensure success. This isn’t just a recipe; it’s a chance to create a gorgeous, shareable centerpiece that embodies the joy of the season. So, tie on your favorite apron (the messy one tells the best stories), and let’s make something unforgettable!
Of Sugar, Spring, and Sweet Memories
This recipe always takes me straight back to my Grandma Rose’s sun-drenched kitchen. Easter was her holiday. While other families had elaborate feasts, her pride and joy was the dessert table—a pastel wonderland of coconut nests, lemon bars, and, the crowning glory, her “Rainbow Log.” It wasn’t a Swiss roll per se (hers was a bit denser, packed with walnuts), but the spirit was the same: a beautiful, rolled cake that looked like it came from a fancy bakery. My job, as her designated “sous-chef,” was to sprinkle the crushed pastel mints. I took this duty very seriously, arranging each fragment as if it were a precious jewel.
One year, I got a little… overzealous. A whole cup of candies ended up in the filling. When we went to roll it, the log cracked spectacularly. My heart sank, but Grandma just laughed her warm, crinkly-eyed laugh. “Olivia, darling,” she said, “now it’s a rustic bark!” She slathered on extra frosting, stuck whole marshmallow chicks on top, and declared it the best one yet. That day, she taught me that kitchen “failures” are often just opportunities for creativity, and that the real magic isn’t in perfection—it’s in the joy of making and sharing something with love. This Easter Swiss Roll is my homage to her and that lesson: a little whimsical, a little sweet, and absolutely full of heart.
Gathering Your Pastel Palette
Here’s everything you’ll need to create this spring masterpiece. I’ve included my little chef notes to help you understand the “why” behind each ingredient—knowledge is power (and better baking)!
For the Cake:
- 6 large egg whites: Room temperature is key! They whip up to a much greater volume, giving us that light, airy sponge we crave. Save the yolks for a rich pasta carbonara or custard later.
- 1 tsp lemon juice (or white vinegar): This acidic magic helps stabilize the egg white foam, making it less likely to collapse. It’s our little insurance policy for a tall, fluffy cake.
- ¼ tsp salt: A flavor enhancer! It balances the sweetness and makes all the other flavors pop.
- ¼ cup granulated sugar: We add this gradually while whipping to dissolve it completely, creating a smooth, glossy meringue.
- ½ cup + 1 tbsp sifted cake flour: Cake flour has a lower protein content than all-purpose, which means a more tender, delicate crumb. Sifting is non-negotiable—it aerates the flour, making it easier to fold in without deflating our precious meringue.
- Gel food coloring (pink, yellow, blue, green): Gel is the champion here. It’s super concentrated, so you get vibrant pastels without adding extra liquid that could thin the batter.
- Powdered sugar (for dusting): This will be our “blank canvas” dusting to prevent sticking when we roll the warm cake, and our final snowy finish.
For the Filling:
- 4 oz cream cheese, softened: Leave it on the counter for a good hour. Soft cream cheese blends smoothly, preventing any lumpy surprises. Full-fat gives the best flavor and stability.
- ¾ cup heavy cream (cold): The colder the cream, the faster and better it whips. We’re looking for stiff peaks that will hold our roll’s shape.
- 1 tbsp sugar: Just a touch to subtly sweeten the filling and complement the tang of the cream cheese.
- Dash of vanilla extract: The flavor backbone. A pure vanilla extract makes all the difference.
- Crushed Easter candies: The fun part! Mini eggs, pastel M&M’s, or malted milk eggs add delightful crunch and bursts of chocolatey flavor. Crush them roughly—you want varied sizes for texture.
Let’s Roll! Step-by-Step Instructions
Follow these steps, breathe, and have fun. You’ve got this!
Step 1: Prep Like a Pro. Preheat your oven to 350°F (175°C). Line a standard 10×15 inch jelly roll pan with parchment paper, letting a little excess hang over the short sides for easy lifting. Give it a very light spray with nonstick spray—this glues the paper down and ensures the cake releases perfectly. Chef’s Hack: Do this first. An anxious batter waiting for a pan is a deflating batter!
Step 2: Whip the Meringue Base. In the impeccably clean bowl of your stand mixer (or using a hand mixer), combine the room-temperature egg whites, lemon juice, and salt. Beat on medium-high until the mixture is frothy and opaque. With the mixer running, gradually—I mean, a tablespoon at a time—add the granulated sugar. Once it’s all in, crank the speed to high and whip until you get soft, glossy peaks. This means when you lift the whisk, the peak will curl over gently. Don’t go to stiff peaks; it can make the cake dry and difficult to roll.
Step 3: Fold with a Gentle Touch. Sift the cake flour over the meringue in two additions. Using a large rubber spatula, fold it in gently. Imagine you’re carefully turning the batter over onto itself, scraping from the bottom of the bowl. We want to incorporate the flour while preserving as many of those precious air bubbles as possible. No vigorous stirring!
Step 4: Create Your Pastel Swirl. Now for the art project! Divide the batter evenly between three small bowls. Add a tiny drop of gel food coloring to each—pink, yellow, and one more (blue and green mixed make a lovely spring aqua). Gently fold the color in until just combined. Here’s the fun part: spoon dollops of each colored batter back into one large bowl. With a knife or skewer, give the batter just 2-3 lazy swirls. We want a marbled effect, not mud!
Step 5: Bake & the Critical Warm Roll. Pour and spread the marbled batter evenly into your prepared pan, getting it into the corners. Bake for 10-12 minutes. The cake is done when the top springs back lightly when touched. While it bakes, lay out a clean kitchen towel and dust it liberally with powdered sugar. The moment the cake comes out, invert it onto the towel. Carefully peel off the parchment paper it baked on. Now, starting at a short end, use the towel to gently roll the cake up into a loose spiral. Let it cool completely rolled up like this. This “trains” the cake to roll and prevents cracking later!
Step 6: Make the Dreamy Filling. In your mixer bowl, beat the softened cream cheese and 1 tbsp sugar until smooth. Switch to the whisk attachment. With the mixer on low, gradually pour in the cold heavy cream and vanilla. Once combined, increase speed to medium-high and whip until you have firm, spreadable peaks. Don’t over-whip, or it can become grainy.
Step 7: Assemble with Love. Carefully unroll the completely cooled cake. It’s okay if it stays slightly curled. Spread the cream cheese filling evenly over the surface, leaving a small border at the far edge. Sprinkle the crushed candies generously over the filling. Then, using the towel to help guide you, re-roll the cake forward into a tight spiral, peeling the towel away as you go.
Step 8: Chill, Garnish, and Slice. Place the roll seam-side down on a serving platter and refrigerate for at least 30 minutes (up to 4 hours) to set. This makes slicing cleanly a breeze. Just before serving, dust the top with a snowfall of powdered sugar and decorate with a few whole candies for that “wow” factor. Use a sharp serrated knife, wiping it clean between slices, for perfect pieces.
Presenting Your Masterpiece
Place your finished roll on a long, rustic wooden board or a simple white platter to let the colors shine. For a truly stunning Easter table, scatter a few real or ceramic eggs, sprigs of fresh mint or lavender, and pastel napkins around the platter. Slice it thick for a hearty dessert portion, or thinner for a dainty afternoon tea treat. I love serving it with a pot of fresh herbal tea or a glass of cold milk for the kids (and kids-at-heart).
Make It Your Own: Fun Variations
- Citrus Sunshine: Add 1 tsp of lemon or orange zest to the cake batter and a tbsp of the corresponding juice to the filling for a bright, zingy twist.
- Berry Bliss: Fold 1/2 cup of finely chopped, well-dried strawberries or raspberries into the filling along with the candies.
- Chocolate Indulgence: Swap 2 tbsp of the cake flour for cocoa powder. Use chocolate candies and add a tbsp of cocoa powder to the filling.
- “Bunny Garden”: Skip the candies inside. After frosting, press shredded coconut onto the outside of the roll to look like “grass” and top with jelly bean “eggs” and a marshmallow bunny.
- Dairy-Free Swap: Use a plant-based cream cheese and coconut cream (chilled overnight, use the solid part) for the filling.
Olivia’s Chef Notes
This recipe has been my spring fling for years, and it’s evolved with every batch. The first time I made it, I used liquid food coloring and ended up with a sad, greyish swirl—a true pastel fail! That’s when I became a gel-color evangelist. I’ve also learned that the “roll while warm” step is the hill I will die on. It feels counterintuitive, but it’s the secret handshake of all successful roll cakes. One year, my cat Waffles decided the dusted towel was his new throne mid-process. Let’s just say we had to start over, and he got a powdered sugar mustache. The mess was worth the laugh. Don’t stress the small cracks; a little powdered sugar covers a multitude of sins, and the flavor is always a home run.
Your Questions, Answered
Q: My cake cracked when I re-rolled it with the filling! What happened?
A: The most common culprits are overbaking (which dries it out) or not rolling it tightly enough while it was warm and flexible. Don’t worry! It’s still delicious. Just press it together, chill it well so the filling acts like glue, and dust generously with powdered sugar. It’ll taste incredible, I promise.
Q: Can I make this ahead of time?
A: Absolutely! You can bake the cake, roll it in the towel, and let it cool completely. Then wrap the whole towel-wrapped roll tightly in plastic wrap and keep it at room temperature for up to a day. Make the filling and assemble the day you plan to serve it. The assembled roll holds beautifully in the fridge for up to 24 hours.
Q: Why did my filling turn out runny?
A: This usually means the cream cheese wasn’t soft enough (causing lumps that break the emulsion) or the heavy cream wasn’t cold enough. Also, ensure you’re using full-fat, brick-style cream cheese, not the spreadable kind in a tub. If it’s a bit soft, just pop the whole assembled roll in the freezer for 20 minutes before slicing to firm it up.
Q: I don’t have a jelly roll pan. Can I use a baking sheet?
A> You can, but the result will be different. A standard baking sheet is larger and has lower sides, so the batter will spread thinner and bake faster, leading to a drier cake that’s harder to roll. If it’s all you have, keep a very close eye on the bake time (maybe 7-9 minutes) and be extra gentle.
Easter Swiss Roll : A Pastel-Perfect Spring Dessert
Description
This Easter Swiss Roll is soft, fluffy, and filled with creamy goodness and cheerful pastel candy. It looks fancy on the table but is surprisingly simple to make. With a light sponge cake and smooth cream cheese filling, it’s the kind of dessert that becomes a yearly tradition. Perfect for Easter gatherings, spring parties, or a fun weekend bake.
Ingredients
For the Cake
-
6 large egg whites, room temperature
-
1 tsp lemon juice or white vinegar
-
¼ tsp salt
-
¼ cup granulated sugar
-
½ cup + 1 tbsp cake flour, sifted
-
Gel food coloring (pastel colors)
-
Powdered sugar, for dusting
For the Filling
-
4 oz cream cheese, softened
-
¾ cup cold heavy cream
-
1 tbsp sugar
-
1 tsp vanilla extract
-
½–¾ cup crushed pastel Easter candies or mini chocolate eggs
Instructions
1️⃣ Prep Pan & Oven
Preheat oven to 350°F (175°C). Line a 10×15-inch jelly roll pan with parchment and lightly grease.
2️⃣ Whip Egg Whites
Beat egg whites, lemon juice, and salt until foamy. Slowly add sugar while mixing. Beat to soft glossy peaks.
3️⃣ Add Flour
Sift flour over the meringue in two additions. Gently fold with a spatula until just combined.
4️⃣ Color & Marble
Divide batter into 3 bowls. Tint each with gel coloring. Spoon dollops back into one bowl and swirl lightly for a marbled look.
5️⃣ Bake
Spread batter evenly in pan. Bake 10–12 minutes until the top springs back when touched.
6️⃣ Roll While Warm
Dust a clean towel with powdered sugar. Turn hot cake onto towel, peel parchment, and roll up from the short side with the towel. Cool completely.
7️⃣ Make Filling
Beat cream cheese and sugar until smooth. Add cream and vanilla. Whip to firm peaks.
8️⃣ Fill & Roll Again
Unroll cooled cake. Spread filling evenly and sprinkle crushed candies. Roll back up tightly (without towel).
9️⃣ Chill & Serve
Chill at least 30 minutes. Dust with powdered sugar, slice with a serrated knife, and serve.
Notes
-
Roll the cake while warm — this prevents cracking later.
-
Use gel coloring only so the batter doesn’t thin out.
-
Don’t overbake — dry cake cracks more easily.
-
Cold cream whips best for a stable filling.
-
Leave a border when spreading filling so it doesn’t squeeze out.
Nutritional Info (Per Slice, Approximately)
Calories: ~166 | Fat: 8g | Saturated Fat: 5g | Carbohydrates: 19g | Sugar: 12g | Protein: 4g
***
There you have it! Your guide to creating a show-stopping, delicious, and joyful Easter Swiss Roll. I can’t wait for you to try it. Remember, baking is an act of love, especially when shared. Tag me on social if you make it—I love seeing your kitchen creations! Happy baking, and happy spring!
The Final Whisk
In the quiet hum of the oven and the soft peak of whipped cream, we find more than a recipe. We find a rhythm—the rhythm of a season turning, of memories woven into batter, of creating something beautiful to offer up with love.
This Swiss Roll is a celebration captured in cake. A marbled promise of new beginnings, a swirl of sweetness to share. It’s the tangible proof that a bit of flour, eggs, and sugar, handled with care, can become a small piece of art for the people you cherish.
So as you slice into those soft, pastel layers, may it taste like spring itself: light, hopeful, and full of delight. Here’s to sweet traditions, both old and new.
Wishing you and yours an Easter filled with the coziest moments and the most delicious slices of joy.


