

Easter Swirl Pie: Your New No-Bake Spring Tradition
Hey there, friend! Come on in—can you smell that? It’s the sweet, buttery scent of a graham cracker crust and the promise of something wonderfully pastel chilling in the fridge. If your heart does a little happy dance at the sight of a dessert that looks almost too pretty to eat, you and I are on the same wavelength. Welcome to the joy of my Easter Swirl Pie.
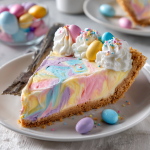
This isn’t just a pie; it’s a celebration on a plate. A no-bake, fuss-free masterpiece that captures the playful, hopeful spirit of spring in every pastel swirl. Picture this: clouds of silky, creamy filling in soft shades of pink, sunshine yellow, and sky blue, all swirled together like a watercolor painting. It sits in a crisp, golden crust and gets a crown of fluffy whipped cream and festive Easter candy. It’s the dessert that makes everyone—from your littlest niece to your most discerning foodie uncle—lean in with wide eyes and say, “You made that?”
The best part? You absolutely can. This recipe is my love letter to busy people who want to create magic without the stress. No oven thermometers, no fussy pastry dough, no hours of labor. Just simple ingredients, a little creative swirling, and the magic of your freezer and fridge doing the hard work. Whether you’re hosting a big Easter brunch, bringing a show-stopper to a potluck, or just want to make a regular Tuesday feel special, this pie is your secret weapon. So, tie on that (probably already flour-dusted) apron, and let’s make something unforgettable together.
The Story Behind the Swirl: A Messy, Sweet Beginning
This recipe has its roots in a kitchen covered in more food coloring than a toddler’s art project. Years ago, long before this blog was even a thought, I was determined to make an Easter dessert for my family that was more exciting than a basic boxed cake. I wanted color, whimsy, and pure joy in every slice. I started with my grandma’s no-bake cheesecake base—a trusted, beloved formula—and decided to get playful.
I remember dividing that creamy mixture into three bowls, my hands shaking a little as I added drops of liquid food coloring. What was supposed to be delicate pastels turned into neon pink, electric yellow, and a blue so bright it could have guided airplanes. My first attempt at swirling looked less like a gentle spring sky and more like a tie-dye shirt from the 90s. I was convinced it was a disaster. But when I brought it to the table, my family’s faces lit up. They didn’t see a mistake; they saw a burst of happiness. That pie, messy swirls and all, disappeared in minutes, accompanied by laughter and requests for “a piece with more blue!” It taught me a beautiful lesson: food made with joy and a dash of bravery is always a success. This Easter Swirl Pie is the polished, prettier version of that happy kitchen accident, but the spirit of playful, loving creation is exactly the same.
Gathering Your Pastel Palette: Ingredients & Insights
Here’s everything you’ll need to build your dreamy pie. Think of this as gathering the paints for your edible masterpiece! I’ve added my little chef notes to help you understand the “why” behind each item and how to swap things if needed.
- 1 pre-made graham cracker crust: Our trusty, time-saving foundation. The buttery sweetness is the perfect contrast to the airy filling. Chef’s Insight: Feel free to use a chocolate cookie crust for a fun twist, or make your own by mixing 1 ½ cups graham cracker crumbs with 6 Tbsp melted butter and a tablespoon of sugar, pressed into a pie plate.
- 1 package (8 oz) cream cheese, softened: This is the backbone of our filling, giving it structure and that classic, tangy richness. Pro Tip: For truly “softened” cream cheese, leave it on the counter for 1-2 hours. In a pinch? Unwrap it, microwave on a plate for 10-15 seconds, flip, and repeat until it yields gently to a finger press. Never melt it!
- 1 container (8 oz) whipped topping (like Cool Whip), thawed: This is our secret for an impossibly light, fluffy texture without whipping heavy cream. Substitution Tip: You can absolutely use an equal amount of freshly whipped, sweetened heavy cream. Just whip 1 ½ cups of cold heavy cream with 2-3 tablespoons of powdered sugar until stiff peaks form.
- 1 box (3.4 oz) instant vanilla pudding mix: The magical stabilizer! It sets the filling perfectly without baking and adds a lovely vanilla flavor. Chef’s Note: It must be “instant” pudding. Cook-and-serve won’t work here.
- 1 cup cold milk: Whole milk will give the richest result, but any milk you have works. The cold temperature helps activate the pudding mix quickly.
- Gel food coloring (pink, yellow, blue, purple): The artist’s tools! Critical Tip: Use gel or paste food coloring, not liquid. Gels are more concentrated, so you get vibrant color without adding extra liquid that could thin out your filling. A tiny drop or a swipe on a toothpick is all you need for beautiful pastels.
- Whipped cream, candy eggs, sprinkles for garnish: The final festive flourish! Use store-bought whipped cream, make your own, or use more of the whipped topping. Let your inner decorator go wild here.
Let’s Make Some Magic: Step-by-Step Instructions
Ready to swirl? Follow these steps, and don’t forget to read my little commentary—it’s like I’m right there with you, passing you the spatula!
Step 1: The Creamy Foundation. In a large mixing bowl, beat the softened cream cheese with a hand mixer or stand mixer fitted with the paddle attachment until it’s completely smooth and lump-free. This is crucial! No one wants little bits of cream cheese in their silky pie. Scrape down the sides of the bowl with a rubber spatula to make sure everything is incorporated. My Little Hack: If your cream cheese is still a bit chilly and fighting you, beat in 1 tablespoon of the cold milk from your measured cup. It will loosen right up.
Step 2: Activate the Magic. Sprinkle the entire box of instant vanilla pudding mix over the smooth cream cheese. Pour in the 1 cup of cold milk. Start beating on low speed at first (to avoid a powdered sugar snowstorm!), then increase to medium and beat for 1-2 minutes. You’ll see it thicken almost immediately. It should look like a very thick, smooth, and cohesive batter. Scrape the bowl again.
Step 3: Lighten & Fluff. Now, we fold. Add about one-third of the thawed whipped topping to the bowl. Use your spatula to gently fold it in—scoop down the side, across the bottom, and up over the top. This incorporates air. Once it’s mostly mixed, add the remaining whipped topping and continue folding gently until no white streaks remain. The mixture will be gloriously light, airy, and spreadable. Resist the urge to mix aggressively; we want to keep that volume!
Step 4: Create Your Pastel Palette. Divide the fluffy filling evenly between 3 or 4 small bowls. I love using three colors (pink, yellow, blue), but a fourth (like purple or mint green) makes it extra spectacular. Now, add your gel food coloring. Pro-Tip: Start with a TINY amount—literally, a dip of a toothpick. You can always add more, but you can’t take it away! Stir gently until the color is uniform. Aim for soft, Easter-egg shades.
Step 5: The Artistic Swirl. Here’s the fun part! Using separate spoons for each color (to keep them clean), drop random spoonfuls of each colored filling into your graham cracker crust. Alternate the colors, piling them next to and on top of each other. Don’t worry about being neat! Once all the filling is in the crust, take a butter knife, a skewer, or even the tip of a spoon. Gently drag it through the mounds of color in a loose figure-eight or zig-zag pattern just 2-3 times. The goal is to marble them, not mix them into one uniform muddy color. Less is more!
Step 6: The Patient Chill. Carefully transfer your pie to the refrigerator. You must let it chill, uncovered, for at least 4 hours, but overnight is ideal. This sets the pudding and allows the flavors to meld beautifully. Chef’s Secret: If you’re in a serious time crunch, you can pop it in the freezer for 1.5-2 hours to set quickly, then move it to the fridge.
Step 7: The Grand Finale. Just before serving, decorate! Pipe or dollop whipped cream around the edges. Artfully place your candy eggs and sprinkles. This is your moment—have fun with it! Slice with a sharp knife dipped in hot water for the cleanest cuts.
Presenting Your Pastel Masterpiece
This pie is a showstopper, so let it shine! Serve it on a simple, elegant cake stand or a colorful charger plate that complements the pastels. For individual slices, use a pie server to lift out each gorgeous, swirled piece. A little extra dollop of whipped cream on the side never hurt anybody. Pair it with a cup of fresh coffee, a glass of cold milk, or a sparkling mimosa for brunch. The most important serving suggestion? Bring it to the table with a big smile and get ready for the “oohs” and “aahs.”
Make It Your Own: Fun Variations
The beauty of this recipe is its versatility! Here are a few ways to twist it:
- Lemon Berry Bliss: Use instant lemon pudding mix. Tint the filling shades of pale yellow, pink (with a drop of raspberry extract), and purple. Garnish with fresh raspberries and blueberries.
- Chocolate Coconut Nest: Use a chocolate cookie crust. Fold ½ cup of toasted coconut into the filling before dividing. Color it light blue and green for a “spring sky and grass” effect and top with chocolate egg candies in a coconut “nest.”
- Funfetti Fiesta: Keep the vanilla pudding, but use pastel rainbow sprinkles as your “color.” Fold ¼ cup sprinkles into the white filling, pour into the crust, and top with more sprinkles. Instant party!
- Dairy-Free Dream: Use dairy-free cream cheese and whipped topping, and your favorite non-dairy milk. The pudding mix is usually dairy-free, but always check the label!
Olivia’s Chef Notes
This recipe has been my Easter go-to for years, and it’s evolved from that neon tie-dye experiment into the reliable beauty you see today. One funny fail I remember: I once was so eager to swirl that I used a thick-handled spoon and basically mixed the whole pie into a solid lavender color. My husband kindly called it “a very confident shade of purple.” We learned that a thin knife is your best friend! Over time, I’ve also learned that this pie is the ultimate fridge-forager’s friend. Have a handful of leftover strawberries? Chop them and press them into the bottom of the crust before adding filling. A bit of lemon zest? Stir it in. It’s a forgiving, joyful recipe. The version I’m sharing with you is the most crowd-pleasing, foolproof iteration, but never be afraid to add your own chapter to its story.
Your Questions, Answered
Q: My filling seems runny after I mix it. What did I do wrong?
A: This usually happens for one of three reasons: 1) The cream cheese wasn’t fully softened, creating lumps that didn’t incorporate. 2) You used a “Cook & Serve” pudding mix instead of “Instant.” 3) The whipped topping was still frozen or you over-mixed and deflated it. To salvage, try popping the whole bowl of filling (before coloring) into the fridge for 20 minutes to firm up, then proceed.
Q: Can I make this ahead of time?
A> Absolutely! In fact, I recommend it. You can make this pie up to 24 hours in advance. Just wait to add the whipped cream and candy garnish until 1-2 hours before serving so they stay fresh and don’t bleed color.
Q: Why do you insist on gel food coloring?
A> Liquid food coloring is mostly water. Adding enough to get a nice color can thin out your delicate filling, potentially making it weep or not set as firmly. Gel colors are potent and water-free, so you get vibrant color without compromising texture. It’s a game-changer!
Q: My swirls disappeared after chilling! What happened?
A> You likely over-swirled. When you drag the knife through, you’re just blending the very top layer. If you go too deep or swirl too many times, the colors will blend together as the pie sets. Next time, remember the 2-3 gentle passes rule. It’ll still taste amazing, I promise!
Easter Swirl Pie : A No-Bake Pastel Dream
Description
Hey there! If you want a dessert that looks festive and fun but is super simple to make, this Easter Swirl Pie is perfect. It’s creamy, colorful, and completely no-bake — which means less stress and more smiles. Great for Easter, spring parties, or anytime you want a cheerful treat from the fridge instead of the oven.
Ingredients
-
1 pre-made graham cracker crust
-
8 oz cream cheese, softened
-
1 box (3.4 oz) instant vanilla pudding mix
-
1 cup cold milk
-
8 oz whipped topping, thawed
-
Gel food coloring (pink, yellow, blue, or other pastel colors)
-
Whipped cream (for topping)
-
Easter candy or pastel sprinkles (optional garnish)
Instructions
-
Beat the cream cheese
In a large bowl, beat softened cream cheese until smooth and lump-free. -
Add pudding & milk
Add instant pudding mix and cold milk. Beat 1–2 minutes until thick and smooth. -
Fold in whipped topping
Gently fold in the whipped topping with a spatula until light and fluffy. -
Divide and color
Split the mixture into 3–4 small bowls. Add a tiny drop of gel food coloring to each and stir to make pastel shades. -
Create the swirl
Spoon dollops of each color randomly into the crust. Layer and scatter them around. -
Swirl gently
Use a knife or skewer to make a few light swirl motions. Don’t overmix — just 2–3 passes for a marbled look. -
Chill
Refrigerate at least 4 hours (overnight is best) until fully set. -
Decorate & serve
Top with whipped cream and Easter candy or sprinkles just before serving.
Notes
-
Use gel coloring, not liquid — it keeps the filling thick and pastel instead of watery.
-
Cream cheese must be soft or the filling can turn lumpy.
-
Don’t over-swirl or the colors blend into one shade.
-
Make ahead friendly: Best made the day before serving.
-
Need it faster? Freeze 90 minutes, then transfer to the fridge.
Nutritional Information (Per Slice, Approximate)
Calories: ~280 | Total Fat: 16g | Saturated Fat: 10g | Cholesterol: 30mg | Sodium: 280mg | Total Carbohydrates: 30g | Dietary Fiber: 0g | Sugars: 20g | Protein: 3g
Disclaimer: Nutritional info is an estimate based on the specific ingredients listed and may vary with substitutions.


