
Tiny Pasta, Big Flavor: Ditalini Bowls Are Your Next Kitchen Hug
Hey there, friend! Come on in. Can you smell that? It’s the cozy, carb-y, utterly irresistible scent of something simple yet spectacular simmering on the stove. If your soul (and stomach) craves a meal that feels like a warm hug, a dish that’s endlessly adaptable to your mood and your fridge’s contents, then I am so excited you’re here today. We’re talking about the ultimate weeknight win, the lazy Sunday savior, the culinary canvas of your dreams: Ditalini Pasta Bowls.
Forget everything you think you know about pasta being just a side dish. We’re giving these tiny, tube-shaped treasures the main character energy they deserve. Ditalini, which charmingly translates to “little thimbles” in Italian, are the perfect vehicle for capturing pockets of sauce, bits of roasted veg, and melting cheese in every single bite. They’re the unassuming hero of the pasta world, and building a bowl around them is my favorite way to create a meal that’s comforting, creative, and completely within your control.
Whether you’re flying solo and need a quick, satisfying dinner, or you’re hosting a casual gathering where everyone can customize their own masterpiece, these bowls are the answer. They’re for the nights you want something more than a salad but less fuss than a four-course feast. They’re for celebrating the last of the summer tomatoes or leaning into the rich, roasted flavors of fall. So, grab your favorite apron (the messy one tells the best stories), and let’s turn a humble cup of tiny pasta into a bowl of pure, customizable joy.
My First Bowl of “Everything But The Kitchen Sink” Magic
My love affair with ditalini bowls started not in a fancy kitchen, but in my first post-college apartment, with a nearly empty fridge and a serious case of the “I don’t want to go to the grocery store” blues. I had a half-box of ditalini left from a minestrone soup experiment, a wilting zucchini, a lonely bell pepper, and a nub of Parmesan. Desperation, as it so often does in the kitchen, became the mother of a delicious invention.
I roasted those sad veggies until they were caramelized and happy, boiled the pasta, and threw it all in a bowl with a glug of good olive oil. As I sat on my tiny balcony, twirling my fork through that steaming, simple bowl, something clicked. It wasn’t about following a recipe to the letter; it was about resourcefulness and flavor. It was about making something that felt nourishing and special out of practically nothing. That bowl taught me that cooking confidence isn’t about knowing every technique—it’s about trusting your instincts and understanding how a few good ingredients can come together. Every time I make a ditalini bowl now, I remember that feeling of triumph. It’s a reminder that the best meals often come from the heart (and the crisper drawer), not just a cookbook.
Gathering Your Bowl-Building Crew: Ingredients & Insights
Here’s the beautiful part: this is less of a strict recipe and more of a blueprint. Think of these as your foundation ingredients. The “Optional” list? That’s your playground. Let’s break it down.
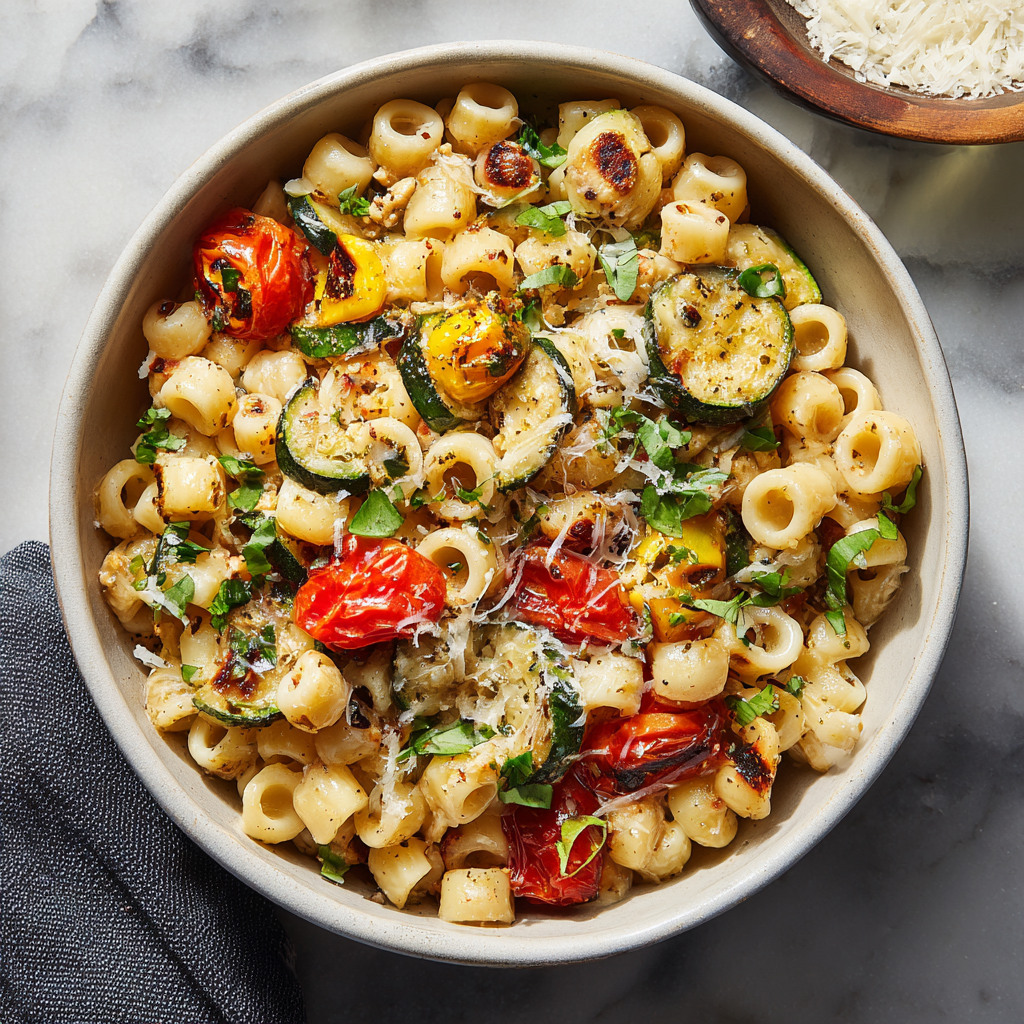
- 1 cup Ditalini Pasta: The star! Their small, tube shape is genius for holding onto sauces and bits of goodness. No ditalini? Small shells (conchiglie) or even elbow macaroni will happily step in.
- Salted Water for Boiling: This is non-negotiable, friends. Your pasta water should taste like the sea. It’s the only chance you get to season the pasta itself from the inside out. This is Chef Secret #1 for flavorful bowls.
- 2 tbsp Olive Oil or 2 tbsp Pesto: Your flavor base. A good extra virgin olive oil adds fruity depth, while pesto (homemade or a quality jarred one) injects a huge burst of herby, garlicky flavor in one go.
- 1/2 cup Roasted or Sautéed Veggies: This is where seasonality shines. I love zucchini, bell peppers, and cherry tomatoes—toss them in oil, salt, and pepper, and roast at 400°F until blistered and sweet. In winter, try cubes of butternut squash or broccoli florets.
- 1/4 cup Grated Parmesan or Crumbled Feta: The salty, umami finish. Parmesan melts into a creamy embrace, while feta adds a tangy, briny punch. Feel free to use pecorino, goat cheese, or a vegan alternative.
Your Optional Playground (Pick 1 or Mix & Match!):
- Protein: 1 cup shredded grilled chicken, 1/2 cup drained chickpeas (for fiber and a lovely texture), or a can of drained tuna.
- Toppings for Crunch & Zing: Crispy breadcrumbs (panko toasted in olive oil), a pinch of chili flakes, fresh herbs like basil or parsley, a squeeze of lemon juice, or a drizzle of chili oil.
Let’s Build Your Bowl: A Step-by-Step Journey to Cozy
Ready? Let’s cook with intention and a whole lot of love. Follow these steps, and you’ll have a restaurant-worthy bowl in about 20 minutes flat.
- Preheat & Prep. If you’re roasting veggies, get that oven heating to 400°F (200°C). Chop your chosen vegetables into even, bite-sized pieces. Toss them on a baking sheet with a tablespoon of olive oil, salt, and pepper. Pop them in the oven. They’ll roast while you handle the pasta, making the whole process seamless.
- Boil That Water Like You Mean It. Fill a medium pot with water and add a generous tablespoon of kosher salt. Bring it to a rolling boil. Chef’s Hack: Place a wooden spoon across the top of the pot to prevent it from boiling over. An old trick that really works!
- Cook the Ditalini to Al Dente. Add the ditalini to the boiling water. Stir immediately to prevent sticking. Cook according to package directions, but start tasting a minute or two early. You want it al dente—firm to the bite. It will continue to soften a bit in the bowl. CRITICAL STEP: Before you drain, scoop out about 1/2 cup of the starchy pasta water. This liquid gold is your secret weapon for creating a silky, cohesive sauce in the bowl.
- Drain & Season. Drain the pasta and return it to the warm pot (off the heat). Immediately add your olive oil or pesto and toss vigorously. If using just oil, add a big pinch of salt and pepper here. The hot pasta will drink up that initial flavor.
- The Magic Toss. This is where you build layers. Add your warm roasted veggies and any protein (like chickpeas or chicken) to the pot with the pasta. Sprinkle in about half of your cheese. Now, add a splash of that reserved pasta water—start with 2 tablespoons. Toss everything together. The starch in the water will emulsify with the oil/cheese, creating a light, glossy coating that brings every element together beautifully.
- Bowl & Beautify. Divide the pasta mixture between two bowls. Top with the remaining cheese. Now, unleash your inner artist with the toppings: a sprinkle of crispy breadcrumbs for that essential crunch, fresh herbs for color, chili flakes for heat, a final drizzle of oil. Make it yours!
How to Serve Your Masterpiece
Presentation is part of the fun! I love using wide, shallow bowls so you can see all the colorful components. Serve it immediately while it’s gloriously warm and the cheese is melty. For a full cozy experience, pair it with a simple side salad of bitter greens (like arugula) with a lemony vinaigrette to cut the richness. And don’t forget a big spoon and a fork—you’ll want both to capture every last little pasta tube and topping.
Make It Your Own: 5 Flavor Twists to Try
The fun never ends! Here are a few of my favorite ways to remix the base blueprint:
- Lemon Garlic & Herb: Use olive oil, then toss with zest and juice of 1 lemon, 2 minced garlic cloves (sautéed briefly), and a handful of fresh chopped parsley and dill. Top with goat cheese.
- Creamy Tomato Dream: Swap the oil for 1/4 cup of tomato paste stirred with 1/4 cup of the pasta water to create a quick, creamy tomato sauce. Add a spoonful of ricotta when tossing.
- Mediterranean Power Bowl: Use pesto, add chickpeas, chopped kalamata olives, roasted red peppers, and cucumbers. Top with feta and fresh oregano.
- Brothy & Light: After draining the pasta, add it back to the pot with 1 cup of warm chicken or veggie broth, your veggies, and a squeeze of lemon. Serve it more like a pasta soup—so soothing.
- Everything Green: Use a handful of spinach or kale, blended into your pesto for extra greens. Top with roasted broccoli, peas, and toasted pine nuts.
From My Kitchen to Yours: A Few Parting Thoughts
This recipe has evolved from my “empty fridge” special into my most-requested casual meal for friends. I’ve served these bowls at everything from book club to a “help me unpack my kitchen” party—they’re always a hit. The biggest lesson? Don’t stress about precision. The measurements are guides, not rules. That last, lonely sausage in the package? Chop it up and throw it in. Those few sun-dried tomatoes at the bottom of the jar? Yes, please.
My kitchen is perpetually a happy mess when I’m cooking these, and that’s how I know I’m doing it right. Cooking should feel joyful, not stressful. So put on some music, pour yourself a little something to drink, and enjoy the process of creating something deliciously yours. I promise, the bowl will taste even better because of it.
Your Questions, Answered: Ditalini Bowl FAQ
Q: Can I make this ahead of time?
A: You can absolutely prep the components! Roast the veggies, cook the protein, and even make the crispy breadcrumbs ahead. Store them separately. I recommend cooking the pasta fresh when you’re ready to serve, as it can get gummy in the fridge. When it’s mealtime, just reheat the veggies/protein, cook the pasta (it’s so quick!), and assemble.
Q: My pasta seems dry after I toss it. What did I do wrong?
A> No worries—this is an easy fix! You likely just need a bit more moisture. This is why we save that pasta water. Add another tablespoon or two and toss again. The starch will help bind everything into a saucier consistency. A little extra olive oil or a dollop of ricotta can also rescue it beautifully.
Q: I’m gluten-free/dairy-free. Can I still make this?
A> 100% yes! This bowl is incredibly adaptable. Use your favorite gluten-free small pasta (many brands make great rice-based options). For dairy-free, skip the Parmesan and use a sprinkle of nutritional yeast for a cheesy flavor, or top with a vegan feta. Your base of veggies, olive oil, and protein is already naturally free of both.
Q: Is this really a meal for two? It seems like a small amount of pasta.
A> The beauty of the bowl is that the pasta is just the foundation. By the time you load it up with a hearty 1/2 cup of veggies, a protein like chickpeas or chicken, and toppings, it becomes a very satisfying and balanced meal. If you’re serving big appetites, simply scale up the pasta and add-ins proportionally. One cup of dry pasta typically yields about 2 1/2 cups cooked, which is a perfect base for two generous bowls.
Ditalini Pasta Bowls: Cozy, Customizable Comfort in Every Bite
Description
Tiny ditalini pasta tubes become the stars of this easy, flexible bowl. Roasted or sautéed veggies, optional protein, and a drizzle of olive oil or pesto create a warm, satisfying meal that’s endlessly adaptable.
Ingredients
Base:
-
1 cup ditalini pasta (or small shells/elbows)
-
Salted water, for boiling
Flavor Base:
-
2 tbsp olive oil or pesto
-
½ cup roasted or sautéed vegetables (zucchini, bell pepper, cherry tomatoes, butternut squash, broccoli)
-
¼ cup grated Parmesan or crumbled feta
Optional Protein & Toppings:
-
1 cup shredded grilled chicken, ½ cup chickpeas, or canned tuna
-
Crispy breadcrumbs, chili flakes, fresh herbs (basil, parsley), lemon juice, chili oil
Instructions
-
Prep & Roast Veggies:
Preheat oven to 400°F (200°C). Toss chopped veggies with 1 tbsp olive oil, salt, and pepper. Roast until tender and caramelized (~15 min). -
Boil Pasta:
Bring a pot of salted water to a rolling boil. Add ditalini and cook al dente according to package directions. Reserve ½ cup pasta water before draining. -
Season & Toss Pasta:
Return pasta to pot off the heat. Add olive oil or pesto, season with salt & pepper, and toss. -
Combine Bowl:
Add roasted veggies and protein (if using) to pasta. Sprinkle in half the cheese. Add 1–2 tbsp reserved pasta water and toss to create a silky coating. -
Serve & Garnish:
Divide between bowls. Top with remaining cheese, crispy breadcrumbs, herbs, chili flakes, or a drizzle of oil. Serve immediately.
Notes
-
Extra Flavor: Toss pasta with lemon zest/juice or a spoonful of ricotta.
-
Prevent Dry Pasta: Always use reserved pasta water to bind ingredients.
-
Make Ahead: Prep veggies and protein in advance. Cook pasta fresh at serving time.
-
Diet-Friendly: Gluten-free pasta and vegan cheese work beautifully.
Nutritional Information (Per Serving – Base Recipe with Olive Oil & Veggies)
Note: This is a rough estimate. Calories will vary based on your specific add-ins and toppings.
Prep Time: 5 mins | Cook Time: 15 mins | Servings: 2
Approximate per bowl: 350-400 calories | 12g protein | 14g fat | 50g carbohydrates | 4g fiber
Final Thoughts
What started as a humble solution for an empty fridge has become a beloved ritual—a testament to how a little creativity can turn simple ingredients into a meal that feels like a comfort-filled embrace. Ditalini bowls are more than just a quick dinner; they’re an invitation to play, to adapt, and to savor the small, satisfying moments in the kitchen.
Remember, the magic isn’t just in the tiny pasta—it’s in the philosophy: that cooking should be forgiving, flexible, and fun. Whether you follow the blueprint exactly or wander freely into your own flavor combinations, what matters is the joy of creating something delicious, exactly the way you like it.
So, the next time you’re staring into the pantry wondering what’s for dinner, grab those little pasta thimbles and build yourself a bowl. Let it be hearty, bright, creamy, or spicy—whatever your heart needs. Because the best meals aren’t just made from ingredients; they’re made with intention, a dash of curiosity, and the understanding that sometimes, the coziest creations come from the simplest beginnings.


