
Crispy Onion Ring Chips: The Snackable Twist on a Classic Favorite
Hey there, friend! Welcome back to my cozy kitchen corner. Can we talk about snacks for a second? I mean, the real kind. The ones you crave at 3 p.m., the ones that disappear from the plate during game night, the ones that make you close your eyes and just go, “Mmm.” We all have that nostalgic love for the classic, thick-cut onion ring, but what if I told you we could take all that incredible flavor—the sweet onion, the savory crunch, the irresistible aroma—and transform it into something lighter, crispier, and utterly, dangerously snackable?
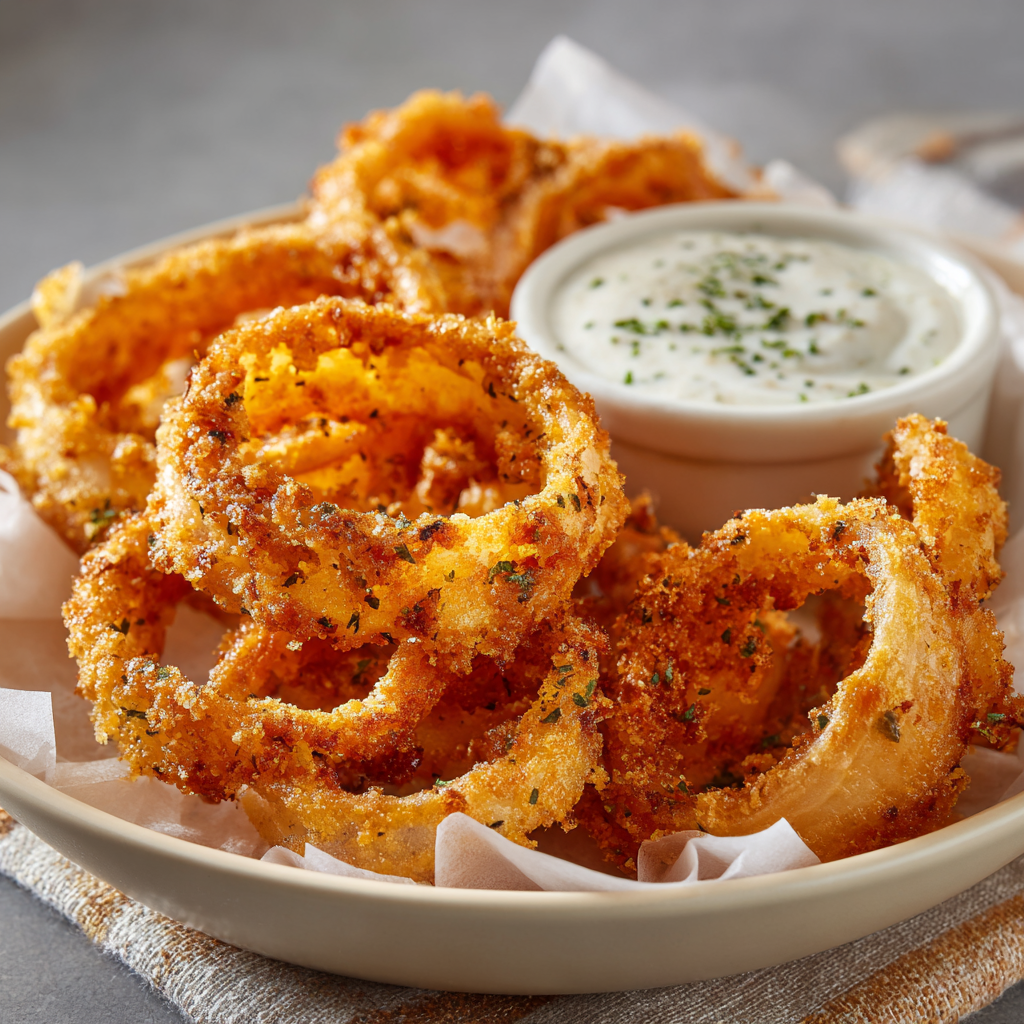
That’s exactly what we’re doing today with these viral-worthy Crispy Onion Ring Chips. Imagine your favorite onion ring got a chic, crispy makeover. These aren’t just rings; they’re whisper-thin, shatteringly crisp chips that you can pile high, dip with abandon, or crumble over everything from burgers to salads. They’re faster to make than traditional rings, feel a bit lighter (which just means you can eat more, right?), and are guaranteed to be the star of your next snack spread. So, tie on your favorite apron, and let’s turn a humble onion into the most addictive chip you’ll make all year.
The Night We Ran Out of Potato Chips
This recipe was born out of a minor kitchen crisis, as the best ones often are. It was a few years ago, right in the middle of a very intense board game night with my closest friends. The bowl of potato chips had been decimated, and we were all still in serious snack mode. I had a big bag of sweet onions on the counter, destined for tomorrow’s soup, and a serious “aha!” moment hit me. What if I sliced them paper-thin and fried them up?
I whipped up a quick, fizzy batter I’d used for tempura, and ten minutes later, I emerged from the kitchen with a heaping bowl of golden, crispy onion ribbons. The sound of that first crunch was deafening in the best way. They were gone in under two minutes, and my friends immediately demanded the recipe. That happy accident taught me a beautiful lesson: sometimes, the best snacks aren’t in the pantry; they’re hiding in the veggie drawer, just waiting for a little creativity and a hot bath of oil. Now, these chips are a non-negotiable staple for all my gatherings.
Gathering Your Flavor Toolkit
Here’s what you’ll need to create this crispy magic. The beauty lies in the simplicity and a couple of smart twists!
- 1 large sweet onion (like Vidalia or Walla Walla): Sweet onions are my go-to here. Their milder, sweeter flavor becomes absolutely magical when crisped up. Chef’s Insight: The natural sugars caramelize beautifully, giving you that perfect balance of sweet and savory without any harsh bite.
- 1/2 cup all-purpose flour: Our main batter base. It gives structure. For a gluten-free swap, a 1:1 GF blend works perfectly.
- 1/2 cup cornstarch: This is the crispy secret weapon! Cornstarch creates a lighter, crispier coating than flour alone. Chef’s Hack: If you’re out, you can use arrowroot powder or even potato starch.
- 1/2 tsp garlic powder: Adds a deep, savory background note. For a kick, a pinch of smoked paprika or onion powder is a fun twist.
- Salt and freshly cracked black pepper to taste: Season your batter well—it’s your first layer of flavor!
- 1/2 cup cold sparkling water: The second crispy secret! The bubbles create a lacy, airy, and incredibly light batter. Pro Tip: The colder it is, the crispier the result. If you don’t have sparkling water, ice-cold regular water works, but you’ll lose some of that ethereal crispness.
- Neutral oil for frying (like avocado, canola, or peanut): You’ll need enough for about 1.5 inches in your pot. These fry quickly, so you don’t need a deep fryer amount. For baking, you’ll just need a good spray oil.
Let’s Make Some Magic: Step-by-Step
Ready to see (and hear) that incredible crunch? Follow these steps, and you’ll be a pro in no time.
- Prep Your Onion: Peel your sweet onion and slice it into the thinnest rings you can manage. A sharp knife or a mandoline (use the guard, please! I speak from bandage experience) is perfect for this. Separate the rings. Don’t worry about the tiny inner pieces—they’ll become delicious little crispy bits! Chef’s Commentary: This is a great time to embrace the imperfect, rustic look. Uniformity is overrated.
- Create the Fizzy Batter: In a medium bowl, whisk together the flour, cornstarch, garlic powder, salt, and pepper. Now, slowly pour in the cold sparkling water while whisking constantly. You’re aiming for a smooth, thin batter that’s about the consistency of heavy cream. A few tiny lumps are okay—don’t over-mix! Little Hack: I sometimes let this batter rest in the fridge for 10 minutes while my oil heats. It seems to get even crispier.
- Heat the Oil: Pour your oil into a heavy-bottomed pot (like a Dutch oven) until it’s about 1.5 inches deep. Heat it over medium-high heat to 350°F (175°C). If you don’t have a thermometer, test it by dropping a tiny bit of batter in. If it sizzles and rises to the surface immediately, you’re good to go. Safety Note: Never leave hot oil unattended!
- The Dip & Sizzle: Working in small batches (this is key for crispiness and even cooking!), dip a handful of onion rings into the batter, letting the excess drip off. Gently lower them into the hot oil. You should hear an immediate, happy sizzle. Fry for 2-3 minutes, flipping once, until they’re a uniform golden brown and look completely crisp. Watch Them: They go from golden to dark quickly, so stay close!
- Drain & Season: Use a spider strainer or slotted spoon to transfer the crispy chips to a wire rack set over a baking sheet (this keeps them crisp better than paper towels). Immediately sprinkle with a little extra salt. That seasoning sticks best when they’re fresh out of the oil. Repeat with the remaining onions, making sure your oil returns to temperature between batches.
- Baking Option (For My Oven Lovers!): Want to bake them? No problem! Preheat your oven to 425°F (220°C). After dipping your onions in batter, lay them in a single layer on a parchment-lined baking sheet. Give them a really good spray with cooking oil until they look shiny. Bake for 15-18 minutes, flipping halfway through, until golden and crisp. They’ll be slightly less lacy than the fried version but still deliciously crunchy.
How to Serve These Crispy Wonders
Presentation is part of the fun! Dump these golden beauties into a big, wide bowl or even a brown paper bag for that rustic, pub-style feel. The key is to serve them immediately while they’re at their peak crispness. I love setting out an array of dipping sauces: a classic creamy ranch, a spicy sriracha mayo, a smoky BBQ, or even a tangy honey mustard. They’re also incredible crumbled over a gourmet burger, piled on top of a hot dog, or used as a crunchy salad topper instead of croutons. Get creative!
Play With Your Food: Delicious Twists
Once you master the basic recipe, the flavor world is your oyster! Here are a few of my favorite riffs:
- Spicy Sriracha Lime: Add 1 tbsp sriracha and the zest of one lime to the batter. Finish with a squeeze of fresh lime juice after frying.
- Everything Bagel Seasoning: After frying, toss the hot chips with a generous sprinkle of everything bagel seasoning. Instant flavor explosion!
- Parmesan Herb: Add 1/4 cup of finely grated parmesan and 1 tsp of dried Italian herbs to the dry mix. Salty, cheesy, and irresistible.
- Beer Batter Bliss: Swap the sparkling water for an equal amount of a light, crispy lager. The yeast adds incredible depth and crunch.
- Sweet & Smoky: Add 1 tsp of smoked paprika and a pinch of brown sugar to the dry ingredients. Perfect for pairing with a cool chipotle dip.
Olivia’s Kitchen Notes
This recipe has evolved from that first desperate game-night experiment. I’ve learned that the cornstarch is non-negotiable for the ultimate crisp, and that keeping *everything* cold (the water, even the bowl sometimes) makes a noticeable difference. I’ve also embraced the “messy” look—these aren’t supposed to be perfect restaurant-style rings. Their craggy, lacy edges are where the extra crunch lives! A funny story: I once was so eager to eat them that I burnt the tip of my tongue on the first one. Now, I always, *always* give them a solid 60 seconds to cool down. Consider that your official warning from a once-burnt, now-wiser cook!
Your Questions, Answered
Q: My chips turned out soggy/not crispy. What happened?
A: The most common culprit is oil temperature! If the oil isn’t hot enough, the batter will absorb it and become greasy. Always use a thermometer and let the oil heat back up between batches. Also, avoid overcrowding the pot, as this causes the temperature to plummet.
Q: Can I make these ahead of time?
A: They are truly best served immediately. However, if you must, you can re-crisp them in a 400°F (200°C) oven for 3-5 minutes. I don’t recommend storing them batter-dipped before cooking, as they’ll get watery.
Q: What’s the best onion to use?
A: I swear by sweet onions for their flavor, but yellow onions work great too—they’ll just have a bit more of a classic, pungent onion kick. Red onions can be used for a colorful twist, but note their flavor is stronger and they contain more water, which can affect crispiness slightly.
Q: Can I air fry these?
A> You can! After dipping in batter, place them in a single layer in your air fryer basket, spray well with oil, and cook at 400°F (200°C) for about 8-10 minutes, flipping halfway. They won’t get *quite* as lacy as the deep-fried version, but they’ll be deliciously crisp.

Crispy Onion Ring Chips: The Snackable Twist on a Classic Favorite
Description
Crispy Onion Ring Chips
A Lighter, Sharper Take on a Classic Favorite
Paper-thin, shatteringly crisp onion chips—perfect for snacking, dipping, or topping your favorite dishes.
Ingredients
Onion & Batter:
-
1 large sweet onion (Vidalia or Walla Walla preferred)
-
½ cup all-purpose flour (or gluten-free 1:1 blend)
-
½ cup cornstarch (or arrowroot/potato starch)
-
½ tsp garlic powder
-
Salt and freshly cracked black pepper, to taste
-
½ cup cold sparkling water (or ice-cold water)
For Frying:
-
Neutral oil (avocado, canola, or peanut) – enough for 1.5 inches in your pot
Optional Garnishes / Twists:
-
Everything bagel seasoning, parmesan & herbs, smoked paprika & brown sugar, or sriracha & lime zest
Instructions
-
Prep Onion:
Peel and slice onion into the thinnest rings possible. Separate the rings. Inner pieces become tasty crispy bits. -
Make Batter:
Whisk together flour, cornstarch, garlic powder, salt, and pepper. Slowly add cold sparkling water until smooth and slightly thin (like heavy cream). Optional: chill for 10 minutes for extra crispiness. -
Heat Oil:
Heat oil in a heavy-bottomed pot to 350°F (175°C). Test by dropping a small bit of batter—it should sizzle immediately. -
Fry Onion Chips:
Dip onion rings in batter, letting excess drip off. Fry in small batches for 2–3 minutes, flipping once, until golden and crisp. Drain on a wire rack over a baking sheet. Sprinkle with salt immediately. -
Optional Baking:
Preheat oven to 425°F (220°C). Lay battered onions in a single layer on a parchment-lined sheet. Spray with oil. Bake 15–18 minutes, flipping halfway. -
Air Fry Option:
Preheat air fryer to 400°F (200°C). Place battered rings in a single layer, spray with oil, and air fry 8–10 minutes, flipping halfway.
Notes
-
Crispiness Hack: Keep batter and water cold; fry in small batches to maintain oil temperature.
-
Flavor Twists:
-
Spicy Sriracha Lime: 1 tbsp sriracha + lime zest in batter.
-
Everything Bagel: Toss fried chips with seasoning.
-
Parmesan Herb: Add ¼ cup parmesan + 1 tsp dried Italian herbs to batter.
-
Sweet & Smoky: Add 1 tsp smoked paprika + pinch of brown sugar to dry mix.
-
Quick Nutritional Snapshot*
*Note: This is an approximate estimate for the fried version, based on a serving for 3 people. Values will vary based on exact ingredients and how much oil is absorbed.
Per Serving: Calories: ~200 | Protein: 3g | Fat: 10g | Carbohydrates: 22g | Fiber: 1g
Final Thoughts
And that, my friend, is how you turn a humble onion into a bowl of pure, golden delight. These Crispy Onion Ring Chips are more than just a snack—they’re a conversation starter, a game-changer for your gatherings, and proof that a little creativity in the kitchen can lead to something truly extraordinary. They capture everything we love about the classic onion ring—the sweet savoriness, the satisfying crunch, the irresistible aroma—and transform it into something light, elegant, and utterly addictive.
As you pull that first crispy chip from the bowl and hear that perfect snap, take a moment to appreciate the simple magic you’ve created. This is the kind of recipe that reminds us why we cook: to share joy, to spark delight, and to turn everyday ingredients into memorable moments. Whether you’re serving them as the star of a party spread, crumbling them over your favorite dishes for a gourmet touch, or simply enjoying a quiet bowlful with a good movie, these chips are guaranteed to bring a smile.
Remember, the best recipes are the ones that make you feel like a kitchen wizard without requiring a magic wand. So embrace the lacy edges, celebrate the imperfect rings, and don’t be afraid to dip, drizzle, and season with abandon.
Thank you for sharing another kitchen adventure with me. I hope these Crispy Onion Ring Chips become your new secret weapon for impressing guests, pleasing a crowd, or just treating yourself to something wonderfully crunchy. Now, go forth and make some noise—the delicious, crispy kind.
Happy snacking,


