
Chicken Involtini: Your New Favorite Fancy-But-Easy Weeknight Wonder
Hey there, friend! Come on in, tie on an apron, and let’s get something incredible bubbling away on the stove. You know that feeling when you crave a meal that feels special—the kind you’d order at a cozy little trattoria with a checkered tablecloth and a candle flickering in a chianti bottle—but you also don’t want to spend your entire evening wrestling with a million steps? That, my fellow flavor-seeker, is precisely where Chicken Involtini swoops in to save the day.
Imagine this: tender, thin chicken cutlets, rolled around a creamy, garlicky, herby filling of spinach and cheese. They get a quick sear until they’re gorgeously golden, then finish baking in the oven, emerging juicy, fragrant, and ready to make you feel like a certified kitchen hero. The best part? It’s mostly assembly and a bit of patience while your oven works its magic. This dish is my ultimate secret weapon for turning a regular Tuesday into a “wow, you made this?!” kind of night. It’s impressive enough to serve to your most foodie friends but straightforward enough that you won’t be frazzled when they arrive. So, let’s turn up some music, pour ourselves a little something, and create some magic together. Welcome to the joy of Chicken Involtini!
The Night I Realized Rolls Could Be Revolutionary
My love affair with involtini didn’t start in a grand Italian kitchen. Oh no. It started in my tiny first apartment kitchen, with a wobbly table and a dream of hosting a “real” dinner party. I was determined to make something that looked like I’d spent all day cooking, but between my job and a budget that screamed “grad student,” my options were limited. I stumbled upon the concept of “rolling things up in other things.” It sounded fun, like culinary arts and crafts.
That night, I used what I had: a lonely chicken breast I pounded into submission with a can of beans, some frozen spinach, and the last nub of cream cheese. I rolled them up, secured them with toothpicks like a precarious science project, and held my breath. When I pulled that pan out of the oven, the smell was unbelievable. My friends’ faces lit up. It wasn’t just dinner; it was an event. We felt fancy. We felt grown-up. That messy, imperfect meal taught me a core truth I carry into this kitchen every day: food doesn’t have to be complicated to feel celebratory. It just has to be made with a little love and a sense of adventure. This recipe is that same spirit, just refined with a few more years of messy-apron experience.
Gathering Your Flavor Toolkit
Here’s everything you’ll need to build these beautiful rolls. Think of it as gathering your construction materials for the tastiest project ever! I’ve added my little chef notes because knowing the “why” behind an ingredient makes you a more confident cook.
- 4 thin chicken cutlets (or 2 large chicken breasts): The canvas! If you’re using breasts, you’ll halve them horizontally (“butterfly” them) and then pound them to an even ¼-inch thickness. This is therapeutic, I promise. Chef’s Tip: Look for packages labeled “thin-cut chicken cutlets” to save a step. If pounding, place the chicken between two sheets of plastic wrap or parchment paper to avoid a splattered mess.
- 1 cup fresh spinach, sautéed and squeezed very dry: This is KEY. We want flavor, not water. Sauté a big heap (it wilts down dramatically) with a tiny drizzle of oil until just wilted, then let it cool and squeeze it in a clean kitchen towel or your fists until no more green liquid runs out. Substitution: A 10-oz box of frozen chopped spinach, thawed and squeezed dry, works perfectly here. No shame in that game!
- 1/2 cup whole-milk ricotta or full-fat cream cheese: Ricotta gives a lovely, light graininess, while cream cheese offers a supremely creamy, rich tang. I adore ricotta for authenticity, but I’ve used cream cheese in a pinch and it was divine. Chef’s Insight: The fat is your friend here—it keeps the filling lush and the chicken moist. Don’t reach for the low-fat versions for this one.
- 1/4 cup finely grated Parmesan cheese: The salty, umami punch that makes the filling sing. Please grate it fresh if you can! The pre-grated stuff in a canister often has anti-caking agents that can make it a bit grainy. Substitution: Pecorino Romano is a fantastic, sharper alternative.
- 1 large garlic clove, minced: Because what’s a cozy Italian-inspired dish without garlic? Mince it finely so it distributes evenly and doesn’t create a harsh bite.
- 1 teaspoon of your favorite dried Italian herbs: Oregano, basil, thyme, or a mix. Rub them between your palms as you add them to wake up their oils. Chef’s Tip: If you have fresh herbs, use 1 tablespoon finely chopped. Fresh basil or thyme is especially lovely.
- Kosher salt and freshly cracked black pepper: Season every layer—the filling AND the chicken. This builds depth of flavor.
- 1 tablespoon olive oil: For searing. A good extra-virgin olive oil adds a fruity note.
- Toothpicks or kitchen twine: The little helpers that keep our rolls from unfurling! Soak toothpicks in water for 10 minutes before using to prevent burning.
- Optional for serving: Marinara sauce or a simple lemon-butter pan sauce. I’ll give you the quick pan sauce hack in the instructions—it’s a game-changer.
Let’s Build & Cook: A Step-by-Step Dance
Ready? Let’s transform these simple ingredients into something spectacular. Follow along, and don’t worry—it’s harder to mess up than you think!
Step 1: Preheat & Prep. First, get that oven heating to a toasty 190°C (375°F). This ensures it’s ready to go when our chicken is beautifully seared. While it warms, pat your chicken cutlets completely dry with paper towels. This is the secret to a perfect, golden sear instead of a steamy, pale one. Give them a good sprinkle of salt and pepper on both sides.
Step 2: Make the Magical Filling. In a medium bowl, combine your thoroughly squeezed spinach, ricotta (or cream cheese), Parmesan, minced garlic, herbs, a good pinch of salt, and a few cranks of pepper. Mix it all together until it’s homogenous. Give it a taste! Does it need more salt? A bit more Parmesan? Adjust to your heart’s content. This is your creation.
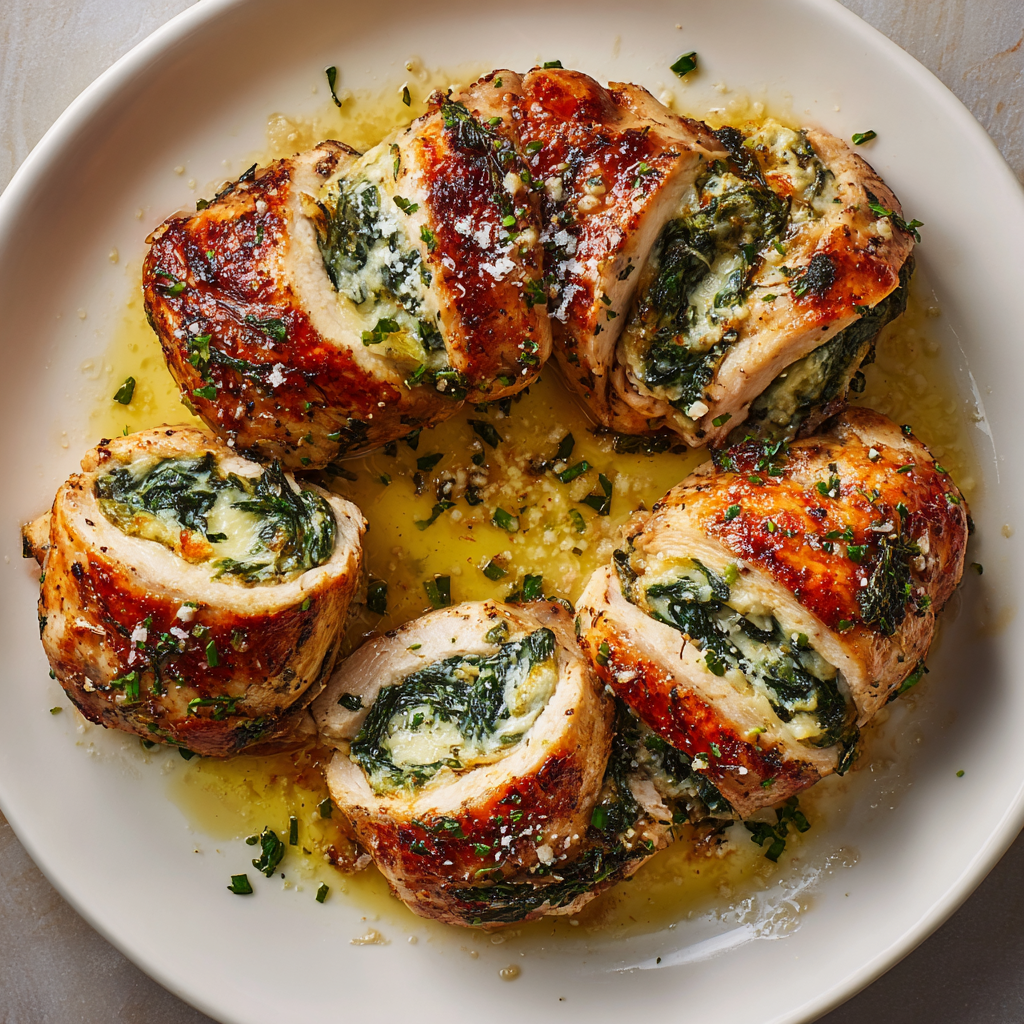
Step 3: The Roll-Up (The Fun Part!). Lay your seasoned chicken cutlets flat on a clean surface. Spoon about 2-3 tablespoons of the filling onto the lower third of each cutlet (closer to you). Don’t overstuff, or it will burst out the sides. Now, gently but firmly, roll the chicken away from you, tucking the filling in as you go, until you have a neat little log. Secure the seam with 2-3 toothpicks or a small piece of kitchen twine. It doesn’t have to be perfect—rustic is charming!
Step 4: Sear to Perfection. Heat the olive oil in a large, oven-safe skillet (like cast iron or stainless steel) over medium-high heat. When the oil shimmers, carefully add the chicken rolls, seam-side down if possible. Don’t crowd the pan; work in batches if needed. Let them sear, undisturbed, for 2-3 minutes per side, until you have a deep golden-brown crust all around. This step isn’t just for looks—it locks in juices and builds incredible flavor.
Step 5: Bake to Juicy Tenderness. Once all sides are golden, if you worked in batches, nestle all the rolls back into the skillet. Immediately transfer the entire skillet to your preheated oven. Bake for 15-20 minutes, until the chicken is cooked through and registers 74°C (165°F) on an instant-read thermometer inserted into the thickest part. This tool is your best friend for never-overcooked chicken!
Step 6: Rest & Sauce (The Chef’s Hack). Carefully remove the skillet from the oven (remember, the handle is HOT!). Transfer the chicken rolls to a cutting board, tent loosely with foil, and let them rest for 5-10 minutes. THIS IS CRUCIAL. It lets the juices redistribute so they don’t all run out when you cut in. Meanwhile, look at those gorgeous browned bits in your still-hot skillet. That’s liquid gold! For a quick pan sauce, add a couple tablespoons of broth or white wine to the hot pan, scrape up the bits (deglaze!), and swirl in a knob of cold butter and a squeeze of lemon juice. Voilà! Restaurant-worthy sauce in 60 seconds.
Step 7: Serve with Love. Remove the toothpicks or twine from the rested chicken rolls. Slice them in half on a diagonal for a beautiful presentation. Drizzle with your simple pan sauce or a spoonful of warm marinara. Get ready for the compliments.
How to Plate Like a Pro (Without the Stress)
Presentation is just sharing the love with your eyes first! I love slicing the rolls on a slight diagonal to show off the stunning swirl of green filling. Arrange them on a warm platter or individual plates. Spoon over that easy pan sauce or a vibrant marinara. For a complete, cozy meal, I nestle them alongside a pile of creamy polenta, buttery mashed potatoes, or a simple tangle of garlicky spaghetti. A bright, crisp arugula salad with a lemon vinaigrette on the side cuts through the richness perfectly. Don’t forget a final flourish of fresh herbs or a little extra Parmesan grated on top!
Make It Your Own: Delicious Twists
The beauty of this recipe is its versatility. Once you master the basic roll, the world is your oyster (or, more aptly, your stuffed chicken)!
- Sun-Dried Tomato & Feta: Swap the spinach for ⅓ cup chopped oil-packed sun-dried tomatoes (pat them dry) and use crumbled feta instead of ricotta/Parmesan. Add a sprinkle of dried oregano.
- Prosciutto-Wrapped: Before rolling, lay a thin slice of prosciutto over each chicken cutlet. Then add the filling and roll. The prosciutto gets crispy and adds a wonderful salty depth.
- Dairy-Free/Paleo: Use a thick, creamy cashew “cheese” or a dairy-free cream cheese alternative. Swap Parmesan for a sprinkle of nutritional yeast for a cheesy flavor.
- Mushroom & Fontina: Sauté ½ cup finely chopped mushrooms with the garlic until all their liquid evaporates. Let cool, then mix with fontina cheese and a touch of thyme.
- “Pizza” Style: Use a tablespoon of pesto mixed into the ricotta, and add a few small cubes of low-moisture mozzarella to the filling. Serve with marinara for dipping!
From My Kitchen to Yours: A Few More Thoughts
This recipe has been a living, evolving thing in my kitchen. I’ve made it for first dates, for comforting friends after breakups, and for chaotic family potlucks where it’s always the first dish to disappear. The biggest lesson? Don’t fear the toothpick. My first batch looked like a pincushion rebellion! You only need 2 or 3 per roll, placed strategically. Over time, I’ve gotten better at the “tuck and roll” motion, but even the messy ones taste incredible. I also used to skip the searing step to save time—big mistake. That golden crust is non-negotiable for flavor. It’s the difference between “good” and “can I have the recipe?!” Finally, this dish is a fantastic make-ahead friend. You can assemble the rolls, secure them, and keep them covered in the fridge for up to 8 hours before searing and baking. It makes hosting feel effortless.
Your Questions, Answered!
Q: My filling keeps leaking out while baking! What am I doing wrong?
A: This usually means one of two things: 1) Overstuffing (less is more! The filling expands a little), or 2) Not securing the seam well enough. Make sure your final seam is on the bottom when you place it in the pan for searing, and use enough toothpicks to hold it closed. A little leakage is normal and tasty, but a major blowout means you need a lighter hand with the filling.
Q: Can I make this without an oven-safe skillet?
A> Absolutely! Just sear the rolls in any skillet you have, then carefully transfer them to a baking dish or sheet pan lined with parchment paper for the oven portion. You might lose some of the flavorful pan drippings for a sauce, but you can still make a simple sauce separately in the skillet after.
Q: How do I know it’s done without a thermometer?
A> While I highly recommend a $10 instant-read thermometer for kitchen confidence, you can also check by making a small cut into the thickest part of one roll. The juices should run clear, not pink, and the chicken should be white throughout with no translucency. But really, get the thermometer—it’s a life-changer!
Q: What’s the best way to reheat leftovers?
A> To keep them from drying out, reheat gently. Cover with foil and warm in a 175°C (350°F) oven for 10-15 minutes, or microwave at 50% power in short bursts. A splash of broth or water in the container can help add steam.

Chicken Involtini : Spinach and Cheese-Stuffed Chicken Rolls
Description
Chicken Involtini – Fancy-But-Easy Weeknight Wonder
Time
-
Prep: 15 minutes
-
Cook: 25 minutes
-
Total: 40 minutes
Ingredients
-
4 thin chicken cutlets (or 2 large chicken breasts, butterflied and pounded to ¼-inch thickness)
-
Kosher salt and freshly cracked black pepper, to taste
-
1 tsp dried Italian herbs (or 1 tbsp fresh, chopped)
-
1 cup fresh spinach, sautéed and squeezed dry (or 10 oz frozen, thawed and squeezed)
-
½ cup whole-milk ricotta or full-fat cream cheese
-
¼ cup finely grated Parmesan cheese
-
1 large garlic clove, minced
-
1 tbsp olive oil
-
Toothpicks or kitchen twine
-
Optional for serving: marinara sauce or simple lemon-butter pan sauce
Instructions
-
Preheat Oven
Preheat oven to 190°C (375°F). -
Prepare Chicken
Pat chicken dry. Season both sides with salt, pepper, and Italian herbs. -
Make Filling
In a bowl, mix spinach, ricotta (or cream cheese), Parmesan, garlic, salt, and pepper until smooth. -
Assemble Rolls
Spoon 2–3 tbsp filling onto the lower third of each cutlet. Roll chicken away from you and secure with toothpicks or twine. -
Sear Chicken
Heat olive oil in an oven-safe skillet over medium-high heat. Add chicken rolls seam-side down. Sear 2–3 minutes per side until golden brown. -
Bake
Transfer skillet to preheated oven and bake 15–20 minutes, until internal temperature reaches 74°C (165°F). -
Rest & Sauce
Let chicken rest 5–10 minutes. For a quick pan sauce, add 2 tbsp broth or white wine to the hot skillet, scrape up browned bits, and swirl in butter and lemon juice. -
Serve
Remove toothpicks or twine. Slice diagonally, drizzle with sauce or marinara, and serve.
Notes
-
Don’t overstuff rolls—less filling prevents leakage.
-
Sear before baking for golden crust and flavor.
-
Oven-safe skillet is best; otherwise, transfer to a baking dish.
-
Rest chicken after baking to retain juices.
Nutritional Information (Per Serving)
Estimated for one chicken roll, using ricotta and olive oil. Values are approximate.
Calories: 320 | Protein: 35g | Fat: 18g | Saturated Fat: 6g | Carbohydrates: 4g | Fiber: 1g | Sugar: 1g | Cholesterol: 110mg | Sodium: 320mg
Final Thoughts: The Elegance of Simplicity
And there you have it—the art of turning a simple chicken breast into a meal that feels like a warm embrace from a Tuscan nonna. Chicken Involtini isn’t just a recipe; it’s a lesson in culinary elegance hidden within everyday ingredients. It teaches us that a little rolling, a confident sear, and a patient bake can transform the ordinary into something worthy of a slow, savored dinner.
This dish celebrates the beautiful middle ground where weeknight practicality meets weekend celebration. It’s proof that you don’t need a dozen ingredients or complicated techniques to create depth, moisture, and wow-factor. All you need is a good roll, a hot pan, and the understanding that the best meals often come from a spirit of playful assembly—of wrapping something good inside something else and letting the heat work its magic.
As you sit down to your plate, with its golden-brown swirls and the scent of garlic and herbs filling the air, take a moment. This is more than fuel. It’s the result of your own hands creating something beautiful and nourishing. It’s a reminder that cooking is a craft where love is the most important ingredient, and a few well-placed toothpicks can feel like a secret superpower.
So, here’s to many more kitchen adventures—to rolling, searing, and sharing meals that are as joyful to make as they are to eat. May your chicken be tender, your filling be flavorful, and your weeknights feel a little more special.
Buon appetito, my friend.


