
Viral Brownie Batter Balls: The No-Bake Treat That’s Actually Good For You
Hey there, friend! Welcome back to my cozy kitchen corner. Can we talk about that magical moment when you swipe a finger through a bowl of raw brownie batter? That deep, chocolatey, fudgy taste that feels like a hug from the inside? I’ve been chasing that feeling my whole life, but let’s be real—licking the spoon comes with a side of guilt (and a concerned glance from anyone watching).
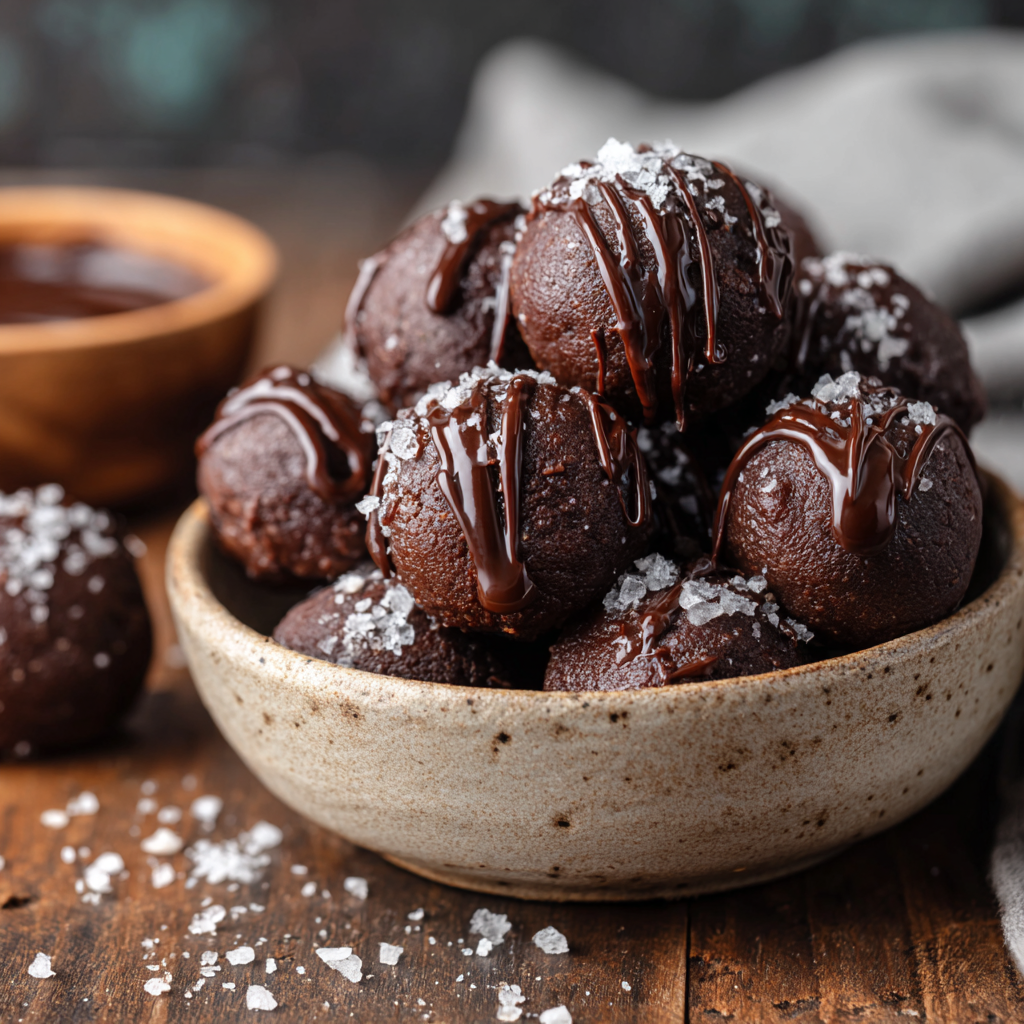
Well, get ready to meet your new best friend. These Viral Brownie Batter Balls are the internet’s latest obsession, and honey, they deserve every single bit of hype. Imagine all the rich, gooey indulgence of your favorite brownie batter, rolled into a perfect little bite, dipped in dark chocolate, and finished with a whisper of sea salt. The kicker? They’re no-bake, packed with protein, and made with wholesome ingredients that’ll make you feel as good as they taste.
This isn’t just another trendy recipe. It’s a game-changer for that 3pm slump, a post-workout treat that doesn’t feel like “health food,” or the perfect sweet bite to share with friends without needing to turn on the oven. I’ve been making these on repeat, and today, I’m so excited to walk you through every step. Grab your favorite mixing bowl and let’s make some magic!
The Brownie Batter That Started It All
My love affair with brownie batter started in my grandma’s kitchen. She was a firm believer that the batter was the best part of baking anything, and she’d always leave just a little extra in the bowl “for the helpers” (a.k.a. me and my cousins). We’d crowd around, spoons at the ready, fighting over the last chocolatey streak. It was pure, unadulterated joy.
Years later, as I got more into mindful eating and balancing my sweet tooth with fueling my body, I missed that ritual. Store-bought “protein balls” often tasted chalky or just… sad. I wanted that childhood euphoria in a grown-up, feel-good package. After what my husband calls my “brownie batter experiment phase” (there were some interesting flops!), I finally landed on this perfect blend. The first time I bit into one of these balls, I literally did a little happy dance right there in the kitchen. It tasted like a secret—decadent, fudgy, and nostalgic, but with a clean, energized feeling afterwards. It was the bridge between my grandma’s spoon and my own kitchen philosophy. Now, every time I make them, I think of her, and I know she’d absolutely approve.
Your Shopping List for Fudgy Bliss
Here’s everything you need to create these little wonders. The beauty is in the simplicity! I’ve added my chef notes next to each one because knowledge is power (and tastier brownie balls).
- 1 cup almond flour: This is our base, giving a tender, moist crumb that mimics real brownie texture. Chef’s Insight: For a nut-free version, you can swap in an equal amount of oat flour (just blitz rolled oats in a blender until fine!). Almond flour adds a richer flavor and healthy fats.
- 1 scoop chocolate protein powder: The secret protein punch! Chef’s Insight: This is key for the “batter” flavor and structure. Use a powder you enjoy the taste of on its own. A whey/casein blend or a plant-based one like brown rice/pea protein works great. If you don’t have it, you can use an extra ¼ cup of almond flour, but you’ll miss the classic brownie taste.
- 3 tbsp cocoa powder: For that deep, authentic chocolate flavor. Chef’s Insight: Not all cocoas are created equal! I use a Dutch-processed cocoa for a smoother, less acidic chocolate hit, but natural unsweetened cocoa powder works perfectly too. This is non-negotiable for true chocolate lovers.
- ½ cup cashew butter: Our “fat” that brings incredible creaminess and binds everything. Chef’s Insight: Cashew butter is mild and lets the chocolate shine. Almond butter or even sunflower seed butter (for nut-free) are fabulous subs. Just make sure it’s drippy and natural, not the super-stiff kind.
- ⅓ cup honey: The natural sweetener that also acts as glue. Chef’s Insight: Maple syrup works just as well for a vegan version! The liquid sweetener is essential for the right dough consistency—it shouldn’t be dry or crumbly.
- A pinch of salt: This is the flavor enhancer that makes the chocolate pop. Trust me!
- Optional for coating: Dark chocolate & sea salt: The glamorous finish! Melting a bar of good dark chocolate (70% is my sweet spot) gives a professional-looking shell. A sprinkle of flaky sea salt on top creates that irresistible sweet-salty contrast that’s downright addictive.
Let’s Make Some No-Bake Magic: Step-by-Step
Ready? This is the fun part. Put on some music, clear a little space on your counter, and let’s get rolling (literally!).
Step 1: The Dry Team Assembly. In a medium-sized mixing bowl, add your almond flour, chocolate protein powder, cocoa powder, and that all-important pinch of salt. Grab a whisk and give it a really good stir. Chef’s Hack: Whisking the dry ingredients first ensures there are no clumps of protein powder or cocoa, so every bite is uniformly chocolatey. It feels professional and takes 30 seconds—totally worth it!
Step 2: Bring in the Wet Crew. Make a well in the center of your dry ingredients and plop in the cashew butter and honey. Now, get ready to use some muscle! Start mixing with a sturdy spatula. It’ll look crumbly at first, but keep faith. After about a minute of pressing and folding, it will magically transform into a thick, fudgy, play-doh-like dough. Chef’s Commentary: This is your arm workout for the day! If it seems too dry, add a teaspoon of water or milk. If it’s too sticky, a dusting more of almond flour will fix it. You’re looking for a dough that holds together when you pinch it.
Step 3: Roll It Out. Line a baking sheet or plate with parchment paper. Using a tablespoon or a small cookie scoop, portion out the dough. Then, using the palms of your hands, roll each portion into a smooth, round ball. Chef’s Tip: If the dough is sticking to your hands, lightly dampen them with water. It creates a non-stick barrier without adding extra flour. Aim for balls about 1-inch in diameter—the perfect pop-in-your-mouth size.
Step 4: The Chocolate Dip (Optional but Highly Recommended). Melt your dark chocolate in a microwave-safe bowl in 20-second bursts, stirring in between, until just smooth. Using a fork or two spoons, dunk each ball, let the excess drip off, and place it back on the parchment paper. Chef’s Hack: For a super-easy drizzle instead of a full coat, just melt a smaller amount of chocolate, scoop it into a zip-top bag, snip a tiny corner, and zig-zag it over the tops. Less mess, just as pretty!
Step 5: The Finishing Touch. Before the chocolate sets, immediately sprinkle a tiny bit of flaky sea salt on top of each ball. This isn’t just for looks—that salt crackle with the sweet chocolate is *chef’s kiss*.
Step 6: The Chill. Pop the whole tray into the refrigerator for at least 30 minutes to let everything set firm. Chef’s Final Note: This waiting period is crucial! It allows the flavors to meld and gives you that perfect, firm-yet-fudgy texture. I know it’s hard, but try to wait!
How to Serve & Savor
Once they’re set, transfer your Brownie Batter Balls to an airtight container (they keep best in the fridge). For serving, I love piling them high on a little ceramic plate or in a shallow bowl. They’re stunning on their own, but for a real treat, place a couple on a small dish with a few fresh raspberries or a tiny cup of espresso. They’re the perfect ending to a casual dinner, a luxurious midday pick-me-up, or a beautiful homemade gift stacked in a cute jar with a ribbon.
Get Creative: Fun Flavor Twists!
Once you’ve mastered the classic, the canvas is yours to play with! Here are a few of my favorite riffs:
- Mint Chocolate Chip: Add ¼ tsp of peppermint extract to the dough and roll the finished balls in crushed sugar-free dark chocolate chips.
- Peanut Butter Cup: Swap the cashew butter for peanut butter and roll in melted peanut butter-chocolate blend.
- Cookie Dough: Use vanilla protein powder, omit the cocoa powder, and add a handful of mini chocolate chips.
- Spicy Mexican Chocolate: Add ¼ tsp of cinnamon and a tiny pinch of cayenne pepper to the dry ingredients for a warm, spicy kick.
- Vegan & Paleo: Use plant-based protein powder, maple syrup, and ensure your chocolate coating is dairy-free. It works like a dream!
Olivia’s Chef Notes & Kitchen Stories
This recipe is a living, breathing thing in my kitchen! The first batch I ever made was way too sticky because I was heavy-handed with the honey. My “balls” looked more like abstract chocolate sculptures! I learned that you can always add more moisture, but you can’t take it away, so start with a slightly heaping ⅓ cup of honey and add more only if needed.
Over time, I’ve found that letting the dough sit for 5 minutes after mixing lets the almond flour fully absorb the moisture, making rolling even easier. Also, a confession: I almost never measure the chocolate for coating. I just chop up what looks right and melt it. Cooking should feel intuitive, not stressful! These balls have become my signature “I-made-you-something” gift for new neighbors, friends having a tough week, or as a thank you. They’re little edible hugs, and that’s what my kitchen is all about.
Your Questions, Answered!
Q: My dough is too dry and crumbly. What did I do wrong?
A: No worries! This usually means your nut butter was a bit too thick or your almond flour was packed down. The fix is simple: Add a teaspoon of water or milk at a time, mixing thoroughly after each addition, until the dough comes together. It can take a minute of mixing for the ingredients to fully incorporate, so be patient and keep pressing it together.
Q: Can I make these without protein powder?
A: You can, but it will change the flavor and texture. The protein powder adds a distinct “brownie mix” taste and helps firm up the balls. To substitute, use an additional ¼ cup of almond flour and 1 extra tablespoon of cocoa powder. They’ll still be delicious, just a different kind of chocolate treat!
Q: How long do they keep, and can I freeze them?
A: They keep beautifully! In an airtight container in the fridge, they’re perfect for up to 2 weeks (if they last that long!). For longer storage, freeze them on a parchment-lined tray until solid, then transfer to a freezer bag. They’ll keep for up to 3 months. Thaw in the fridge or eat straight from the freezer for a cool, fudgy bite.
Q: The chocolate coating is clumpy and hard to work with. Help!
A> This means the chocolate may have gotten too hot or had a tiny bit of water in it. For smooth melting, chop chocolate finely, melt slowly (using those 20-second bursts!), and stir well. If it’s still thick, stir in a tiny bit of coconut oil (½ tsp) to thin it. For dipping, using a fork and letting excess drip back into the bowl is the cleanest method.

Viral Brownie Batter Balls : Protein-Packed, No-Bake, and Ultra Fudgy
Description
These Viral Brownie Batter Balls taste just like licking the spoon—rich, fudgy, and chocolatey—but they’re made with wholesome ingredients and zero baking. Perfect for a quick snack, post-workout treat, or a sweet bite that won’t weigh you down.
Ingredients
-
1 cup almond flour (or oat flour for nut-free)
-
1 scoop chocolate protein powder
-
3 tbsp unsweetened cocoa powder
-
½ cup cashew butter (or almond/peanut/sunflower butter, runny)
-
⅓ cup honey (or maple syrup for vegan)
-
Pinch of salt
Optional coating:
-
½ cup dark chocolate, melted
-
Flaky sea salt for topping
Instructions
-
Mix dry ingredients:
In a bowl, whisk almond flour, protein powder, cocoa powder, and salt. -
Add wet ingredients:
Stir in cashew butter and honey until a thick, fudgy dough forms. If dry, add 1–2 tsp water or milk. -
Roll:
Scoop and roll into 1-inch balls. Place on a parchment-lined plate or tray. -
Optional chocolate dip:
Dip balls in melted dark chocolate or drizzle over the top. Sprinkle with sea salt. -
Chill:
Refrigerate 30 minutes until firm.
Notes
-
Use drippy nut butter for the best texture.
-
If dough is sticky, chill 5 minutes before rolling.
-
For extra fudginess, let the dough rest 5 minutes before shaping.
-
Skip the coating for a lighter snack—or don’t
Nutritional Info (Per Ball, Approximate)
Calories: ~130 | Protein: 6g | Carbs: 10g | Fat: 9g | Sugar: 6g
Note: This is an estimate based on the specific ingredients I used. Values will vary slightly depending on your brand of protein powder, nut butter, and whether you add the chocolate coating.
Final Thoughts
There’s something quietly magical about these Brownie Batter Balls. They feel like a small, delicious rebellion—against the idea that treats must be either indulgent or healthy, but never both. Against the notion that cooking has to be complicated. Against the guilt that so often shadows our simplest pleasures.
In my kitchen, these little bites have become more than a recipe. They’re a reminder that joy can be intentional. That nurturing your body and savoring a moment of pure, childhood delight aren’t mutually exclusive. They’re proof that a few wholesome ingredients, stirred together with a bit of love, can become something greater than the sum of their parts.
As you roll the fudgy dough between your palms, you’re not just making a snack. You’re crafting a portable piece of comfort, a secret weapon for the long afternoons, a tangible bit of kindness to share. Whether you’re making them for yourself, for your family, or for a friend who needs a sweet lift, you’re participating in the oldest, most beautiful kitchen tradition: feeding the soul, one bite at a time.
So here’s to the batter-lickers, the chocolate-lovers, and the joy-seekers. May your bowls be sweet, your hands slightly sticky, and your hearts full. Thank you for letting me share this corner of my kitchen with you. Now, go enjoy your well-deserved bite of bliss.
With love and a sprinkle of sea salt,
Olivia


