

The Ultimate Grilled Cheese: A Love Letter to Simple, Soul-Satisfying Food
Hey there, friend! Come on in, pull up a stool. Can you smell that? It’s the scent of butter hitting a hot pan, the quiet sizzle that promises something truly magical is about to happen. Of all the dishes in my kitchen repertoire, the one that never, ever fails to make everything feel right with the world is the humble, glorious grilled cheese sandwich.
It’s more than just bread and cheese, isn’t it? It’s a warm hug on a plate. It’s the culinary equivalent of your favorite cozy sweater. It’s the quick lunch that turns into a moment of pure, unadulterated joy. But here’s my little kitchen confession: for years, I made “good” grilled cheese. It was fine. It was cheesy. But it wasn’t transcendent. It wasn’t the ultimate version that makes you close your eyes and sigh with the first bite.
So, I got obsessed. I turned my kitchen into a grilled cheese laboratory. I tested breads, cheeses, fats, heats, and presses. I ate more grilled cheese in a month than I care to admit (it’s a tough job, but someone had to do it!). And today, I’m sharing everything I learned. This isn’t just a recipe; it’s your blueprint to grilled cheese perfection. We’re going for maximum crispiness on the outside, and a lava flow of dreamily melted cheese on the inside. Forget everything you thought you knew about this classic. Let’s build your new favorite sandwich together.
My First Kitchen Victory: Dad’s “Secret” Grilled Cheese
My love affair with this sandwich started long before I had any real kitchen skills. It was a rainy Saturday, I was about seven, and my dad was on “lunch duty.” Mom was out, and the prospect of dad cooking was always a little… adventurous. But that day, he declared he was making his “world-famous” grilled cheese. I remember perching on the counter, watching him with skepticism.
He used the big, heavy cast-iron skillet that was usually off-limits. He didn’t just slap margarine on bread; he gently softened real butter in a little dish and painted it on thick, right to the edges. The cheese wasn’t a single slice from a plastic package; it was a mix of orange cheddar and something white and creamy he grated himself. He cooked it low and slow, and he taught me the most important lesson: listen. “Hear that quiet sizzle, Liv? That’s the sound of patience. If it’s spitting and shouting, the heat’s too high and we’ll burn our treasure.” When he slid that golden, crisp sandwich onto my plate and I pulled it apart to see the long, beautiful cheese strands, I was a goner. It was my first understanding that a little attention and love could turn the simplest ingredients into a masterpiece. That’s the spirit we’re bringing to this recipe today.
Gathering Your Golden, Gooey Toolkit
Here’s where we build our foundation. Every ingredient here has a role to play. Choosing great components is the first step to a next-level sandwich.
- 2 Slices of Excellent Bread (about ½” thick): This is your structural canvas. I highly recommend a sturdy sourdough or a country white. The slight chew and robust structure prevent sogginess and give that fantastic crisp. Chef’s Insight: Avoid ultra-soft, thin sandwich bread—it can’t stand up to the butter and heat. Day-old bread is actually perfect here!
- 2-3 tbsp Butter, softened to room temperature: Not melted! Softened butter spreads evenly, creating a consistent, golden-brown crust. This is non-negotiable for the ultimate crisp. Substitution Tip: For an even crispier, more savory edge, you can use an equal amount of high-quality mayonnaise on the outside of the bread. It sounds wild, but trust me—it works.
- 3-4 oz of Your Cheese Dream Team: This is the heart. I use a blend of cheeses for perfect melt and flavor.
- Sharp Cheddar (about 2 oz): Provides the classic, tangy flavor punch and beautiful color.
- Fontina or Gruyère (about 1.5 oz): The melt master. These cheeses get incredibly creamy and oozy without becoming greasy.
- A thin slice of Monterey Jack or American (about 0.5 oz): My secret weapon! These cheeses contain sodium citrate, which helps emulsify the entire cheese blend into one supremely smooth, melt. Don’t knock it till you try it!
Chef’s Insight: Always grate your own cheese! Pre-shredded bags contain anti-caking agents that can hinder a smooth melt.
- A Pinch of Flaky Sea Salt: A tiny sprinkle on the buttered outside of the bread before cooking elevates the buttery flavor to new heights.
Crafting Your Masterpiece: Step-by-Step
Ready? Let’s cook. This is where patience and our senses come into play. Clear your stovetop, grab your favorite spatula, and let’s make some magic.
- Prep is Everything. Take your butter out of the fridge at least 30 minutes before you start. Grate all your cheeses and mix them gently in a bowl. This blend is now ready for maximum meltability. Get your bread sliced to an even ½-inch thickness. Chef’s Hack: I like to spread a very thin layer of Dijon mustard or fig jam on the inside of the bread before adding cheese. It adds a subtle background note that cuts the richness beautifully. Try it once you master the classic!
- Butter to the Edge. Using a knife or the back of a spoon, spread a generous, even layer of softened butter all the way to the very edges of one side of each bread slice. This ensures every single bite of crust gets golden. Sprinkle the buttered sides lightly with flaky salt.
- Build Your Sandwich, Cold. Place one slice of bread, buttered side down, on your cutting board. Pile your cheese blend high in the center, leaving just a small border so it doesn’t all spill out. Top with the second slice, buttered side up. Press down gently.
- Heat & Wait (The Hardest Part!). Place a heavy-bottomed skillet (cast-iron is king) or griddle over medium-low heat. Let it preheat for a full 2-3 minutes. You want steady, gentle heat. Chef’s Tip: If your butter immediately burns and smokes when the sandwich hits the pan, your heat is too high. We’re going for a steady, golden sizzle.
- The First Side: The Foundation of Flavor. Carefully place your sandwich in the pan. Now, here’s the game-changer: cover the skillet with a lid. This traps the heat and acts like a mini-oven, melting the cheese from the top down while the bottom crisps. Cook covered for 3-4 minutes. Peek to check for a deep, golden-brown color.
- The Flip & Final Crisp. Use a confident, smooth motion with your spatula to flip the sandwich. It should feel sturdy. Cook the second side, uncovered now, for another 2-3 minutes, until equally golden and glorious. If you want, press down lightly with the spatula to ensure even contact. Listen for that gentle, buttery sizzle.
- The Rest (Yes, Really!). This is crucial! Transfer your masterpiece to a wire rack (not a plate!) for just 60 seconds. This lets the cheese settle slightly so it doesn’t immediately gush out when you cut it, and it keeps the bottom crust from steaming and getting soft. You’ve waited this long—you can wait one more minute, I promise.
How to Serve This Golden Glory
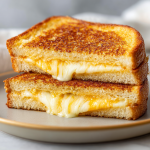
The presentation is simple but impactful. Use a sharp serrated knife and cut the sandwich diagonally—those triangles just taste better, it’s science (or at least, it feels that way). Plate it with the gooey cheese interior facing up. The classic pairing is, of course, a steaming bowl of creamy tomato soup for dipping. But it’s also fantastic with a simple side of crunchy potato chips, a tangy dill pickle spear, or a bright, crisp apple salad. Serve it immediately and watch the cheese pull!
Get Creative: Your Grilled Cheese, Your Rules!
Once you’ve nailed the classic, the world is your oyster (or, more fittingly, your cheese board!). Here are a few of my favorite twists:
- The “Everything” Grill: Add a schmear of cream cheese mixed with everything bagel seasoning to the inside of the bread before adding cheddar.
- Apple & Sharp Cheddar: Add a few very thin slices of crisp apple (like Honeycrisp) and a drizzle of honey inside with your cheddar blend.
- Caprese Style: Use fresh mozzarella, a slice of ripe tomato, and a few fresh basil leaves. After cooking, drizzle with balsamic glaze.
- For a Dairy-Free Friend: Use your favorite vegan butter and a high-quality melty vegan cheese (the shreds that come in a block often work better). A swipe of miso paste inside adds a fantastic umami depth.
- The “Inside Out”: Butter the bread, then press the buttered sides into grated Parmesan before cooking. You get an incredible, crispy-cheesy crust.
Olivia’s Kitchen Notes & Stories
This recipe has been my edible science project for years. The “lid trick” was a total happy accident discovered one day when I was trying to melt the cheese faster because I was *starving*. It revolutionized my grilled cheese game! I’ve also learned that the type of pan matters. My dad’s heavy cast iron distributes heat evenly and gives an unbeatable sear, but a good non-stick skillet works beautifully, too.
And a funny story: I once hosted a “Grilled Cheese Bar” for friends, with every bread, cheese, and add-in you could imagine. The winner? A bizarre-sounding combo of sourdough, brie, strawberry jam, and crispy bacon that someone invented on the spot. It was insane and incredible. So don’t be afraid to play with your food! The best recipes, even the “ultimate” ones, have room for your own personality.
Grilled Cheese 911: Your Questions, Answered
Let’s tackle some common hiccups so your sandwich is flawless every time.
Q: My bread is burning before my cheese melts! What am I doing wrong?
A: Your heat is too high, my friend! Grilled cheese is a low-and-slow affair. Dial it back to medium-low. If you’re already there, your pan might be too thin or your burner too powerful. Try moving it to a smaller burner. And don’t forget the lid trick from Step 5—this is the ultimate solution to this problem.
Q: Why is my cheese not getting that beautiful, stringy pull?
A: Two likely culprits. First, the cheese type. Some cheeses (like pre-shredded bags or very aged, dry cheddar) don’t melt well. Use the blend I recommend, and always grate it fresh. Second, you might be cutting into it too quickly! That 60-second rest lets the molten cheese cool just enough to become stretchy instead of liquid.
Q: Can I make more than one at a time?
A: Absolutely, but don’t overcrowd the pan. Each sandwich needs its own space for heat circulation. If your pan is big enough, go for it! If not, cook them in batches and keep the finished ones warm on that wire rack in a 250°F oven.
Q: Is mayonnaise really better than butter on the outside?
A: It’s not “better,” but it’s a fantastic alternative with a different result. Mayo (made with oil and eggs) creates an incredibly crisp, evenly browned crust with a slightly tangy flavor. Butter gives a richer, more traditional taste. I say try both and pick your favorite team!
Ultimate Grilled Cheese Sandwich : Crispy, Gooey Comfort in Every Bite
Description
Hey there, friend! Few things in life are as comforting as a perfectly made grilled cheese sandwich. Golden and crisp on the outside, irresistibly gooey on the inside—this is the kind of food that feels like a warm hug. This recipe takes the classic we all love and turns it into the ultimate version, using simple techniques and the right combination of cheeses to deliver maximum flavor and melt. No fancy tricks—just care, patience, and really good ingredients.
Ingredients
-
2 slices sturdy bread (sourdough or country white, about ½-inch thick)
-
2–3 tablespoons butter, softened (or mayonnaise, optional)
-
3–4 oz cheese, freshly grated (see blend below)
-
2 oz sharp cheddar
-
1–1½ oz fontina or Gruyère
-
½ oz Monterey Jack or American (for extra melt)
-
-
Pinch of flaky sea salt (optional)
Instructions
-
Prepare the cheese
Grate all cheeses and gently mix them together in a bowl. Set aside. -
Butter the bread
Spread softened butter evenly over one side of each slice of bread, all the way to the edges. Sprinkle lightly with flaky salt if using. -
Assemble the sandwich
Place one slice of bread butter-side down on a cutting board. Add the cheese mixture evenly on top. Cover with the second slice of bread, butter-side up. Press gently. -
Cook low and slow
Heat a skillet (preferably cast iron) over medium-low heat. Place the sandwich in the pan and cover with a lid. Cook for 3–4 minutes until the bottom is golden brown. -
Flip and finish
Flip carefully and cook uncovered for another 2–3 minutes, until the second side is golden and the cheese is fully melted. -
Rest briefly
Transfer to a wire rack and let rest for about 1 minute. Slice diagonally and serve immediately.
Notes
-
Low heat is key: High heat burns bread before cheese melts. Patience pays off.
-
Always grate your own cheese: Pre-shredded cheese doesn’t melt as smoothly.
-
Cover the pan at first: This traps heat and ensures perfectly melted cheese.
-
Butter vs. mayo: Butter gives classic flavor; mayo creates an ultra-crisp crust—try both!
-
Rest before cutting: This keeps the cheese gooey but not runny.
Nutritional Information*
*For 1 sandwich made with sourdough bread, the specified cheese blend, and 2 tbsp butter. This is an estimate.
Calories: ~520 | Protein: 22g | Carbohydrates: 32g | Fat: 34g | Saturated Fat: 19g | Fiber: 2g
Final Thoughts
The journey to the ultimate grilled cheese is more than just mastering a sandwich—it’s a celebration of the simple, soul-satisfying moments that good food brings into our lives. It’s about the smell of butter in a hot pan, the sound of a gentle sizzle, and the sight of that first, glorious cheese pull.
Whether you stick to the classic blend or venture into wild, creative twists, remember that the heart of this recipe isn’t just in the ingredients—it’s in the patience, the attention, and the little bit of love you pour into it. This sandwich has been my comfort, my kitchen experiment, and my edible love letter to the power of simplicity.
So here’s to rainy days, to shared lunches, and to the humble grilled cheese that feels like home. Now, go forth, butter your bread to the edges, and create your own golden, gooey masterpiece.
Happy cooking, friends.
Olivia


