

Your New Go-To Snack: Wholesome, Easy, and Unbelievably Good
Hey there, friend! Come on in, grab an apron, and let’s talk about one of life’s great kitchen dilemmas. You know the one. It’s mid-afternoon, your energy is dipping, and you’re staring into the pantry abyss. You want something satisfying but not heavy, something sweet but not sinful, something you can feel genuinely good about giving to your kids (or sneaking for yourself!). Or maybe it’s morning, and the cereal just isn’t cutting it—you need a breakfast you can hold in your hand as you dash out the door.
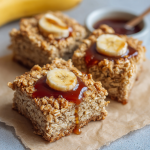
I’ve been there more times than I can count. That’s why I’m practically buzzing to share this recipe with you today. These Banana Oat Bars are my kitchen’s MVP, the snack that never lets me down. Imagine the coziest, soft-baked banana bread, transformed into a perfectly portable, sliceable bar. They’re naturally sweetened with just banana and a kiss of maple syrup, packed with hearty oats, and spiced with warm cinnamon. The best part? You likely have every single ingredient in your kitchen right now, and the whole thing comes together in one bowl in about 5 minutes of active time.
This isn’t just a recipe; it’s a trusty sidekick. A lunchbox hero, a pre-workout fuel, a midnight nibble with a cup of tea. It’s the kind of homemade magic that proves you don’t need a laundry list of complicated ingredients to make something truly delicious and nourishing. So, let’s turn those spotty bananas on your counter into something amazing. I promise, once you try these, you’ll be baking them on repeat.
A Bowl, a Banana, and My Grandma’s Wisdom
This recipe always takes me back to my grandma’s sun-drenched kitchen. She was the queen of “waste not, want not,” and she had a sixth sense for spotting a perfectly overripe banana from across the room. “Olivia,” she’d say, pointing at the brown-speckled fruit, “that’s not past its prime. That’s at the peak of its flavor! Now it’s ready for something special.”
Her go-to was always a magnificent, towering banana bread. But one busy Sunday when I was visiting, with cousins running underfoot and the oven already full, she showed me her quick trick. She mashed that banana right into a bowl, stirred in some oats, a glug of syrup from the cupboard, and a single egg. In what felt like seconds, she had a thick batter that she pressed into a pan. “Sometimes, sweetheart,” she whispered with a wink, “you need the comfort of banana bread but in a hurry.” What came out of the oven were these dense, sweet, cake-like squares that we all devoured warm. It was less a formal recipe and more a kitchen instinct—a delicious solution born from simplicity and a little bit of cleverness. My version today is just a polished echo of her instinct, with a pinch of cinnamon for extra warmth. It reminds me that the best food often comes from resourcefulness and love, not complexity.
Gathering Your Simple, Wholesome Ingredients
See? I told you it was simple! Here’s everything you’ll need. I’ve added my little chef’s notes for each one because knowing your ingredients is the first step to feeling confident and creative in the kitchen.
- 1 Ripe Banana – The spottier, the better! Those brown spots mean the starches have converted to sugars, giving us incredible natural sweetness and moistness. Chef’s Insight: No ripe bananas? You can “ripen” a yellow banana in a 300°F oven for 15-20 minutes until the skin blackens. Let it cool before using.
- 1 Cup Oats – I use old-fashioned rolled oats for a hearty, textured bite. Quick oats work perfectly too and will yield a slightly more uniform, softer bar. Pro Tip: For a gluten-free version, ensure your oats are certified gluten-free!
- 1 Egg – Our binder and source of protein. It gives the bars structure and a lovely soft texture. Substitution Tip: For a vegan bar, a “flax egg” (1 tbsp ground flaxseed mixed with 2.5 tbsp water, left to gel for 5 mins) works wonderfully.
- 1/4 Cup Pure Maple Syrup – This adds a deep, caramel-like sweetness that pairs beautifully with banana. Chef’s Insight: Honey is a great 1:1 substitute, though it will impart its own distinct flavor. Avoid pancake syrup—it’s not the same!
- 1 Teaspoon Baking Soda – Our leavening agent! It gives the bars a gentle lift and soft, cakey crumb. Important: Make sure your baking soda is fresh for the best rise.
- 1 Teaspoon Cinnamon – The cozy factor! Cinnamon and banana are a match made in heaven. Feel free to add a pinch of nutmeg or allspice if you’re feeling adventurous.
- Optional: Chocolate Chips or Walnuts – My personal weakness is a handful of dark chocolate chips folded in—they create little pockets of melty joy. Chopped walnuts add a fantastic crunch and healthy fats. This is where you can make it your own!
Let’s Make Some Magic: The Simple Steps
Ready? This is the easiest process ever. I’ll walk you through each step with my favorite tips to ensure perfect bars every single time.
Step 1: Prep Your Pan & Oven. Preheat your oven to 350°F (175°C). This is the perfect temperature for gentle, even baking. Take an 8×8 inch baking pan and lightly grease it with butter, coconut oil, or a quick spritz of cooking spray. For ultimate ease, line it with parchment paper, leaving a little overhang on two sides—this creates a “sling” so you can lift the whole batch out for super clean cuts later!
Step 2: The One-Bowl Wonder Begins. In a medium mixing bowl, take your ripe banana and mash it thoroughly with a fork. You want it almost liquidy, with no large lumps. Chef’s Hack: If you have a few stubborn bits, that’s okay! They’ll bake into lovely little bursts of banana flavor. To the banana mush, add the egg and maple syrup. Now, whisk or stir vigorously until the mixture is smooth, creamy, and beautifully amalgamated. See how the maple syrup ribbons through? That’s the good stuff.
Step 3: Bring in the Dry Team. Dump in your oats, baking soda, and cinnamon right into the wet mixture. Here’s my key tip: stir just until everything is moistened and combined. Don’t overmix! We’re not making a smooth batter; we’re creating a cohesive, thick, spoonable mixture. Over-stirring can make the oats gummy. If you’re adding chocolate chips or walnuts, now’s the time to fold them in gently.
Step 4: Pan & Spread. Pour (or more accurately, plop and scrape) your mixture into your prepared pan. Use a spatula or the back of a spoon to spread it into a smooth, even layer, nudging it into the corners. A little damp fingertip can help smooth the top perfectly if it’s being stubborn.
Step 5: Bake to Golden Perfection. Slide the pan into your preheated oven. Now, set a timer for 20 minutes. Ovens vary, so at the 20-minute mark, start checking. You’re looking for golden edges that are pulling slightly away from the pan and a top that looks set. The center should spring back lightly when you gently press it. If it still looks wet or jiggles, give it another 3-5 minutes. Total bake time is usually 20-25 minutes.
Step 6: The Most Important Step: Patience! I know, the smell is incredible and you want to dive right in. But trust me here. Let the pan cool on a wire rack for at least 20-30 minutes. This allows the bars to finish setting up. If you try to cut them while they’re piping hot, they’ll be crumbly. For the cleanest cuts, let them cool completely before slicing into 9 or 12 squares.
How to Serve & Savor
These bars are delicious at any temperature! I love them slightly warm, just after they’ve cooled enough to handle. For a next-level treat, place a square in a bowl and top with a scoop of vanilla Greek yogurt and a drizzle of peanut butter. For breakfast, pair one with a piece of fruit and a latte. Pack them in lunchboxes, take them on hikes, or enjoy one with a cup of tea as an afternoon pick-me-up. They’re endlessly versatile and always welcome.
Make It Your Own: Delicious Twists
- Blueberry Lemon: Fold in 1/2 cup fresh or frozen blueberries and the zest of one lemon.
- Peanut Butter Chocolate: Swirl 1/4 cup of natural peanut butter into the batter before baking and use chocolate chips.
- Apple Pie: Replace the banana with 1 cup of unsweetened applesauce and add 1/2 cup of finely diced apple.
- Tropical: Add 1/4 cup shredded coconut and 2 tbsp of chopped dried mango.
- Protein Power: Stir 2 scoops of your favorite vanilla or unflavored protein powder into the wet ingredients. You may need to add a tablespoon or two of milk if the batter gets too thick.
Chef’s Notes & Kitchen Chatter
This recipe has evolved from my grandma’s quick fix to my most-baked staple. I’ve made it in vacation rentals with only a fork and a toaster oven, and I’ve doubled it for bake sales. One time, I accidentally used baking powder instead of soda (we’ve all been there!), and while they were a bit more cake-like, they were still totally edible! The beauty is in its forgiveness.
Over time, I’ve learned that letting the mixture sit for 5 minutes after combining allows the oats to absorb some of the moisture, resulting in a better texture. I also firmly believe a pinch of flaky sea salt on top before baking elevates all the flavors spectacularly. Don’t be afraid to play—it’s a blank canvas for your cravings!
Your Questions, Answered
Q: My bars turned out a bit wet/mushy in the middle. What happened?
A: This usually means they needed a few more minutes in the oven, or your banana was very large and extra watery. Next time, bake until a toothpick inserted comes out with just a few moist crumbs (not wet batter). You can also try using quick oats, which absorb moisture more readily.
Q: Can I make these without eggs?
A> Absolutely! A “flax egg” is my favorite substitute. Mix 1 tablespoon of ground flaxseed with 2.5 tablespoons of water, let it sit for 5-10 minutes to thicken, and use it in place of the egg. The bars will be slightly more dense but still delicious.
Q: How should I store them, and do they freeze well?
A: Store cooled bars in an airtight container in the fridge for up to 5 days. They also freeze beautifully! Wrap individual bars in plastic wrap and place them in a freezer bag for up to 3 months. Thaw at room temperature or pop them in the microwave for 20 seconds.
Q: Can I use steel-cut oats?
A> I wouldn’t recommend it for this recipe. Steel-cut oats won’t soften enough with the shorter baking time and lack of cooking liquid, resulting in a very hard, chewy texture. Stick with old-fashioned or quick oats for the best results.
Banana Oat Bars : Soft, Naturally Sweet & Perfect for Snacking
Description
Banana Oat Bars
Soft, wholesome, naturally sweet bars that are perfect for breakfast, snacks, or lunchboxes.
Prep Time: 5 minutes
Bake Time: 20–25 minutes
Total Time: 30 minutes
Yields: 9 bars
Ingredients
-
1 ripe banana (the browner, the sweeter)
-
1 cup rolled oats (old-fashioned or quick; gluten-free if needed)
-
1 egg (or 1 flax egg for vegan option: 1 tbsp ground flaxseed + 2.5 tbsp water, set 5–10 minutes)
-
1/4 cup pure maple syrup (or honey)
-
1 tsp baking soda
-
1 tsp cinnamon
-
Optional: 1/4 cup chocolate chips, walnuts, or other mix-ins
Instructions
-
Preheat Oven & Prep Pan – 350°F (175°C). Lightly grease an 8×8-inch pan or line with parchment paper, leaving an overhang for easy removal.
-
Mash Banana – In a medium bowl, mash the banana until smooth. Stir in the egg and maple syrup until creamy.
-
Add Dry Ingredients – Mix in oats, baking soda, and cinnamon until just combined. Fold in optional mix-ins if using.
-
Transfer & Spread – Pour batter into prepared pan and spread evenly. Smooth the top with a spatula.
-
Bake – 20–25 minutes, until edges are lightly golden and the center springs back to touch. If still too wet, bake 3–5 minutes longer.
-
Cool & Slice – Cool in pan 20–30 minutes before slicing into 9 bars.
Notes
-
Bananas: Use very ripe bananas for maximum natural sweetness.
-
Texture: Let the batter sit 5 minutes before baking to allow oats to absorb moisture.
-
Mix-Ins: Chocolate chips, nuts, dried fruit, or a sprinkle of sea salt on top.
-
Storage: Airtight container in fridge up to 5 days. Freeze individually wrapped bars up to 3 months.
Nutritional Information*
*This is an estimate for 1 bar (based on 9 servings) without optional add-ins, calculated using a nutrition database. Values will vary with specific ingredients and additions.
- Calories: ~120
- Protein: 3g
- Carbohydrates: 18g
- Sugar: 7g (all natural from banana & maple syrup)
- Fat: 3g
- Fiber: 2g
Prep Time: 5 mins | Bake Time: 20-25 mins | Total Time: 30 mins | Servings: 9 bars
Final Thoughts: Your Trusty Snack Secret, Perfected
And there you have it—a recipe that proves “simple” and “spectacular” can absolutely live on the same plate. These Banana Oat Bars are more than just a convenient snack; they’re a small act of everyday kindness to your future self. They’re the proof that wholesome food doesn’t have to be complicated, and that the most satisfying flavors often come from the humblest ingredients, treated with a little bit of care.
They bridge the gap between what we crave and what nourishes us, between a busy schedule and the desire for something homemade. Whether you’re packing them with love into a lunchbox, grabbing one as you run out the door, or enjoying a quiet moment with a square and a cup of tea, these bars are a tangible little bit of comfort and energy.
Remember, this recipe is a foundation. It’s your kitchen, your bananas, your adventure. Tweak the spices, fold in your favorite add-ins, make it exactly what you need it to be. Once this method is in your back pocket, you’ll never look at a ripe banana the same way again—you’ll see possibility.
So, mash those bananas, stir that one bowl, and fill your kitchen with the warm, comforting scent of cinnamon and toasted oats. You’ve just unlocked a new level of easy, feel-good baking.
Happy snacking,
Olivia


