

The Cookie That Packs a Punch: Your New Coffee Break BFF
Hey there, friend! Come on in, grab an apron, and let’s get something straight: life is too short for weak coffee and boring cookies. If you’ve ever taken a sip of your perfectly brewed cup only to wish you could eat that rich, roasty flavor, I have glorious news for you. Welcome to the world of Espresso Cookies—the soft, chewy, caffeinated hug your taste buds have been dreaming of.
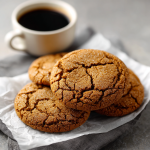
Imagine this: a cookie that’s audaciously buttery, with a crackly sugar edge that gives way to a center so tender it practically melts. And then—BAM—that deep, resonant note of real espresso hits, singing a duet with sweet, dark chocolate. This isn’t just a cookie; it’s an experience. It’s your 3 PM slump’s worst enemy and your dessert table’s new star. Whether you’re a baking newbie or a seasoned spoon-licker, this recipe is your ticket to becoming a kitchen legend. So, preheat that oven. We’re about to make your house smell like a cozy Italian café and your cookie jar the most popular spot in the house.
My “Eureka!” Moment: How These Cookies Came to Be
This recipe was born from a happy little accident, as the best ones often are. Picture it: a rainy Sunday, my third cup of coffee growing cold as I dove into a classic chocolate chip cookie recipe. In my caffeine-fueled haze, I knocked over a nearly-full jar of instant espresso powder. A fragrant, earthy cloud poofed up, and a good tablespoon or two landed squarely in my mixing bowl. My heart sank for a second… and then curiosity won. I shrugged, gave it a stir, and popped the tray in the oven.
The smell that filled my kitchen was nothing short of magic. When my husband bit into the first warm cookie, his eyes went wide. “This is it,” he said, with a mouth full of crumbs. “This is the cookie. It tastes like our favorite coffee shop feels.” That was the moment. It wasn’t a mistake; it was a discovery! That batch disappeared faster than any cookie I’d ever made, and the recipe was forever changed. Now, it’s my most-requested treat, the one I pack for road trips and bring to potlucks. It’s a tiny, edible reminder that sometimes the best flavors come from leaning into the beautiful mess.
Gathering Your Flavor Arsenal
Let’s break down the team of ingredients that make these cookies legendary. I’ve got notes and swaps for you, because flexibility is power in the kitchen!
- 1 cup (2 sticks) unsalted butter, softened: This is our flavor and texture foundation. Unsalted lets you control the salt level. “Softened” is key—it should give slightly when pressed, not be melty. Pro tip: if you forgot to take it out, cut it into chunks and let it sit for 15-20 minutes. No microwave!
- 1 cup brown sugar & ½ cup granulated sugar: The dynamic duo! Brown sugar brings moisture, chew, and a hint of molasses warmth. Granulated sugar helps create those lovely crisp edges. For a deeper flavor, try using dark brown sugar.
- 2 large eggs: Our binders and leaveners, bringing richness and structure. Make sure they’re at room temperature to blend smoothly with the butter.
- 2 tsp vanilla extract: The flavor enhancer. It rounds out the sharpness of the espresso and complements the chocolate. Use the real stuff if you can—it makes a difference!
- 2 tbsp instant espresso powder: The STAR. This isn’t ground coffee; it’s concentrated, soluble espresso. It delivers that intense coffee flavor without grittiness. My favorite brand is Medaglia d’Oro. If you only have very finely ground espresso, it might work but could add a slight texture.
- 2 ½ cups all-purpose flour: The structure. For a foolproof measure, fluff your flour with a spoon, spoon it into your measuring cup, and level it off. No packing!
- 1 tsp baking soda: Our leavening agent, giving the cookies their perfect lift and spread.
- ½ tsp salt: The flavor booster. It makes the sweet and bitter notes pop. I use fine sea salt.
- Optional: 1 cup chocolate chips or chopped dark chocolate: Highly recommended! The bitterness of dark chocolate (70% is perfect) is a dream with espresso. But semi-sweet or even white chocolate chips are delicious, too.
Let’s Bake! Your Step-by-Step Roadmap to Cookie Bliss
Follow these steps, lean into the process, and don’t forget to sneak a taste of the dough (we all do it).
- Preheat & Prep: Fire up your oven to 350°F (175°C). Line your baking sheets with parchment paper. This isn’t just for easy cleanup; it prevents the bottoms from over-browning. No parchment? A silicone baking mat works great too.
- Creaming is Key: In a large bowl, beat the softened butter and both sugars together for a good 2-3 minutes with a hand mixer or stand mixer fitted with the paddle. You’re not just mixing; you’re incorporating air. The mixture should become pale, fluffy, and look like creamy frosting. This step is non-negotiable for that perfect texture!
- Incorporate the Wet Team: Beat in the eggs, one at a time, making sure each is fully blended before adding the next. Then, add the vanilla and the glorious espresso powder. Here’s a chef hack: mix the espresso powder with the vanilla before adding to help it dissolve and distribute evenly. Beat until the batter is smooth and a beautiful coffee color.
- Whisk the Dry: In a separate bowl, whisk together the flour, baking soda, and salt. This ensures the leavening and salt are evenly distributed throughout the flour, preventing bitter soda pockets in your finished cookies.
- Combine Gently: Gradually add the dry ingredients to the wet mixture. Mix on low speed *just until* the flour disappears. A few streaks are okay! Overmixing is the enemy of tenderness—it develops gluten and leads to tough cookies.
- The Fun Part – Fold Ins: If you’re using chocolate, now’s the time! Use a spatula to gently fold them in until evenly dispersed. The dough will be thick and gorgeous.
- Scoop & Space: Using a cookie scoop or two spoons, portion dough into balls about 2 tablespoons each. Roll them gently in your hands to smooth them out. Place them on your prepared sheet at least 2 inches apart—they need room to spread and become their best selves.
- Bake to Perfection: Bake for 10-12 minutes. The cookies are done when the edges look set and are lightly golden, but the centers still appear soft, puffy, and slightly underdone. They will firm up as they cool. For super chewy centers, err on the side of 10 minutes.
- The Patient Wait: Let the cookies cool on the hot baking sheet for 5 minutes. This allows them to finish setting up without falling apart. Then, transfer them to a wire rack to cool completely… or enjoy immediately with a cold glass of milk.
How to Serve These Little Gems
Presentation is part of the joy! Pile these espresso cookies high on a rustic wooden board or a vintage cake stand. For the ultimate experience, serve them slightly warm when the chocolate is still gooey. A dusting of flaky sea salt or a drizzle of melted chocolate right before serving takes them to gourmet heights. Of course, their natural partner is a cup of excellent coffee—an espresso for the brave, a creamy latte for the decadent. They’re also incredible crumbled over vanilla ice cream. You really can’t go wrong.
Make It Your Own: Delicious Twists & Swaps
- Mocha Chip: Swap ¼ cup of the flour for unsweetened cocoa powder for a double-chocolate coffee experience.
- Espresso Walnut: Fold in 1 cup of toasted, chopped walnuts along with the chocolate for a fantastic crunch.
- Dulce de Leche Swirl: After scooping, press your thumb into the center of each dough ball and fill with a teaspoon of dulce de Leche before baking. Sweet, salty, coffee magic.
- Gluten-Free: Use a 1:1 gluten-free all-purpose flour blend (like Bob’s Red Mill or King Arthur). The texture will be slightly more delicate but just as delicious.
- “Tiramisu” Style: Once cooled, dust the tops generously with a mixture of cocoa powder and powdered sugar.
From My Kitchen to Yours: A Few Final Whispers
This recipe is a living thing in my kitchen. I’ve played with adding a pinch of cinnamon (heavenly), and once I even swirled in a ribbon of salted caramel sauce into the dough before baking—chaotic but brilliant. The biggest lesson? Don’t skip the chilling if you have time. Pop the scooped dough balls in the fridge for 30-60 minutes before baking. This solidifies the butter, leading to a thicker, chewier cookie with more pronounced flavor. If you’re a freezer-meal prepper, these dough balls freeze beautifully! Just scoop onto a tray, freeze solid, then transfer to a bag. Bake from frozen, adding 1-2 minutes to the bake time. Fresh cookies, on demand. You’re welcome.
Your Questions, Answered
Q: My cookies came out flat and spread too much. What happened?
A> The usual suspects: 1) Butter was too soft or melted. 2) The baking sheet was still warm from a previous batch. 3) Not enough flour (did you pack your measuring cup?). Next time, ensure your butter is just softened, use cool baking sheets, and try the fluff-spoon-level measuring method. Chilling the dough will also fix this.
Q: Can I use brewed coffee or ground coffee instead of espresso powder?
A> I don’t recommend it. Liquid coffee won’t provide the concentrated flavor punch and will throw off your wet/dry ingredient balance. Finely ground coffee will make the cookies unpleasantly gritty. Instant espresso powder is truly the secret weapon here. Look for it in the coffee aisle of most grocery stores!
Q: My cookies are too cakey/puffy. How do I get them chewier?
A> A cakey texture often means there was too much flour or the leavening was too active. Double-check your flour measurement. Also, using an extra egg yolk (in addition to the two whole eggs) can add richness and chew. And remember, slightly under-baking is the chewy cookie’s best friend.
Q: How do I store them to keep them soft?
A> Once completely cool, store them in an airtight container at room temperature with a piece of bread tossed in. The cookies will draw moisture from the bread and stay soft for days! The bread gets hard; you replace it. It’s an old baker’s trick that works like a charm.
Espresso Cookies : Soft, Chewy & Caffeinated Treats
Description
Espresso Cookies
Soft, Chewy, Caffeinated Bliss for Coffee Lovers
A buttery, crackly-edged cookie with tender centers and a bold espresso punch. Perfect for your 3 PM coffee break or dessert table.
Ingredients
Cookie Base
-
1 cup (2 sticks) unsalted butter, softened
-
1 cup brown sugar
-
1/2 cup granulated sugar
-
2 large eggs, room temperature
-
2 tsp vanilla extract
-
2 tbsp instant espresso powder
Dry Ingredients
-
2 1/2 cups all-purpose flour
-
1 tsp baking soda
-
1/2 tsp salt
Optional Mix-ins
-
1 cup chocolate chips or chopped dark chocolate
Instructions
-
Preheat & Prep
Preheat oven to 350°F (175°C). Line baking sheets with parchment paper or silicone mats. -
Cream Butter & Sugars
Beat butter and sugars 2–3 min until pale and fluffy. -
Add Wet Ingredients
Beat in eggs one at a time. Mix in vanilla and espresso powder (mix espresso with vanilla first for even distribution). -
Combine Dry Ingredients
Whisk flour, baking soda, and salt in a separate bowl. Gradually fold into wet mixture until just combined. -
Fold in Mix-ins
Gently fold in chocolate chips or other mix-ins. -
Scoop & Space
Portion dough into ~2 tbsp balls. Place on baking sheet 2 inches apart. -
Bake
Bake 10–12 min until edges are set and lightly golden; centers should look slightly underdone. -
Cool
Cool 5 min on baking sheet, then transfer to wire rack. Enjoy warm or fully cooled.
Notes
-
Chewier Cookies: Slightly underbake and/or add an extra egg yolk.
-
Flat Cookies Fix: Ensure butter is softened, not melted, and chill dough 30–60 min.
-
Mocha Chocolate: Replace 1/4 cup flour with unsweetened cocoa.
-
Nutty Crunch: Fold in 1 cup toasted walnuts.
-
Dulce de Leche Surprise: Press 1 tsp into the center before baking.
-
Gluten-Free: Use 1:1 gluten-free flour blend.
-
Tiramisu Style: Dust with cocoa + powdered sugar once cooled.
Nutritional Info (Because We’re Curious!)
Per cookie (approximately, based on a batch of 24 with chocolate chips):
Calories: ~180 | Protein: 2g | Carbohydrates: 22g | Fat: 9g | Saturated Fat: 5g | Cholesterol: 30mg | Sodium: 85mg | Fiber: 1g | Sugar: 14g
This is just an estimate. For precise dietary calculations, use your specific ingredients with a nutrition calculator. Now, go enjoy your well-earned treat!
Final Thoughts: The First Batch is Just the Beginning
And that’s the full story—from a happy kitchen accident to your new go-to recipe. You’ve got all the tips, tricks, and heartfelt advice to make your first batch a smashing success.
But this is really just the first chapter. Your chapter. Whether you stick to the classic or dive into the delicious twists, these cookies are now yours to perfect, share, and love. I can’t wait to hear about the memories you create with them, the variations you invent, and the moments of quiet satisfaction they bring to your kitchen.
Thank you for baking with me. Now, go create something wonderful.
With love and a full cookie jar,
Olivia


