
The Lazy Baker’s Dream: Oreo Cinnamon Rolls That Steal the Show
Hey friends! Olivia here, coming to you from my flour-dusted countertop. Can you smell that? It’s the magical scent of warm cinnamon, melting chocolate, and pure, unadulterated joy wafting from my oven. Today, we’re throwing the rulebook out the window and making something gloriously fun, sinfully easy, and guaranteed to make everyone at your table do a little happy dance. We’re taking the humble, store-bought cinnamon roll—that beacon of convenience and comfort—and turning it into a show-stopping, conversation-starting dessert mash-up: Easy Oreo Cinnamon Rolls.
I know what you’re thinking. “Olivia, from-scratch cinnamon rolls are a project.” And you’re right! Sometimes you want that Saturday morning kneading therapy. But other times? You want something spectacularly delicious on the table in under 30 minutes flat. You’ve got surprise guests, a house full of hungry kids, or you’re simply treating yourself to a cozy night in. That’s where this recipe shines. It’s for the days when you want maximum flavor payoff with minimal kitchen time. We’re combining the gooey, spiced warmth of a classic cinnamon roll with the crunchy, chocolatey delight of Oreos. It’s a match made in dessert heaven, and I can’t wait for you to try it. So grab that can of dough hiding in the fridge, let’s get a little messy, and create something unforgettable together.
The Midnight Snack That Started It All
This recipe was born from a classic case of the late-night munchies and a serious craving for innovation. Picture it: my college dorm, circa 2 a.m., studying for finals with my roommate. We were fueled by tea, determination, and a desperate need for sugar. The only things in our “pantry” (a glorified shelf) were a can of cinnamon rolls from a care package and a half-eaten sleeve of Oreos. Necessity, as they say, is the mother of invention.
In a stroke of sleep-deprived genius, we decided to combine our two greatest assets. We crushed those Oreos right in the bag with a textbook (very sanitary, I know), sprinkled the chunks over the unbaked rolls, and crossed our fingers. What emerged from our tiny, unreliable oven was nothing short of a miracle. The cookies softened into fudgy pockets, the cinnamon swirl hugged the chocolate bits, and the glaze made it all sing. It was more than a snack; it was a moment of pure, shared joy. That’s the spirit I want to bring to your kitchen today. No fuss, no stress, just clever little twists that turn the ordinary into pure magic.
Your Short & Sweet Shopping List
Here’s everything you need to create this magic. I’ve included my best tips for each ingredient so you can shop and bake like a pro!
- 1 can (typically 12.4 oz) refrigerated cinnamon rolls with icing – This is our brilliant shortcut! I usually grab the “Grands!” style for bigger, fluffier rolls. Chef’s Insight: Don’t stress about the brand. Any standard can (usually containing 5 or 8 rolls) will work perfectly. The icing included is your built-in glaze—how easy is that?
- 8–10 Oreo cookies, crushed – The star of the show! I use classic “Original” Oreos for that perfect chocolate flavor. Substitution Tip: Feel free to get creative! Mint Oreos would be amazing for a holiday twist, or Double Stuf for an extra creamy bite. For a nuttier flavor, try cookies and cream-style bars.
- ½ cup powdered sugar (optional, for extra glaze) – The icing from the can is great, but I’m a firm believer in more glaze. This is for my fellow drizzle enthusiasts. Chef’s Insight: Sift your powdered sugar! It prevents lumps and makes the smoothest, dreamiest glaze imaginable.
- 1–2 tablespoons milk – Just a splash to turn that powdered sugar into a pourable glaze. Any milk you have works—dairy, almond, oat, you name it.
- Non-stick cooking spray or butter for greasing – A little insurance policy to make sure your rolls pop right out with all their gorgeous, gooey bottoms intact.
Let’s Bake! Your Foolproof, Step-by-Step Guide
Follow these simple steps, and in less time than it takes to watch a sitcom, you’ll have a pan of warm, heavenly treats. I’ve packed each step with my favorite kitchen hacks to ensure your success.
Step 1: Preheat & Prep. Crank your oven to 350°F (175°C). This is the perfect temperature to get the rolls golden and cooked through without burning our precious Oreo addition. While it heats up, take a moment to lightly grease your baking dish—an 8-inch round cake pan or a small square dish works beautifully. This little act of kindness ensures easy serving later.
Step 2: Unleash the Dough & Crush the Cookies. Open that can of cinnamon rolls (the *pop* is so satisfying!). Separate them and set them on your work surface. Now, for the fun part: crushing the Oreos. You can do this in a zip-top bag with a rolling pin (great for stress relief!), pulse them a few times in a food processor, or even chop them roughly with a knife. You want a mix of fine crumbs and some pea-sized chunks for wonderful texture. Chef’s Hack: Don’t scrape out the filling! Crush the whole cookie. That creamy center melts into the most delicious fudgy bits.
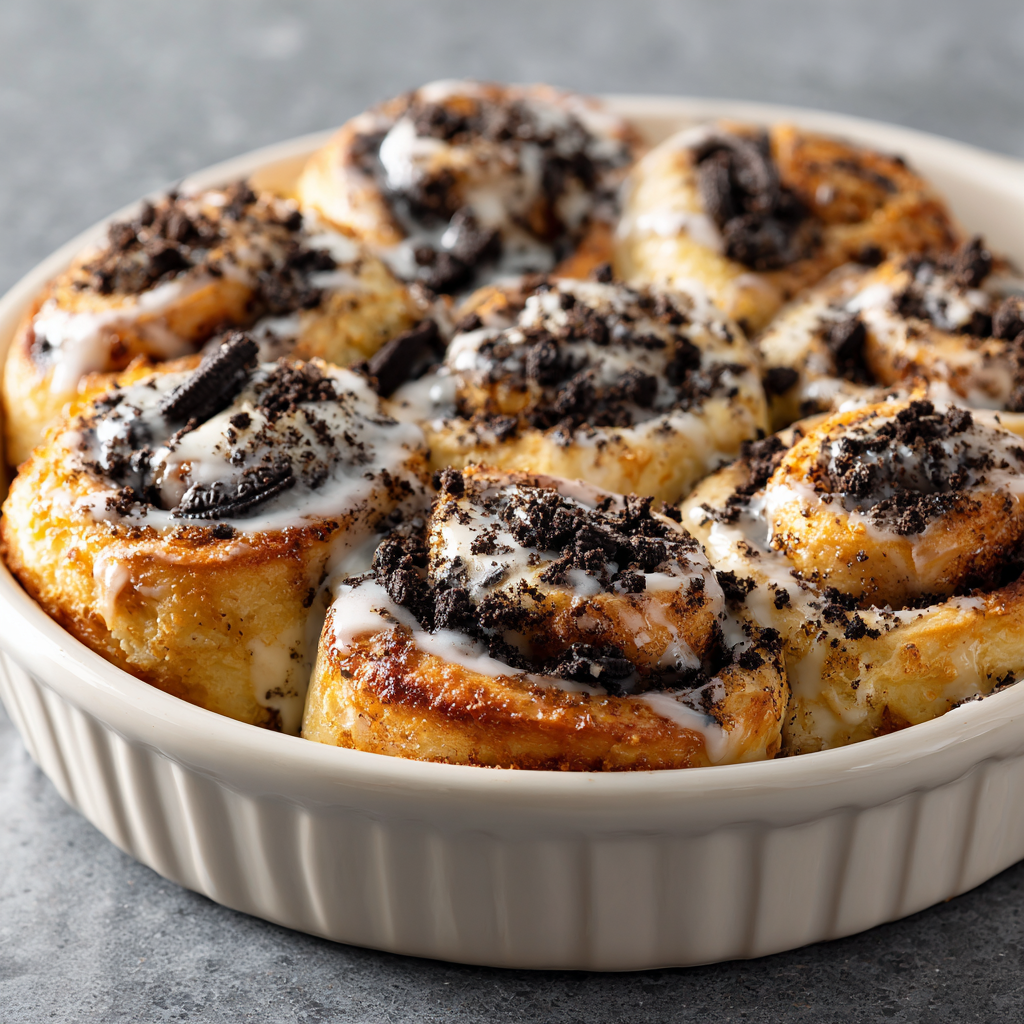
Step 3: Assemble the Magic. Here’s where we transform the ordinary. Take each cinnamon roll and generously sprinkle a heaping tablespoon of crushed Oreos over the top of the dough. Don’t be shy! Then, simply roll them back up, tucking the cookies inside the spiral. The dough might feel a little fuller, and that’s perfect. Place each swirled roll into your prepared dish, spacing them slightly apart so they have room to puff and become neighbors as they bake.
Step 4: Bake to Golden Perfection. Slide your dish into the preheated oven and let the magic happen for 15-20 minutes. You’re looking for the tops to be a deep, golden brown and the centers to look set. A good sign is when you can smell that incredible cinnamon-chocolate aroma filling your kitchen. Pro Tip: Ovens can be sneaky. Start checking at 15 minutes. If the tops are browning too fast but the centers seem doughy, you can loosely tent the pan with aluminum foil for the last few minutes.
Step 5: Glaze While Warm. As soon as the rolls come out of the oven, it’s glaze time! Warm pastries absorb flavors and icing so much better. If you’re using the included icing, just squeeze it over the hot rolls right from the packet—the heat will make it melt and seep into all the nooks. If you made the extra glaze (whisk the powdered sugar and milk until smooth), drizzle it lavishly over the top. The warmth will create a beautiful, shiny finish.
Step 6: The Grand Finale. For maximum visual appeal and crunch, sprinkle the remaining crushed Oreos over the glazed rolls while the glaze is still wet. This adds a final hit of chocolate flavor and a fantastic textural contrast. Let them cool for just a minute or two—I know it’s hard to wait!—so the glaze can set slightly and you don’t burn your tongue on molten sugar. Then, dig in!
How to Serve These Chocolatey Spirals of Joy
Presentation is part of the fun! I love serving these right from the baking dish placed in the center of the table for that cozy, family-style feel. Use a big spoon or spatula to scoop them out, ensuring everyone gets plenty of the gooey bottom layer. Pair them with a big pot of strong coffee, ice-cold milk for the kids (and kids-at-heart), or even a scoop of vanilla ice cream on the side if you’re feeling truly decadent. The warm-cold contrast is a game-changer!
Mix It Up! 5 Delicious Twists on the Classic
Once you master the basic recipe, the flavor playground is open! Here are a few of my favorite riffs:
- Cookies & Cream Cheesecake: Mix 4 oz of softened cream cheese into your powdered sugar glaze. Drizzle over the rolls and top with white chocolate chips.
- S’mores Sensation: Add a handful of mini marshmallows to the pan for the last 3 minutes of baking. Finish with the glaze and a sprinkle of crushed graham crackers.
- Peanut Butter Paradise: Use Peanut Butter Oreos! Swirl a tablespoon of warm peanut butter into the glaze before drizzling.
- Mint Chocolate Refresh: Swap in Mint Oreos and add a drop of peppermint extract to the glaze. Perfect for the holidays!
- Fruity Fun: After baking, top with a handful of fresh raspberries or sliced strawberries. The tart fruit cuts through the sweetness beautifully.
Olivia’s Kitchen Notebook
This recipe has evolved from that messy dorm-room experiment into my go-to “hero dessert” for last-minute gatherings. I’ve learned a few things along the way! First, the type of cinnamon roll matters less than your enthusiasm. I once only had the “flaky” variety on hand, and they worked like a charm. Second, don’t skip the step of sprinkling extra Oreos on top after glazing—it makes them look bakery-level gorgeous with zero effort.
The funniest kitchen fail? I once was chatting so much with a friend that I completely forgot to add the *cinnamon rolls* to the crushed Oreos. I just put a pan of cookie crumbs in the oven. We still laugh about my “deconstructed Oreo cinnamon roll” phase. Moral of the story: even when things go hilariously wrong, you’re making memories. And usually, it still tastes pretty good.
Your Questions, Answered!
Q: Can I make these ahead of time?
A: You can prep them up to a point! Assemble the rolls (through Step 3) in the baking dish, cover tightly with plastic wrap, and refrigerate overnight. In the morning, let the dish sit on the counter while the oven preheats, then bake as directed, adding a minute or two if needed from cold. I don’t recommend freezing the unbaked rolls with the Oreos inside, as the cookies can get soggy.
Q: My glaze is too thick/too thin. Help!
A> No problem! This is an easy fix. Too thick? Add milk, just a teaspoon at a time, and whisk until it reaches a pourable consistency. Too thin? Add more sifted powdered sugar, a tablespoon at a time, until it thickens up. You want it to ribbon off your whisk.
Q: The Oreos on top sank into the glaze and got soggy. What happened?
A> This likely means the rolls or the glaze cooled too much before you added the final sprinkle. For the crunchiest topping, add the final Oreo crush immediately after drizzling the glaze, while everything is still very warm. The glaze will set around them, locking in some crunch.
Q: Can I use homemade cinnamon roll dough?
A> Absolutely! This is a fantastic way to elevate your favorite from-scratch recipe. Just follow your dough recipe as usual, sprinkling the crushed Oreos on the buttered and cinnamon-sugared rectangle before you roll it up. Proceed with proving and baking according to your recipe’s instructions.

Easy Oreo Cinnamon Rolls : Gooey, Chocolatey, and Ready in Minutes
Description
These Oreo Cinnamon Rolls are the ultimate shortcut dessert—warm, gooey cinnamon rolls packed with crunchy, chocolatey Oreo pieces and finished with a sweet glaze. Made with store-bought dough, they’re perfect for busy mornings, last-minute guests, or whenever you want something fun and comforting without spending hours in the kitchen.
Ingredients
-
1 can (about 12–13 oz) refrigerated cinnamon rolls with icing
-
8–10 Oreo cookies, crushed (cookies and filling)
-
Non-stick cooking spray or butter, for greasing
Optional Extra Glaze
-
½ cup powdered sugar
-
1–2 tablespoons milk (any kind)
Instructions
-
Preheat & Prepare
Preheat oven to 350°F (175°C). Lightly grease an 8-inch round or square baking dish. -
Crush the Oreos
Place Oreos in a zip-top bag and crush with a rolling pin, or pulse briefly in a food processor. Aim for a mix of crumbs and small chunks. -
Fill the Rolls
Separate the cinnamon rolls. Sprinkle about 1 tablespoon of crushed Oreos over each roll, then gently roll them back up. -
Arrange & Bake
Place rolls in the prepared dish. Bake for 15–20 minutes, until puffed and golden and centers are set. -
Glaze While Warm
Drizzle the included icing over hot rolls.
Optional: Whisk powdered sugar and milk until smooth and drizzle for extra glaze. -
Finish & Serve
Sprinkle a little extra crushed Oreo on top. Let cool 1–2 minutes, then enjoy warm.
Notes
-
Check early: Ovens vary—start checking at 15 minutes to avoid overbaking.
-
Crunch balance: Add the final Oreo sprinkle right after glazing so it sticks but keeps some texture.
-
Flavor swaps: Try Mint Oreos, Peanut Butter Oreos, or Double Stuf for a twist.
-
Make-ahead: Assemble the night before, cover, refrigerate, and bake in the morning (add 1–2 minutes if cold).
Nutritional Info (Because We’re All About Balance!)
Approximate values per roll (based on 8 rolls per batch, using included icing and 10 Oreos):
Calories: 290 | Protein: 4g | Carbohydrates: 40g | Fat: 13g | Sugar: 22g
Remember, friends, this is a treat recipe—a celebration in a pan! It’s all about savoring each gooey, chocolatey, joyful bite with the people you love. Enjoy every minute of it.
Final Thoughts: Your Shortcut to Sweet, Shared Joy
And there you have it—the easiest, most delightfully decadent upgrade to a classic comfort food. These Oreo Cinnamon Rolls are more than just a recipe; they’re a reminder that the most memorable moments in the kitchen often come from a little creativity, a dash of convenience, and a willingness to break the rules in the name of something delicious.
This isn’t about perfection. It’s about the fun of that pop of the can, the therapeutic crush of cookies, and the unbeatable aroma that fills your home. It’s about turning a regular Tuesday into a tiny celebration or impressing your friends without spending hours at the counter. That 2 a.m. dorm-room experiment taught me that the best dishes are often the ones that bring people together with simplicity and a whole lot of heart.
So the next time a sweet craving strikes or you need a guaranteed crowd-pleaser, remember this magical mash-up. Keep that can of dough and sleeve of Oreos in your pantry, and you’ll always be minutes away from a warm, gooey, chocolate-studded smile.
Happy baking, and enjoy every messy, delicious moment!
With love and a sprinkle of cookie crumbs,
Olivia 💕


