
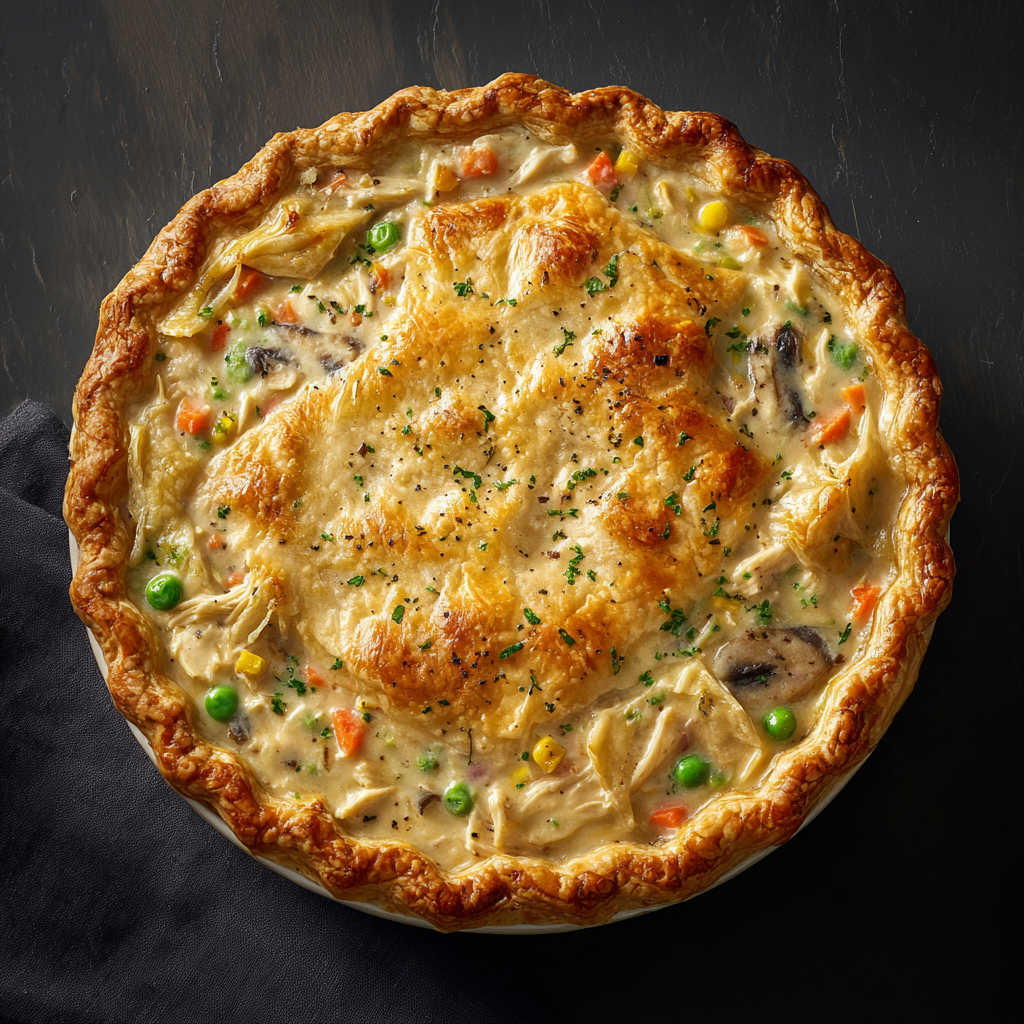
The Coziest Turkey Pot Pie You’ll Ever Make
Hey there, friend! Come on in, wipe your feet, and take a deep breath. Do you smell that? It’s the smell of pure, unadulterated comfort. It’s the scent of buttery, golden-brown pastry giving you a warm hug, and a creamy, hearty filling that whispers, “Everything is going to be okay.” If you’re anything like me, you live for these kinds of meals—the ones that don’t just fill your belly but also soothe your soul.
Today, we’re making my absolute go-to for using up leftovers or just treating yourself on a chilly evening: the legendary Turkey Pot Pie. This isn’t just any pot pie; this is the one that will have your family hovering around the oven, asking “Is it ready yet?” every five minutes. We’re talking tender, juicy turkey and sweet little peas and carrots, all swimming in a luxuriously creamy sauce that’s flavored with just the right herbs, all tucked under a blanket of the flakiest, most glorious crust you can imagine.
The best part? This recipe is your new best friend in the kitchen. It’s forgiving, flexible, and honestly, just a joy to put together. Whether you’re a seasoned pro or just starting your cooking journey, this turkey pot pie is about to become a staple in your recipe box. So, tie on that apron (messy is totally welcome here!), and let’s create some magic.
A Pie Full of Memories
This recipe takes me right back to my grandma’s kitchen table. The day after every major holiday—without fail—you’d find her standing at the counter, still in her robe, humming as she transformed our mountain of leftover turkey into what she called her “Second-Day Surprise.” To me, it was even better than the big feast itself. There was something so special about it, this quiet, cozy meal that was just for us. No fancy china, no guests to impress, just a steaming pie placed right in the center of the table, its crust cracked and bubbling, promising pure comfort. She’d always let me press the edges of the crust with a fork, teaching me how to “seal in the love.” To this day, the moment I pull a golden-brown pot pie from my own oven, I’m ten years old again, feeling that same wave of warmth and anticipation. It’s more than a dish; it’s a delicious, edible hug from the past.
Gathering Your Cozy Ingredients
Let’s gather our cast of characters! This is where the fun begins. I love pulling everything out and seeing the beautiful colors and textures before we even start cooking. Here’s what you’ll need to create this masterpiece.
- 2 cups cooked turkey, shredded or diced – This is the star! Leftover holiday turkey is perfect, but a rotisserie chicken from the store works just as beautifully. Chef’s Insight: Using a mix of white and dark meat gives you the best flavor and texture.
- 1 cup frozen peas and carrots – Don’t thaw them! The frozen veggies will cook perfectly in the sauce and help cool the filling down before we add the crust. It’s a little kitchen hack that saves time and effort.
- ½ cup diced celery – This adds a wonderful, subtle earthy flavor and a bit of crunch. If you’re not a celery fan, you can skip it, but it really builds the flavor base.
- ½ cup diced onion – Yellow or white onion is perfect here. They soften and sweeten as they cook, creating the foundation of our filling.
- 3 tbsp butter – This is the start of our magical sauce. It adds richness and helps cook our veggies to perfection.
- ⅓ cup all-purpose flour – This is what will thicken our filling into that dreamy, creamy consistency. When mixed with the butter, it creates a “roux,” which is the secret behind any great sauce or gravy.
- 1¾ cups chicken or turkey broth – Using a good-quality broth makes a world of difference! It’s the liquid base of our sauce. Substitution Tip: A vegetarian broth works wonderfully here if that’s what you have on hand.
- ½ cup milk or cream – Milk will give you a lighter sauce, while cream will make it extra rich and decadent. I usually use whole milk for the perfect balance. For a dairy-free version, unsweetened almond or oat milk works surprisingly well.
- ½ tsp salt & ¼ tsp black pepper – The essential seasonings! Always taste your filling before assembling the pie, as the saltiness of your broth and turkey can vary.
- ½ tsp dried thyme – This is my favorite herb for pot pie. It adds that classic, cozy, savory note. Fresh thyme is even better—use about 1 teaspoon if you have it!
- 1 double pie crust – Be it store-bought or homemade, no judgment here! I use store-bought when I’m short on time, and it’s always a winner. The goal is comfort, not stress.
- 1 egg, beaten (for egg wash) – This is the secret to that gorgeous, glossy, professional-looking golden-brown crust. A little brush of egg wash is like a magic wand for your pastry.
Let’s Build Some Comfort, Step-by-Step
Okay, team! It’s time to get our hands dirty (figuratively, of course). Follow these steps, and you’ll have a perfect pot pie in no time. I’ve sprinkled in all my favorite little hacks to make this process smooth and fun.
- Preheat Your Oven & Get Ready: First things first, crank that oven to 400°F (200°C). We want it nice and hot so our crust gets super flaky and golden right from the start. Chef’s Hack: While the oven is heating, take your pie crusts out of the fridge if they’re refrigerated. Letting them sit at room temperature for 10-15 minutes makes them much easier to roll out and handle without cracking.
- Sauté the Veggies: Grab a large, oven-safe skillet if you have one (it makes life easier!), or a regular saucepan. Melt your butter over medium heat. Once it’s foaming, toss in your diced onion and celery. We’re not looking for color here, just to soften them up and fill your kitchen with that incredible savory aroma. This should take about 5-7 minutes. You’ll know they’re ready when the onions become translucent.
- Create the Roux: Now for the secret sauce! Sprinkle the flour over the cooked veggies and butter. Stir constantly for a full minute. This cooks out the raw flour taste and creates our thickening agent. It will look like a thick, pasty mess—that’s exactly what you want! This is your roux, the heart of the creamy filling.
- Whisk in the Liquids & Thicken: Here’s where you need a little patience. Slowly, and I mean slowly, pour in your broth and milk while whisking constantly. Why slowly? It prevents lumps from forming and ensures a silky-smooth sauce. Keep whisking until the mixture is smooth, then let it come to a gentle simmer. You’ll see it transform before your eyes, thickening up into a beautiful, creamy gravy. This is the moment of magic!
- Bring It All Together: Turn off the heat. Now, stir in your salt, pepper, thyme, the cooked turkey, and the frozen peas and carrots. The frozen veggies will stop the cooking process and cool the filling down just enough so it doesn’t melt the bottom crust when we assemble the pie. Give it a taste! This is your chance to adjust the seasoning. Need more pepper? A pinch more salt? Make it yours.
- Assemble Your Masterpiece: If you didn’t cook your filling in an oven-safe skillet, now transfer it to a 9-inch pie dish. Carefully line the dish with your first pie crust, letting the edges hang over. Pour in that glorious, creamy filling. Place the second crust on top, and crimp the edges together with a fork to seal everything in. Don’t be shy—press firmly! Cut a few slits in the top crust; these are vital “steam vents” that let the hot air escape so your pie doesn’t explode (we’ve all been there!). Finally, brush the entire top with the beaten egg wash for that show-stopping golden finish.
- Bake to Golden Perfection: Place your beautiful pie on a baking sheet (to catch any potential bubble-overs) and bake for 35-40 minutes. You’re looking for a deep golden-brown crust and bubbly filling. Pro Tip: If the edges of your crust are browning too quickly, just tent them with a little strip of aluminum foil. This protects them while the center catches up.
- The Hardest Part: Let it Rest! I know, I know. The smell is intoxicating, and you just want to dive in. But trust me on this one. Let the pot pie rest on a wire rack for a good 10 minutes before you slice into it. This allows the filling to set slightly, so when you cut it, you get a clean, beautiful slice instead of a soupy mess. It’s worth the wait, I promise!
How to Serve Your Masterpiece
Presentation is part of the fun! I love placing the whole pie right in the middle of the table for that classic, family-style feel. Use a sharp knife and a sturdy pie server to cut generous slices. This pie is rich and hearty, so it really stands on its own, but I always love serving it with a simple, bright side salad with a tangy vinaigrette to cut through the richness. A scoop of garlic mashed potatoes or cranberry sauce on the side is also a fantastic, celebratory touch!
Make It Your Own: Fun Recipe Twists
This recipe is a wonderful canvas for your creativity! Here are a few of my favorite ways to mix it up:
- Chicken & Biscuit Style: Swap the turkey for chicken and top the filling with drop biscuits instead of a top crust for a rustic, homey feel.
- Curry Pot Pie: Add 1-2 teaspoons of your favorite curry powder to the roux for a warm, spiced, and utterly delicious twist.
- Loaded Veggie: Make it vegetarian! Use vegetable broth and load up the filling with mushrooms, potatoes, green beans, and corn.
- Fresh Herb Bliss: In the summer, swap the dried thyme for a handful of fresh chopped herbs like tarragon, dill, and parsley.
- Gluten-Free & Dairy-Free: Use a gluten-free 1:1 flour blend and your favorite dairy-free butter and milk. Many stores also sell great gluten-free pie crusts!
Olivia’s Chef’s Notes
This recipe has been on quite a journey with me! The first time I made it on my own, I was so eager that I forgot to add the flour to the roux. I ended up with a very flavorful, but very soupy, turkey soup in a pie crust. It was a delicious disaster, and we laughed about it for days. The lesson? Don’t rush the roux! It’s the most important step.
Over the years, I’ve learned to make a double batch of the filling and freeze half. On a busy weeknight, I just thaw it, pour it into a dish, top with crust, and bake. It’s my ultimate freezer meal hack. This recipe is meant to be shared, adapted, and loved. If you add an extra clove of garlic or a splash of white wine to the sauce, you’re not messing it up—you’re making it yours. And that’s what home cooking is all about.
Your Pot Pie Questions, Answered!
I’ve gotten so many wonderful questions about this recipe over the years. Here are the most common ones to help you on your pot pie journey!
- Q: My bottom crust is always soggy. What am I doing wrong?A: This is the #1 question! A few tricks: First, make sure your filling isn’t piping hot when you add the bottom crust. Letting it cool slightly is key. Second, you can create a moisture barrier by brushing the bottom crust with a thin layer of beaten egg white and pre-baking it for 5-7 minutes before adding the filling. This creates a seal. And finally, baking your pie on a preheated baking sheet helps cook the bottom crust more aggressively.
- Q: Can I make this ahead of time?A: Absolutely! You can assemble the entire pie, cover it tightly, and keep it in the refrigerator for up to 24 hours before baking. You might need to add 5-10 minutes to the baking time since it will be going into the oven cold. You can also freeze the unbaked pie for up to 3 months. Bake from frozen, adding about 20-30 minutes to the baking time, and tent the crust with foil for the first half to prevent over-browning.
- Q: My sauce is too thin/runny. How can I fix it?A: If your sauce hasn’t thickened enough, don’t panic! Mix one tablespoon of cornstarch with two tablespoons of cold water or broth to create a “slurry.” Whisk this into your simmering filling and let it cook for another minute or two. It should thicken up beautifully. Remember, the filling will also continue to thicken as it cools.
- Q: Can I use puff pastry instead of pie crust?A: You sure can! It will give you a totally different, but equally delicious, flaky and puffy top. Just follow the package directions for baking. I wouldn’t recommend it for the bottom crust, as it can get a bit soggy. Use a standard pie crust for the bottom and puff pastry for the top for the best of both worlds!
Turkey Pot Pie : Creamy, Hearty & Wrapped in Golden Crust
Description
Creamy Turkey Pot Pie with Biscuit Topping
Prep Time: 15 minutes
Cook Time: 25–30 minutes
Total Time: 40–45 minutes
Servings: 6–8
Ingredients
For the Filling
-
2–3 cups cooked turkey, cubed or shredded
-
2 cups frozen mixed vegetables (peas, carrots, corn)
-
1 cup sour cream
-
1 can (10.5 oz) cream of chicken soup (or cream of mushroom)
-
Salt and pepper, to taste
-
1 tsp garlic powder
-
1 tsp onion powder
-
½ tsp smoked paprika (optional)
For the Biscuit Topping
-
1 can refrigerated biscuits OR
-
Homemade biscuit dough of your choice
-
1–2 cups shredded cheddar cheese (optional)
Instructions
1. Prepare the Filling
-
In a large bowl, combine:
-
cooked turkey
-
mixed vegetables
-
sour cream
-
cream of chicken soup
-
garlic powder, onion powder, salt, pepper, paprika
-
-
Mix until everything is well combined.
2. Assemble
-
Preheat oven to 375°F (190°C).
-
Spread the creamy turkey mixture evenly into a baking dish.
-
If using cheese, sprinkle it over the filling.
3. Add Biscuit Topping
-
Place the biscuits on top of the mixture in a single layer.
-
(Optional) Brush biscuits with melted butter for extra flavor.
4. Bake
-
Bake for 25–30 minutes, or until the biscuits are golden brown and the filling is bubbling around the edges.
Notes
-
Swap turkey for chicken if you don’t have leftovers.
-
Add cooked potatoes for extra heartiness.
-
Use puff pastry instead of biscuits for a flakier topping.
Nutritional Information*
*Please note: This is an estimated nutritional breakdown based on the ingredients used. Values can vary significantly based on specific brands and ingredient choices.
- Prep Time: 20 minutes
- Cook Time: 40 minutes
- Servings: 6
Estimated per Slice:
- Calories: ~450 kcal
- Carbohydrates: ~32 g
- Fat: ~26 g
- Protein: ~22 g
- Sodium: ~620 mg
Dietary Info: Contains dairy and gluten. See the “Recipe Variations” section for gluten-free and dairy-free adaptation ideas!
Final Thoughts
Well, my friend, there you have it. You’ve just created more than a meal; you’ve crafted a memory. As you sit down to enjoy that first, steaming bite, I hope you feel an immense sense of pride. You took simple, humble ingredients and spun them into pure gold—a dish that nourishes, comforts, and brings people together.
This turkey pot pie is more than a recipe; it’s a promise. A promise that even from leftovers, something new and spectacular can be born. A promise that a little bit of butter, flour, and love can solve a lot of problems, even if it’s just a case of the Mondays. It’s a testament to the fact that the coziest, most cherished meals aren’t always the most complicated ones.
So, whether this pie becomes your post-holiday tradition, your secret weapon for using up a rotisserie chicken, or just your go-to for a rainy day, I hope it finds a special place in your kitchen and your heart. Don’t forget to share it, adapt it, and pass it on.
Now, go enjoy your masterpiece. You’ve earned it.
With love and a full belly,
Olivia


