

Your New Go-To Dessert That’s as Easy as It Is Gorgeous
Hey there, friend! Come on in, grab an apron, and let’s talk about one of life’s greatest joys: a dessert that looks like you spent all day in the kitchen but secretly comes together with a whole lot of heart and not a lot of fuss. If your idea of a perfect sweet treat involves layers of chocolatey goodness, juicy fruit, and clouds of whipped cream, then you and I are about to become best friends. This Cherry Chocolate Chip Trifle is the superstar of my dessert table, and I’m so excited to share it with you.
We’ve all been there—you’re hosting a dinner, heading to a potluck, or just craving something spectacular on a Tuesday night. You want that “wow” factor without the stress of precise baking or fancy techniques. That’s where this glorious trifle sweeps in to save the day! It’s a stunning, no-bake (well, almost no-bake!) layered dessert that celebrates the magical pairing of rich chocolate and bright, tangy cherries. Every spoonful is a journey through soft cake, silky pudding, bursting cherries, and creamy whipped topping, with little surprises of chocolate chips in every bite.
So, whether you’re a seasoned baker or someone who considers store-bought cake mix a kitchen superpower, this recipe is for you. It’s forgiving, fun to assemble, and guaranteed to bring smiles to the table. Let’s create some magic together!
The Trifle That Started It All
This recipe takes me right back to my Grandma Eleanor’s sun-drenched kitchen. She was the queen of “a little bit of this, a little bit of that” cooking, and her desserts were legendary. The first time I saw her make a trifle, I was mesmerized. She didn’t use a recipe; she just started layering day-old pound cake with jam, fresh berries from her garden, and this impossibly thick custard she’d whipped up.
She’d let me stand on a stool and help, my small hands carefully arranging the final layer of whipped cream. “The secret, Livvy,” she’d whisper with a wink, “is that it’s meant to be messy. It’s all about the layers of love you can’t even see.” My version is a nod to her spirit but with a chocolatey, cherry-packed twist that my own family now goes wild for. It’s the dessert I bring to every gathering, and without fail, someone always asks for the recipe. It’s more than just a dessert; it’s a edible, shareable piece of my story.
Gathering Your Trifle Team: The Ingredients
Here’s the dream team of ingredients that come together to create this masterpiece. Don’t be afraid to mix and match based on what you have!
- 1 box chocolate cake mix (and required ingredients) – This is our fabulous shortcut! I love a deep, dark chocolate mix for maximum richness. Chef’s Insight: If you have a from-scratch chocolate cake recipe you adore, by all means, use it! But on a busy day, that box mix is your best friend. For a denser, brownie-like texture, try a devil’s food cake mix.
- 2 cups vanilla pudding – This is the creamy, silky glue that holds our layers together. You can use the kind you cook on the stovetop, the instant kind you whisk with milk, or even the pre-made cups from the dairy aisle for ultimate convenience.
- 1 jar (16 oz) cherry pie filling – This is where the big, juicy fruit flavor comes from! The sweet-tart cherries are the perfect counterpoint to the rich chocolate. Substitution Tip: Not a cherry fan? Raspberry or strawberry pie filling works beautifully here too!
- 1 cup heavy cream – We’re making our own whipped cream because the flavor and texture are just *chef’s kiss* compared to the stuff in a tub. It’s lighter, less sweet, and oh-so-satisfying to make.
- ¼ cup powdered sugar – This sweetens our whipped cream without any grittiness. It dissolves perfectly into the cream.
- 1 tsp vanilla extract – A dash of vanilla adds a warm, aromatic depth to the whipped cream. Don’t skip it!
- ½ cup mini chocolate chips – I prefer mini chips because they distribute more evenly throughout the layers, giving you a little chocolate in every single bite. Chef’s Insight: For a more decadent twist, chop up your favorite dark chocolate bar instead.
- Fresh cherries & chocolate shavings (for garnish) – These are optional but highly recommended for that professional, “I definitely meant to do that” finish.
Let’s Build Some Layers: Step-by-Step Instructions
Okay, the fun part! Assembling this trifle is like edible arts and crafts. There’s no wrong way to do it, but I’ll guide you through my favorite method.
Step 1: Bake and Cube the Cake
First, bake your chocolate cake according to the package directions in a 9×13 inch pan. Let it cool completely—and I mean completely. A warm cake will turn your trifle into a warm, soggy mess. Once it’s cool, use a serrated knife to cut it into roughly 1-inch cubes. Don’t worry about perfection! Irregular pieces add to the homemade charm. Chef’s Hack: Baking the cake a day ahead is a fantastic time-saver. Just wrap it tightly and cube it when you’re ready to assemble.
Step 2: Whip the Cream to Cloud-Like Perfection
Pour your heavy cream into a large, clean bowl. Here’s a pro tip: chill your bowl and whisk attachments (or beaters) in the freezer for 10-15 minutes before you start. Cold tools are the secret to whipping cream quickly and getting those lovely, stable peaks. Beat the cream on medium-high speed until it just starts to thicken. Then, add the powdered sugar and vanilla. Continue beating until soft peaks form—this means when you lift the whisk, the peak of cream will gently curl over. Be careful not to overbeat, or you’ll end up with butter! Set this beautiful fluff aside.
Step 3: The Grand Layering Ceremony Begins!
Grab your trifle dish! If you don’t have one, a large glass bowl or even individual parfait glasses work wonderfully. We want to see those gorgeous layers! Start with a generous layer of chocolate cake cubes, using about a third of them. Gently press them down to create an even base.
Step 4: The Pudding & Cherry Duo
Next, spoon about half of your vanilla pudding over the cake layer. Use the back of the spoon to spread it gently to the edges so it’s visible from the outside. Now, for the star of the show—spoon half of the cherry pie filling over the pudding. Let those gorgeous red cherries tumble where they may! Then, sprinkle a handful of those mini chocolate chips over the cherries.
Step 5: Repeat and Conquer
Time to do it all again! Add another third of the cake cubes, the rest of the pudding, the rest of the cherry filling, and another sprinkle of chocolate chips.
Step 6: The Grand Finale
For your final layer, add the remaining cake cubes. Now, lovingly dollop all of that homemade whipped cream on top. Swirl it, peak it, make it look beautiful! This is the crowning glory.
Step 7: The Patience Game (The Hardest Part!)
Cover the trifle with plastic wrap and pop it in the fridge for at least 1-2 hours, but ideally 4 hours or even overnight. I know, the wait is torture! But this chilling time is non-negotiable. It allows the cake to soak up all the lovely juices and flavors, and for everything to set into a cohesive, sliceable (or scoopable) dream.
Step 8: Garnish and Serve with Pride
Right before serving, garnish the top with fresh cherries and a flurry of chocolate shavings. This is your moment to shine!
How to Serve Your Masterpiece
Presentation is key with a trifle! Use a large, clear-glass spoon to dig all the way down to the bottom, ensuring you get every single glorious layer in one serving. I love serving this straight from the trifle dish placed in the center of the table—it’s a real conversation starter. For a more elegant touch, you can assemble individual portions in mason jars or wine glasses for a portable, pre-portioned treat. It pairs wonderfully with a cup of strong coffee to cut through the sweetness or a glass of dessert wine.
Make It Your Own: Recipe Variations
The beauty of a trifle is its versatility. Here are a few of my favorite twists:
- Black Forest Twist: Use chocolate pudding instead of vanilla, and add a splash of Kirsch (cherry liqueur) to the whipped cream.
- Peanut Butter Cup: Swirl ½ cup of peanut butter into the vanilla pudding and use chopped peanut butter cups instead of chocolate chips.
- Summer Berry Bliss: Swap the cherry pie filling for a mix of fresh blueberries, raspberries, and sliced strawberries tossed in a tablespoon of sugar.
- Cookies & Cream: Use crumbled chocolate sandwich cookies (Oreos) in place of the cake cubes and fold some cookie crumbs into the pudding.
- Dairy-Free Delight: Use a dairy-free cake mix, coconut whipped cream, and your favorite plant-based pudding and chocolate chips.
Olivia’s Chef Notes & Kitchen Confessions
This recipe has evolved so much since my first attempt, which I lovingly call “The Great Trifle Slump of 2015.” I was in a hurry and didn’t let the cake cool. I assembled it warm and served it immediately. Let’s just say it was more of a cherry-chocolate soup in a bowl! We ate it with a smile (because, well, chocolate), but I learned my lesson about patience that day.
Over the years, I’ve found that toasting the cake cubes for 5-10 minutes in a 300°F oven before assembling adds a wonderful texture and helps them stand up to the moisture better. And don’t be shy with the layers—the more haphazard and “rustic” they look, the more homemade and heartwarming the final product feels. This trifle isn’t about perfection; it’s about joy, flavor, and sharing something made with love.
Your Trifle Questions, Answered!
Q: Can I make this trifle ahead of time?
A: Absolutely! In fact, I highly recommend it. You can assemble the entire trifle (including the whipped cream topping) up to 24 hours in advance. Just keep it tightly covered in the fridge. The flavors have more time to mingle and become best friends, making it even more delicious.
Q: My trifle seems a bit soggy. What did I do wrong?
A: The most common culprit is a warm cake. Ensuring your cake is completely cooled before cubing is the #1 rule to avoid sogginess. Another tip is to not over-saturate the layers—you’re adding moisture from the pudding and cherries, so you don’t need to add any extra syrup or liqueur unless the recipe specifically calls for it.
Q: Can I use Cool Whip instead of making my own whipped cream?
A: You sure can! While I adore the flavor of homemade, a 8-oz tub of thawed Cool Whip or other non-dairy whipped topping will work just fine. Fold it into a bowl to fluff it up a bit before spreading it on top.
Q: I don’t have a trifle dish. What can I use instead?
A: No problem! A large glass salad bowl, a pretty casserole dish, or even a 9×13 inch pan will work. The only downside is you won’t see the beautiful side layers, but the taste will be exactly the same. For a cute individual serving, layer the ingredients in mason jars or parfait glasses.
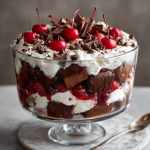
Cherry Chocolate Chip Trifle : Easy, Decadent Layered Dessert
Description
Cherry Chocolate Chip Trifle
Prep Time: 25 minutes
Chill Time: 1–2 hours (or overnight)
Total Time: ~1 hour 30 minutes
Servings: 10–12
Ingredients
Cake Layer
-
1 box chocolate cake mix (plus ingredients required on box)
-
Optional: Toast cake cubes for 5–10 minutes at 300°F for better texture
Pudding Layer
-
2 cups vanilla pudding (instant, cooked, or pre-made)
Cherry Layer
-
1 jar (16 oz) cherry pie filling
Whipped Cream
-
1 cup heavy cream
-
¼ cup powdered sugar
-
1 tsp vanilla extract
Add-Ins & Toppings
-
½ cup mini chocolate chips
-
Fresh cherries (optional)
-
Chocolate shavings (optional)
Instructions
1. Bake the Cake
Bake chocolate cake in a 9×13-inch pan according to package.
Cool completely, then cut into 1-inch cubes.
2. Make the Whipped Cream
Chill the bowl and beaters 10–15 minutes.
Beat heavy cream until slightly thickened.
Add powdered sugar + vanilla; beat to soft peaks.
Do not overbeat.
3. Build the Trifle (Layering #1)
In a trifle dish or large glass bowl:
-
Add ⅓ of the cake cubes.
-
Spread ½ the vanilla pudding over the cake.
-
Spoon ½ the cherry pie filling over pudding.
-
Sprinkle mini chocolate chips.
4. Repeat (Layering #2)
Add:
-
Another ⅓ cake
-
Remaining pudding
-
Remaining cherry filling
-
More chocolate chips
5. Final Layer
Add final ⅓ of cake cubes.
Spread all homemade whipped cream on top.
6. Chill
Cover and refrigerate 1–2 hours, ideally 4 hours or overnight for best flavor and texture.
7. Garnish
Top with fresh cherries and chocolate shavings before serving.
Notes
-
Cool cake fully to avoid sogginess.
-
Toast cake cubes for firmer texture.
-
Assemble in glassware to show off layers.
-
Make up to 24 hours ahead.
Nutrition
- Calories: 370 cal Per Serving
- Fat: 18g
- Carbohydrates: 48g
- Protein: 4g
Quick Nutrition & Prep Details
- Prep Time: 25 minutes
- Chill Time: 1-2 hours (or more)
- Total Time: 1 hour 30 minutes
- Servings: 10-12
- Estimated per serving: 370 calories | 18g fat | 48g carbs | 4g protein
Final Thoughts: More Than Just a Dessert
So, there you have it—the not-so-secret secret to a dessert that dazzles with minimal hassle. This Cherry Chocolate Chip Trifle is more than just a collection of ingredients; it’s a testament to the fact that the most memorable food doesn’t have to be complicated. It’s about the joy of assembling, the beauty of the layers, and the sheer pleasure of sharing something made with heart.
Whether it becomes your trusted potluck hero, your celebratory centerpiece, or your special Tuesday night treat, this trifle is ready to step into your life and create its own delicious memories. It’s forgiving, flexible, and forever guaranteed to earn that heartfelt, “Wow, you made this?”
So go ahead, give it a try. Embrace the layers, make it your own, and get ready for the compliments to roll in. After all, a little bit of love and a lot of chocolate and cherries is a recipe for happiness that never fails.
Happy layering


