
Your New Holiday Obsession is Here (And It’s No-Bake!)
Hello, my fellow flavor lovers! Olivia here, welcoming you back to my cozy kitchen corner. Can you smell it? That magical, spiced-sugar-and-espresso scent that seems to define the most wonderful time of the year? There’s something about the holidays that makes me want to create desserts that aren’t just delicious, but are true showstoppers. The kind of treat that makes everyone stop mid-conversation, lean in, and whisper, “Okay, what is that and can I have the recipe?”
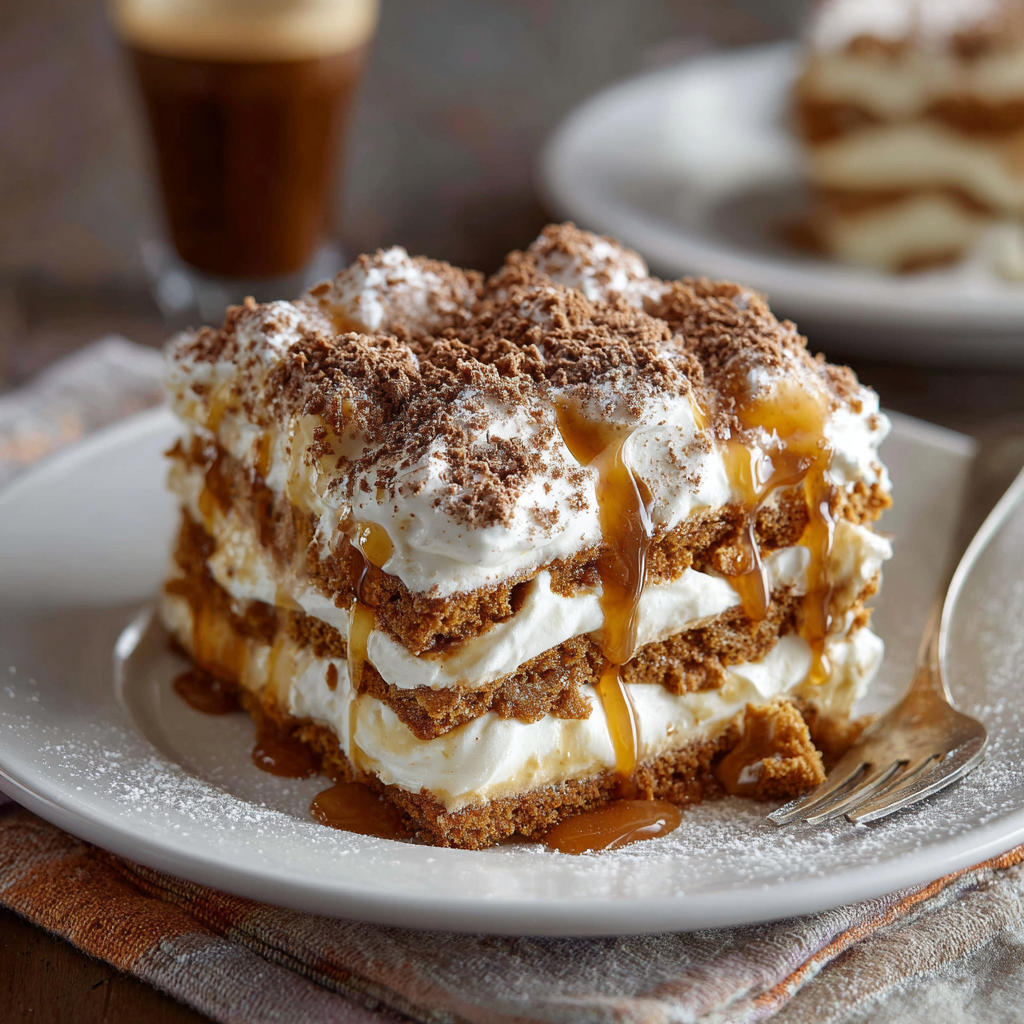
If you’ve been chasing that feeling—the joy of presenting a dessert that looks like you slaved for hours but secretly came together with brilliant simplicity—you are in for the absolute best treat. Today, we’re throwing the traditional rulebook out the window and making a Biscoff & Mascarpone Dessert Lasagna. Yes, you read that right! We’re taking everything we adore about a classic tiramisu—the creamy layers, the coffee kick, the dreamy, melt-in-your-mouth texture—and giving it a cozy, caramel-spiced twist with the one and only Biscoff cookie.
This is the dessert for the busy host, the baking-averse foodie, and the person who believes joy is found in a perfectly layered spoonful. It requires zero oven time, embraces a little happy mess, and rewards you with a dessert so decadent and crowd-pleasing, it will undoubtedly earn a permanent spot in your holiday repertoire. So, tie on your favorite (probably flour-dusted) apron, and let’s create some magic together!
The Happy Accident That Started It All
This recipe was born from a classic case of “kitchen improvisation.” A few years back, I was hosting my first big Friendsgiving. I had my menu meticulously planned, my turkey brining, and my pie dough chilling. Then, my best friend texted: “Forgot to tell you, Mark is bringing his sister! She’s a pastry chef!”
Panic. My perfectly planned apple pie suddenly felt… simple. I scanned my pantry, my eyes landing on a sleeve of Biscoff cookies I’d bought for a pie crust that never happened. Next to it sat a tub of mascarpone. The espresso machine was still warm from the morning. In a whirlwind of inspired chaos, I started layering. I didn’t have ladyfingers, so I used the Biscoff. I whipped the mascarpone with cream and a splash of vanilla. I didn’t overthink it; I just built it.
When we finally dug into that chilled, layered masterpiece, the room went quiet. The pastry chef asked for the recipe. That’s when I knew this happy accident was something special. It wasn’t just a dessert; it was a reminder that the best creations often come from a place of joyful spontaneity, not rigid perfection.
Gathering Your Cozy, Caramel-y Cast of Characters
One of the best parts of this recipe is its simplicity. You likely have many of these ingredients already, and the ones you don’t are worth the special trip! Here’s everything you’ll need, along with my little chef insights to make you feel like a pro.
- 2 packages Biscoff cookies (about 60 cookies): These are the star of the show! Their warm, speculoos spice (think cinnamon, nutmeg, and caramel) is what sets this dessert apart. Chef’s Insight: Don’t substitute the crunchy, flat Biscoff cookies with the spreadable Biscoff butter—they’re two different things! If you can’t find Biscoff, speculoos cookies or even gingersnaps would be a lovely, spiced alternative.
- 1 cup strong brewed espresso or coffee, cooled: This is our flavor soaker. The deep, robust bitterness of the coffee beautifully cuts through the sweetness of the cream and cookies. Pro Tip: If you don’t have an espresso machine, instant espresso powder dissolved in hot water works wonderfully. Just make sure it’s completely cooled before you start dipping!
- 2 tablespoons brown sugar: A little brown sugar dissolved into the coffee adds a touch of molasses-rich depth that complements the Biscoff spice perfectly. You can skip it if you prefer, but it creates a more harmonious flavor bridge.
- 1 tablespoon coffee liqueur (optional): This is our “adulting” upgrade. A splash of Kahlúa or Tia Maria adds another layer of warm, boozy complexity. Substitution Tip: For an alcohol-free version, you can use a teaspoon of vanilla extract or simply omit it altogether—the dessert will still be incredible.
- 1½ cups mascarpone cheese: This is the heart of our creamy layer. Mascarpone is an Italian cream cheese that’s incredibly rich, velvety, and less tangy than American cream cheese. Chef’s Secret: Let it sit at room temperature for 15-20 minutes before mixing. This prevents it from seizing up and ensures a silky-smooth, lump-free cream.
- 1½ cups heavy cream: We’re whipping this to glorious, fluffy peaks to lighten up the mascarpone. Non-negotiable Tip: Make sure your cream and your mixing bowl are VERY cold. I sometimes pop my bowl in the freezer for 10 minutes before I start. This is the secret to a stable, voluminous whipped cream.
- ½ cup powdered sugar: We use powdered sugar instead of granulated because it dissolves instantly and won’t give our cream a gritty texture.
- 1 teaspoon vanilla extract: The classic flavor enhancer. It rounds out all the other flavors and makes the whole dessert smell like a dream.
- Unsweetened cocoa powder, for dusting: This is our elegant finishing touch. The bitter cocoa provides a stunning visual contrast and a final flavor note that ties everything together.
- Optional: shaved chocolate or cookie crumbs, for garnish: A little extra bling for your showstopper! I love using a vegetable peeler on a bar of dark chocolate or simply crushing a few extra Biscoff cookies for a textured top.
Let’s Build Our Masterpiece: A Step-by-Step Guide
Ready to assemble? This is where the fun begins. I’ll walk you through each step with all my favorite little hacks to ensure your dessert lasagna is pure perfection.
Step 1: The Flavor Soak
In a small, shallow bowl (a pie plate works great for this!), whisk together the cooled espresso, brown sugar, and coffee liqueur (if using) until the sugar dissolves. Little Chef Hack: The shallow bowl is key! It allows you to quickly dip the entire cookie without needing a deep pool of liquid.
Step 2: The Cloud-Like Cream
In a large, chilled bowl, combine the mascarpone, heavy cream, powdered sugar, and vanilla extract. Using a hand mixer or a stand mixer with the whisk attachment, beat on medium-high speed until the mixture is smooth, thick, and holds soft peaks. Pro Commentary: What are soft peaks? When you lift the beaters out of the cream, the peak that forms should gently curl over at the tip. Don’t overbeat to stiff peaks, or your cream can become grainy and be harder to spread. We want billowy, luxurious clouds!
Step 3: The Foundation Layer
Grab your 9×13-inch baking dish (or a beautiful glass trifle bowl for a stunning parfait effect). Spread a thin, even layer of the mascarpone cream on the bottom. This first layer acts as a delicious “glue” that will anchor your first row of cookies and prevent them from sliding around.
Step 4: The Dip & Layer Dance
Now for the rhythmic part! Take a Biscoff cookie and quickly dip it into the espresso mixture. I mean quickly—just a one-second in-and-out. CRUCIAL TIP: Do not soak the cookie! Biscoff cookies are porous and will turn to mush if left in the liquid for too long. A quick dip gives you all the flavor without the structural collapse. Place the dipped cookies side-by-side over the cream layer, breaking a few cookies if needed to fill in any gaps.
Step 5: Cream, Repeat, Cream, Repeat!
Spoon a generous, thick layer of the mascarpone cream (about one-third of what’s left) over the cookie layer. Use an offset spatula or the back of a spoon to spread it evenly, making sure to cover all the cookies. Then, repeat the process: dip more cookies, create a new layer, then more cream. Continue until you run out of ingredients, making sure you end with a beautiful, final layer of the mascarpone cream.
Step 6: The Patience-Pays-Off Chill
This is the hardest but most important step! Cover the dish tightly with plastic wrap and refrigerate it for at least 6 hours, but ideally overnight. Why so long? This waiting period is magical. It allows the cookies to soften perfectly into a cake-like layer, the flavors to marry and deepen, and the whole dessert to set up so you get those gorgeous, clean slices (or swoops, if using a trifle bowl).
Step 7: The Grand Finale Garnish
Right before serving, use a fine-mesh sieve to dust the top generously with unsweetened cocoa powder. This is your moment to be artistic! For an extra “wow” factor, sprinkle on some shaved chocolate or crushed Biscoff crumbs. Then, stand back and accept the applause.
How to Serve This Stunning Dessert
Presentation is part of the fun! For a classic, shareable look, slice it right in the 9×13-inch dish and serve it on plates. If you used a trifle bowl, simply scoop it into bowls or glasses, making sure to get all those beautiful layers in each serving. I love pairing it with a fresh cup of coffee or an after-dinner espresso to complement the flavors inside. It’s rich, so a smaller slice is often perfect, but I won’t judge if you go back for seconds!
Make It Your Own: Delicious Twists & Swaps
The beauty of this dessert lasagna is its versatility. Feel free to play and adapt it to your taste or dietary needs!
- Chocolate Lover’s Dream: Add a layer of chocolate shavings or a drizzle of chocolate sauce between the cookie and cream layers.
- Peanut Butter Bliss: Swirl ½ cup of smooth peanut butter into the mascarpone cream mixture. The PB & Biscoff combo is legendary.
- Dairy-Free Delight: Use plant-based heavy cream and mascarpone alternatives (many great brands exist now!). The Biscoff cookies are accidentally vegan, so this swap works beautifully.
- Fruity Freshness: Add a thin layer of salted caramel or a raspberry compote between the layers for a sweet-and-tart surprise.
- Extra Crunch: Sprinkle some chopped, toasted hazelnuts or pecans between layers for a delightful textural contrast.
A Few More Thoughts From My Kitchen to Yours
This recipe has become my go-to holiday gift for neighbors and friends. I often make it in disposable foil pans so I can give the whole thing away (and not be tempted to eat it all myself!). Over the years, I’ve learned a few things: it’s virtually foolproof, it travels like a dream, and it somehow tastes even better on the second day.
I also have a funny confession: the first time I made it, I was so nervous about the cookies being too hard that I dipped them for a few seconds too long. The result was a delicious, but… let’s call it a “tiramisu pudding.” Still tasty, but not the structural integrity we’re going for! So trust me on the quick dip. This dessert is a testament to the fact that the best things in life (and in the kitchen) are often the simplest, as long as they’re made with a generous dash of love and a sprinkle of cozy spice.
Your Questions, Answered!
I’ve gotten so many messages about this recipe over the years. Here are the most common questions and how to fix any potential hiccups.
Q: My mascarpone cream split/looked curdled. What happened?
A: This usually happens if the mascarpone was too cold when you started mixing, or if you added the cream while the mascarpone was still too firm. Fix: Let your mascarpone sit on the counter for 15-20 minutes before you begin. You can also try beating the mascarpone with the powdered sugar first until it’s smooth, *then* slowly stream in the heavy cream while mixing. If it does split, sometimes adding a tablespoon or two of extra cold heavy cream and whisking by hand can bring it back together.
Q: Can I make this dessert ahead of time?
A: Absolutely! In fact, I insist on it. This dessert needs that long chilling time to set up and develop its flavor. You can make it up to 24 hours in advance with perfect results. Just wait to dust it with cocoa powder until right before you serve it, as the moisture can make the cocoa dissolve and look blotchy over time.
Q: My dessert was too soggy. How can I prevent that?
A: The number one culprit is over-dipping the cookies. Remember, it’s a quick *dip*, not a soak. Think of it as giving the cookie a little espresso bath rather than a swim. The cookie should still feel firm when you place it in the dish. It will soften perfectly during the chilling time.
Q: I can’t find mascarpone. What’s the best substitute?
A: While the flavor and texture are unique, you can make a decent stand-in by beating together 12 ounces of full-fat, softened cream cheese with ¼ cup of heavy cream and ¼ cup of sour cream until smooth. It will be a bit tangier, but still utterly delicious.

Biscoff & Mascarpone Tiramisu-Style Dessert Lasagna : A Holiday Showstopper
Description
Looking for a cozy, hearty dish that hits all the flavors of a classic cheeseburger—without the meat? This vegan lasagna layers a savory lentil-walnut “meat,” creamy cashew cheese, and tangy pickles between tender noodles for the ultimate comfort food mashup.
Ingredients
For the Lentil-Walnut “Meat”
-
1 cup cooked brown lentils
-
1 cup finely chopped walnuts
-
1 tbsp olive oil
-
1 onion, diced
-
2 garlic cloves, minced
-
2 tbsp tomato paste
-
2 tbsp soy sauce (or tamari)
-
1 tbsp mustard
-
1 tsp smoked paprika
-
1 tsp onion powder
-
Salt and pepper to taste
For the Cashew Cheese Sauce
-
1½ cups raw cashews (soaked 4+ hours or boiled 10 mins)
-
1 cup plant-based milk
-
3 tbsp nutritional yeast
-
1 tbsp lemon juice
-
1 tsp garlic powder
-
1 tsp turmeric
-
Salt to taste
Other Layers
-
9 lasagna noodles, cooked
-
½ cup chopped dill pickles
-
1 tomato, thinly sliced
-
Sesame seeds (optional)
Instructions
-
Preheat oven to 375°F (190°C) and lightly grease a baking dish.
-
Make the “meat”: Heat olive oil in a skillet over medium heat. Sauté onion until soft, add garlic for 30 seconds. Stir in tomato paste, soy sauce, mustard, smoked paprika, onion powder, salt, and pepper. Add lentils and walnuts, cook until combined. Remove from heat.
-
Make the cheese sauce: Blend cashews, plant-based milk, nutritional yeast, lemon juice, garlic powder, turmeric, and salt until smooth. Adjust consistency with more milk if needed.
-
Assemble the lasagna: Spread a thin layer of cheese sauce on the bottom of the dish. Layer 3 noodles, half the “meat,” one-third of the sauce, and half the pickles. Repeat: noodles, remaining “meat,” one-third sauce, remaining pickles. Top with final 3 noodles and remaining sauce. Sprinkle sesame seeds.
-
Bake: 25-30 minutes until bubbly and lightly golden. Let rest 10 minutes before slicing.
-
Serve: Garnish with tomato slices and shredded lettuce if desired.
Nutritional Information (Approximate)
Servings: 12 | Prep Time: 20 minutes | Chill Time: 6 hours | Total Time: 6 hours 20 minutes
Calories: 390 | Protein: 4g | Carbohydrates: 30g | Fat: 28g | Sugar: 18g | Fiber: 1g | Sodium: 160mg
*Please note: Nutritional information is an estimate and may vary based on specific ingredients used and portion sizes.*
Final Thoughts: Your New Holiday Secret Weapon
As I look at the final photos of this Biscoff & Mascarpone Dessert Lasagna, with its perfect layers peeking out from under a blanket of cocoa, I’m reminded why this recipe has become my non-negotiable holiday staple. It sits in that beautiful, magical space between effortless and extraordinary. It’s the dessert that whispers, “I’m a sophisticated, layered masterpiece,” while proudly declaring, “And I didn’t even need the oven!”
This is more than just a recipe; it’s a confidence boost. It’s the proof that you can create a genuine showstopper without stress, without specialized skills, and with the joyful spirit of improvisation that makes holiday cooking so special. It’s for the moments you want to gather around the table and share something truly memorable, something that feels like a warm, caramel-spiced hug in a dish.
So, as you wrap up your own creation and slide it into the fridge, take a moment. Admire your work. Anticipate the joy it will bring. You’ve just made magic—the kind that’s layered with flavor, steeped in happy accidents, and destined to become a requested tradition for years to come.
Here’s to effortless elegance, to cozy spices, and to desserts that bring everyone together.
Happy no-baking, and happy holidays!
With love and a sprinkle of Biscoff crumbs,
Olivia


