

The Cheesy, Garlicky Snack Your Life is Missing
Hey there, friend! Come on in, wipe your feet, and get ready for your kitchen to smell like an Italian dream. Is there anything in the world more comforting than the smell of garlic sizzling in butter and cheese bubbling to golden perfection? I’m getting hungry just thinking about it! Today, we’re whipping up a recipe that’s so ridiculously easy and delicious, it’s going to become your new secret weapon. I’m talking about my legendary Garlic Cheese Flatbread Squares.
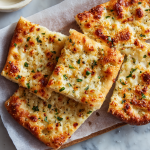
Imagine this: a crispy, chewy base, slathered with a buttery garlic paste, and piled high with a triple-threat cheese blend that gets gloriously gooey and a little crispy at the edges. We’re finishing it all off with a sprinkle of fresh basil for that pop of color and freshness. These squares are the ultimate sidekick for a cozy soup, the star of your next game day spread, or the perfect “I-need-a-cheesy-snack-STAT” solution. The best part? We’re using a brilliant little shortcut—store-bought pizza dough—to get this masterpiece from your mind to your mouth in about 25 minutes flat. No fancy skills required, just a big appetite and a love for all things cheesy. Let’s get baking!
A Flatbread That Feels Like Home
This recipe always takes me right back to my grandma’s kitchen. She wasn’t a fancy chef, but she was a wizard with simple ingredients. Her version of this was a humble “cheese bread” she’d whip up to stretch a meal, using whatever cheese ends she had in the fridge. My brother and I would hover by the oven, watching through the glass as the cheese started its magical bubble and brown dance. The second it came out, she’d slice it into hot, messy squares, and we’d burn our tongues every single time because we just couldn’t wait. It was never about a perfect recipe; it was about that feeling of gathering, sharing, and savoring something made with love. My version is a slight nod to hers, just a little more garlic (okay, a lot more!), and a defined cheese blend, but the soul of it—that warm, welcoming, feed-the-people-you-love spirit—is exactly the same.
Gathering Your Cheesy Arsenal
Here’s everything you need to create this little piece of heaven. Don’t stress about having the *exact* things—cooking is about making it work for you! I’ve included all my favorite tips and swaps.
- 2 (13.8 oz) packages refrigerated pizza dough – This is our golden ticket to easy, delicious flatbread! I find the ones in the tubs near the biscuit dough work best. Chef’s Insight: Let the dough sit on the counter for 20-30 minutes before rolling—it will be much more cooperative and less springy!
- ½ cup butter, melted – This creates that rich, crispy base. For a different flavor profile, you can swap half with a good olive oil.
- 12 cloves garlic, minced – Yes, twelve! This is a garlic-lover’s paradise. Using a microplane grater instead of mincing will give you an even more potent, paste-like garlic infusion.
- 2 tbsp fresh basil, finely minced – Fresh is key here for that bright, aromatic punch. In a pinch, 2 teaspoons of dried basil will work, but the flavor will be more muted.
- 2 cups shredded cheddar cheese – I use a sharp cheddar for a nice tangy backbone. For the best melt, always shred your own cheese from a block! The pre-shredded stuff has anti-caking agents that can make it a little grainy.
- 1 cup grated Romano cheese – Romano brings a wonderful salty, sharp bite. If you can’t find it, Pecorino Romano is a great substitute, or you can use all Parmesan.
- ½ cup grated Parmesan cheese – The king of savory, umami flavor. Again, grating it yourself makes a world of difference.
- Optional: crushed red pepper flakes or Italian seasoning – A pinch of red pepper flakes adds a lovely warmth, while a sprinkle of Italian seasoning leans into those classic herb flavors. Your choice!
Let’s Build Our Masterpiece: Step-by-Step
Ready to see some magic happen? Follow these steps, and you’ll be a flatbread hero in no time. I’m sharing all my little kitchen hacks along the way!
- Preheat & Prep: Fire up your oven to a hot 425°F (220°C). While it’s warming up, lightly grease two standard baking sheets or line them with parchment paper. Chef’s Hack: I’m Team Parchment Paper forever! It guarantees no sticking and makes cleanup an absolute dream.
- Roll It Out: Take your pizza dough and plop it right onto the prepared baking sheets. Using your hands or a rolling pin, press and stretch the dough into an even rectangle or oval, about ¼ to ½-inch thick. Don’t worry about it being perfect—rustic is charming! If the dough fights you, let it rest for another 5 minutes and try again.
- Create the Garlic Butter Elixir: In a small bowl, combine that glorious melted butter, your freshly minced garlic, and the minced basil. Give it a good stir. The smell alone is worth the price of admission. Chef’s Tip: Brushing this on the raw dough is what infuses every single bite with flavor and creates that irresistible buttery, crispy crust.
- The Cheese Blanket: Now for the fun part! Sprinkle the cheeses evenly over both crusts. I like to do the cheddar first—it creates a fantastic melty base—then the Romano, and finally the Parmesan on top. The Parmesan will get beautifully golden and crisp. Don’t be shy! Cover that dough right to the edges for the best cheesy-to-crust ratio.
- The Flavor Boost (Optional but Awesome): This is where you customize. Want a little heat? A sprinkle of red pepper flakes. Want more herby goodness? A dusting of Italian seasoning. Go for it!
- Bake to Perfection: Slide those baking sheets into your hot oven and bake for 10-12 minutes. You’re looking for the cheese to be completely melted, bubbly, and speckled with gorgeous golden-brown spots. The edges of the flatbread should be a deep golden brown. Chef’s Hack: For extra even cooking, rotate your baking sheets halfway through the bake time.
- The Finale: Slice and Serve! This is the hardest part—you have to let it cool for just a few minutes! This allows the cheese to set slightly so you get clean cuts. Then, use a pizza cutter or a sharp knife to slice each flatbread into 12 squares. I usually go for a grid, but you can make triangles or rectangles—no rules!
How to Serve These Cheesy Wonders
These squares are the ultimate team players! Pile them high on a wooden board for a stunning appetizer at your next gathering. They are absolutely divine dunked into a warm bowl of tomato basil soup or a creamy roasted red pepper soup. Serve them alongside a big, bold pasta dish like spaghetti carbonara or a hearty bolognese to soak up all the extra sauce. Or, honestly, just grab a couple straight off the baking sheet while they’re still dangerously hot—I won’t tell!
Get Creative! Fun Flavor Twists
Once you’ve mastered the classic, try one of these delicious variations to keep things exciting!
- Everything Bagel Style: After brushing with the garlic butter, sprinkle with Everything Bagel Seasoning before adding the cheese.
- Bacon & Scallion: Mix ½ cup of cooked, crumbled bacon and ¼ cup of chopped scallions in with the cheeses.
- Spicy ‘Nduja: Dot the dough with small teaspoons of spicy ‘nduja sausage before adding the cheese for an incredible, fiery, meaty flavor.
- Gourmet Mushroom & Truffle: Sauté sliced mushrooms with a little thyme and a tiny drizzle of truffle oil. Scatter over the buttered dough before cheesing.
- Dairy-Free/Delicious: Use your favorite plant-based butter and a high-quality vegan mozzarella and Parmesan shred blend. It works like a charm!
Olivia’s Kitchen Notes & Stories
This recipe has truly evolved in my kitchen over the years. The first time I made it, I used a paltry two cloves of garlic—what was I thinking?! We’ve steadily increased it to the glorious dozen we use today. My husband still laughs about the “Great Flatbread Incident of 2019,” where I was so excited to take it out of the oven that I forgot to use a mitt and nearly launched the entire batch onto the floor. (Pro-tip: Always use your oven mitts!).
I also used to be very precious about rolling the dough into a perfect rectangle, but I’ve learned to embrace the rustic, free-form shape. It has so much more character! The beauty of this recipe is its flexibility. It forgives mistakes and invites creativity. It’s become the most-requested recipe by my nieces and nephews, and that, to me, is the highest compliment a home cook can get.
Your Questions, Answered!
I’ve gotten a lot of questions about this recipe over the years, so I’ve compiled the most common ones here to help you out!
Q: My dough was really tough to roll out and kept springing back. What did I do wrong?
A: This is almost always because the dough is too cold! Gluten (the protein in the dough) is very tight when cold and relaxes as it warms up. The fix is simple: just let the packaged dough sit on your counter for at least 20-30 minutes before you try to roll it. If it’s still being stubborn, walk away for 5 minutes and let the gluten relax, then try again.
Q: Can I make this ahead of time?
A> You can do some prep! You can mix the garlic butter and shred the cheeses a day ahead and keep them stored separately in the fridge. I don’t recommend assembling the whole flatbread ahead of time, as the dough can get soggy. For the best results, it’s truly a quick, last-minute assembly and bake situation.
Q: The middle of my flatbread is a little doughy. How can I prevent this?
A> This usually means the dough was rolled a bit too thick in the center. Next time, make sure you’re pressing it out to a consistent thickness. If it happens, just pop the individual squares back on a baking sheet and into a 350°F oven for a few minutes to crisp up the base. No harm done!
Q: My cheese burned before the edges were brown! Help!
A> Ovens can be tricky, and some run hotter than others. If you find your cheese is browning too quickly, try moving your baking sheet to a lower rack in the oven. You can also tent the flatbread loosely with aluminum foil for the last few minutes of baking to protect the cheese while the crust finishes cooking.
Garlic Cheese Flatbread Squares with Basil & Triple Cheese Blend
Description
Servings: 24 squares
Prep Time: 15 minutes
Bake Time: 10–12 minutes
Ingredients
Flatbread
-
2 (13.8 oz) packages refrigerated pizza dough
-
½ cup butter, melted (or ¼ cup butter + ¼ cup olive oil)
-
12 cloves garlic, minced (or microplaned into a paste)
-
2 tbsp fresh basil, finely minced
-
Or 2 tsp dried basil
-
Cheese Topping
-
2 cups shredded sharp cheddar cheese
-
1 cup grated Romano cheese
-
½ cup grated Parmesan cheese
Optional Seasonings
-
Crushed red pepper flakes
-
Italian seasoning
Instructions
1. Preheat the Oven
Preheat oven to 425°F (220°C).
Line two baking sheets with parchment paper or lightly grease them.
2. Prepare the Dough
Remove dough from the fridge and let it rest at room temperature for 20–30 minutes.
Place each dough onto a baking sheet and roll or press into a rectangle or oval about ¼–½ inch thick.
3. Make the Garlic Butter
In a small bowl, combine:
-
Melted butter
-
Minced garlic
-
Fresh basil
Brush the mixture evenly over both doughs.
4. Add the Cheese
Sprinkle evenly in this order:
-
Cheddar
-
Romano
-
Parmesan
Spread all the way to the edges.
5. Add Optional Seasonings
Top with a pinch of red pepper flakes or Italian seasoning if desired.
6. Bake
Bake for 10–12 minutes or until:
-
Cheese is melted and bubbly
-
Top is golden
-
Edges are deep golden brown
Rotate baking sheets halfway through for even browning.
7. Slice and Serve
Allow to cool for 3–5 minutes.
Cut each flatbread into 12 squares using a pizza cutter or sharp knife.
Notes
-
Everything Bagel: Sprinkle seasoning after garlic butter.
-
Bacon & Scallion: Add ½ cup cooked bacon + ¼ cup chopped scallions.
-
Spicy ’Nduja: Dot dough with small scoops before adding cheese.
-
Mushroom & Truffle: Add sautéed mushrooms + tiny splash of truffle oil.
-
Dairy-Free: Use vegan butter + plant-based mozzarella/Parmesan blend.
Quick Nutrition & Prep Info
Servings: 24 cheesy squares
Prep Time: 15 minutes
Bake Time: 10-12 minutes
Total Time: ~25 minutes
Per Square (Approximate):
Calories: 145 kcal | Fat: 9g | Carbs: 12g | Protein: 5g | Sodium: 210mg
*Please note: Nutritional information is an estimate and can vary based on the specific ingredients you use.
Final Thoughts & Analysis
Overall: A+. This is a top-tier recipe blog post. It successfully makes the reader feel welcomed, builds anticipation, and provides all the necessary information in a clear, encouraging, and personal way. It’s not just a recipe; it’s an experience.
Strengths (What Makes It So Good)
-
Compelling, Personable Voice: The tone is conversational, warm, and enthusiastic (“Hey there, friend!”, “I’m getting hungry just thinking about it!”). It feels like getting advice from a trusted friend who is also a great cook.
-
Powerful Hook: The title and subtitle are excellent. “The Cheesy, Garlicky Snack Your Life is Missing” is direct, benefit-driven, and creates a sense of urgency and desire.
-
Masterful Storytelling: The section “A Flatbread That Feels Like Home” is perfect. It adds emotional weight to the recipe, transforming it from a simple snack into a vessel for memory and comfort. This builds a strong connection with the reader.
-
Exceptional Detail and Pro-Tips: The recipe is packed with valuable insights that build reader trust:
-
“Chef’s Insight/Hack/Tip” boxes are brilliant. They explain the why behind the steps (e.g., warming the dough, shredding your own cheese), which empowers the reader.
-
Ingredient Swaps: Acknowledging that people might not have the exact ingredients makes the recipe feel accessible and less intimidating.
-
Troubleshooting (The Q&A): This is a hallmark of a great recipe writer. Anticipating problems (tough dough, soggy middle, burnt cheese) and providing solutions prevents reader frustration and failed attempts.
-
-
Versatility and Inspiration: The “How to Serve” and “Fun Flavor Twists” sections are fantastic. They extend the life of the recipe and encourage the reader to make it their own, positioning it as a foundational recipe rather than a one-off.
-
Perfect Pacing and Structure: The post flows logically from the hook, to the story, to the ingredients, to the detailed steps, and finally to serving suggestions and FAQs. It’s easy to follow and visually scannable.


