

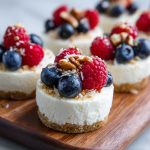
Low-Carb Berry Cheesecake Cups with Fresh Fruit and Nuts
Who Says “Easy” Can’t Be “Elegant”?
Hey there, friend! Come on in, pull up a stool. Can you smell that? It’s the sweet, sunny scent of fresh berries and creamy cheesecake filling up my kitchen. If your idea of a perfect dessert involves zero baking, minimal fuss, and maximum flavor, you are about to fall head-over-heels for these Berry Cheesecake Cups.
I’m a firm believer that the best treats are the ones that make you feel as good as they taste. These little cups are my go-to for when I’m craving something indulgently creamy and sweet, but don’t want the heaviness of a traditional cheesecake. They’re light, they’re bright, and they’re wonderfully low in carbs, but I promise, you won’t miss a single thing. The smooth, tangy filling, the burst of juicy berries, and that satisfying crunch from the nuts… it’s a textural dream come true in a perfect, personal portion.
Whether you’re whipping up a quick treat for yourself after a long day, need a stunning dessert for a dinner party that won’t keep you slaving in the kitchen, or are looking for a brunch showstopper, this recipe is your new best friend. So, grab your favorite mixing bowl and let’s create some no-bake magic together!
A Berry Sweet Memory
This recipe always takes me back to my grandma’s sun-drenched porch, the middle of a sweltering July afternoon. She wasn’t a fancy baker, but she was a genius with “cooling desserts.” I remember one specific summer day, she pulled out a big, chipped ceramic bowl and started whipping together cream cheese and something sweet without ever turning on the oven. She layered it with the wild blueberries and raspberries we’d just picked from her garden, topping it all with a handful of toasted pecans from her neighbor’s tree.
It wasn’t in fancy cups—we ate it straight from the big bowl with mismatched spoons—but the feeling was pure magic. Cool, creamy, and bursting with the taste of summer. These Berry Cheesecake Cups are my little tribute to her and that perfect, simple joy. It’s that same spirit of effortless, from-the-heart cooking that I try to bring to everything I make here. It’s not about perfection; it’s about the feeling.
Your Simple, Star-Studded Cast of Ingredients
One of the best things about this recipe is its flexibility. Here’s your grocery list, complete with my favorite chef insights and swaps to make this recipe your own.
- 8 oz Cream Cheese, softened: This is the superstar, the base of our creamy dream. Full-fat is key here for the richest, smoothest texture. Make sure it’s truly softened to room temperature to avoid a lumpy filling. If you’re in a pinch, you can gently soften it in the microwave in 10-second bursts.
- ½ cup Greek Yogurt or Sour Cream: This is our secret weapon for tang and lightness! Greek yogurt adds a protein boost and a lovely sharpness, while sour cream gives you that classic, decadent cheesecake bite. You can’t go wrong with either.
- ¼ cup Powdered Erythritol or Monk Fruit Sweetener: I specifically recommend the powdered version to avoid any gritty texture. These natural sweeteners keep our cups low-carb and delicious. If you’re not watching carbs, regular powdered sugar works beautifully.
- 1 tsp Vanilla Extract: The soul-warming essence that makes everything taste like home. For a real treat, try using the seeds from a vanilla bean!
- ½ cup Fresh Blueberries & ½ cup Fresh Raspberries: The jewel-toned topping! I love the combination of sweet blueberries and slightly tart raspberries. Pro-tip: In the winter, frozen berries (thawed and patted dry) work perfectly well.
- ¼ cup Crushed Walnuts or Pecans: Our textural finale! Toasting them first in a dry pan for a few minutes will unlock their nutty, aromatic oils and take the crunch to a whole new level.
- 8 Small Dessert Cups or Ramekins: Your canvas! I use little mason jars for a rustic look, but clear glass cups of any kind make the layers look gorgeous.
Let’s Build Our Masterpiece: Step-by-Step
Ready to see how quickly this all comes together? Follow these steps, and you’ll be enjoying dessert in no time.
- The Fluffy Foundation: In a medium-sized mixing bowl, combine your softened cream cheese, Greek yogurt (or sour cream), powdered sweetener, and vanilla extract. Now, here’s a little chef hack: use an electric hand mixer on medium speed for about 1-2 minutes. Scrape down the sides of the bowl with a spatula and mix for another 30 seconds until the mixture is utterly smooth, light, and fluffy. Don’t just stir it—whip it! This incorporates air and is the secret to that cloud-like texture.
- The Art of the Assembly: Now for the fun part! You can simply spoon the filling evenly into your eight cups, but for a truly professional look, spoon the mixture into a large zip-top bag, snip off one corner, and pipe it in. It’s so easy and makes everything look so elegant. Fill each cup about ¾ of the way full.
- The Berry Beautiful Topping: Time for the color! Artfully arrange a few blueberries and raspberries on top of the creamy base. I like to gently press them in just slightly so they don’t roll off. Don’t be shy here—make it look abundant and joyful!
- The Crunchy Finale: Grab your crushed, (hopefully toasted!) walnuts or pecans and sprinkle a generous pinch over the berries. This adds that essential nutty flavor and a fantastic crunch that contrasts the creamy filling perfectly.
- The Patience Pays Off Step: This might be the hardest part. Cover the cups and chill them in the refrigerator for at least 30 minutes. I know, I know, you want to dig in! But trust me, this waiting period allows the flavors to meld and the filling to firm up to the perfect, spoonable consistency. It’s worth the wait!
How to Serve These Stunning Cups
Presentation is part of the fun! I love serving these in clear glasses so everyone can admire the beautiful layers. For a special touch, place them on a decorative tray lined with a tea towel or a few fresh mint leaves. They are perfect as a make-ahead dessert for parties—just pull them out of the fridge when your guests are ready for something sweet. A sprig of fresh mint or a tiny twist of lemon zest on top right before serving adds a final, professional flourish.
Get Creative! Flavor Twists & Swaps
The beauty of this recipe is its versatility. Don’t be afraid to play!
- Tropical Escape: Swap the berries for diced mango and pineapple, and use toasted coconut flakes instead of nuts.
- Lemon Zest Delight: Add the zest of one lemon to the filling for a bright, sunny, and zingy flavor profile.
- Chocolate Lover’s Dream: Fold 2 tablespoons of unsweetened cocoa powder into the filling and top with a few raspberries and some shaved dark chocolate.
- Dairy-Free Delight: Use a high-quality dairy-free cream cheese and coconut yogurt for a wonderfully creamy plant-based version.
- Nut-Free Option: Simply omit the nuts or use a sprinkle of low-carb granola or sunflower seeds for that crucial crunch.
From My Kitchen to Yours: A Few Final Thoughts
This recipe has truly evolved in my kitchen. It started as a lazy Sunday experiment when I wanted cheesecake but didn’t want to deal with a water bath or the agonizing wait for it to cool. The first version was… let’s just say it was a single, large, slightly lumpy mess in a pie dish! But the flavor was there. Over time, I perfected the whipping technique, discovered the joy of individual portions, and learned that toasting the nuts is a complete game-changer.
One of my favorite kitchen memories is of my nephew, who is a notoriously picky eater, devouring two of these cups and then asking if we could make a “giant bathtub-sized” one next time. It’s recipes like this—simple, joyful, and loved by all—that remind me why I love to cook. It’s about creating those happy, full-bellied moments.
Your Questions, Answered!
I’ve gotten a few questions about this recipe over time, so I thought I’d answer the most common ones right here!
- Q: My filling is lumpy! What did I do wrong?
A: This almost always happens when the cream cheese is too cold. It’s crucial that it’s softened to room temperature. If you have lumps, just keep beating! The persistence of your electric mixer will usually smooth them out. For next time, take the cream cheese out of the fridge about an hour before you start.
- Q: Can I make these ahead of time?
A: Absolutely! They are the perfect make-ahead dessert. You can assemble them completely and store them, covered, in the refrigerator for up to 2 days. I’d wait to add the nut topping until just before serving to keep it extra crunchy.
- Q: I don’t have an electric mixer. Can I make this by hand?
A: You can, but it will take some elbow grease! Make sure your cream cheese is very, very soft. Use a sturdy whisk and really put your arm into it, whisking vigorously until smooth. It’s a great arm workout!
- Q: Is there a way to make this lower in fat?
A: You can use Neufchâtel cheese (the 1/3 less fat version) and non-fat Greek yogurt. The texture will be slightly less rich, but it will still be delicious!
Berry Cheesecake Cups : Low-Carb, Creamy & Freshly Fruity
Description
If your dream dessert is creamy, fruity, and comforting without turning on the oven, these Low-Carb Berry Cheesecake Cups are about to be your new obsession. They’re silky, tangy, lightly sweet, and topped with fresh berries and toasted nuts for the perfect crunch. Think cheesecake—but lighter, brighter, faster, and portioned into adorable little cups.
Ingredients
Cheesecake Filling
-
8 oz cream cheese, softened
-
½ cup Greek yogurt or sour cream
-
¼ cup powdered erythritol or monk fruit sweetener
-
1 tsp vanilla extract
Toppings
-
½ cup blueberries
-
½ cup raspberries
-
¼ cup crushed walnuts or pecans (toasted if possible)
For Serving
-
8 small dessert cups, ramekins, or mini mason jars
Instructions
In a bowl, beat cream cheese, Greek yogurt (or sour cream), sweetener, and vanilla until smooth, fluffy, and lump-free. An electric mixer works best, but a whisk will work if the cream cheese is very soft.
Spoon or pipe the mixture into 8 dessert cups, filling each about ¾ full.
Top with a generous mix of blueberries and raspberries. Gently press them in so they nestle into the creamy layer.
Sprinkle crushed nuts over the top. Toasting them first makes a huge difference!
Cover and refrigerate for at least 30 minutes. This helps the flavors meld and the texture firm up beautifully.
Notes
-
Lumpy filling? Your cream cheese wasn’t soft enough. Keep beating—it will smooth out!
-
Make ahead: Fully assemble up to 2 days in advance. Add nuts right before serving.
-
No mixer? Whisk by hand with the cream cheese fully softened.
-
Lower-fat version: Use Neufchâtel (⅓ less fat) and non-fat Greek yogurt.
Nutritional Information*
Prep Time: 10 minutes | Chill Time: 30 minutes | Total Time: 40 minutes | Servings: 8
*Please note: Nutritional information is an estimate and may vary based on the specific brands and ingredients you use.
Per Serving (estimated):
Calories: 180 | Fat: 15g | Carbs: 6g (Net: 4g) | Protein: 5g | Sugar: 3g
Final Thoughts
And just like that, we’ve created little jars of pure, no-bake joy. These Low-Carb Berry Cheesecake Cups are more than just a dessert; they’re proof that eating well doesn’t mean sacrificing flavor or fun. They’re a celebration of simplicity—a reminder that the most satisfying things in life (and in the kitchen) often come together without fuss or fanfare.
They carry the spirit of my grandma’s porch and that big, chipped bowl: a sense of ease, abundance, and sharing what you have with love. Whether you stick to the classic berry-nut combo or embark on your own tropical or chocolatey twist, this recipe is a trusty blueprint for creating a moment of sweet delight.
So, here’s my final wish for you: that you make these cups not just for the delicious end result, but for the joy in the process. For the sound of the mixer whipping clouds of filling. For the vibrant pop of berry colors against the creamy white. For the quiet, satisfied crunch of a toasted pecan. And most of all, for the shared smiles around your table—or the quiet, well-deserved moment of indulgence just for you.
Thank you for cooking with me today. Now, go grab a spoon and taste that sunshine.
With love and a full heart,
Your friend in the kitchen


