

Easy Brownie Trifle Cups with Pudding and Whipped Cream
The Ultimate Grab-and-Go Game Day Dessert
Hey friends, Olivia here! Is there anything better than the buzz of a game day gathering? The high-fives, the friendly rivalries, and of course, the absolutely epic spread of food. But let’s be real: when you’re hosting, the last thing you want is a dessert that requires fancy plating or a million forks. You need something easy, make-ahead, and so delicious it has everyone doing a victory dance in your living room.
That’s exactly why I’m so excited to share my Brownie Trifle Cups with you today. We’re taking everything we love about a classic, show-stopping trifle—the layers of cake, creamy filling, and fluffy topping—and shrinking it down into perfect, personal portions. Imagine rich, fudgy brownie chunks, silky chocolate pudding, and clouds of sweet whipped cream, all layered up in a clear cup you can grab with one hand. They’re portable, they’re ridiculously easy to assemble, and they are guaranteed crowd-pleasers.
Whether you’re tailgating, hosting a watch party, or just need a serious chocolate fix on a Tuesday afternoon, these little cups of joy are your new best friend. You don’t need any special skills, just a love for all things chocolate and cozy. So, tie on your favorite (probably messy) apron, and let’s make something unforgettable together!
A Trifle Obsession: My First Kitchen Victory
This recipe takes me right back to my first “big” cooking attempt as a teenager. My mom was hosting her book club, and I, in a burst of culinary confidence, volunteered to make dessert. I found a picture in a magazine of a towering, gorgeous trifle in a giant glass bowl. It looked so elegant and complicated, but the recipe was surprisingly simple. I remember the nervous excitement of layering each component, peering into the bowl to make sure my lines were straight. When I carried it out to the table, the “oohs” and “aahs” from my mom’s friends made me feel like a Top Chef winner. That trifle wasn’t just dessert; it was my first real taste of the magic that happens when you create something with your hands to share with others. These individual cups capture that same spirit of simple, shareable joy, but in a way that’s even more fun and personal.
Gathering Your Trifle Team: Ingredients & Insights
Here’s the dream team of ingredients that makes these cups so magical. The best part? This is a no-stress zone. I’ll give you all my favorite chef hacks and substitutions so you can make this recipe your own.
- 1 Batch of Brownies (Homemade or Boxed): This is your flavor foundation! I’m a huge fan of a from-scratch, fudgy brownie for maximum richness, but on a busy day, a trusty boxed mix is a total game-changer and works beautifully. Chef’s Insight: For the best texture, let your brownies cool completely before cutting. This prevents them from crumbling and turning into mush when you layer them.
- 2 Cups Chocolate Pudding: This is the creamy, luxurious layer that ties everything together. Instant pudding is my go-to for speed and convenience—just whisk with cold milk and you’re done. If you’re feeling fancy, a homemade pudding from scratch is pure heaven. Substitution Tip: Not a chocolate-on-chocolate person? Swap in vanilla, butterscotch, or even peanut butter pudding for a delicious twist!
- 2 Cups Whipped Cream or Whipped Topping: This adds a light, airy contrast to the dense brownies and pudding. You can use freshly whipped cream (sweetened with a little powdered sugar and vanilla) for that from-scratch pride, or a tub of whipped topping like Cool Whip for ultimate ease and stability. Chef’s Hack: If whipping your own cream, chill your bowl and whisk attachments in the freezer for 10 minutes first. It whips up faster and holds its shape better!
- Optional Toppings: Mini Chocolate Chips, Crushed Oreos, Sprinkles, or Caramel Drizzle: This is where you get to be an artist! Toppings add texture, color, and that final “wow” factor. Chef’s Insight: A little flaky sea salt on top of a caramel drizzle is a next-level move that balances the sweetness perfectly.
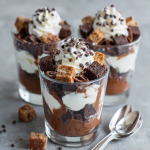
- 8-10 Small Clear Cups for Serving: The clear cups are key! They let everyone see those beautiful, tempting layers. I love using 8-ounce plastic or glass dessert cups.
Let’s Build Some Deliciousness: Step-by-Step Instructions
Ready to assemble? This is the fun part! I’ll walk you through each step with all my favorite tips to ensure your trifle cups are absolutely perfect.
- Bake and Cool Your Brownies. First things first, get those brownies baking! Follow your favorite recipe or box instructions. Once they’re out of the oven and filling your kitchen with that incredible chocolatey aroma, let them cool completely on a wire rack. I know it’s tempting to dive right in, but patience is key here. Cutting warm brownies will create crumbly, messy chunks that are harder to layer neatly. Little Chef Hack: To speed up the cooling process, you can pop the pan of brownies into the refrigerator for about 30 minutes after they’ve cooled on the counter for a bit.
- Cut the Brownies and Prep Your Fillings. Once the brownies are completely cool, cut them into bite-sized, ½-inch to 1-inch cubes. I find a plastic knife works wonders for cutting brownies cleanly without tearing. While you’re at it, prepare your chocolate pudding according to the package directions (or your homemade recipe) and get your whipped cream ready to go. Having all your components prepped and within arm’s reach makes the assembly line so smooth. Commentary: I like to get my “station” set up: a bowl of brownie chunks, a bowl of pudding, a bowl of whipped cream, and my toppings all lined up. It makes me feel like a dessert architect!
- Start with a Pudding Foundation. Grab your first clear cup and spoon a generous layer of chocolate pudding into the bottom. This first layer acts as a delicious anchor for everything above it. Aim for about 1 ½ to 2 tablespoons, just enough to create a solid base. Little Chef Hack: If you want super clean layers, you can use a piping bag (or a zip-top bag with the corner snipped off) to pipe the pudding and whipped cream. It feels fancy but is surprisingly easy!
- Add a Layer of Brownie Chunks. Next, gently place a handful of brownie cubes on top of the pudding. Don’t press down too hard; we want to keep those layers distinct and fluffy. You can be neat and orderly, or just scatter them in for a more rustic, homemade look—both are wonderful! Commentary: This is where the magic starts to happen. Seeing that chocolate-on-chocolate action is a beautiful thing.
- Dollop on the Whipped Cream. Now for the cloud! Add a smooth layer of whipped cream over the brownie chunks. This provides a cool, creamy contrast to the rich brownie and pudding below. Again, a spoonful or two is perfect.
- Repeat and Conquer! Keep going! Add another sequence of pudding, brownies, and whipped cream until you get near the top of the cup. I usually find two full layers are perfect, but you can adjust based on the size of your cups. Little Chef Hack: Leave about a half-inch of space at the top for your final garnish. This prevents any messy spills and makes them look professionally finished.
- The Grand Finale: Garnish! This is your moment to shine! Top the final layer of whipped cream with your chosen toppings. A sprinkle of mini chocolate chips, a crush of Oreos, a festive dash of sprinkles, or an artful drizzle of caramel sauce—it’s all up to you. This step adds personality and a fantastic textural crunch.
- Chill and Serve. Once all your cups are assembled and looking gorgeous, cover them lightly with plastic wrap and pop them in the refrigerator for at least 30 minutes before serving. This chilling time allows the flavors to meld together beautifully and firms everything up, making them the perfect portable treat for your game day spread.
Plating Up the Perfect Bite
These trifle cups are designed for effortless serving! Their individual nature is the star of the show. I love setting up a dessert station on my counter with all the cups lined up, maybe alongside some coffee and napkins. For an extra touch, you can place them on a large wooden board or a decorative tray. The clear cups do all the work, showcasing those stunning layers and inviting everyone to dig in. All you have to do is hand them out and accept the compliments!
Get Creative! Fun Flavor Twists
Don’t be afraid to play with this recipe! It’s a fantastic base for all kinds of delicious variations.
- PB&J Bliss: Use peanut butter pudding instead of chocolate, and between layers, add a swirl of raspberry or strawberry jam. It’s a classic flavor combo that never fails.
- Cookies & Cream: Swap the brownies for crumbled chocolate sandwich cookies (like Oreos) and use vanilla pudding. It’s a cookies-and-cream lover’s dream!
- Salted Caramel Pretzel: Use caramel pudding, and add a crunchy layer of crushed salted pretzels along with the brownies. The sweet and salty combo is irresistible.
- Mint Chocolate Chip: Add a ¼ teaspoon of peppermint extract to your whipped cream, and use mini chocolate chips and Andes mint pieces as your topping for a refreshing twist.
- Black Forest: Use chocolate pudding, but add a layer of canned cherry pie filling between the brownie and whipped cream layers for a decadent Black Forest trifle experience.
Olivia’s Chef Notes & Kitchen Confessions
This recipe has become my go-to for so many occasions, and it’s evolved in the funniest ways. The first time I made them, I was so excited that I started layering while the brownies were still warm. Let’s just say my “trifle cups” turned into more of a “deconstructed brownie soup” situation—still tasty, but not exactly photogenic! I learned the hard way that cooling is non-negotiable.
Over time, I’ve also started making a giant batch of brownies and freezing half the cubes specifically for these cups. That way, when a last-minute potluck invite comes through, I can whip up a batch of these stunning desserts in under 20 minutes flat. It makes me feel like a kitchen superhero. The beauty of this recipe truly lies in its flexibility and the pure joy it brings to everyone who tries it. It’s a little cup of cozy, chocolatey happiness.
Your Questions, Answered!
Q: Can I make these Brownie Trifle Cups ahead of time?
A: Absolutely! They are the perfect make-ahead dessert. You can assemble them completely, cover them tightly, and store them in the refrigerator for up to 24 hours before serving. I’d wait to add any crunchy toppings (like crushed Oreos or pretzels) until just before serving so they don’t get soggy.
Q: My whipped cream is deflating and getting runny. What happened?
A: This is a common one! If you’re whipping your own cream, make sure you’re using heavy cream or heavy whipping cream (not half-and-half or milk) and that it’s very cold. Your bowl and beaters should be chilled, too. Over-whipping can also cause it to break and become grainy. If you’re looking for a more stable option that holds up for days, whipped topping (Cool Whip) is a fantastic, no-fuss alternative.
Q: The brownie chunks are sinking into the pudding. How can I prevent this?
A: This usually happens if the pudding is too thin or the brownies are very moist and heavy. Make sure your pudding has had time to fully set and thicken according to the package directions. Letting the brownies cool completely also helps them firm up, making them less likely to sink. If it still happens, don’t worry—it will still taste incredible!
Q: Can I make a single, large trifle instead of individual cups?
A: Of course! This recipe translates beautifully to one big, impressive trifle. Simply use a large glass trifle bowl and follow the same layering process. It’s a stunning centerpiece for a dessert table.
Brownie Trifle Cups : Rich, Creamy & Game Day-Ready
Description
These Brownie Trifle Cups are everything you want in a game day dessert—easy, make-ahead, portable, and irresistibly chocolatey. With layers of fudgy brownie pieces, silky pudding, and fluffy whipped cream, they’re guaranteed crowd-pleasers. No fancy piping skills needed—just simple layering and lots of chocolate love.
Ingredients
Base Layers
-
1 batch brownies (homemade or boxed), cooled completely
-
2 cups chocolate pudding (instant or homemade)
-
2 cups whipped cream or whipped topping
Optional Toppings
-
Mini chocolate chips
-
Crushed Oreos
-
Sprinkles
-
Caramel or chocolate drizzle
-
Flaky sea salt
Other
-
8–10 clear 8 oz cups for layering
Instructions
1. Bake & Cool the Brownies
Prepare brownies according to your recipe or box instructions. Cool fully—this keeps the cubes neat and prevents mushy layers.
2. Prep the Components
Cut cooled brownies into ½–1 inch cubes.
Prepare pudding and whipped cream (or thaw whipped topping).
Set up a simple “layering station” so everything is within reach.
3. Build the First Layers
-
Spoon 2 tbsp pudding into the bottom of each cup.
-
Add a handful of brownie chunks over the pudding.
-
Top with a layer of whipped cream.
4. Repeat the Layers
Add more pudding → more brownies → more whipped cream.
Two full layers usually fit nicely in an 8 oz cup.
Leave space at the top for garnishing.
5. Add Final Toppings
Finish each cup with mini chocolate chips, crushed Oreos, sprinkles, or a caramel drizzle. A pinch of flaky sea salt is chef’s kiss.
6. Chill & Serve
Refrigerate for at least 30 minutes to set the layers. Serve cold and enjoy!
Notes
-
A plastic knife cuts brownies cleaner than metal.
-
Use piping bags (or zip bags) to keep layers tidy.
-
Cool brownies + fully set pudding = no sinking layers.
-
Fresh whipped cream is great, but Cool Whip stays firm longer.
Nutritional Information*
*Please note: This is an estimated nutritional breakdown. Values can vary significantly based on the specific brands and ingredients you use.
- Calories: ~300
- Carbohydrates: 35g
- Fat: 16g
- Sugar: 25g
- Protein: 3g
Prep Time: 15 minutes | Cook Time: 30 minutes (for brownies) | Total Time: 45 minutes | Servings: 8-10 cups
Final Thoughts
There’s something truly special about a dessert that feels indulgent but comes together without stress. These Brownie Trifle Cups are exactly that—a little masterpiece in a portable package. They capture the cozy, celebratory feeling of a gathering in every single layer: the deep chocolate richness, the creamy sweetness, and the fluffy finish that makes each spoonful perfect.
Whether you stick to the classic chocolate-on-chocolate or get playful with the variations, these cups are a reminder that great food doesn’t have to be complicated. It’s about building flavors, sharing joy, and creating those small, sweet moments that people remember. From my first wobbly trifle to these easy, handheld delights, the heart of the recipe stays the same: make it with love, and serve it with a smile.
So the next time you need a guaranteed win—for game day, a potluck, or just a Tuesday—remember these cups. Whip them up, watch them disappear, and enjoy the happy, chocolate-fueled buzz around the table.


