

Your New Favorite Kitchen Hack is Here!
Hey there, friend! Come on in, the kitchen’s just getting warm. Can you smell that? It’s the scent of buttery, golden-brown dough, bubbling marinara, and melted cheese that stretches for miles. If that doesn’t make your stomach do a happy little dance, I don’t know what will!
Let’s be real: we all have those days. The ones where you’re juggling a million things, the kids are hangry (or let’s be honest, you’re the one who’s hangry), and the idea of making a from-scratch dinner feels as likely as climbing Mount Everest. That’s exactly why I’m so utterly obsessed with these Mini Deep Dish Crescent Roll Pizzas. They are the ultimate kitchen lifesaver.
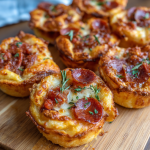
We’re taking a humble can of crescent roll dough and transforming it into the most adorable, individual deep-dish pizza cups you’ve ever seen. They’re crispy on the outside, wonderfully soft and cheesy on the inside, and they bake up in a flash. Perfect for a last-minute appetizer, a fun dinner the whole family will love, or the star of your next game-day spread. So, tie on your favorite apron (the messy one with all the character, of course), and let’s make some magic happen!
A Happy Little Accident: The Birth of a Family Favorite
I have to confess, this recipe wasn’t born from hours of meticulous planning. It was born from a classic “What on earth am I going to make for dinner?” panic on a busy Tuesday night. My fridge was looking a little sad, but I had a can of crescent rolls, some leftover marinara from pasta night, and a bag of cheese that was calling my name.
I remember my niece and nephew were over, and their little faces were the picture of impatience. In a moment of pure “let’s just see what happens” inspiration, I pressed the dough into a muffin tin, threw in the sauce and cheese, and crossed my fingers. Fifteen minutes later, I pulled out these puffy, golden, mini pizza masterpieces. The kids’ eyes went wide. They dove in (after letting them cool, barely!), and the silence that followed was the best review a home cook could ever get. Now, they request “Aunt Liv’s Pizza Cups” every single time they come over. It’s a recipe that holds so much joy for me, not because it’s fancy, but because it’s a reminder that the best meals are often the simplest ones, made with a dash of creativity and a whole lot of love.
Gathering Your Pizza Party Ingredients
One of the best things about this recipe is its beautiful simplicity. You probably have most of this hanging out in your kitchen right now! Here’s what you’ll need to make 12 irresistible mini pizzas.
- 1 can (8 oz) Crescent Roll Dough: This is our magical shortcut! The buttery, flaky layers create the perfect vessel. Chef’s Insight: If you can find the “sheets” instead of the perforated triangles, it makes dividing the dough even easier, but both work perfectly!
- 1/2 cup Marinara or Pizza Sauce: Use your absolute favorite jarred sauce for ease, or your own homemade if you’re feeling fancy. Substitution Tip: Pesto, Alfredo sauce, or even a drizzle of BBQ sauce are fantastic alternatives for a different flavor profile!
- 1 ½ cups Shredded Mozzarella Cheese: The king of meltiness! Chef’s Insight: For an extra flavor boost, I love to use a blend of mozzarella and a little grated Parmesan or Asiago. The Parmesan adds a lovely salty, nutty depth.
- 1/2 cup Pepperoni Slices: A classic for a reason. Substitution Tip: This is where you can get creative! Cooked and crumbled Italian sausage, diced ham, chopped bell peppers, sliced olives, or sautéed mushrooms all work wonderfully.
- Optional: Mini Cookie Cutters: If you’re making these for kids (or just want to feel like a kid yourself!), using tiny heart, star, or animal-shaped cookie cutters on the pepperoni is an instant mood-lifter.
- Cooking Spray or Olive Oil: For greasing the muffin tin. This is a non-negotiable step to ensure your pizza cups release beautifully without sticking.
Let’s Get Building: Your Step-by-Step Guide
Okay, team! Ready to assemble these little pockets of joy? It’s so simple, you might just have it memorized after the first time. I’ll walk you through each step with all my favorite tips and tricks.
- Preheat and Prep: First things first, get that oven hot! Preheat it to 350°F (175°C). While it’s warming up, grab your standard 12-cup muffin tin and give it a good, even spray with cooking spray or a light brush of olive oil. Chef’s Hack: Don’t skip greasing the tin! Even with non-stick coatings, a little extra insurance ensures a clean release and a beautifully golden crust.
- Shape the Dough: Now for the fun part! Open that can of crescent rolls (that *pop* is always so satisfying, isn’t it?). If you’re using the classic perforated triangles, simply press the perforations together to seal them, then use a knife or a pizza cutter to divide the dough into 12 equal squares. Gently press each piece of dough into a muffin cup, making sure to push it down into the bottom and up the sides. You’re creating a little edible bowl for all that cheesy goodness! Chef’s Tip: Don’t stress about making it look perfect. Rustic is charming! Just try to get the dough about halfway up the sides to form a nice little crust.
- Sauce It Up: Grab a small spoon and add about 1 to 2 teaspoons of your marinara sauce into each dough cup. Chef’s Pro-Tip: The biggest mistake here is over-saucing! Too much sauce will make the dough soggy. A thin, even layer on the bottom is all you need. Think of it as the flavorful foundation, not a swimming pool.
- The Cheese Please: Now, shower that sauce with a generous sprinkle of shredded mozzarella. I like to fill the cups about halfway with cheese first—this creates a glorious, gooey layer that melts right into the sauce. Chef’s Insight: Reserving a tiny pinch of cheese to sprinkle on top at the very end gives you that picture-perfect, bubbly, golden-brown finish.
- Top It Off: This is where you make it your own! Place your pepperoni slices (maybe a fun shape or two!) or your other favorite toppings on top of the cheese. If you’re adding veggies, give them a quick chop so they cook evenly.
- Bake to Perfection: Slide that muffin tin into your preheated oven and bake for 13-15 minutes. You’re looking for a deeply golden-brown crust and bubbly, melted cheese. Chef’s Hack: Ovens can vary, so I always start checking at the 12-minute mark. If the cheese isn’t quite as golden as you’d like, you can pop them under the broiler for just 30-60 seconds at the end—but watch them like a hawk!
- The Grand Finale: Cooling & Serving: This might be the hardest step: you have to let them cool! Take the tin out of the oven and place it on a wire rack. Let the mini pizzas rest for 2-3 minutes. This allows the molten cheese and sauce to set just enough so they don’t burn anyone’s mouth (we’ve all been there!). Then, take a small spoon or a butter knife and gently loosen the edges, lifting each one out. Serve them immediately while they’re hot and fabulous!
How to Serve These Adorable Pizza Cups
Presentation is part of the fun! I love piling these mini deep dish pizzas high on a big wooden board or a vibrant platter. They look incredible all grouped together. For the full experience, serve them with small bowls of extra marinara sauce or creamy ranch dressing for dipping. They’re a self-contained meal all on their own, but they also pair wonderfully with a simple, crisp green salad or some carrot and celery sticks to balance out all that cozy, cheesy goodness. Perfect for letting everyone grab their own and dig in!
Mix It Up! Endless Flavor Variations
The beauty of this recipe is its versatility. Once you’ve mastered the classic, the pizza world is your oyster! Here are a few of my favorite twists:
- Hawaiian Party: A layer of diced ham and a few chunks of pineapple. Sweet, salty, and always a debate-starter!
- Veggie Lover’s Delight: Load it up with finely chopped bell peppers, red onion, sliced black olives, and mushrooms.
- BBQ Chicken: Swap the marinara for BBQ sauce, and use a mix of shredded cooked chicken and mozzarella. Top with a little fresh cilantro after baking.
- Margherita Style: Use a high-quality marinara, fresh mozzarella pearls, and a small basil leaf tucked in before baking.
- Breakfast Pizza: Fill the dough with a spoonful of scrambled egg, cooked crumbled sausage, and a mix of cheddar and mozzarella cheese. A fantastic grab-and-go breakfast!
Olivia’s Chef’s Notes & Kitchen Stories
This recipe has truly evolved in my kitchen over the years. I remember one time I was feeling extra ambitious and tried to stuff an entire meatball into one. Let’s just say it resulted in a volcanic cheese eruption that took a solid 20 minutes to clean off the oven floor! Lesson learned: keep the chunks small.
I’ve also found that these freeze amazingly well. After baking and cooling, just pop them into a freezer bag. When a craving hits, you can reheat them straight from the freezer in the air fryer (my favorite method for maximum crispiness) or the oven. They’re just as good as the day you made them!
Most importantly, don’t be afraid to play. Cooking should be fun, not stressful. This recipe is a fantastic canvas for your culinary creativity. So, raid your fridge, see what needs using up, and make it your own. That’s where the real magic happens.
Your Questions, Answered!
Over the years, I’ve gotten a few repeat questions about these pizza cups. Here are the answers to the most common ones to ensure your baking success!
Q: My mini pizzas came out soggy. What happened?
A: The number one culprit for sogginess is too much sauce! Remember, you only need 1-2 teaspoons per cup. The dough steams from the inside as it bakes, and excess liquid from the sauce can prevent it from getting crispy. Also, make sure your toppings (especially veggies) aren’t too watery.
Q: Can I make these ahead of time?
A: Absolutely! You can assemble the pizzas in the muffin tin, cover it tightly with plastic wrap, and keep it in the fridge for up to 4 hours before baking. You might need to add a minute or two to the baking time since you’re starting with a cold tin.
Q: My dough is sticking to the pan! How can I prevent this?
A> A good coating of cooking spray is key. If you’re still having issues, you can try lining the cups with small squares of parchment paper for foolproof removal.
Q: Can I use a different dough?
A: Of course! While crescent dough is our star here, you can also use a tube of refrigerated biscuit dough. Just flatten each biscuit into a 4-inch round before pressing it into the muffin cup. The texture will be a bit more biscuit-like, but still utterly delicious.
Mini Deep Dish Crescent Roll Pizzas: Quick, Cheesy, & Crowd-Pleasing
Description
They’re everything you want in a quick, crowd-pleasing recipe — easy, comforting, endlessly customizable, and guaranteed to make everyone at the table smile. Whether you’re serving them for movie night, game day, or just a cozy dinner where everyone gets to eat with their hands, these little golden pizza cups are pure joy in every bite.
Ingredients
-
1 can (8 oz / 235 g) refrigerated crescent roll dough
-
½ cup pizza sauce (or marinara)
-
1 cup shredded mozzarella cheese
-
12 slices pepperoni (or any favorite topping)
-
2 tablespoons grated Parmesan cheese
-
1 teaspoon Italian seasoning (optional)
-
Nonstick cooking spray (for greasing muffin tin)
Optional Add-ins:
-
Diced bell peppers, onions, mushrooms, olives, or cooked sausage
Instructions
-
Preheat oven:
Set to 375°F (190°C) and lightly grease a 12-cup muffin tin with cooking spray. -
Prepare dough cups:
Unroll crescent dough and separate into triangles.
Press each triangle into a muffin cup, gently shaping it to form a small crust up the sides. -
Add sauce:
Spoon about 1 to 2 teaspoons of pizza sauce into each dough cup — don’t overfill. -
Add toppings:
Sprinkle a little mozzarella cheese, then place a pepperoni slice (or chosen topping) on top.
Add a pinch of Parmesan and Italian seasoning if desired. -
Bake:
Bake for 12–15 minutes, or until the crust is golden brown and cheese is bubbly. -
Cool slightly & serve:
Let rest for 2–3 minutes, then gently lift out with a fork or spoon.
Serve warm and enjoy!
Notes
-
Sprinkle a little cheese under the sauce for a crispier crust.
-
Use parchment muffin liners for easy cleanup.
-
Want to make ahead? Assemble, cover, and refrigerate for up to 6 hours before baking.
Nutrition
- Calories: 150 cal Per Serving
- Fat: 9 g
- Carbohydrates: 11 g
- Protein: 6 g
Quick Nutritional Info (Per Mini Pizza)
Please note: This is an estimate and can vary based on the specific brands of ingredients you use.
- Prep Time: 10 mins
- Cook Time: 15 mins
- Total Time: 25 mins
- Calories: ~150
- Protein: 6g
- Carbs: 11g
- Fat: 9g
Final Thoughts: Your New Go-To Recipe is Served!
And there you have it! From a happy little accident to a guaranteed family favorite, these Mini Deep Dish Crescent Roll Pizzas are more than just a recipe—they’re your ticket to a stress-free, fun, and delicious meal. They prove that you don’t need hours in the kitchen to create something that feels special and brings everyone together.
So the next time that “what’s for dinner?” panic starts to set in, remember this simple hack. Grab that can of dough, raid your fridge for toppings, and in less than 30 minutes, you’ll have a plateful of golden, cheesy joy. I hope this recipe becomes a cherished, easy staple in your home, just like it is in mine.
Now, I’d love to hear from you! What are your favorite topping combinations? Snap a picture and tag me—I can’t wait to see the delicious creations you come up with!
I hope you and your loved ones adore these Mini Deep Dish Crescent Roll Pizzas as much as we do. They’re a little bite of pure, uncomplicated joy. Happy baking!
Happy cooking!
XOXO, Olivia


