

Your New Favorite Cookie is Here: Homemade Twix Cookies!
Hey there, friend! Come on in, grab an apron, and get ready for what might just be the most decadent, joy-sparking cookie recipe to ever come out of my kitchen. If you’ve ever found yourself sneaking a Twix bar from the candy bowl (no judgment here!), then you are absolutely going to lose your mind over these Homemade Twix Cookies.
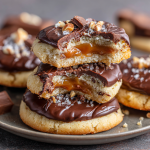
Picture this: a soft, buttery, melt-in-your-mouth shortbread cookie that’s so tender it practically crumbles at the touch. On top of that, a layer of rich, gooey, just-salty-enough caramel that stays perfectly soft. And to crown it all? A sleek, glossy blanket of smooth milk chocolate ganache. Each bite is a perfect symphony of texture and flavor—a direct homage to that iconic candy bar, but somehow… more. More buttery, more caramel-y, and made with a whole lot of love.
This isn’t just a recipe; it’s an experience. It’s the kind of treat you make when you want to impress your book club, become the star of the cookie swap, or simply treat yourself after a long week. So, preheat your ovens and let’s create some magic together. I promise, your kitchen is about to smell absolutely incredible.
A Sweet Slice of Nostalgia
This recipe always takes me right back to my grandma’s linoleum-floored kitchen. She was a wizard with a rolling pin and a bag of chocolate chips, and her cookie jar was a sacred, always-full treasure chest. I remember one rainy afternoon, we were baking together, and I was nibbling on a Twix bar, lamenting that I couldn’t just bake a giant, cookie-sized version. She looked at me, her eyes twinkling, and said, “Well, why can’t we?”
We spent the rest of the day experimenting. Our first batch was… ambitious. The caramel oozed everywhere, the chocolate seized up, and we had a glorious, sticky mess. But we also had the best time laughing and taste-testing our “failures.” That spirit of playful experimentation is the heart of this recipe. It’s evolved over the years (I’ve finally mastered the ganache, thank goodness!), but the core joy remains the same: turning a simple, store-bought treat into a homemade masterpiece that’s meant to be shared. Every time I make these, I think of her, and I hope this recipe becomes a part of your own family’s sweet memories, too.
Gathering Your Cookie Crew: The Ingredients
Don’t let the three layers intimidate you! Each one is simple and uses straightforward ingredients. Here’s everything you’ll need, along with a few of my chef-y insights to set you up for success.
For the Buttery Shortbread Cookie Base:
- 1 cup unsalted butter, softened: This is the soul of our shortbread. Using unsalted lets you control the salt level. For the best texture, make sure it’s truly softened at room temp—you should be able to press your finger into it easily.
- ½ cup cream cheese, softened: My secret weapon! This isn’t for tang, but for an unbelievably tender, soft cookie that stays moist. Full-fat is best here for the creamiest result.
- 1 cup white sugar: For sweetness and that classic cookie structure.
- 1 large egg: Our binding agent, bringing everything together.
- 1 tsp vanilla extract: A must for that warm, classic bakery aroma. Feel free to use vanilla bean paste for those gorgeous little specks!
- 2½ cups all-purpose flour: The foundation. Fluff it up in the container before you scoop and level it off for accurate measuring.
- ½ tsp salt: Crucial for balancing the sweetness and making all the flavors pop.
- ½ tsp baking soda: Gives our cookie just a tiny bit of lift for the perfect texture.
For the Gooey Caramel Layer:
- 40 Kraft caramel cubes (or about 11 oz soft caramels): The classic choice! They melt beautifully and have that nostalgic flavor we all love. You can find them unwrapped in bags now to save time!
- 2 tbsp heavy cream: This transforms the firm caramels into a luscious, pourable, and spreadable sauce. Don’t skip it!
For the Silky Chocolate Ganache:
- 1 cup milk chocolate chips: I love milk chocolate for its classic Twix-bar flavor, but semi-sweet chips work wonderfully if you prefer a less sweet topping.
- ¼ cup heavy cream: When heated and poured over the chocolate, it creates a magical, glossy, professional-looking ganache that sets beautifully.
Let’s Build These Cookie Masterpieces: Step-by-Step
Ready to layer up the goodness? Follow these steps, and you’ll have a batch of perfect Twix cookies in no time. I’ve sprinkled in all my best tips and tricks!
Step 1: Make the Cookie Base
First, preheat your oven to 350°F (175°C). Line your baking sheets with parchment paper—this is a non-negotiable for easy cleanup and preventing any sticking! Now, in a large bowl, cream together the softened butter, cream cheese, and sugar. We’re not just mixing; we’re creaming until the mixture is light, pale, and fluffy. This takes about 2-3 minutes with a stand or hand mixer, and it’s key for that perfect cookie texture. Scrape down the sides of the bowl, then beat in the egg and vanilla extract until everything is beautifully combined.
Chef’s Hack: In a separate bowl, whisk together your flour, salt, and baking soda. This ensures the leavening is evenly distributed. With your mixer on low, gradually add the dry ingredients to the wet, mixing just until no dry streaks of flour remain. Overmixing is the enemy of a tender cookie!
Step 2: Shape & Bake to Golden Perfection
Using a cookie scoop (a 1.5-tablespoon size is perfect), portion the dough into balls. Place them about 2 inches apart on your prepared baking sheets. Now, here’s a pro move: gently flatten each ball just slightly with the palm of your hand or the bottom of a glass. We’re not making them thin, just encouraging them into a nice, even disk shape for our layers.
Bake for 10-12 minutes. You’re looking for the edges to be just lightly golden and set, while the centers might still look a tiny bit soft. That’s exactly what we want! They will continue to cook as they cool. Let them rest on the baking sheet for 5 minutes before transferring them to a wire rack to cool completely. Patience is key here! Adding warm caramel to a warm cookie is a recipe for a puddle.
Step 3: Prepare the Luscious Caramel Layer
While the cookies cool, let’s make the caramel. You can do this in a small saucepan over low heat, stirring constantly, but my go-to is the microwave for speed and ease. Combine the unwrapped caramels and heavy cream in a microwave-safe bowl. Heat on high in 30-second bursts, stirring well after each interval. It usually takes about 90 seconds total. You’re aiming for a completely smooth, pourable consistency.
Chef’s Insight: If the caramel seems too thick to spoon easily, add another teaspoon of cream and stir it in. Once it’s ready, working relatively quickly, spoon about a teaspoon of caramel onto the center of each fully cooled cookie. You can gently spread it out almost to the edges with the back of the spoon. Let this layer set for about 15 minutes before moving on.
Step 4: Create the Glossy Chocolate Ganache
This is where the magic happens! Place your chocolate chips in a heatproof bowl. In a separate small saucepan or in the microwave, heat the ¼ cup of heavy cream until it’s very hot and just beginning to simmer, but not boiling. Pour the hot cream directly over the chocolate chips. Now, walk away! Let it sit untouched for 2 full minutes. This allows the chocolate to gently melt.
After 2 minutes, take a whisk or a spatula and start stirring slowly from the center, working your way out, until the mixture is smooth, glossy, and luxurious. If a few chips aren’t melting, you can pop the bowl into the microwave for 10 seconds and stir again. Spoon the ganache over the caramel layer, or for extra fancy cookies, transfer it to a zip-top bag, snip off a tiny corner, and pipe it on. So professional!
Step 5: The Final Countdown – Set & Serve!
Your masterpiece is complete! Now, we just need to let the layers firm up. You can let them sit at room temperature for about 30-45 minutes, or for a quicker set, pop the tray into the refrigerator for 10-15 minutes. This gives you that perfect clean bite through all three glorious layers.
How to Serve Your Twix Cookie Creations
Presentation is part of the fun! Arrange these beauties on a beautiful wooden board or a vintage cake stand—they deserve to be shown off. A light dusting of flaky sea salt over the chocolate before it sets is a stunning (and delicious) gourmet touch. These cookies are rich, so I love serving them with a hot cup of black coffee or a tall glass of cold milk to balance the sweetness. They are the ultimate show-stopper for any dessert table, guaranteed to have your friends and family asking for the recipe!
Get Creative! Twix Cookie Variations
Once you’ve mastered the classic, feel free to play with the formula! Here are a few of my favorite twists:
- Salted Dark Chocolate: Use dark chocolate chips for the ganache and sprinkle with a touch of flaky sea salt.
- Peanut Butter Lover’s: Add ½ cup of creamy peanut butter to the cookie dough, and use a peanut butter cup chopped up in the ganache.
- Gluten-Free Swap: Substitute the all-purpose flour with a 1:1 gluten-free baking blend for equally delicious results.
- Dulce de Leche Shortcut: For an even quicker caramel layer, you can use pre-made dulce de leche from a can—just warm it slightly so it’s spreadable.
Chef’s Notes & Kitchen Confessions
Oh, the stories these cookies could tell! I mentioned my first messy attempt with my grandma, but there was also the time I decided to double the batch for a holiday party and accidentally used salted butter, forgetting to adjust the salt in the dough. Let’s just say they were… aggressively salty. A delicious lesson in reading recipes carefully!
Over the years, I’ve learned that the cream cheese is the true game-changer for the cookie base—it was a happy accident when I was out of sour cream for another recipe. I also used to be terrified of ganache, convinced I would mess it up. But trust me, the hot-pour-and-wait method is foolproof. This recipe is a living thing in my kitchen, and I encourage you to make it your own, too. Don’t be afraid of a little mess; that’s often where the best flavors and memories are made.
Your Twix Cookie Questions, Answered!
Q: My caramel layer is super hard once it cools. What did I do wrong?
A: This usually means the caramel was overheated. When melting, low and slow is the way to go! If it happens, don’t panic. A quick fix is to warm the cookies very briefly in the microwave for 5-8 seconds before serving. This will soften the caramel beautifully.
Q: Can I make these cookies ahead of time?
A: Absolutely! They are fantastic make-ahead treats. Once fully set, store them in an airtight container at room temperature for up to 3 days, or in the fridge for up to a week. The layers hold up perfectly. You can also freeze them for up to 3 months!
Q: My ganache is grainy or seized. How can I save it?
A: Graininess usually means the cream was too hot and the chocolate “broke.” If it seizes (becomes a thick, clumpy mess), it’s often because a tiny bit of water got in. The rescue mission? Whisk in a teaspoon of warm cream at a time until it smooths back out. It’s surprisingly resilient!
Q: Why did my cookies spread too much?
A> This could be a couple of things! First, make sure your butter is softened but not melted or greasy. Second, check that your baking soda is fresh. And finally, if your dough seems too soft after mixing, chilling it for 20-30 minutes before baking can work wonders.
Twix Cookies : Buttery Shortbread, Gooey Caramel & Chocolate Ganache
Description
If you’ve ever wished your favorite candy bar came in fresh-from-the-oven cookie form, your dream just came true! These Homemade Twix Cookies are soft, buttery shortbread rounds topped with a gooey caramel layer and silky milk chocolate ganache. Every bite melts in your mouth with that perfect candy-bar crunch-meets-cookie comfort.
Ingredients
For the Shortbread Cookies:
-
1 cup unsalted butter, softened
-
½ cup cream cheese, softened
-
1 cup white sugar
-
1 large egg
-
1 tsp vanilla extract
-
2½ cups all-purpose flour
-
½ tsp salt
-
½ tsp baking soda
For the Caramel Layer:
-
40 Kraft caramel cubes (about 11 oz)
-
2 tbsp heavy cream
For the Chocolate Ganache:
-
1 cup milk chocolate chips (or semi-sweet, if preferred)
-
¼ cup heavy cream
Instructions
1. Make the Cookie Base
Preheat oven to 350°F (175°C). Line baking sheets with parchment paper.
In a large bowl, cream together butter, cream cheese, and sugar until light and fluffy (about 2–3 minutes). Beat in the egg and vanilla extract until smooth.
In a separate bowl, whisk together flour, salt, and baking soda. Gradually add to the wet ingredients and mix until combined.
2. Shape and Bake
Scoop about 1½ tablespoons of dough per cookie and place on prepared baking sheets. Gently flatten each dough ball slightly.
Bake for 10–12 minutes, until the edges are just golden. Let cool on the pan for 5 minutes, then transfer to a wire rack to cool completely.
3. Prepare the Caramel Layer
In a microwave-safe bowl, combine caramels and heavy cream. Microwave in 30-second intervals, stirring after each, until smooth (about 90 seconds total).
Spoon about 1 teaspoon of caramel onto each cooled cookie and spread gently toward the edges. Let set for about 15 minutes.
4. Make the Chocolate Ganache
Heat ¼ cup heavy cream until hot but not boiling. Pour over chocolate chips and let sit for 2 minutes. Stir until smooth and glossy.
Spoon or pipe the ganache over the caramel layer. Let the cookies sit at room temperature until the chocolate sets (30–45 minutes) or refrigerate for 10–15 minutes for faster setting.
Notes
-
If your dough is soft, chill it for 20–30 minutes before baking to prevent spreading.
-
Overheating caramel can make it hard; melt it gently for a soft, chewy layer.
-
Add a sprinkle of flaky sea salt before the chocolate sets for a gourmet touch.
Nutrition
- Calories: 240 cal Per Serving
- Sugar: 18g
- Fat: 13g
- Carbohydrates: 28g
- Protein: 2g
Nutritional Information (Per Cookie – Approx. for 24 cookies)
Calories: 240 | Fat: 13g | Carbs: 28g | Sugar: 18g | Protein: 2g
Please note: This is an estimate generated from the ingredients used and may vary based on specific brands and portion sizes.
Prep & Storage
Prep Time: 20 minutes | Bake Time: 12 minutes | Assembly Time: 20 minutes | Total Time: ~1 hour | Servings: 24 cookies
Store in an airtight container at room temperature for 3 days or in the refrigerator for up to 1 week.
***
Don’t forget to save this recipe for later! Pin the image below to your favorite Dessert board.
Final Thoughts: Your New Favorite Cookie Awaits
And there you have it! What was once a simple candy bar craving has been transformed into a truly spectacular homemade cookie. You’ve created a treat that’s more than the sum of its parts—a buttery, crumbly base, a soft and salty caramel heart, and a sleek, rich chocolate crown.
I hope this recipe brings as much joy to your kitchen as it has to mine. I hope you feel a sense of pride when you present that platter and watch eyes light up. I hope you find your own little twists and make the recipe yours, creating new stories and sweet memories with every batch.
So, go on, enjoy that first perfect bite with a well-deserved pat on the back. You’ve just baked a little bit of magic.
Happy baking!


