

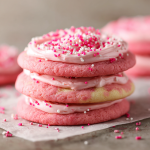
Your New Favorite Sweet, Pink, and Perfectly Soft Cookie
Hey there, friend! Come on in, pull up a stool, and let’s get ready to bake something that’s guaranteed to bring a little extra joy into your kitchen. Is there anything more delightful than the sight of something sweet and pink coming out of the oven? I’m convinced it’s a direct injection of happiness. Today, we’re whipping up a batch of my absolutely adored Easy Pink Velvet Cookies with Cream Cheese Frosting.
Now, if you’re thinking, “Olivia, red velvet is a thing, but pink velvet?”—trust me on this one. This is our chance to take all the tender, buttery, slightly vanilla-magic of a classic and give it a playful, pastel twist. These cookies are soft without being cakey, sweet without being cloying, and that tangy cream cheese frosting? It’s the perfect creamy counterpart to the delicate cookie beneath.
Whether you’re planning a Valentine’s Day surprise, prepping for a baby shower, celebrating a birthday, or just embracing a “Treat Yourself” kind of Tuesday, these cookies are your answer. They look like they came from a fancy patisserie, but I promise you, they are wonderfully simple. You don’t need any fancy skills or equipment—just a bowl, a spoon, and a whole lot of love. So, tie on your apron (the messy one is always the best), and let’s create some pretty-in-pink magic together!
A Splash of Pink and a Whole Lot of Love
This recipe always takes me right back to my grandma’s sun-drenched kitchen. She wasn’t a “fancy” baker, but she was a “heart” baker. Every year for my birthday, she’d let me choose any treat I wanted. One year, obsessed with a pink tutu I wore practically everywhere, I declared I wanted a “pink cake.” With a twinkle in her eye, she whipped up a simple vanilla batter, found a tiny bottle of rose-pink food coloring, and created the most magnificent pink cake my seven-year-old eyes had ever seen.
It wasn’t just a cake; it was a feeling. It was the feeling of being seen, of my whimsical request being treated as the most important order of the day. These Pink Velvet Cookies are my grown-up, cookie-fied homage to that memory. They capture that same spirit of playful, heartfelt baking. That’s what I want for you in your kitchen—to create those little moments of magic, whether it’s for a special someone or just for your wonderful self. Food made with joy always, always tastes better.
Gathering Your Pink Velvet Arsenal
Alright, let’s gather our players! One of the best things about this recipe is how simple the ingredient list is. You probably have most of this in your pantry right now. Here’s everything you’ll need, plus a few of my chef-y insights to help you understand the “why” behind the “what.”
For the Pink Velvet Cookies:
- ½ cup unsalted butter, softened: This is the base of our flavor and texture. Using unsalted lets you control the salt level. Pro-Tip: “Softened” means it should give slightly when you press it, but not be greasy or melted. If you forget to take it out, you can cube it and let it sit on the counter for 15-20 minutes.
- ¾ cup granulated sugar: Sweetens the cookies and helps them spread just the right amount while creating a lovely, tender crumb.
- 1 large egg: Our binding agent! It brings the dough together and adds richness. Make sure it’s at room temperature to blend seamlessly with the butter.
- 1 tsp vanilla extract: The soul of the cookie! Use the real stuff—it makes a world of difference in creating that warm, classic flavor.
- 1–2 drops pink food coloring (gel preferred): Gel food coloring is my best friend here because it gives you vibrant color without adding extra liquid to the dough, which can throw off the texture. Start with one drop and add more until you get your dream shade of pink!
- 1½ cups all-purpose flour: The structural backbone of our cookie. For a fluffier cookie, make sure you fluff your flour with a spoon before scooping and leveling it off with a knife. No packing it in!
- 1 tsp baking powder: This is our leavening agent, giving the cookies a gentle lift and that perfect, soft texture.
- ¼ tsp salt: Don’t you dare skip this! Salt is the flavor enhancer that makes the sweet and buttery notes really pop.
For the Cream Cheese Frosting:
- 4 oz cream cheese, softened: The star of the show! Full-fat cream cheese will give you the best, creamiest, and most stable frosting. Again, softened is key for a lump-free experience.
- ¼ cup butter, softened: Combined with the cream cheese, this creates an impossibly smooth and rich base for our frosting.
- 1½ cups powdered sugar: This sweetens and thickens the frosting. Sift it if you have time to avoid any little lumps.
- 1 tsp vanilla extract: A dash of vanilla in the frosting ties the whole cookie together beautifully.
- Optional: pink sprinkles or sanding sugar for topping: This is where you can get creative! A little sparkle or a fun sprinkle mix adds texture and makes them extra festive.
Let’s Bake! Your Step-by-Step Guide to Cookie Bliss
Ready to see some magic happen? Follow these steps, and you’ll have a batch of stunning pink cookies before you know it. I’ve sprinkled in all my favorite tips and hacks to ensure your success.
- Preheat & Prep: First things first, preheat your oven to 350°F (175°C). This is non-negotiable for even baking! While it’s heating up, line a baking sheet with parchment paper. Not only does this prevent sticking, but it also makes cleanup an absolute dream. Chef’s Hack: If you don’t have parchment, a light coating of baking spray works, but parchment is the gold standard.
- Make the Cookie Dough: In a medium-sized bowl, we’re going to cream together the softened butter and granulated sugar. Now, “creaming” isn’t just mixing—it’s beating them together until the mixture becomes pale, fluffy, and light. This usually takes about 2-3 minutes with a hand mixer or stand mixer. This step is crucial because it incorporates air into the dough, which helps our cookies rise. Next, beat in the egg, vanilla extract, and your chosen pink food coloring. Scrape down the sides of the bowl to make sure everything is evenly incorporated and a beautiful, uniform pink. Finally, add the flour, baking powder, and salt. Mix on low speed just until the flour disappears and a soft dough forms. Pro-Tip: Overmixing at this stage can lead to tough cookies, so as soon as you don’t see any dry flour, stop the mixer!
- Scoop & Bake: Now for the fun part! Using a cookie scoop or a tablespoon, portion out the dough and roll it into smooth balls. Place them on your prepared baking sheet, leaving about 2 inches between each one—they need a little room to breathe and spread. Gently flatten each ball just slightly with the palm of your hand or the bottom of a glass. This helps them bake into a perfect cookie shape rather than staying domed. Pop the sheet into your preheated oven and bake for 9-11 minutes. You’re looking for the edges to be just set. The centers might still look a tiny bit soft, and that’s perfect! They will continue to cook on the hot baking sheet as they cool. Chef’s Hack: For super-uniform cookies, I swear by my medium (1.5 tablespoon) cookie scoop. It’s a game-changer!
- Let Them Cool (The Hardest Part!): Once out of the oven, let the cookies cool on the baking sheet for 5 minutes. This allows them to firm up enough to handle. Then, transfer them to a wire rack to cool completely. I know it’s tempting, but do not frost warm cookies! The heat will melt the frosting into a sad, runny puddle. Patience is a virtue here, I promise.
- Make the Dreamy Frosting: While the cookies are cooling, let’s make that heavenly cream cheese frosting. In a clean bowl, beat the softened cream cheese and butter together until the mixture is completely smooth and creamy—no lumps allowed! Gradually add the sifted powdered sugar and vanilla extract. Start mixing on low so you don’t end up in a sugar-dust cloud, then increase the speed to high and beat for 1-2 minutes until it’s light and fluffy. Give it a taste. Is it heaven? Yes, yes it is.
- Frost & Decorate: The final act! Once the cookies are completely cool, it’s time to decorate. You can simply spread a generous swirl of frosting on top using a butter knife or a small offset spatula. For a more professional look, spoon the frosting into a piping bag fitted with a star or round tip and pipe a beautiful swirl onto each cookie. Immediately after frosting, add your sprinkles or sanding sugar so they stick. And voilà! You’ve just created bakery-level beauty in your own kitchen.
Sharing the Pink Love
How you serve these is part of the fun! I love stacking them high on a vintage cake stand for a real “wow” factor at a party. For a more casual gathering, a simple wooden board or a colorful plate works beautifully. They pair perfectly with a cold glass of milk, a hot cup of coffee, or a bubbly glass of prosecco for the grown-ups. The most important ingredient? Sharing them with people who make you smile.
Get Creative! Fun Twists on the Classic
Feel like playing? This recipe is a wonderful canvas for your creativity! Here are a few of my favorite variations:
- Lemon Zest Glow-Up: Add the zest of one lemon to the cookie dough and a teaspoon of lemon juice to the frosting for a bright, sunny, pink lemonade vibe.
- White Chocolate Chip Bliss: Fold ½ cup of white chocolate chips into the dough right after you mix in the flour. The melty chips are a divine contrast to the tangy frosting.
- Almond Elegance: Swap the vanilla extract in the cookie dough for almond extract (just ½ tsp, it’s potent!). It adds a beautiful, sophisticated flavor.
- Naturally Pink: Want to skip the food coloring? You can use 1 tablespoon of beet powder mixed with the dry ingredients for a gorgeous natural pink hue.
- Mini Cookie Sandwiches: Bake smaller, teaspoon-sized cookies. Once cooled, flip one over and frost the bottom, then sandwich it with another cookie for adorable, bite-sized treats!
From My Kitchen to Yours: A Few Parting Thoughts
This recipe has been a labor of love, and it’s evolved so much since the first time I tested it. The first batch? Let’s just say they were more “pink hockey pucks” than “velvet clouds.” I learned that creaming the butter and sugar properly was the secret handshake to the perfect texture. And the frosting? I once made the tragic mistake of using cold cream cheese. The lumps! We had to call that batch “rustic.”
Now, it’s my go-to recipe when I need a guaranteed smile. I’ve made them for nervous brides, new neighbors, and just because it was a Wednesday. They never fail to brighten the day. So, don’t stress about perfection. A little lopsided frosting or a slightly uneven pink tone just adds to the homemade charm. The real magic is in the making and the sharing. Happy baking, my friend!
Your Questions, Answered!
I’ve gotten a lot of questions about these cookies over the years, so I’ve compiled the most common ones here to help you out.
Q: My cookies spread too much and got flat. What happened?
A: This is usually a temperature issue! The most common culprit is butter that was too warm or even melted. Make sure your butter is just softened, not greasy. Also, double-check that your baking powder is fresh—it loses its potency over time. And finally, make sure your oven is fully preheated before the cookies go in.
Q: My frosting is too runny. How can I fix it?
A: Runny frosting is almost always due to the cream cheese and butter being too soft. Pop the bowl of frosting into the refrigerator for 20-30 minutes to let it firm up, then re-whip it. You can also add a little more sifted powdered sugar, a quarter cup at a time, until it reaches your desired consistency.
Q: Can I make the dough ahead of time?
A> Absolutely! You can make the cookie dough, portion it into balls, and freeze them on a baking sheet. Once frozen solid, transfer them to a freezer bag. When you’re ready to bake, just place the frozen dough balls on a parchment-lined sheet and add 1-2 minutes to the baking time. No need to thaw!
Q: Why is gel food coloring preferred over liquid?
A> Liquid food coloring is mostly water. Adding too much can throw off the liquid-to-dry-ingredient ratio in your dough, potentially making it sticky or affecting the texture. Gel coloring is highly concentrated, so you need just a tiny drop for vibrant color without adding extra moisture.
Easy Pink Velvet Cookies with Cream Cheese Frosting
Description
Easy Pink Velvet Cookies with Cream Cheese Frosting
Prep Time: 15 min
Bake Time: 9–11 min
Cooling & Frosting: 15–20 min
Total Time: ~45 min
Ingredients
For the Cookies:
-
½ cup unsalted butter, softened
-
¾ cup granulated sugar
-
1 large egg, room temperature
-
1 tsp vanilla extract
-
1–2 drops pink food coloring (gel preferred)
-
1½ cups all-purpose flour
-
1 tsp baking powder
-
¼ tsp salt
For the Cream Cheese Frosting:
-
4 oz cream cheese, softened
-
¼ cup butter, softened
-
1½ cups powdered sugar
-
1 tsp vanilla extract
Optional Decoration:
-
Pink sprinkles or sanding sugar
Instructions
-
Preheat & Prep:
Preheat oven to 350°F (175°C). Line a baking sheet with parchment paper. -
Make Cookie Dough:
-
Cream butter and sugar until pale and fluffy (2–3 min).
-
Beat in egg, vanilla, and pink food coloring.
-
Mix in flour, baking powder, and salt on low speed until just combined.
-
-
Scoop & Bake:
-
Roll dough into 1.5–2 tbsp balls, place on prepared sheet 2 in apart.
-
Gently flatten slightly.
-
Bake 9–11 min until edges are set but centers slightly soft. Cool 5 min on sheet, then transfer to wire rack.
-
-
Make Frosting:
-
Beat cream cheese and butter until smooth.
-
Gradually add powdered sugar and vanilla, beat until light and fluffy.
-
-
Frost & Decorate:
-
Once cookies are completely cool, spread or pipe frosting.
-
Top with sprinkles if desired.
-
Notes
-
Avoid spreading: Butter should be softened, not melted; oven preheated.
-
Make ahead: Freeze dough balls; bake directly from frozen, adding 1–2 min to baking time.
-
Gel coloring: Concentrated, won’t affect dough moisture.
-
Fun twists:
-
Lemon zest in dough + lemon juice in frosting
-
White chocolate chips folded into dough
-
Almond extract instead of vanilla
-
Beet powder for natural pink
-
Nutrition
- Calories: 280cal Per Serving
- Fat: 15g
- Carbohydrates: 32g
- Protein: 2g
Nutritional Information (Approximate, per cookie)
This is just a general estimate, as ingredients can vary.
- Calories: 280
- Protein: 2g
- Carbohydrates: 32g
- Fat: 15g
Final Thoughts: A Little Bit of Sweetness to Share
And there you have it, my friend—your very own batch of pure, pink, edible joy. From that first creamy bite of butter and sugar to the final flourish of sprinkles, I hope the process of making these Pink Velvet Cookies brought as much happiness to your kitchen as the recipe has to mine.
These cookies are proof that a little bit of color and a whole lot of heart can transform simple ingredients into something truly special. They’re not just a dessert; they’re a mood-lifter, a celebration starter, and a delicious way to tell someone, “I’m thinking of you.”
So, whether you’re stacking them high for a party, boxing a few up for a friend, or simply enjoying one with a quiet cup of tea after a long day, I hope they remind you to find the sweet, soft, and beautifully pink moments in life.


