
Eggnog Cheesecake Bars: Your New Holiday Showstopper!
Hello, my fellow kitchen enthusiasts! Olivia here, welcoming you back to my cozy corner of the internet. Can you smell it? That magical, spiced, and unmistakably festive scent that starts wafting through the air this time of year? I’m talking about the one and only, eggnog. It’s the liquid embodiment of holiday cheer, and for as long as I can remember, its arrival in stores signals the official start of the baking season in my home.
But let’s be real for a second. As much as I adore a chilled glass of the stuff, sometimes you want to enjoy that iconic flavor in a new, exciting way. You want a dessert that feels elegant and special, something that will make your guests’ eyes light up. You want a treat that whispers, “You are a culinary genius,” without requiring you to slave away for hours. Enter the hero of this story: my Creamy, Spiced, and Absolutely Holiday-Perfect Eggnog Cheesecake Bars.
Imagine this: a buttery, golden graham cracker crust that gives you the perfect satisfying crunch. On top, a layer of the creamiest, dreamiest cheesecake filling, infused with all the warm, nostalgic flavors of nutmeg and a hint of rum. It’s rich without being heavy, festive without being overly complicated. These bars are the ultimate party pleaser, perfect for your cookie tray, your holiday potluck, or just a quiet, cozy night in with a festive movie. So, tie on your favorite (probably messy) apron, and let’s create some magic together!
The Christmas Eve Kitchen Disaster That Started It All
I have to share a little story with you about how this recipe came to be. Picture it: my kitchen, Christmas Eve, about five years ago. I was determined to make a grand, full-sized eggnog cheesecake for the family dinner. I had my springform pan, my water bath ready to go, and the confidence of a chef who had watched one too many holiday baking championships. Everything was going perfectly… until it came time to unmold it. Let’s just say the beautiful, tall cheesecake decided it wanted to be more of a… cheesecake puddle. A delicious, spiced puddle, but a puddle nonetheless.
In a panic, with guests arriving soon, I scooped the delicious filling and crust into a square pan, gave it a furious chill in the freezer, and cut it into rustic squares. I dusted them with powdered sugar, hoping no one would notice the disaster. But you know what? They were the first dessert to disappear! Everyone raved about the perfect, bite-sized portions and the intense eggnog flavor. That “happy little accident,” as Bob Ross would say, taught me a valuable lesson: sometimes, the best recipes aren’t about grand, complicated gestures, but about simple, heartfelt, and utterly delicious food. These bars are a testament to that—foolproof, fun, and packed with flavor.
Gathering Your Cozy Ingredients
One of the things I love most about this recipe is how approachable the ingredient list is. You likely have most of these in your pantry already! Let’s break it down. I’ll give you my little chef insights and substitution tips for each one.
For the Buttery Graham Cracker Crust:
- 1 ½ cups Graham Cracker Crumbs: This is your foundation! That toasty, honey-kissed flavor is the perfect partner for the spiced filling. Chef’s Insight: You can buy pre-crumbled crumbs, but I often just throw whole graham crackers into a zip-top bag and roll over them with a rolling pin—it’s a fantastic (and free!) way to work out any pre-holiday stress.
- ¼ cup Granulated Sugar: A little sweetness to balance the slight bitterness of the crackers and help the crust caramelize and hold together.
- 6 tablespoons Melted Butter: This is the glue! It binds the crumbs into that perfect, crisp base. Substitution Tip: If you’re out of butter, coconut oil works beautifully and adds a subtle, lovely flavor.
For the Dreamy Eggnog Filling:
- 16 oz Cream Cheese, softened: This is non-negotiable, friends. You MUST let your cream cheese come to room temperature. I can’t stress this enough. Taking it out about an hour before you start ensures a silky-smooth filling with no pesky lumps. Substitution Tip: For a lighter version, you can use Neufchâtel cheese. For a dairy-free swap, there are some fantastic plant-based cream cheeses on the market now!
- ½ cup Granulated Sugar: We don’t need a ton of sugar here because the eggnog brings its own sweetness. This amount gives us the perfect balance.
- 2 large Eggs: They act as the binder and give the cheesecake its structure and rich texture. Always add them one at a time, letting each fully incorporate.
- ½ cup Eggnog: The star of the show! Use the best quality, full-fat eggnog you can find for the most decadent flavor. Chef’s Insight: If you’re feeling adventurous, homemade eggnog is a game-changer, but the store-bought stuff works wonderfully.
- 1 tablespoon All-Purpose Flour: This is my little secret weapon! Just a tablespoon helps stabilize the filling, preventing cracks and ensuring a perfect, creamy set.
- ½ teaspoon Ground Nutmeg: This is the soulmate of eggnog. It provides that warm, aromatic spice we all know and love. For an extra kick, I love using freshly grated nutmeg.
- ½ teaspoon Rum Extract: This gives you that classic, boozy eggnog flavor without any actual alcohol, making it family-friendly. Substitution Tip: If you prefer, vanilla extract is a gorgeous alternative. Or, if you’re feeling festive, a real tablespoon of dark rum or bourbon works too (just reduce the eggnog by a tablespoon).
For the Festive Finishing Touch:
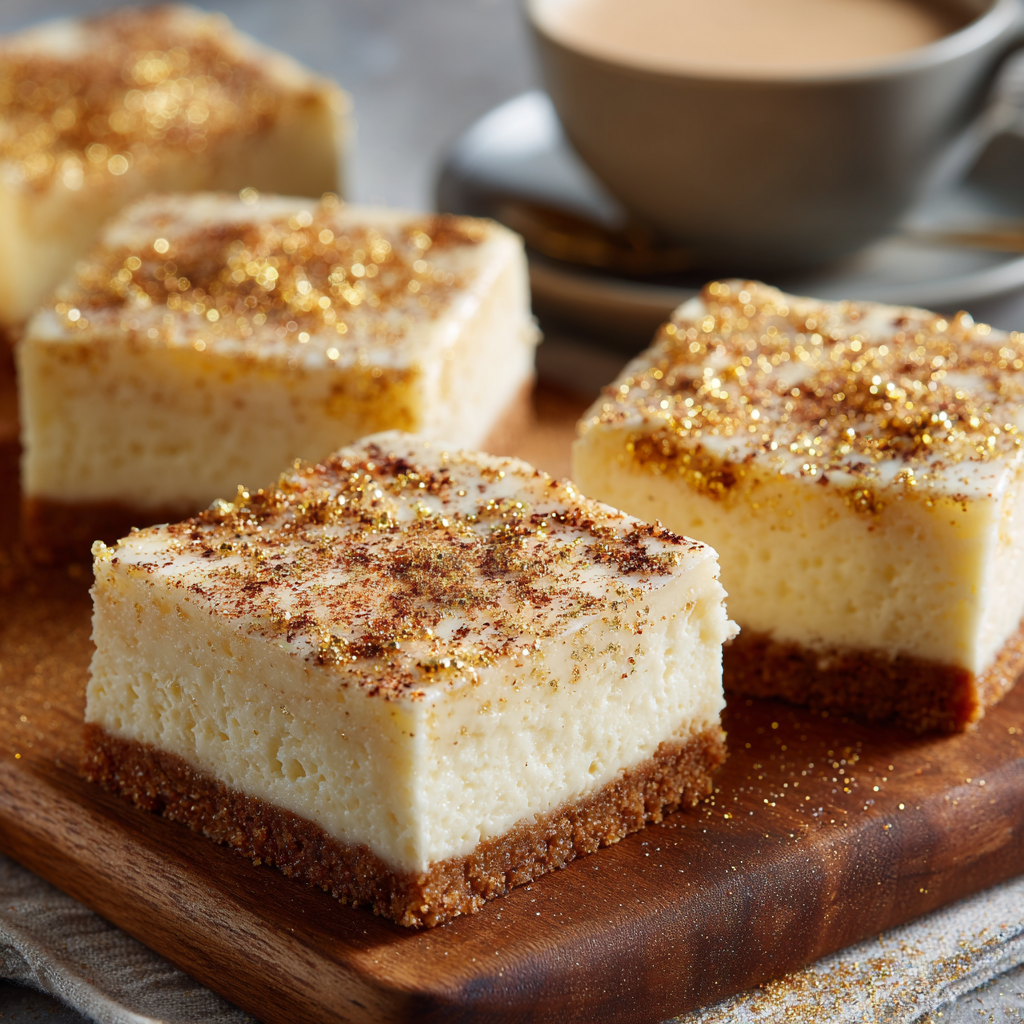
- Gold Edible Shimmer or Powdered Sugar: This is the “party dress” for your bars! A dusting of powdered sugar looks like a gentle snowfall, while a touch of gold shimmer makes them feel truly celebratory and elegant.
Let’s Bake! Your Step-by-Step Guide to Perfection
Okay, team! Now for the fun part. Let’s walk through this together. I’ll be with you every step of the way with my favorite tips and hacks to ensure your bars are absolutely flawless.
- Prep Your Stage: First things first, preheat your oven to 325°F (160°C). This lower temperature is key for a gentle, even bake that prevents cracking. Now, take an 8×8 or 9×9-inch baking pan and line it with parchment paper, leaving some overhang on two opposite sides. Chef’s Hack: This little “sling” is your best friend! It allows you to lift the entire block of cheesecake out of the pan later for super clean and easy slicing. No more awkward digging with a spatula!
- Create the Crust: In a medium bowl, combine your graham cracker crumbs and sugar. Pour in the melted butter and stir until the mixture resembles wet sand and every crumb is coated. Dump this into your prepared pan and press it down into a firm, even layer. I like to use the bottom of a flat measuring cup or a glass to really pack it in—this prevents a crumbly crust later. Pop it in the oven for 8-10 minutes. You’re just looking for it to be lightly fragrant and set. Let it cool on a rack while you make the filling. This par-baking step gives your crust a head start, ensuring it stays crisp and doesn’t get soggy.
- Whip Up the Filling: In a large bowl, beat your softened cream cheese and sugar together on medium speed until it’s completely smooth, creamy, and free of lumps. This should take about 2-3 minutes. Scrape down the bowl and the beaters—this is a crucial step to avoid hidden pockets of un-mixed cheese! Now, add your eggs one at a time, beating well after each addition until just combined. Pro Tip: Don’t over-beat once the eggs are in! Too much air can cause the cheesecake to puff up and then fall, leading to cracks.
- Infuse the Flavor: Now for the magic! With the mixer on low, slowly pour in the eggnog. Sprinkle in the flour and nutmeg, and add the rum extract. Mix until everything is beautifully blended and the batter is smooth. Remember, low and slow is the way to go here to keep things silky.
- Bake to Creamy Perfection: Pour your luscious filling over the slightly cooled crust and smooth the top with a spatula. Give the pan a gentle tap on the counter to release any air bubbles. Place it in the preheated oven and bake for 30-35 minutes. The edges should look set, but the center should still have a slight jiggle—like Jell-O—when you gently shake the pan. This is the sign of a perfectly creamy cheesecake! It will firm up as it cools.
- The Patience Game (The Hardest Part!): Once baked, transfer the pan to a wire rack and let it cool completely to room temperature. Then, and this is important, cover it and refrigerate for at least 2 hours, but preferably overnight. This chilling time allows the flavors to meld and the texture to become perfectly sliceable. Trust me, it’s worth the wait!
How to Serve Your Masterpiece
When you’re ready to serve, use the parchment paper sling to lift the whole cheesecake block onto a cutting board. Run a sharp, thin-bladed knife under hot water, wipe it dry, and then slice into beautiful, clean bars. Wipe the knife clean and reheat it between cuts for the prettiest slices. Right before serving, give them that final festive touch—a delicate dusting of powdered sugar or a light spray of gold edible shimmer. I love serving these on a rustic wooden board or a beautiful vintage platter. They’re incredible with a cup of strong coffee, a glass of cold milk, or even a snifter of brandy for the adults!
Get Creative! Fun Recipe Variations
One of the best things about this base recipe is how adaptable it is! Here are a few ways to make it your own:
- Bourbon Caramel Drizzle: Swap the rum extract for real bourbon in the filling, and then drizzle the top with a generous amount of salted caramel sauce before serving. It’s next-level indulgence.
- Chocolate Chip Eggnog Bars: Fold ½ cup of mini chocolate chips into the filling before pouring it over the crust. The chocolate and eggnog combo is a classic for a reason!
- Gingerbread Crust: Replace the graham cracker crumbs with crushed gingersnap cookies for a warm, spicy crust that complements the eggnog beautifully.
- Pumpkin Spice Twist: Add ¼ cup of pumpkin puree and a teaspoon of pumpkin pie spice to the filling for a hybrid dessert that celebrates the best of both holiday worlds.
- Dairy-Free Delight: Use plant-based cream cheese, butter, and your favorite store-bought vegan eggnog. It works like a charm!
Chef’s Notes from My Kitchen to Yours
Over the years, this recipe has become a staple in my holiday rotation, and it’s evolved in the best ways. I’ve learned that using full-fat, high-quality cream cheese and eggnog truly makes a difference in the final, luxurious texture. I also used to be so nervous about over-baking, but embracing the “jiggle” has been a game-changer for my cheesecake confidence!
A funny kitchen story? Just last week, I was making a double batch for a cookie exchange and, in my holiday frenzy, I accidentally added a whole tablespoon of nutmeg instead of a half. I panicked for a second, but after they baked and chilled, my taste-testers (aka my family) declared them the “most eggnoggy” and best batch I’d ever made! So don’t be afraid to tweak the spice levels to your taste. Cooking is about joy, not perfection. These bars freeze amazingly well, too. I often make a batch in early December, slice them, and freeze them in a single layer so I’m always ready for unexpected guests or a last-minute treat craving.
Your Questions, Answered!
I’ve gotten so many wonderful questions about this recipe over the years. Here are the most common ones to help you out!
- My cheesecake bars cracked in the middle. What did I do wrong? Don’t worry, a crack doesn’t affect the taste one bit! This usually happens from over-baking or a sudden temperature change. To prevent it, make sure you’re baking at 325°F (not 350°F) and you pull it out when the center still has a slight jiggle. Also, avoid opening the oven door frequently during baking. And remember, that dusting of powdered sugar or shimmer covers a multitude of sins!
- Can I use a different size pan? Absolutely! A 9×9-inch pan will give you slightly thinner bars and may bake a few minutes faster. An 8×8-inch pan will yield thicker, more decadent bars. I don’t recommend a springform pan for this particular bar recipe, as the structure is different from a full cheesecake.
- How long will these keep in the fridge? Stored in an airtight container, these bars will stay fresh and delicious for up to 5 days. The flavor actually gets better after a day or two!
- Can I make these without eggs? I haven’t tested this recipe with an egg substitute like flax egg, as eggs are crucial for the structure of the cheesecake filling. I wouldn’t recommend it for this specific recipe, but there are many great vegan cheesecake recipes out there that are designed without eggs from the start.

Eggnog Cheesecake Bars : Creamy, Spiced & Holiday-Perfect
Description
Bring on the cozy, the sparkle, and the unmistakable flavor of the holidays! These Eggnog Cheesecake Bars are everything you love about Christmas wrapped into one bite—creamy, spiced, and perfectly sweet. A buttery graham cracker crust meets a silky eggnog-infused cheesecake layer, kissed with nutmeg and a whisper of rum flavor. They’re elegant enough for your holiday dessert table yet easy enough for a casual night in by the fire. Once you try them, they’ll become your new signature treat of the season!
Ingredients
For the Crust:
-
1 ½ cups graham cracker crumbs
-
¼ cup granulated sugar
-
6 tbsp melted butter
For the Filling:
-
16 oz cream cheese, softened
-
½ cup granulated sugar
-
2 large eggs
-
½ cup eggnog
-
1 tbsp all-purpose flour
-
½ tsp ground nutmeg
-
½ tsp rum extract (or 1 tbsp dark rum / 1 tsp vanilla extract)
For Garnish:
-
Powdered sugar or gold edible shimmer
Instructions
-
Prep: Preheat oven to 325°F (160°C). Line an 8×8 or 9×9-inch pan with parchment paper, leaving overhang for easy lifting.
-
Make the Crust: Mix graham crumbs, sugar, and butter until evenly moistened. Press firmly into the pan and bake 8–10 minutes, then cool slightly.
-
Whip the Filling: Beat cream cheese and sugar until smooth. Add eggs one at a time, then blend in eggnog, flour, nutmeg, and rum extract until just combined.
-
Bake: Pour over crust, smooth the top, and bake 30–35 minutes, until edges are set but the center still jiggles slightly.
-
Chill: Cool to room temp, then refrigerate for at least 2 hours (overnight for best texture).
-
Serve: Lift from the pan, slice into bars, and dust with powdered sugar or shimmer.
Nutrition
- Calories: 190 cal Per bar
- Sugar: 12 g
- Fat: 13 g
- Carbohydrates: 15 g
- Protein: 3 g
Quick Nutrition Info
While we’re here for the joy of baking and flavor, it’s always helpful to have a general idea! This is an approximate calculation per bar (based on 16 bars from a 9×9 pan).
- Calories: 190
- Carbs: 15g
- Fat: 13g
- Sugar: 12g
- Protein: 3g
I hope you love making and sharing these Eggnog Cheesecake Bars as much as I do. They’re more than just a dessert; they’re a little bite of holiday magic. Happy baking, friends!
XO, Olivia
Final Thoughts: A Slice of Holiday Magic
And there you have it—the story, the secrets, and the simple steps to creating a dessert that truly captures the spirit of the season in every bite. These Eggnog Cheesecake Bars are more than just a treat; they’re a testament to the fact that the most beloved recipes often come from happy accidents and heartfelt efforts.
They’re proof that you don’t need a towering, complicated confection to create a “wow” moment. All you need is a handful of cozy ingredients, a little patience for chilling, and the joy of sharing something made with love. So, as you pull these golden, spiced bars from the oven, know that you’re not just making a dessert—you’re creating a new holiday tradition, one perfectly creamy, blissful square at a time.
I hope this recipe brings as much light, laughter, and deliciousness to your kitchen as it has to mine. From my cozy corner to yours, happy baking and happiest holidays!


