

Forget the Oven! Let’s Make Strawberry Lasagna
Hey there, friend! Can you feel it? That warm, golden sunshine, the sound of laughter floating through an open window, the sheer, unadulterated joy of a season that just begs for easy, no-fuss, spectacular food. Summer is all about making memories, not slaving over a hot stove. And that, my dear foodie, is precisely why I’m so wildly in love with this dessert.
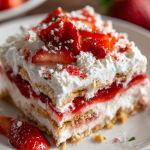
Welcome to the world of Strawberry Lasagna! Now, before you picture sheets of pasta next to your berries, let me stop you right there. This “lasagna” is a brilliant, no-bake layered dessert that builds a symphony of textures and flavors in a humble 9×13 pan. We’re talking about a buttery Oreo crust, a lusciously tangy cream cheese layer, a cloud-like strawberry fluff, and a final pillow of whipped topping, all crowned with fresh, ruby-red strawberries. Each spoonful is a perfect bite—crunchy, creamy, sweet, and just a little bit tart. It’s the kind of dessert that makes people’s eyes light up, the one that disappears from the potluck table in minutes, and the recipe you’ll be asked for again and again. So, tie on your favorite apron (the messy one with the good vibes), and let’s create some magic together. No oven required!
The Potluck Hero: A Story of Strawberry Lasagna
This recipe will forever be tied to one specific, slightly chaotic, and utterly wonderful Fourth of July barbecue at my friend Sarah’s house. I’d signed up to bring a dessert, but my day had been a whirlwind. Before I knew it, it was 4 PM, and I had nothing but a sad-looking bag of flour and some eggs to my name. Panic started to set in. Then, I remembered a scribbled note in my grandmother’s recipe box: “Layered Strawberry Delight.”
With a prayer and a quick grocery run, I threw this “lasagna” together in 20 frantic minutes, shoved it in the fridge, and prayed it would set during the drive. When I unveiled it at the party, still slightly dubious, it was an instant sensation. The kids were mesmerized by the layers, the adults were swooning over the flavor, and my friend’s husband jokingly asked if I could leave the whole pan behind. In that moment, surrounded by good friends and the setting sun, this dessert cemented itself in my heart. It wasn’t just a quick fix; it was a reminder that the most memorable dishes are often the simplest, and the ones made with a little bit of love (and a dash of desperation) are always the most delicious.
Gathering Your Sunshine Ingredients
Here’s your shopping list for this slice of heaven! The beauty of this recipe is its flexibility, so I’ve included my favorite chef insights and substitutions to make it your own.
- 1 box Golden Oreos (about 36 cookies), crushed – These are the base of our “pasta” layer! They provide a sweet, vanilla-y, and wonderfully sturdy crust. Chef’s Insight: Don’t have Golden Oreos? Graham crackers work beautifully! You’ll need about 2 ½ cups of crumbs mixed with the same amount of butter.
- 5 tbsp unsalted butter, melted – This is the glue that holds our crust together. Using unsalted lets us control the sweetness.
- 8 oz cream cheese, softened – The star of our second layer. Softening is key! Take it out of the fridge at least an hour ahead. If it’s still cold, you’ll end up with lumpy cream cheese, and we want silky smooth. For a lighter twist, Neufchâtel cheese works perfectly.
- ½ cup powdered sugar – It dissolves effortlessly into the cream cheese, giving us a smooth sweetness without any graininess.
- ½ cup sour cream or Greek yogurt – This is my secret weapon! It adds a delightful tang that cuts through the sweetness and makes the cream cheese layer incredibly creamy. I usually use full-fat Greek yogurt for a little protein boost.
- 16 oz whipped topping (like Cool Whip), divided – This gives our dessert its signature light, airy texture. We use it in multiple layers. Chef’s Swap: Feeling ambitious? You can absolutely use 3 cups of freshly whipped heavy cream sweetened with a little powdered sugar. It’s divine!
- 1 (3 oz) box strawberry gelatin – This is what gives the strawberry layer its vibrant color and that classic, nostalgic flavor we all love.
- ½ cup boiling water & ½ cup cold water – For dissolving and cooling the gelatin. Easy peasy.
- 2–3 cups fresh chopped strawberries – The real hero! Using fresh fruit brings a bright, juicy burst to every bite. Don’t use frozen here, as they’ll make the layer too watery.
- Fresh sliced strawberries, white chocolate shavings, or crushed freeze-dried strawberries – This is where you get to be an artist! The garnish makes it stunning.
Let’s Build This Beautiful Dessert!
Ready to play dessert architect? Follow these steps, and you’ll have a masterpiece in no time. I’m sharing all my little hacks along the way!
- The Foundation (The Crust): First, let’s turn those Golden Oreos into crumbs. My favorite method? Toss them into a zip-top bag and go at them with a rolling pin—it’s a fantastic stress reliever! A food processor works wonders, too. In a medium bowl, mix the fine crumbs with the melted butter until it resembles wet sand. Pour this into your 9×13-inch pan and press it down firmly and evenly. I like to use the bottom of a measuring cup to get a really solid, compact base. Pop this in the fridge to set while we work on the next layer. Chef’s Hack: A cold crust is a stable crust!
- The Tangy Cloud (Cream Cheese Layer): In a large mixing bowl, beat the softened cream cheese until it’s completely smooth and lump-free. This is the most important step for a silky texture! Now, beat in the powdered sugar and sour cream (or Greek yogurt) until everything is well combined and creamy. Here’s the fun part: gently fold in one 8-ounce container of the whipped topping. “Folding” means you use a spatula to cut down through the middle, slide it across the bottom, and turn the mixture over itself. This keeps all that lovely air in the whipped topping. Spread this dreamy mixture evenly over your chilled crust.
- The Berry Burst (Strawberry Layer): In a heatproof bowl, stir the strawberry gelatin into the ½ cup of boiling water until it’s completely dissolved. This should only take a minute or two. Then, stir in the ½ cup of cold water. Now, walk away. Let this mixture sit on the counter until it’s no longer warm to the touch, but hasn’t started to set yet. This is crucial! If the gelatin is too hot, it will melt the cream cheese layer beneath it. Once it’s cooled, gently fold in the chopped fresh strawberries and the second 8-ounce container of whipped topping. You’ll see those beautiful streaks of pink and red—it’s gorgeous! Carefully spread this over the cream cheese layer.
- The Grand Finale (Topping & Garnish): Almost there! Spread the final 8 ounces of whipped topping over the strawberry layer. Now, decorate! I love arranging fresh strawberry slices in a pretty pattern and then sprinkling everything with delicate white chocolate shavings. For an extra punch of strawberry flavor and a stunning color pop, crush some freeze-dried strawberries into a powder and dust it over the top. It’s a total game-changer.
- The Test of Patience (The Chill): This is the hardest part. Cover your beautiful creation with plastic wrap or a lid and refrigerate it for at least 4 hours, but ideally overnight. Trust me on this. Overnight chilling allows the layers to firm up perfectly, making it easy to slice into clean, beautiful squares. The flavors also have time to mingle and become best friends.
How to Serve Your Masterpiece
When it’s time to serve, use a sharp knife dipped in hot water and wiped dry between each cut. This gives you those pristine, picture-perfect slices that show off every single layer. I love serving this on a simple white platter to let the vibrant colors shine. It’s a star all on its own, but for an extra-special touch, drizzle a little strawberry sauce or melted white chocolate on each plate before placing a square on top. Pair it with an iced coffee for a summer brunch or a glass of bubbly Prosecco for a festive evening!
Make It Your Own: Delicious Twists & Swaps
The fun doesn’t stop with strawberries! This recipe is a fantastic blueprint for all sorts of flavor adventures.
- Triple Berry Bliss: Swap the strawberries for a mix of raspberries, blueberries, and blackberries. Use raspberry or mixed berry gelatin.
- Chocolate-Covered Strawberry: Use chocolate sandwich cookies (like Oreos) for the crust and add a layer of chocolate shavings on top with the strawberries.
- Lemon Berry Dream: Use lemon gelatin and fold in a mix of blueberries and raspberries. The lemon and berry combo is incredibly refreshing.
- Peaches and Cream: A summer stunner! Use peach gelatin and 2-3 cups of diced fresh peaches. Garnish with fresh peach slices.
- Dairy-Free Delight: Use vegan butter and cream cheese, and swap the whipped topping and sour cream for your favorite dairy-free alternatives. It works like a charm!
Olivia’s Kitchen Notes & Stories
This recipe has truly evolved in my kitchen over the years. The first time I made it, I was so impatient that I only chilled it for two hours. Let’s just say we ate it with spoons straight from the pan like a delicious, deconstructed mess! It was still fantastic, but it taught me the value of patience. I’ve also learned that the sour cream/Greek yogurt addition was a total happy accident—I once ran out of cream cheese and had to improvise, and the resulting tang was so good I never looked back.
One of my favorite kitchen memories is of my niece, who was about five at the time, “helping” me make this. Her job was to sprinkle the white chocolate on top, and she took it very seriously, concentrating with her little tongue sticking out. She ended up using the entire bag, creating a glorious, lopsided mountain of chocolate. It was the best-looking strawberry lasagna I’ve ever seen because it was made with pure, unbridled joy. That’s the spirit I want you to bring to your kitchen, too!
Your Questions, Answered!
I’ve gotten so many messages about this recipe over the years. Here are the most common questions and how to fix any potential hiccups.
- Q: My strawberry layer is runny! What happened?
A: This usually happens for one of two reasons. First, the gelatin mixture was still too warm when you added the whipped topping, causing it to deflate and melt. Always make sure it’s fully cooled. Second, it might not have chilled long enough. This dessert needs a full 4+ hours to set properly. If you’re in a pinch, 30-60 minutes in the freezer can help, but the fridge is best.
- Q: Can I make this dessert ahead of time?
A: Absolutely! In fact, I highly recommend it. Making it the night before is the ultimate secret to perfect, clean slices and well-developed flavor. It will keep beautifully in the fridge for 2-3 days.
- Q: My cream cheese layer is lumpy. Can I fix it?
A: Lumpy cream cheese is almost always because it wasn’t soft enough to start. To avoid this, let it sit on the counter for a good hour. If you’re already in a pickle, you can try beating it with the powdered sugar for a few extra minutes, or even pushing the mixture through a fine-mesh sieve—it’s a bit of a workout, but it works!
- Q: Can I use frozen strawberries instead of fresh?
A: I don’t recommend it for this specific recipe. Frozen strawberries release a lot of water as they thaw, which will make your strawberry layer watery and prevent it from setting correctly. Fresh is definitely the way to go for the best texture.
Strawberry Lasagna : No-Bake Layered Dessert with Creamy & Fruity Goodness
Description
No-Bake Strawberry Lasagna
Prep Time: 20 minutes
Chill Time: 4+ hours (ideally overnight)
Total Time: ~4 hours 20 minutes
Yield: ~12 servings
A crunchy, creamy, fruity dessert with layers of Oreo crust, cream cheese filling, strawberry fluff, and whipped topping—no oven needed!
Ingredients
Crust:
-
1 box Golden Oreos (36 cookies), crushed (or 2½ cups graham cracker crumbs)
-
5 tbsp unsalted butter, melted
Cream Cheese Layer:
-
8 oz cream cheese, softened
-
½ cup powdered sugar
-
½ cup sour cream or Greek yogurt
-
8 oz whipped topping (Cool Whip), folded in
Strawberry Layer:
-
1 (3 oz) box strawberry gelatin
-
½ cup boiling water
-
½ cup cold water
-
2–3 cups fresh chopped strawberries
-
8 oz whipped topping, folded in
Topping & Garnish:
-
8 oz whipped topping
-
Fresh strawberry slices, white chocolate shavings, or crushed freeze-dried strawberries
Instructions
1. Make the Crust
-
Crush Oreos into fine crumbs.
-
Mix with melted butter until sandy.
-
Press firmly into a 9×13-inch pan and chill while preparing other layers.
2. Prepare Cream Cheese Layer
-
Beat cream cheese until smooth.
-
Add powdered sugar and sour cream; mix until creamy.
-
Gently fold in 8 oz whipped topping.
-
Spread evenly over chilled crust.
3. Prepare Strawberry Layer
-
Dissolve gelatin in boiling water, then stir in cold water. Let cool to room temperature.
-
Fold in chopped strawberries and 8 oz whipped topping.
-
Spread carefully over cream cheese layer.
4. Add Topping & Garnish
-
Spread remaining 8 oz whipped topping over strawberry layer.
-
Decorate with fresh strawberries, white chocolate shavings, or crushed freeze-dried strawberries.
5. Chill
-
Cover with plastic wrap and refrigerate at least 4 hours or overnight.
6. Serve
-
Use a sharp knife dipped in hot water for clean slices.
-
Optional: drizzle strawberry sauce or melted white chocolate on plates.
Notes
-
Triple Berry: Use raspberries, blueberries, and blackberries with matching gelatin.
-
Chocolate Strawberry: Use chocolate sandwich cookies for crust, top with chocolate shavings.
-
Lemon Berry: Swap gelatin for lemon, fold in blueberries/raspberries.
-
Peach & Cream: Use peach gelatin and diced fresh peaches.
-
Dairy-Free: Use vegan butter, cream cheese, whipped topping, and sour cream alternatives.
Nutrition
- Calories: 310 cal Per Serving
- Sugar: 24g
- Fat: 18g
- Saturated Fat: 10g
- Carbohydrates: 35g
- Protein: 3g
Nutritional Information (Per Serving)
Please note: This is an approximate calculation and can vary based on specific ingredients and brands used.
- Calories: 310
- Fat: 18g
- Saturated Fat: 10g
- Carbohydrates: 35g
- Sugar: 24g
- Protein: 3g
- Fiber: 1g
- Sodium: 210mg
Prep Time: 25 minutes | Chill Time: 4+ hours | Total Time: About 4 hours 30 minutes | Servings: 15
There you have it! My all-time favorite no-bake summer showstopper. I hope this Strawberry Lasagna brings as much joy and sweetness to your table as it has to mine. If you make it, I’d love to see your creation! Tag me on social media. Now, go enjoy that sunshine and your delicious dessert!
Final Thoughts: The Encouraging & Heartfelt Finale
So, what are you waiting for?
This Strawberry Lasagna is more than just a dessert; it’s a testament to the joy of simple, no-fuss cooking. It’s the promise of a spectacular treat without the heat, and a guarantee of smiles around your table. Whether it becomes your potluck secret weapon or your new favorite family tradition, this dessert is ready to make your summer a little sweeter and a whole lot easier. So, gather your ingredients, embrace the fun, and get ready for the compliments to roll in. You’ve got this!


