

The Secret to the World’s Best Homemade Cream Cheese Frosting
Hey there, friend! Come on in, pull up a stool, and let’s talk about one of the greatest joys in life: a perfect swirl of homemade cream cheese frosting. You know the one. It’s that dreamy, cloud-like topping that makes you close your eyes for a second after the first bite. It’s the crowning glory on a spiced carrot cake, the heart and soul of a classic red velvet, and let’s be real, it’s the real reason we all eat cinnamon rolls.
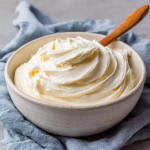
If you’ve ever been let down by a frosting that was too runny, too grainy, or so sweet it made your teeth ache, I’m here to tell you: those days are over. This recipe is my kitchen superhero, my go-to for pretty much every bake sale, birthday party, and “I-just-need-a-little-something-sweet” moment. It’s luxuriously smooth, perfectly tangy to balance the sweetness, and so incredibly spreadable. It holds a gorgeous piped shape but never tastes stiff or overly buttery.
The best part? You don’t need any fancy chef skills or equipment. We’re using simple, honest ingredients and a few little secrets I’ve picked up over years of (happy) kitchen mistakes. So, grab your mixer and that cute apron—the one with the flour smudge you’re so proud of—because we’re about to make a frosting that will absolutely, 100% elevate every dessert it touches. Let’s get whipping!
A Slice of Humble Pie (and a Whole Lot of Frosting)
This recipe feels like an old friend to me, but we didn’t start off on the best foot. I vividly remember the first time I tried to make cream cheese frosting for my dad’s birthday carrot cake. I was about sixteen, feeling wildly overconfident, and I made every mistake in the book. I used cream cheese straight from the fridge, whipped it with rock-hard butter, and got so impatient that I dumped in all the powdered sugar at once.
The result was a lumpy, curdled-looking mess with stubborn sugar pockets. I was devastated. But my dad, being the wonderful man he is, slathered it onto his cake slice with a smile and said, “Olivia, it tastes like love. A little lumpy love, but love nonetheless.” We still laugh about that “Lumpy Love Cake.” That kitchen fail taught me a beautiful lesson: the food we make for the people we care about is always appreciated, but mastering the little techniques? That’s how we turn love into something truly unforgettable. This frosting is the polished, perfectly smooth version of that lumpy love, and I’m so excited to share it with you.
Gathering Your A-Team: The Ingredients
Great frosting starts with great ingredients. Here’s exactly what you’ll need and why each one is a star player. Remember, quality and temperature are everything here!
- 8 oz (one block) Full-Fat Cream Cheese, softened: This is the heart of the operation. Full-fat is non-negotiable for the best texture and flavor; low-fat versions have more water and stabilizers, which can lead to a runny frosting. Let it sit on the counter until it’s room temperature and squishable for a perfectly smooth, lump-free base.
- ½ cup (1 stick) Unsalted Butter, softened: Butter adds structure and a rich, creamy mouthfeel. Using unsalted lets you control the salt level perfectly. It needs to be just as soft as the cream cheese—press your finger into it and it should leave a deep indent. Not melted, but pliable!
- 3–4 cups Powdered Sugar, sifted: This sweetens and thickens our frosting. I always start with 3 cups and add more only if I need it stiffer. Sifting is your secret weapon against graininess! It breaks up any lumps and incorporates air, leading to a fluffier result.
- 2 teaspoons Pure Vanilla Extract: This is the aromatic soul. Pure vanilla adds a warm, complex flavor that imitation vanilla just can’t match. Don’t be shy with it!
- A Generous Pinch of Fine Sea Salt: This might seem odd, but trust me, it’s a game-changer. Salt enhances all the other flavors and cuts through the sweetness, making the tangy cream cheese flavor really pop.
Feeling Adventurous? Optional Flavor Twists:
- Zest of 1 Lemon or Orange: For a bright, sunny lift. Perfect for carrot cake or lemon cupcakes.
- ½ teaspoon Almond Extract: Adds a beautiful, cozy depth that pairs magically with cherry or vanilla bakes.
- 1 tablespoon Maple Syrup: Swap it for the vanilla for a warm, autumnal flavor that’s incredible on pumpkin spice cakes.
Let’s Make Some Magic: The Step-by-Step Guide
Okay, here’s where the fun begins! Follow these steps, and you’ll have perfect frosting in about 10 minutes. I’ve packed this section with all my favorite chef hacks to ensure your success.
Step 1: The Perfect Creaming
In the bowl of your stand mixer fitted with the paddle attachment (a hand mixer works great too!), place your softened cream cheese and softened butter. Beat them together on medium-high speed for a full 2-3 minutes. Don’t rush this! You’re looking for the mixture to become pale, light, and incredibly fluffy. This step incorporates air, which is the foundation of our dreamy texture. Chef’s Hack: If your ingredients are truly at room temp, you shouldn’t see a single lump.
Step 2: The Sweet Incorporation
Now, reduce your mixer speed to low. This is crucial to avoid a powdered sugar snowstorm all over your kitchen! Gradually add your sifted powdered sugar, about one cup at a time. Let each cup incorporate fully before adding the next. Once all the sugar is in, you can safely crank the speed back up to medium-high and beat for another minute until the mixture is smooth and silky. Chef’s Insight: Start with 3 cups of sugar. After adding the vanilla and salt, you can assess the consistency. If you need it thicker for piping, beat in the remaining cup a little at a time.
Step 3: The Flavor Finish
Now, add your vanilla extract and that all-important pinch of salt. If you’re using any of the optional flavor twists, add them now too. Beat on medium speed for another 1-2 minutes. You’ll see the frosting become even fluffier and more voluminous. Give it a quick taste—is it perfect? Adjust if needed. Chef’s Hack: To test for piping readiness, scoop a spoonful and turn it upside down. It should hold its shape without dripping. If it’s too soft, add a bit more sugar. If it’s too thick, a teaspoon of milk or cream can loosen it up.
Step 4: To Use or To Store
Your masterpiece is complete! You can use it immediately to frost a cooled cake or cupcakes. If you’re not using it right away, store it in an airtight container in the refrigerator for up to one week. Pro-Tip: If it’s been chilled, always let it come to room temperature and then re-whip it with your mixer for a minute to bring back that creamy, spreadable texture.
Plating & Serving: The Grand Finale
How you serve this frosting is half the fun! For a rustic, homemade feel, use an offset spatula to create beautiful, swoopy waves on a layer cake. For cupcakes, fit a piping bag with a large star tip (I’m a sucker for a Wilton 1M or 2D) and pipe tall, elegant swirls that just beg to be bitten into. Don’t forget the final flourish—a sprinkle of cinnamon on carrot cake, a few red velvet cake crumbs on its namesake cupcake, or a light grating of orange zest can make your dessert look like it came from a professional bakery.
Mix It Up! Creative Frosting Variations
Once you’ve mastered the classic, the flavor world is your oyster! Here are a few of my favorite twists:
- Lemon Blueberry Bliss: Add the zest of one lemon and fold in ¼ cup of finely chopped, dried blueberries.
- Brown Sugar Cinnamon: Replace ½ cup of the powdered sugar with packed dark brown sugar and add 1 teaspoon of ground cinnamon for a warm, caramel-like flavor.
- Chocolate Cream Cheese: Whisk in ½ cup of sifted unsweetened cocoa powder along with the powdered sugar for a tangy chocolate frosting.
- Dairy-Free/Delicious: Use your favorite plant-based butter and cream cheese blocks (I find Violife and Miyoko’s work best). The method is exactly the same!
- Boozy Bourbon Pecan: Swap the vanilla for 1 tablespoon of good bourbon and fold in ⅓ cup of toasted, chopped pecans.
Olivia’s Chef Notes & Kitchen Confessions
This recipe has been my trusty sidekick for so long, it’s practically evolved with me. I used to be terrified of over-mixing, but I’ve learned that giving the butter and cream cheese a good, long whip at the beginning is the key to ethereal fluffiness. My husband jokes that I should just attach a permanent frosting bowl to my stand mixer because I make this so often.
One of my favorite kitchen memories is of my niece, who was about four at the time, “helping” me make this. She was in charge of adding the vanilla, and with the solemn focus only a toddler can muster, she poured in what must have been a quarter of the bottle. We ended up with the most intensely vanilla frosting known to humankind, and it was a huge hit. The moral of the story? Don’t stress. Cooking is supposed to be fun, and sometimes the “mistakes” are the most delicious part.
Your Frosting Questions, Answered!
Q: My frosting is too runny! What did I do wrong and how can I fix it?
A: A runny frosting is almost always a temperature issue. If your cream cheese or butter were too warm, the fat can’t hold the structure. Don’t panic! The easiest fix is to pop the entire bowl (or the finished frosting) into the refrigerator for 20-30 minutes to let the fats firm up, then re-whip it. If it’s still too soft, you can beat in a little more sifted powdered sugar, a tablespoon at a time, until it thickens up.
Q: Why does my frosting have little lumps in it?
A Those pesky lumps are almost certainly from cream cheese that wasn’t soft enough. To avoid this, let your cream cheese sit on the counter for at least 1-2 hours, until it’s truly room temperature and squishable. If you’re stuck with lumps, you can try pressing the finished frosting through a fine-mesh sieve—it’s a bit of a workout, but it works!
Q: Can I make this frosting ahead of time?
A: Absolutely! You can make it up to 3 days in advance. Store it in an airtight container in the fridge. When you’re ready to use it, let it sit on the counter for about 30-60 minutes to warm up slightly, then re-whip it with your mixer for a minute or two to bring back its creamy, spreadable consistency.
Q: My frosting tastes too sweet. How can I balance it?
A: This is a common concern! First, make sure you’ve used that generous pinch of salt—it’s the number one way to cut sweetness. Next time, try starting with only 3 cups of powdered sugar. You can also add an extra teaspoon of lemon juice or a little more cream cheese to increase the tangy factor and balance the sugar.
Best Homemade Cream Cheese Frosting : Smooth, Tangy & Perfect for Spreading
Description
Get ready to meet the frosting that transforms every dessert into pure magic! This Homemade Cream Cheese Frosting is the ultimate blend of tangy and sweet—silky smooth, perfectly spreadable, and irresistibly creamy. Whether you’re crowning a red velvet masterpiece, slathering carrot cake layers, or swirling cinnamon rolls, this recipe never disappoints. With just a few simple tricks (and zero fancy equipment), you’ll whip up bakery-worthy frosting that’s rich, fluffy, and totally addictive.
Ingredients
-
8 oz (1 block) full-fat cream cheese, softened
-
½ cup (1 stick) unsalted butter, softened
-
3–4 cups powdered sugar, sifted
-
2 tsp pure vanilla extract
-
A pinch of fine sea salt
Optional Flavor Twists:
-
1 lemon or orange zest – for a citrusy lift
-
½ tsp almond extract – for a cozy, nutty note
-
1 tbsp maple syrup – for a warm autumn vibe
Instructions
-
Whip It Good: Beat softened cream cheese and butter together for 2–3 minutes until light and fluffy. Room temperature ingredients are key to that velvety texture.
-
Sweeten the Deal: Reduce mixer speed to low and add powdered sugar, one cup at a time. Beat well after each addition. Start with 3 cups; add more if you want a thicker consistency.
-
Flavor & Finish: Mix in vanilla and a pinch of salt. Whip for another 1–2 minutes until creamy and smooth.
-
Frost or Store: Use immediately, or refrigerate for up to 1 week. Re-whip before using to restore fluffiness.
Notes
-
If it’s too soft, chill for 20 minutes, then re-whip.
-
Too thick? Add 1 tsp milk or cream.
-
Add lemon zest or a hint of cinnamon for your own signature twist.
Nutrition
- Calories: 190cal Per2 Tbsp
- Sodium: 80mg
- Fat: 10g
- Carbohydrates: 24g
- Protein: 1g
Nutritional Information*
*Please note: This is an estimate provided for informational purposes only. I am not a nutritionist.
Per 2-tablespoon serving (approx.): Calories: 190 | Fat: 10g | Carbohydrates: 24g | Sugar: 23g | Protein: 1g | Sodium: 80mg
Prep Time: 10 minutes | Total Time: 10 minutes | Yield: Frosts 12 cupcakes or one 9-inch cake layer
Final Thoughts: Your New Frosting Era Starts Now
And there you have it—every secret, every tip, and all the heart behind what I truly believe is the world’s best homemade cream cheese frosting. This isn’t just a recipe; it’s your ticket to turning simple bakes into show-stopping, soul-warming treats. No more runny, too-sweet, or lumpy disappointments.
You now have the power to create something incredibly delicious and deceptively simple. So go ahead, slather it generously on that weeknight cupcake, pipe it with pride onto your celebration cake, or, let’s be real, eat a spoonful straight from the bowl. You’ve earned it. Happy baking, and don’t forget to share the sweet results!


