

Forget Takeout: The Coziest, Cheesiest Baked Chicken Nuggets Are Here!
Hey there, friend! Can you smell that? It’s the warm, golden, slightly-cheesy aroma of pure comfort wafting from my oven straight into your kitchen. If your weeknights feel like a race against the clock and your family’s pleas for “something fun” for dinner are getting louder, you have just landed in your new happy place. I’m so thrilled you’re here.
Let’s talk about a universal truth: everyone, from tiny tots to grown-ups with sophisticated palates, lights up at the sight of a platter of chicken nuggets. There’s something so joyfully simple about them. But let’s be real, the frozen bagged kind can often be… well, a little sad. They’re either mysteriously chewy, disappointingly bland, or packed with ingredients I can’t pronounce.
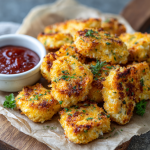
What if I told you that in less than 30 minutes, with just five simple ingredients you probably have right now, you can create a batch of chicken nuggets that are not only insanely delicious but also secretly good for you? These aren’t just any nuggets. They’re my legendary Easy, Cheesy, Baked Chicken Nuggets. We’re talking juicy on the inside, perfectly crispy on the outside, gloriously golden, and packed with so much flavor that the dipping sauce might just get jealous.
The best part? This is a recipe that celebrates ease and joy. You don’t need any fancy equipment or a degree in culinary arts. You just need a bowl, a baking sheet, and a passion for turning a simple can of chicken into a little bite of magic. So, tie on your favorite apron (the messy one with all the stories is highly encouraged), and let’s make some memories, one perfectly baked nugget at a time.
A Nugget of Nostalgia: Why This Recipe Sticks
This recipe didn’t start in a fancy test kitchen; it was born out of pure, unadulterated desperation on a rainy Tuesday. My niece and nephew were over, my fridge was suspiciously empty, and the “I’m hunnnngry” chorus was reaching a crescendo. I had one lone can of chicken in the pantry, some cheese, and a whole lot of hope.
As I mixed everything together, I was transported back to my own childhood, standing on a step-stool next to my grandma, helping her shape her famous meatballs. The feeling of the cool, mixed ingredients in my hands, the pride of creating something with her, the anticipation as the smell filled the house—it was magic. That’s the feeling I wanted to recreate. When I pulled that first batch of golden nuggets out of the oven and saw the kids’ eyes go wide with delight, I knew we had a winner. They weren’t just eating chicken; they were devouring a little piece of homemade love. It was a powerful reminder that the best recipes aren’t about complexity; they’re about connection.
Your Kitchen Allies: The Simple, Mighty Ingredient List
Ready to see the magic behind these nuggets? It’s all in this beautiful, short list. Each ingredient plays a specific role, and I’ve got some fun swaps and chef-y insights for you, so you can make this recipe your own.
- 1 (12.5 oz) can chicken breast, drained well – This is our superstar and biggest time-saver! Using canned chicken means zero cooking and shredding, making this a 10-minute prep dream. Chef’s Insight: Really press down on the chicken in a fine-mesh strainer to get out as much liquid as possible. A drier start means a crispier, less soggy nugget! Substitution Tip: Have leftover roasted or rotisserie chicken? Shred up about 1.5 cups and you’re good to go!
- 1 large egg – Think of the egg as our mighty binder, the culinary glue that holds our nugget dream team together. Chef’s Insight: I like to lightly beat the egg in a small bowl first before adding it to the mix. This ensures it incorporates evenly without you overworking the meat mixture.
- 1/3 cup shredded mozzarella cheese – Hello, melty, stretchy goodness! Mozzarella gives us that fantastic cheesy flavor and also helps with browning and texture. Substitution Tip: Feel free to swap this for any mild, melty cheese like Monterey Jack, provolone, or even a mild cheddar.
- 3 tbsp grated parmesan cheese – This is our secret flavor weapon. Parmesan adds a salty, savory, umami punch that takes these nuggets from “yum” to “WOW.” Chef’s Insight: For the best texture and melt, use the real grated Parm from the refrigerated section, not the shelf-stable canister. It makes a difference!
- Seasoning of choice (e.g., garlic powder, onion powder, paprika, salt & pepper) – This is where your personality shines! My go-to blend is 1/2 tsp garlic powder, 1/4 tsp onion powder, 1/4 tsp smoked paprika, and a good pinch of salt and black pepper. Substitution Tip: A tablespoon of your favorite everything bagel seasoning or a dry ranch seasoning packet works like a charm here for an instant flavor boost!
Let’s Get Building: Your Foolproof Nugget Blueprint
Alright, team, it’s go time! This is where we turn that simple mixture into golden perfection. I’ll walk you through every step with my favorite little hacks to ensure nugget nirvana.
- Preheat and Prep. Fire up that oven to 400°F (200°C). This hot temperature is key for getting a crispy exterior without drying out the inside. While it’s heating, line a baking sheet with parchment paper. Chef’s Hack: Parchment paper is my best friend here—it prevents sticking without adding extra grease, and it makes cleanup an absolute dream. No parchment? A light spritz of cooking spray will do the trick.
- The Big Mix. In a medium-sized bowl, combine your well-drained canned chicken, the beaten egg, mozzarella, parmesan, and your chosen seasonings. Now, roll up your sleeves and dive in! The best tool for this job is clean hands. Gently mix everything until it’s just combined. Chef’s Tip: Don’t overmix! You want a cohesive mixture, but if you work it too much, the nuggets can become a bit tough. A light touch is everything.
- Shape with Love. Now for the fun, slightly messy part! Scoop up about a tablespoon of the mixture. Using your hands, gently press and shape it into a classic nugget shape. I find flat, slightly oval patties work best for even cooking. Chef’s Hack: If the mixture is sticking to your hands, lightly wet your palms with a bit of water or a tiny dab of oil. This creates a non-stick barrier and makes the shaping process smooth sailing.
- Bake to Perfection. Arrange your little nugget soldiers on the prepared baking sheet, making sure they aren’t touching. This allows the hot air to circulate and gives us that all-over crispiness. Pop them in the oven for 18-22 minutes. Here’s the crucial part: flip them halfway through! At the 10-minute mark, give each one a careful flip. You’ll see they’re already starting to firm up and get golden on the bottom. This flip is what gives you that gorgeous, even color and texture on both sides.
- The Cool Down. Once they’re golden brown and slightly crispy on the edges, pull the baking sheet out of the oven. I know it’s tempting to dive right in, but let them cool on the sheet for about 5 minutes. Chef’s Insight: This resting time allows the cheeses to set a little, making them less likely to fall apart when you pick them up for their first dip.
Dipping and Serving: The Grand Finale!
Presentation is part of the fun! Pile these warm, cheesy nuggets high on a rustic wooden board or a colorful platter. Surround them with little bowls of all your favorite dipping sauces—it turns dinner into an interactive experience. For the ultimate cozy night, serve them alongside a simple green salad, some sweet potato fries, or even just a big pile of steamed broccoli (the cheese in the nuggets makes kids surprisingly willing to eat their greens!). They are also champions of the lunchbox—just let them cool completely before packing them up.
Mix It Up! 5 Fun Twists on the Classic
Once you’ve mastered the basic recipe, the world is your nugget! Here are a few of my favorite ways to shake things up:
- Buffalo Blue Cheese: Mix 2 tablespoons of buffalo sauce into the chicken mixture and use crumbled blue cheese instead of mozzarella. Serve with ranch for dipping.
- Pizza Party: Add 1/4 cup of finely chopped pepperoni and a teaspoon of Italian seasoning. Use a blend of mozzarella and provolone for that true pizza parlor vibe.
- Keto “Everything Bagel”: Swap the seasoning for 2 tablespoons of everything bagel seasoning. The flavor is insane!
- Dairy-Free Delight: Simply omit the cheese and add an extra tablespoon of parmesan-style nutritional yeast for a cheesy flavor. You may need a second egg white to help bind it.
- Herb Garden Fresh: Stir in 2 tablespoons of finely chopped fresh herbs like parsley, chives, and dill for a brighter, more elegant nugget perfect for a ladies’ lunch.
From My Kitchen to Yours: A Few Final Secrets
This recipe has been a living, evolving little project in my kitchen. The first time I made it, I was so nervous they wouldn’t hold together that I made them comically thick. We ended up calling them “chicken cookies,” and they were still delicious! I’ve learned that a flatter, more nugget-like shape is ideal for the perfect texture.
One of my favorite kitchen stories involves my husband, who is a self-proclaimed “nugget connoisseur.” He tried one, paused, and said, “Wait, this is canned chicken? You’re lying.” That was the moment I knew this recipe was a true keeper. It’s a humble little miracle that consistently surprises and delights. Don’t be afraid to make a double batch and freeze some for future you—they reheat beautifully in the oven or air fryer!
Your Nugget Questions, Answered!
I’ve gotten so many wonderful questions about this recipe over the years. Here are the answers to the most common head-scratchers to ensure your nugget success every single time.
Q: My mixture is a bit wet and sticky. What did I do wrong?
A: Don’t worry, this is common! The main culprit is usually not draining the canned chicken well enough. Really give it a good squeeze in a strainer. If it’s still sticky, pop the mixture into the fridge for 15-20 minutes. This will firm it up and make it much easier to handle. You can also wet your hands more frequently while shaping.
Q: Can I make these in an air fryer?
A: Absolutely! They turn out fantastically crispy in the air fryer. Arrange them in a single layer in the basket (you may need to cook in batches), spray lightly with oil, and air fry at 375°F (190°C) for 10-12 minutes, flipping halfway through.
Q: Why are my nuggets not getting crispy?
A: A few things can cause this: 1) The oven wasn’t fully preheated. 2) They were placed on a cold baking sheet. 3) The nuggets were too crowded on the pan. 4) There was too much residual moisture in the chicken. Ensuring a hot oven, proper spacing, and well-drained chicken is the trifecta for crispiness!
Q: Can I prep these ahead of time?
A: You can! You can mix the ingredients and store the raw mixture in an airtight container in the fridge for up to 24 hours. Shape and bake when you’re ready. You can also freeze the shaped, unbaked nuggets on a parchment-lined tray, then transfer them to a freezer bag. Bake from frozen, adding a few extra minutes to the cooking time.
Baked Chicken Nuggets : Easy, Cheesy & Totally Kid-Approved
Description
Meet your new dinner hero: Easy, Cheesy, Baked Chicken Nuggets! Crispy on the outside, juicy inside, and loaded with cheesy flavor, these golden bites prove comfort food can be both wholesome and wildly delicious. Made with just five simple ingredients (yes, even canned chicken!), they’re perfect for busy weeknights, kid-approved meals, or cozy nights in. No fryer, no mystery ingredients—just pure, baked-to-perfection goodness that’ll have everyone asking for seconds.
Ingredients
-
1 (12.5 oz) can chicken breast, drained & flaked (or 1½ cups cooked shredded chicken)
-
1 large egg, lightly beaten
-
⅓ cup shredded mozzarella cheese
-
3 tbsp grated parmesan cheese
-
½ tsp garlic powder, ¼ tsp onion powder, ¼ tsp smoked paprika, salt & pepper to taste
Optional: 1 tbsp ranch seasoning or everything bagel mix for a flavor twist
Instructions
-
Preheat oven: Set to 400°F (200°C) and line a baking sheet with parchment paper.
-
Mix: In a medium bowl, combine drained chicken, egg, cheeses, and seasonings. Mix gently until well combined.
-
Shape: Scoop about 1 tbsp of the mixture and shape into nuggets or small patties.
-
Bake: Arrange on the baking sheet (don’t crowd them!) and bake for 18–22 minutes, flipping halfway through until golden brown and crisp.
-
Cool & Serve: Let rest 5 minutes before serving for the perfect texture.
Notes
-
Buffalo Blue: Add 2 tbsp buffalo sauce + 2 tbsp crumbled blue cheese.
-
Pizza Party: Mix in ¼ cup chopped pepperoni & 1 tsp Italian seasoning.
-
Everything Bagel: Swap seasonings for 2 tbsp everything bagel mix.
-
Herb Garden: Add 2 tbsp fresh parsley, dill, and chives for bright flavor.
-
Dairy-Free: Skip cheese, add 1 tbsp nutritional yeast, and 1 extra egg white.
Nutrition
- Calories: 180 cal Per Serving
- Sodium: 400mg
- Fat: 9g
- Carbohydrates: 1g
- Protein: 22g
Quick Nutrition Breakdown
Estimated per serving (4-5 nuggets): Calories: 180 | Protein: 22g | Fat: 9g | Carbohydrates: 1g | Fiber: 0g | Sodium: 400mg
Note: This is an estimate and can vary based on specific ingredient brands and any substitutions you make. The beauty is that they are high in protein and low in carbs, making them a satisfying and healthy-ish option!
Final Thoughts: Your New Go-To Recipe is Served
And just like that, you’ve done it. You’ve transformed a handful of simple, humble ingredients into a platter of pure, uncomplicated joy. You’ve traded the mystery of the frozen bag for the satisfaction of knowing exactly what’s on your family’s plate—and more importantly, you’ve created a moment of connection in the middle of a busy week.
These Easy, Cheesy, Baked Chicken Nuggets are more than just a meal; they’re a reminder that the best food doesn’t have to be complicated. It’s about the feeling of the mixture in your hands, the golden-brown promise in the oven’s glow, and the shared smiles around the table. This recipe is your secret weapon against the dinnertime grind, a little pocket of cozy you can summon anytime.
So, the next time the clock is ticking and the call for “something fun” echoes through your home, remember this little can of magic waiting in your pantry. You have everything you need to create a small, delicious victory.


