
Your New Favorite Kitchen Project: Fiery Homemade Cinnamon Mints
Hey there, friend! Come on in, pull up a stool, and let’s get our hands a little dusty with powdered sugar. Is there anything more satisfying than the fiery, eye-watering, sinus-clearing kick of a strong cinnamon mint? That instant blast of cool heat that makes you feel both refreshed and utterly alive? If you’re nodding along, you are my people.
For years, I was a loyal devotee to those little red tins. They lived in every purse, every car cup holder, and every jacket pocket. They were a tiny, potent promise of fresh breath and a quick flavor reset. But one day, standing in my kitchen surrounded by from-scratch bread and homemade pasta sauce, I had a thought: “Why can’t I make these?” Why should something so wonderfully simple be a mystery?
Turns out, the secret to creating your own version of those iconic mints is not only totally doable, but it’s also an absolute blast. This project turns your kitchen into a mini candy lab for an afternoon. We’re talking about transforming a handful of simple ingredients into little red-hot flavor bombs that you can proudly say you made yourself. They’re perfect for gifting, for parties, or just for stashing everywhere you go. So, if you’re ready to roll up your sleeves and create something magically simple and delicious, you’ve come to the right place. Let’s make some homemade cinnamon mints!
A Tin Full of Memories
My love affair with these mints started with my grandpa. He was a man of few words, but his pockets were always full of treasures: a pocketknife, a few pieces of peppermint candy, and, without fail, that iconic red tin of cinnamon Altoids. After every Sunday dinner, he’d lean back in his chair, pull it out with a soft *pop* of the lid, and slide one across the table to me.
My eyes would water with that first intense crack of cinnamon, and he’d give a low, quiet chuckle. It was our little ritual. It wasn’t just about the mint; it was about that moment of connection, that shared, slightly painful, but wonderful experience. To this day, the scent of pure cinnamon oil instantly transports me back to that dining room, filled with the lingering smell of roast chicken and the sound of family laughter. Making these mints at home feels like I’m bottling up a little bit of that nostalgia and sharing it with you.
Gathering Your Mint-Making Magic
Ready to see what goes into these fiery little gems? The ingredient list is beautifully short, but each one plays a starring role. Here’s the breakdown:
- 4 cups Powdered Gum Paste Mix: This is the foundation of our mints! Don’t let the name intimidate you—it’s simply a mix of sugar, gum arabic (a natural binder), and sometimes cornstarch. It creates that perfectly smooth, hard-but-dissolves-beautifully texture we’re after. Chef’s Insight: You can find this in the cake decorating aisle of most craft stores or online. It’s what gives fancy fondant its pliability, but for us, it’s the key to a professional-quality mint.
- 1 oz Cinnamon Oil Flavor (typically two 0.5 oz bottles): This is NON-NEGOTIABLE for that authentic, powerful punch. Do not, I repeat, do not try to substitute with cinnamon extract. Cinnamon oil is highly concentrated and provides that intense, lingering heat that defines these mints. Pro Tip: Be careful when handling—it’s potent and can irritate skin, so I like to wear disposable gloves when adding it.
- 4–6 drops Red Food Coloring: A little color for that classic “fire engine” vibe! Gel food coloring works best as it won’t alter the consistency of your dough. Feel free to go wild with other colors if you’re creating different flavors!
- Warm Water (as needed): Our magic activator. The warmth helps the gum paste dissolve and become pliable. Add it slowly—you can always add more, but you can’t take it out!
- Powdered Sugar (for dusting): This is our “non-stick spray” for this project. It prevents the super-sticky dough from clinging to your hands and the rolling surface. A light, snowy dusting is all you need.
Optional Twists for the Adventurous:
- A Pinch of Cayenne Pepper: For those who like to walk on the wild side! This adds a deeper, smoky heat that builds behind the cinnamon. Start small—you can always add more next time.
- 1 tbsp Crushed Freeze-Dried Strawberries: For a “Cinnamon Strawberry” vibe! The fruity tang plays so nicely with the spice. Just crush them into a fine powder before adding.
Crafting Your Cinnamon Fireballs: A Step-by-Step Guide
Okay, team! This is where the fun begins. Clear a clean counter space, put on some good music, and let’s create some candy magic. It’s less about precise baking and more about feeling the dough and having fun with it.
- Combine and Conquer: In a large, non-porous bowl (like glass or stainless steel), pour in your 4 cups of powdered gum paste mix. Now, here’s the first chef hack: start with just a tablespoon of warm water at a time. Use a fork or a spatula to mix it in. You’re looking for a consistency that resembles damp sand that holds together when you pinch it. Too much water too fast, and you’ll have a sticky mess. Patience is key here! Once it starts clumping, it’s time to get your hands in there.
- The Flavor Infusion (Gloves Recommended!): Now, add your 4-6 drops of red food coloring and your 1 oz of cinnamon oil. This is the moment of truth! Knead, knead, knead! I like to do this right in the bowl at first to contain the color. You’ll work it for a good 3-5 minutes until the color is completely even and there are no more white or light-pink streaks. If you’re adding any optional twists like cayenne or strawberry powder, now is the time to incorporate them.
- Create Your Workstation: Liberally dust your clean countertop with powdered sugar. Turn your beautiful, red, fragrant dough out onto the surface. Give it a few more kneads to ensure it’s smooth and pliable, like a firm Play-Doh. If it feels sticky, dust it with more powdered sugar. If it’s cracking, dip your fingers in warm water and knead it in—just a tiny bit at a time!
- Shape Your Mints! You have two fantastic options here:
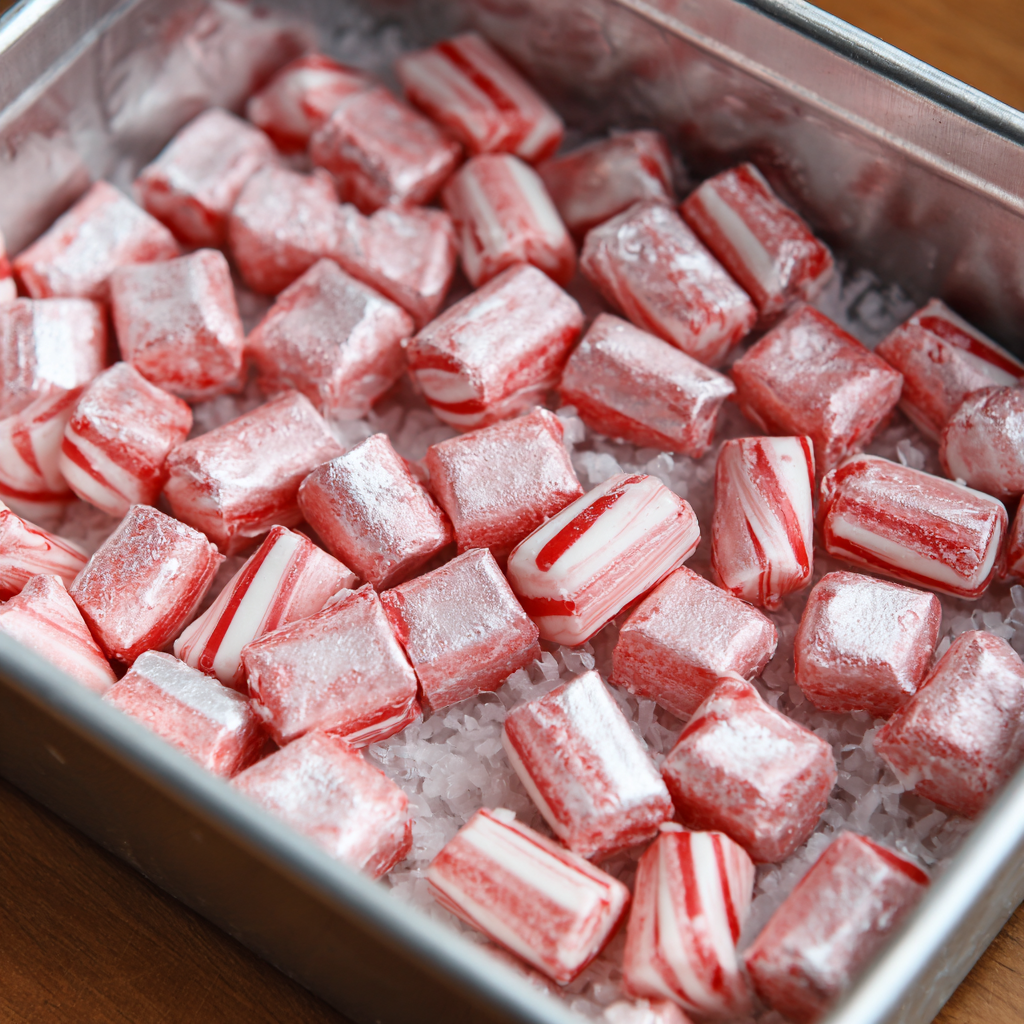
- The Classic Roll-and-Cut: Use a rolling pin (dust it too!) to roll the dough to about ¼-inch thickness. Then, use a tiny cookie cutter (a ½-inch round is perfect) or even a pizza cutter to slice it into small squares. This method gives you that uniform, professional look.
- The Rustic Hand-Rolled Method (My Favorite!): Pinch off tiny, pea-sized pieces of dough and roll them between your palms into little balls. Then, gently press them down with your finger to flatten them slightly. I love this method because they look charmingly homemade, and it’s incredibly meditative.
- The Patience Phase – Drying: Line a baking sheet with parchment paper and arrange your mints in a single layer, making sure they aren’t touching. Here’s a crucial tip: DO NOT cover them. They need air circulation to dry and harden properly. Let them sit uncovered for 24-48 hours. I like to flip them over halfway through the drying time to ensure both sides get nice and hard. You’ll know they’re done when they’re firm to the touch and have a satisfying “click” when you tap them together.
Sharing the (Fiery) Love
Once your mints are perfectly dried and hardened, the real fun begins—packaging and sharing! I love piling them into small glass jars with cute labels for gifts. You can find adorable mini tins online to get that truly authentic feel. For a party, scatter them in a beautiful bowl as a bold, edible centerpiece. And of course, don’t forget to fill your own pockets, purse, and car console. There’s nothing quite like the pride of offering a friend a mint and saying, “Oh, these? I made them myself.”
Get Creative! Flavor Twists & Swaps
Once you’ve mastered the classic, the candy world is your oyster! The basic gum paste method is a blank canvas. Try these fun variations:
- Peppermint Patties: Use peppermint oil and a drop of green food coloring. Roll slightly thicker and dip half in melted dark chocolate for a homemade York Peppermint Pattie experience.
- Orange Creamsicle: A combo of orange oil and vanilla extract, with a pale orange color. So refreshing!
- Lemon-Ginger Zing: Use lemon oil and add a teaspoon of very finely grated fresh ginger to the dough for a spicy, citrusy kick.
- “Buttered” Rum: Use rum flavoring and a tiny touch of butter extract for a warm, cozy, wintery mint.
Olivia’s Kitchen Confidential
This recipe has evolved so much since my first batch, which I can only describe as a “sticky, pink, vaguely cinnamon-scented disaster.” I learned the hard way about adding water too fast! The beauty of this process is in its simplicity and the feel of the dough. Don’t stress about making every mint perfectly identical. The slight variations are what make them charming and uniquely yours.
One of my favorite kitchen memories is the time my niece “helped” me make a batch. She was so focused on rolling her little balls, her tongue stuck out in concentration, and she proudly declared they were “dragon breath beads.” Now, that’s what I call them in my head. That’s the real magic of homemade food—it’s not just about the flavor, it’s about the stories and memories you cook up along the way. So, have fun with it, and don’t be afraid to get a little messy.
Your Mint Questions, Answered!
I’ve made these more times than I can count, and I’ve answered a lot of questions from readers along the way. Here are the most common ones to help you on your mint-making journey!
Q: My dough is way too sticky! What do I do?
A: Don’t panic! This is the most common issue, and it’s an easy fix. Simply dust your hands and the dough with more powdered sugar and knead it in. The powdered sugar will absorb the excess moisture and bring the dough back to a workable consistency. You may need to do this a few times.
Q: Why can’t I use cinnamon extract instead of cinnamon oil?
A: This is all about potency and flavor authenticity. Cinnamon oil is an essential oil, meaning it’s highly concentrated and provides that intense, sharp, sinus-clearing heat that defines these mints. Extract is alcohol-based and much, much milder. If you use extract, you’d need a huge amount to get any real flavor, which would throw off the liquid balance of your dough and you still wouldn’t get that signature “fire” we’re after.
Q: My mints are still soft after 48 hours. Help!
A: This usually means the air is a bit humid, or your mints were a tad on the thick side. No worries! Just give them more time. You can also place them in a cool, dry spot with a fan blowing lightly nearby to increase air circulation. They will eventually harden up!
Q: How long do these actually last, and what’s the best way to store them?
A> Stored in an airtight container at room temperature (away from direct sunlight and heat), your homemade mints will stay fresh and potent for a good 2 months. The sugar and oil are natural preservers. Just make sure they are completely hardened before you seal them up to prevent any moisture from getting trapped.

Homemade Cinnamon Mints – Like Altoids
Description
Ready to turn your kitchen into a candy lab? These Fiery Homemade Cinnamon Mints pack that perfect punch — sweet, spicy, and wildly addictive. They’re crisp, bright, and full of that unmistakable red-hot flavor that wakes up your senses. With just a few simple ingredients and a little patience, you’ll create your own stash of nostalgic, handcrafted mints that put the store-bought tins to shame. Whether you’re gifting them, displaying them at a party, or sneaking one after coffee, these fiery gems are pure fun — and pure flavor.
Instructions
-
Mix the Base: In a glass bowl, combine gum paste mix with 1 tbsp warm water at a time until it forms damp, sand-like clumps.
-
Flavor & Color: Add cinnamon oil and red food coloring (wear gloves!). Knead until smooth, uniform, and vibrant.
-
Knead & Adjust: Turn onto a surface dusted with powdered sugar. Knead until pliable — not sticky, not crumbly. Add a few drops of water if too dry.
-
Shape the Mints:
-
Classic Roll & Cut: Roll to ¼-inch thickness and cut into tiny squares or circles.
-
Hand-Rolled: Roll pea-sized balls and flatten slightly for a rustic touch.
-
-
Drying Time: Arrange on parchment-lined trays and air-dry for 24–48 hours, flipping halfway through until hard and crisp.
Notes
-
Peppermint: Swap cinnamon oil for peppermint + green food coloring.
-
Orange Creamsicle: Mix orange and vanilla extracts with soft orange color.
-
Lemon-Ginger: Lemon oil + pinch of grated ginger = zesty perfection.
Nutrition
- Calories: 75cal Per 5 Mints
- Fat: 0g
- Carbohydrates: 19g
- Protein: 0g
Quick Nutritional Note
Let’s be real—these are a candy treat! The primary ingredient is sugar. The nutritional info per 5 mints is approximately: 75 Calories, 0g Fat, 19g Carbohydrates (17g Sugars), 0g Protein. They are fat-free, but they are a pure sugar delight, so enjoy them in moderation as a little flavor-packed pick-me-up!
Final Thoughts: Your Own Pocket-Sized Fire
And just like that, you’re no longer just a consumer of those iconic red mints—you’re an artisan, a creator of fiery little flavor bombs. As you look at your finished batch, gleaming like tiny red jewels, I hope you feel a surge of pride. You’ve unlocked a simple, magical kitchen secret and created something uniquely powerful and delightful.
These mints are more than just a treat; they’re a testament to the joy of making. They’re a conversation starter, a heartfelt gift, and a personal stash of sinus-clearing satisfaction that you crafted with your own hands. So, go ahead and pop one in. Feel that familiar, eye-watering kick, and know that you made that happen.


