

Your New Go-To Party Hero: Easy Pizza Dip
Hey there, friend! Olivia here, waving from a kitchen that currently smells like a dreamy, cheesy pizzeria. Can we just take a moment to appreciate the magic of dip? It’s the ultimate communal food, the centerpiece of every great gathering, the thing that brings everyone together, hovering around the coffee table, laughing and scooping up every last bit.
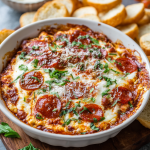
But today, we’re not making just any dip. We’re making a legend. We’re taking everything we absolutely adore about a perfect, gooey, topping-laden pizza and transforming it into a warm, bubbly, dippable masterpiece. That’s right, I’m talking about my legendary Easy Pizza Dip.
This isn’t just a recipe; it’s a party in a dish. It’s the appetizer that disappears faster than you can say “more bread, please!” and the one that will have your friends and family begging you for the recipe. The best part? You don’t need any fancy chef skills or hours of your time. We’re talking about 10 minutes of joyful prep and about 20 minutes in the oven. That’s it! You get all the comfort, flavor, and cheesy pull of a homemade pizza, without ever having to fuss with dough. So, tie on your favorite apron (the one that’s probably already a little flour-dusted, because same), and let’s create some kitchen magic together!
The Game Day That Started It All
I’ll never forget the first time this dip made its grand entrance. It was a chilly Sunday, the kind perfect for football, comfy sweaters, and a spread of snacks that could feed a small army. I was hosting, and as usual, I’d gone a little overboard. But I had a last-minute panic—what if I didn’t have enough food? (A classic hostess fear, I know!)
Rifling through the fridge, I found a block of cream cheese, some leftover pizza sauce from pasta night, and a treasure trove of shredded cheeses. A half-eaten bag of pepperoni and some lonely bell peppers completed the picture. In a moment of “what’s the worst that could happen?” inspiration, I layered it all in my trusty little cast-iron skillet and popped it in the oven. The smell that wafted through the house was nothing short of intoxicating. When I brought it out, still bubbling and golden, it was an instant sensation. The bowl was scraped clean before the first quarter ended, and it’s been a non-negotiable part of my party menu ever since. It’s a reminder that the best recipes often aren’t planned—they’re born from a little chaos and a whole lot of heart.
Gathering Your Pizza Dip Dream Team
Here’s the beautiful part: this recipe is incredibly forgiving and flexible. Think of this list as your blueprint, not a rigid rulebook. Let’s break down the all-star cast of characters that make this dip so unforgettable.
- 8 oz Cream Cheese, softened: This is our rich, tangy base. Using full-fat cream cheese gives you the creamiest, most luxurious texture. Chef’s Insight: For the love of all things dippable, make sure it’s truly softened to room temperature! This is the #1 secret to a smooth, lump-free base. If you forget, you can microwave it for 15-20 seconds on low power.
- 1/2 tsp Garlic Powder: We’re using powder here for consistent, mellow garlic flavor throughout the base. Substitution Tip: Feel free to add a finely minced fresh garlic clove for a more pungent kick!
- 1/2 tsp Italian Seasoning: The aromatic soul of the dish! This little blend of oregano, basil, thyme, and rosemary brings that classic pizza-parlor fragrance. Chef’s Insight: Rub the dried herbs between your palms before adding them to wake up their oils and maximize their flavor.
- 1 cup Pizza or Marinara Sauce: The zesty heart of the dip! Chef’s Insight: I prefer a smooth pizza sauce for an even layer, but a chunky marinara works beautifully, too. Use your favorite store-bought brand to keep it easy, or your go-to homemade recipe if you’re feeling fancy.
- 1 ½ cups Shredded Mozzarella Cheese: The king of meltiness and that iconic cheese-pull! Chef’s Insight: I highly recommend shredding your own mozzarella from a block. Pre-shredded bags are coated with anti-caking agents that can make the melt less smooth.
- 1/2 cup Grated Parmesan Cheese: Our salty, nutty flavor booster. It adds a wonderful depth and helps the top get beautifully golden. Substitution Tip: Pecorino Romano is a fantastic, sharper alternative.
- Toppings of Your Choice: This is where you make it your own! My classic go-tos are:
- Mini Pepperoni: They’re the perfect size! They get a little crispy around the edges in the oven.
- Chopped Bell Peppers & Olives: For a pop of color and freshness.
- Cooked Sausage or Mushrooms: For a heartier, meat-lover’s version. Just make sure any meat is cooked and any veggies are sautéed to remove excess moisture first!
- Dippers! The trusty vessels for all that cheesy goodness.
- Sliced Baguette: Toasted or untoasted, it’s a classic.
- Tortilla Chips or Breadsticks: For a serious crunch factor.
- Veggies like bell pepper strips, carrot sticks, or cauliflower florets: A fresh, low-carb option that’s always a hit.
Let’s Build Our Masterpiece: Step-by-Step
Ready to see how this all comes together? It’s so simple, you’ll have it memorized after the first time. I’ll walk you through each step with my favorite little hacks to ensure dip perfection.
- Preheat and Prep. First things first, get that oven heating to a cozy 375°F (190°C). This gives your oven time to come to the perfect temperature for even cooking. While it’s warming up, grab your baking dish. I love using a 9-inch pie dish or a 8-10 inch oven-safe skillet. A skillet is my secret weapon because you can go straight from the oven to the table, and it looks so rustic and charming! Chef’s Hack: Give your dish a very light coating of butter or non-stick spray. It’s not totally necessary, but it makes cleanup a dream.
- Create the Creamy Base. In a medium bowl, plop in your softened cream cheese. Add the garlic powder and Italian seasoning. Now, using a spatula or a wooden spoon, mix and mash until it’s completely smooth and the seasonings are evenly distributed. Chef’s Commentary: Don’t be tempted to use a whisk here—it just gets clogged! A sturdy spatula is your best friend. The goal is a velvety, spreadable layer.
- Layer One: The Foundation. Scoop your seasoned cream cheese mixture into your prepared baking dish. Now, spread it into a smooth, even layer across the bottom. I like to use the back of my spoon or a small offset spatula for this. You’re creating a delicious barrier that will keep the sauce from making the bottom layer soupy. Think of it as the “cheesy crust” of our dip-pizza!
- Layer Two: The Zesty Heart. Here comes the color! Gently spoon your pizza sauce over the cream cheese layer. The key word here is spread gently. You don’t want to mix the layers; you want distinct strata of flavor. I like to dollop it in a few spots and then gently swirl it just to cover the white layer underneath. This ensures you get a bit of everything in every single scoop.
- Layer Three: The Cheesy Blanket. Time for the cheese! Sprinkle your glorious shredded mozzarella evenly over the saucy layer, making sure to get all the way to the edges. Follow that up with a generous shower of the grated Parmesan. This two-cheese combo is pure magic—the mozzarella for the stretch, the Parmesan for the flavor and golden-brown top. Chef’s Hack: For an extra flavor boost, mix a pinch of Italian seasoning into your shredded cheeses before sprinkling.
- The Grand Finale: Toppings! This is the fun part! Scatter your chosen toppings over the cheese. If you’re using mini pepperoni, I love to cover the surface for maximum impact. If you’re using a mix, feel free to get artistic and create sections or just a joyful, confetti-like scatter. Chef’s Insight: If you’re using particularly watery veggies like fresh mushrooms, give them a quick sauté first to drive off moisture, otherwise, they can make your dip a bit watery.
- Bake to Bubbly Perfection. Carefully place your beautiful creation into the preheated oven. Now, the hardest part: wait! Bake for 20-25 minutes. You’re looking for the entire dip to be hot and bubbly all the way through, with the cheese fully melted and the top starting to get those gorgeous golden-brown spots. If you want an extra-browned top, you can pop it under the broiler for the last minute—but watch it like a hawk!
- Serve with Joy! Once it’s out of the oven, let it rest for just 2-3 minutes. This allows the layers to set slightly, making it easier to scoop without it being a lava-hot mess. Place it right in the middle of the table with a big basket of your chosen dippers and watch the magic happen.
How to Serve Your Sensational Dip
Presentation is part of the fun! I love placing the warm skillet or baking dish right onto a trivet in the center of my coffee table or dining table. Surround it with an abundant platter of dippers—I like to mix toasted baguette slices, a handful of sturdy tortilla chips, and a vibrant array of fresh veggie sticks for color. Don’t forget to provide a few sturdy spoons for scooping! This isn’t a dainty dish; it’s meant to be dived into with gusto. For a bigger party, I sometimes double the recipe and use a larger baking dish—trust me, it will get eaten.
Make It Your Own: Delicious Variations
The beauty of this dip is its versatility. Here are a few of my favorite ways to switch it up:
- Hawaiian Twist: Swap the pepperoni for diced ham and a handful of well-drained crushed pineapple. The sweet and salty combo is a crowd-pleaser!
- Spicy Supreme: Use a spicy marinara sauce, add pickled jalapeños to the topping layer, and mix a bit of shredded pepper jack cheese in with the mozzarella.
- White Pizza Dip: Omit the red sauce. Instead, mix the cream cheese with a 1/2 cup of ricotta, extra garlic, and a handful of spinach. Top with mozzarella and Parmesan as usual.
- Loaded Veggie: Go wild with sautéed mushrooms, black olives, bell peppers, onions, and artichoke hearts. It’s a garden-fresh delight.
- Gluten-Free & Lower-Carb: This is naturally easy! Just serve with your favorite gluten-free crackers or a big platter of fresh vegetable dippers like bell peppers, cucumber, and zucchini slices.
Chef’s Notes: From My Kitchen to Yours
This recipe has truly evolved over the years in my kitchen. I started out making it exactly as written, but then one day I got adventurous and added a hidden layer of cooked, crumbled Italian sausage underneath the sauce. Let me tell you, it was a game-changer for the meat-lovers in my life! I’ve also learned that this dip is a fantastic “clean out the fridge” recipe. A little bit of leftover grilled chicken? Chop it up! A few stray olives? Toss ’em on! It’s very forgiving.
One of my favorite kitchen memories involves this dip and my then-five-year-old nephew. He declared he was “only going to eat the cheesy part” and proceeded to expertly scoop out every bit of melted mozzarella from his corner, leaving a little cheesy crater that had us all in stitches. It’s now a running family joke. The moral of the story? However it gets eaten, as long as it brings a smile, you’ve done it perfectly.
Your Pizza Dip Questions, Answered!
Over the years, I’ve gotten a few repeat questions about this dip. Here are the answers to help you nail it every single time.
Q: My dip turned out a bit watery. What happened?
A: The most common culprit is excess moisture from toppings. Fresh vegetables like mushrooms, onions, and bell peppers release a lot of water as they cook. The easy fix is to give them a quick sauté in a pan before scattering them over the dip. This cooks off that excess liquid and concentrates their flavor! Also, make sure your cream cheese layer is a solid barrier between the dish and the sauce.
Q: Can I make this pizza dip ahead of time?
A> Absolutely! You are a party-planning genius. Assemble the entire dip in the baking dish, cover it tightly with plastic wrap, and refrigerate for up to 24 hours. When you’re ready, just pop it straight into the preheated oven. You may need to add an extra 5-10 minutes to the bake time since it’s going in cold.
Q: What can I use if I don’t have an oven-safe skillet or baking dish?
A> No problem! A standard 9-inch pie plate works wonderfully. You can also use an 8×8 square baking dish. The key is to use something that’s the right size so your dip layers aren’t too thin or too thick. If all else fails, a glass or ceramic casserole dish of a similar size will do the trick.
Q: The cream cheese was lumpy when I mixed it. How can I avoid that?
A> This is the #1 tip I can give you: truly softened cream cheese is non-negotiable. Take it out of the fridge at least an hour before you start. If you’re in a pinch, you can microwave the (unwrapped) block on a plate for 15-20 seconds on 50% power. Check it, and repeat if necessary. You want it soft to the touch but not melted or hot.
Easy Pizza Dip
Description
Hey there, friend! Olivia here, welcoming you back into my cozy kitchen. If you love pizza (and who doesn’t?), this recipe is about to become your new party hero. Imagine everything you love about a cheesy, topping-loaded pizza—gooey mozzarella, savory sauce, and your favorite add-ins—transformed into a hot, bubbly dip that’s perfect for sharing. No dough, no fuss, just pure pizza comfort in every scoop.
Ingredients
-
8 oz cream cheese, softened
-
½ tsp garlic powder
-
½ tsp Italian seasoning
-
1 cup pizza or marinara sauce
-
1 ½ cups shredded mozzarella cheese
-
½ cup grated Parmesan cheese
-
Toppings of your choice (mini pepperoni, sautéed mushrooms, olives, bell peppers, cooked sausage, etc.)
-
Dippers: sliced baguette, tortilla chips, breadsticks, or veggie sticks
Instructions
-
Preheat the oven to 375°F (190°C). Lightly grease a 9-inch pie dish or oven-safe skillet.
-
Mix the base. In a bowl, stir together cream cheese, garlic powder, and Italian seasoning until smooth. Spread evenly into the bottom of your dish.
-
Add the sauce. Spoon pizza sauce gently over the cream cheese layer.
-
Top with cheese. Sprinkle mozzarella evenly, then Parmesan.
-
Add toppings. Scatter your favorite pizza toppings across the top. (Tip: sauté veggies first to prevent extra moisture.)
-
Bake for 20–25 minutes, until bubbly and golden. For extra browning, broil for 1–2 minutes at the end.
-
Serve warm with your chosen dippers and watch it vanish!
Notes
-
Soften your cream cheese fully for a smooth, creamy base. If short on time, microwave it for 15–20 seconds at 50% power.
-
Shred your own mozzarella for the best melty, gooey texture.
-
Make ahead option: Assemble, cover, and refrigerate for up to 24 hours. Just add 5–10 extra minutes to the baking time.
-
Presentation trick: Bake in a cast iron skillet so you can serve straight from oven to table. Rustic, warm, and party-perfect.
Nutrition
- Calories: 180 cal Per Serving
- Fat: 14 g
- Carbohydrates: 4 g
- Protein: 8 g
Quick Nutrition & Prep Details
Prep Time: 10 minutes | Bake Time: 25 minutes | Total Time: 35 minutes | Serves: 6-8
Approximate nutrition per serving (without dippers):
Calories: 180 | Fat: 14g | Protein: 8g | Carbohydrates: 4g
Final Thoughts: Your New Party Secret is Served
Well, friend, there you have it—the story, the secrets, and the simple steps to what I truly believe is a perfect party appetizer. This Easy Pizza Dip is more than just a recipe; it’s a guaranteed smile, a conversation starter, and the delicious solution to “what should I bring?”
It’s the dish that proves the best memories are often made around food that’s unpretentious, shareable, and bursting with flavor. It’s for the game day host, the potluck hero, the busy parent needing a quick crowd-pleaser, and anyone who believes that a little melted cheese can solve just about anything.
So, the next time you’re staring into the fridge, wondering what to make, remember this little skillet of joy. Don’t overthink it, don’t stress—just layer, bake, and gather. I have a feeling it’s going to become a legend in your kitchen, too.


