

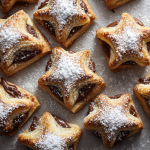
Your New Favorite Treat: Magical Nutella Puff Pastry Stars
Hey there, friend! Come on in, take a seat at my kitchen island. Can you smell that? It’s the warm, buttery scent of puff pastry baking, mingling with the sweet, intoxicating aroma of melted Nutella. If there’s a cozier, more joyful smell in the world, I haven’t found it yet. Today, we’re making magic. We’re turning a few simple, humble ingredients into a batch of stunning, flaky, gooey Nutella Puff Pastry Stars that are guaranteed to make you feel like a pastry wizard.
I know what you might be thinking: “Stars? That sounds fancy. I’m not a professional baker, Olivia!” But trust me on this one. This is one of those recipes that looks incredibly impressive but is secretly one of the easiest things you’ll ever make. It’s my go-to when I need a last-minute brunch showstopper, a sweet treat for a cookie exchange, or just a little Tuesday afternoon pick-me-up. They require no fancy skills, just a happy heart and a star-shaped cookie cutter.
So, tie on your favorite apron (the one that’s probably seen a few floury battles), and let’s create something unforgettable. These little stars are more than just a pastry; they’re bite-sized pieces of joy, dusted with a little snowy powdered sugar and a whole lot of love. Let’s get baking!
A Starlit Memory: Where It All Began
This recipe always takes me back to my first Christmas in my own little apartment. I was fresh out of college, my budget was, let’s say, “creative,” but my desire to host a festive gathering was immense. I wanted to fill my home with the same warmth and delicious smells my mom always did, but I was terrified of complicated recipes and expensive ingredients.
Rifling through my freezer, I found a lonely sheet of puff pastry. In the pantry, a jar of Nutella stood guard next to the coffee. It was a moment of pure, unplanned inspiration. With a small star cookie cutter I’d bought on a whim, I started stamping out shapes, sandwiching them with dollops of that glorious hazelnut spread. The result? Pure, unadulterated magic. My friends’ faces when they bit into the warm, flaky, chocolate-filled pastries were all the confirmation I needed. They weren’t just eating a snack; they were sharing a moment of pure, simple joy. That’s the power of these little stars—they prove that the most memorable food doesn’t have to be complicated, it just has to be made with love.
Gathering Your Stellar Ingredients
One of the best things about this recipe is the short and sweet ingredient list. Each one plays a crucial role in creating pastry perfection. Here’s what you’ll need:
- 1 sheet puff pastry, thawed – This is our secret weapon! Look for it in the freezer aisle. I prefer the all-butter variety for the richest flavor, but any brand will work beautifully. The key is to thaw it according to the package directions—usually in the fridge overnight or on the counter for 30-40 minutes. You want it pliable but still cold to the touch.
- 1/3 cup Nutella or hazelnut spread – The heart and soul of our stars! Its creamy, chocolate-hazelnut flavor is simply iconic. Chef’s Insight: If you’re feeling adventurous, you can substitute with any thick, spreadable filling. Think biscoff cookie butter, a high-quality raspberry jam, or even a dollop of salted caramel. The world is your oyster!
- 1 egg (for egg wash) – Don’t skip this! A simple egg wash (just the egg beaten with a tiny splash of water or milk) is what gives our stars that gorgeous, professional-looking golden-brown shine. It’s the difference between “nice” and “wow!”
- Powdered sugar (for dusting) – Our final flourish! This snowy dusting makes the stars look like they’ve just fallen from a winter sky. It adds a lovely, delicate sweetness that balances the rich Nutella perfectly.
- Star-shaped cookie cutter (about 3-inch size is ideal) – The tool that makes it all possible! If you don’t have a star, don’t fret. Use any shape you love—hearts for Valentine’s Day, circles for simplicity, or even Christmas trees for the holidays. The method remains the same.
Crafting Your Constellation: A Step-by-Step Guide
Alright, let’s roll up our sleeves and transform these simple ingredients into edible art. Follow these steps, and you’ll be a star-baking pro in no time!
Step 1: Prep Your Pastry & Station
First things first, preheat your oven to 375°F (190°C). This ensures it’s nice and hot when our stars are ready for their debut. Line a baking sheet with parchment paper—this prevents sticking and makes cleanup a dream. Now, lightly flour your work surface and your rolling pin. Unfold your thawed puff pastry sheet and give it a gentle roll. We’re not trying to make it paper-thin, just evening it out and smoothing any creases. Chef’s Hack: If your pastry feels sticky or soft, pop it back in the fridge for 10 minutes. Cold pastry is happy pastry and will puff up much better in the oven!
Step 2: Cut Out Your Stars
Take your star-shaped cookie cutter and start stamping! Press down firmly and cleanly to get defined edges. You’ll need an even number of stars because each pastry is a sandwich. Try to cut them as close together as possible to minimize waste. Once you’ve cut all your stars, you can gently re-roll the scraps to get a few more. Pro Tip: If the scraps are getting too warm, layer them on top of each other, chill for 10 minutes, and then re-roll. This keeps the layers intact.
Step 3: The Nutella Fill-Up
Place half of your pastry stars onto the prepared baking sheet, spacing them about an inch apart. They need a little room to puff and expand. Now, for the fun part: the filling! Spoon about a teaspoon of Nutella into the center of each star on the tray. The key here is to leave a clear border around the edges. If the Nutella goes all the way to the edge, it will squish out when you seal them, and we want all that gooey goodness locked inside.
Step 4: Seal the Deal
Carefully place the remaining star cut-outs on top of the Nutella-covered bases, like a little pastry hat. Now, take a fork and gently press down around the edges to seal the two layers together. This not only locks in the filling but also creates a lovely crimped pattern. Give them a little press to make sure they’re well-sealed friends.
Step 5: The Golden Egg Wash
In a small bowl, beat your single egg until it’s smooth and uniform. Using a pastry brush (your finger works in a pinch!), gently brush a thin layer of the egg wash over the top of each star. Be careful not to let it drip down the sides, as this can glue the layers together and prevent them from puffing up to their full, flaky potential. This step is what gives them that beautiful, bakery-worthy golden color.
Step 6: Bake to Perfection
Slide your baking sheet into the preheated oven and let the magic happen! Bake for 12-15 minutes. You’re looking for the stars to be magnificently puffed up and a deep, golden brown. Ovens can vary, so keep an eye on them, especially during the last few minutes. That hot air and steam are working hard to create hundreds of delicate, buttery layers.
Step 7: The Final Snowy Touch
Once they’re beautifully golden, remove them from the oven. Let them cool on the baking sheet for at least 5-10 minutes. They’re molten lava hot inside! Once they’ve cooled slightly, place a little powdered sugar in a fine-mesh sieve and dust it generously over the top. It’s like a fresh snowfall on your little pastry village. And just like that, you’ve done it!
Shining on the Plate: How to Serve Your Stars
Presentation is part of the fun! I love arranging these stars on a rustic wooden board or a beautiful vintage platter. They look absolutely enchanting piled high, with the powdered sugar dusted over them. They are perfect with a hot cup of coffee for a morning treat or served with a glass of cold milk as an after-dinner dessert. For a truly special touch during the holidays, I sometimes arrange them in the shape of a Christmas tree on a large platter, starting with one at the top and building down. They are guaranteed to be the star of any table!
Mix It Up! Creative Twists on the Classic
The basic formula is a fantastic canvas for your creativity. Here are a few of my favorite ways to mix things up:
- Fruit & Nutella: Add a few thin slices of banana or a dollop of raspberry jam along with the Nutella for a fruit-chocolate twist.
- Biscoff Bliss: Swap the Nutella for Biscoff cookie butter. The warm, spiced flavor is absolutely incredible.
- Salted Caramel Sensation: Use a thick salted caramel sauce as the filling and finish with a sprinkle of flaky sea salt after baking.
- Cheesy & Sweet: For the adults, place a small cube of brie or camembert inside with the Nutella. It bakes into a savory-sweet, gooey dream.
- Cinnamon Sugar Sparkle: Before baking, skip the egg wash and brush the tops with melted butter, then sprinkle with a mix of cinnamon and sugar for a crunchy, sparkly top.
From My Kitchen to Yours: A Few Final Thoughts
This recipe has been with me for years, and it has evolved in the best way. I’ve learned that the messier my apron gets, the better the stars turn out—it means I’m not overthinking it! One of my favorite kitchen memories is the time I tried to make a giant star using a massive cutter. It puffed up into a glorious, lopsided mountain of pastry that we had to eat with a fork and knife. It was hilarious and delicious, a reminder that cooking doesn’t have to be perfect to be wonderful.
The biggest lesson? Always, always let them cool a bit before you take a bite. I can’t tell you how many times I’ve burned the roof of my mouth because I was too impatient to wait for that molten Nutella to settle. The anticipation is part of the fun! This recipe is a keeper, one I hope you’ll share with your own friends and family, creating your own starlit memories.
Your Questions, Answered!
Over the years, I’ve gotten a few repeat questions about these stars. Here are the answers to help you troubleshoot like a pro!
Q: My Nutella leaked out everywhere while baking! What did I do wrong?
A: Ah, the great Nutella escape! This usually happens for one of two reasons. First, you might have used too much filling. A teaspoon is really all you need. Second, and most importantly, you might not have sealed the edges well enough. Make sure you press firmly all the way around with the tines of your fork to create a tight seal. Leaving a good border is key!
Q: Can I make these ahead of time?
A: Absolutely! You can assemble the stars completely (up to the point of baking), place them on the baking sheet, and then freeze them solid. Once frozen, transfer them to a zip-top bag. When you’re ready to bake, just place the frozen stars on a parchment-lined tray, brush with egg wash, and bake. You’ll likely need to add 2-4 extra minutes to the baking time.
Q: My pastry didn’t puff up very much. Why?
A: The most common culprit is that the pastry got too warm before it went into the oven. Remember, puff pastry puffs because the cold butter layers create steam. If the butter melts before baking, you lose that steam power. Keep everything cold, work relatively quickly, and don’t be afraid to chill the assembled stars for 10 minutes before baking if your kitchen is warm.
Q: I don’t have an egg. Can I skip the egg wash?
A: You can! The stars will still taste delicious. For a similar golden color, you can brush them with a little milk, heavy cream, or even melted butter. They just won’t have that signature high-gloss shine, but they’ll be just as lovely in a more rustic way.
Nutella Puff Pastry Stars
Description
Magical Nutella Puff Pastry Stars
Ingredients
-
1 sheet puff pastry, thawed but still cold
-
⅓ cup Nutella (or hazelnut spread)
-
1 egg, beaten (for egg wash)
-
Powdered sugar, for dusting
-
1 star-shaped cookie cutter (~3-inch size)
Instructions
-
Prep: Preheat oven to 375°F (190°C). Line a baking sheet with parchment.
-
Roll & Cut: Lightly flour surface, roll pastry to smooth creases. Cut out star shapes with cutter (you need an even number).
-
Fill: Place half the stars on the baking sheet. Add 1 tsp Nutella to the center of each, leaving a border.
-
Seal: Top with remaining stars. Press edges with a fork to seal.
-
Egg Wash: Brush tops with beaten egg (avoid drips down the sides).
-
Bake: Bake 12–15 min, until puffed and golden. Cool 5–10 min.
-
Finish: Dust with powdered sugar before serving.
Notes
-
Don’t overfill—1 tsp Nutella per star is plenty.
-
Keep pastry cold for best puff. Chill assembled stars for 10 min if needed.
-
To freeze: Assemble stars (unbaked), freeze on tray, then store in a bag. Bake from frozen, adding 2–4 min.
Nutrition
- Calories: 180 cal Per Serving
- Sugar: 7g
- Fat: 11g
- Carbohydrates: 17g
- Protein: 2g
Just the Facts (Because We’re Curious!)
Please note: These are approximate values and can vary based on specific ingredients used.
- Prep Time: 15 mins
- Bake Time: 15 mins
- Calories: ~180 per star
- Fat: 11g
- Carbs: 17g
- Sugar: 7g
- Protein: 2g
Final Thoughts: Your Own Starlit Journey Awaits
And there you have it—the secret to creating a little bit of everyday magic. These Nutella Puff Pastry Stars are more than just a recipe; they’re an invitation to find joy in the simple act of creating. They prove that you don’t need a culinary degree or a pantry full of exotic ingredients to make something truly special. All you need is a sheet of pastry, a jar of something sweet, and the willingness to get your hands a little dusty with flour and powdered sugar.
So, the next time you feel a spark of inspiration or a need for a cozy, comforting treat, remember this recipe. Stamp out your stars, embrace any lopsided perfection, and fill your kitchen with that unforgettable, buttery aroma. I hope these pastries become a cherished part of your own story, creating warm, starlit memories for you and the ones you love. Now, go on and bake some joy!


