
Your New Favorite Holiday Tradition: Christmas Tree Brownie Pops!
Hello, my festive friends, and welcome back to the kitchen! Can you smell that? It’s the scent of pine needles, a crackling fireplace, and… is that fudgy brownies fresh from the oven? Yes, it absolutely is. There’s a special kind of magic that happens during the holiday season, and for me, a huge part of that magic lives right here, in the heart of the home, whipping up treats that are as fun to make as they are to eat.
If you’ve ever felt like your holiday baking spread is missing a little *sparkle*, or you’re looking for a project that will have the whole family gathered around the table (sprinkles at the ready!), you are in for the most delightful treat. Today, we’re turning a classic, beloved brownie into an edible holiday masterpiece: Christmas Tree Brownie Pops!
Imagine this: rich, decadent, melt-in-your-mouth brownies, transformed into adorable little Christmas trees. We’ll pipe on swirls of vibrant green frosting, deck them out with a rainbow of sprinkles, and crown each one with a shiny candy star. With a lollipop stick for easy handling, they’re part dessert, part decoration, and 100% guaranteed to bring instant cheer. They’re perfect for cookie exchanges, school parties, or simply as a joyful weekend activity that ends with a delicious reward. So, tie on your favorite (probably messy) apron, and let’s create some holiday magic together!
The Year the Brownies Saved Christmas
I have to share a little story with you about how these festive pops became a non-negotiable part of my holiday lineup. A few years back, I was hosting my very first big family Christmas Eve dinner. I had planned an elaborate, multi-layer Yule log cake—the kind you see in fancy magazines. It was ambitious, to say the least. Long story short, my beautiful Bûche de Noël cracked, split, and generally looked more like a log that had been through a woodchipper than a pristine winter forest.
Panic started to set in. I had a dozen people arriving in a few hours and no centerpiece dessert! But then, I remembered a pan of simple, foolproof brownies I had stashed away for a snack. In a moment of pure, desperate inspiration, I grabbed my tree-shaped cookie cutter, some green food coloring, and a bag of sprinkles. What started as a kitchen disaster turned into the hit of the night. My little cousins’ faces lit up when they saw the “forest” of brownie trees, and the adults weren’t far behind. It taught me a beautiful lesson: the best holiday treats aren’t about perfection; they’re about joy, creativity, and a whole lot of love. Now, I make them on purpose, every single year.
Gathering Your Festive Forest Ingredients
One of the best things about this recipe is that you likely have most of these ingredients in your pantry right now. We’re using a simple, from-scratch brownie base that’s wonderfully fudgy and sturdy—perfect for holding its tree shape. Let’s break it down!
For the Brownies (Makes about 12 pops)
- 1/2 cup unsalted butter – This gives our brownies that rich, melt-in-your-mouth texture. I prefer unsalted so I can control the salt level. Chef’s Insight: If you only have salted butter, just reduce the added salt below to a tiny pinch.
- 1 cup granulated sugar – For that classic sweet, crisp brownie top we all know and love.
- 2 large eggs – They bind everything together and add structure. Make sure they’re at room temperature for a smoother batter!
- 1 tsp vanilla extract – The secret weapon! A good quality vanilla adds a warm, complex flavor that makes the chocolate pop.
- 1/3 cup unsweetened cocoa powder – This is where our chocolate flavor comes from. I use a standard cocoa powder, not Dutch-processed, for this recipe.
- 1/2 cup all-purpose flour – The foundation. We’re not using much, which is key to a fudgy, not cakey, texture.
- 1/4 tsp salt – Never skip the salt! It balances the sweetness and intensifies the chocolate flavor beautifully.
- 1/4 tsp baking powder – This gives our brownies just a tiny bit of lift, so they’re not overly dense.
For Decorating Your Trees
- 1 cup green buttercream frosting – You can use your favorite store-bought tub to save time, or whip up a quick homemade batch with 1/2 cup softened butter, 1 1/2 cups powdered sugar, 1-2 tbsp milk, and a teaspoon of vanilla, beaten until fluffy. Substitution Tip: For a different look, try cream cheese frosting! It’s delicious with chocolate.
- Holiday sprinkles – This is where you can get creative! I love a mix of red and green nonpareils, but jimmies, sanding sugar, or even tiny edible pearls all work wonderfully. This is your “ornament” stash!
- 12 candy stars – The perfect tree-topper. If you can’t find candy stars, Chef’s Hack: yellow M&Ms or even a dab of yellow frosting piped into a star shape work great.
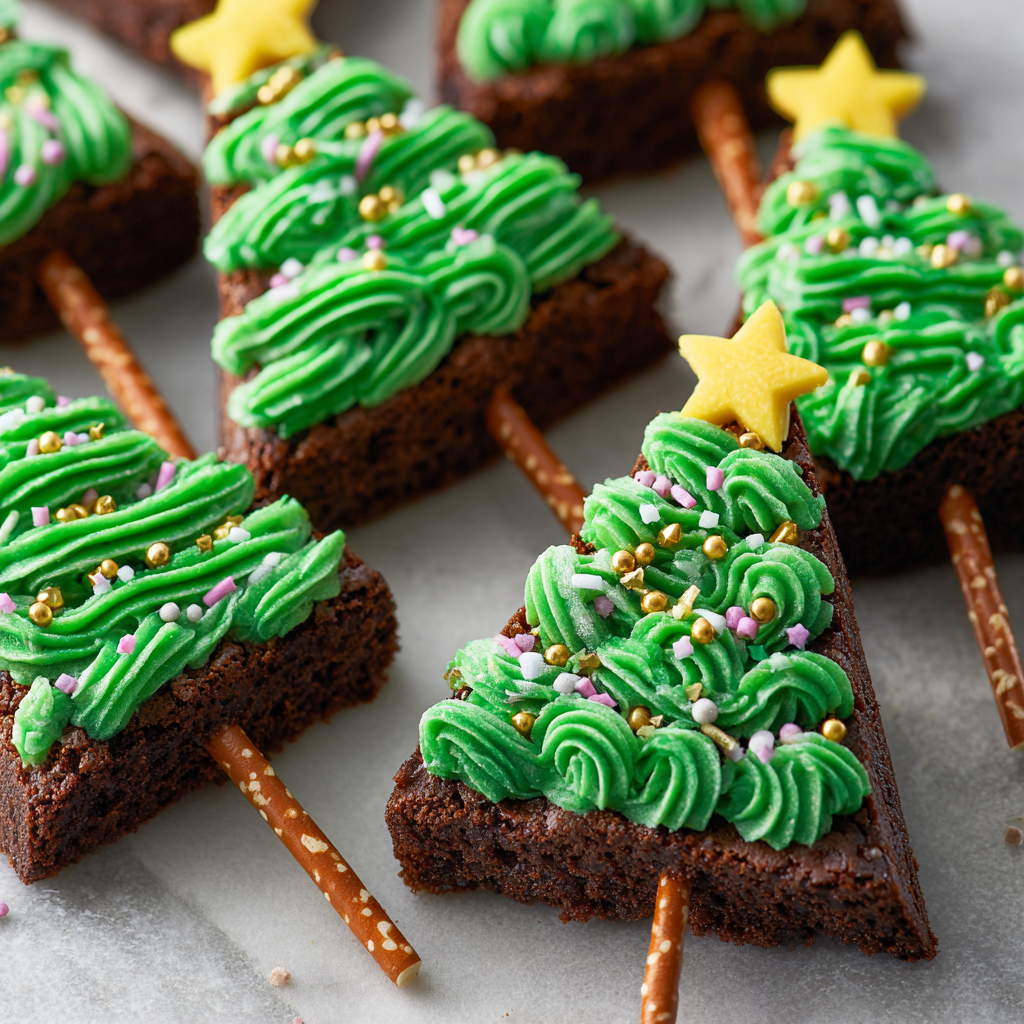
- Lollipop sticks or pretzel rods – Lollipop sticks give you the classic “pop” look. For a sturdier, edible handle, I absolutely adore using pretzel rods—the salty-sweet combo is incredible!
Let’s Build Our Brownie Forest: A Step-by-Step Guide
Ready to get your hands a little messy? This is the fun part! I’ll walk you through each step with all my favorite tips and tricks to ensure your Christmas trees are the talk of the town.
- Bake the Brownies to Fudgy Perfection. Start by preheating your oven to 350°F (175°C) and greasing or lining an 8×8 inch baking pan with parchment paper. Pro-Tip: Let the parchment paper hang over the sides a bit—it creates a “sling” that makes it super easy to lift the entire brownie slab out later! In a medium saucepan, gently melt the butter over low heat. Remove it from the heat and immediately whisk in the granulated sugar. Let it sit for a minute to cool slightly—we don’t want to cook the eggs! Then, whisk in the eggs, one at a time, followed by the vanilla extract. You’ll see the mixture become thick and glossy. Now, sift in the cocoa powder, flour, salt, and baking powder. Stir until you have a beautiful, smooth, and unified batter. No overmixing needed! Pour the batter into your prepared pan and spread it evenly. Bake for 20-25 minutes. You’ll know they’re done when the top is set and a toothpick inserted into the center comes out with a few moist crumbs clinging to it. Do not overbake! We want fudgy, not dry.
- The All-Important Cool Down. This might be the hardest step: patience! Let the brownies cool completely in the pan on a wire rack. I know it’s tempting to dive right in, but warm brownies are too soft and will crumble when we try to cut and shape them. For the cleanest, sharpest tree shapes, I highly recommend popping the fully cooled pan into the refrigerator for at least an hour, or even the freezer for 30 minutes. This makes them incredibly easy to handle.
- Carve Your Christmas Trees. Once your brownie slab is firm and cool, lift it out of the pan using the parchment paper sling. Place it on a cutting board. We’re going to create triangles. First, use a sharp knife to slice the brownie into three even rows. Now, for the fun geometry! Cut each row into alternating triangles. Imagine a zig-zag pattern. Make a diagonal cut from the top corner to the bottom center of the first rectangle, then another diagonal cut from that bottom center point up to the top of the other side. You’ve just made your first tree! Repeat this all the way down the row. Don’t worry about the scraps—those are the chef’s treat! Chef’s Hack: If you have a small tree-shaped cookie cutter, you can absolutely use that for perfectly uniform shapes!
- Insert the Sticks. Take your lollipop sticks or pretzel rods and gently but firmly insert them about halfway into the flat base of each brownie triangle. If you feel any resistance or cracking, you can use the tip of a knife to pre-poke a small pilot hole. If you used pretzel rods and they feel a bit loose, a tiny dab of melted chocolate or frosting at the insertion point will act as edible glue, holding everything securely together.
- Deck the Halls (and the Brownies)! Now for the grand transformation! Scoop your green buttercream frosting into a piping bag fitted with a star tip (like a Wilton 1M or 21). If you don’t have a piping bag, a sturdy plastic bag with a corner snipped off works just fine. Starting at the bottom of the tree, pipe swirls of frosting around the brownie, moving your way up to the top. The star tip will create a beautiful, textured “garland” effect. While the frosting is still wet, immediately shower your trees with holiday sprinkles—these are your ornaments! Finally, press a candy star firmly onto the very top. And there you have it! A gorgeous, festive, and utterly delicious Christmas Tree Brownie Pop.
Spreading the Holiday Cheer: How to Serve Your Masterpieces
Presentation is part of the fun with these pops! For a truly magical display, stick the ends of the pops into a foam block or even a sturdy upside-down colander that you’ve covered with foil. You can create a whole “forest” on your dessert table. For a simpler approach, just lay them flat on a festive platter lined with parchment paper. They look adorable peeking out from among other holiday cookies and treats. These are perfect for gifting, too—wrap them individually in clear cellophane bags tied with a ribbon for a homemade gift that anyone would adore.
Branch Out! Fun Variations for Your Brownie Trees
Feel like mixing it up? This recipe is a wonderful canvas for your creativity!
- Chocolate Drizzle: Skip the green frosting and drizzle the trees with melted white or dark chocolate, then add sprinkles. It’s a more minimalist, elegant look.
- Peppermint Twist: Add 1/4 teaspoon of peppermint extract to your brownie batter and use crushed candy canes as your “ornaments” for a cool, festive flavor.
- Gluten-Free & Dairy-Free: Use your favorite gluten-free 1:1 flour blend and replace the butter with a plant-based alternative. The recipe is very forgiving!
- Nutty Forest: Fold 1/3 cup of finely chopped pecans or walnuts into the brownie batter for a little extra crunch.
- “Snowy” Trees: For a winter wonderland effect, pipe the trees with white frosting or a simple vanilla glaze and use white sanding sugar and blue sprinkles.
Olivia’s Chef’s Notes & Kitchen Confessions
Over the years, this recipe has evolved in the best ways. I’ve learned that the “mistakes” are often the most charming part. One year, my nephew decided his tree needed a trunk, so we stuck a mini pretzel stick at the base of each one—and it was adorable! Another time, I ran out of green food coloring and made a batch of pink “gingerbread” trees. They were a huge hit. The point is, don’t stress.
My biggest piece of advice is to embrace the mess. The sprinkles will go everywhere. Your fingers will be covered in green frosting. You will probably eat more brownie scraps than you intended. And it will be perfect. This recipe is about the experience as much as the outcome. So put on some holiday music, pour yourself a mug of hot cocoa, and enjoy the process of creating something beautiful and delicious with your own two hands.
Your Brownie Pop Questions, Answered!
I’ve made these countless times and have answered a lot of questions from readers along the way. Here are the most common ones to help you on your baking journey!
Q: My brownies are crumbling when I try to insert the stick! What did I do wrong?
A: Oh, I’ve been there! This usually happens for one of two reasons: 1) The brownies weren’t cooled and chilled enough. A firm, cold brownie is a sturdy brownie. Pop them back in the fridge! 2) They might be a tad overbaked. Next time, try taking them out of the oven a minute or two earlier. If you’re in a pinch, you can “glue” the cracks and secure the stick with a little dab of melted chocolate or thick frosting.
Q: Can I use a boxed brownie mix to save time?
A> You absolutely can! A boxed mix is a fantastic shortcut. Just look for a “fudge” style mix rather than a “cakey” one, and follow the directions for an 8×8 inch pan. The chilling step is even more crucial with box mixes, as they can sometimes be more tender.
Q: How far in advance can I make these?
A> You can bake and cut the brownies 1-2 days in advance; just store them in an airtight container in the fridge. For the best texture and appearance, I recommend decorating them the day you plan to serve them. The assembled pops will hold up beautifully at room temperature for a day.
Q: My frosting is too thin and won’t hold a swirl. Help!
A> This is a common frosting dilemma! If it’s store-bought, try stirring it vigorously to incorporate more air, or even chilling it for 15-20 minutes. If it’s homemade, your butter might have been too soft. The fix is easy: just gradually add more sifted powdered sugar, a quarter cup at a time, until it reaches a stiffer, pipe-able consistency.

Christmas Tree Brownie Pops
Description
Christmas Tree Brownies
Ingredients
Ingredients
-
1 box brownie mix (or homemade brownies)
-
Ingredients called for on box (eggs, oil, water)
-
Green frosting (store-bought or homemade buttercream)
-
Candy decorations (M&Ms, sprinkles, mini marshmallows, candy canes, etc.)
-
Lollipop sticks or small candy canes (optional, for tree trunks)
Instructions
-
Bake Brownies:
-
Prepare brownies in a 9×13-inch pan according to package or recipe directions.
-
Let brownies cool completely for clean cuts.
-
-
Cut Into Trees:
-
Trim edges for straight sides.
-
Cut into long strips, then cut each strip into triangles (tree shapes).
-
-
Add Tree Trunks (Optional):
-
Gently insert lollipop sticks, pretzel rods, or broken candy canes into the base of each triangle.
-
-
Decorate Trees:
-
Pipe or spread green frosting to look like branches.
-
Decorate with candies, sprinkles, or marshmallows as ornaments.
-
Add a candy star or yellow sprinkle on top if desired.
-
Notes
-
Chill brownies before cutting for cleaner slices.
-
Use a star-shaped sprinkle or mini candy for the tree topper.
-
Store in an airtight container up to 3 days (or freeze undecorated brownies up to 1 month).
Nutritional Information*
*This is an estimate for one brownie pop using the provided recipe and standard ingredients. Values can vary based on specific brands and decorating choices.
- Prep Time: 20 mins
- Cook Time: 25 mins
- Calories: ~210 per pop
- Fat: 10g
- Carbohydrates: 28g
- Sugar: 20g
- Protein: 2g
There you have it, my friends! Everything you need to create a forest of festive, fun, and fabulously tasty Christmas Tree Brownie Pops. I can’t wait for you to try them. Tag me on Instagram @OliviasCozyKitchen if you make them—I love seeing your creations! Happy Baking and Happy Holidays!
Final Thoughts: A New Tradition Rooted in Joy
As we wrap up our time in the kitchen today, I hope you’re feeling as inspired and excited as I am every time I make these. These Christmas Tree Brownie Pops are more than just a dessert; they’re a tiny, edible celebration. They represent the heart of what holiday baking is all about: creativity, connection, and the simple, sweet joy of making something with your own two hands.
Remember, your holiday traditions don’t have to be grand or perfect to be magical. Sometimes, the most cherished moments sprout from a simple pan of brownies and a little bit of festive spirit. So, whether this becomes your new go-to for parties, a fun family activity, or your secret weapon for a last-minute dessert emergency, I hope these little trees bring as much light and happiness to your home as they have to mine.
From my cozy kitchen to yours, I wish you a season filled with love, laughter, and of course, delicious treats.


