
Let’s Make Some Edible Holiday Magic!
Hello, my friends, and welcome back to the kitchen! Can you smell it? That crisp, chilly air is finally starting to carry the unmistakable scent of the holidays. It’s my absolute favorite time of year to bake and create, to fill the house with warmth and the sounds of laughter. And if your heart, like mine, does a little happy dance at the thought of turning simple ingredients into pure, show-stopping joy, then you are in for the most wonderful treat today.
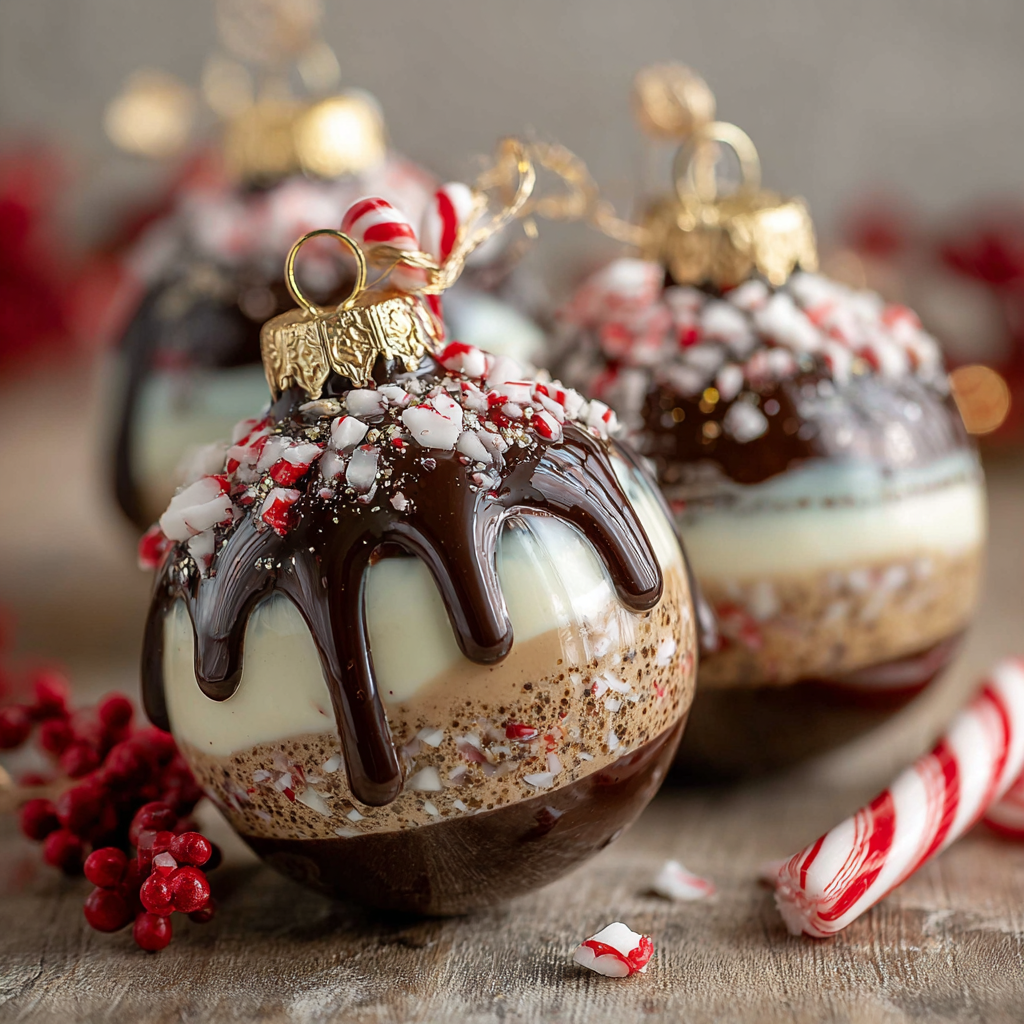
I’m talking about a dessert that looks like it belongs in a patisserie window but is totally achievable right in your own kitchen. We’re making Peppermint Mocha Mousse Ornaments. Just saying the name makes me smile! Imagine the richest, silkiest chocolate mousse you’ve ever tasted, infused with a hint of coffee to deepen the flavor, then given a cheerful crunch of cool peppermint. Each one is enrobed in a dazzling, glossy mirror glaze that shimmers like a freshly hung ornament on the tree.
Yes, they look elegant and impressive, but I promise you, the process is a blast. This is a project that’s perfect for a festive weekend in, maybe with some holiday music playing and a mug of hot cocoa within reach. We’re going to walk through every single step together. So, tie on your favorite (probably messy) apron, and let’s create some edible holiday magic that will have all your guests utterly spellbound.
A Sweet Slice of Christmas Past
This recipe always takes me right back to my grandma’s house. Every Christmas Eve, she would let me help her decorate the tree. It was a serious affair—tinsel had to be placed one strand at a time, and the glass ornaments were handled with the care of a museum curator. But my favorite part was the box of non-breakable, kid-friendly ornaments. They were chunky, colorful, and always had a little hook that I was somehow always tempted to put in my mouth (don’t tell!).
One year, I had the brilliant, five-year-old idea that we should make ornaments you could eat. My grandma, being the incredible sport that she was, humored me. Our first attempt was… not successful. Let’s just say gingerbread men covered in glitter glue are not a recommended snack. But the spark of that idea—edible, beautiful holiday decorations—never left me. These mousse ornaments are my grown-up, way-more-delicious homage to that memory. They capture that same feeling of wonder and playfulness, but with a flavor combination that is pure, sophisticated comfort. Every time I make them, I think of her, and it makes my holiday table feel just a little bit more magical.
Gathering Your Magical Ingredients
Before we begin, let’s get familiar with our cast of characters. Using quality ingredients here makes a world of difference in both flavor and texture. Don’t worry, I’ve got substitution tips for you, too!
For the Chocolate-Coffee Mousse:
- 1 cup cold heavy cream: This is the base of our mousse, providing that dreamy, airy texture. Make sure it’s straight-from-the-fridge cold for the best whip. For a lighter version, you could use whipping cream, but the mousse won’t be quite as stable.
- 1/2 cup dark chocolate chips: The star of the show! I love the depth of flavor from dark chocolate, but semi-sweet works beautifully too. Use a bar of baking chocolate, chopped, for an even smoother melt.
- 1 tbsp instant espresso powder: This is my secret weapon! It doesn’t make the mousse taste like coffee; it just makes the chocolate taste more like chocolate. If you don’t have it, you can use 1-2 teaspoons of very strong, freshly brewed coffee, cooled completely.
- 2 tbsp sugar: Just a touch to balance the bitterness of the dark chocolate and coffee.
- 2 egg yolks: They add incredible richness and help stabilize our mousse. We’ll cook them gently to ensure they’re safe to eat.
- 2 tbsp water: This helps create a sabayon with the yolks, making them lovely and thick.
- 1/2 tsp vanilla extract: The classic flavor enhancer. A little splash rounds out all the other flavors.
- Pinch of salt: Never, ever skip the salt! It cuts the sweetness and makes every flavor pop.
For the Peppermint Crunch Layer:
- 1/2 cup crushed peppermint candies: This gives us that fantastic festive crunch and cool flavor. Candy canes are perfect for this! Pro tip: place them in a zip-top bag and crush them with a rolling pin.
- 1/2 cup white chocolate, melted: This acts as the glue for our peppermint crunch. It also adds a creamy sweetness that pairs so well with the dark chocolate mousse.
For the Mirror Glaze:
- 1/2 cup sweetened condensed milk: This is the key to the glaze’s signature shine and slight sweetness. There’s no real substitute here—it’s magic in a can!
- 1/2 cup white chocolate chips: Combined with the gelatin, this gives the glaze its structure and gorgeous opaque color.
- 1 tbsp gelatin + 3 tbsp water (bloomed): Don’t be intimidated! “Blooming” just means sprinkling the gelatin over the water and letting it sit to absorb the liquid and become a spongy gel. This is what makes the glaze set beautifully.
- 1/3 cup sugar & 1/3 cup water: We’ll cook these together into a simple syrup to dissolve the sugar and create the liquid base for our glaze.
- Gel food coloring (red or shimmer): Gel coloring is best because it won’t water down the glaze. Go for classic red, a festive shimmer, or even a mix!
Extras:
- Silicone ornament molds: Essential for that perfect ornament shape! They make unmolding a breeze.
- Candy hooks or fondant toppers: For that final, adorable decorative touch.
Let’s Get Building: A Step-by-Step Guide to Mousse Magic
Okay, team! Here’s where the fun really begins. Read through all the steps first, and remember, we’re not in a rush. Cooking is about the journey, not just the destination. Let’s do this!
Step 1: Create the Peppermint Crunch Base
First, we’ll create that delightful crunchy bottom for our ornaments. Place your peppermint candies in a sturdy zip-top bag and use a rolling pin to crush them into small, festive pieces. You want a mix of fine bits and a few larger chunks for great texture. Next, gently melt your white chocolate in the microwave in 20-second bursts, stirring each time, until it’s smooth. Chef’s Hack: Be careful not to overheat it, or it can seize up! Now, stir the crushed peppermints into the melted white chocolate. Spoon a thin, even layer of this mixture into the bottom of each cavity in your silicone ornament mold. Pop the whole mold into the freezer for at least 15 minutes to set rock solid. This creates a barrier so the mousse doesn’t soak into our crunchy layer.
Step 2: Whip Up the Chocolate-Coffee Mousse
While the base is setting, let’s make the star of the show. Start by pouring your cold heavy cream into a large bowl and whipping it until it just holds soft peaks. You should see trails from the whisk, but it should still look soft and billowy—don’t take it to stiff peaks. Set this aside. Now, combine your dark chocolate chips and instant espresso powder in a heatproof bowl. Melt them together over a double boiler or in the microwave (again, in short bursts!), stirring until gloriously smooth. Set this aside to cool slightly.
Now for the yolks! In a separate heatproof bowl, whisk together the 2 egg yolks, 2 tablespoons of sugar, and 2 tablespoons of water. Place this bowl over a pot of gently simmering water, making sure the bottom of the bowl isn’t touching the water. Chef’s Hack: Whisk constantly for about 4-5 minutes. You’re looking for the mixture to become pale, thick, and foamy—this is called a sabayon. It should leave a ribbon trail on the surface when you lift the whisk. This step gently cooks the eggs and gives our mousse incredible body.
Once your sabayon is ready, take it off the heat and immediately whisk it into the slightly cooled chocolate-espresso mixture. This will look rich and beautiful. Now, let’s be gentle. Take about one-third of your whipped cream and fold it vigorously into the chocolate mixture to lighten it up. Then, carefully fold in the remaining whipped cream until no white streaks remain. Chef’s Hack: Use a spatula and a “figure-eight” motion, cutting through the center and folding over the top. Be patient! We want to keep all that air we whipped in.
Step 3: Assemble and Freeze
Pull your mold with the set peppermint base out of the freezer. Spoon or pipe your beautiful mousse into each cavity, right on top of the crunch layer. Fill them up to the top and use an offset spatula or the back of a knife to smooth the surface perfectly. This will be the bottom of your ornament, so a flat, clean surface is key for a beautiful glaze later. Once they’re all filled, gently tap the mold on the counter to release any air bubbles. Now, the hardest part: patience. Cover the mold with plastic wrap and freeze it overnight, or for at least 8 hours. They need to be completely frozen solid for the glaze to work its magic.
Step 4: Create the Dazzling Mirror Glaze
Glaze day! This is so satisfying. Start by blooming your gelatin: sprinkle the 1 tablespoon of gelatin over the 3 tablespoons of water in a small bowl. It will look wrinkly and solid—that’s perfect! Let it sit for 5 minutes. In a small saucepan, combine the 1/3 cup sugar, 1/3 cup water, and the sweetened condensed milk. Heat this over medium heat, stirring, until it just begins to simmer and the sugar is fully dissolved. Remove it from the heat.
Immediately add your bloomed gelatin and your white chocolate chips to the hot liquid. Stir continuously until everything is completely melted and the mixture is smooth. If you’re using gel food coloring, now is the time to stir it in. Add a little at a time until you reach your desired color. Now, strain the glaze through a fine-mesh sieve into a clean bowl to remove any little lumps. This is the secret to a perfectly glass-smooth finish! Let the glaze cool down, stirring occasionally, until it reaches about 90°F (32°C) on a digital thermometer. This temperature is non-negotiable for success!
Step 5: The Grand Finale – Glazing and Decorating
Set up a glazing station: place a wire rack over a baking sheet (to catch the drips) and have your frozen, unmolded mousse ornaments nearby. To unmold, simply flex the silicone mold—they should pop out easily. Place them on the wire rack, flat (formerly bottom) side up. Working quickly but carefully, pour the cooled glaze over one ornament at a time, completely covering the top and sides. Use a spatula to help spread it if needed. The excess will drip down onto the baking sheet. Immediately place a candy hook or fondant topper into the top before the glaze sets. Repeat with all ornaments. Let the glaze set for a few minutes at room temperature, then carefully transfer your finished masterpieces to a serving plate. They are best served slightly thawed, so let them sit in the fridge for 20-30 minutes before serving for the perfect mousse texture.
How to Serve Your Edible Ornaments
Presentation is part of the fun! For a true “wow” moment, arrange these glazed ornaments on a beautiful cake stand or a platter lined with a dusting of powdered sugar “snow.” You could even scatter a few extra crushed peppermints or chocolate shavings around the base. They are rich, so one per person is perfect, perhaps with a small cup of strong coffee or a glass of cold milk to balance the sweetness. Watch as your guests’ eyes light up when they realize these gorgeous decorations are meant to be eaten!
Get Creative! Fun Flavor Twists
Feel like mixing it up? This recipe is a fantastic canvas for your creativity!
- Orange Chocolate: Swap the peppermint for crushed gingerbread cookies and add a teaspoon of orange zest to the mousse for a classic flavor pairing.
- Cookies & Cream: Use crushed Oreos instead of peppermints for the crunch layer and use a black cocoa powder in the glaze for a dramatic black mirror effect.
- Mint Chip: Omit the espresso powder and add 1/4 teaspoon of pure peppermint extract to the mousse itself. Use green food coloring in the glaze and top with mini chocolate chips.
- Dairy-Free Delight: Use chilled coconut cream for whipping, dairy-free chocolate, and a vegan sweetened condensed milk alternative. Agar-agar can be used in place of gelatin for the glaze.
Olivia’s Kitchen Notes & Stories
This recipe has seen a few… interesting… iterations in my kitchen. The first time I attempted a mirror glaze, I was so impatient I poured it on while it was still warm. Let’s just say I ended up with “Peppermint Mocha Puddles” instead of ornaments! It was a delicious, messy lesson in the importance of temperature. Another time, I tried to be fancy and added edible gold leaf, which my dog, Biscuit, promptly tried to eat off the counter. We’ve learned to keep the bling out of his reach.
The beauty of this recipe is that it feels fancy, but it’s really just a series of simple steps done with care. Don’t stress if your first glaze isn’t perfectly smooth—it will still taste incredible. The most important ingredient is the joy you put into making it. These ornaments have become a non-negotiable part of my holiday hosting, and I hope they bring as much happiness to your table as they have to mine.
Your Questions, Answered!
Q: My glaze was too thick and lumpy! What went wrong?
A: This usually means the glaze was too cool when you poured it. The ideal temperature is 90°F (32°C). If it starts to thicken as you’re working, you can gently re-warm it over a double boiler for a few seconds or pop it in the microwave for 5-10 seconds and stir. Always strain it for that flawless finish!
Q: Can I make these ahead of time?
A: Absolutely! That’s one of the best parts. The assembled mousse ornaments can live in the freezer, well-wrapped, for up to 2 weeks. You can glaze them a day or two before serving and keep them refrigerated. The glaze holds up beautifully.
Q: I’m nervous about using raw egg yolks. Is there a way to pasteurize them?
A> That’s a great question and a common concern! The good news is, when we whisk the yolks with sugar and water over the simmering water for 4-5 minutes, we are actually gently cooking them to a safe temperature (160°F/71°C). If you want to be extra cautious, you can use pasteurized eggs found in most grocery stores.
Peppermint Mocha Mousse Ornaments
Description
Peppermint Mocha Mousse Ornaments
Ingredients
Chocolate Coffee Mousse:
-
6 oz semisweet chocolate, chopped
-
2 tsp instant espresso powder
-
1 tsp vanilla extract
-
2 cups heavy cream, chilled
-
¼ cup powdered sugar
Peppermint White Chocolate Glaze:
-
1 cup white chocolate chips
-
½ cup heavy cream
-
1 tsp peppermint extract
-
Red gel food coloring
Assembly/Decoration:
-
8 silicone half-sphere molds
-
8 candy cane hooks (or candy cane pieces, pretzel rods, or fondant toppers)
-
Crushed candy canes (optional garnish)
Instructions
-
Make the mousse:
-
Melt chocolate + espresso over a double boiler. Stir in vanilla, let cool.
-
Whip cream + powdered sugar to soft peaks.
-
Fold whipped cream into cooled chocolate mixture until smooth.
-
Pipe mousse into silicone molds. Freeze 4 hours or overnight.
-
-
Prepare the glaze:
-
Heat cream until steaming, pour over white chocolate. Stir until smooth.
-
Add peppermint extract. Tint half with red food gel, leaving half white.
-
-
Glaze ornaments:
-
Unmold frozen mousse spheres.
-
Place on rack over parchment.
-
Pour alternating red/white glaze for a swirl effect. Let set 15 minutes.
-
-
Decorate:
-
Insert a candy cane hook on top to look like ornament hanger.
-
Sprinkle with crushed candy canes or edible glitter if desired.
-
Notes
-
Glaze must cool to ~90°F before pouring for shiny finish.
-
Can be made ahead: freeze mousse up to 2 weeks, glaze the day before serving.
Final Thoughts: You Are the Magic
And there you have it, my friends. What began as a simple, childhood dream in my grandma’s living room has now become a shimmering, edible reality in your kitchen. As you look at your finished Peppermint Mocha Mousse Ornaments, I hope you feel an immense sense of pride. You’ve taken humble ingredients—cream, chocolate, a few crushed candies—and transformed them into pure, edible artistry.
Remember, the true magic of this recipe isn’t just in the dazzling glaze or the silky mousse (though they are certainly wonderful). It’s in the time you took to create something beautiful. It’s in the laughter that filled your kitchen while the music played. It’s in the shared moment of wonder when your family and friends see these ornaments on your table, their eyes wide with delight.
So, as you celebrate this holiday season, carry this feeling with you. Whether your glaze was perfectly smooth or charmingly rustic, whether you followed the recipe to the letter or added your own creative twist, you have succeeded. You have created not just a dessert, but a memory. You have baked with joy, and that is the most important ingredient of all.


