

Your New Favorite Morning Ritual: Banana Oat Chocolate Chip Breakfast Bars
Hey there, friend! Can we talk about mornings for a second? Specifically, those mornings when the alarm feels like a personal attack, your to-do list is already a mile long, and the mere thought of scrambling eggs or blending a smoothie seems like a monumental task. We’ve all been there. On those days, the siren call of a sugary cereal box or a drive-thru window is strong, but I’m here to tell you there’s a better way—a way that’s wholesome, delicious, and feels like a warm hug in bar form.
I want to introduce you to my absolute go-to recipe for Banana Oat Chocolate Chip Breakfast Bars. These little squares of joy are the heroes of my kitchen. They’re chewy, naturally sweet, and packed with ingredients that will actually fuel your day, not leave you crashing by 10 AM. The best part? They come together in one bowl with just a few simple steps. Seriously, if you can mash a banana and stir, you are already a breakfast bar master.
This recipe is all about flexibility and forgiveness. No buttermilk? No problem. Out of vanilla? You’ll survive. It’s the kind of recipe that invites you to play, to make it your own. So, preheat that oven, grab those spotty bananas sitting on your counter (you know the ones!), and let’s create something wonderful together. Your future self, on a hectic Tuesday morning, will thank you profusely.
The Happy Accident That Started It All
This recipe has a special place in my heart because it was born from a classic “kitchen sink” moment. Picture this: It was a rainy Sunday evening, and I was staring into the abyss of my pantry, willing inspiration to strike. I had a serious case of the “I-don’t-want-to-go-grocery-shopping” blues. On the counter, three bananas were staging a full-scale mutiny, becoming softer and spottier by the minute. I couldn’t bear to waste them.
I had oats, a half-empty jar of peanut butter, and a bag of chocolate chips leftover from a cookie-baking spree. In a moment of “what’s the worst that could happen?” energy, I mashed it all together, spread it in a pan, and crossed my fingers. What emerged from the oven was nothing short of magic. The apartment smelled like a cozy bakery, and the bars were perfectly chewy with little molten pockets of chocolate. My husband wandered into the kitchen, drawn by the scent, and we ended up eating half the pan straight away, standing over the stove, laughing about our impromptu dessert. It was one of those unplanned, perfectly imperfect moments that remind me why I love cooking—it’s not just about feeding yourself, it’s about creating little pockets of joy.
Gathering Your A-Team: The Ingredients
Here’s everything you’ll need to make these magic bars. I’ve included some of my favorite tips and swaps for each ingredient because life happens, and we need recipes that can roll with the punches!
- 3 Ripe Bananas, mashed: This is non-negotiable! The riper the banana, the sweeter your bars will be naturally. Those black-speckled bananas are pure gold here. They mash easily and impart a deep, caramel-like sweetness. Chef’s Insight: If your bananas aren’t quite ripe enough, you can pop them (in their peels) on a baking sheet in a 300°F oven for 15-20 minutes until the skins turn black. Let them cool, and they’ll be perfectly soft and sweet!
- 2 cups Oats (rolled or quick): This is the hearty base that gives the bars their satisfying chew. I prefer old-fashioned rolled oats for a bit more texture, but quick oats work perfectly fine and will yield a slightly softer bar. Substitution Tip: Need these to be gluten-free? Just make sure you’re using certified gluten-free oats!
- 1 cup Chocolate Chips: Because… chocolate! This is the fun part. I like semi-sweet chips to balance the sweetness of the bananas, but dark chocolate or milk chocolate are fantastic too. Chef’s Insight: For a slightly healthier twist, try chopped dark chocolate or cacao nibs. The nibs give a wonderful crunch and intense chocolate flavor without the added sugar.
- ½ cup Peanut Butter: This adds richness, protein, and helps bind everything together. I use creamy, natural peanut butter, but any kind will work. Substitution Tip: Allergic to peanuts? No worries! Almond butter, cashew butter, or even sunflower seed butter are fabulous alternatives.
Optional Flavor Boosters (Mix and Match!):
- 1 tsp Vanilla Extract: A classic for a reason. It rounds out the flavors and makes everything taste more… well, baked!
- 1 scoop Chocolate Protein Powder: My secret weapon for turning these into a powerhouse post-workout snack. It makes them extra filling. Pro-Tip: If you add protein powder, you might need to add a tablespoon or two of milk (dairy or non-dairy) to keep the batter from becoming too dry.
- Dash of Cinnamon: A warm, cozy spice that pairs beautifully with banana and chocolate. A little goes a long way!
Let’s Get Baking: Your Foolproof Steps
Ready? This is where the magic happens. I’ll walk you through each step with a few little hacks I’ve learned along the way to ensure your bars are absolutely perfect.
- Preheat & Prep: First things first, preheat your oven to 350°F (175°C). This is crucial for even baking. While it’s heating up, line an 8×8 or 9×9 inch baking pan with parchment paper. Chef’s Hack: Let the parchment paper hang over the sides a bit—this creates “handles” that will make it super easy to lift the entire slab of bars out of the pan later for clean, easy slicing. No more wrestling with a knife in the pan!
- The Mash-Up: Grab a large mixing bowl and those beautiful ripe bananas. Get in there with a fork or a potato masher and mash them until they’re nice and smooth, with just a few small lumps for texture. Little Story: I find this step incredibly therapeutic. It’s a great way to take out any pre-Monday frustration!
- The Big Stir: To the mashed bananas, add the peanut butter. Give it a good stir until it’s fully incorporated—you’ll have a creamy, dreamy base. Now, dump in your oats and any of your chosen optional add-ins (vanilla, cinnamon, protein powder). Stir, stir, stir until everything is evenly combined. The mixture will be thick, and that’s exactly what we want.
- The Grand Finale (Chocolate!): Now for the best part! Add your chocolate chips to the bowl. Here’s a Pro-Tip: reserve a small handful of chips. Instead of stirring them all in, fold most of them in gently. Why? This prevents over-mixing and ensures you get lovely pockets of chocolate throughout. We’ll use the reserved chips in a second.
- Pan & Sprinkle: Transfer your batter to the prepared pan. Use a spatula or the back of a spoon to press it down into a smooth, even layer. This is important for bars that bake evenly. Now, take those reserved chocolate chips and sprinkle them over the top. This little touch makes the bars look professionally baked and gives you a burst of chocolate right on top.
- Bake to Perfection: Slide the pan into your preheated oven and bake for 20-25 minutes. You’re looking for the edges to be lightly golden brown and the top to feel firm to the touch. Chef’s Note: Ovens can vary, so start checking at the 18-minute mark. Remember, they will continue to set up as they cool, so don’t overbake them looking for a crispy top!
- The Patience Test (The Hardest Part!): This is critical! Remove the pan from the oven and place it on a wire rack to cool completely. I know, the smell is intoxicating and you want to dive right in, but if you slice them while warm, they’ll be crumbly. Letting them cool allows them to set up properly, giving you that perfect, chewy texture.
How to Serve & Savor
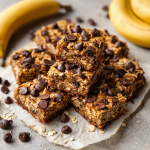
Once your bars are completely cool, use the parchment paper handles to lift the whole slab onto a cutting board. Slice them into squares or rectangles—whatever makes your heart happy! I usually get 9 generous bars or 12 smaller, snack-sized ones. They are perfect grab-and-go style, wrapped in a little parchment paper and tied with twine for a cute touch. For a more decadent treat, I love warming a bar for 15 seconds in the microwave and serving it with a dollop of Greek yogurt and a few fresh banana slices. Pure bliss!
Make It Your Own: Delicious Variations
The beauty of this recipe is its versatility. Here are a few of my favorite ways to mix it up:
- Tropical Twist: Swap the chocolate chips for ½ cup of chopped dried mango and ½ cup of shredded coconut. It’s like a vacation in a bar!
- Berry Blast: Use frozen or fresh blueberries or raspberries instead of chocolate chips. The berries will burst while baking, creating little juicy pockets.
- Trail Mix Bars: Replace the chocolate chips with a mix of chopped nuts (walnuts, almonds), seeds (sunflower, pumpkin), and a handful of dried cranberries.
- Nut-Free & Vegan: Use sunflower seed butter instead of peanut butter and ensure your chocolate chips are dairy-free. Voila!
- Double Chocolate: Add 2 tablespoons of unsweetened cocoa powder to the batter along with the oats for an ultra-chocolatey experience.
A Few Final Thoughts from My Kitchen to Yours
This recipe has evolved so much since that first rainy Sunday. I’ve made it for new moms, as a healthy snack for my nieces and nephews, and as a travel-friendly treat on road trips. It’s my most-requested recipe, and I love that everyone who makes it seems to add their own personal touch. One funny story: I once accidentally used salted caramel peanut butter and added a handful of pretzel pieces. It was a happy, sweet-and-salty accident that has now become a regular variation in our house! Don’t be afraid to experiment. The worst thing that can happen is you have a slightly imperfect—but still delicious—batch of homemade breakfast bars. And really, is that so bad? Cooking is about joy, connection, and a little bit of delicious mess. Now, go forth and bake!
Your Questions, Answered!
I’ve gotten a lot of questions about this recipe over the years, so I’ve compiled the most common ones here to help you out.
- Q: My bars turned out a bit crumbly. What did I do wrong?
A: This usually happens for one of two reasons: 1) The bananas weren’t ripe enough. Super ripe bananas are key for moisture and binding. 2) They were sliced before they were completely cool. I know it’s hard to wait, but letting them cool fully is the secret to them holding their shape. If they are crumbly, just think of it as a delicious granola—it’s perfect for sprinkling over yogurt! - Q: Can I make these without peanut butter?
A: Absolutely! Any nut or seed butter will work wonderfully. Almond butter and cashew butter are my top alternatives. If you need a nut-free option, sunflower seed butter is fantastic (just note it can make the bars turn a slight greenish color over time—it’s a harmless chemical reaction with the bananas, I promise!). - Q: How should I store these, and can I freeze them?
A: These bars are perfect for meal prep! Store them in an airtight container at room temperature for 2-3 days, or in the fridge for up to a week. For longer storage, they freeze beautifully. Wrap each bar individually in plastic wrap or parchment paper, place them in a freezer bag, and freeze for up to 3 months. Just thaw at room temperature or pop one in the microwave for a quick defrost. - Q: The center of my bars seems underbaked. Help!
A: This can happen if the layer of batter is too thick in the center. Make sure you’re spreading it evenly in the pan, pressing it down so it’s uniform. If you find your oven runs cool, you may need to add an extra 3-5 minutes of baking time. You can also use a toothpick inserted in the center; it won’t come out clean because of the bananas and chocolate, but it shouldn’t have wet, gloopy batter on it.
Banana Oat Chocolate Chip Breakfast Bars
Description
Banana Oat Chocolate Chip Breakfast Bars
Yields: 12 bars
Prep Time: 10 min
Bake Time: 20–25 min
Ingredients
-
3 ripe bananas, mashed
-
2 cups oats (rolled or quick)
-
½ cup peanut butter (or almond/cashew/sunflower butter)
-
1 cup chocolate chips (semi-sweet, dark, or milk)
-
Optional:
-
1 tsp vanilla extract
-
1 scoop chocolate protein powder
-
Dash of cinnamon
-
Instructions
Step 1: Preheat & Prep
-
Preheat oven to 350°F (175°C).
-
Line an 8×8 or 9×9 inch baking pan with parchment paper, leaving overhang for easy lifting.
Step 2: Mash & Mix
-
Mash bananas in a large bowl until smooth (few small lumps are fine).
-
Stir in peanut butter until creamy.
-
Add oats and any optional ingredients (vanilla, cinnamon, protein powder). Mix until evenly combined.
Step 3: Add Chocolate
-
Fold in most of the chocolate chips, reserving a small handful for topping.
Step 4: Bake
-
Transfer batter to prepared pan, pressing evenly.
-
Sprinkle reserved chocolate chips on top.
-
Bake 20–25 min until edges are lightly golden and top feels firm. Start checking at 18 min.
-
Cool completely in pan on a wire rack.
Step 5: Slice & Serve
-
Lift slab out using parchment “handles” and cut into 9–12 bars.
-
Optional: Serve warm with Greek yogurt or extra banana slices.
Notes
-
Tropical Twist: Replace chocolate chips with ½ cup chopped dried mango + ½ cup shredded coconut.
-
Berry Blast: Use fresh or frozen berries instead of chocolate chips.
-
Trail Mix Bars: Swap chocolate chips for nuts, seeds, and dried cranberries.
-
Nut-Free & Vegan: Use sunflower seed butter and dairy-free chocolate chips.
-
Double Chocolate: Add 2 tbsp cocoa powder to the batter along with oats.
Nutrition
- Calories: 190 cal Per bar
- Fat: 8g
- Carbohydrates: 26g
- Protein: 5g
Nutritional Information*
*Please note: This is an approximate estimate calculated without optional add-ins and can vary based on specific ingredients used.
Prep Time: 10 minutes | Cook Time: 20 minutes | Total Time: 30 minutes | Makes: 12 bars
Per Bar (approximate): Calories: 190 | Protein: 5g (more with protein powder) | Carbohydrates: 26g | Fat: 8g | Fiber: 3g
Final Thoughts: Your Morning, Made Better
And just like that, you’ve done it. You’ve transformed a few simple, wholesome ingredients into a week’s worth of delicious, feel-good breakfasts. These bars are so much more than a convenient meal; they’re a little act of self-care for your future, busy-morning self.
They are proof that you don’t need a lot of time, fancy ingredients, or complicated skills to eat well. All you need is a bowl, a spoon, and the desire to start your day with something genuinely good.
I hope this recipe becomes a reliable, joyful staple in your kitchen. I hope it saves you on those chaotic mornings and makes you feel proud of the nourishing food you’ve created. Most of all, I hope it reminds you that the best recipes are the ones that fit seamlessly into your life, bringing a little bit of sweetness and a whole lot of ease.
Now, I’d love to hear from you! Did you add a secret ingredient? Did your kids gobble them up? Snap a picture of your batch and share it with me.


