

Easy 3-Ingredient Butter Cookies: Your New Go-To Treat
Hey there, friend! Olivia here. Can we talk about that feeling? You know the one. It’s 4 PM on a Tuesday, the light is getting all soft and golden, and a sudden, undeniable craving for something sweet hits you. Not just any sweet—something simple, buttery, and comforting. Maybe you’ve got friends popping over unexpectedly, or you promised to bring a treat to the school bake sale and, ahem, completely forgot. Or maybe, you just deserve a little moment of homemade happiness with your afternoon cup of coffee.
Well, I’m about to become your new favorite kitchen confidante because I’m sharing the recipe that has saved me more times than I can count: my legendary 3-Ingredient Butter Cookies. Yes, you read that right. Three ingredients. No eggs, no leavening, no complicated steps. Just pure, unadulterated, melt-in-your-mouth magic.
These cookies are the culinary equivalent of a warm hug. They’re crisp around the very edges, tender and sandy in the center, and they practically dissolve on your tongue in a wave of buttery goodness. The best part? From the moment you get the craving to the moment you’re biting into a warm cookie is less than 30 minutes. No chilling the dough, no fancy mixer required (though it helps!), and absolutely no stress.
So, if you’ve ever looked at a cookie recipe and thought, “I don’t have time for that,” this is your sign to preheat the oven. This is the recipe that proves that the most extraordinary things often come from the simplest beginnings. Let’s make some magic happen!
A Pinch of Nostalgia: Where These Cookies Came From
This recipe isn’t just a collection of ingredients to me; it’s a thread that connects me to my grandmother. My Nana wasn’t a fancy pastry chef—she was a “a little of this, a little of that” kind of cook who could make a feast out of seemingly nothing. Her kitchen was always warm, always smelled of something delicious, and was the heart of our family home.
I remember one rainy Saturday when I was about eight, feeling a little bored and restless. Nana, without a word, pulled out her big yellow mixing bowl, a block of butter, the flour canister, and the box of snowy-white powdered sugar. “We’re making teacakes, Livvy,” she announced. My eyes widened. Teacakes sounded so elegant! But as she guided my small hands to cream the butter and sugar, then gently work in the flour, I realized this wasn’t a complicated, fussy dessert. It was pure, simple alchemy.
The smell that filled her kitchen as those humble little dough balls baked is etched into my memory forever. It’s the smell of love, of simplicity, of knowing that you’re about to enjoy something made with your own two hands. That’s the spirit I want to bring to your kitchen today. No fuss, just joy.
Gather Your Simple, Beautiful Ingredients
See? I told you it was simple! Here’s exactly what you’ll need. But don’t just scoop and measure—let’s talk about why each ingredient is so important. Understanding the “why” is the first step to becoming a truly confident baker!
- 1 cup (2 sticks) Unsalted Butter, Softened – This is the star of the show, so quality matters! I always use unsalted butter so I can control the exact amount of salt in the recipe. “Softened” is the key word here. Your butter should be cool to the touch but yield easily when you press it. Think about the consistency of a perfect scoop of ice cream straight from the container. Chef’s Insight: If you’re in a pinch, you can quickly soften butter by grating cold butter on a box grater. It works like a charm!
- ½ cup Powdered Sugar (also called Confectioner’s Sugar or Icing Sugar) – Powdered sugar is a game-changer here. Because it’s so fine, it dissolves instantly into the butter, creating a super smooth, tender dough without any graininess. It also contains a tiny bit of cornstarch, which contributes to that lovely, delicate texture. Substitution Tip: In a real pinch, you can use granulated sugar, but your cookies will be a bit more crisp and less melt-in-your-mouth. The texture will be more like a shortbread.
- 2 cups All-Purpose Flour – The structure of our cookie! When you’re measuring flour, the best way to ensure accuracy is to “fluff” the flour in its container, then spoon it gently into your measuring cup, and level it off with a knife. Scooping directly with the cup can pack in too much flour, leading to dry cookies. Chef’s Insight: For an even more tender cookie, you can swap one cup of the all-purpose flour for one cup of cake flour!
Optional but Highly Recommended:
- 1 teaspoon Vanilla Extract – A classic flavor enhancer that adds a warm, aromatic depth.
- A generous pinch of Fine Sea Salt – Trust me on this! Salt is a flavor amplifier. It doesn’t make the cookies taste salty; it makes them taste more buttery and balances the sweetness perfectly.
Let’s Bake! Your Foolproof Step-by-Step Guide
Ready? This is where the fun begins. Put on some music, tie on that apron (embrace the mess!), and let’s create something wonderful together.
- Preheat and Prepare. First things first, preheat your oven to 350°F (175°C). This gives the oven time to reach a consistent temperature, which is crucial for even baking. While it’s heating up, line a baking sheet (or two!) with parchment paper. Not only does this prevent sticking, but it also makes cleanup an absolute dream. No scrubbing pans today! Chef’s Hack: If you don’t have parchment paper, you can use a silicone baking mat or give the pan a very light coating of butter.
- Cream the Butter and Sugar. In a medium-sized bowl, add your softened butter and powdered sugar. Now, we “cream” them together. This isn’t just mixing; it’s about incorporating air into the butter. Using a hand mixer or a stand mixer fitted with the paddle attachment, beat them on medium speed for 2-3 minutes. You’ll know it’s ready when the mixture turns pale yellow, looks fluffy, and has almost a whipped consistency. Why this matters: This step is the secret to a light, tender cookie, not a dense one. Don’t rush it!
- Incorporate the Flour. Now, with your mixer on low speed, gradually add the flour (and your pinch of salt/vanilla if using). I add it in about three batches to prevent a giant flour cloud from erupting in your kitchen! Mix just until the flour disappears and a soft dough forms. It might look a little crumbly at first, but if you pinch it, it should hold together. Chef’s Warning: Stop mixing as soon as the dough comes together. Overmixing at this stage can develop the gluten in the flour and make the cookies tough. We want tender, not tough!
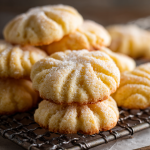
- Shape Your Cookies. This is the fun, hands-on part! You can use a small cookie scoop (about 1 tablespoon size) for perfectly uniform cookies, or simply use your hands to roll the dough into 1-inch balls. Place them on your prepared baking sheet, leaving about 2 inches between each one—they won’t spread a ton, but they need a little room to breathe. Now, for the classic look, gently press down on each ball with the tines of a fork to create a crisscross pattern. This also helps them bake evenly. Fun Idea: Instead of a fork, press the bottom of a glass that’s been dipped in sugar. Or, leave them as balls for a more rustic, mound-shaped cookie!
- Bake to Golden Perfection. Slide your baking sheet into the preheated oven and bake for 12-15 minutes. Ovens can vary, so keep an eye on them. You’re looking for the very edges to just barely start turning a light, golden brown. The centers will still look soft and pale, and that’s exactly what we want. Chef’s Secret: These cookies are meant to be pale! If you wait for them to get golden all over, they’ll be overbaked and crunchy all the way through. We’re aiming for that perfect contrast of crisp edges and soft centers.
- The Most Important Step: Let Them Cool! I know, the temptation is real! But when the cookies come out of the oven, they are incredibly fragile. Let them cool on the hot baking sheet for at least 5 minutes. This allows them to set up. Then, use a spatula to gently transfer them to a wire rack to cool completely. This step ensures they achieve that signature sandy, melt-in-your-mouth texture. Patience is a virtue, especially when it comes to cookies.
How to Serve These Buttery Beauties
These cookies are stunning in their simplicity. I love to pile them high on a rustic wooden board or a vintage cake stand. They’re the perfect companion to a cup of strong coffee, a glass of cold milk, or a pot of herbal tea. For a special touch, you can place them in a cute box lined with parchment paper—they make the most heartfelt, homemade gift. Honestly, a plate of these cookies and a warm smile is one of the best ways to welcome someone into your home.
Get Creative! Fun Flavor Twists
The basic recipe is a perfect canvas for your creativity! Here are a few of my favorite ways to mix it up:
- Citrus Zest: Add the zest of one lemon or orange to the butter-sugar mixture for a bright, sunny flavor.
- Almond or Lemon Extract: Swap the vanilla for ½ teaspoon of almond extract (a little goes a long way!) or an extra teaspoon of lemon extract.
- Chocolate Dip: Once cooled, dip half of each cookie in melted dark or semi-sweet chocolate. Let them set on parchment paper for a decadent finish.
- Rolled in Sugar: Before baking, roll the dough balls in granulated or coarse sparkling sugar for a delightful crunch.
- Gluten-Free Swap: You can use a 1:1 gluten-free all-purpose flour blend with great success!
From My Kitchen to Yours: A Few Final Thoughts
This recipe has evolved so much since that first rainy day with my Nana. I’ve made these cookies for countless holiday parties, as a “thinking of you” gift for friends, and as a quick treat after a long day. I’ve even been known to keep a log of this dough in the freezer, just so I can slice and bake a few fresh cookies whenever the mood strikes. It’s that versatile!
One of my favorite kitchen stories involves these cookies and my dog, Barnaby. I had just pulled a tray out of the oven and set it on the stovetop to cool. I turned my back for one second to wash a bowl, and when I turned around, Barnaby had somehow managed to very carefully snatch one cookie from the very back of the tray without disturbing any of the others. He gave me a look that said, “What? It smelled too good to resist.” I couldn’t even be mad. If a dog approves, you know it’s a good recipe.
The beauty of this recipe is that it’s yours to play with now. Make it, share it, and make some memories of your own.
Your Questions, Answered!
Q: My dough is really crumbly and won’t hold together. What did I do wrong?
A: This usually happens if the butter was a bit too cold or if you accidentally added a touch too much flour. Don’t worry! Just add a teaspoon of very cold water or milk at a time, mixing gently with your hands, until the dough just comes together. It should feel like Play-Doh.
Q: Why did my cookies spread too much and become flat?
A: The most common culprit is butter that was too warm. If the butter is melty or greasy, the cookies will spread. Remember, we want softened butter, not melted! Also, make sure your oven is fully preheated. Putting dough into a cool oven can cause spreading.
Q: My cookies are really hard. How can I make them softer?
A: Hard cookies are almost always a sign of overbaking. Remember, we want just a hint of gold on the edges. They will continue to firm up as they cool on the pan. Next time, try baking them for a minute or two less. Also, be careful not to overmix the dough after adding the flour, as this can develop gluten and lead to a tougher texture.
Q: Can I make these cookies ahead of time?
A: Absolutely! You can keep the baked cookies in an airtight container at room temperature for up to 5 days. You can also freeze the dough! Roll it into a log wrapped in plastic, and freeze for up to 3 months. When you’re ready, just slice and bake—you may need to add a minute or two to the baking time.
Easy 3-Ingredient Butter Cookies
Description
Crisp at the edges, tender in the middle, and buttery enough to melt in your mouth—these cookies are the definition of simple magic. With just three pantry staples and less than 30 minutes, you can have a tray of homemade cookies ready to brighten any moment. Perfect for last-minute guests, bake sales, or a cozy afternoon with coffee.
Ingredients
-
1 cup (2 sticks) unsalted butter, softened
-
½ cup powdered sugar
-
2 cups all-purpose flour
Optional (but highly recommended):
-
1 tsp vanilla extract
-
A pinch of fine sea salt
Instructions
-
Preheat oven – Set to 350°F (175°C). Line baking sheets with parchment.
-
Cream butter + sugar – Beat butter and powdered sugar together until light and fluffy (2–3 min).
-
Add flour – Mix in flour (plus salt/vanilla if using) until dough just comes together. Don’t overmix.
-
Shape – Roll into 1-inch balls. Place 2 inches apart on baking sheets. Flatten gently with a fork for a crisscross pattern.
-
Bake – 12–15 min, until edges are just turning golden. Centers should remain pale.
-
Cool – Let cookies rest 5 min on the tray, then transfer to a wire rack to cool completely.
Notes
-
Classic Pairing – Coffee, tea, or cold milk.
-
Citrus Zest – Add lemon or orange zest to the dough.
-
Chocolate-Dipped – Half-dip cooled cookies in melted chocolate.
-
Sugar-Crusted – Roll dough balls in sugar before baking.
-
Gluten-Free – Swap in a 1:1 GF flour blend.
Nutrition
- Calories: 110 cal 24 per batch
- Sugar: 3g
- Fat: 7g
- Carbohydrates: 10g
Nutritional Information*
*Please note: This is an approximate calculation based on the ingredients used and is provided as a courtesy. Exact values may vary based on specific ingredients and portion sizes.
Per Cookie (assuming 24 cookies per batch): Calories: 110 | Fat: 7g | Saturated Fat: 4.5g | Carbohydrates: 10g | Sugar: 3g | Protein: 1g
Prep Time: 10 minutes | Cook Time: 12-15 minutes | Total Time: 25 minutes | Servings: 24 cookies
Final Thoughts: Your New Kitchen Staple
And there you have it—the recipe that proves incredible things truly do come in simple packages. These butter cookies are more than just a quick fix for a sweet tooth; they’re a reminder that baking doesn’t have to be complicated to be deeply satisfying. They’re a blank canvas for your creativity, a last-minute lifesaver, and a tangible piece of warmth and comfort.
I hope this recipe finds its way into your regular rotation, creating golden afternoons and happy memories in your own kitchen. Now, go preheat that oven! You deserve a little moment of buttery, melt-in-your-mouth magic.


