
Ditch the Boring Lunch: Your Ultimate Mix & Match Meal Prep Bowl Blueprint!
Hey there, friend! Come on in, the coffee’s fresh and I’ve got a serious game-changer to share with you today. If your weekdays are a chaotic whirlwind of meetings, errands, and “what on earth am I going to eat for lunch?!” panic, you are not alone. I’ve been there more times than I can count, staring into the fridge at 6 PM with that familiar sense of dread, ultimately reaching for… well, something less than inspiring.
But what if I told you that just one hour on a Sunday could set you up for a week of vibrant, delicious, and truly satisfying meals? Meals you’ll actually look forward to? I’m not talking about sad, steamed broccoli and plain chicken breast destined for the microwave. Oh no. We’re building flavor-packed, colorful bowls that are anything but boring. Think hearty grains, lean proteins, rainbow veggies, and creamy, zesty sauces that make your taste buds sing.
This isn’t just a recipe; it’s a formula. A blueprint for freedom in the kitchen! It’s designed to be flexible, forgiving, and fun. Whether you’re feeding a family, prepping for one, or navigating dietary needs, this mix-and-match approach is your new secret weapon. So, grab your favorite apron (the messy one with stories, obviously), and let’s turn meal prep from a chore into your favorite act of weekly self-care. Let’s build some bowls!
The Bowl That Started It All: A Tale of Trial, Error, and Tzatziki
This whole meal prep obsession started, like many of my best kitchen adventures, out of sheer necessity and a little bit of desperation. A few years back, I was juggling a hectic schedule, and my lunches were a disaster—a random assortment of crackers, a sad desk salad, or, let’s be real, a quick trip to the nearest cafe for a overpriced sandwich. I felt sluggish, uninspired, and my wallet was definitely feeling the pinch.
One Sunday, after a particularly glorious farmers’ market haul, I decided enough was enough. I roasted every vegetable I had—zucchini, peppers, red onions, you name it. I whipped up a quick batch of lemon-oregano chicken thighs (breasts were too intimidating back then!), and I made a giant vat of quinoa. I didn’t have a plan; I was just cooking to soothe my soul. I threw it all into containers with a big spoonful of the tzatziki I’d made for a party and a crumbling of feta.
The next day at lunch, I opened that container and it was a revelation. It was colorful, it was fresh, and it was mine. That first bite was more than just fuel; it was a moment of calm in a crazy day. It tasted like I had my life together, even when I absolutely did not. That was the “aha!” moment. Meal prep didn’t have to be a rigid, bland science. It could be creative, delicious, and feel like a giant hug from past-you to present-you. And it all started with a bowl.
Your Bowl-Building Shopping List
The beauty of this system is that you are the master of your domain! Use this list as inspiration. Raid your fridge, see what’s on sale, and choose what makes your heart happy. This is your culinary canvas!
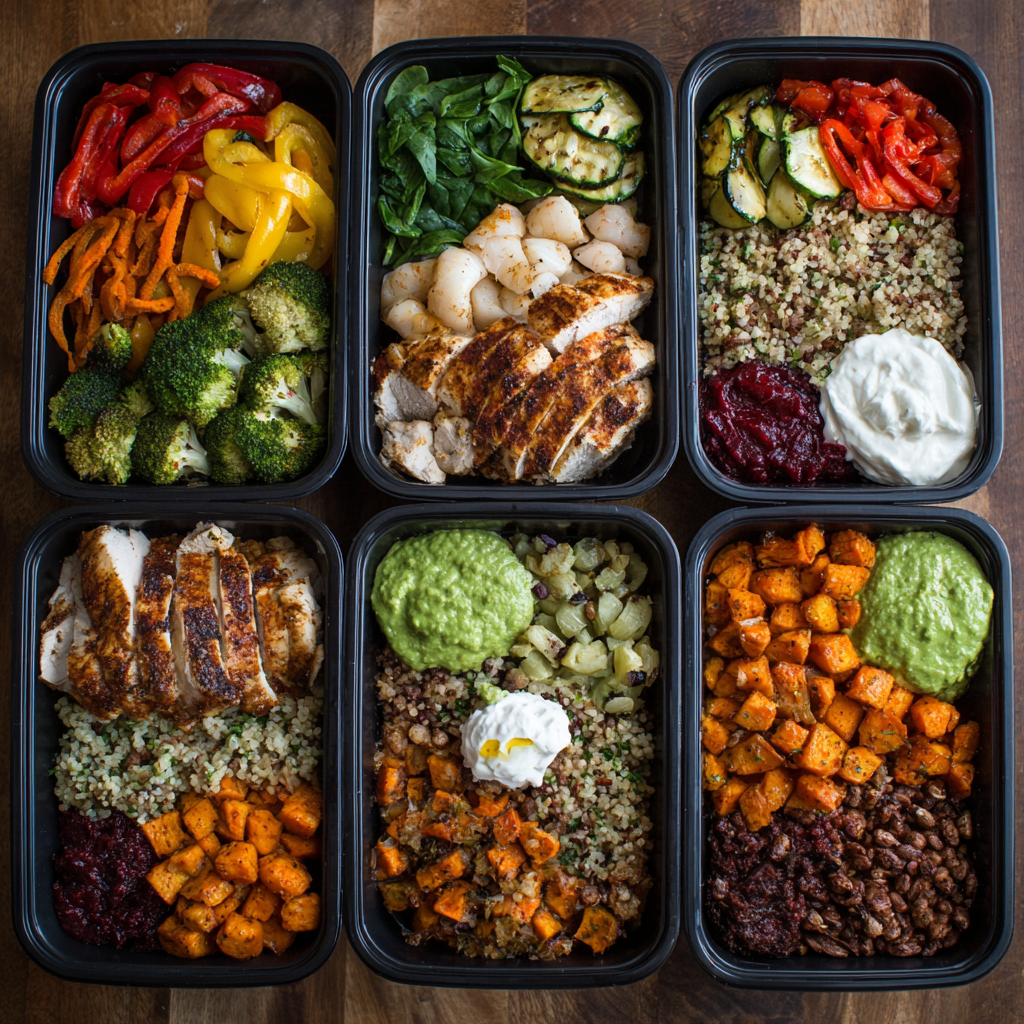
The Ultimate Meal Prep Formula (Makes 4-5 servings)
Each glorious bowl = 1 Protein + 1 Grain/Base + 2 Veggies + 1 Flavor Boost
Choose Your Protein (Pick 1 or 2 to prep)
- Grilled Chicken Breast: My go-to! I pound it to an even thickness for perfect cooking every time. Chef’s Tip: Marinate for 30 minutes in lemon juice, olive oil, garlic, and dried oregano for a Mediterranean vibe.
- Ground Turkey or Lean Beef: Perfect for a taco-style bowl! Brown it with taco seasoning, cumin, and a pinch of chili powder.
- Baked Tofu or Tempeh: The ultimate veggie-powered protein. Chef’s Tip: Press your tofu for 30 minutes first, then cube and toss in cornstarch and soy sauce for a crispy, baked exterior.
- Hard-Boiled Eggs: So simple, so satisfying. A fantastic no-cook option. Peel them right before you assemble your bowls.
- Salmon or Shrimp: Cooks super fast! For salmon, I just season with salt, pepper, and a drizzle of maple syrup or honey, then bake at 400°F for 12-15 minutes.
Choose Your Grain or Base (Pick 1)
- Brown Rice or Quinoa: Classic, hearty, and filling. I cook my grains in low-sodium broth instead of water for an instant flavor upgrade.
- Farro or Couscous: Farro has a wonderful chewy texture, and couscous is lightning-fast to prepare. A great way to mix it up!
- Cauliflower Rice: The perfect low-carb, veggie-packed base. Chef’s Tip: Sauté it from frozen in a dry pan to cook off any excess moisture so your bowl doesn’t get soggy.
- Roasted Sweet Potato Cubes: Yes, they can be the base! Roast them with smoked paprika for a sweet and smoky foundation.
Add Your Veggies (Pick at least 2!)
- Roasted Broccoli, Bell Peppers, Zucchini: Roasting is magic—it caramelizes the natural sugars and creates incredible flavor. Toss with olive oil, salt, and pepper at 425°F for 20-25 minutes.
- Raw Carrots, Cucumber, Spinach, Red Cabbage: For crunch and freshness! I love using a vegetable peeler to create beautiful carrot and cucumber ribbons.
- Sautéed Kale or Mushrooms: Sauté kale with a little garlic until just wilted. Mushrooms cooked down with a splash of tamari are umami heaven.
Flavor Boosts & Toppings (The BEST part!)
- Hummus or Guacamole: Creamy, dreamy, and packed with healthy fats. A dollop transforms everything. Sub Tip: If you’re worried about guac browning, place the pit in the container with it or squeeze extra lime juice on top.
- Tahini Sauce, Tzatziki, or Yogurt Sauce: My absolute favorite category. A simple tahini sauce (tahini, lemon juice, water, garlic) goes with literally everything.
- Salsa or Pico de Gallo: Brings a bright, acidic kick that cuts through richer ingredients.
- Feta, Nuts, Seeds, or Fresh Herbs: The finishing touches! Crumbled feta, toasted pepitas, slivered almonds, or a huge handful of fresh cilantro or parsley add texture and a final pop of flavor.
- A Drizzle of Sriracha, Balsamic Glaze, or Soy Sauce: Your liquid gold. Keep a few small bottles in your desk drawer for an easy lunchtime upgrade.
Let’s Get Prepping: Your Step-by-Step Blueprint
Okay, apron on, music playing, let’s do this! We’re going to work efficiently, using your oven and stovetop simultaneously. This whole process should take you about 45-60 minutes, start to finish.
- Preheat and Plan. First, preheat your oven to 425°F (220°C). Take a deep breath and glance at your chosen ingredients. Get out all your baking sheets, pots, and pans. This is called “mise en place” – getting everything in its place. It feels fancy and makes you look like a pro.
- Attack the Oven. Chop your chosen roasting vegetables into even, bite-sized pieces. This ensures they cook at the same rate. Toss them in a large bowl with a good glug of olive oil, salt, and pepper. Don’t be shy with the seasoning! Spread them in a single layer on a parchment-lined baking sheet (for easy cleanup!). Pop them in the oven and set your timer for 20 minutes. If you’re doing sweet potatoes, they might go on a separate sheet as they can take longer (closer to 30 mins).
- Start Your Grains. While the veggies are roasting, get your grain cooking. If you’re doing quinoa or rice, get it going on the stove according to package directions (remember: broth instead of water!). This is usually a bring-to-a-boil-then-simmer situation, which means it will happily cook itself while you focus on other things.
- Cook Your Protein. This is your main active cooking time. If you’re grilling chicken, heat your grill pan or skillet over medium-high heat. Cook for 5-7 minutes per side, depending on thickness. If you’re using ground meat, brown it in a skillet, breaking it up as it cooks, and add your spices. If you’re baking tofu or salmon, now’s the time to get it in the oven (maybe on another rack with the veggies).
- The Grace Period. Your protein is resting, your grains are simmering, your veggies are roasting. This is the perfect time to wash and chop any raw veggies you’re using—spinach, cucumber, etc. Also, mix up your sauces! Whisk together that tahini sauce or spoon your store-bought hummus into small containers.
- Cool and Assemble. Once everything is cooked, let it all cool for about 10-15 minutes. Putting steaming hot food directly into containers creates condensation, which leads to sogginess—the enemy of good meal prep! I spread my grains and proteins on a large plate or baking sheet to speed up the cooling process. Then, it’s assembly line time! Grab your containers and start building. I usually do a base of grain, then protein, then a mix of roasted and raw veggies.
- Store Smart. Keep your sauces and any super crunchy toppings (like nuts or seeds) separate in small containers or bags. Only add them right before you eat to maintain perfect texture. Pop everything in the fridge, and give yourself a massive high-five. You did it!
How to Serve Your Masterpiece
When lunchtime rolls around, it’s showtime! If you’ve kept your components separate, you can even mix and match throughout the week to keep things interesting. To serve, simply grab your base container and your sauce/topping container. Drizzle your glorious sauce over the top, sprinkle on your crunchy toppings and fresh herbs, and give it a good mix. If you’re reheating, do so gently in the microwave for 1-2 minutes, stopping to stir halfway. The goal is to warm it through without nuking it into oblivion. Then, add your cold toppings and enjoy immediately!
Mix It Up! Endless Bowl Variations
The fun never ends! Here are a few of my favorite themed combinations to spark your creativity:
- Mexican Fiesta: Cumin-lime chicken or black beans, cilantro-lime cauliflower rice, roasted corn and peppers, pico de gallo, guacamole, and a drizzle of hot sauce.
- Asian Ginger-Sesame: Sesame-baked tofu or shrimp, brown rice, sautéed shiitake mushrooms and snap peas, shredded red cabbage and carrots, with a ginger-soy-sesame oil dressing and a sprinkle of sesame seeds.
- Garden Herb & Lemon: Lemon-herb grilled chicken or chickpeas, farro, roasted zucchini and asparagus, a big handful of arugula, with a herby yogurt sauce and lemon wedge.
- Breakfast-for-Lunch: Scrambled eggs or turkey sausage, roasted sweet potato base, sautéed peppers and onions, with a dollop of salsa or avocado.
Olivia’s Chef Notes & Kitchen Confessions
This formula has evolved so much since that first fateful bowl. I used to be terrified of undercooking chicken, so I’d murder it into a dry, chewy hockey puck. I’ve learned that a good meat thermometer is a meal prepper’s best friend—pull chicken at 165°F and let it rest! I also once tried to prep sliced avocado for the whole week… it was a brown, mushy tragedy by Monday afternoon. Lesson learned: some things are worth doing fresh.
Don’t be afraid to play with spices! A little smoked paprika, a dash of curry powder, or a sprinkle of everything bagel seasoning can completely transform a bowl without any extra effort. My kitchen is almost always a beautiful disaster during prep Sunday, but seeing my fridge stocked with colorful, ready-to-go food is the most satisfying clean-up reward ever.
Meal Prep Bowl FAQs: Your Questions, Answered!
Q: How long do these bowls actually last in the fridge?
A: For best quality and food safety, aim to eat them within 4 days. The proteins and grains hold up beautifully. If you’re using a more delicate green like spinach, it might wilt a bit by day 4, but it’s still perfectly safe to eat.
Q: My bowls get soggy! How do I prevent that?
A: Sogginess is public enemy #1! The key is three-fold: 1) Let everything cool completely before assembling. 2) Store wet ingredients (sauces, juicy tomatoes) separately. 3) If using raw veggies that release water (like cucumbers), you can pack them separately or add them the day you plan to eat them.
Q: Can I freeze these bowls?
A: You can, but with caution. Grains (rice, quinoa) and proteins (cooked chicken, beef) freeze very well. Roasted veggies can become mushy upon thawing. I don’t recommend freezing any bowls with dairy-based sauces or raw veggies. For freezing, portion the cooled grain and protein into freezer-safe bags or containers, press out the air, and freeze for up to 3 months. Thaw in the fridge overnight before assembling your bowl with fresh components.
Q: I’m bored of the same bowl every day. Help!
A: This is why we keep components separate! Don’t assemble everything into individual containers at once. Instead, store each category (protein, grain, veggie A, veggie B) in its own large container. Each morning, you can build a custom bowl, choosing a different combination each time. It feels like a whole new meal!

Ultimate Meal Prep Bowl – Mix & Match for the Week
- Total Time: 45 minute
Description
Say goodbye to sad desk salads and hello to vibrant, flavor-packed bowls that actually make you excited for lunch. With just an hour of prep, you’ll stock your fridge with nourishing, customizable meals that are as fun to build as they are to eat. Think of this as your blueprint—pick a protein, add a base, pile on veggies, and finish with a sauce or topping. The result? Endless variety, zero boredom.
Ingredients
1 Protein + 1 Grain/Base + 2 Veggies + 1 Flavor Boost
Proteins (choose 1–2)
-
Grilled chicken (marinated in lemon, olive oil, garlic, oregano)
-
Ground turkey or beef (seasoned taco-style)
-
Baked tofu or tempeh (pressed & tossed in soy sauce + cornstarch)
-
Hard-boiled eggs
-
Salmon or shrimp (roasted with honey or maple drizzle)
Grains/Bases
-
Brown rice, quinoa (cook in broth for extra flavor)
-
Farro or couscous
-
Cauliflower rice (low-carb, sautéed)
-
Roasted sweet potato cubes (smoky with paprika)
Veggies
-
Roasted: broccoli, zucchini, bell peppers, red onion
-
Raw: cucumber, carrots, spinach, red cabbage
-
Sautéed: kale, mushrooms
Flavor Boosts
-
Creamy: hummus, tzatziki, tahini, guacamole
-
Fresh: herbs, salsa, pico de gallo
-
Crunch: nuts, seeds, crumbled feta
-
Drizzle: sriracha, balsamic glaze, soy sauce
Instructions
-
Roast Veggies: 425°F (220°C) for 20–25 min.
-
Cook Grain: Simmer quinoa/rice in broth until fluffy.
-
Prepare Protein: Grill chicken, brown turkey, bake salmon, or roast tofu.
-
Cool & Assemble: Let ingredients cool before portioning. Build bowls with base → protein → veggies → sauce/toppings.
-
Store Smart: Keep sauces and crunchy toppings separate until serving.
Notes
-
Mexican Fiesta: Chicken, cauliflower rice, roasted corn + peppers, pico, guac.
-
Asian Sesame: Tofu, brown rice, sautéed mushrooms + snap peas, sesame-ginger dressing.
-
Mediterranean: Salmon, farro, roasted zucchini + asparagus, tzatziki, feta.
-
Breakfast-for-Lunch: Eggs, roasted sweet potato, peppers + onions, salsa.
- Prep Time: 45–60 min (batch prep)
Nutrition
- Calories: 500–600 cal Per bowl
- Fat: 20–25g
- Carbohydrates: 45–55g
- Protein: 35–40g
Nutritional Information*
*This is a general estimate based on a sample bowl with 4oz grilled chicken breast, ½ cup quinoa, 1 cup roasted broccoli and peppers, and 2 tbsp tahini sauce. Values will vary dramatically based on your specific ingredients and portions.
- Calories: ~500-600
- Protein: ~35-40g
- Carbohydrates: ~45-55g
- Fat: ~20-25g
Final Thoughts: Your Week, Conquered.
Just like that, you’ve done it. You’ve taken control of the chaos and turned it into something beautiful, nutritious, and downright delicious. Look at that fridge! It’s no longer a cavern of questionable leftovers; it’s a curated collection of possibilities, a gallery of your own making.
Remember, this blueprint isn’t about perfection. It’s about progress. Some weeks you’ll roast every vegetable known to humankind, and other weeks, a bag of pre-shredded carrots and a container of store-bought hummus will be your MVP. And that’s more than okay—it’s brilliant.
The real magic of this system isn’t just in the time or money you’ll save (though you’ll save a ton of both). It’s in the peace of mind you’ve just gifted your future self. All those hectic weekdays just got a whole lot brighter with a lunch you can truly look forward to.
So here’s to ditching the boring lunch for good. Here’s to more energy, less stress, and the simple, profound joy of a meal made with your own hands. You’ve got this, my friend. Now go forth and build your masterpiece.


