
Welcome to the Coziest Kitchen on the Internet!
Hello, my fellow flavor-lover! Can you feel it? That crisp, magical buzz in the air that only comes once a year? It’s the season of twinkling lights, heartfelt gatherings, and the unmistakable scent of something sweet baking in the oven. If your heart, like mine, does a little happy dance at the thought of creating edible holiday magic, then you are absolutely in the right place. Today, we’re taking a beloved classic—the humble, fudgy, utterly irresistible brownie—and turning it into the most adorable, show-stopping centerpiece for your holiday table. Get ready to unleash your inner holiday elf because we’re making Christmas Tree Brownies!
This isn’t just a recipe; it’s a passport to pure, unadulterated fun. I’m talking about a project that’s perfect for a festive solo baking session with your favorite holiday playlist or a wildly entertaining activity to keep little hands (and big ones!) busy. The best part? You don’t need to be a pastry chef or have hours to spare. We’re starting with a simple boxed mix because, let’s be real, sometimes the magic is in the decorating, not the labor. So, tie on your favorite—probably messy—apron, pour yourself a cup of cocoa (or something a little stronger!), and let’s create some delicious, sprinkle-filled memories together.
A Story of Sweet (and Slightly Crooked) Beginnings
This recipe holds a seriously special place in my heart. It all started a few years ago when my then five-year-old niece, Chloe, declared she was my “sous-chef” for our annual holiday cookie decorating party. The plan was ambitious: gingerbread houses, intricately decorated sugar cookies, the works. But after a flour explosion that would make a blizzard jealous and a minor icing-related meltdown (from me, not her), we needed a Plan B. Something easy, fast, and foolproof.
I spotted a pan of cooling brownies and a lightbulb went off. We grabbed a glass, cut them into rough triangles, and got to work. Chloe’s little face was a picture of pure concentration as she turned those brown lumps into a forest of green Christmas trees, applying sprinkles with the serious dedication of a artist. Were they perfectly symmetrical? Not even close. Was there more icing on her face than on the brownies? Absolutely. But the joy and pride she felt were 100% real. Now, it’s our non-negotiable tradition. It reminds me that the holidays aren’t about perfection; they’re about the messy, sweet, and wonderfully imperfect moments we create together.
Gathering Your Merry Ingredients
Here’s your shopping list for this festive adventure! Remember, cooking is an art, not a science—feel free to get creative with substitutions.
- 1 box of store-bought brownie mix (plus the oil, eggs, and water it calls for): This is our fantastic shortcut! I’m a huge fan of using a fudge-style mix for a denser, sturdier brownie that holds its shape when cut. My personal favorite is Ghirardelli Triple Chocolate, but any brand you love will work beautifully.
- ½ container of vanilla icing: The trusty canvas for our edible trees. Chef’s Insight: Let the icing sit at room temperature for a bit before you use it—it will be much easier to stir and color. For a richer flavor, you could substitute with cream cheese frosting!
- Green food coloring: Gel food coloring is my top chef hack here! It gives you a vibrant, beautiful green hue without thinning out your icing like liquid coloring can. You’ll only need a tiny dab!
- Festive sprinkles: This is where your personality shines! Use classic red and green nonpareils, little silver balls, colorful sanding sugar, or even tiny holiday-shaped sprinkles. Raid your cupboard and have fun!
- Candy canes OR pretzel sticks: The all-important tree trunk! Substitution Tip: Candy canes add a lovely peppermint flavor, while pretzel sticks offer a delicious sweet-and-salty contrast. For a nut-free option, go with the pretzels. You can break candy canes in half or use mini ones.
- Optional: Star-shaped sprinkles or a yellow candy for the tree topper: The perfect finishing touch! A single yellow M&M, a star sprinkle, or even a dab of yellow icing will complete your masterpiece.
Let’s Build a Forest of Brownie Trees!
Follow these steps, and you’ll have a plateful of holiday cheer in no time. I’ve packed this section with all my favorite tips and tricks to ensure your success!
- Bake Those Brownies: First, preheat your oven according to your brownie mix’s package directions. Pro-Tip: Line your baking pan (usually a 9×13) with parchment paper, leaving a little overhang on two sides. This is our secret weapon for effortlessly lifting the entire slab of brownies out of the pan later for clean, crumble-free cutting! Prepare the mix as directed and spread the batter evenly into your prepared pan. Bake until a toothpick inserted into the center comes out with a few moist crumbs clinging to it. Do not overbake! We want them fudgy and dense, not cakey and dry.
- The All-Important Cool Down: I know, I know. This is the hardest part. But patience, young grasshopper! You MUST let the brownies cool completely in the pan on a wire rack. If you try to cut or frost them while they’re warm, they will fall apart, and the icing will melt into a sad, runny puddle. To speed things up, you can even pop the cooled pan into the refrigerator for 30 minutes. This makes them even easier to handle.
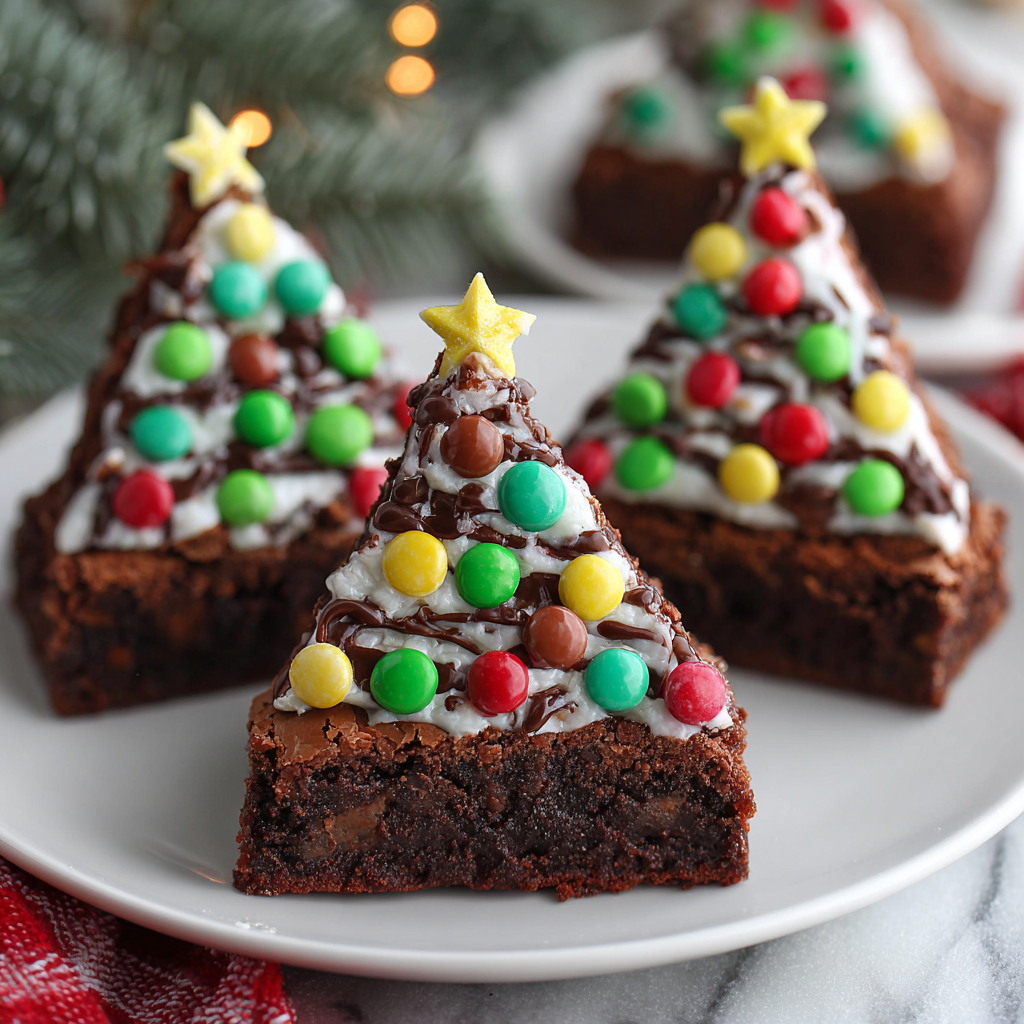
- Slice into Triangles: Once your brownies are completely cool, use the parchment paper to lift the entire block out of the pan and onto a cutting board. Now, grab a sharp knife. Here’s the easy method: first, cut the brownies into squares or rectangles. Then, take each square and carefully cut it diagonally from one corner to the opposite corner to create two triangles. Easy peasy! For smaller trees, you can cut smaller squares to start.
- Color Your Frosting: Scoop about half the container of vanilla icing into a small bowl. Add your green food coloring. Chef’s Hack: Start with a little! You can always add more to deepen the color. If you’re using gel coloring, a toothpick is perfect for grabbing a small amount. Stir vigorously until the color is uniform and gorgeous. If you want to pipe your icing, you can spoon it into a zip-top bag and snip a tiny corner off, or use a piping bag fitted with a star tip for a cool textured look.
- Deck the Trees with Icing and Sprinkles: Now for the fun part! Using a butter knife or a small offset spatula, spread or pipe the green icing onto each brownie triangle. Work one tree at a time: ice it, then immediately add your sprinkles before the icing sets. This ensures those festive “ornaments” stick right where you want them!
- Add the Trunk and Star: Almost there! Gently press a piece of candy cane or a pretzel stick into the base of each tree for the trunk. Finally, add your star sprinkle or a dab of yellow icing to the very top. Ta-da! You’ve just created edible holiday magic.
How to Serve Your Holiday Masterpiece
Presentation is part of the fun! Arrange your forest of Christmas Tree Brownies on a large platter or a festive cake stand. For a real “wow” factor, dust the platter with a light snowfall of powdered sugar before placing the trees. You can even create a little winter scene with some shredded coconut “snow” and a few plastic reindeer or Santa figurines around the edge of the plate. They’re the perfect sweet ending to a holiday meal or the star of the show at your cookie exchange party.
Get Creative: Festive Twists & Swaps
Feel like mixing it up? This recipe is a fantastic blank canvas for your creativity!
- Peppermint Patty: Add a layer of peppermint flavor by placing a thin After Eight mint or a York Peppermint Pattie on the brownie batter before baking. The mint will melt into the brownie as it bakes!
- Nutty Wonderland: Stir ½ cup of chopped pecans or walnuts into your brownie batter before baking for a delightful crunch.
- Gluten-Free Joy: Use your favorite gluten-free brownie mix and ensure your pretzels and sprinkles are certified gluten-free. It’s an easy swap that lets everyone join the fun.
- Dark Chocolate Forest: Use chocolate frosting instead of vanilla! Color it green for a deeper, richer-looking tree, or leave it brown and use white sprinkles to mimic snow-covered branches.
- Orange Chocolate: Add a teaspoon of orange zest to the brownie batter and use orange extract in the icing instead of food coloring for a citrusy, sophisticated twist.
Olivia’s Chef Notes & Kitchen Confessions
Over the years, this recipe has seen it all. There was the infamous “Leaning Tower of Brownie” year where I used too much icing, making the trees top-heavy and wobbly (solution: less icing!). There was the year I accidentally used red food coloring instead of green and created a forest of… well, let’s not go there. The point is, it always turns out delicious, and it always brings a smile.
My biggest evolution was discovering the parchment paper sling. Before that, I was trying to pry brownies out of the pan with a spatula, resulting in more of a “brownie crumble forest” than intact trees. Embrace the parchment—it’s a game-changer. Most of all, remember to have fun and not stress. If a tree breaks, that’s just the chef’s treat. Happy baking, my friend!
Your Questions, Answered!
Q: My brownies are crumbling when I try to cut them! What did I do wrong?
A: Oh, I’ve been there! This usually happens for one of two reasons: 1) The brownies were still warm. They need to be completely cool to firm up. 2) They were slightly overbaked. Next time, try baking for a minute or two less. For now, don’t worry! Crumble them up, mix with a little of the icing, and roll into truffle balls. Roll them in sprinkles—instant holiday cake pops!
Q: My green icing is too runny and is sliding off the brownies. Help!
A: This is likely because the brownies were still warm, or you used a liquid food coloring which can thin out the icing. If the icing itself is runny, you can thicken it up by adding a tablespoon or two of powdered sugar and stirring it in. Gel food coloring is your best bet for vibrant color without the runny mess!
Q: Can I make these ahead of time?
A: You absolutely can! Bake and cut the brownies up to 2 days ahead. Store them in an airtight container at room temperature. I recommend frosting and decorating them the day you plan to serve them for the freshest look and best texture. The assembled trees are best enjoyed within 2-3 days.
Q: I don’t have a piping bag. What can I use instead?
A: No problem! A simple zip-top plastic bag is a perfect substitute. Just spoon your colored icing into the bag, seal it, and snip a very small corner off the bottom. You can pipe lines or just use it to spread the icing more neatly. A butter knife or a small spoon works just fine, too!

Christmas Tree Brownies
Description
Brownies are already a crowd favorite—but dress them up as Christmas trees, and suddenly you’ve got the star of your holiday table. This recipe takes a simple boxed mix and turns it into a festive, sprinkle-studded forest. Perfect for a family activity, a cookie exchange showstopper, or just a cozy afternoon project with cocoa and carols. Best of all, it’s foolproof, fun, and fabulously festive.
Ingredients
-
1 box brownie mix (plus oil, eggs & water per package)
-
½ container vanilla icing (or cream cheese frosting)
-
Green gel food coloring
-
Festive sprinkles
-
Candy canes or pretzel sticks (for tree trunks)
-
Optional: Star sprinkles or yellow candies for toppers
Instructions
-
Bake: Prepare brownies per package in a parchment-lined 9×13 pan. Bake until fudgy (don’t overbake). Cool completely.
-
Cut: Lift brownies out using parchment. Slice into squares, then cut diagonally to form triangles (trees).
-
Tint Icing: Stir green gel food coloring into icing until vibrant. Spoon into a piping bag or zip-top bag with the corner snipped.
-
Decorate: Pipe or spread green icing on each triangle. Add sprinkles immediately before icing sets.
-
Add Trunks & Stars: Insert candy cane halves or pretzel sticks into the base of each brownie for the trunk. Finish with a star sprinkle or yellow candy topper.
-
Set & Serve: Let icing firm up, then arrange your “forest” on a platter dusted with powdered sugar sno
Notes
-
Add crushed candy canes to the icing for a peppermint kick.
-
Stir nuts or chocolate chunks into brownie batter for extra richness.
-
Use white icing with blue sprinkles for a frosty, snow-covered forest look.
-
Gluten-free? Just swap in a GF brownie mix and certified GF sprinkles.
Nutritional Information (Per Tree – Approximate)
Calories: 180 | Fat: 7g | Carbs: 28g | Sugars: 18g | Protein: 1g
Prep Time: 20 mins | Total Time: 30 mins (plus cooling) | Level: Super easy! | Storage: Best enjoyed within 2–3 days in an airtight container.
Final Thoughts: Your Sweet, Messy, Perfect Holiday Masterpiece
And there you have it! Your very own forest of festive, fudgy Christmas Tree Brownies, ready to bring a little extra magic and a whole lot of joy to your holiday celebrations.
Remember, the true secret ingredient here isn’t in the boxed mix or the vibrant green icing—it’s the spirit of fun you bring to the process. So what if your trees are a little crooked or your sprinkles are a little lopsided? Those aren’t mistakes; they’re proof of a wonderful, hands-on memory made in the kitchen. This holiday season, give yourself the gift of letting go of perfection. Embrace the messy, sweet, and wonderfully real moments of connection, whether you’re decorating solo with a cup of cocoa or surrounded by loved ones with icing on their noses.


